S0J-FE18-10 - Rotary tool Vevor - Free user manual and instructions
Find the device manual for free S0J-FE18-10 Vevor in PDF.

| Product Type | Cordless Rotary Tool |
| Brand | Vevor |
| Model | S0J-FE18-10 |
| Battery | Li-ion 12 V, 2500 mAh |
| Charging Voltage | USB 5 V DC |
| Charging Type | USB Type-C Cable |
| Charging Time | Approximately 1.5 to 2.5 hours |
| No-Load Speed | 5 000 – 32 000 RPM |
| Number of Speeds | 28 levels |
| Collet Size | 2.3 mm (3/32") / 3.2 mm (1/8") |
| Main Functions | Grinding, sanding, brushing, polishing, carving, cutting, drilling, engraving, cleaning, grooming |
| Safety Protections | Spindle lock, overheat protection |
| Recommended Use | Light DIY, crafts, short-duration tasks |
| Included Accessories | Collets, wrench, chucks, sanding bands, abrasive papers, grinding wheels, diamond bits, burrs, drill bits, polishing discs, brushes |
| Maintenance | Clean with a damp cloth and mild soap; do not use solvents; unplug before cleaning |
| Manufacturer | Shanghaimuxinmuyeyouxiangongsi, Shanghai, China |
| Importers | Australia: SIHAO PTY LTD; United States: Sanven Technology Ltd.; United Kingdom: YH CONSULTING LIMITED |
Frequently Asked Questions - S0J-FE18-10 Vevor
User questions about S0J-FE18-10 Vevor
0 question about this device. Answer the ones you know or ask your own.
Ask a new question about this device
Download the instructions for your Rotary tool in PDF format for free! Find your manual S0J-FE18-10 - Vevor and take your electronic device back in hand. On this page are published all the documents necessary for the use of your device. S0J-FE18-10 by Vevor.
USER MANUAL S0J-FE18-10 Vevor
Affordable. Reliable. Home Improvement.
Rotary Tool
Model:S0J-FE18-10
Model:S0J-FE18-10

This is the original instruction, please read all manual instructions care before operating. VEVOR reserves a clear interpretation of our user manual. The appearance of the product shall be subject to the product received. Please forgive us that we won't inform you again if there are technology or software updates on our product.
 | Warning-To reduce the risk of injury, user must read instructi manual carefully. |
 | Warning-marking concerning risk of Eye Injury |
 | Warning-marking concerning Risk of Hearing Loss |
 | CORRECT DISPOSALThis product is subject to the provision of european Directive 2012/19/EU. The symbol showing a wheelie bin crossed through indicates that the product requires separate refuse collection in European Union. This applies to the product and all accesso marked with this symbol. Products marked as such may not discarded with normal domestic waste, but must be taken to acollection point for recycling electrical and electronic devices. |
 | To preserve natural resources, please recycle or dispose of battery properly. This battery pack contains Li-ion batteries. C your local waste authority for information regarding available recycling and/or disposal options. Discharge your battery by operating your tool, then remove the battery pack from the housing and cover the battery connections with heavy-duty ad tape to prevent shortcircuit and energy discharge. Do not atte open or remove any of the components. |
Safety Notes
Please do not press the spindle lock while the machine is running to avoid to the machine or safety accident.
Safety instructions
Warning: read all safety warnings and all instructions. Failure to follow the warnings and instructions may result in electric shock, fire and/or serious injury. Save all warnings and instructions for future reference.
1) Work area safety
a) Keep work area clean and well lit. Cluttered or dark areas invite accidents. b) Do not operate power tools in explosive atmospheres, such as in the presence of flammable liquids, gases or dust. Power tools create sparks which may ignite the dust or fumes.
c) keep children and bystanders away while operating a power tool. Distractions can cause you to lose control.
2) Electrical safety
a) Power tool plugs must match the outlet. Never modify the plug in any way not use any adapter plugs with earthed (grounded) power tools.
Unmodified plugs and matching outlets. Will reduce risk of electric shock.
b) Avoid body contact with earthed or grounded surfaces such as pipes, radi ranges and refrigerators. There is an increased risk of electric shock if your earthed or grounded.
c) Do not expose power tools to rain or wet conditions. Water entering a po will increase the risk of electric shock.
d) Do not abuse the cord. Never use the cord for carrying, pulling or unplug the power tool. Keep cord away from heat, oil, sharp edges or moving parts. Damaged or entangled. Cords increase the risk of electric shock.
e) When operating a power tool outdoors, use an extension cord suitable for outdoor use. Use of a cord suitable for outdoor use reduces the risk of elec shock.
3) Personal safety
a) Stay alert, watch what you are doing and use common sense when operating power tool. Do not use a power tool while you are tired or under the influence of drugs, alcohol or medication. A moment of inattention while operating power to may result in serious personal injury.
b) Use personal protective equipment. Always wear eye protection. Protective equipment such as dust mask, nonskid safety shoes, hard hat, or hearing protection used for appropriate conditions will reduce personal injuries.
c) Prevent unintentional starting. Ensure the switch is in the off-position before connecting to power source and/or battery pack, picking up or carrying the tool. Carrying power tools with your finger on the switch or energising power tools have the switch on invites accidents.
d) Remove any adjusting key or wrench before turning the power tool on. A or a key left attached to a rotating part of the power tool may result in pe injury.
e) Do not overreach. Keep proper footing and balance at all times. This enables better control of the power tool in unexpected situations.
f) Dress properly. Do not wear loose clothing or jewellery. Keep your hair, c and gloves away from moving parts. Loose clothes, jewellery or long hair can caught in moving parts.
g) If devices are provided for the connection of dust extraction and collection facilities, ensure these are connected and properly used.
Use of these devices can reduce dust-related hazards.
4) Battery tool use and care
a) Ensure the switch is in the off position before inserting battery pack. Inserting the battery pack into power tools that have the switch on invites accidents.
b) Recharge only with the charger specified by the manufacturer. A charger is suitable for one type of battery pack.
c) Use power tools only with specifically designated battery packs. Use of an other battery packs may create a risk of injury and fire.
d) When battery pack is not in use, keep it away from other metal objects paper clips, coins, keys, nails, screw, or other small metal objects
that can make a connection from one terminal to another. Shorting the battery terminals together may cause burns or fire.
e) Under abusive conditions, liquid may be ejected from the battery; avoid cc if contact accidentally occurs, flush with water. If liquid contacts eyes, addition seek medical help. Liquid ejected from the battery may cause irritation or bur
5) Safety instructions for all operations
Safety warnings common for grinding, sanding, wire brushing, polishing, carving abrasive cutting-off operations:
a) This power tool is intended to function as a grinder, sander, wire brush, pe carving or cut-off tool. Read all safety warnings, instructions, illustrations and specifications provided with this power tool. Failure to follow all instructions list below may result in electric shock, fire and/or serious injury.
Note! List only those operations that are applicable.
b) Do not use accessories which are not specifically designed and recommend
by the tool manufacturer.Just because the accessory can be attached to your power tool, it does not assure safe operation.
running faster than their rated speed can break and fly apart.
d) The outside diameter and the thickness of your accessory must be within capacity rating of your power tool. Incorrectly sized accessories cannot be adequately controlled.
e) The arbor size of wheels, sanding drums or any other accessory must profit the spindle or collet of the power tool. Accessories that do not match the mounting hardware of the power tool will run out of balance, vibrate excessive and may cause loss of control.
f) Mandrel mounted wheels, sanding drums, cutters or other accessories must fully inserted into the collet or chuck. If the mandrel is insufficiently held and overhang of the wheel is too long, the mounted wheel may become loose a ejected at high velocity.
g) Do not use a damaged accessory. Please inspect the accessory before ease use such as abrasive wheels for chips and cracks, sanding drum for cracks, excess wear, wire brush for loose or cracked wires.
If power tool or accessory is dropped, inspect for damage or install an unda accessory. After inspecting and installing an accessory, position yourself and bystanders away from the plane of the rotating accessory and run the power at maximum no-load speed for one minute. Damaged accessories will normally break apart during this test time.
h) Wear personal protective equipment. Depending on application, use face sh safety goggles or safety glasses. As appropriate, wear dust mask, hearing protectors, gloves and workshop aproncapable of stopping small abrasive or workpiece fragments. The eye protection must be capable of stopping flying d generated by various operations. The dust mask or respirator must be capable of filtrating particles generated by your operation.
Prolonged exposure to high-intensity noise may cause hearing loss.
i) Keep bystanders a safe distance away from work area. Anyone entering the work area must wear personal protective equipment. Fragments of workpiece of a broken accessory may fly away and cause injury beyond immediate area or operation.
c) The rated speed of the grinding accessories must be at least equal to th
maximum speed marked on the power tool. Grinding accessories
j) Hold power tool by insulated gripping surfaces only, when performing an operation where the cutting accessory may contact hidden wiring or its own or Cutting accessory contacting a "ive" wire may make exposed metal parts of the power tool "live" and could give the operator an electric shock.
k) Always hold the tool firmly in your hand(s) during the start-up. The reactive torque of the motor, as it accelerates to full speed, can cause the tool to t1) Use clamps to support workpiece whenever practical. Never hold a small workpiece in one hand and the tool in the other hand while in use. Clampir small workpiece allows you to use your hand(s) to control the tool. Round m such as dowel rods, pipes or tubing has a tendency to roll while being cut, may cause the bit to bind or jump toward you.
m) Position the cord clear of the spinning accessory. If you lose control, the may be cut or snagged and your hand or arm may be pulled into the spin accessory.
n) Never lay the power tool down until the accessory has come to a complete. The spinning accessory may grab the surface and pull the power tool out of control.
0) After changing the bits or making any adjustments, make sure the collet I chuck or any other adjustment devices are securely tightened.
Loose adjustment devices can unexpectedly shift, causing loss of control, loose rotating components will be violently thrown.
p) Do not run the power tool while carrying it at your side. Accidental contains the spinning accessory could snag your clothing, pulling the accessory into your body.
q) Regularly clean the power tool's air vents. The motor's fan will draw the inside the housing and excessive accumulation of powdered metal may cause electrical hazards.
r) Do not operate the power tool near flammable materials. Sparks could igni these materials.
s) Do not use accessories that require liquid coolants. Using water or other coolants may result in electrocution or shock.
6) Further safety instructions for all operations
Kickback and related warnings:
Kickback is a sudden reaction to a pinched or snagged rotating wheel, sandi band, brush or any other accessory. Pinching or snagging causes rapid stallir the rotating accessory which in turn causes the uncontrolled power tool to be forced in the direction opposite of the accessory's rotation. For example, if an abrasive wheel is snagged or pinched by the workpiece, the edge of the wh is entering into the pinch point can dig into the surface of the material caus the wheel to climb out or kick out. The wheel may either jump toward or a the operator, depending on the direction of the wheel's movement at the poir pinching. Abrasive wheels may also break under these conditions. Kickback is result of power tool misuse and/or incorrect operating procedures or conditions and can be avoided by taking proper precautions as given below.
a) Maintain a firm grip on the power tool and position your body and arm to you to resist kickback forces. The operator can control kickback forces, if pro precautions are taken.
b) Use special care when working corners, sharp edges, etc. Avoid bouncing snagging the accessory. Corners, sharp edges or bouncing have a tendency to snag the rotating accessory and cause loss of control or kickback.
c) When attaching a toothed saw blade, since such blades create frequent ickback, make sure maintain a firm grip on the rotary tool and position your and arm to allow you to resist kickback forces.
d) Always feed the bit into the material in the same direction as the cutting exiting from the material (which is the same direction as the chips are throw. Feeding the tool in the wrong direction causes the cutting edge of the bit to out of the work and pull the tool in the direction of this feed.
e) When using rotary files, cut-off wheels, high-speed cutters or tungsten carb cutters, always have the work securely clamped. These wheels will grab if th become slightly canted in the groove, and can kickback.
When a cut-off wheel grabs, the wheel itself usually breaks. When a rotary high-speed cutter or tungsten carbide cutter grabs, it may jump from the groc and you could lose control of the tool.
6) Additional safety instructions for grinding and cutting-off operations Safety warnings specific for grinding and abrasive cutting-off operations:
a) Use only wheel types that are recommended for your power tool and only recommended applications. For example: do not grind with the side of a cut-off wheel. Abrasive cut-off wheels are intended for peripheral grinding, side forces applied to these wheels may cause them to shatter.
b) For threaded abrasive cones and plugs use only undamaged wheel mandrel with an unrelieved shoulder flange that are of correct size and length. Proper mandrels will reduce the possibility of breakage.
c) Do not "jam" a cut-off wheel or apply excessive pressure. Do not attempt make an excessive depth of cut. Over stressing the wheel increases the load and susceptibility to twisting or snagging of the wheel in the cut and the po of kickback or wheel breakage.
d) Do not position your hand in line with and behind the rotating wheel. Wh wheel, at the point of operation, is moving away from your hand, the possib kickback may propel the spinning wheel and the power tool directly at you.
e) When the wheel is pinched, snagged or when interrupting a cut for any switch off the power tool and hold the power tool motionless until the wheel to a complete stop. Never attempt to remove the cut-off wheel from the cut the wheel is in motion otherwise kickback may occur. Investigate and take corrective action to eliminate the cause of wheel pinching or snagging.
f) Do not restart the cutting operation in the workpiece. Let the wheel reach speed and carefully re-enter the cut. The wheel may bind, walk up or kickba the power tool is restarted in the workpiece.
g) Support panels or any oversized workpiece to minimize the risk of wheel pinching and kickback. Large workpieces tend to sag under their own weight. Supports must be placed under the workpiece near the line of cut and near edge of the workpiece on both sides of the wheel.
h) Use extra caution when making a "pocket cut" into existing walls or other areas. The protruding wheel may cut gas or water pipes, electrical wiring or objects that can cause kickback.
Product Description and Specifications

Read all safety warnings and all instructions. Failure to follow the warn and instructions may result in electric shock, fire and/or serious injury.
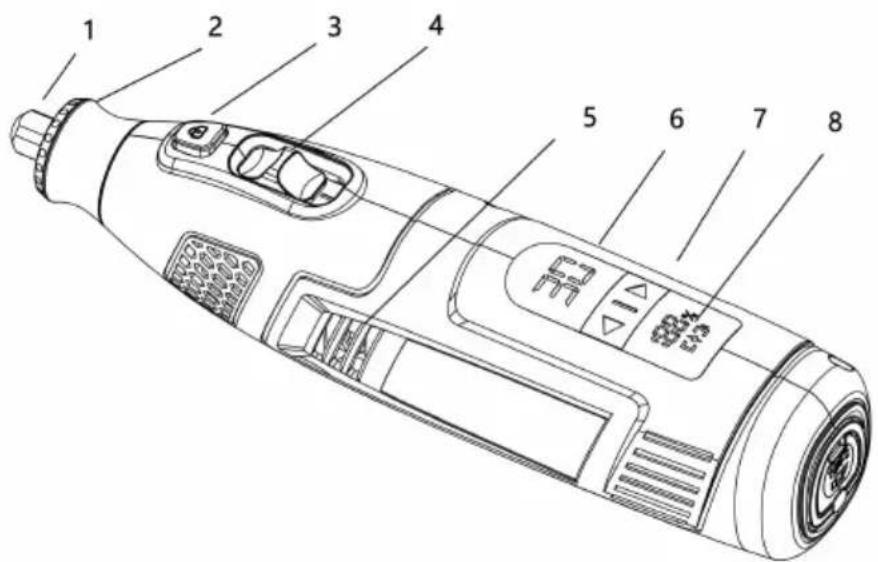
- Collet nut
- Locking cap
- Spindle lock button
-
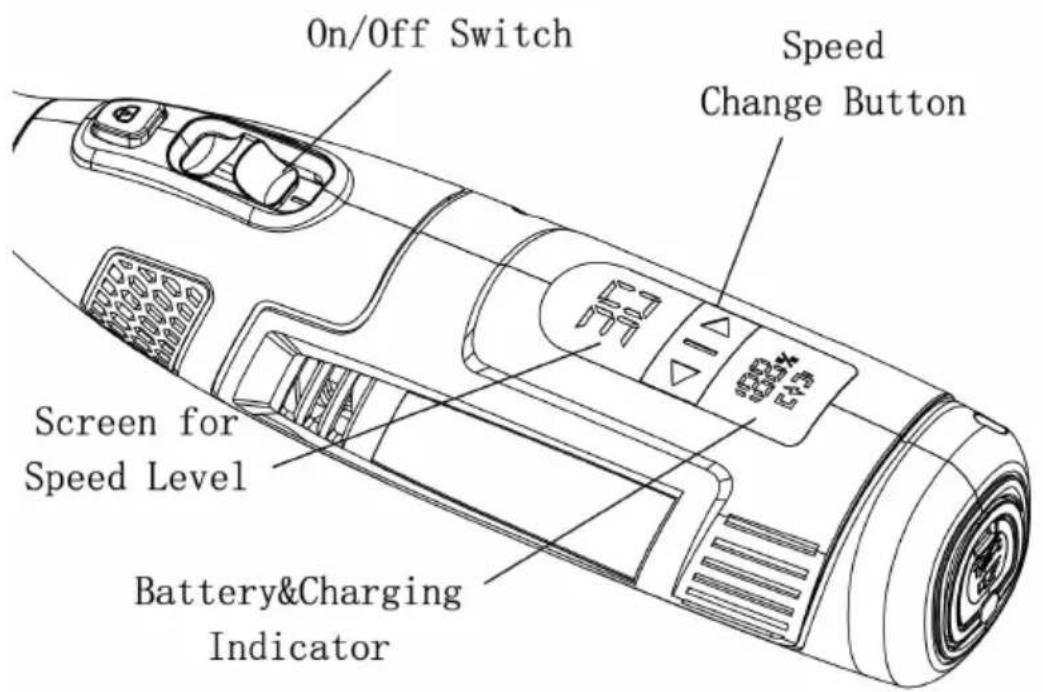
On/off switch
-
Ventilation slots
- Battery capacity indicator
- Speed Change Button
8.Battery&Charging Indicator
NOTE: This product does not come with a charger. Technical Data
| Rechargeable battery: | 12V Li-ion 2500mAh |
| Charging voltage: | USB 5V DC |
| Charging cord: | Type C USB wire |
| Battery charging time: | about 1.5- 2.5hours |
| No load speed: | 5000-32000 RPM |
| Collet size: | 2.3mm (3/32") / 3.2mm(1/8") |
Operation
Charging the tool
Note! The Mini Grinder does not come completely charged from the factory. sure to charge tool prior to initial use.
Connect the power supply and insert the C-type plug into the machine.
The electronic screen on the device showcases the charging percentage in re time. It continues to display the percentage until it reaches 100%, which sign that the battery is fully charged.
NOTE! A battery pack that has been unused for a while or never been charged must be charged before reuse or first use.
CAUTION! Do not charge a battery for a second time in close succession. There is a danger of overcharging the battery pack.
Turn On/Off the Tool and Setting the Speed Range
Turn On/Off the Tool
The switch button is located on the top side of the motor housing. Push the button, the tool will be turned on and start working. Then on any speed s push switch button directly, the tool will be turned off.
Setting the Speed Range
After turn on the tool, the screen located in the front of the switch button v the number of speed level. The number can be adjusted during operation by quickly pressing the button or button one time, the tool speed will be
changed accordingly. The tool have 28 speeds level, the number will start sc circularly from 1 to 28 level when continues quickly pressing the button, and speed will be changed from 5000 to 32000rpm, select the expected speed fc application.
Overheat Protection
Note! This tool is Mini Grinder for light-duty applications, do not abuse it for duty or continuously for long time working.
The tool is designed as one of the most powerful tool on the same level. It perfect for light-duty DIY & crafting, and also can be short time working for cutting, drilling, or routing, but not recommended for continuously long time working or heavy duty since is still a mini grinder for light-duty applications. avoid the user to abuse the tool, it is built in a overheat protection function, the tool is overused and caused the quickly heating up, the overheat protection function will shut off the tool to avoid damage. After the tool rest and cool the normal temperature, restart it for your work.
Installing or changing the accessory
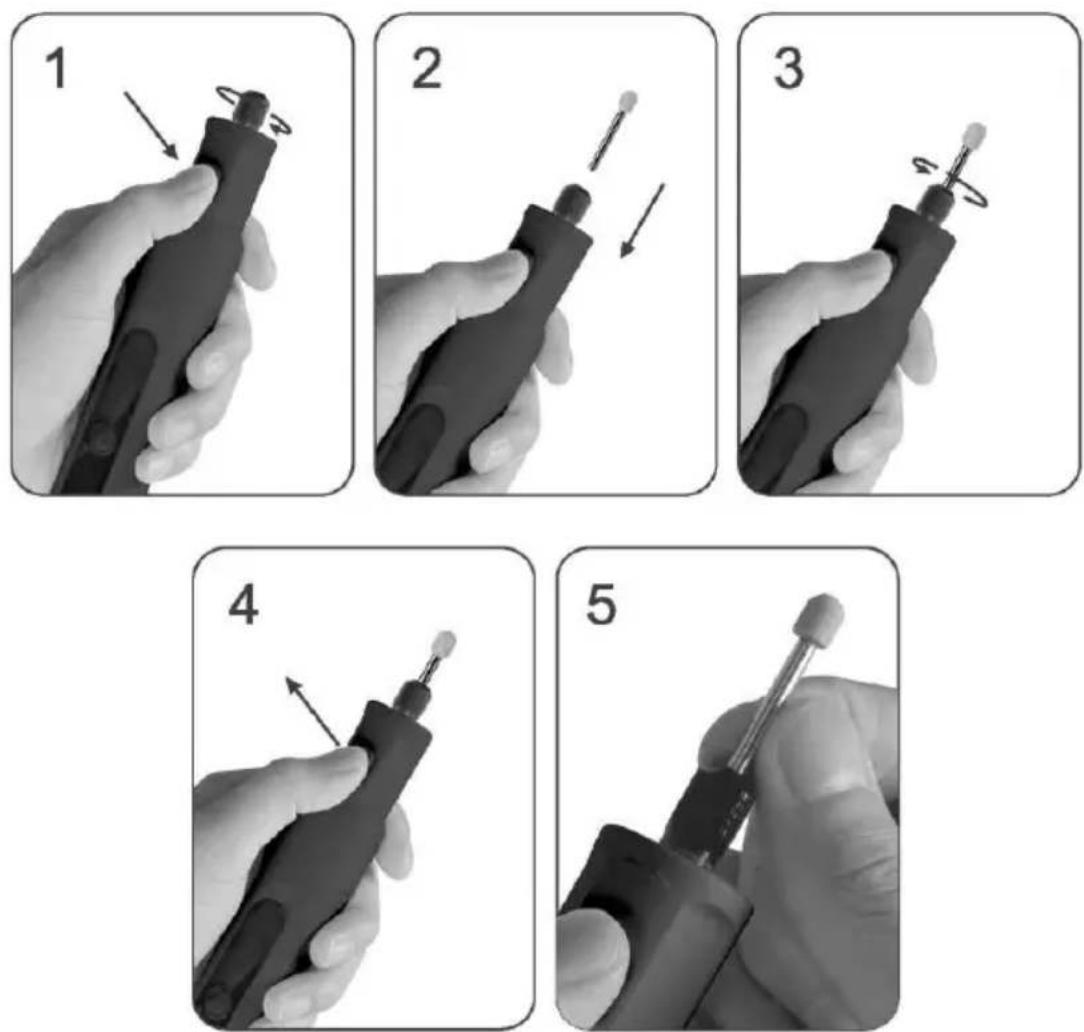
Note!Turn the tool off and ensure that the rotating part is stopped before taking next step.
-
Press down the spindle lock button and turn the chuck until the button is fully engaged in, then unscrew the locking collar.
-
After the locking collar loose the collet, insert or change an accessory you wanted into the collet.
-
Press down the spindle lock button again and screw the locking collar un the collet firmly tighten the accessory rod.
-
Finally, release the spindle lock button and ready to use.
-
Advise: uninstall to take off the accessory when finish work and always using the tissue to take the accessory for protecting your hand.
Warning!
-
Before using the tool, ensure that it is ready and safe to use!
-
Do not use in wet condition and environment!
- Never use the tool near to flammable gas or liquids.
-
Wear glasses while using the tool.
-
Do not touch the drill/grinding tip during operation even if it is in low speed because it can cause injury!
-
Do not force to operate the device when it slows down or stops turn it or finish the work process.
-
Do not overtighten the locking collar with too much force to avoid damage machine components while install the accessory because this is a mini-tool w too much strength.
Operating Instructions for Using the Rotary Tool
The first step in learning to use the rotary tool is to get the "feel" of it. Hold it in your hand and feel its weight and balance. Feel the taper of the Always hold the tool away from your face. Accessories can be damaged during handling, and can fly apart as they come up to speed. This is not common does happen. Whenever you hold the tool, be careful not to cover the air v with your hand. This blocks the airflow and causes the motor to overheat. F control in close work, grip the rotary tool like a pencil between your thumb fingers.
(See Figure Left). The "Golf Grip" method of holding the tool can be used for aggressive operations such as grinding a flat surface or using cutoff wheels. Figure Right)

natural_image
Hand holding a handheld electronic device with a 'Left' label (no other text or symbols visible)
natural_image
Hand holding a handheld electric shaver with a circular tip, labeled 'Right' in the top-left corner (no other text or symbols visible)Practice on scrap materials first to see how the Rotary Tool's high-speed act performs. Keep in mind that the work is done by the speed of the tool and accessory in the collet. You should not lean on or push the tool during use
lower the spinning accessory lightly to the work and allow it to touch the pc which you want cutting (or sanding or etching, etc.) to begin. Concentrate on guiding the tool over the work using very little pressure from your hand. Allow accessory to do the work. Usually, it is best to make a series of passes with tool rather than attempt to do all the work in one pass. To make a cut, for pass the tool back and forth over the work, much as you would a small part Cut a little material on each pass until you reach the desired depth. For more the gentle touch is best. With it, you have the best control, are less likely to errors, and will get the most efficient work out of the accessory.
Speed Setting for Accessories:
Note! Please check the reference list and select the right speed for each job using items appropriately. The number of speed level is from 1 to 30, the s from 5k to 30k rpm accordingly.
Reminder! The following table is only a description of the use method of all accessories that may be used for this tool, such as application scenarios, processing materials, recommended speed selection, etc. Do not mean that the sales package contains all these accessories. The actual accessories which sa package included, please refer to the description of the sales link.
| Functions | Images | Accessory Description | Cork | Hardwood | Plastic | Steel | Aluminum, brass, etc. | Shell, stone | Ceramic | Glass |
| Sanding | Sanding paper | Speed 2-4 RPM8-16k | Speed 2-4 RPM8-16k | Speed 2-4 RPM8-16k | Speed 2-4 RPM8-16k | Speed 2-4 RPM8-16k | — | — | — | |
| Sanding bands | Speed 1-4 RPM 5-16k | Speed 1-4 RPM 5-16k | Speed 1-4 RPM 5-16k | Speed 1-4 RPM 5-16k | Speed 1-4 RPM 5-16k | Speed 1-4 RPM 5-16k | Speed 1-4 RPM 5-16k | — | ||
| Cutting | Cutting blade | Speed 4-5 RPM16-20k | Speed 4-5 RPM16-20k | Speed 4-5 RPM16-20k | — | — | — | — | — | |
| Cut off wheels fiberglass | Speed 4-5 RPM16-20k | Speed 4-5 RPM16-20k | Speed 4-5 RPM16-20k | Speed 4-5 RPM16-20k | Speed 4-5 RPM16-20k | — | — | — | ||
| Grinding/ Sharpening | Silicon carbide grinding wheels with shank | — | — | — | Speed 3-5 RPM12-20k | Speed 3-5 RPM12-20k | Speed 3-5 RPM12-20k | Speed 3-5 RPM12-20k | — | |
| Aluminum oxid e Grinding wheels with shank | — | — | Speed 3-5 RPM12-20k | Speed 3-5 RPM12-20k | Speed 3-5 RPM12-20k | Speed 3-5 RPM12-20k | Speed 3-5 RPM12-20k | — | ||
| Rubber grinder with shank | — | — | — | Speed 3-5 RPM12-20k | Speed 3-5 RPM12-20k | — | — | Speed 3-5 RPM12-20k | ||
| Carving/ Engraving | Diamond grinding needle | Speed 3-5 RPM12-20k | Speed 3-5 RPM12-20k | Speed 3-5 RPM12-20k | Speed 3-5 RPM12-20k | Speed 3-5 RPM12-20k | Speed 3-5 RPM12-20k | Speed 3-5 RPM12-20k | Speed 3-5 RPM12-20k | |
| HSS cutter | Speed 3-5 RPM12-20k | Speed 3-5 RPM12-20k | Speed 3-5 RPM12-20k | — | — | — | — | — | ||
| Drilling | HSS drill bit | Speed 4-5 RPM16-20k | Speed 4-5 RPM16-20k | Speed 4-5 RPM16-20k | — | — | — | — | — | |
| Cleaning/ Polishing | Brushes | Speed 2-4 RPM8-16k | Speed 2-4 RPM8-16k | Speed 2-4 RPM8-16k | Speed 2-4 RPM8-16k | Speed 2-4 RPM8-16k | Speed 2-4 RPM8-16k | Speed 2-4 RPM8-16k | Speed 2-4 RPM8-16k | |
| Felt wheels / Mandrel | Speed 3-5 RPM12-20k | Speed 3-5 RPM12-20k | Speed 3-5 RPM12-20k | Speed 3-5 RPM12-20k | Speed 3-5 RPM12-20k | Speed 3-5 RPM12-20k | Speed 3-5 RPM12-20k | Speed 3-5 RPM112-20k | ||
| Accessories | Collets | To clamp accessories | ||||||||
| Wrench | For replacing the accessories | |||||||||
| Mandrel for cut off wheel | To link Rubber emery wheel/ Sanding paper / Diamond wheel/cut off wheels/ Grinding wheels | |||||||||
| Sanding shank | Mandrel drum for sanding bands installation | |||||||||
Accessories
Sanding bands & shank: Use to grind pet nail or work-pieces made of metal, wood, stone and plastic. Need to assemble them together before use.
Sanding paper: Use for detail sanding or polishing work-pieces made of metal,wood,stone and plastic. Need to assemble it on the mandrels with screw before use.
Grinding stones: Use for surface treatment of metal parts, cast-metal parts, welding seams and for the removal of rust. Different shapes are available.
Diamond bits: For fine detail work, engraving, carving, touch-up and finishing. Use on wood, jade, ceramic, glass, hardened steel, semi precious stones and other hard materials. Bits are covered with diamond particles.
Multipurpose cutting bit: Ideal for shaping, hollowing, grooving, slotting, inlaying and making tapered holes in soft metals, plastics and woods especially on curved surfaces.
Drill bits: Use for drilling holes in work-pieces made of plastic, wood or stone. Wool polishing and felt wheel: Use to polish work-pieces made of metal and plastic. Need to assemble the felt wheel on the mandrels with threaded head before use.
Rubber wheel with shank: Polishing for various, metal, iron, jade, agate, glass, stone and pet nail etc.
Bristle brush: For work-pieces cleaning.
Mandrels: Shafts with screw or threaded head, which are designed for retaining grinding and polishing wheels.
Diamond pet nail grinder wheel: For pet claw grooming, nail ginding, sanding. Recommended maximum pet grooming speed not over 12000rpm.
Cleaning&maintenance
Always pull out the mains power plug before starting any cleaning wo
Cleaning
Keep all safety devices, air vents and the motor housing free of dirt dust as far as possible.
Wipe the equipment with a clean cloth or blow it with compressed a low pressure.
We recommend that you clean the device immediately each time you have finished using it.
Clean the equipment regularly with a moist cloth and some soft soap not use cleaning agents or solvents; these could attack the plastic pa of the equipment. Ensure that no water can seep into the device.
Maintenance
There are no parts inside the equipment which require additional maintenance.
Manufacturer: Shanghaimuxinmuyeyouxiangongsi
Address: Shuangchenglu 803nong11hao1602A-1609shi, baoshanqu, shanghai 200000 CN.
Imported to AUS: SIHAO PTY LTD. 1 ROKEVA STREETEASTWOOD NSW 2122 Australia
Imported to USA: Sanven Technology Ltd. Suite 250, 9166 Anaheim Place, Rancho Cucamonga, CA 91730
| UK | REP |
YH CONSULTING LIMITED.
C/O YH Consulting Limited Office 147,
Centurion House, London Road,
Staines-upon-Thames, Surrey, TW18 4AX
| EC | REP |
E-CrossStu GmbH
Mainzer Landstr.69,
60329 Frankfurt am Main.

VEVOR
Affordable. Reliable. Home Improvement.
Outil rotatif
blessures graves. blessure.
Product Description and Specifications

vitesse.
natural_image
Hand holding a handheld electronic device with a 'Left' label (no other text or symbols visible)
natural_image
Hand holding a handheld electric shaver with a circular tip, labeled 'Right' in the top-left corner (no other text or symbols visible)C/O YH Consulting Limited Office 147,
Centurion House, London Road,
Staines-upon-Thames, Surrey, TW18 4AX
| EC | REP |
E-CrossStu GmbH
Mainzer Landstr.69,
60329 Frankfurt am Main.

VEVOR
Affordable. Reliable. Home Improvement.
Rotationswerkzeug
Modell: S0J-FE18-10
Modell: S0J-FE18-10

Product Description and Specifications

aus.
natural_image
Hand holding a handheld electronic device with a 'Left' label (no other text or symbols visible)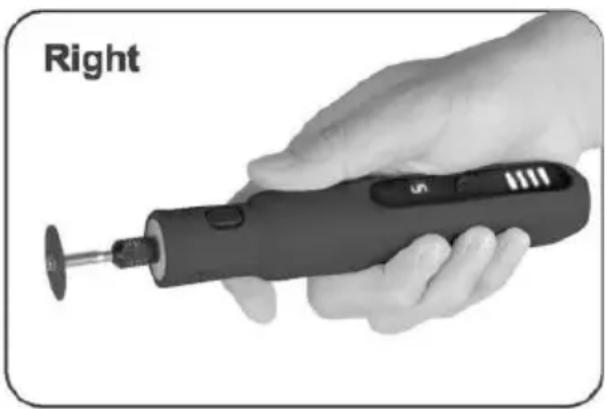
natural_image
Hand holding a handheld electric shaver with a circular tip, labeled 'Right' in the top-left corner (no other text or symbols visible)C/O YH Consulting Limited Office 147,
Centurion House, London Road,
Staines-upon-Thames, Surrey, TW18 4AX
| EC | REP |
E-CrossStu GmbH
Mainzer Landstr.69,
60329 Frankfurt am Main.

VEVOR
Affordable. Reliable. Home Improvement.
Utensile rotante
Modello: S0J-FE18-10
Modello: S0J-FE18-10

spegnerà.
natural_image
Hand holding a handheld electronic device with a 'Left' label (no other text or symbols visible)
natural_image
Hand holding a handheld electric shaver with a circular tip, labeled 'Right' in the top-left corner (no other text or symbols visible)Importato in AUS: SIHAO PTY LTD. 1 ROKEVA STREETEASTWOOD NSW 2122 Australia
Importato negli USA: Sanven Technology Ltd. Suite 250, 9166 Anaheim Place, Rancho Cucamonga, CA 91730
| UK | REP |
YH CONSULTING LIMITED.
C/O YH Consulting Limited Office 147,
Centurion House, London Road,
Staines-upon-Thames, Surrey, TW18 4AX
| EC | REP |
E-CrossStu GmbH
Mainzer Landstr.69,
60329 Frankfurt am Main.

VEVOR
Affordable. Reliable. Home Improvement.
Product Description and Specifications

apagará.
natural_image
Hand holding a handheld electronic device with a 'Left' label (no other text or symbols visible)
natural_image
Hand holding a handheld electric shaver with a circular tip, labeled 'Right' in the top-left corner (no other text or symbols visible)C/O YH Consulting Limited Office 147,
Centurion House, London Road,
Staines-upon-Thames, Surrey, TW18 4AX
| EC | REP |
E-CrossStu GmbH
Mainzer Landstr.69,
60329 Frankfurt am Main.

VEVOR
Affordable. Reliable. Home Improvement.
Narzędzie obrotowe
Model: S0J-FE18-10
Model: S0J-FE18-10

Product Description and Specifications

narzędzia.
natural_image
Two-step black-and-white photo showing a hand holding a small tool, labeled 4 and 5 (no text or symbols on the tool itself)Ostrzeżenie!
natural_image
Hand holding a handheld electronic device with a label 'Left' in the top-left corner (no other text or symbols visible)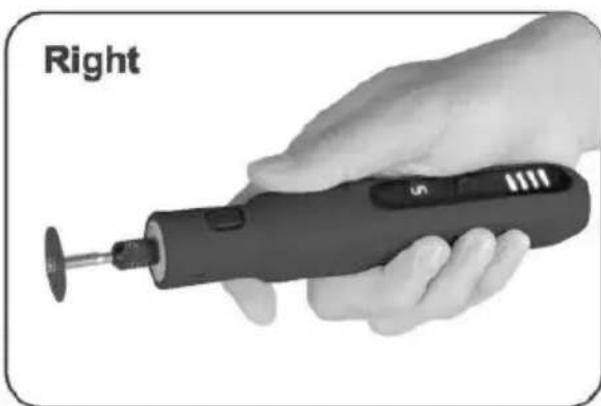
natural_image
Hand holding a handheld electric shaver with a circular tip, labeled 'Right' in the top-left corner (no other text or symbols visible)STREETEASTWOOD NSW 2122 Australia
Importowane do USA: Sanven Technology Ltd. Suite 250, 9166 Anar Place, Rancho Cucamonga, CA 91730
| UK | REP |
YH CONSULTING LIMITED.
C/O YH Consulting Limited Office 147,
Centurion House, London Road,
Staines-upon-Thames, Surrey, TW18 4AX
| EC | REP |
E-CrossStu GmbH
Mainzer Landstr.69,
60329 Frankfurt am Main.

VEVOR
Affordable. Reliable. Home Improvement.
Roterend gereedschap
Model: S0J-FE18-10
Model: S0J-FE18-10

Product Description and Specifications

uitgeschakeld.
natural_image
Hand holding a handheld electronic device with a 'Left' label (no other text or symbols visible)
natural_image
Hand holding a handheld electric shaver with a circular tip, labeled 'Right' in the top-left corner (no other text or symbols visible)C/O YH Consulting Limited Office 147,
Centurion House, London Road,
Staines-upon-Thames, Surrey, TW18 4AX
| EC | REP |
E-CrossStu GmbH
Mainzer Landstr.69,
60329 Frankfurt am Main.

VEVOR
Affordable. Reliable. Home Improvement.
Roterande verktyg
Modell: S0J-FE18-10
Modell: S0J-FE18-10

Product Description and Specifications

natural_image
Close-up of a hand holding a handheld device with a knob and pointer (no text or symbols visible)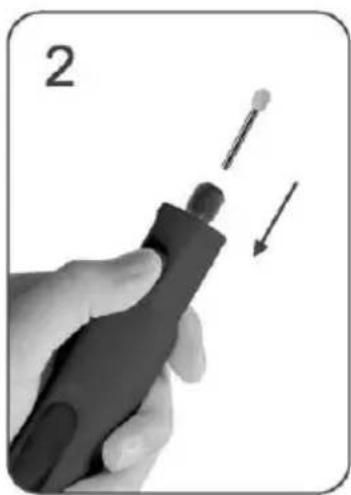
natural_image
Close-up of a hand holding a pen with a screwdriver, showing a downward arrow indicating motion (no text or symbols)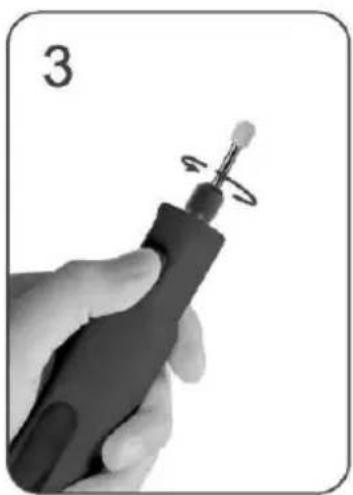
natural_image
Hand holding a handheld electronic device with a screwdriver and circular motion indicator (no text or symbols visible)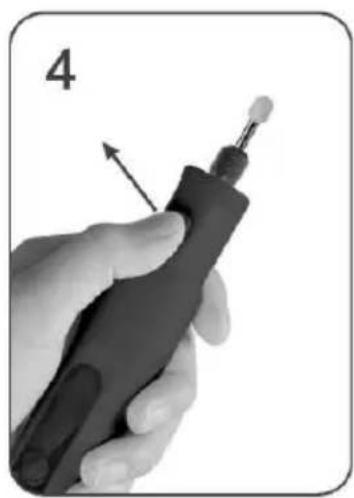
natural_image
Close-up of a hand holding a handheld electronic device with a pointed tip and arrow indicator (no text or symbols)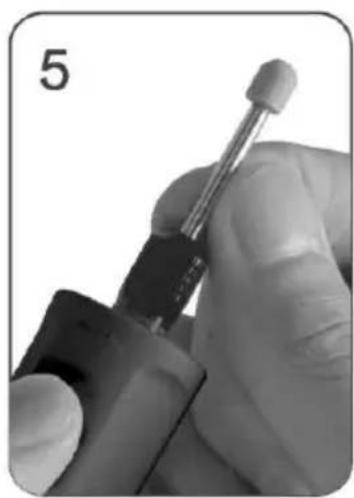
natural_image
Close-up of a gloved hand holding a dental tool with a screwdriver, no visible text or symbolsVarning!
natural_image
Hand holding a handheld electronic device with a 'Left' label (no other text or symbols visible)
natural_image
Hand holding a handheld electric shaver with a circular tip, labeled 'Right' in the top-left corner (no other text or symbols visible)C/O YH Consulting Limited Office 147,
Centurion House, London Road,
Staines-upon-Thames, Surrey, TW18 4AX
| EC | REP |
E-CrossStu GmbH
Mainzer Landstr.69,
60329 Frankfurt am Main.