Q0V-CX51-20 - Glue gun Vevor - Free user manual and instructions
Find the device manual for free Q0V-CX51-20 Vevor in PDF.

User questions about Q0V-CX51-20 Vevor
0 question about this device. Answer the ones you know or ask your own.
Ask a new question about this device
Download the instructions for your Glue gun in PDF format for free! Find your manual Q0V-CX51-20 - Vevor and take your electronic device back in hand. On this page are published all the documents necessary for the use of your device. Q0V-CX51-20 by Vevor.
USER MANUAL Q0V-CX51-20 Vevor
Technical Support and E-Warranty Certificate
www.vevor.com/support
CORDLESS CAULKING GUN
MODEL:Q0V-CX51-20
We continue to be committed to provide you tools with competitive price. "Save Half", "Half Price" or any other similar expressions used by us only represent estimate of savings you might benefit from buying certain tools with us compared top brands and doses not necessarily mean to cover all categories of tools offered are kindly reminded to verify carefully when you are placing an order with us actually saving half in comparison with the top major brands.
MODEL:Q0V-CX51-20
natural_image
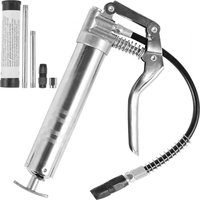
Technical line drawing of two different types of spray gun components (no text or symbols present)NEED HELP? CONTACT US!
Have product questions? Need technical support? Please feel from contact us:
Technical Support and E-Warranty Certificate www.vevor.com/support
This is the original instruction, please read all manual instruction carefully before operating. VEVOR reserves a clear interpretation user manual. The appearance of the product shall be subject to product you received. Please forgive us that we won't inform you there are any technology or software updates on our product.
 | Warning-To reduce the risk of injury, users must read the in manual carefully. |
 | Warning- Be sure to wear eye protectors when using this pr |
 | Warning- Be sure to wear gloves when using this product. |
 | CORRECT DISPOSALThis product is subject to the provision of European Directive 2012/19/EC. The symbol showing a wheelie bin crossed through indicates that the product requires separate refuse collection in European Union. This applies to the product and all accessor marked with this symbol. Products marked as such may not discarded with normal domestic waste but must be taken to collection point for recycling electrical and electronic devices. |
 | FCC statement:This device complies with Part 15 of the FCC Rules. Operati subject to the following two conditions:(1)This device may not harmful interference, and (2)this device must accept any interfere received, including interference that may cause undesired opera |
IMPORTANT SAFETY WARNINGS
WARNING: Read all safety warnings, instructions, illustrations and specifications provided with this power tool. Failure to follow all instructions listed below may result in electric shock, fire and/or serious injury. Save all warnings and instructions for future reference. The term "power tool" in the safety instructions refers to Cordless caulking gun.
Work area safety
a) Keep work area clean and well lit. Cluttered or dark areas invite accident
b) Do not operate power tools in explosive atmospheres, such as in the pre- of flammable liquids, gases or dust. Power tools create sparks which may igr the dust or fumes.
c) Keep children and bystanders away while operating a power tool. Distractic can cause you to lose control.
Electrical safety
a) Power tool plugs must match the outlet. Never modify the plug in any way, not use any adapter plugs with earthed (grounded) power tools. Unmodified p and matching outlets will reduce risk of electric shock.
b) Avoid body contact with earthed or grounded surfaces, such as pipes, rad ranges and refrigerators. There is an increased risk of electric shock if your earthed or grounded.
c) Do not expose power tools to rain or wet conditions. Water entering a po will increase the risk of electric shock.
d) Do not abuse the cord. Never use the cord for carrying, pulling or unplug the power tool. Keep cord away from heat, oil, sharp edges or moving parts. Damaged or entangled cords increase the risk of electric shock.
e) When operating a power tool outdoors, use an extension cord suitable for outdoor use. Use of a cord suitable for outdoor use reduces the risk of electric shock.
f) If operating a power tool in a damp location is unavoidable, use a residual current device (RCD) protected supply. Use of an RCD reduces the risk of e-shock.
Personal safety
a) Stay alert, watch what you are doing and use common sense when operating power tool. Do not use a power tool while you are tired or under the influence of drugs, alcohol or medication. A moment of inattention while operating power to may result in serious personal injury.
b) Use personal protective equipment. Always wear eye protection. Protective equipment such as a dust mask, non-skid safety shoes, hard hat or hearing protection used for appropriate conditions will reduce personal injuries.
c) Prevent unintentional starting. Ensure the switch is in the off-position before connecting to power source and/or battery pack, picking up or carrying the tool. Carrying power tools with your finger on the switch or energising power tools
have the switch on invites accidents.
d) Remove any adjusting key or wrench before turning the power tool on. A or a key left attached to a rotating part of the power tool may result in pe injury.
e) Do not overreach. Keep proper footing and balance at all times. This ena better control of the power tool in unexpected situations.
f) Dress properly. Do not wear loose clothing or jewellery. Keep your hair and clothing away from moving parts. Loose clothes, jewellery or long hair can be caught in moving parts.
g) If devices are provided for the connection of dust extraction and collection facilities, ensure these are connected and properly used. Use of dust collection can reduce dust-related hazards.
h) Do not let familiarity gained from frequent use of tools allow you to become complacent and ignore tool safety principles. A careless action can cause severe injury within a fraction of a second.
Power tool use and care
a) Do not force the power tool. Use the correct power tool for your applicat correct power tool will do the job better and safer at the rate for which it v designed.
b) Do not use the power tool if the switch does not turn it on and off. An that cannot be controlled with the switch is dangerous and must be repaired.
c) Disconnect the plug from the power source and/or remove the battery pack detachable, from the power tool before making any adjustments, changing accessories, or storing power tools. Such preventive safety measures reduce the risk of starting the power tool accidentally.
d) Store idle power tools out of the reach of children and do not allow pers unfamiliar with the power tool or these instructions to operate the power tool. Power tools are dangerous in the hands of untrained users.
e) Maintain power tools and accessories. Check for misalignment or binding of moving parts, breakage of parts and any other condition that may affect the tooTs operation. If damaged, have the power tool repaired before use. Many accidents are caused by poorly maintained power tools.
f) Keep cutting tools sharp and clean. Properly maintained cutting tools with a cutting edges are less likely to bind and are easier to control.
g) Use the power tool, accessories and tool bits etc. in accordance with these instructions, taking into account the working conditions and the work to be performed. Use of the power tool for operations different from those intended result in a hazardous situation.
h) Keep handles and grasping surfaces dry, clean and free from oil and great Slippery handles and grasping surfaces do not allow for safe handling and co of the tool in unexpected situations.
Service
a) Have your power tool serviced by a qualified repair person using only ideal replacement parts. This will ensure that the safety of the power tool is maintained
Battery power tool Safety Instructions
- prevent unintentional starting. Ensure the switch is in the off-position before connecting to battery pack, picking up or carrying the power tool. Carrying the power tool with your
finger on the switch or energizing power tool that have the switch on invites accidents.
-
Disconnect the battery pack from the power tool before making any adjust changing accessories, or storing power tool. Such preventive safety measures reduce the risk of starting the power tool accidentally.
-
Recharge only with the charger specified by the manufacturer. A charger is suitable for one type of battery pack may create a risk of fire when used v another battery pack.
-
Use power tools only with specifically designated battery packs. Use of an other battery packs may create a risk of injury and fire
-
When battery pack is not in use, keep it away from other metal objects, paper clips, coins, keys, nails, screws or other small metal objects, that can a connection from one terminal to another. Shorting the battery terminals together may cause burns or a fire.
-
Under abusive conditions, liquid may be ejected from the battery; avoid cc If contact accidentally occurs, flush with water. If liquid contacts eyes, addition seek medical help. Liquid ejected from the battery may cause irritation or bur
-
Do not use a battery pack or power tool that is damaged or modified. D or modified batteries may exhibit unpredictable behavior resulting in fire, explosive or risk of injury.
-
Do not expose a battery pack or power tool to fire or excessive temperature. Exposure to fire or temperature above 265^ F may cause explosion.
- Follow all charging instructions and do not charge the battery pack or po outside of the temperature range specified in the instructions. Charging improp or at
temperatures outside of the specified range may damage the battery and increase the risk of fire.
- Have servicing performed by a qualified repair person using only identical replacement parts. This will ensure that the safety of the product is maintained
- Do not modify or attempt to repair the power tool or the battery pack e indicated in the instructions for use and care.
- The battery Charger gets hot during use. The Charger's heat can build it unsafe levels and create a fire hazard if it does not receive adequate ventilation due to an electrical fault, or if it is used in a hot environment. Do not place Charger on a flammable surface. Do not obstruct any vents on the Charger. Especially avoid placing the charger on carpets and rugs; they are not only flammable, but they also obstruct vents under the charger. Place the Charger stable, solid, nonflammable surface (such as a stable metal workbench or concrete floor) at least 1 foot away from all flammable objects, such as draps walls. Keep a fire extinguisher and a smoke detector in the area. Frequently monitor the Charger and Battery Pack while charging.
- Lithium Battery Safety Warnings Lithium Batteries Store A Large AMOUNT OF ENERGY AND Will Vent Fire OR EXPLODE IF MISTREATE
a. Keep Battery pack dry.
b. DO NOT DO ANY OF THE FOLLOWING to THE BATTERY PACK: • Op Drop, • Short-circuit, • puncture, • incinerate, or • Expose to temperatures gre than 265°F.
c. Charge Battery Pack only according to its Charger's instructions.
d. Inspect Battery Pack before every use; Do not use or charge if damaged.
Other safety rules
Keep work area clean and well lit. Cluttered or dark areas invite accidents
Do not operate power tools in explosive atmospheres, such as in the pres of flammable liquids, gases or dust. Power tools create sparks which may the dust or fumes.
Keep children and bystanders away while operating a power tool. Distractio can cause you to lose control.
➢ Stay alert, watch what you are doing and use common sense when opera power tool. Do not use a power tool while you are tired or under the in-drugs, alcohol or medication.
Use personal protective equipment, such as a dust mask, non-skid safety shoes, hard hat or hearing protection used for appropriate conditions will reduce personal injuries.
➢ Prevent unintentional starting. Ensure the switch is in the off-position before connecting to power source and/or battery pack, picking up or carrying the
Do not overreach. Keep proper footing and balance at all times. This enables better control of the power tool in unexpected situations.
➢ Dress properly. Do not wear loose clothing or jewelry. Keep your hair and clothing away from moving parts. Loose clothes, jewelry or long hair can I caught in moving parts.
When battery is not in use, keep it away from other metal objects, like p clips, coins, keys, nails, screws or other small metal objects, that can make connection from one terminal to another.
Have your power tool serviced by a qualified repair person using only ider replacement parts. This will ensure that the safety of the power tool is maintained.
SAVE THESE INSTRUCTIONS
TECHNICAL PARAMETERS
| Model | Q0V-CX51-20 |
| Rating voltage: | 20V |
| Caulking speed: | 1-4mm/s |
| Working current: | 1A |
| LED current: | 200mA (only for 300ml short barrel) |
| LED lumens: | 400-450LM (only for 300ml short barrel) |
| Working pressure: | 270kgs |
| Working time: | 4 hours |
| LED color temperature: | 6000-6500K (only for 300ml short barrel) |
| LED color display: | 70-75Ra (only for 300ml short barrel) |
FUNCTIONAL DESCRIPTION
1. APPLICATIONS
➢ You may use this tool for the following purposes:
Sealing cracks to keep your home's conditioned air inside while keeping unconditioned air outside, increasing your home's energy efficiency.
➢ Filling holes and cracks before painting.
Creating a moisture barrier around areas that could be damaged by water.
Sealing cracks to keep insects from crawling inside your home.
- Applying adhesive.
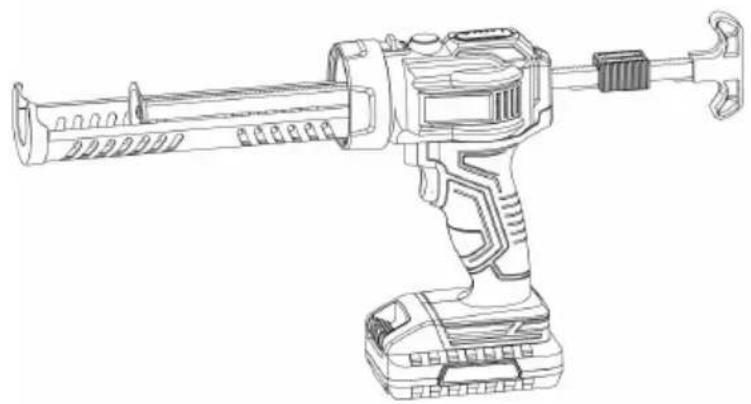
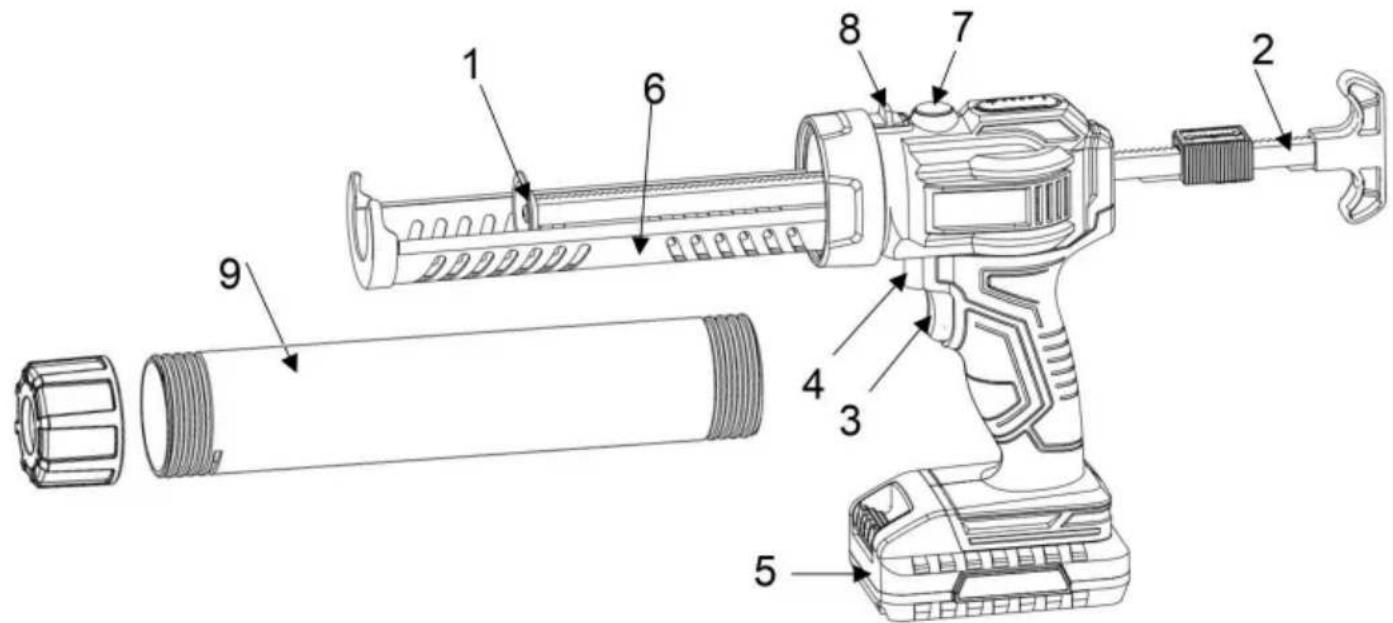
2. PRODUCT DETAILS

- Plunger rod
- Plunger rod handle
- Start button
- Switch trigger
- Battery
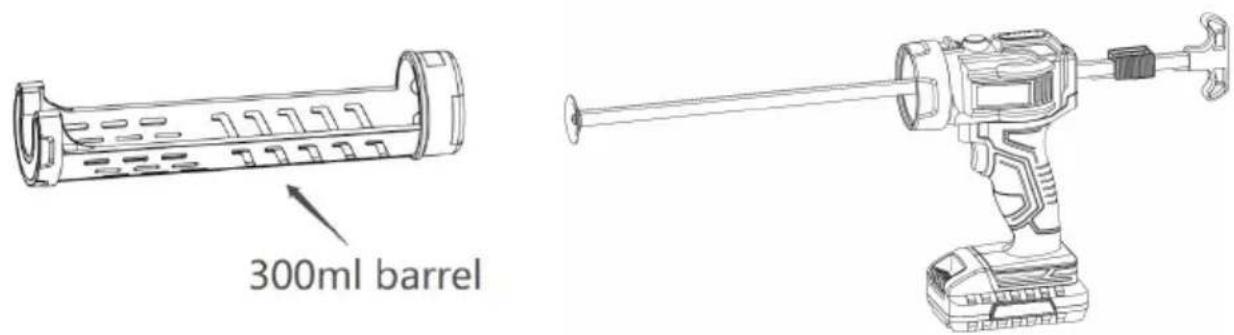
- 300ml short barrel
- Light switch
- Barrel replacement switch
- 600ml long barrel
Push the battery to the bottom of the gun.

natural_image
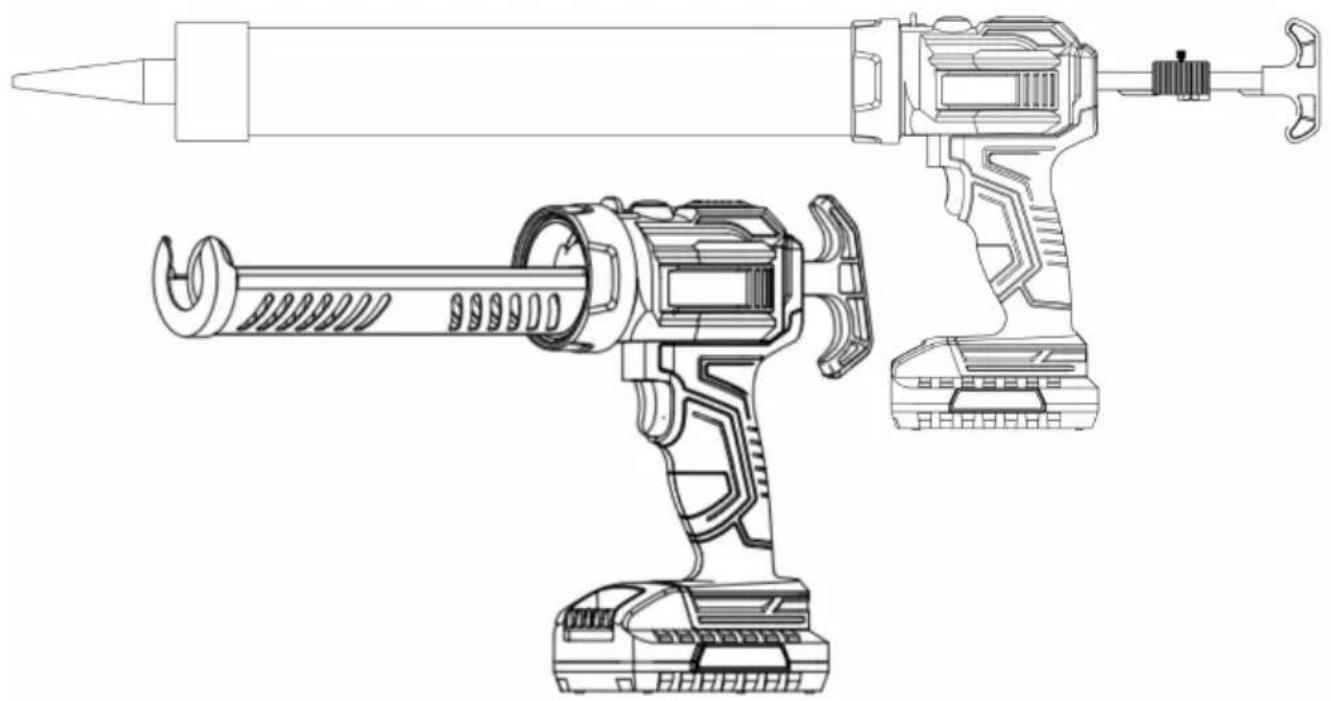
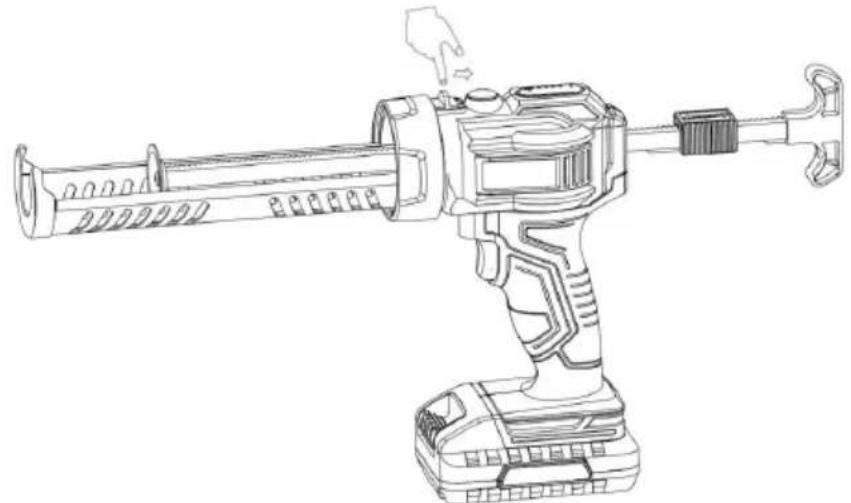
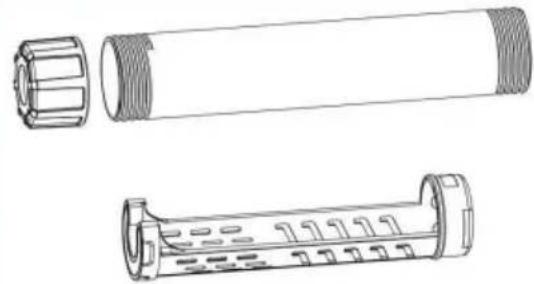
Technical line drawing of a mechanical device with attached housing (no text or symbols)2. TO INSTALL AND REPLACE THE BARREL

To install 300ml cartridge barrel, just put the barrel into the bayonet at an a 90 °and rotate it back until a sound is heard, that is, the fixation is comple
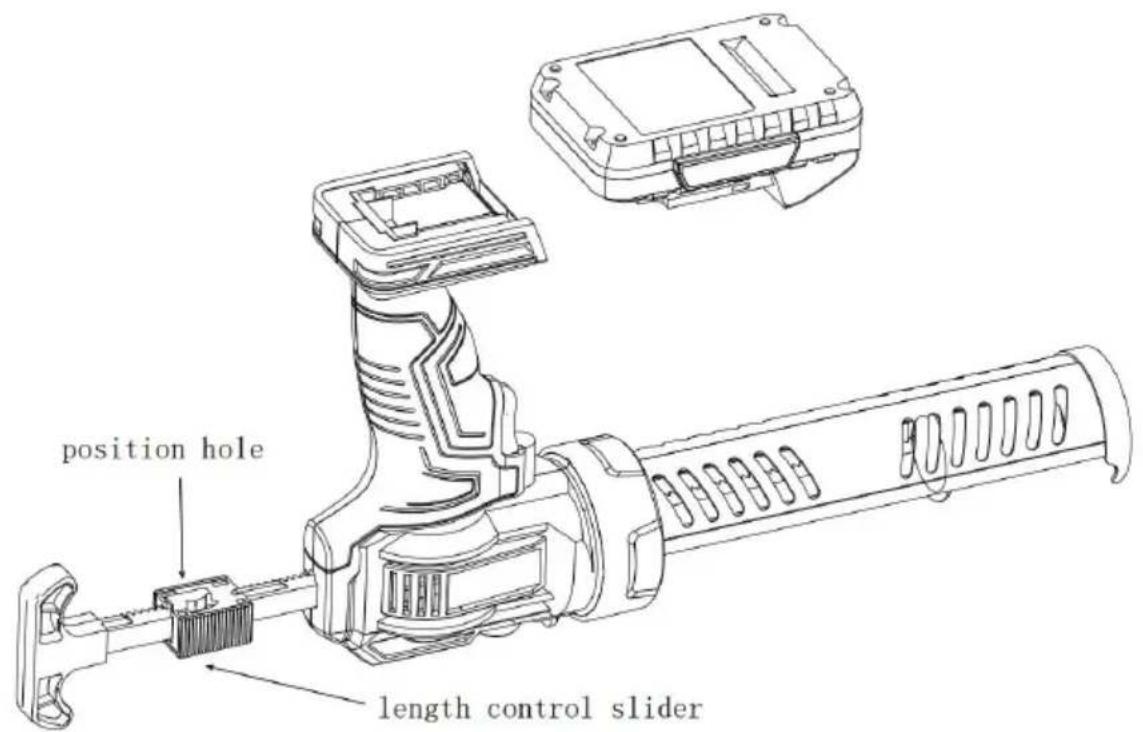
Also, you need to change the length of plunger rod to fit the 300ml barrel. shown in the following figure, slide the length control slider to the left until i in the position hole and cannot move forward.
In this way, you will get a 300ml glue gun.
natural_image
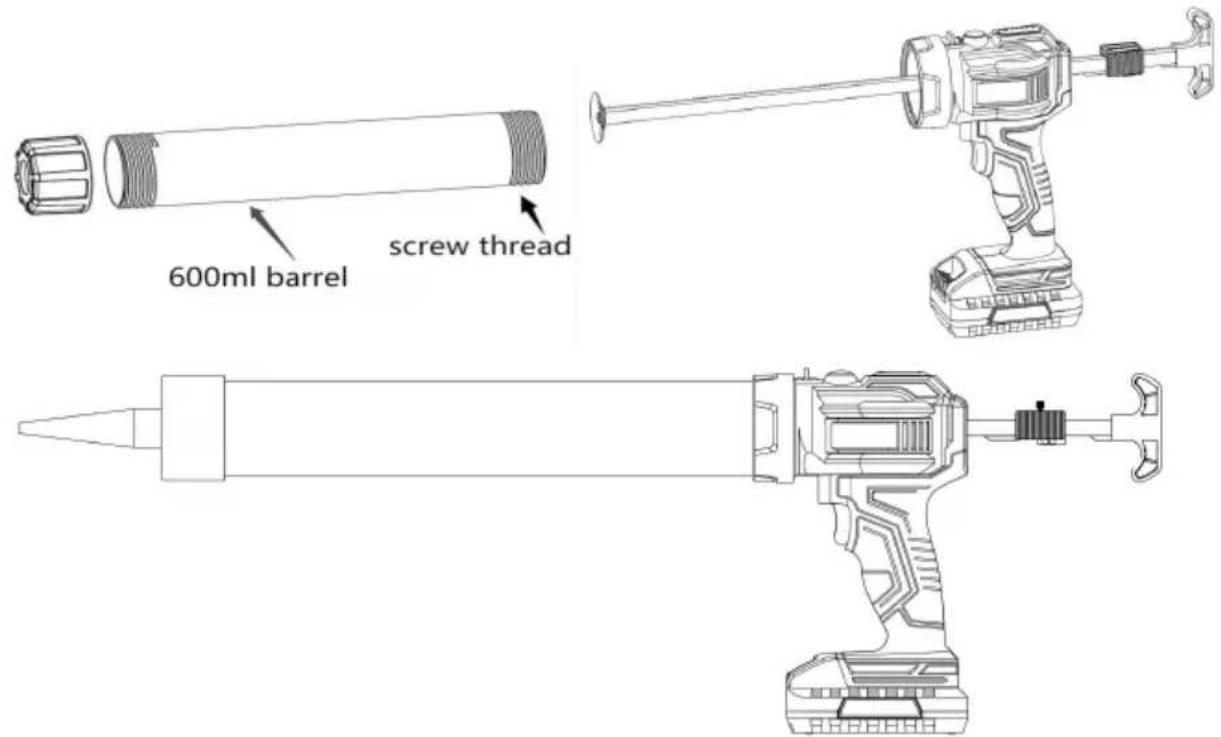
Line drawing of a handheld electric shaver with lever and base mount (no text or symbols)To remove the 300ml cartridge barrel, slightly pull the barrel replacement swit backward, at the same time rotate barrel by 90^ and pull it out.
natural_image
Line drawing of a syringe with handle and base mount (no text or symbols)To install 600ml cartridge barrel, rotate barrel directly.
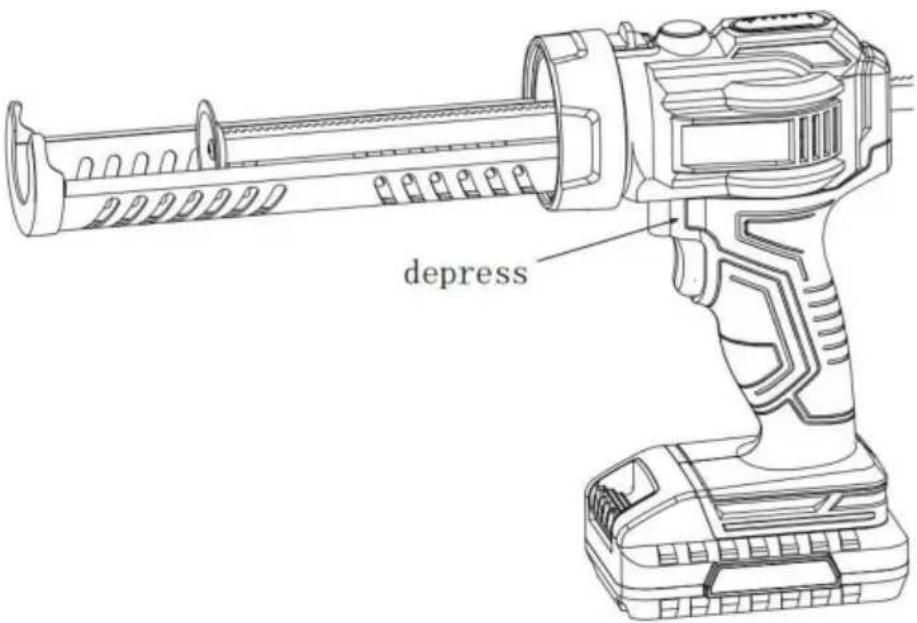
3. STARTING/STOPPING THE CAULKING GUN
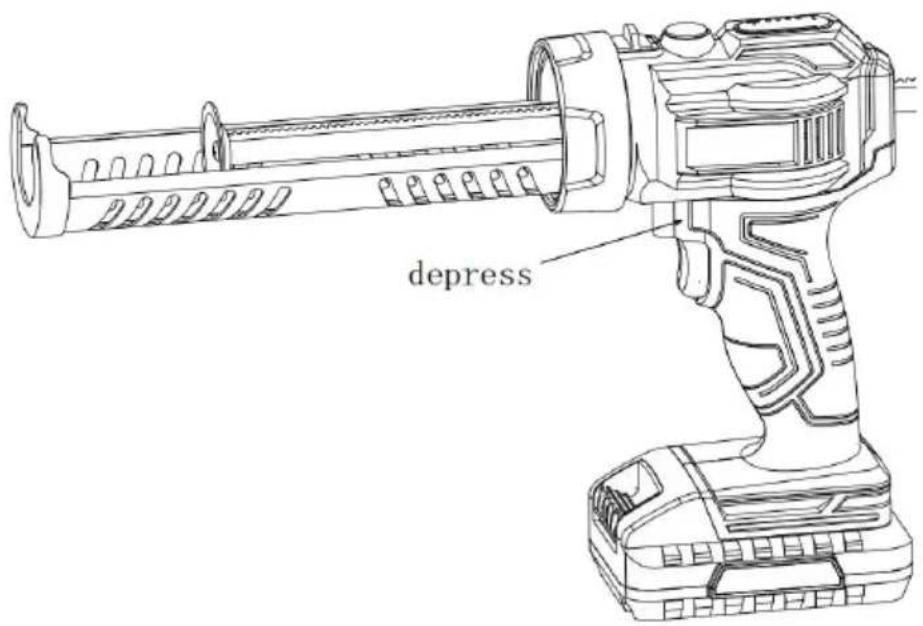
To turn the caulk gun ON, depress the switch trigger.
To turn the caulk gun OFF, release the switch trigger.
4. APPLYING CAULK
natural_image
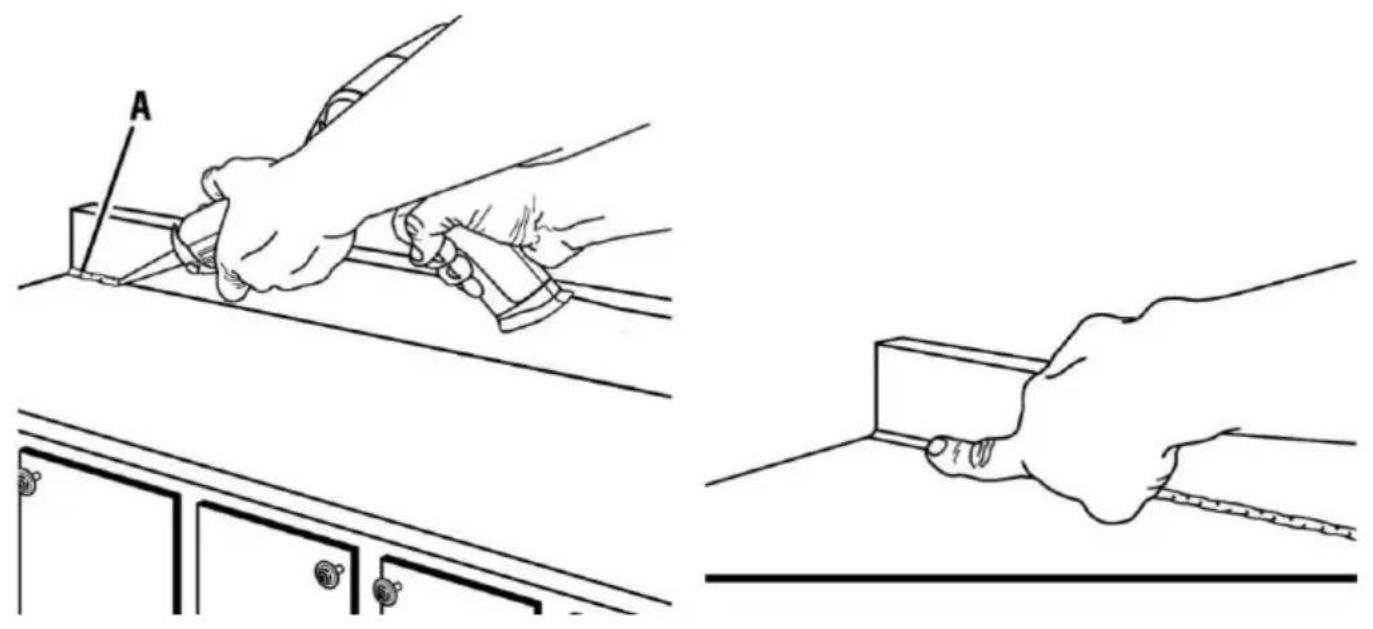
Line drawings showing hands using a tool to install or install a component, with no text or symbols present.Removing any dust, dirt, or remnants of old caulking. Make sure the area to caulked is clean and dry.
Hold the gun at a slight angle. If filling a crack, insert the spout into the c possible; otherwise, run the caulk gun along the surface.
Squeeze the trigger allowing the caulk to extrude from the tube tip.
If the bead of caulk is too narrow, re-cut the nozzle to provide a larger open. However, it is better to apply a thin bead of caulk and add a little more if than to apply too much and attempt to remove the excess.
If there is blocked, you can release the switch trigger and the plunge rod w automatically unlock and back off, check and make sure that:
Nozzle tip is cut.
Inner seal in the caulk tube is broken.
Hardened material is removed from the nozzle.
Caulk tube is not damaged or frozen.
Plunger rod is free of caulk/adhesive materials.
If the motor continues to shut off, try another tube of material or take the t authorized service center.
Carefully move the caulk gun at an even pace along the gap to be filled a continue to depress the switch trigger. Make sure the caulk comes in full co with both application surfaces. If necessary, use your finger to gently press tl caulk into a corner or crack.
MAINTENANCE
When servicing, use only identical replacement parts. Use of any other parts create a hazard or cause product damage.
To avoid serious personal injury, always remove the batteries from the product when cleaning or performing any maintenance.
Avoid using solvents when cleaning plastic parts. Most plastics are susceptible damage from various types of commercial solvents and may be damaged by use. Use clean clothes to remove dirt, dust, oil, grease, etc.
Do not at any time let brake fluids, gasoline, petroleum-based products, penetrating oils, etc., come in contact with plastic parts. Chemicals can damage weaken or destroy plastic which may result in serious personal injury.
Manufacturer: Shanghaimuxinmuyeyouxiangongsi
Address: Shuangchenglu 803nong11hao1602A-1609shi, baoshanqu, shanghai 200000 CN.
Imported to AUS: SIHAO PTY LTD. 1 ROKEVA STREETEASTWOOD NSW 2 Australia
Imported to USA: Sanven Technology Ltd. Suite 250, 9166 Anaheim Place, Rancho Cucamonga, CA 91730
| UK | REP |
YH CONSULTING LIMITED.
C/O YH Consulting Limited Office 147, Centre
House, London Road, Staines-upon-Thames,
Surrey, TW18 4AX
| EC | REP |
E-CrossStu GmbH
Mainzer Landstr.69,
60329 Frankfurt am Main.
VEVOR®
TOUGH TOOLS, HALF PRICE
Technical Support and E-Warranty Certificate www.vevor.com/support
VEVOR®
TOUGH TOOLS, HALF PRICE
natural_image
Technical line drawing of two spray gun components (no text or symbols)BESOIN D'AIDE? CONTACTEZ-NOUS!
- Tige de piston 2.
natural_image
Technical line drawing of a mechanical device with exploded view showing internal components (no text or symbols)2. POUR INSTALLER ET REMPLACER LE BARIL

natural_image
Technical line drawings of three cylindrical mechanical components with threaded ends (no text or symbols)
natural_image
Line drawing of a handheld electric gun with lever and base mount (no text or symbols)
natural_image
Line drawing of a handheld electric shaver with lever and base mount (no text or symbols)natural_image
Line drawing of a handheld spray gun with attached trigger and housing (no text or symbols)natural_image
Line drawing of a syringe with handle and base mount (no text or symbols)3. DÉMARRAGE/ARRÊT DU PISTOLET À CALFEUTRER

natural_image
Line drawings showing hands performing manual tasks on a device, with no text or symbols present.A/S YH Consulting Limited Bureau 147, Centurion
Maison, London Road, Staines-upon-Thames,
Surrey, TW18 4AX

E-CrossStu GmbH
Mainzer Landstr.69,
natural_image
Technical line drawing of two spray gun components (no text or symbols)natural_image
Technical line drawing of a mechanical device with exploded view showing internal components (no text or symbols)natural_image
Technical line drawings of three cylindrical mechanical components with threaded ends (no text or symbols)
natural_image
Line drawing of a handheld electric gun with lever and base mount (no text or symbols)
natural_image
Line drawing of a handheld electric shaver with lever and base mount (no text or symbols)natural_image
Line drawing of a handheld spray gun with attached trigger and housing (no text or symbols)natural_image
Line drawing of a syringe with handle and base mount (no text or symbols)3. STARTEN/STOPPEN DER DICHTPISTOLE

natural_image
Line drawings showing hands performing manual tasks on a device panel, with no text or symbols present.C/O YH Consulting Limited Office 147, Centurion
Haus, London Road, Staines-upon-Thames,
Surrey, TW18 4AX

natural_image
Technical line drawing of two different types of spray gun components (no text or symbols present)natural_image
Technical line drawing of a mechanical device with exploded view showing internal components (no text or symbols)2. PER INSTALLARE E SOSTITUIRE LA CANNA

natural_image
Technical line drawings of three cylindrical mechanical components with threaded ends (no text or symbols)
natural_image
Line drawing of a handheld electric shaver with lever and base mount (no text or symbols)
natural_image
Line drawing of a handheld electric shaver with lever and base mount (no text or symbols)natural_image
Line drawing of a handheld spray gun with attached trigger and base mount (no text or symbols)natural_image
Line drawing of a syringe with handle and base mount (no text or symbols)3. AVVIO/ARRESTO DELLA PISTOLA PER CALACATTATURE
natural_image
Line drawings showing hands performing manual tasks on a device panel, with no text or symbols present.Importato in AUS: SIHAO PTY LTD. 1 ROKEVA STREETEASTWOOD NSW 2122 Australia
Importato negli USA: Sanven Technology Ltd. Suite 250, 9166 Anaheim Place, Rancho Cucamonga, CA 91730

CONSULENZA YH LIMITATA.
C/O YH Consulting Limited Ufficio 147, Centurion
Casa, London Road, Staines-upon-Thames,
natural_image
Technical line drawing of two spray gun components (no text or symbols)natural_image
Technical line drawing of a mechanical device with exploded view showing internal components (no text or symbols)2. PARA INSTALAR Y REEMPLAZAR EL CAÑÓN

natural_image
Technical line drawings of three cylindrical mechanical components with threaded ends and internal features (no text or symbols)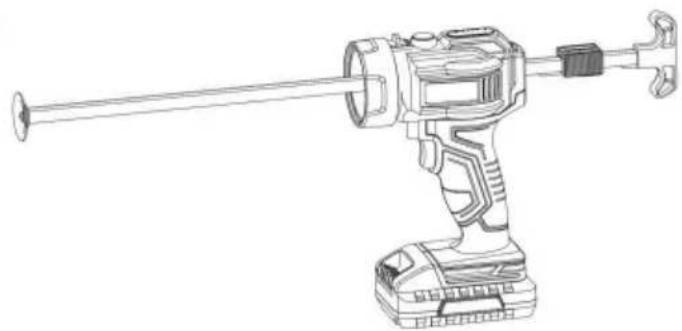
natural_image
Line drawing of a handheld electric shaver with lever and base mount (no text or symbols)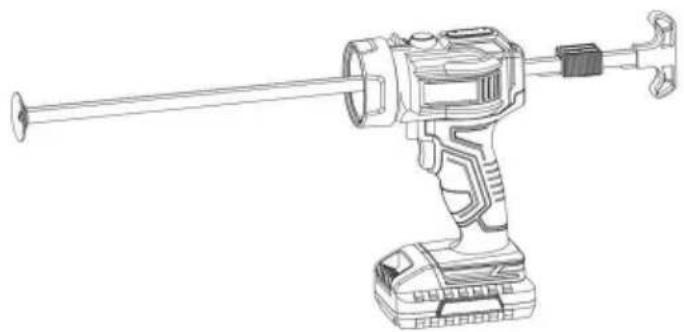
natural_image
Line drawing of a handheld electric shaver with lever and base mount (no text or symbols)natural_image
Line drawing of a handheld spray gun with attached trigger and housing (no text or symbols)natural_image
Line drawing of a syringe with handle and base mount (no text or symbols)3. PUESTA EN MARCHA/PARADA DE LA PISTOLA DE CALAFATEO

natural_image
Line drawings showing hands performing manual tasks on a device, including cutting and holding a tool (no text or symbols present)Casa, London Road, Staines-upon-Thames,
Surrey, TW18 4AX

E-CrossStu GmbH
natural_image
Technical line drawing of two different types of spray guns, one with a pointed tip and the other with a multi-stage nozzle (no text or symbols present)POTRZEBUJESZ POMOCY? SKONTAKTUJ SIĘ Z NAMI!
- Tłoczysko 2.
Uchwyt tłoczyska
natural_image
Technical line drawing of a mechanical device with exploded view showing internal components (no text or symbols)2. ABY ZAMONTOWAĆ I WYMIENIĆ LUFĘ
natural_image
Technical line drawings of three cylindrical mechanical components with threaded ends (no text or symbols)
natural_image
Line drawing of a handheld electric shaver with lever and base mount (no text or symbols)
natural_image
Line drawing of a handheld electric drill bit with lever and base mount (no text or symbols)natural_image
Line drawing of a handheld spray gun with attached trigger and housing (no text or symbols)natural_image
Line drawing of a syringe with handle and base mount (no text or symbols)natural_image
Line drawings showing hands performing manual tasks on a device, including cutting and holding a tool (no text or symbols present)C/O YH Consulting Limited Biuro 147, Centurion
Dom, London Road, Staines-upon-Thames,
Surrey, TW18 4AX
| Przedstawiciel UE |
E-CrossStu GmbH
Mainzer Landstr.69,
60329 Frankfurt nad Menem.
VEVOR®
TOUGH TOOLS, HALF PRICE
natural_image
Technical line drawing of two spray gun components (no text or symbols)HULP NODIG? NEEM CONTACT MET ONS OP!
BELANGRIJKE VEILIGHEIDSWAARSCHUWINGEN
FUNCTIONELE BESCHRIJVING
1. TOEPASSINGEN
- Zuigerstang 2.
Zuigerstanghendel
natural_image
Technical line drawing of a mechanical device with exploded view showing internal components (no text or symbols)2. HET INSTALLEREN EN VERVANGEN VAN DE LOOP

natural_image
Technical line drawings of three cylindrical mechanical components with threaded ends (no text or symbols)
natural_image
Line drawing of a handheld electric shaver with lever and base mount (no text or symbols)
natural_image
Line drawing of a handheld electric shaver with lever and base mount (no text or symbols)natural_image
Line drawing of a handheld spray gun with attached trigger and housing (no text or symbols)natural_image
Line drawing of a syringe with handle and base mount (no text or symbols)3. HET KITPISTOOL STARTEN/STOPPEN

natural_image
Line drawings showing hands performing manual tasks on a device, including cutting and holding a tool (no text or symbols present)C/O YH Consulting Limited Kantoor 147, Centurion
Huis, London Road, Staines-upon-Thames,
Surrey, TW18 4AX

E-CrossStu GmbH
Mainzer Landstr.69,
natural_image
Technical line drawing of two spray gun components (no text or symbols)BEHÖVER HJÄLP? KONTAKTA OSS!
2. PRODUKTINFORMATION
natural_image
Technical line drawing of a mechanical device with exploded view showing internal components (no text or symbols)2. ATT INSTALLERA OCH BYTA UT TUNNAN

natural_image
Technical line drawings of three cylindrical mechanical components with threaded ends (no text or symbols)
natural_image
Line drawing of a handheld electric shaver with lever and base mount (no text or symbols)
natural_image
Line drawing of a handheld electric shaver with lever and base mount (no text or symbols)natural_image
Line drawing of a handheld spray gun with attached trigger and base mount (no text or symbols)natural_image
Line drawing of a syringe with handle and base mount (no text or symbols)3. STARTA/STOPPA FÄTNINGSPISTOLEN

natural_image
Line drawings showing hands using a tool to adjust or install a component, with no text or symbols present.C/O YH Consulting Limited Office 147, Centurion
House, London Road, Staines-upon-Thames,
Surrey, TW18 4AX
| EC | REP |
E-CrossStu GmbH
Mainzer Landstr.69,
60329 Frankfurt am Main.
VEVOR®
TOUGH TOOLS, HALF PRICE