S1P-HJ2501-H - Sander Vevor - Free user manual and instructions
Find the device manual for free S1P-HJ2501-H Vevor in PDF.

| Brand | Vevor |
| Model | S1P-HJ2501-H |
| Product type | Belt sander |
| Power supply voltage | AC120V 60Hz (North America) / AC230-240V 50Hz (EU/Australia) |
| Motor power | 1000-1300 W |
| Motor speed | 1100-3200 RPM |
| Speed adjustment | Adjustment knob, 6 positions |
| Abrasive belt included | 100 belts (grits 60, 80, 180, 400, 800) |
| Accessories included | Extra handle, hex key, wrench, spare carbon brushes |
| Starting | Sliding switch with continuous operation function |
| Protection class | II (double insulation) |
| Certifications | CE, UKCA |
| Cleaning | Blow compressed air through ventilation slots |
| Safety | Safety goggles, ear protection, dust mask, gloves recommended |
| Recommended use | Sanding wood, metal, pipes |
| Warranty | Electronic warranty certificate available at www.vvor.com/support |
Frequently Asked Questions - S1P-HJ2501-H Vevor
User questions about S1P-HJ2501-H Vevor
0 question about this device. Answer the ones you know or ask your own.
Ask a new question about this device
Download the instructions for your Sander in PDF format for free! Find your manual S1P-HJ2501-H - Vevor and take your electronic device back in hand. On this page are published all the documents necessary for the use of your device. S1P-HJ2501-H by Vevor.
USER MANUAL S1P-HJ2501-H Vevor
Technical Support and E-Warranty Certificate www. vvor. com/support
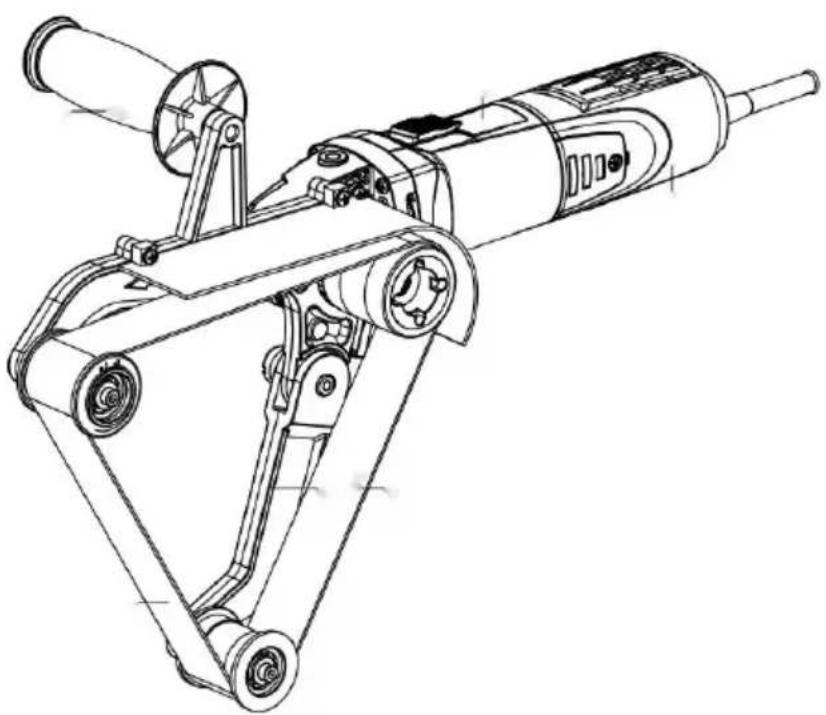
BELT SANDER
MODEL: S1P-HJ2501-H
We continue to be committed to provide you tools with competitive price. "Save Half", "Half Price" or any other similar expressions used by us only represent the estimate of savings you might benefit from buying certain tools with us compared to top brands and does not necessarily mean to cover all categories of tools offered. Are kindly reminded to verify carefully when you are placing an order with us actually saving half in comparison with the top major brands.
MODEL: S1P-HJ2501-H
NEED HELP? CONTACT US!
Have product questions? Need technical support? Please feel fr contact us:
Technical Support and E-Warranty Certificate www. vvor. com/support
This is the original instruction, please read all manual instruction carefully before operating. VEVOR reserves a clear interpretation user manual. The appearance of the product shall be subject to product you received. Please forgive us that we won't inform y if there are any technology or software updates on our product
| Warning-To reduce the risk of injury, user must read instruct manual carefully. | |
| Always wear ANSI approved safety goggles when working with and equipment.Wear eye protection.Wear ear protection.Wear dust masks.Wear protective gloves. | |
| CEUKCA | Compliance is a EC & UK security certification. |
| This product is of protection class II. That means it is equipped enhanced or double insulation. | |
| CORRECT DISPOSALThis product is subject to the provision of European Directive 2012/19/EC. The symbol showing a wheelie bin crossed throb indicates that the product requires separate refuse collection European Union. This applies to the product and all accessmarked with this symbol. Products marked as such may not be discarded with normal domestic waste, but must be taken to collection point for recycling electrical and electronic devices | |
IMPORTANT SAFEGUARDS
WARNING: Read all safety warnings, instructions, illustrations and specifications provided with this power tool. Failure to follow all instructions listed below may result in electric shock, fire and/or serious injury. Save all warnings and instructions for future reference. The term "power tool" the safety instructions refers to your belt sander
Work area safety
a) Keep work area clean and well lit. Cluttered or dark areas invite accidents.
b) Do not operate power tools in explosive atmospheres, such as in the presence of flammable liquids, gases or dust. Power tools create sparks which may ignite the dust or fumes.
c) Keep children and bystanders away while operating a power tool. Distractic can cause you to lose control.
Electrical safety
a) Power tool plugs must match the outlet. Never modify the plug in any way, not use any adapter plugs with earthed (grounded) power tools. Unmodified parts and matching outlets will reduce risk of electric shock.
b) Avoid body contact with earthed or grounded surfaces, such as pipes, rad ranges and refrigerators. There is an increased risk of electric shock if your earthed or grounded.
c) Do not expose power tools to rain or wet conditions. Water entering a pot will increase the risk of electric shock.
d) Do not abuse the cord. Never use the cord for carrying, pulling or unplug the power tool. Keep cord away from heat, oil, sharp edges or moving parts. Damaged or entangled cords increase the risk of electric shock.
e) When operating a power tool outdoors, use an extension cord suitable for outdoor use. Use of a cord suitable for outdoor use reduces the risk of elec shock.
f) If operating a power tool in a damp location is unavoidable, use a residual current device (RCD) protected supply. Use of an RCD reduces the risk of e-shock.
Personal safety
a) Stay alert, watch what you are doing and use common sense when operating a power tool. Do not use a power tool while you are tired or under the influence of drugs, alcohol or medication. A moment of inattention while operating power tools may result in serious personal injury.
b)Use personal protective equipment. Always wear eye protection. Protectiveequipment such as a dust mask, non-skid safety shoes, hard hat or hearing
protection used for appropriate conditions will reduce personal injuries.
c) Prevent unintentional starting. Ensure the switch is in the off-position before connecting to power source and/or battery pack, picking up or carrying the tc Carrying power tools with your finger on the switch or energising power tools have the switch on invites accidents.
d) Remove any adjusting key or wrench before turning the power tool on. A or a key left attached to a rotating part of the power tool may result in pe injury.
e) Do not overreach. Keep proper footing and balance at all times. This enabetter control of the power tool in unexpected situations.
f) Dress properly. Do not wear loose clothing or jewellery. Keep your hair and clothing away from moving parts. Loose clothes, jewellery or long hair can be caught in moving parts.
g) If devices are provided for the connection of dust extraction and collection facilities, ensure these are connected and properly used. Use of dust collection can reduce dust-related hazards.
h) Do not let familiarity gained from frequent use of tools allow you to become complacent and ignore tool safety principles. A careless action can cause sev injury within a fraction of a second.
Power tool use and care
a) Do not force the power tool. Use the correct power tool for your application. Correct power tool will do the job better and safer at the rate for which it is designed.
b) Do not use the power tool if the switch does not turn it on and off. An that cannot be controlled with the switch is dangerous and must be repaired.
c) Disconnect the plug from the power source and/or remove the battery pack detachable, from the power tool before making any adjustments, changing accessories, or storing power tools. Such preventive safety measures reduce the risk of starting the power tool accidentally.
d) Store idle power tools out of the reach of children and do not allow personal unfamiliar with the power tool or these instructions to operate the power tool. Power tools are dangerous in the hands of untrained users.
e) Maintain power tools and accessories. Check for misalignment or binding c
moving parts, breakage of parts and any other condition that may affect the tools operation. If damaged, have the power tool repaired before use. Many accidents are caused by poorly maintained power tools.
f) Keep cutting tools sharp and clean. Properly maintained cutting tools with a cutting edges are less likely to bind and are easier to control.
g) Use the power tool, accessories and tool bits etc. in accordance with these instructions, taking into account the working conditions and the work to be performed. Use of the power tool for operations different from those intended result in a hazardous situation.
h) Keep handles and grasping surfaces dry, clean and free from oil and gre. Slippery handles and grasping surfaces do not allow for safe handling and co of the tool in unexpected situations.
Service
a) Have your power tool serviced by a qualified repair person using only ide replacement parts. This will ensure that the safety of the power tool is main
Special Safety Instructions
Hold power tool by insulated gripping surfaces.because the belt may contact i own cord.Cutting a "live" wire may make exposed metal parts of the tool "liv could give the operator an electric shock.
Flying sparks are created when sanding metal. Ensure that no persons are in danger. Due to the risk of fire, all combustible materials must be removed from work area (area affected by flying sparks).
During machining, of metals in particular, conductive dust can form deposits in the machine. This can lead to the transfer of electrical energy onto the maching housing. This can mean atemporary danger of electric shocks. This is why it is necessary when the machine is running to blow compressed air through the ventilation slots of the machine regularly, frequently and thoroughly. Here, the machine must be held firmly
Dust from material such as paint containing lead, some wood species,minerals and metal may be harmful! Contact with or inhalation of the dust may cause
allergic reactions and/or respiratory diseases to the operator or bystanders. Certain kinds of dust are classified as carcinogenic such as oak and beech especially in conjunction with additives for wood conditioning (chromate, wood preservative). Material containing asbestos must only be treated by specialists.
Where the use of a dust extraction device is possible it shall be used.
The work place must be well ventilated.
The use of a dust mask of filter class P2 is recommended.
Follow national requirements for the materials you want to work with.
Materials that generate dusts or vapours that may be harmful to health must processed.
Wear ear protectors. Exposure to noise can cause hearingoss.
Wear protective gloves.

Always wear protective goggles.
Secure the workpiece against slipping, e.g. with the help of clamping devices. Always guide the machine with both hands on the handles provided. Loss of control can cause personal injury.
Never place your hand near rotating parts of the device or near the rotating sanding belt.
Remove sanding dust and similar material only when the machine is not in operation.
Pull the plug out of the plug socket before any adjustments.
conversions or servicing are performed.
The rated speed of the sanding belt must be at least equato the belt speed marked on the power tool. Asanding belt running faster than its rated speed break and fly apart.
Check prior to each use that the sanding belt is correctly attached and is completely on the rollers.Carry out a trial run: Allow the machine to run at idlingspeed for 30 seconds in a safe location. Stop immediately if significant vibrations occur or if other defects are notedif such a situation occurs, check machine to determinethe cause.
SAVE THESE INSTRUCTIONS
PRODUCT PARAMETERS
| MODEL | Voltage | Motor Power | Motor Speed |
| S1P-HJ2501-H | North America: AC120V 60Hz | 1000W | 1100-3200/rpm |
| EuropeanUnion: AC230-240V 50Hz | 1300W | ||
| Australia: AC230-240V 50Hz |
Sanding belt Optional Equipment
A. 100PCS Sanding Belts
20 x Zirconia Corundum Belts, 60 Grit
20 x Zirconia Corundum Belts, 80 Grit
20 x Brown Corundum Belts, 180 Grit
20 x Brown Corundum Belts, 400 Grit
20 x Brown Corundum Belts, 800 Grit
B. 50PCS Sanding Belts
10 x Zirconia Corundum Belts, 60 Grit
10 x Zirconia Corundum Belts, 80 Grit
10 x Brown Corundum Belts, 180 Grit
10 x Brown Corundum Belts, 400 Grit
10 x Brown Corundum Belts, 800 Grit
C. 3PCS Sanding Belts
1 x Brown Corundum Belts, 80 Grit
1 x Brown Corundum Belts, 100 Grit
1 x Brown Corundum Belts, 120 Grit
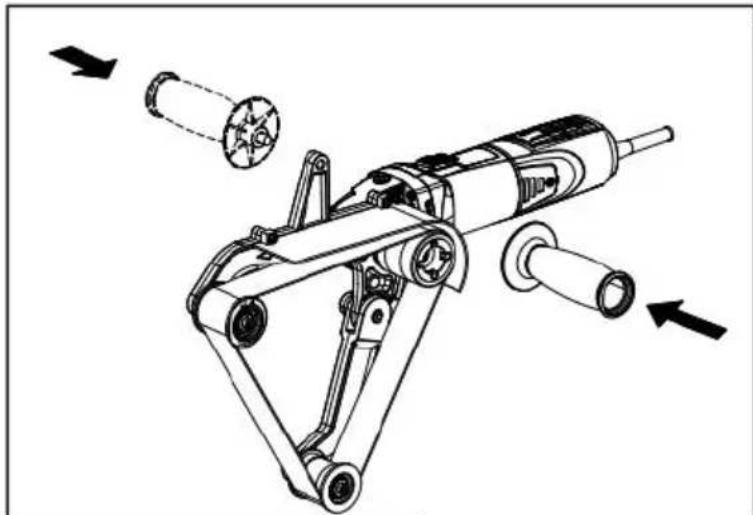
standard configuration 1 x Handle 1 x Hex Wrench
2 x Carbon Brushes 1 x Drive Wheel
1 x 115mm Hole Spanner 2 x Guide Wheel End Plates
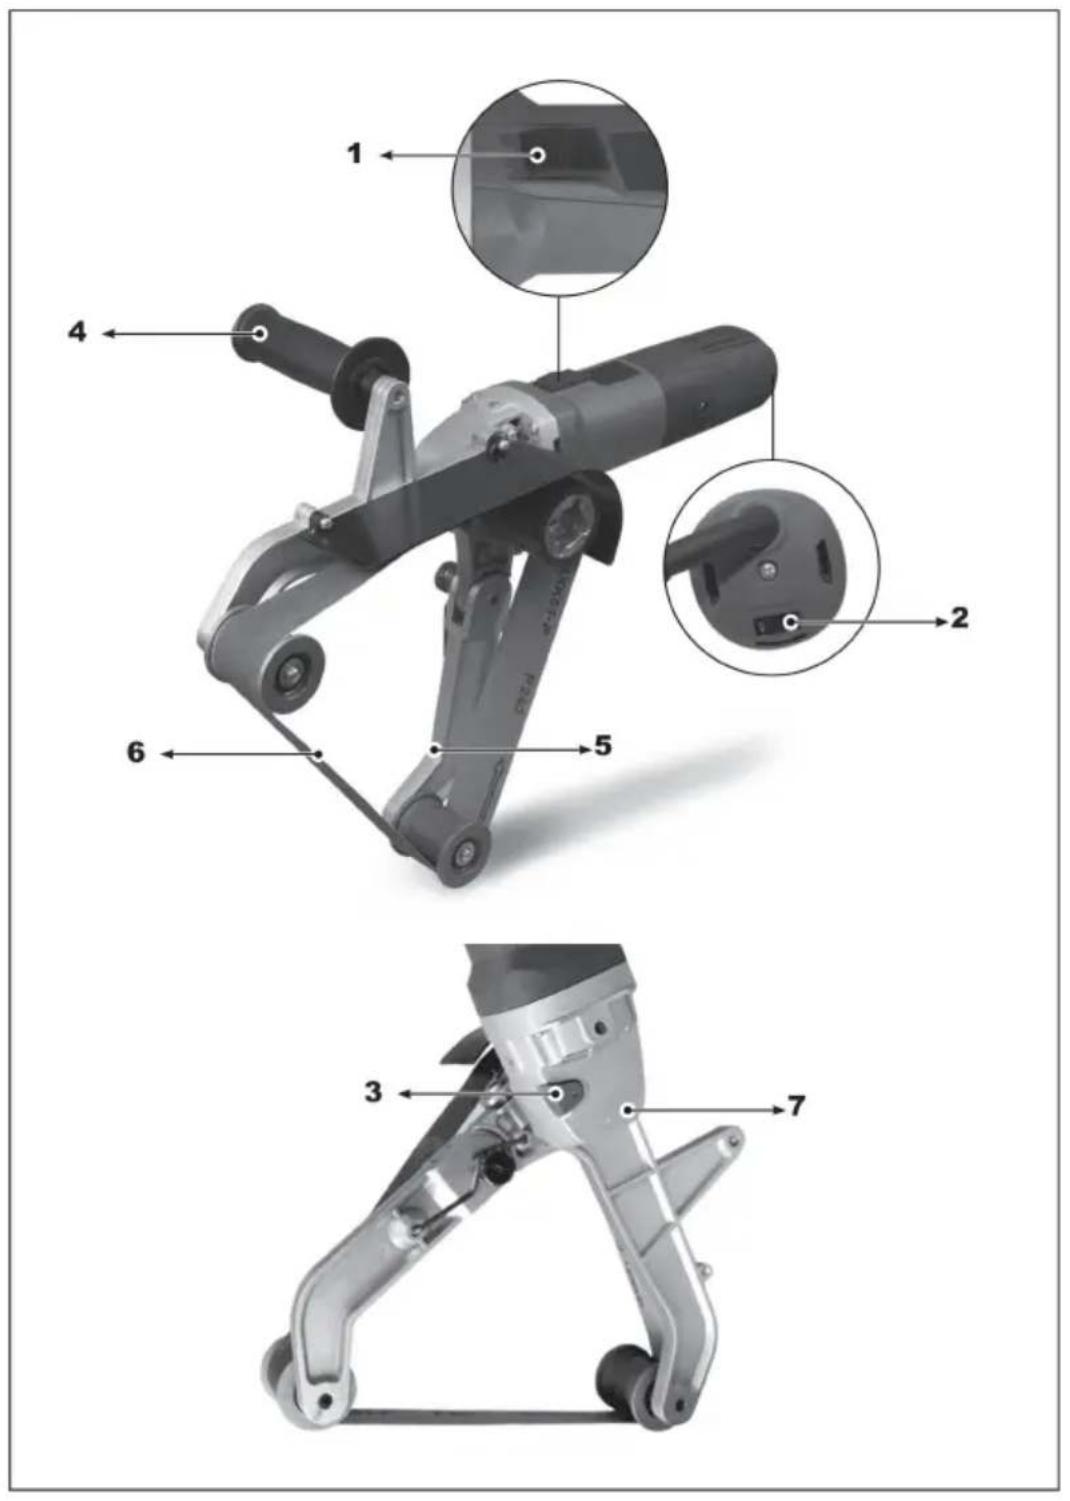
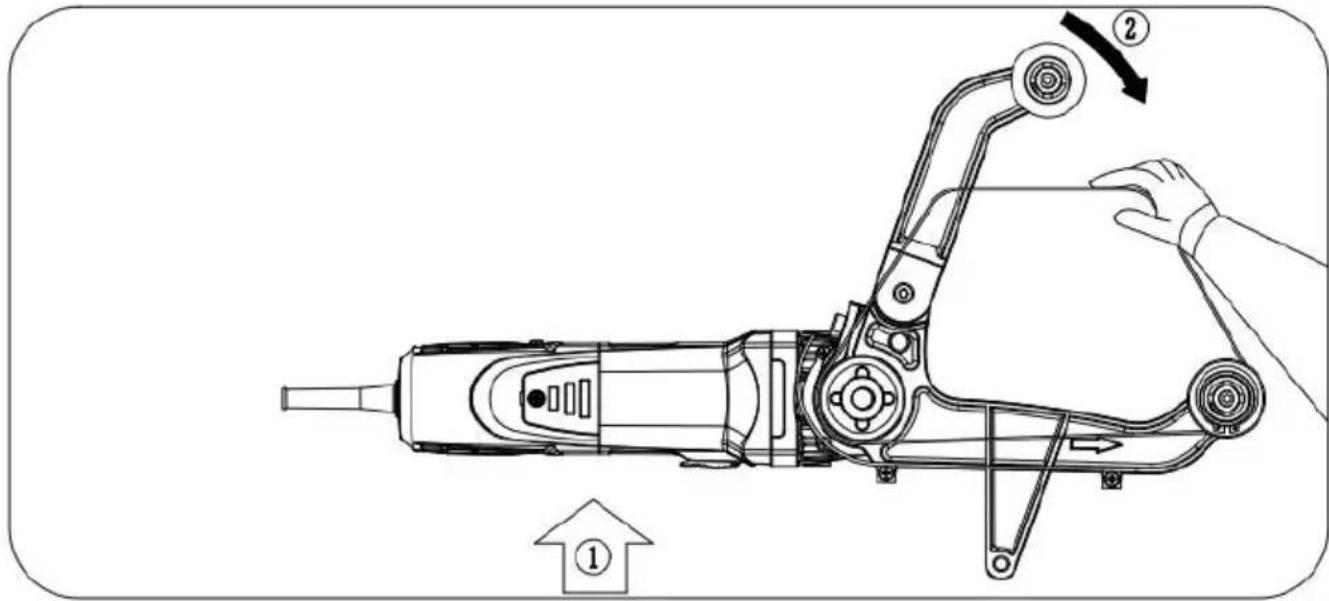
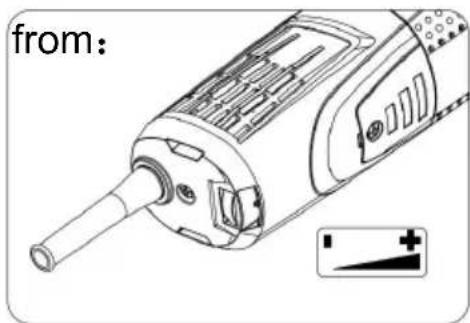
1 Switch ON /OFF
2 Adjusting wheel for setting belt speed
3 Spindle lock.
4 Additional handle
5 Tensioner arm for replacing the sanding belt.
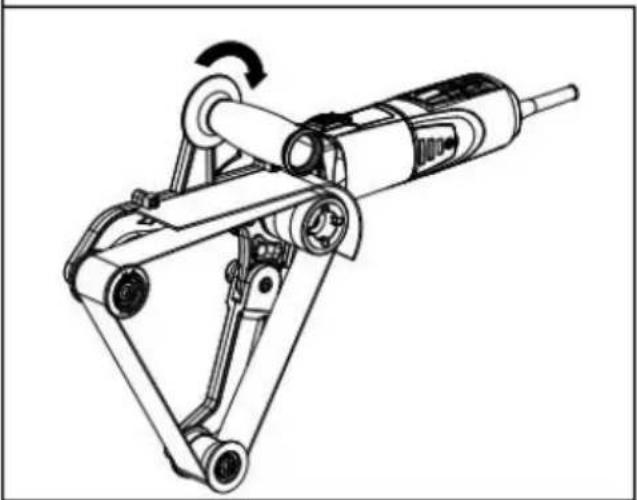
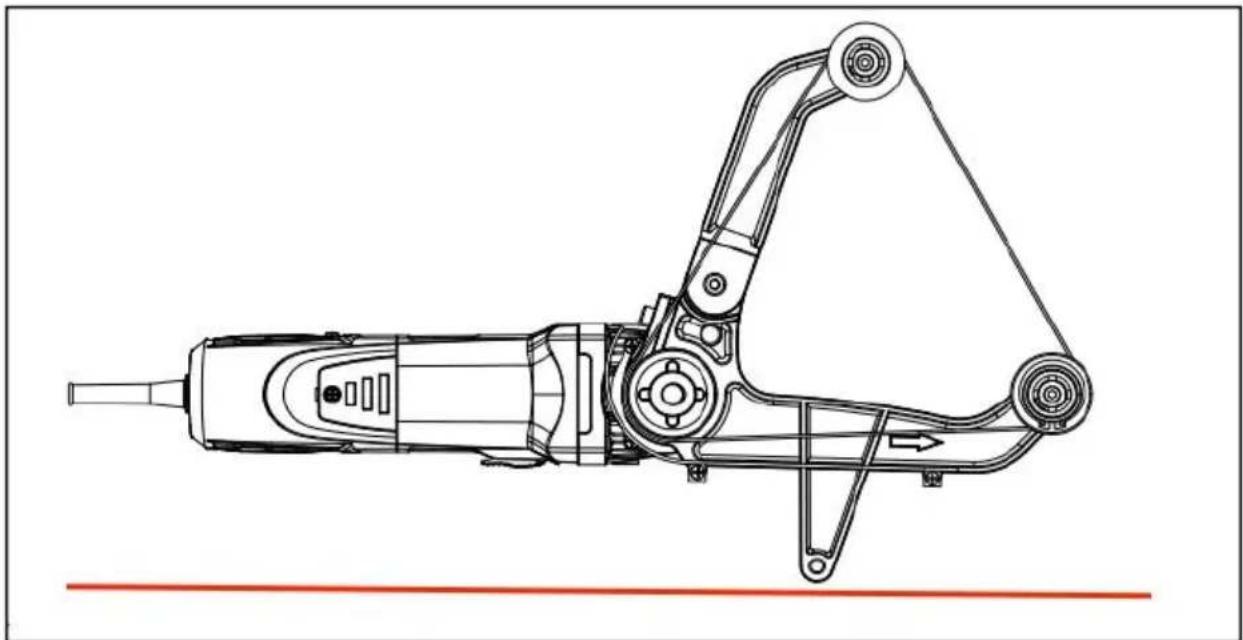
6 Sanding belt.
7 Arrow (direction of rotation of drive shaft)
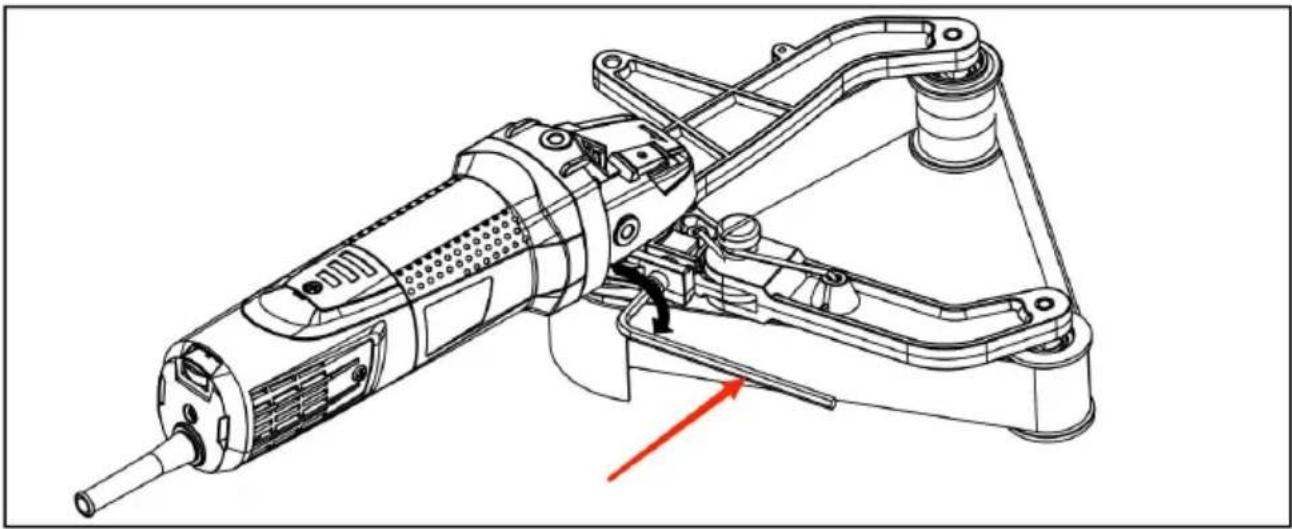
- Put the Pipe Sanding Adapter on the host machine.
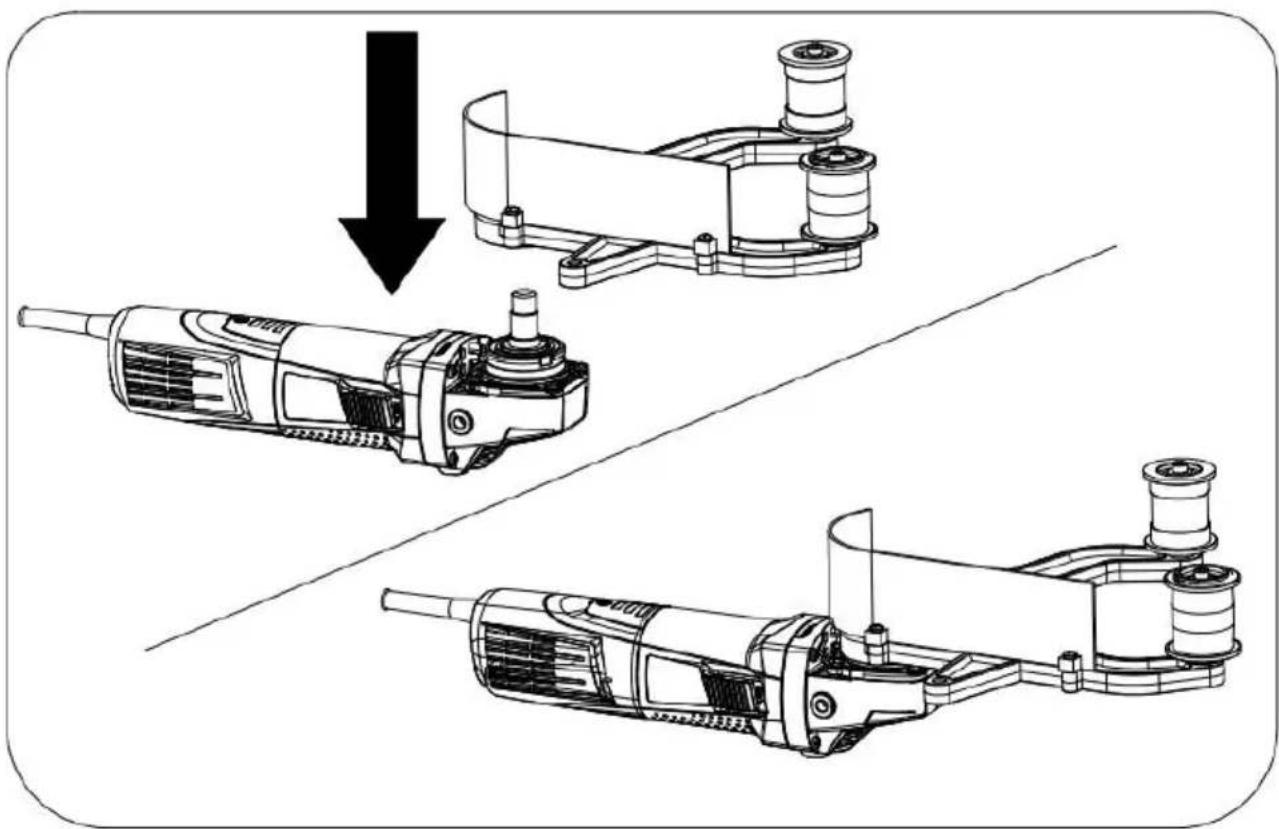
2.Secure with the drive wheel and twist with the hole wrench
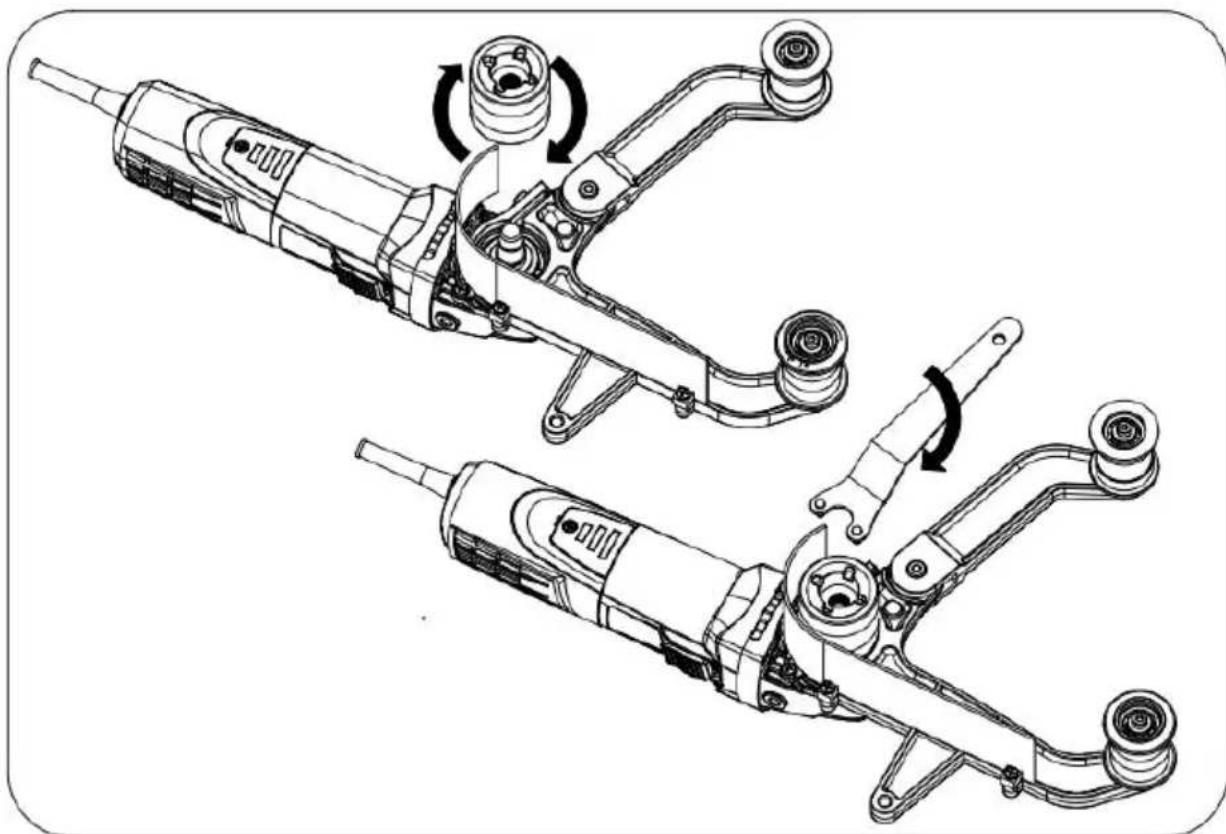
3.Install the sand belt in this step as shown in the figure
4.Fix with Hex Wrench
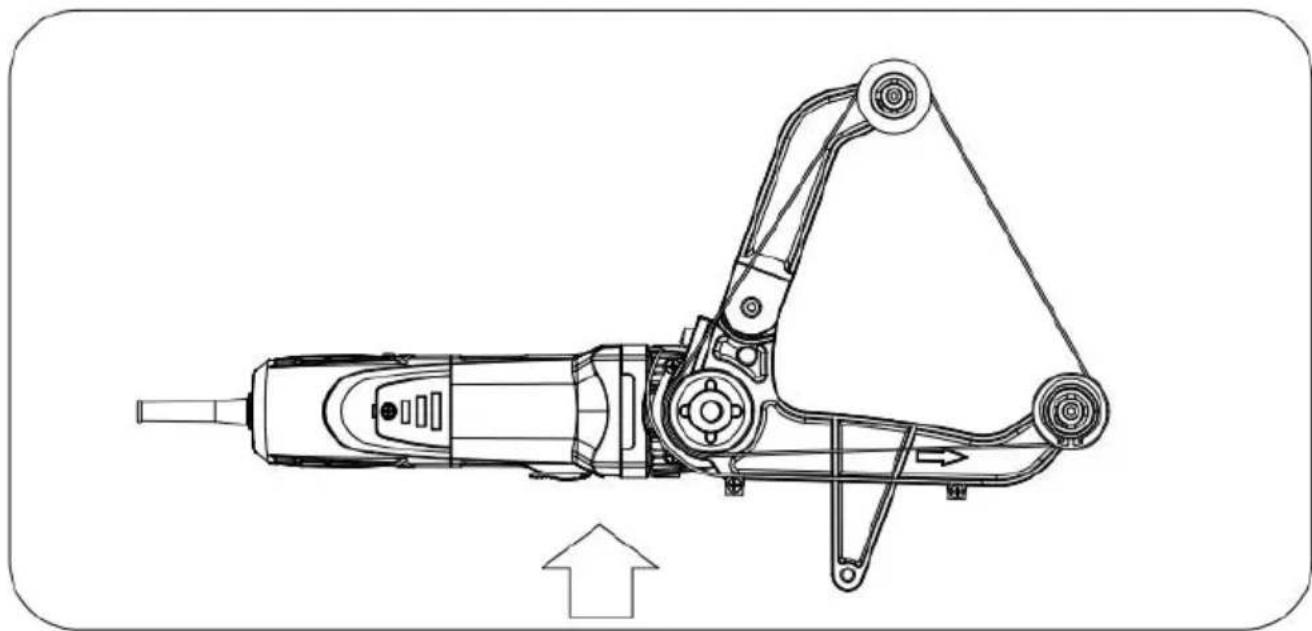
- Install the handle as shown (according to the user's habits).
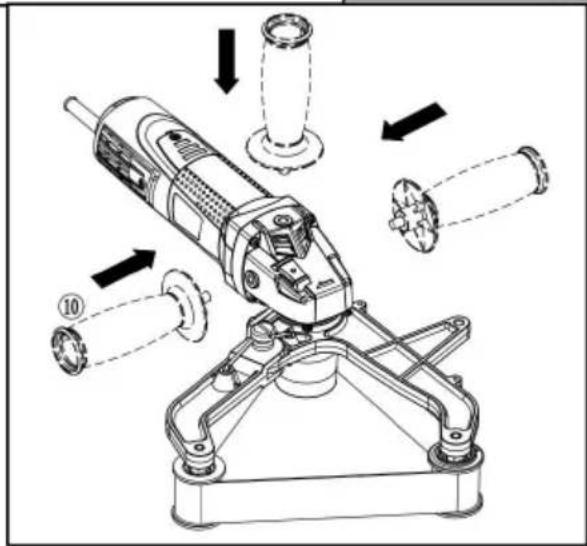
- Try to assemble Pipe Sanding Adapter parallel to the host.
Commissioning
Before plugging in, check that the rated mains voltage and mains frequency, as stated on the rating label, match with your power supp Attaching the additional handle. Always work with the additional handle attached (4)! Secure the additional handle by screwing it tightly to the or right.
USE
Always guide the machine with both hands.
The machine must not be allowed to draw in additional dust and sha When switching the machine on and off, keep it away from dust dep After switching off the machine, only place it down when the motor h come to a standstill.
In continuous operation, the machine continues running if it is forced o your hands.Therefore, always hold the machine using the handles provided, stand in a safe position and concentrate.
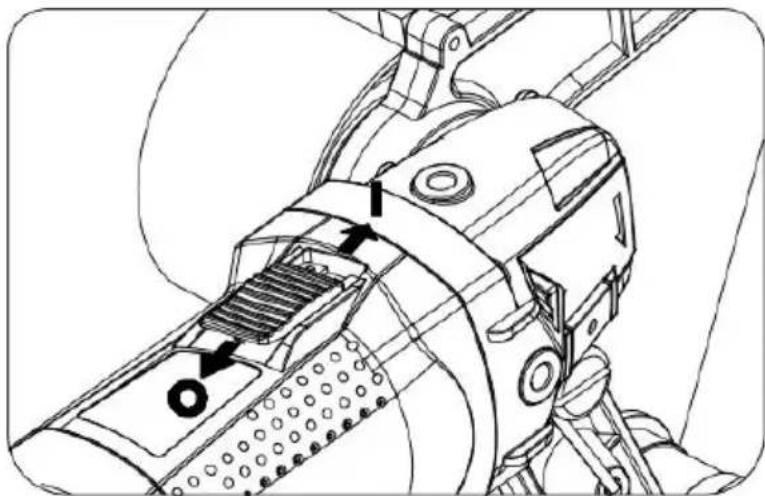
Switching on/Continuous activation: Push sliding switch (1) forward.
For continuous activation, now tilt downwards until it engages.
Switching off: Press the rear end of the slide switch (1) and release.
Setting belt speed
The belt speed can be preset via the setting wheel (2) and is infinit variable.
There are 1-6 gear speeds to choose from:
Sanding belt replacement
Release the tensioner arm (5) and remove the sanding belt (6).
Place the new sanding belt on the rollers such that its direction of circulation (arrows on the inside of the sanding belt) matches the arrow on the gearbox. Release the tensioner arm (5). Ensure that the sanding is completely on therollers.
Sanding procedure
Place the machine on the material such that the sanding belt is para the surface of the workpiece.
When working, please ensure that the machine is operated at right a to the pipe so that the belt does not fall off the rollers.
Using the additional handle, the belt can be pressed against the pipe at same time placed around it. The angle of contact and the cutting may be changed by the contact pressure
Keep the machine in constant motion because otherwise recesses cou be produced in the material.
CLEAN AND MAINTENANCE
Motor cleaning: blow compressed air through the rearventilation slots of the machine regularly, frequently and thoroughly. Here, the machine may be held firmly.
Address: Baoshanqu Shuangchenglu 803long 11hao 1602A-1609shi Shanghai
Imported to USA: Sanven Technology Ltd. Suite 250, 9166 Anaheim Place, Rancho Cucamonga, CA 91730
Imported to AUS: SIHAO PTY LTD. 1 ROKEVA STREETEASTWOOD NSW 2122 Australia

Pooledas Group Ltd
Unit 5 Albert Edward House, The Pavilion
Preston, United Kingdom

SHUNSHUN GmbH
Romeracker 9 Z2021, 76351
Technical Support and E-Warranty Certificate www. vvor. com/support
VEVOR®
TOUGH TOOLS, HALF PRICE
Assistance technique et certificat de garantie electronique www. vevor. com/support
PONCEUSE À BANDE
MODELE: S1P-HJ2501-H
Always wear protective goggles.
Always wear protective goggles.
Sanven Technology Ltd. Suite 250, 9166 Anaheim Place, Rancho Cucamonga, CA
Always wear protective goggles.
in corindone marrone, grana 80 1 nastro in
corindone marrone, grana 100 1 nastro in
Anaheim Place, Rancho Cucamonga, CA
91730 Importato nell'AUS: SIHAO PTY LTD. 1 ROKEVA STREETEASTWOOD NSW 2122 Australia

Gruppo Pooledas Ltd
Always wear protective goggles.
Place, Rancho Cucamonga, CA 91730
Importado a AUS: SIHAO PTY LTD. 1 ROKEVA STREET ASTWOOD NSW 2122 Australia

Grupo Pooledas Ltd
Always wear protective goggles.
HULP NODIG? NEEM CONTACT MET ONS OP!