JUMCC06B - Pets Vevor - Free user manual and instructions
Find the device manual for free JUMCC06B Vevor in PDF.

| Product Type | Automatic Chicken Coop Door Opener |
| Brand | Vevor |
| Model | JUMCC06B |
| Frame Dimensions | Width: 8.3 inches (21 cm), Height: 10.24 inches (26 cm) |
| Main Power Supply | AC 100-240V to 5V DC power adapter (included) |
| Alternative Power | 9V 10W solar panel (not included) with charge controller |
| Backup Battery | 4 AA 1.5V batteries or 4 Ni-MH 1.2V rechargeable batteries (not included) |
| Sensors | Adjustable ambient light sensor (0-23), Anti-pinch infrared sensor |
| Remote Control | Wireless, range not specified, uses A27 12V battery (not included) |
| Operating Modes | Timer (open/close time), Light sensor, Mixed, Manual |
| Display | Digital (24-hour format) with SET, UP, DOWN, TEST, LEARN buttons |
| Material | Not specified, estimated: ABS plastic and stainless steel |
| Weight | Approximately 1.5 kg (estimated) |
| Installation | Wall mounting with screws, requires an opening of 8.3 x 10.24 inches |
| Safety | Infrared detection prevents closing if obstacle, emergency stop |
| Standards | Compliant with FCC Part 15, WEEE Directive 2012/19/EU |
| Warranty | Electronic warranty certificate available at www.vevor.com/support |
| Included Accessories | Power adapter, door frame, screws, remote control, screwdriver |
Frequently Asked Questions - JUMCC06B Vevor
User questions about JUMCC06B Vevor
0 question about this device. Answer the ones you know or ask your own.
Ask a new question about this device
Download the instructions for your Pets in PDF format for free! Find your manual JUMCC06B - Vevor and take your electronic device back in hand. On this page are published all the documents necessary for the use of your device. JUMCC06B by Vevor.
USER MANUAL JUMCC06B Vevor
Technical Support and E-Warranty Certificate www.vevor.com/support
CHICKEN COOP DOOR OPENER
MODEL:JUMCC06B
We continue to be committed to provide you tools with competitive price. "Save Half", "Half Price" or any other similar expressions used by us only represer estimate of savings you might benefit from buying certain tools with us compared to top brands and does not necessarily mean to cover all categories of tools offered by are kindly reminded to verify carefully when you are placing an order with us if yo actually saving half in comparison with the top major brands.
MODEL:JUMCC06B
NEED HELP? CONTACT US!
Have product questions? Need technical support? Please feel free contact us:
Technical Support and E-Warranty Certificate www.vevor.com/support
This is the original instruction, please read all manual instructions carefully before operating. VEVOR reserves a clear interpretation of user manual. The appearance of the product shall be subject to the product you received. Please forgive us that we won't inform you there are any technology or software updates on our product.
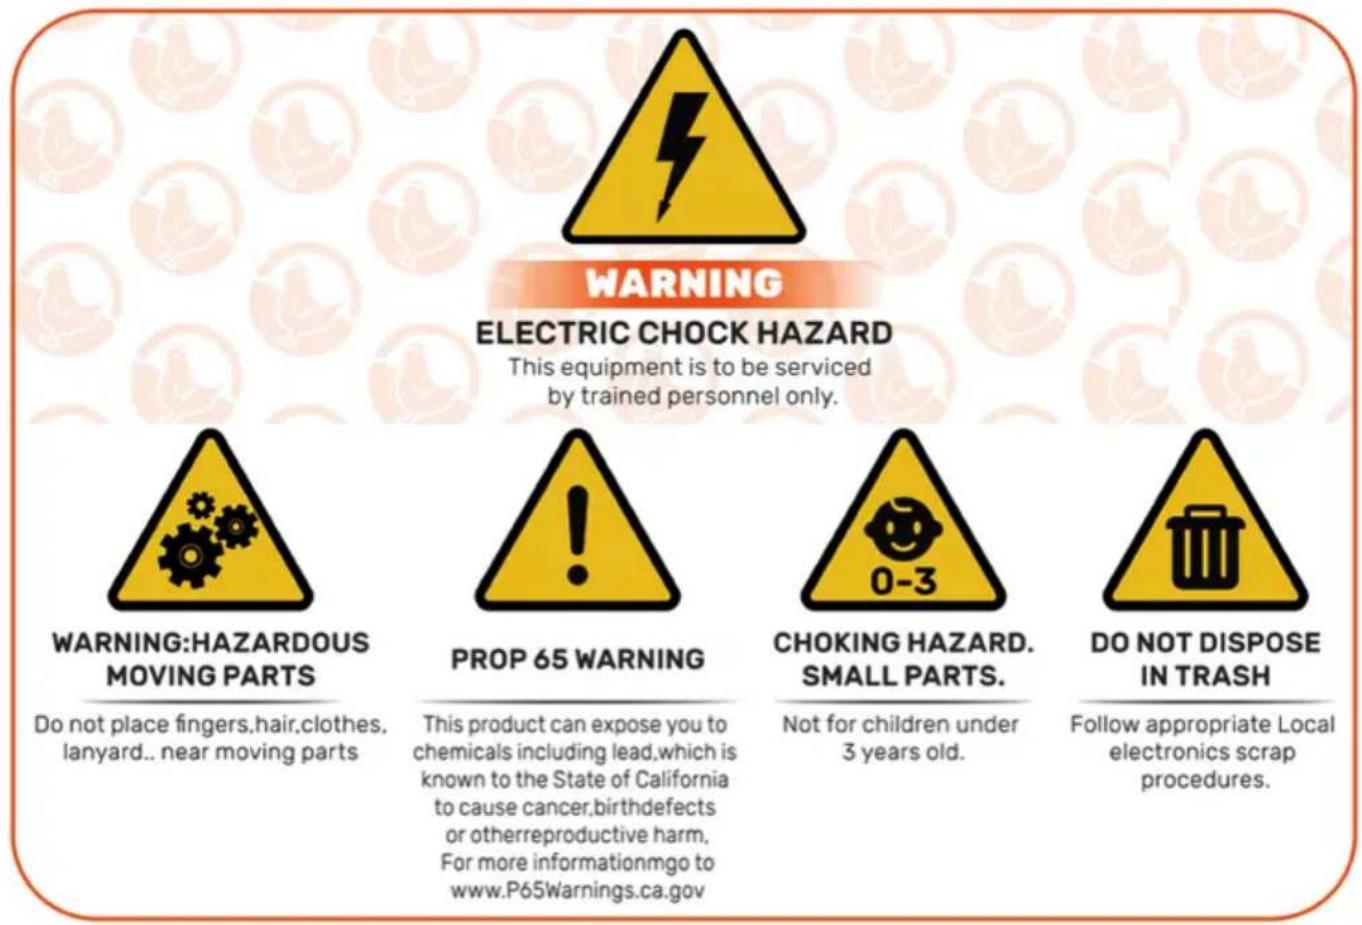
IMPORTANT SAFEGUARDS

Read all safety warnings, instructions, illustrations and specifications provided with this electrical appliances. Failure to follow all instructions listed below may result in electric shock, fire and/or serious injury
Warnings & Cautions
- To reduce risk of electric shock, do not disassemble this product. - Use the AC/DC Power Adapter and cable provided with the unit. The use other cablescan result in shock, fire or cause damage to the unit.
- If the supply core/DC Power Adapter is damaged, it must be replaced by the manufacturer, its service agent or similarly qualified persons in order to a hazard.
- Ensure the unit is connected to the power source properly.
- » Do not use the unit if power cord is damaged or if the plug socket contains loose. Only use the AC/DC Power Adapter with a 100-240V AC power source.
- Run power supply to a protected area or build power supply housing in order to protect the power plug in from weather.(Run cord through hole in chicken coop and plug in on the interior of the coop)
- 》This appliance can be used by children aged from 8 years and above an persons with reduced physical, sensory or mental capabilities or lack of experience and knowledge if they have been given supervision or instruction concerning use of the appliance in a safe way and understand the hazards involved. Children shall not play with the appliance. Cleaning and user maintenance shall not be made by children without supervision.
SAVE THESE INSTRUCTIONS
FCC Information
CAUTION: Changes or modifications not expressly approved by the party responsible for compliance could void the user's authority to operate the equipment!
This device complies with Part 15 of the FCC Rules. Operation is subject to the following two conditions:
1) This product may cause harmful interference.
2) This product must accept any interference received, including interference that may cause undesired operation.
WARNING: Changes or modifications to this product not expressly approved by the party.responsible for compliance could void the user's authority to operate the product.
Note: This product has been tested and found to comply with the limits a Class B digitaldevice pursuant to Part 15 of the FCC Rules, These lim
are designed to provide reasonable protection against harmful interference in a residential installation.
This product generates, uses and can radiate radio frequency energy, and if not installed and used in accordance with the instructions, may cause harmful interference to radiocommunications. However, there is no guarantee that interference will not occur in a particular installation. If this product does cause harmful interference to radio or television reception, which can be determined by turning the product off and on, the user is encouraged to try to correct the interference by one or more of the following measures.
- Reorient or relocate the receiving antenna.
- Increase the distance between the product and receiver.
- Connect the product to an outlet on a circuit different from that to which the receiver isconnected.
- Consult the dealer or an experienced radio/TV technician for assistance
Product Introduction
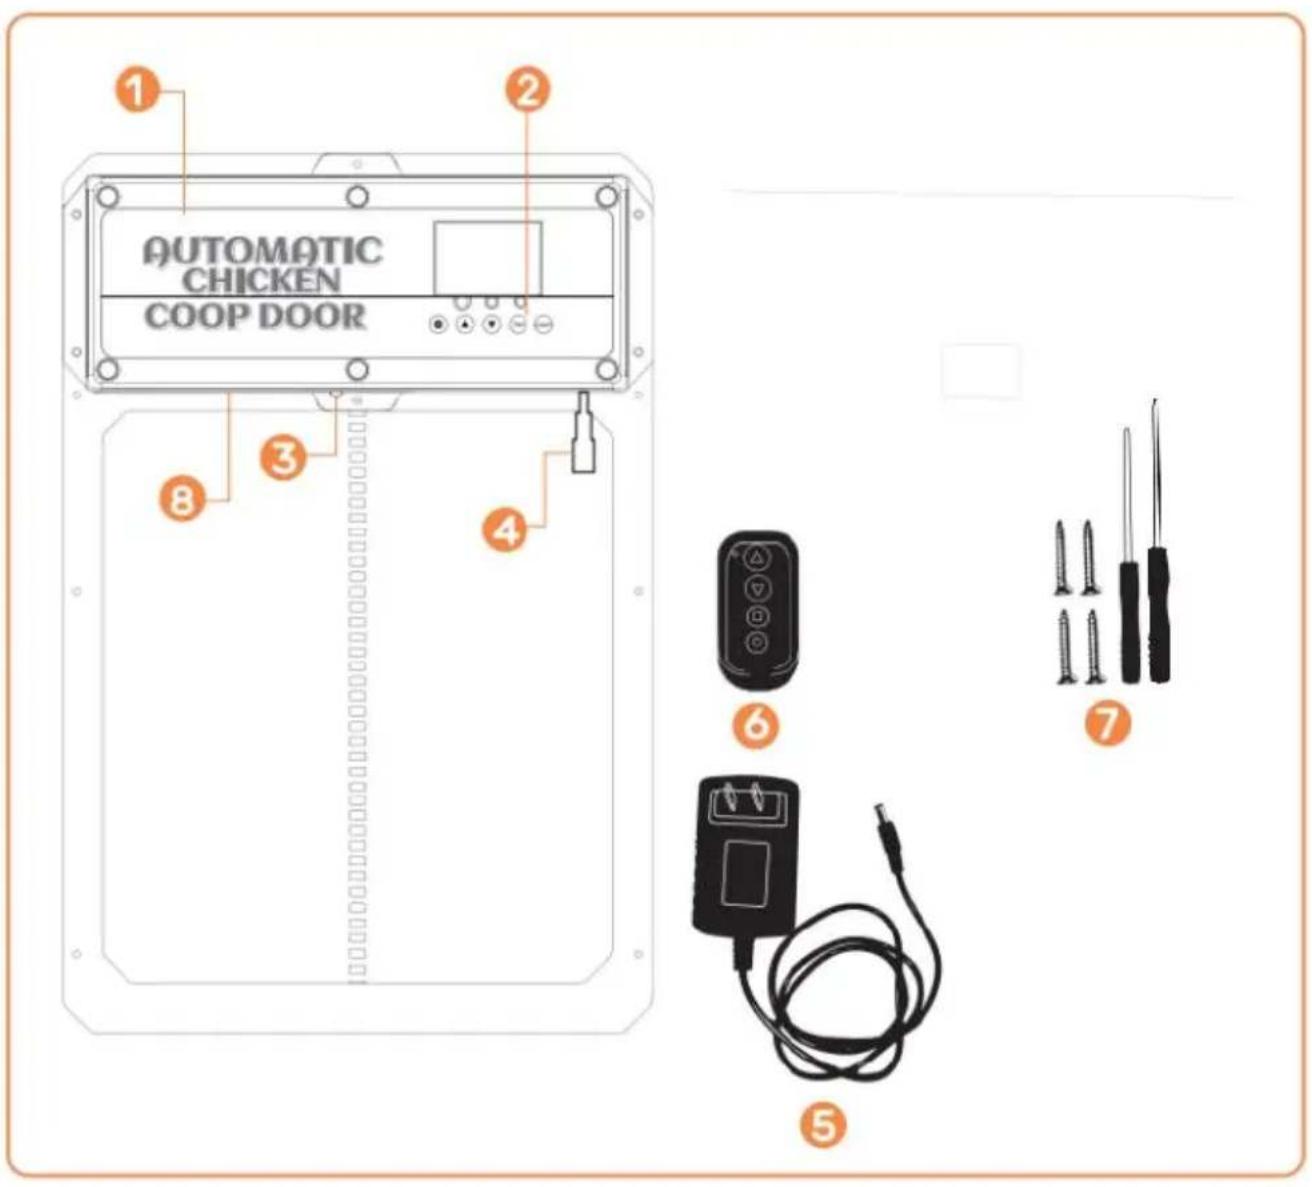
① Chicken Coop Door
② Control Panel
③ Infrared sensor
④ DC/Solar Female Plug
⑤ AC/DC Power Adapter with Cord and DC Male Plug
⑥ Wireless Remote Control (Batteries Not Included, LOAD A27 BATTERIES)
⑦ Self-tapping screws and screwdriver
⑧ Internal Battery Pack (BACKUP POWER SUPPLY)
Installation Introduction
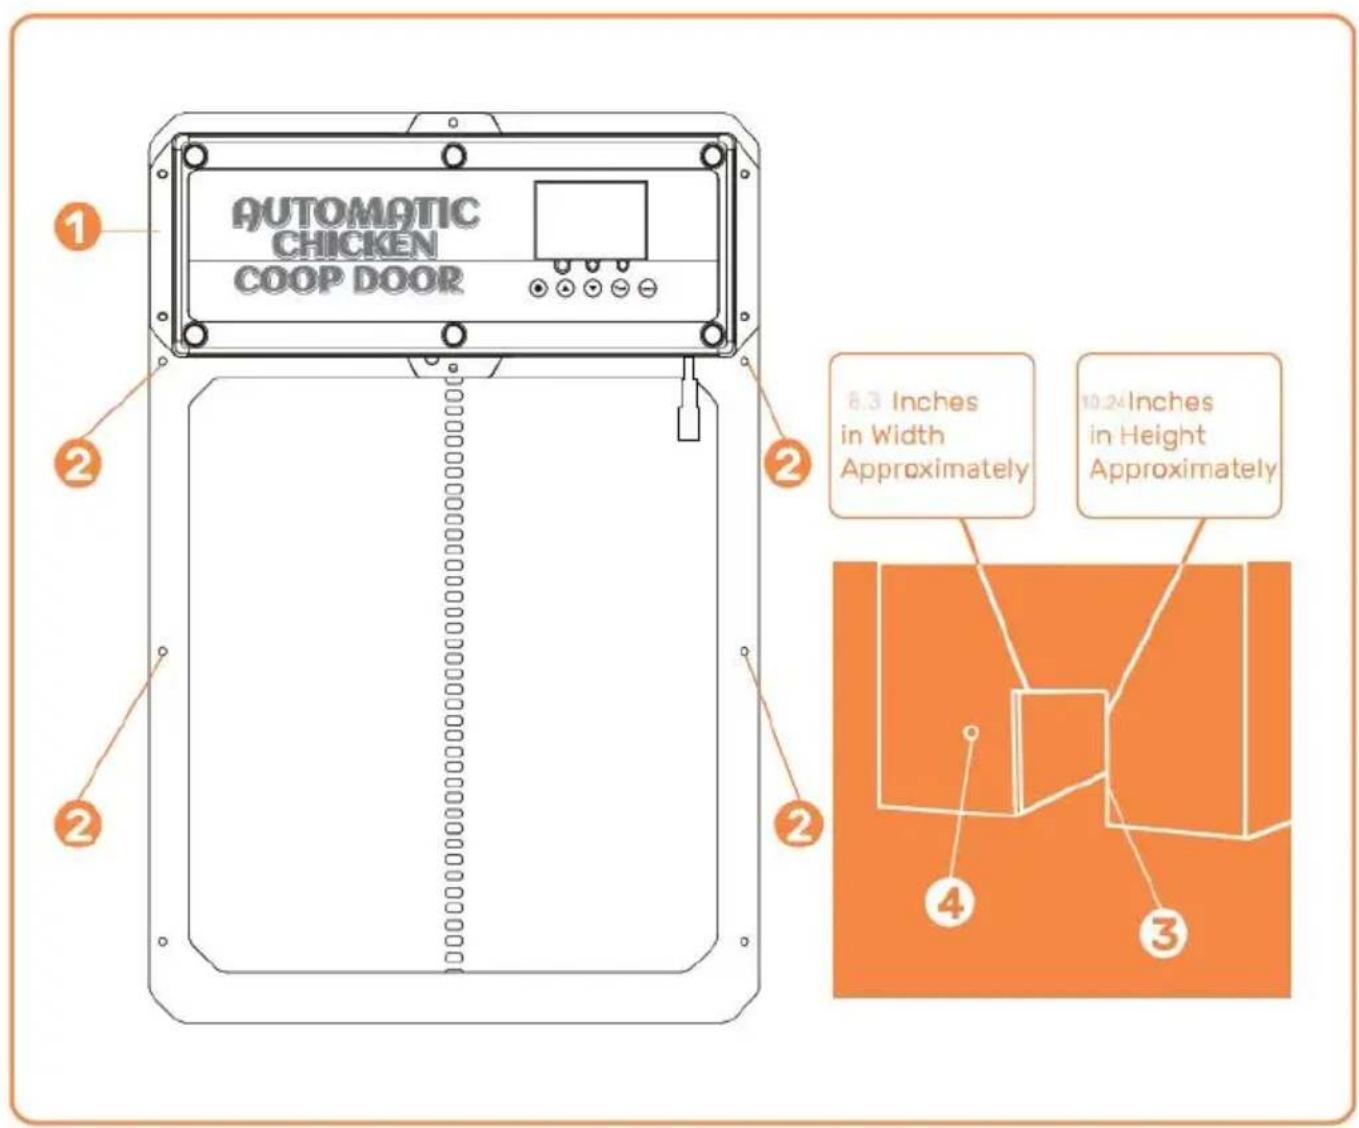
①Chicken Coop Door Frame
② Screw Installation Location
③ Chicken Coop Structure/Wall (with hole for the Chicken Coop Door Frame Installation)
④ Hole for power supply to run through to ensure power is protected from weather
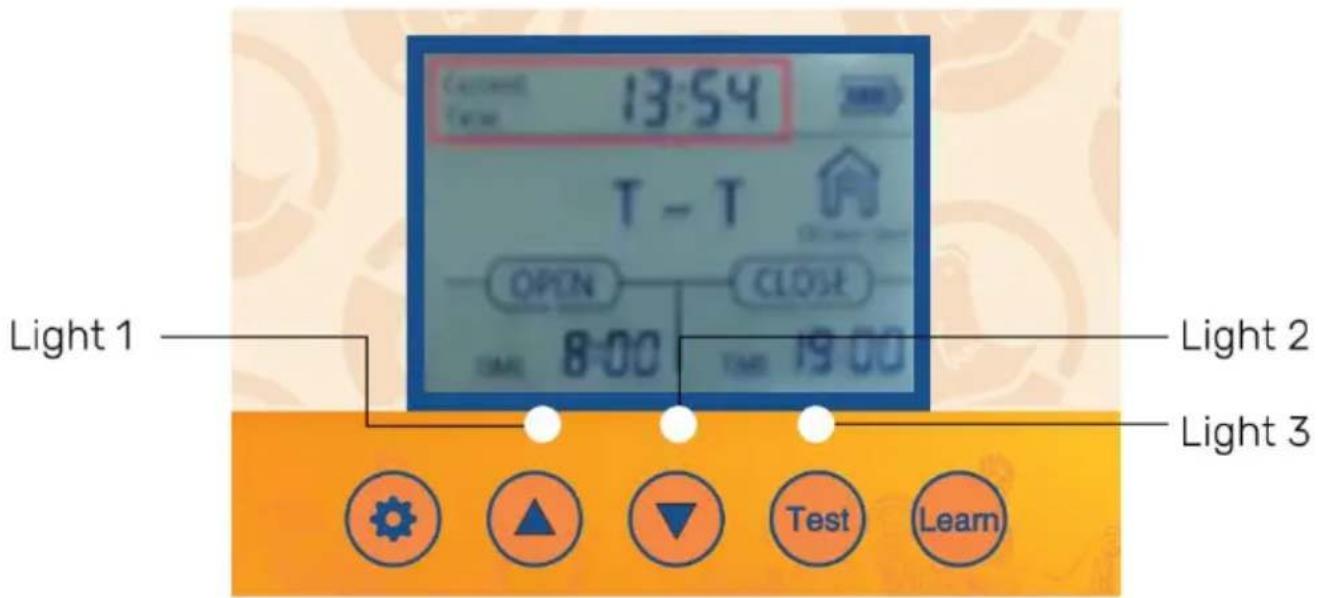
Control Panel Introduction
Digital Display

SET- Button used to switch between programming modes

RN- Button used to add/remove the wireless remote control(s)

- Button used to manually open/close the door

- Button used to change program functions while in the program mode

WN)- Button used to change program functions while in the program
• Light 1-Open door [green] and close door [red] indicator lights
• Light 2-Infrared sensor working indicator light
• Light 3-Light sensor working indicator light
Operations Manual
General Introduction
The Coop Door is the perfect solution for a more enjoyable Homesteading way of life. We utilize modern technology and put that into a slim compact design to provide our customers with the best Automatic Coop Door available.
Our product is made to support your homesteading goals and to help make homesteading easier. We suggest to use the power cord or solar to powe door, this door uses a lot of power due to it being a sturdier door so will die fast!
General Introduction
-
- Verify/create an opening in the chicken door structure/wall such that the chicken coop door frame can be installed and securely fastened with screws. Width= 8.3 inch es. Height=10.24 inches
-
- Attach the chicken coop door frame to the chicken coop structure/wall with the self-tapping screws (DO NOT OVERTIGHTEN OR DOOR WILL COMPRESS
AND NOT OPEN). Ensure the chicken coop door frame is flat [no gaps/warps] against chicken coop structure/wall after the self-tapping screws are installed. Use a power tool to install screws through door.
-
- Connect the DC Male Plug of the AC/DC Power Adapter to either one of the DC Female Plugs on the chicken coop door.
-
- Connect AC/DC Power Adapter to a power source and the chicken coop door will turn on as confirmed by the Digital Display being illuminated. Ensure power source is protected from weather by plugging in on interior of coop or building a simple power supply box to prevent water intrusion.
-
- To utilize the light sensor or the timer see page 10-11.
-
- Don't forget if the door isn't opening/closing all of the way try loosening the screws on the door. The door can get pinched if the door is installed to tight.
-
- If the door is not closing after programming. Please try turning off the power again and try closing it again.
-
- If you have exterior trim or anything that could make the door installed uneven then use 2x4s or some flat pieces of wood to ensure flushness.
-
- Use two 1" to !" wooden spacers and install them above door at the width of the holes in the rain shield.
- 10. Install rain shield onto the two wooden spacers So door can go up and behind the rain shield.
General Installation Continued I(Infrared Sensor)
• 11. The infrared sensor is built-in this door. • 12. There is a red light on the sensor to indicate when something is blocking infrared ray. While the red light is illuminated the door will not close.
- 13. The animal sensing probe is shown in Figure . When the door descends (descending) the probe senses an animal at the door (action+temperature, blue light on), and the door will return to rise. After 1 minute, it will continue to descend. After power outage, restarting the probe requires preheating for about 15 seconds (blue light goes out) to operate normally.
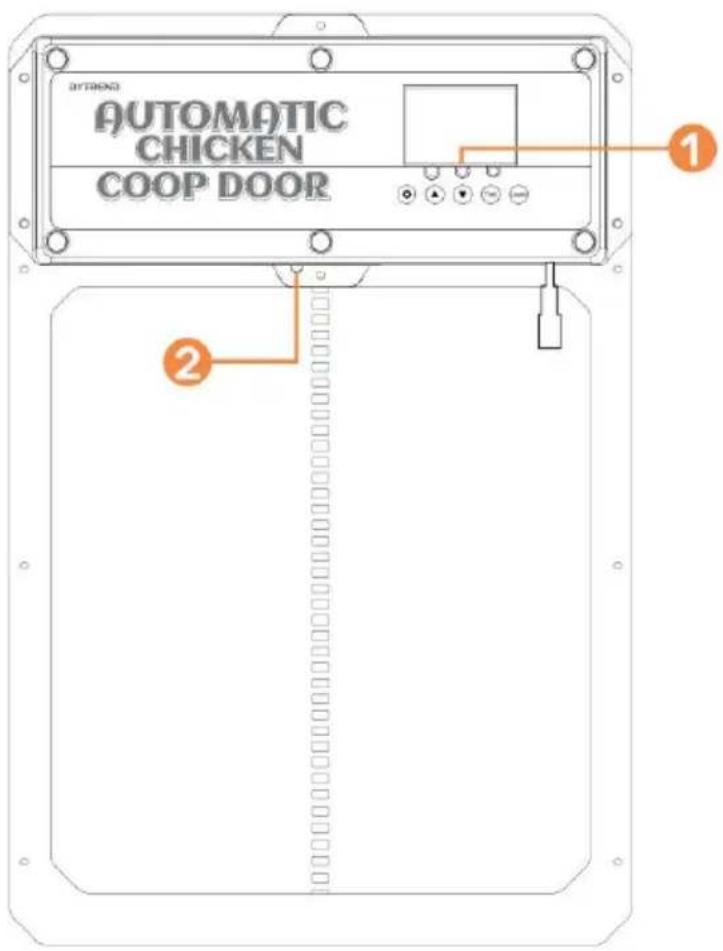
① Infrared sensor
② Infrared sensor indicator light
1.0 - Programming the Wireless Remote Control(s)
- 1. Verify the remote control battery[s] are installed in the remote control(s) (Battery(s): A27/12V sold separately).
- To pair a remote control to the chicken coop door push and hold the LEAR
button on the control panel down for 2 seconds. Then press any button on the remote control twice. The green LED flashes twice, indicating that the pairing is complete. To pair the second remote control repeat this step.
- 3. To un-pair all remote control[s] push and long hold the LEARN button, until the green LED flashes twice, indicating that the cancellation is complete.
Note: If power is removed from the chicken coop door for a short period of time and power is reapplied, the remote control[s] will still be paired to the chicken coop door.
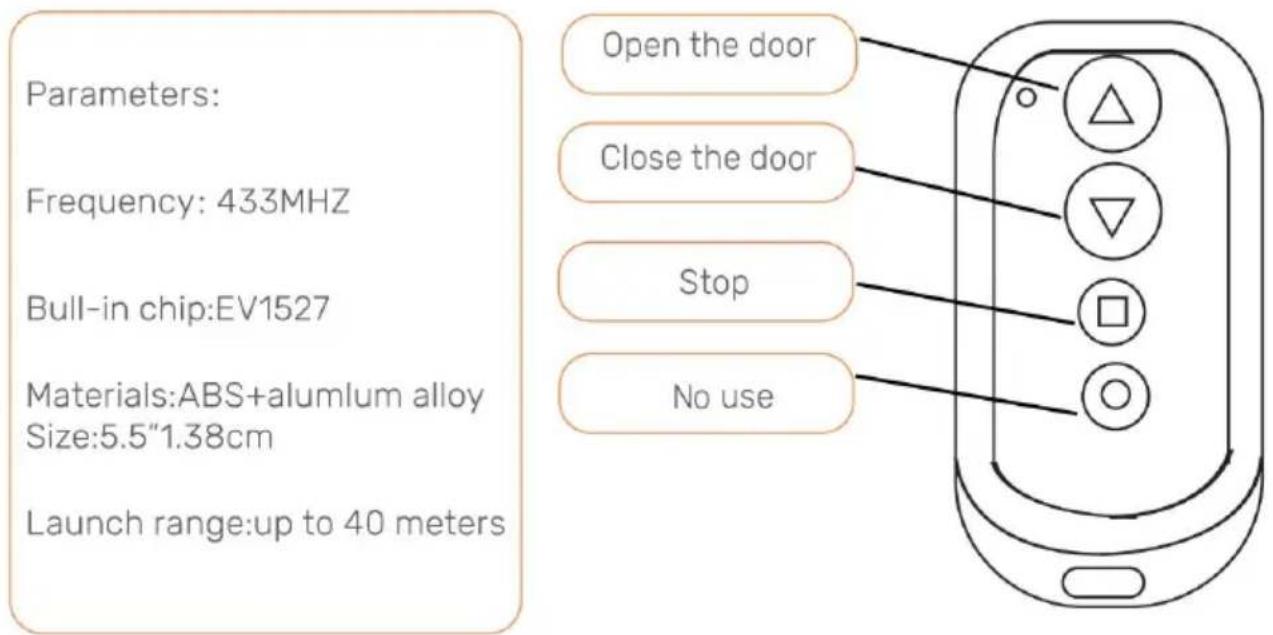
2.0- Open/Close Chicken Coop Door With Remote Control
1.Push the Up Arrow button to open the door.
- 2. Push the Down Arrow button to close the door.
• 3. Push the Square butt to stop any movement of the door.
3.0- Open/Close Chicken Coop Door Without Remote Control
Sequentially pushing the Test button on the control panel will either open or clos the door.
• 1. Push the Test button on the control panel. The door will open.
- 2.Push the Test button on the control panel. The door stop moving.
- 3. Push the Test button on the control panel. The door will close.
4.0- Programming the Chicken Coop Door
1. Screen Wakeup
- 1.1 Button wake-up: Press the SET or TEST button once to turn on the screen for about 1 second.
- 1.2 Remote control wake-up: Press and hold any key on the remote control for about 5 seconds to light up the screen.
2. Setting manual door opening or closing
2.1 Connect the power supply, and the display screen will display as shown
2.2 Push the TEST button for one time for open the door.
2.3 Press the TEST button once to pause.
2.4 Press theTEST button again to close the door.
3. Setting the Local Time (24 Hour Time Format) for the Door
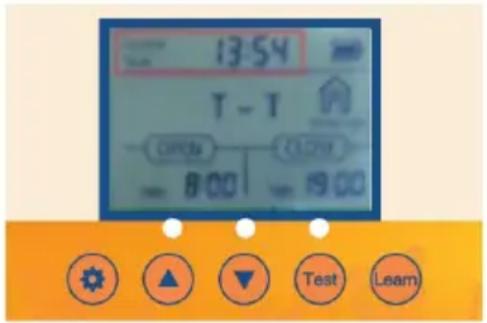
- 3.1Push the SET button on the control panel to display
- 3.2 The Hours time unit will flash. Adjust the Hours time unit by pushing the UP or DOWN button.
- 3.3 Push the SET button to switch to the Minutes time unit. The Minutes time unit will flash.
- 3.4 Adjust the Minutes time unit by pushing the UP or DOWN button.
- 3.5 Push the SET button to confirm the time setting and the nextsetting. Sequentially pushing the SET button on the control panel will cycle through the
different settings to be programmed.
4. Set timing and light sensing mixed mode

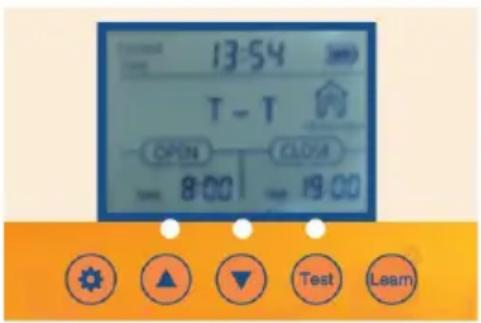
4.1 Push the SET button for one second on the copanel to display
4.2 T- T Indicates time to open the door - time to close the door.
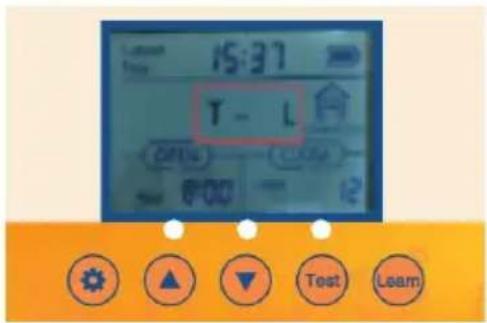
4.3 Push the UP button for one second on the control panel to display 4.4 T-L Indicates time to open the door -light to close the door.
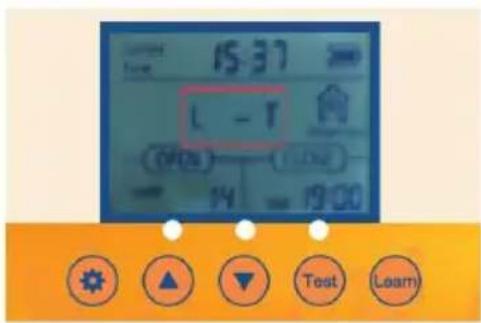
4.5 Push the UP button for one second on the control panel to display
4.6 L-T Indicates light to open the door - time to close the door
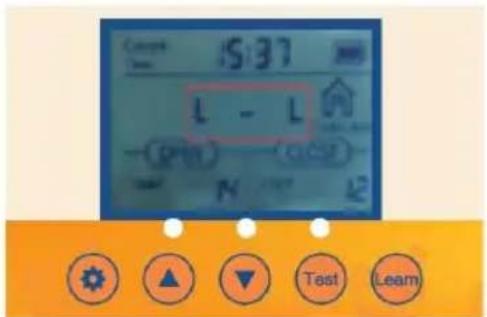
4.7 Push the UP button for one second on the control panel to display 4.8 L-L Indicates light to open the door -light to the door.
5.Turning option on so that the Door opens or closes automatically with Setting and Timer
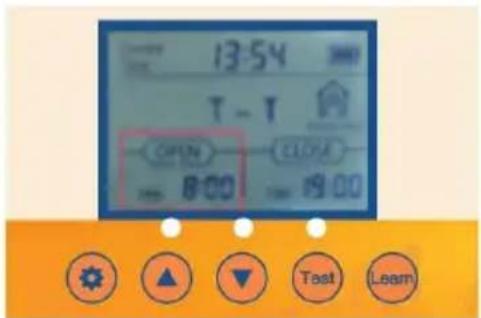
- 5.1 Verify/Push the SET button on the control panel to display OPEN-T
- 5.2 The Hours time unit will flash. Adjust the Hours time unit by pushing the UP or DOWN button.
- 5.3 Push the SET button to switch to the Minutes time unit. The Minutes time unit will flash.
- 5.4 Adjust the Minutes time unit by pushing the UP or DOWN button
6.Turning option on so that the Door opens or closes automatically with Light Brightness Setting
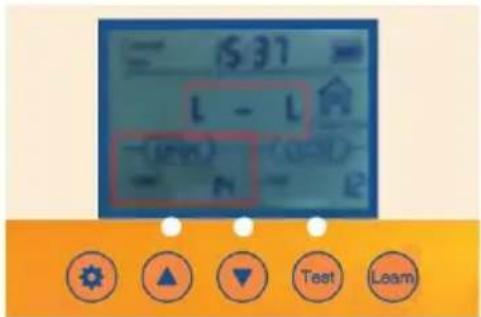
- 6.1 Verify/Push the SET button on the control panel to display OPEN-L
- 6.2 The Lumen value unit will flash. Adjust the value unit by pushing the UP or
DOWN button.
- 6.3 Adjust the Lumen value unit by pushing the UP or DOWN button.
Remember, For Open
23 = The most light for the door to open
0 = The least for the door to open
Remember, For Close
23= The least light for door to close
0= The most light for the door to close
- 6.4 It is recommended that the customer set it at around 15. If the sensitivity value is too strong, the chicken coop door will open and close when it senses a little light!
7. Close option on so that the Door opens or closes automatically with the Local Time Setting and Timer
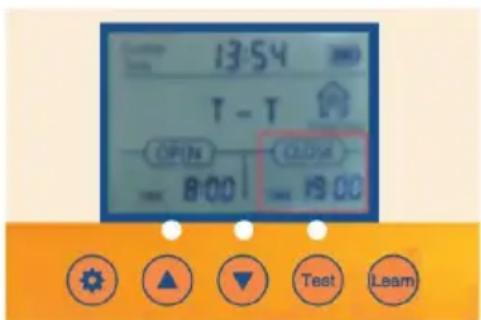
- 7.1 Verify/Push the SET button on the control panel to display CLOSE-T
- 7.2 The Hours time unit will flash. Adjust the Hours time unit by pushing the or DOWN button.
- 7.3 Push the SET button to switch to the Minutes time unit. The Minutes ti unit will flash.
- 7.4 Adjust the Minutes time unit by pushing the UP or DOWN button.
8. Close option on so that the Door opens or closes automatic Ambient Light Brightness Setting

- 8.1 Verify/Push the SET button on the control panel to display CLOSE-L
- 8.2 The Lumen value unit will flash. Adjust the Lumen value unit by pushing the UP or DOWN button.
- 8.3 Adjust the Lumen value unit by pushing the DOWN or button.
Remember, For Open
23 = The most light for the door to open
0 = The least for the door to open
Remember, For Close
23= The least light for door to close
0= The most light for the door to close
- 8.4 It is recommended that the customer set it at around 15. If the sensitivity value is strong, the chicken coop door will open and close when it senses a little light!
The chicken coop door is equipped with automatic charging function:
1.How to use the battery:
① No.5 1.2V nickel hydrogen rechargeable battery The 4PCS control board has voltage stabilizing function and automatically stops when the battery is fully charged.
② 4PCS AA1.5V No.5 battery.
• 2. Solar charging panel charging: output 9V 10W solar charging panel as shown in the figure
Note: If the solar power supply is used, AA batteries cannot be used, a 1.2V Ni-MH/Ni-Cr batteries are required
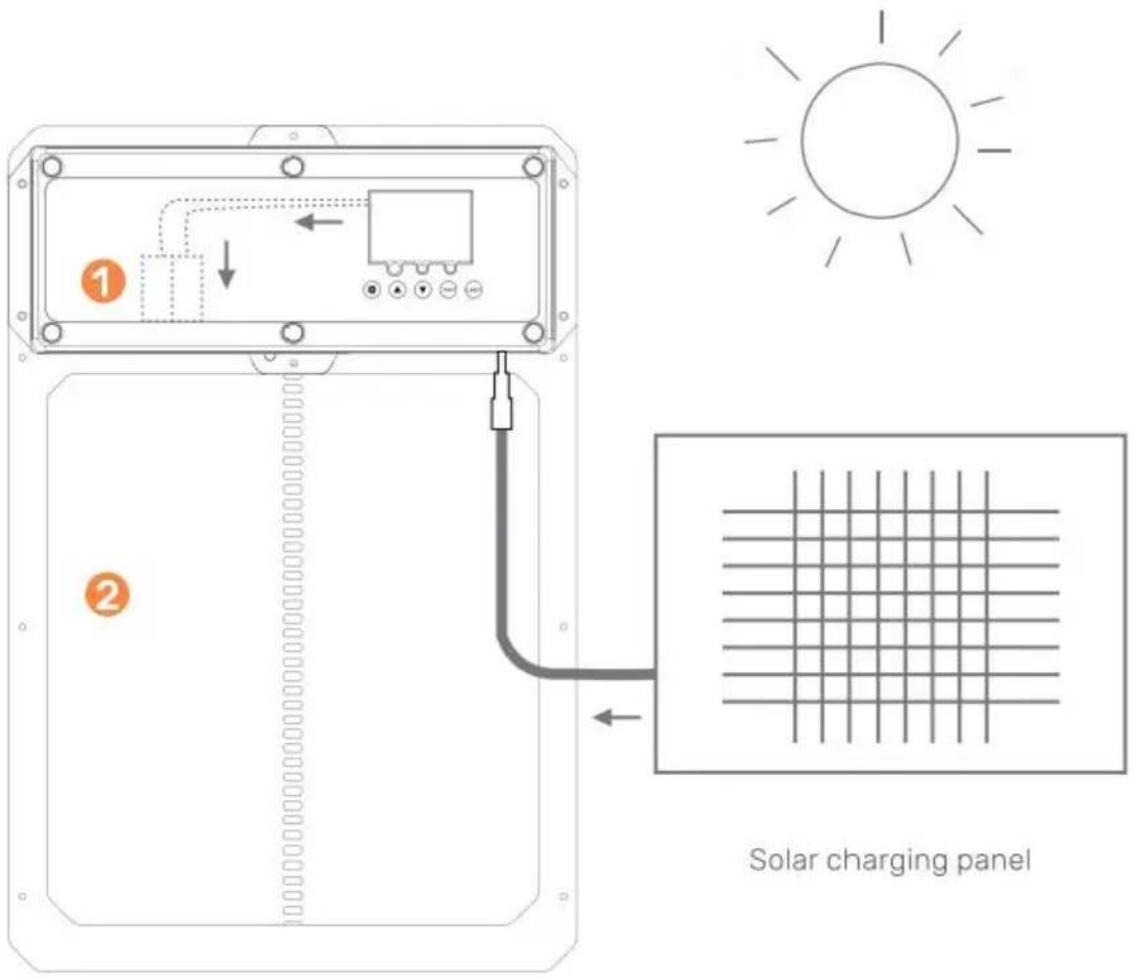
① rechargeable battery
② Chicken door coop
CAUTION: DO NOT TOUCH LEAD WIRES TOGETHER!
What you need:
10W-25W Solar Panel
9V 10Amp Solar Charge Controller
9V Battery 10AmpHour Battery
• 1. Install Solar Panel in direction to optimize for sunlight.
• 2. Connect solar panel to solar charge controller.
• 3. Connect battery to solar charge controller.
• 4. Connect auto chicken coop door to solar charge controller.
- 5. Protect solar charge controller and battery in enclosing to protect from rain/weather.

natural_image
Product photo of a solar panel with 12V power supply, connected cables, and a battery pack (no visible text or symbols)See examples of products below
Solar Charge Controller and 25W Solar Panel
Maintenance & Troubleshooting
Remote Control(s) Not Working
- Check that the remote control battery(s) are installed in the correct direction and the battery(s) are full of charge. Replace batteries if required.
- Ensure the remote is programmed to the Chicken Coop Door correctly.
- Check that the Chicken Coop Door is powered on.
Chicken Coop Door Does Not Power On
- Ensure there is power going to the unit.
- 》 Check the electrical connections powering the unit to ensure they are not dirty or damaged.
Chicken Coop Door Does Not Open and/or Close Automatically with the
Time or Brightness Settings
- 》 Check to see if the settings used are programmed correctly and the features are not turned off .
Timer isn't working properly
Follow these instructions to diagnose whether your timer is faulty or the door settings were not set correctly.
• 1. Unplug the door from power.
• 2.Plug the door back in.
• 3. Do not change any other settings.
• 4. Reset the opening or closing time.
- 5.Wait until the door goes to specify the opening time 0805 to confirm if the door opens.
- 6. If following these steps made your door work follow the same instructions to program the door to your local time and your door open and close time. Ensure unplug the door again prior to doing so just to give it a hard reset.
Can a Solar Panel or Backup Battery be used with the unit?
Yes, it can be connected/installed with the supplied DC Male Plug
Does the Chicken Coop Door have to be installed on the inside or outs coop?
It depends on how you plan to use it. If it is installed on the inside of a closed coop then the light sensitivity settings will not operate properly.
What to do if the Door Jams when opening or closing the door?
Ensure the door frame is installed flat against the wall and that there are no foreign debris found in the path of travel of the door. Also ensure the installation screws are not installed too tight!
What to do if the Door does NOT open/close all of the way?
If the door is NOT closing try to reset your power supply.
Correct Disposal
This product is subject to the provision of European Directive 2012/19/EC
The symbol showing a wheelie bin crossed through indicates that the product requires separate refuse collection in the European Union. This applies to the product and all accessories marked with this symbol. Products marked as such may not be discarded with normal domestic waste, but must be taken to a collection point for recycling electrical and electronic devices.
Made In China
VEVOR®
TOUGH TOOLS, HALF PRICE
Technical Support and E-Warranty Certificate
www.vevor.com/support
VEVOR®
TOUGH TOOLS, HALF PRICE
SALVARE QUESTE ISTRUZIONI
Informazioni FCC
Manuale operativo
② Infrared sensor indicator light
natural_image
Product photo of a solar panel with connected cables and a 25W label (no readable text or symbols on main components)elettronica www.vevor.com/support
VEVOR®
TOUGH TOOLS, HALF PRICE
ZAPISZTEINSTRUKCJE
Informacje FCC
Machine Translated by Google
② Infrared sensor indicator light
① akumulator
Kurnik z 2 drzwiami
UWAGA: NIE DOTYKAJ PRZEWODÓW ZE SOBĄ!
Czego potrzebujesz:
natural_image
Product photo of a solar panel with connected cables and a 25W label (no readable text or symbols on main components)② Infrared sensor indicator light
natural_image
Product photo of a solar panel with connected cables and a 25W label (no readable text or symbols on main components)www.vevor.com/support
VEVOR®
TOUGH TOOLS, HALF PRICE
CONSERVEZ CES INSTRUCTIONS
Informations de la FCC
② Infrared sensor indicator light
natural_image
Product photo of a solar panel with connected cables and a 25W label (no readable text or symbols on main components)HULP NODIG? NEEM CONTACT MET ONS OP!
BEWAAR DEZEINSTRUCTIES
FCC-informatie
② Infrared sensor indicator light
① oplaadbare batterij
② Kippenhok met deur
LET OP: RAAK DE DRAĐEN NIET SAMEN AAN!
Wat heb je nodig:
10W-25W zonnepaneel
9V 10Amp Zonne-laadregelaar
9V-batterij 10AmpHour-batterij • 1.
natural_image
Product photo of a solar panel with connected cables and a 25W label (no readable text or symbols on main components)garantiecertificaat www.vevor.com/support
VEVOR®
TOUGH TOOLS, HALF PRICE
SPARA DENNA INSTRUKTIONER
FCC-information
ÿHönshusets dörrram y
Skruvinstallationsplats
Driftshandbok
Allmän introduktion
② Infrared sensor indicator light
① laddningsbart batteri
② hönslucka
FÖRSIKTIGHET: RÖR INTE LEDNINGSKABLAR SAMMANS!
Vad du behöver:
10W-25W solpanel
9V 10Amp Solar Charge Controller
natural_image
Product photo of a solar panel with connected cables and a 25W label (no readable text or symbols on main components)www.vevor.com/support
VEVOR®
TOUGH TOOLS, HALF PRICE
② Infrared sensor indicator light