
A333 - Manual strapping tool Vevor - Free user manual and instructions
Find the device manual for free A333 Vevor in PDF.

| Product Type | Manual Strapping Tool |
| Brand | Vevor |
| Model | A333 |
| Compatible Materials | Steel (straps) |
| Compatible Strap Width | 12.7 – 19 mm (0.5 – 0.75 inch) |
| Compatible Strap Thickness | 0.38 – 0.7 mm (0.015 – 0.027 inch) |
| Recommended Tensile Strength | 700 – 850 N/mm² (100,000 – 123,000 psi) |
| Joint Strength | Approximately 80% of strap strength |
| Main Functions | Loading, tensioning, sealing, and cutting of strapping |
| Safety | Mandatory wearing of safety glasses and gloves; position yourself to the side during tensioning |
| Maintenance and Cleaning | Clean regularly with compressed air; avoid prolonged exposure to sunlight |
| Spare Parts | Hex key A83, screw A72, horizontal handle A84, grip knob A51 |
| Repairability | Adjustment of sealing depth via screw A72 and stop |
| Technical Support | www.vevor.com/support |
Frequently Asked Questions - A333 Vevor
User questions about A333 Vevor
0 question about this device. Answer the ones you know or ask your own.
Ask a new question about this device
Download the instructions for your Manual strapping tool in PDF format for free! Find your manual A333 - Vevor and take your electronic device back in hand. On this page are published all the documents necessary for the use of your device. A333 by Vevor.
USER MANUAL A333 Vevor
Technical Support and E-Warranty Certificate
www.vevor.com/support
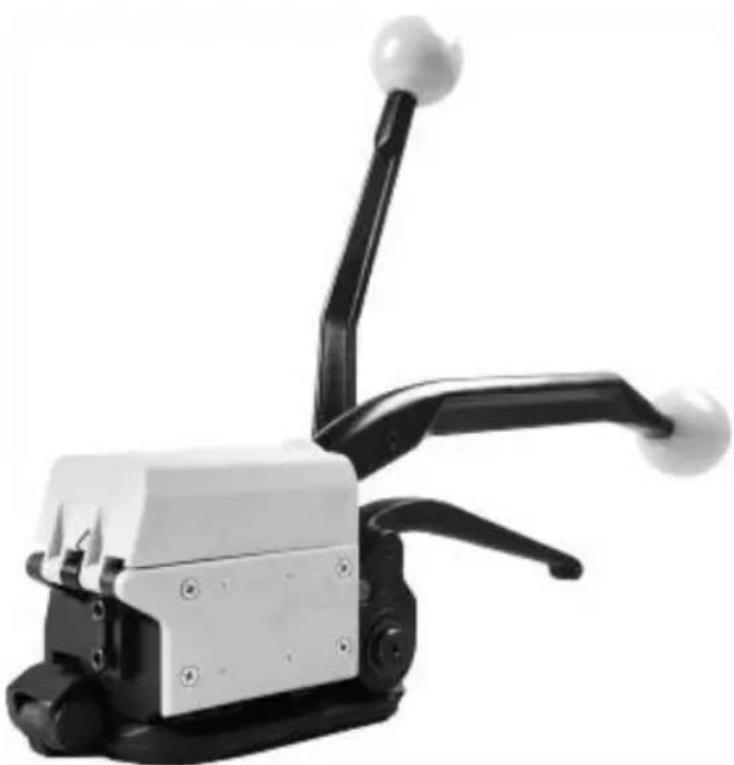
Manual Strapping Tool
MODEL: A333
We continue to be committed to provide you tools with competitive price. "Save Half", "Half Price" or any other similar expressions used by us only represent the estimate of savings you might benefit from buying certain tools with us compared to top brands and does not necessarily mean to cover all categories of tools offered. We are kindly reminded to verify carefully when you are placing an order with us actually saving half in comparison with the top major brands.
MODEL: A333
NEED HELP? CONTACT US!
Have product questions? Need technical support? Please feel fr contact us:
Technical Support and E-Warranty Certificate www.vevor.com/support
This is the original instruction, please read all manual instruction carefully before operating. VEVOR reserves a clear interpretation user manual. The appearance of the product shall be subject to product you received. Please forgive us that we won't inform you there are any technology or software updates on our product.
INSTRUCTIONS
Thank you very much for choosing this Manual Strapping Tool - Please read all of the instructions before using it. The information will help you achieve the best possible results.
The products carried in this catalog may be different in color than the item.
1. SAFETY INSTRUCTIONS

Read these instructions carefully. Failure to follow these instructions can result in severe personal injury.

Eye injury hazard
Failure to wear safety glasses with side shields can re severe eye injury or blindness.
Operation
Tool must not be used by persons not properly trained in their use. Before tensioning strap, read and understand the tool operating instructions. Failure to follow the operating instructions or improper load positioning could result in strap breakage.
Become familiar with your tool and keep your fingers away from area can pinch or cut.
Joints
You are fully responsible for reviewing the joints made by your tool. Become familiar with the seal control and seal adjustment described in operation manual. Misformed joints may not secure the load and could cause serious injury. Never handle or ship any load with improperly f joints.
Dispensing Strap
Only dispense strap from a dispenser specifically designed for strap. Tuck strap end back into dispenser when not in use.
Protective gloves
When handling strap, always wear protective gloves.

Strap warnings
Never use strap as a means of pulling or lifting loads. Failure to fo these warnings can result in severe personal injury.
Strap breakage hazard
Improper operation of the tool, excessive tensioning, using strap not recommended for this tool or sharp corners on the load can result in sudden loss of strap tension or strap breakage during tensioning, which could result
in the following:
- A sudden loss of balance causes you to fall.
- Both tool and strap flying violently towards your face.
Note as follows:
- If the load corners are sharp, use edge protectors.
- Place the strap correctly around a properly positioned load.
- Positioning yourself in line with the strap, during tensioning and sea can result in severe personal injury
from flying strap or tool. When tensioning or sealing, position yourself one side of the strap and keep all
bystanders away.
- Use the correct strap quality, strap width, strap gauge and strap testrength recommended in this manual
for your tool. Using strap not recommended for this tool can result in breakage during tensioning.
Cutting tensioned strap
When cutting strapping, use the proper strapping cutter and keep other personnel and yourself at a safe distance from the strap. Always start
side of the strap, away from the direction the loosened strap end will Use only cutters designed for strap and never hammers, pliers, hacks axes,etc.
Fall hazard
Keep your working area tidy. Untidiness of your working area may cause risk of injury. Maintaining improper footing and / or balance when operating the tool can cause you to fall. Before tensioning, especially in elevated areas, always establish good balance. Both feet should be securely placed on a flat, solid surface, especially when working in elevated areas. Do not use the tool when you are in an awkward position.
Pay attention to the rules and regulations for preventions of accidents which are valid for the workplace.
Tool hazards
A well-maintained tool is a safe tool!
Check tool regularly for broken or worn parts. Do not operate a tool broken or worn parts.
Never modify any tool. Modification can result in severe bodily injury.
2. TECHNICAL DATA
Joint strength
Approx. 80% of the strap's tensile strength.
Steel strapping
| Width | 12.7-19mm (0.5 - 0.75inch) |
| Thickness | 0.38-0.7mm ( 0.015 -0.027inch) |
| Quality | Fundamentally the A333 allows the use of all c steel straps with tensile strengths ranging from to 850N/mm2/100000-123000 psi.Straps with a low breaking elongation are unsui |
3. OPERATION
When using the machine, it's indispensable to wear protective gloves safety glasses.


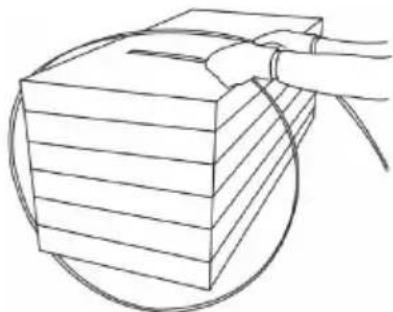
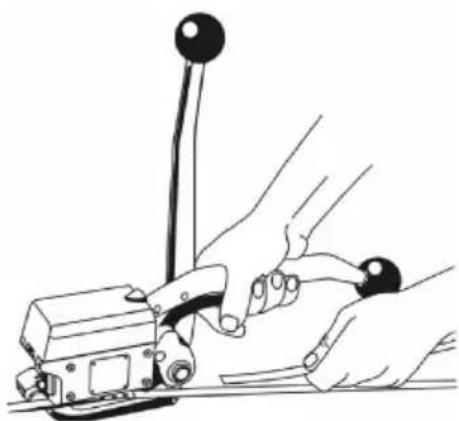
Feeding the strapping around the package
The strapping is fed around the package in the direction shown in the illustration. The strapping end is held tightly with the left hand and p firmly towards the operator with the right hand.
Loading the strapping
The rocker is raised with the right hand. The left hand inserts the twy lying precisely upon one another into the tool until they hit strap stop. The lower strap end must slightly protrude from the end of the base. Be certain that the strapping is held by the strap guide.
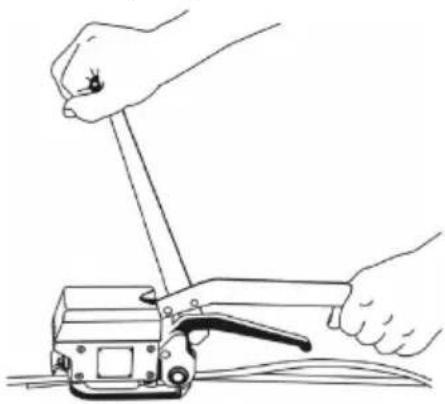
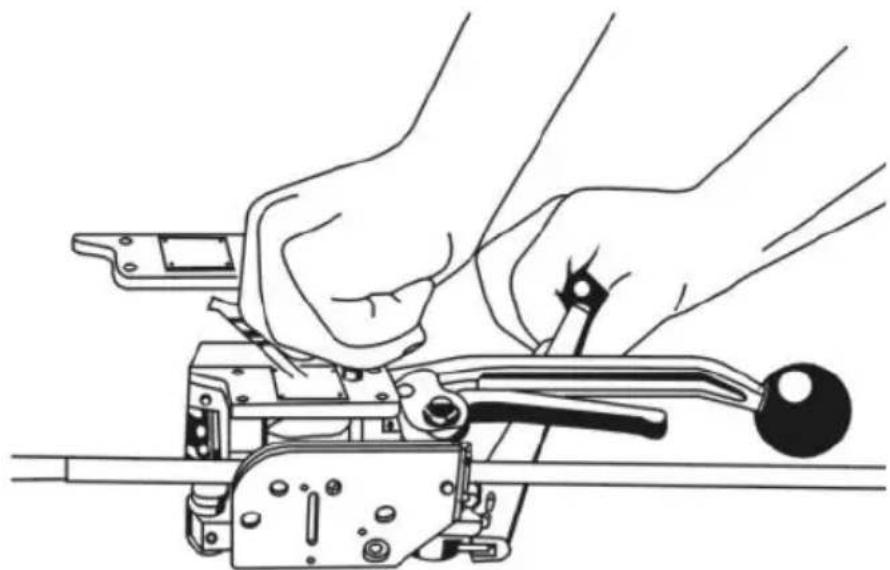
Tensioning the strapping
The tool is held tightly with the left hand placed on the sealing lever. The tensional handle is now moved forward and backward with the right hand until the desired tens attained.
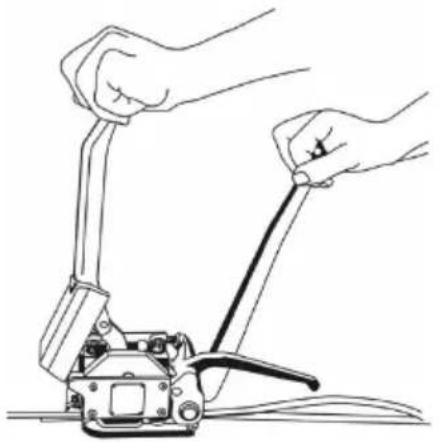
Sealing the strapping
The sealing lever is moved forward using left hand until it hits the stop. The lever moved back to its initial position. When sealing, the right hand absorbs the sealir force by holding the tensioning handle.
Releasing the tool
Hold the cut-off strap end with the left lift the rocker with the right hand and potool from the applied strap to the right.
4. SEAL CONTROL
Regular control of the seal is necessary. The seal can be checked vis and the person controlling it can easily judge the quality of the seal. checking the seal the following illustrations must be compared.
Correct seal
A correct seal must conform to the illustration.The depth with which t upper strap hooks into the lower one must be 1.0-2.0 mm, and it is recommended that the optimal depth be 1.5 mm.The upper strap mus sheared clean and the cutter must not leave scratch marks on the lo strap.

Incorrect seal (the sealing mechanism is adjusted too high)
This stamped seal is not deep enough and the upper strap is not sheared. The tensile strength of this seal is insufficient and the strappin
must be taken away from the package. The tool must be readjusted immediately (see SEALADJUSTMENT).

Incorrect seal (the sealing mechanism is adjusted too low)
This stamped seal is too deep and the lower strap is scratched by a cutter. Although the tensile strength of this seal is sufficient the straps must be taken away from the package because of the scratched lower strap. The tool must be readjusted immediately (see SEALADJUSTMENT

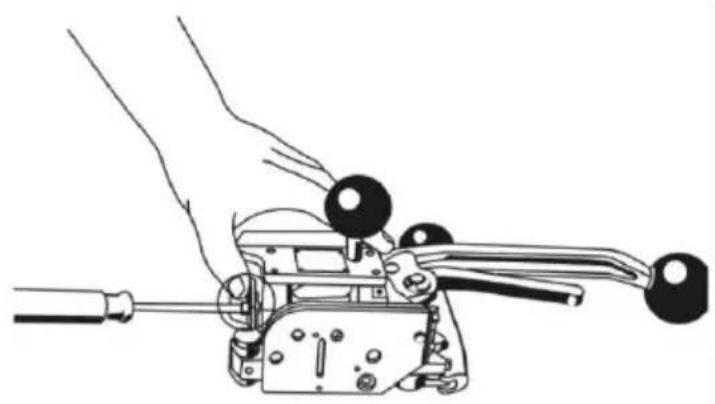
5. SEAL ADJUSTMENT
The sealing and cutting depth of the sealing mechanism and the cutt be adjusted with the use of the hexagon key A83 which is supplied tool as follows:
- Place tool as shown above.
Loosen both screws A72 open themby approx.3 revolutions.
-
If sealing depth is not sufficient reset stop in the direction of the bar plate.
-
If sealing depth is excessive reset stop in the direction of the body
- Retighten screws A72.
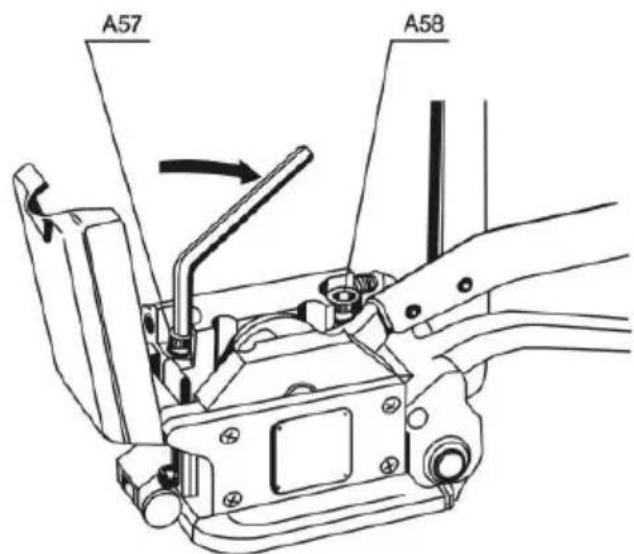
Assembly Instructions
After every disassembly it is essential to retighten screws A57 and A the recommended torque when reassembling. The use of a torque key necessary.
6. CLEANING
In case of heavy dirt and when painted straps are used the punch,dies,gripper and feed-wheel must be cleaned regularly.Normally it sufficient to blow out the parts with the help of an air gun.
7. ACCESSORIES
Using tool with horizontal handle
Upon request the tool can be supplied with a bolt A84 and a grip B1A51.When using tool for horizontal applications, the operator holds the t on the grip ball during tensioning.
Install the handle as follows:
Remove side cover A44 and break the marked position. Reassemble si cover and screw bolt with mounted ball into the body
Suspension
It is possible to suspend the tool for strapping in vertical position. Ord suitable suspension separately under item no.A85.
MAINTENANCE
- Avoid prolonged exposure to the sun to avoid aging.
Manufacturer: Shanghaiuxinmuyeyouxiangonsi
Address: Shuangchenglu 803nong11hao1602A-1609shi, baoshanqu, shanghai 200000 CN.
Imported to AUS: SIHAO PTY LTD. 1 ROKEVA STREETEASTWOOD NSW 2122 Australia
Imported to USA: Sanven Technology Ltd. Suite 250, 9166 Anaheim Place, Rancho Cucamonga, CA 91730
E-CrossStu GmbH
Mainzer Landstr.69, 60329 Frankfurt am Main

YH CONSULTING LIMITED.
C/O YH Consulting Limited Office 147, Centurion House, London Road, Staines-upon-Thames, Surrey TW18 4AX
VEVOR
TOUGH TOOLS, HALF PRICE
Technical Support and E-Warranty Certificate
www.vevor.com/support
VEVOR®
TOUGH TOOLS, HALF PRICE
A/S YH Consulting Limited Bureau 147, Centurion
Maison, London Road, Staines-upon-Thames, Surrey, TW18 4AX
VEVOR
TOUGH TOOLS, HALF PRICE
www.vevor.com/support
C/O YH Consulting Limited Office 147, Centurion
Haus, London Road, Staines-upon-Thames, Surrey, TW18 4AX
VEVOR
TOUGH TOOLS, HALF PRICE
elettronica www.vevor.com/support
Importato in AUS: SIHAO PTY LTD. 1 ROKEVA STREETEASTWOOD
Nuovo Galles del Sud 2122 Australia
Importato negli USA: Sanven Technology Ltd. Suite 250, 9166 Anaheim
Luogo, Rancho Cucamonga, CA 91730

E-CrossStu GmbH
Mainzer Landstr.69, 60329 Francoforte sul Meno.
CONSULENZA YH LIMITATA.
C/O YH Consulting Limited Ufficio 147, Centurion
Casa, London Road, Staines-upon-Thames, Surrey, TW18 4AX
VEVOR
TOUGH TOOLS, HALF PRICE
Casa, London Road, Staines-upon-Thames, Surrey, TW18 4AX
VEVOR
TOUGH TOOLS, HALF PRICE
Soporte专业技术o y certificate de garantiaelectrónica www.vevor.com/support
VEVOR
TOUGH TOOLS, HALF PRICE
C/O YH Consulting Limited Biuro 147, Centurion
Dom, London Road, Staines-upon-Thames, Surrey, TW18 4AX
VEVOR
TOUGH TOOLS, HALF PRICE
HULP NODIG? NEEM CONTACT MET ONS OP!
C/O YH Consulting Limited Kantoor 147, Centurion
Huis, London Road, Staines-upon-Thames, Surrey, TW18 4AX
VEVOR
TOUGH TOOLS, HALF PRICE
garantiecertificaat www.vevor.com/support
VEVOR®
TOUGH TOOLS, HALF PRICE
www.vevor.com/support
Place, Rancho Cucamonga, CA 91730
E-CrossStu GmbH
Mainzer Landstr.69, 60329 Frankfurt am Main.

YH CONSULTING LIMITED.
C/O YH Consulting Limited Office 147, Centurion
House, London Road, Staines-upon-Thames, Surrey, TW18 4AX
VEVOR
TOUGH TOOLS, HALF PRICE


