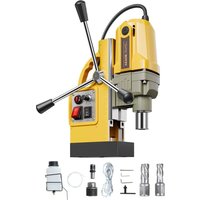
ZT-40HAR - Drill Vevor - Free user manual and instructions
Find the device manual for free ZT-40HAR Vevor in PDF.


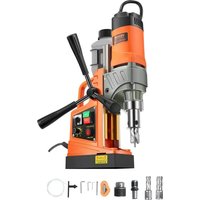
| Product Type | Magnetic Base Drill |
| Brand | Vevor |
| Model | ZT-40HAR |
| Power Supply | AC 230 V 50 Hz (EUR/AUS) / AC 120 V 60 Hz (US) |
| Maximum Power | 1200 W |
| Speed Range | 0-800 rpm (EUR/AUS) / 0-900 rpm (US) |
| Magnetic Attraction | 12500 N |
| Annular Cutting Capacity | Up to Φ40 mm, depth 50 mm |
| Twist Drilling Capacity | Φ3 to Φ16 mm, depth 100 mm |
| Spindle Stroke | 160 mm |
| Fuse | 15 A |
| Rotation Direction | Forward / Reverse |
| Main Functions | Magnetic drilling, variable speed, integrated cooling, forward/reverse |
| Safety | Vibration protection, mandatory grounding, emergency stop, recommended PPE |
| Maintenance and Cleaning | Clean the magnetic base after each use, lubricate the slides, check grounding regularly |
| Included Accessories | Coolant tank, M5 hex keys, chuck key, pilot pin |
| Spare Parts and Repairability | Use genuine Vevor parts for maintenance; replaceable fuse |
| General Information | Manual available in multiple languages; technical support at www.vevor.com/support |
Frequently Asked Questions - ZT-40HAR Vevor
User questions about ZT-40HAR Vevor
0 question about this device. Answer the ones you know or ask your own.
Ask a new question about this device
Download the instructions for your Drill in PDF format for free! Find your manual ZT-40HAR - Vevor and take your electronic device back in hand. On this page are published all the documents necessary for the use of your device. ZT-40HAR by Vevor.
USER MANUAL ZT-40HAR Vevor
Technical Support and E-Warranty Certificate www.vevor.com/support
MAGNETIC BASE DRILL
MODEL:ZT-40HAR
We continue to be committed to provide you tools with competitive price.
"Save Half", "Half Price" or any other similar expressions used by us only represent estimate of savings you might benefit from buying certain tools with us compared to the top brands and does not necessarily mean to cover all categories of tools offered by us. kindly reminded to verify carefully when you are placing an order with us if you are a saving half in comparison with the top major brands.
VEVOR®
TOUGH TOOLS, HALF PRICE
MAGNETIC BASE DRIL
MODEL: ZT-40HAR

NOTE: The buttons on the control panel of some machine models may different. Please see the real product for detailed information.
NEED HELP? CONTACT US!
Have product questions? Need technical support? Please feel free to contact Technical Support and E-Warranty Certificate www.vevor.com/support
This is the original instruction, please read all manual instructions carefully be operating. VEVOR reserves a clear interpretation of our user manual. The appearance of the product shall be subject to the product you received. Please forgive us that we won't inform you again if there are any technology or software updates on our product.
O
product and all accessories marked with this symbol. Products marked as such may not be discarded with normal domestic waste but must be taken to a collection point for recycling electrical and electronic devices.

This device complies with Part 15 of the FCC Rules. Operation is subject to following two conditions: (1) This device may not cause harmful interference, and (2) this device must accept any interference received, including interference that may cause undesired operation.
SAFETYWARNINGS

WARNING: Read all safety warnings, instructions, illustrations and
specifications provided with this power tool. Failure to follow all instructions list below may result in electric shock, fire and/or serious injury.
Save all warnings and instructions for future reference.

General Power Tool SafetyWarnings - Work area safety
a) Keep the work area clean and well lit. Cluttered or dark areas invite acci b) Do not operate power tools in explosive atmospheres, such as in the pres of flammable liquids, gases or dust. Power tools create sparks which may ign the dust or fumes.
c) Keep children and bystanders away while operating a power tool. Distractic can cause you to lose control.
d) Before working to tie the cuffs, women need to wear a good woman hat hair hidden in the hat, is strictly prohibited to wear gloves. When the construct completed, the switch must be turned off before leaving.

General Power Tool SafetyWarnings - Electrical safety
a) Power tool plugs must match the outlet. Never modify the plug in any way
not use any adapter plugs with earthed (grounded) power tools. Unmodified p and matching outlets will reduce risk of electric shock.
b) Avoid body contact with earthed or grounded surfaces, such as pipes, rad ranges and refrigerators. There is an increased risk of electric shock if your is earthed or grounded.
c) Do not expose power tools to rain or wet conditions. Water entering a pot tool will increase the risk of electric shock.
d) Do not abuse the cord. Never use the cord for carrying, pulling or unplugging the power tool. Keep cord away from heat, oil, sharp edges or moving parts. Damaged or entangled cords increase the risk of electric shock.
e) When operating a power tool outdoors, use an extension cord suitable for outdoor use. Use of a cord suitable for outdoor use reduces the risk of elec shock.
f) If operating a power tool in a damp location is unavoidable, use a ground circuit interrupter (GFCI) protected supply. Use of an GFCI reduces the risk of electric shock.

General Power Tool SafetyWarnings - Personal safety
a) Stay alert, watch what you are doing and use common sense when operating power tool. Do not use a power tool while you are tired or under the influence of drugs, alcohol or medication. A moment of inattention while operating power tools may result in serious personal injury.
b)Use personal protective equipment. Always wear eye protection. Protective equipment such as a dust mask, non-skid safety shoes, hard hat or hearing protection used for appropriate conditions will reduce personal injuries.
c) Prevent unintentional starting. Ensure the switch is in the off-position before connecting to power source and/or battery pack, picking up or carrying the tool. Carrying power tools with your finger on the switch or energising power tools have the switch on invites accidents.
d) Remove any adjusting key or wrench before turning the power tool on. A wrench or a key left attached to a rotating part of the power tool may result in personal injury.
e) Do not overreach. Keep proper footing and balance at all times. This ena better control of the power tool in unexpected situations.
f) Dress properly. Do not wear loose clothing or jewellery. Keep your hair and clothing away from moving parts. Loose clothes, jewellery or long hair can be caught in moving parts.
g) If devices are provided for the connection of dust extraction and collection facilities, ensure these are connected and properly used. Use of dust collection can reduce dust-related hazards.
h) Do not let familiarity gained from frequent use of tools allow you to become complacent and ignore tool safety principles. A careless action can cause severe injury within a fraction of a second.
I) This product is not a toy. Keep it out of reach of children.
J) Only use safety equipment that has been approved by an appropriate standards agency. Unapproved safety equipment may not provide adequate protection. Eye protection must be ANSI-approved and breathing protection must be NIOSH-approved for the specific hazards in the work area.
K) Do not lay the tool down until it has come to a complete stop. Moving grab the surface and pull the tool out of your control.
L) When using a handheld power tool, maintain a firm grip on the tool with hands to resist starting torque.
M) Do not leave the tool unattended when the Battery Pack is connected. The tool, and remove the Battery Pack before leaving.
N) People with pacemakers should consult their physician(s) before use. Electromagnetic fields in close proximity to heart pacemaker could cause pacemaker interference or pacemaker failure.
O) The warnings, precautions, and instructions discussed in this instruction manual cannot cover all possible conditions and situations that may occur. It be understood by the operator that common sense and caution are factors w cannot be built into this product, but must be supplied by the operator
Power tool use and care
a) Do not force the power tool. Use the correct power tool for your application. Correct power tool will do the job better and safer at the rate for which it was designed.
b) Do not use the power tool if the switch does not turn it on and off. Any tool that cannot be controlled with the switch is dangerous and must be repa
c) Disconnect the plug from the power source and/or remove the battery pack detachable, from the power tool before making any adjustments, changing accessories, or storing power tools. Such preventive safety measures reduce t risk of starting the power tool accidentally.
d) Store idle power tools out of the reach of children and do not allow personal unfamiliar with the power tool or these instructions to operate the power tool. Power tools are dangerous in the hands of untrained users.
e) Maintain power tools and accessories. Check for misalignment or binding c moving parts, breakage of parts and any other condition that may affect the tool's operation. If damaged, have the power tool repaired before use. Many accidents are caused by poorly maintained power tools.
f) Keep cutting tools sharp and clean. Properly maintained cutting tools with a cutting edges are less likely to bind and are easier to control.
g) Use the power tool, accessories and tool bits etc. in accordance with these instructions, taking into account the working conditions and the work to be performed. Use of the power tool for operations different from those intended could result in a hazardous situation.
h) Keep handles and grasping surfaces dry, clean and free from oil and grease. Slippery handles and grasping surfaces do not allow for safe handling and co of the tool in unexpected situations.
i) Please confirm the number of voltage volts before use. The working voltag not more than ± 5% . If it is more than that, it will cause motor burning and accidents.
j) During construction, please pay attention to avoiding water entering the motor or blocking the ventilation hole, so as not to reduce the heat dissipation performance of the motor and cause the motor to burn down.
k) In the steel plate construction, please pay attention to the safety of the layer of personnel and goods, iron beam and column drilling, and pay attention the safety of the structure of the building.
L) In suspension operation, the safety belt must be tightly tied and the magr drill fixed to prevent sudden power failure or power failure caused by accident M) Do not cut the power cord or change the plug yourself. This will cause machine to burn out.
Service
Have your power tool serviced by a qualified repair person using only identical replacement parts. This will ensure that the safety of the power tool is maintained. In any case, it should be started in no-load state. It is forbidden to start with no as to avoid damage to the machine. Please pay attention to the stability of magnetic drill when working at high altitude, so as to prevent the machine from falling down.
Ensure that the ground cable is grounded reliably.
When moving, the magnetic drill should be lifted to prevent damage to the magnetic base.
In the maintenance must use the original parts, in order to make the machir achieve the best use state.
Maintain labels and nameplates on the tool. These carry important safety information. If unreadable or missing, contact VEVOR for a replacement.

Vibration Safety
This tool vibrates during use. Repeated or long-term exposure to vibration may cause temporary or permanent physical injury, particularly to the hands, arms shoulders. To reduce the risk of vibration-related injury:
a. Anyone using vibrating tools regularly or for an extended period should first be examined by a doctor and then have regular medical check-ups to ensure m problems are not being caused or worsened from use. Pregnant women or p who have impaired blood circulation to the hand, past hand injuries, nervous system disorders, diabetes, or Raynaud's Disease should not use this tool. If feel any symptoms related to vibration (such as tingling, numbness, and white blue fingers), seek medical advice as soon as possible.
b. Do not smoke during use. Nicotine reduces the blood supply to the hands, fingers, increasing the risk of vibration-related injury.
c. Wear suitable gloves to reduce the vibration effects on the use.
d. Use tools with the lowest vibration when there is a choice.
e. Include vibration-free periods each day of work.
f. Grip tool as lightly as possible (while still keeping safe control of it). Let do the work.
g. To reduce vibration, maintain the tool as explained in this manual. If any abnormal vibration occurs, stop use immediately.

Grounding Safety
TO PREVENT ELECTRIC SHOCK AND DEATH FROM INCORRECT
GROUNDING: check with a qualified electrician if you are in doubt as to wh the outlet is properly grounded. Do not modify the power cord plug provided the charger. Do not use the charger if the power cord or plug is damaged. damaged, have it repaired by a service facility before use. If the plug will n outlet, have a proper outlet installed by a qualified electrician.
MODEL AND PARAMETERS
| Model | ZT-40HAR |
| Input | AC 230V 50Hz(EUR/AUS); AC 120V 60Hz(US) |
| Max. Power | 1200W |
| Speed | 0-900r/min(US); 0-800r/min(EUR/AUS) |
| Magnetic Attraction | 12500N |
| Max. Hollow Drilling | Φ40mm(Depth:50mm) |
| Twist Drilling | Φ3-Φ16mm(Depth:100mm) |
| Trip | 160mm |
| Fuse | 15A |
| Direction Of Rotation | Forward / Reverse |
STRUCTURE DIAGRAM
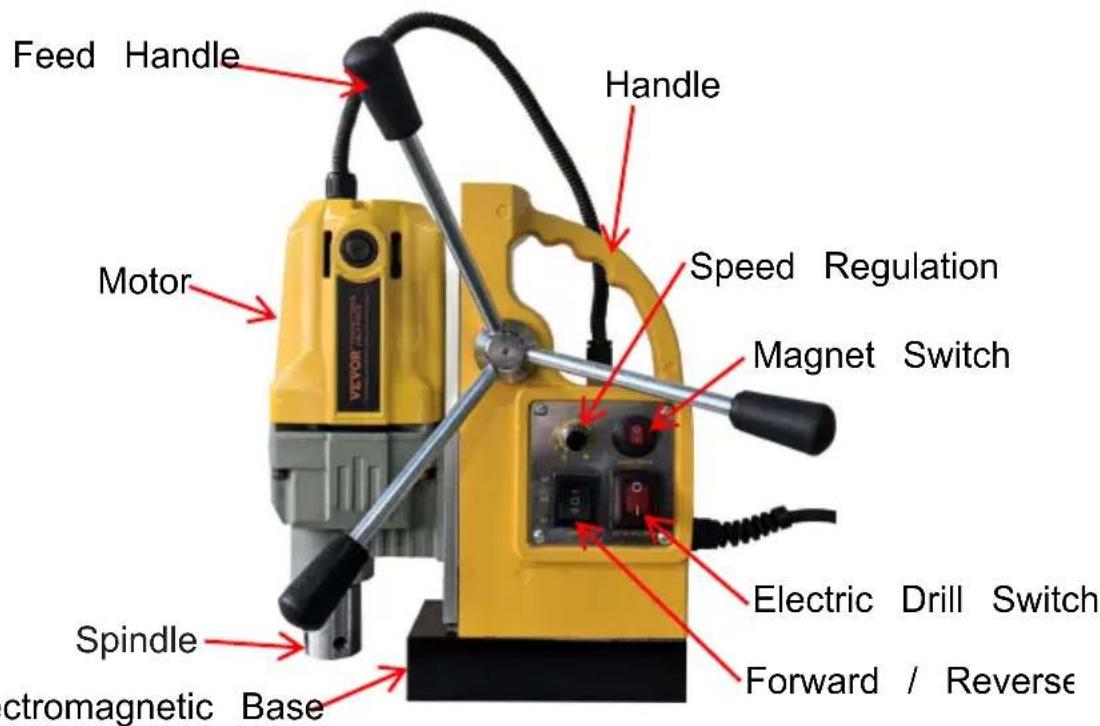
NOTE: The buttons on the control panel of some machine models may be different. Please see the real product for detailed information.
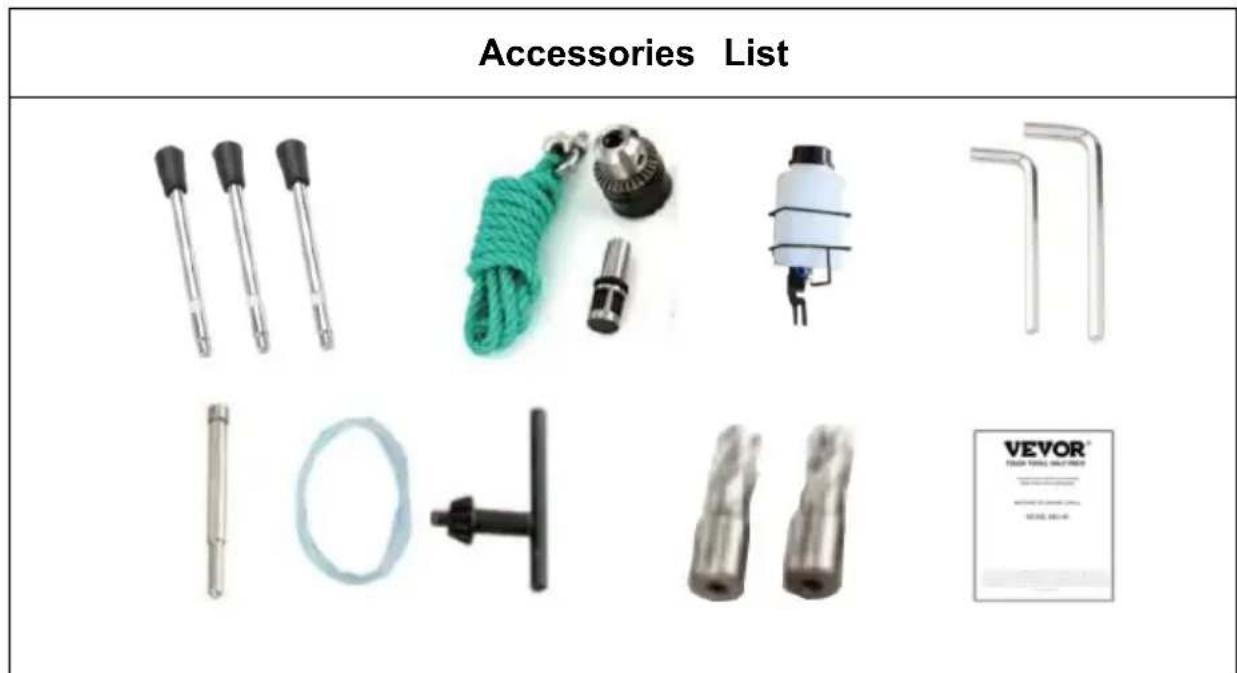
NOTE: Drill bits vary by region, please refer to your purchase.
Drill Bits(2 Pieces): 1 / 2^ + 5 / 8^ (USA)
Drill Bits(2 Pieces): 12mm + 16mm (EUR/AUS)
ORDER OF OPERATION
1) Choose to turn on the Forward or Reverse switch.
2) Turn on the MAGNET SWITCH, the switch indicator lights up, and the m starts to work.
3) Open the ELECTRIC DRILL SWITCH, the drill has been energized.
4) Open the speed switch to adjust the speed of the drill.

WARNING: When you need to switch the Forward / Reverse, you must
wait for the motor spindle to stop rotating before operating !
INSTALLATION OF COOLANT TANK
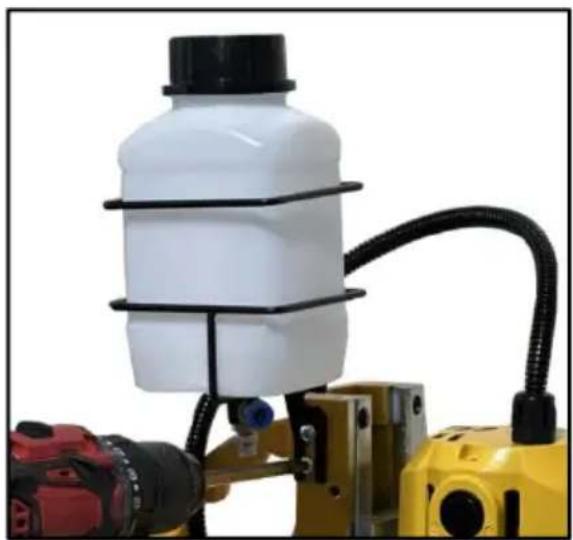
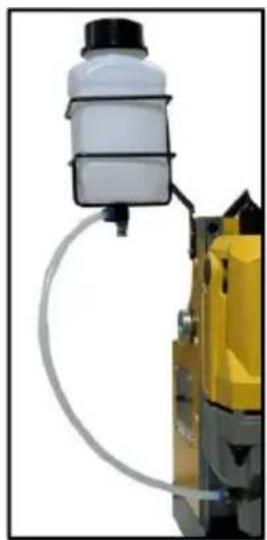
Install the coolant tank as shown above.
TWIST DRILL BIT INSTALLATION
- Insert the arbor into the spindle and secure it by attaching the set screw tightening them with the M5 hex wrench.
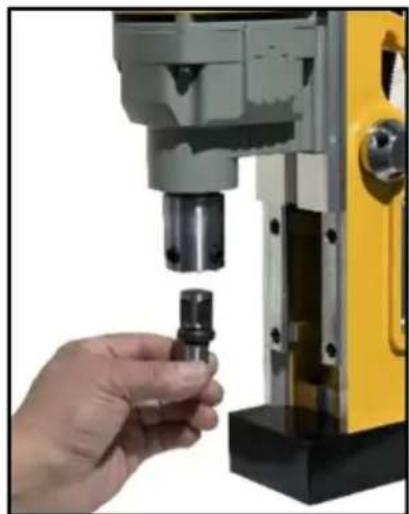
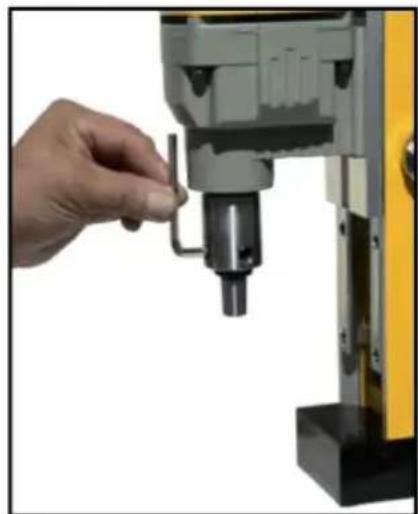
- Slide the chuck onto the arbor until it is locked into place.
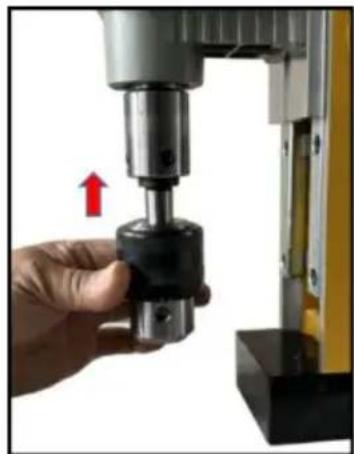
- Loosen the chuck's jaws by inserting the chuck wrench into either hole or chuck and turning it counterclockwise.
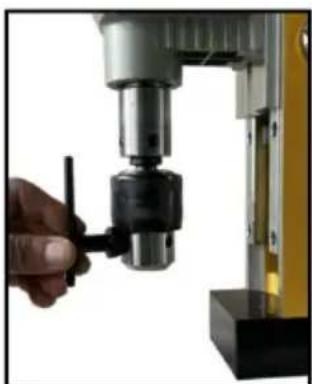
- Mount your twist drill bit (not included) into the chuck and turn the chuck wrench clockwise until the bit is locked in place.
WARNING: ALWAYS remove adjustment wrenches before use.
ANNULAR CUTTER/CORE DRILL BIT INSTALLATION
- Insert the pilot pin into the top hole of your core drill bit (not included).
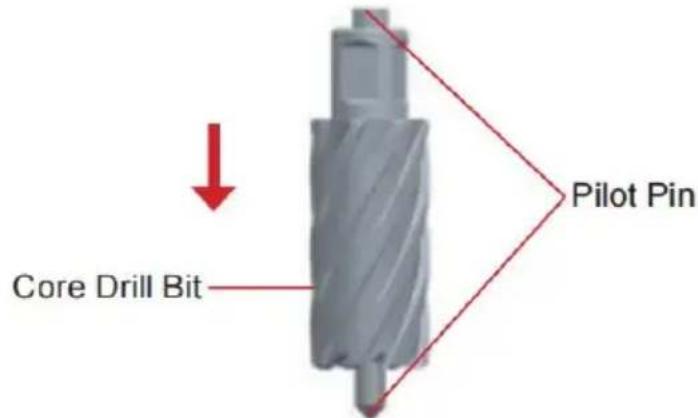
- Fit the bit onto the spindle, locking it in place by attaching the set screw tightening them with the M5 hex wrench.
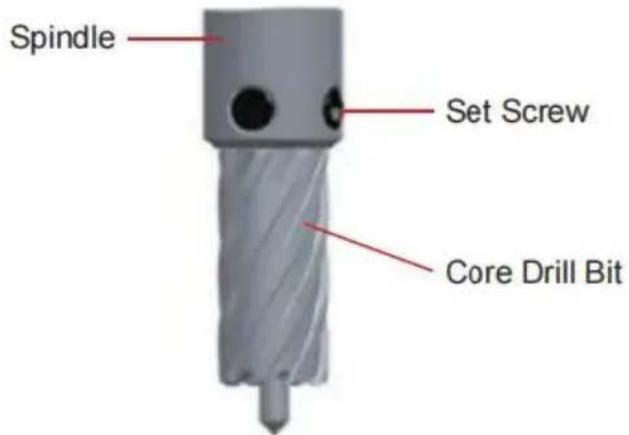
WARNING: ALWAYS remove adjustment wrenches before use.
- Locate with a pilot pin first within the center position marked or marker.
- To start drilling, you must press the annular cutter slowly, allowing the cut to touch the steel plate carefully. The feed rate should be reduced by 1/3 w the completion of a drilled hole is near.
NOTE: The annular cutter should always be in the cooling state during cutting. The best cooling method is with cooling device. Flow of the coolant should be less than 47cc/min.
For those materials which create a large amount of fine powder, such as cast copper and cast copper, coolant can not be used. Compressed air can be used inst for chip removal.
- Pay attention to whether chips are winding. Withdraw the cutter and remove chip to avoid cutter damage due to squeezing.
- In the case of the slug sticking in the inner bore, adjust the bit blade b cutter body with a metalloid bar till the slug drops off. Never use hard object tap the edges of teeth to prevent damage to the sharpening edges.
- Slug sticking occurs due to the following :
| Rouble Spots | Solution |
| Edges of teeth dull or damage. | Replace with a new cutter. |
| Gap of sidewalk is too large. | Reduce gap of sidewalk. |
| Cooling is not sufficient. | Increase the flow of coolant. |
| Feeding too large or too hard w drilling through steel plates. | Slow down. |
| Spring of the arbor breaks. | Replace new spring. |
- In order to avoid the influence of magnetic suction, clear out the iron filir clutter at the bottom of the magnetic base before drilling.
TROUBLE SHOOTING INSTRUCTION
| Problem | Reason | Solution |
| Magnetic holder has no suction. | Poor switch contact. | Repair switch. |
| The power is off. | Repairing the power | |
| The fuse is blown out | Replace the fuse | |
| Electromagnet short circuit or burn out. | Repair or replace the magnetic base. | |
| It is not adsorbed or steel parts. | Change or thicken the adsorption surface (thickness > 15mm). | |
| The machine won't work after the power is on. | Poor switch contact. | Repair switch. |
| Loose plug. | Connecting the power | |
| The brush does not contact the commutator. | Replace the brush. | |
| Magnetic seat suction weak. | The adsorbed workpiece is too thin. | Change or thicken the adsorption surface (thickness > 15mm). |
| Small adsorbable surface. | Change the adsorption surface or temporarily weld the thick adsorption surface. | |
| Elliptical holes appear in the drilling holes. | The vibration caused the fastener to loosen. | Tighten the fastener after correcting the verticality. |
| The drill cuts only on | Regrinding bit. | |
| There is debris on the adsorption surface. | Remove clutter. |
MAINTENANCE AND STORAGE
NOTE: Please remove the plug before maintenance.
- After each use, clean the bottom of the magnetic seat drill and keep it g
- Please butter the track in time when the slide is not smooth.
- Please check the electrical protection device regularly.
- Whether grounding is reliable.
- Please check it in time during the rainy season.
VEVOR
TOUGH TOOLS, HALF PRICE
Technical Support and E-Warranty Certificate
www.vevor.com/support
VEVOR®
TOUGH TOOLS, HALF PRICE
elettronica www.vevor.com/support
VEVOR®
TOUGH TOOLS, HALF PRICE
Soporte专业技术 y certificate de garantia electrònica www.vevor.com/support
TALADRO CON BASE MAGNETICA
MODELO:ZT-40HAR
www.vevor.com/support
VEVOR®
TOUGH TOOLS, HALF PRICE
Technische ondersteuning en e-garantiecertificaat www.vevor.com/support
MAGNETISCHE BASISBOOR
MODEL:ZT-40HAR
HULP NODIG? NEEM CONTACT MET ONS OP!
VEILIGHEIDSWAARSCHUWINGEN

VOLGORDE VAN WERKING
garantiecertificaat www.vevor.com/support
VEVOR®
TOUGH TOOLS, HALF PRICE
Assistance technique et certificat de garantie electronique www.vevor.com/support
FORETÀBASE MAGNETIQUE
MODELE: ZT-40HAR
Forets (2 pieces): 1 / 2^ + 5 / 8^ USA Forets (2
(PIECES):Φ12mm+Φ16mm EUR/AUS
ORDRE D'OPERATION
www.vevor.com/support
- MAGNETIC BASE DRILL
- MODEL:ZT-40HAR
- VEVOR®
- MODEL: ZT-40HAR
- NEED HELP? CONTACT US!
- SAFETYWARNINGS
- General Power Tool SafetyWarnings - Personal safety
- Power tool use and care
- Service
- Vibration Safety
- Grounding Safety
- STRUCTURE DIAGRAM
- ORDER OF OPERATION
- INSTALLATION OF COOLANT TANK
- TWIST DRILL BIT INSTALLATION
- ANNULAR CUTTER/CORE DRILL BIT INSTALLATION
- MAINTENANCE AND STORAGE
- NOTE: Please remove the plug before maintenance.
- VEVOR
- TOUGH TOOLS, HALF PRICE
- MAGNETISCHE BASISBOOR
- HULP NODIG? NEEM CONTACT MET ONS OP!
- VEILIGHEIDSWAARSCHUWINGEN
- VOLGORDE VAN WERKING
- ORDRE D'OPERATION
Brand : Vevor
Model : ZT-40HAR
Category : Drill