
TY210075 - Motor vehicle accessory Vevor - Free user manual and instructions
Find the device manual for free TY210075 Vevor in PDF.

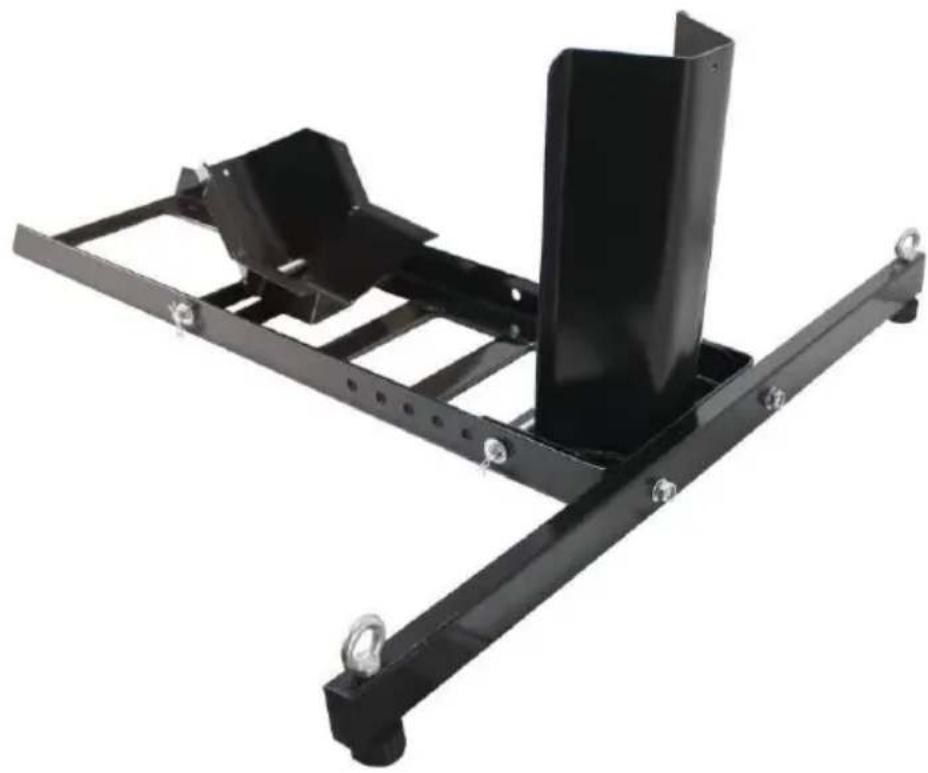
| Product Type | Motorcycle Wheel Chock |
| Brand | Vevor |
| Model | TY210075 |
| Maximum Load Capacity | 1800 lb (approx. 816 kg) |
| Suitable Tire Diameter | 15 to 22 inches |
| Suitable Tire Width | 3 to 7 inches |
| Main Material | Steel |
| Assembly | Assembly required – instructions provided – mount on concrete or truck bed |
| Main Function | Lock and immobilize the front wheel of a motorcycle for transport or storage |
| Locking Mechanism | Pivoting bracket that closes when the wheel is in place |
| Adjustment | Wheel support position adjustable according to tire size |
| Maximum Transport Speed | 88 km/h (55 mph) |
| Safety | Use tie-down straps – do not exceed capacity – wear protective equipment – do not use under influence |
| Maintenance | Check component condition – tighten hardware – clean regularly – replace if damaged |
| Spare Parts | Wheel cradle, wheel support, base, front bracket, eyelets, caps, washers, nuts, R-pins, rod, bolts (see manual) |
| Warranty | Technical support and electronic warranty certificate via www.vevor.com |
Frequently Asked Questions - TY210075 Vevor
User questions about TY210075 Vevor
0 question about this device. Answer the ones you know or ask your own.
Ask a new question about this device
Download the instructions for your Motor vehicle accessory in PDF format for free! Find your manual TY210075 - Vevor and take your electronic device back in hand. On this page are published all the documents necessary for the use of your device. TY210075 by Vevor.
USER MANUAL TY210075 Vevor
Technical Support and E-Warranty Certificate www.vevor.com/support
MOTORCYCLE WHEEL CHOCK USER MANUAL
Model: TY210075
We continue to be committed to provide you tools with competitive price. "Save Half", "Half Price" or any other similar expressions used by us only represents an estimate of savings year might benefit from buying certain tools with us compared to the major top brands and doses not necessarily mean to cover all categories of tools offered by us. You are kindly reminded verify carefully when you are placing an order with us if you are actually saving half in comparison with the top major brands.
VEVOR®
Motorcycle Wheel Chock
Model: TY210075
natural_image
Metal frame structure with mounting holes and a vertical panel, no visible text or symbolsNEED HELP? CONTACT US!
Have product questions? Need technical support? Please feel free to contact us:

CustomerService@vevor.com
This is the original instruction, please read all manual instructions carefully before operating. VEVOR reserves a clear interpretation of o user manual. The appearance of the product shall be subject to the product you received. Please forgive us that we won't inform you ag there are any technology or software updates on our product.

Safety & Warning
- Read and understand this entire manual before assembling, installing operating, or servicing this product. Failure to follow these warning and instructions can cause death, personal injury or damage to valuable property.
- Keep this manual for the safety warnings and precautions. The manual offers important information on how to assemble, use and maintain this product. Support load by appropriate means after lifting
- Do not exceed rated capacity.
- Use safety equipment. Safety shoes, hard hat and work gloves must used for applicable conditions.
- Dress appropriately. Never wear loose fitting clothing or jewelry whe working. Contain long hair, and keep hair, clothing and gloves aw from moving parts. Use common sense when working. Stay alert ar concentrate when setting up and using the Motorcycle Wheel Chock. Never work while under the influence of alcohol, drugs or medications.
- Before transporting a motorcycle in a truck bed, secure the motorcycle with ropes, and/or tie-downs (not included). The vehicle's engine m be OFF and parking brake set before loading or unloading the motor-cycle into or out of the Wheel Chock. Do not exceed 55 M while transporting a motor-cycle in a truck bed.
Keep in mind that the warnings previously discussed cannot cover all possible events and circumstances. It is important that the person setting up and using this Motorcycle Wheel Chock use common sense at all times.
Specifications
| Model Series | TY210075 |
| Maximum Load Capacity (lbs) | 1800 |
| Fit Tire Diameter(inch) | 15-22 |
| Fit Tire Width(inch) | 3-7 |
Parts List
| Part Description Qty Part Description Qty | |
| 1 Wheel Cradle 1 7 Washer,size12 2 | |
| 2 Wheel Bracket 1 8 Nut,M10 2 | |
| 3 Stand Base 1 9 Washer,size12 4 | |
| 4 Front Support 1 10 R-Pin 4 | |
| 5 Eyelet 2 11 Rod 2 | |
| 6 Leg Plug 2 12 Bolt, M10 x 45 2 |

Mounting the Motorcycle Wheel Chock
-
Once assembled, this Motorcycle Wheel Chock must be mounted to solid, level concrete surface, or in the bed of a truck.
-
To assemble the Wheel Chock:
A. Assemble Front Support (4) to the front, closed end of the Stand Base (3), using Bolts (12), Washers (7) and Nuts (8). If not already assembled, thread the Eyelets (5) and the Leg Plugs (8) into the Front Support.
B. See Assembly Drawing for positioning of the Wheel Bracket (2). Assemble this to the Stand Base using Rod (11) secured with Washers (9) and R-Pins (10).
C. Note: The Wheel Cradle (1) can be moved forward, or backward depending on the size of the motorcycle front wheel.
Measure the motorcycle front wheel and see how it fits between the Wheel Bracket(2) and the Wheel Cradle(1). Then put the Wheel Cradle in the desired position and secure it in place using Rod (11); use Washers (9) and R-Pins (10) to lock the Rod in place.
D. This Wheel Chock and Stand must be securely mounted before using. Plan the location carefully. The mounting surface must be level and solid and designed to support the heavy weight of a motorcycle. There should be adequate room on both sides of the Stand so that the motorcycle can be safely rolled in and out without obstructions.
E. There are mounting holes in the bottom of the Stand Base (3). Use these holes as a template to plan where to mount the Stand. Mounting hardware should be inserted into all 4 of the mounting holes on each side of the Stand Base.
F. For mounting in concrete, use concrete drill bit to drill holes; then attach concrete see how it fits between the Wheel Bracket securing the Stand Base to the concrete. Follow hardware manufacturer's instructions for properly securing concrete anchors in the cement.
G. For mounting to a truck bed, plan the location only after making sure that no electrical wires, gas tanks or other obstacles are in the path of the drilling. Use a steel cutting drill bit to drill the needed holes. Secure the Stand Base to the truck bed with appropriate hardware.
Using the Motorcycle Wheel Chock
-
As stated, the Wheel Cradle (1) can be adjusted to one of six positions depending on the size of the motorcycle wheel. Find the position that best locks the wheel in place when the wheel is rolled the Wheel Bracket pivots up to its closed position.
-
Loading a motorcycle into a truck bed will require appropriate ramps (not included). The motorcycle must also be secured to the truck with straps or belts (not included). To load the motorcycle into the Wheel Chock, lower the leading edge of the Wheel Bracket (2) and slowly the motorcycle into the Stand. It is recommended that an assistant he with this task. As the wheel rolls in, the pivoting Bracket will pivot a close, securing the motorcycle in the Wheel Chock.
- If the motorcycle is going to be stored in the Wheel Chock length of time, it is recommended that additional stability supports a used (straps or belts).
- To release the motorcycle from the Wheel Chock, first remove stability supports used, and then with assistance, slowly roll back the motorcycle away from the Wheel Chock.
Maintaining the Wheel Chock
Frequently check the condition of the Motorcycle Wheel Chock. Make sure all components are in good condition. If the Wheel Chock becomes damaged through accident, or if any weld damage noted, the product should be replaced. Check to make sure that hardware is tightly secured in place. Keep the Wheel Chock clean
VEVOR®
TOUGH TOOLS, HALF PRICE
Technical Support and E-Warranty Certificate
www.vevor.com/support
Made In China
VEVOR®
TOUGH TOOLS, HALF PRICE
natural_image
Black metal frame structure with mounting holes and a vertical support (no text or symbols visible)BESOIN D'AIDE ? CONTACTEZ-NOUS !
www.vevor.com/support
Fabriqué en Chine
VEVOR®
TOUGH TOOLS, HALF PRICE
natural_image
Black metal frame structure with mounting holes and a vertical support (no text or symbols visible)www.vevor.com/support
natural_image
Metal frame structure with mounting feet and a vertical support (no text or symbols visible)elettronica www.vevor.com/support
Made in China
VEVOR®
TOUGH TOOLS, HALF PRICE
CALZO PARA RUEDA DEMOTOCICLETA
MANUAL DELUSUARIO
Modelo: TY210075
natural_image
Black metal frame structure with mounting holes and a vertical support (no text or symbols visible)natural_image
Black metal frame structure with mounting holes and a vertical support (no text or symbols visible)POTRZEBUJESZ POMOCY? SKONTAKTUJ SIĘ Z NAMI!
www.vevor.com/support
natural_image
Metal frame structure with mounting feet and a vertical support (no text or symbols visible)HULP NODIG? NEEM CONTACT MET ONS OP!
Klantenservice@vevor.com
www.vevor.com/support
Gemaakt in China
VEVOR®
TOUGH TOOLS, HALF PRICE
natural_image
Metal frame structure with mounting feet and a vertical support (no text or symbols visible)BEHÖVER DU HJÄLP? KONTAKTA OSS!
Montering avmotorcykelhjulskloss
www.vevor.com/support
Tillverkad i Kina


