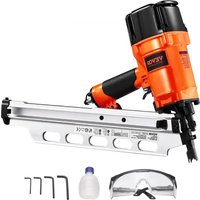
USER MANUAL RHF9021NS Vevor
Technical Support and E-Warranty Certificate
www.vevor.com/support
FRAMING NAILER
MODEL: RHF9021NS
We continue to be committed to providing you with tools at competitive prices. "Save Half", "Half Price", or any other similar expressions used by us only represent an estimate of savings you might benefit from buying certain tools with us compared to the major top brands and do not necessarily mean to cover all categories of tools offered by us. You are kindly reminded to verify carefully when placing an order with us if you are actually saving half in comparison with the top major brands.
MODEL: RHF9021NS
Have product questions? Need technical support? Please feel free to contact us:
Technical Support and E-Warranty Certificate www.vevor.com/support
This is the original instruction. Please read all manual instructions carefully before operating. VEVOR reserves a clear interpretation of the user manual. The appearance of the product shall be subject to the product you received. Please forgive us that we won't inform you again if there are any technology or software updates on our product.
 | Warning-To reduce the risk of injury, user must read instructions manual carefully. |
 | Warning-marking concerning risk of Eye Injury |
 | Warning-marking concerning Risk of Hearing Loss |
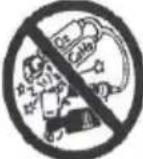 | Never use oxygen or other bottled gasses |
WARNING
Please read and fully understand this manual for information relating to protecting your safety and preventing equipment problems.
Safety instructions
EYE PROTECTION: Which meets ANSI specifications and provides protection against flying particles both from the FRONT and SIDE should ALWAYS be worn by the operator and others in the work area when connecting to air supply, loading, operating, or servicing this tool. Eye protection is required to guard against flying fasteners and debris, which could cause severe eye injury.
AIR SUPPLY AND CONNECTIONS
Do not use oxygen, combustible gases, or bottled gases as a power source for this tool, as the tool may explode and possibly cause injury.
Do not use supply sources that can potentially exceed 200 P.S.I.G. The tool may burst, possibly causing injury.
The connector on the tool must not hold pressure when the air supply is disconnected. If the wrong fitting is used, the tool can remain charged with air after disconnecting and will be able to drive a fastener even after the line is disconnected, possibly causing injury.
Do not pull the trigger or depress the safety arm while connected to the air, as the tool may cycle, possibly causing injury.
Always disconnect the air supply: 1. Before making adjustments; 2. When servicing the tool; 3. When clearing a jam; 4. When the tool is not in use. When moving to a different work area, eliminate accidental actuation which may cause possible injury.
WARNING:
When loading the tool: 1. Never place a hand or any other part of your body in the fastener discharge area of the tool; 2. Never point the tool at anyone; 3. Do not pull the trigger or depress the safety as actuation may occur, possibly causing injury.
The operator must not hold the trigger pulled on contact trip (bump mode) except during fastening operation, as serious injury could result if the tip accidentally contacted someone or something, causing the tool to
Always keep hands and body away from the discharge area of the tool. In contact safety (bump fire) mode, the tool may bounce from the recoil of driving a fastener, and an unwanted second fastener may be driven, possibly causing
injury.
Inspect the operation of the contact safety mechanism frequently. Do not use the tool if the safety is not working correctly, as accidental driving of a fastener may occur. Do not interfere with the proper operation of the safety arm mechanism.
Do not drive fasteners with the tool at an overly steep angle or on other fasteners, as this may cause deflection of fasteners which could cause injury.
SCHEMATIC & PART LIST
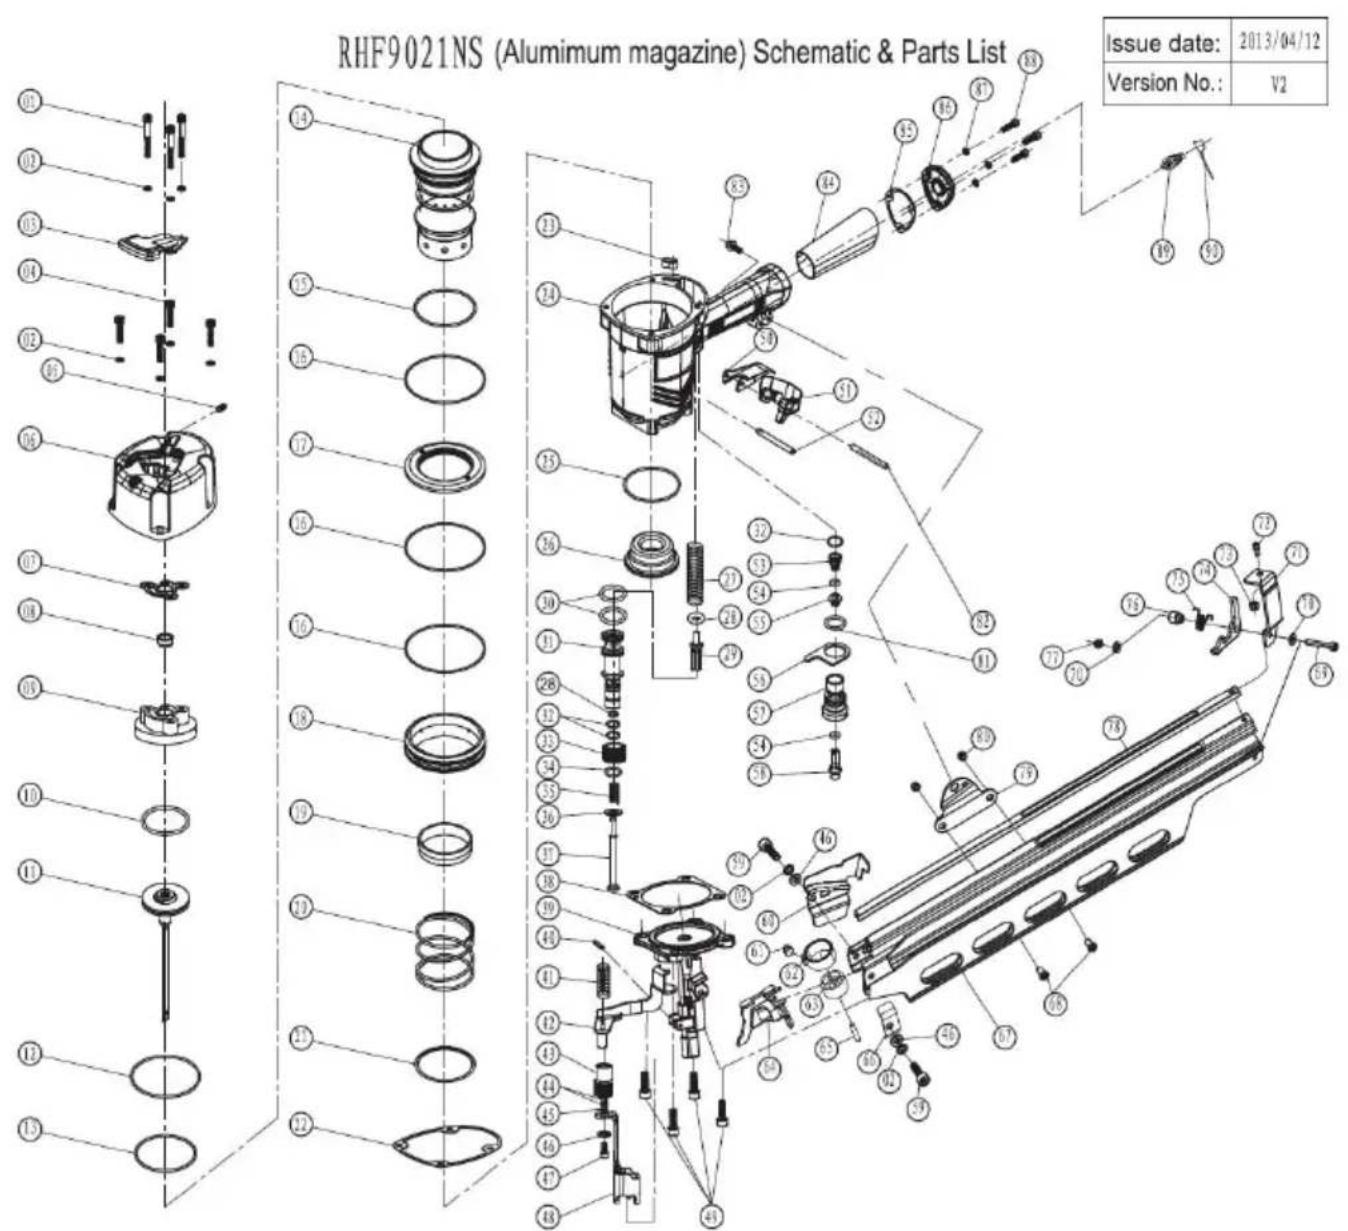
| No. | Description | Qty. | No. | Description | Qty. |
| 01 | Hex bolt M6X45 | 3 | 24 | Gun body | 1 |
| 02 | Spring washer 6 | 9 | 25 | O-ring | 1 |
| 03 | Air Deflector | 1 | 26 | Bumper | 1 |
| 04 | Hex bolt M6X25 | 4 | 27 | Compressed spring | 1 |
| 05 | Hex bolt M4X4 | 1 | 28 | O-ring 4.5X1.8 | 2 |
| 06 | Cylinder cover | 1 | 29 | Pusher | 1 |
| 07 | Head valve washer | 1 | 30 | O-ring 10*2 | 2 |
| 08 | Sealing plug | 1 | 31 | Valve pole | 1 |
| 09 | Head valve | 1 | 32 | O-ring (9X1.8) | 3 |
| 10 | O-ring 50X3.55 | 1 | 33 | Valve pole Sleeve | 1 |
| 11 | Main piston | 1 | 34 | O-ring (6.1 X1.8) | 1 |
| 12 | O-ring 79.3x2.5 | 1 | 35 | Compressed spring | 1 |
| 13 | O-ring 69.3x2.5 | 1 | 36 | Flat washer 5 | 1 |
| 14 | Cylinder | 1 | 37 | Pusher pin | 1 |
| 15 | O-ring 62.8X2.65 | 1 | 38 | Gasket | 1 |
| 16 | O-ring 95 x2 5 . | 3 | 39 | Dirve guide | 1 |
| 17 | Upper collar | 1 | 40 | Pin | 2 |
| 18 | Nether collar | 1 | 41 | Compressed spring | 1 |
| 19 | Sealing washer | 1 | 42 | Safety yoke assembly | 1 |
| 20 | Compressed spring | 1 | 43 | Adjust nut | 1 |
| 21 | Spring washer | 1 | 44 | Compressed spring | 2 |
| 22 | Washer | 1 | 45 | Steel ball | 2 |
| 23 | Sealing washer | 1 | 46 | Flat washer 6 | 3 |
| 47 | Bolt M6*10 | 1 | 70 | Flat washer 4 | 2 |
| 48 | Safety nose | 1 | 71 | Baffle | 1 |
| 49 | Bolt M8*20 | 4 | 72 | Bolt M5*10 | 1 |
| 50 | Trigger | 1 | 73 | Nut | 1 |
| 51 | Safety seat | 1 | 74 | Latch | 1 |
| 52 | Pin 3*30 | 1 | 75 | Latch spring | 1 |
| 53 | Spring | 1 | 76 | Pin sleeve | 1 |
| 54 | O-ring 7 x 1.9 | 2 | 77 | Nut M4 | 1 |
| 55 | Pusher | 1 | 78 | Nail guide bar | 1 |
| 56 | Fixed piece | 1 | 79 | Fixed seat | 1 |
| 57 | Switch seat | 1 | 80 | Nut M6 | 2 |
| 58 | Switch pole | 1 | 81 | O-ring 11.2*1.85 | |
| 59 | Bolt M6*18 | 2 | 82 | Pin | 1 |
| 60 | Fixed block | 1 | 83 | Bolt M8*16 | 1 |
| 61 | Locating pin | 1 | 84 | Handle sleeve | 1 |
| 62 | Scroll spring | 1 | 85 | End cap washer | 1 |
| 63 | Spring core | 1 | 86 | End cap | 1 |
| 64 | Pusher assembly | 1 | 87 | Spring washer 5 | 3 |
| 65 | Pin 4*25 | 1 | 88 | Bolt M5*18 | 3 |
| 66 | Protector block | 1 | 89 | Air coupler | 1 |
| 67 | Aluminum magazine | 1 | 90 | Coupler plug | 1 |
| 68 | Bolt M6*12 | 2 | | | |
| 69 | Bolt M4*25 | 1 | | | |
WARNING:
Do not drive fasteners close to the edge of the work piece, as the wood may split, allowing the fastener to be deflected, possibly causing injury.
- The operator requires a finger to be off the trigger and the work contact element (safety) of the tool to be placed on the work piece.
element (safety) of the tool to be placed on the work piece.
- The work contact element is then depressed against the workpiece, and the trigger is pulled to drive the fastener.
- The trigger is then released after each fastener is driven. Move to the next location where the fastener will be driven and repeat the procedure.
- Empty fasteners from magazine.
- Make sure the trigger and the safety move up and down without sticking.
- Make sure the trigger and the safety move up and down without sticking.
Check and replace any damaged or worn components of the tool. The safety warning labels on the tool must be replaced if they become un-readable from wear.
Check and replace any damaged or worn components of the tool. The safety warning labels on the tool must be replaced if they become unreadable from wear.
- Depress the safety against the work piece without pulling the trigger. The tool must not cycle (fire). Never use the tool if a cycle occurs.
- Hold the tool clear from the work piece. The safety should return to original down position. Pull the trigger, the tool must not cycle (fire). Do not use the tool if a cycle occurs.
- Hold the tool clear from the workpiece. The safety should return to its original down position. Pull the trigger; the tool must not cycle (fire). Do not use the tool if a cycle occurs.
- Connect the air hose.
- Depress the magazine latch; pull back on the pusher until it latches back of magazine.
- Insert a strip of fasteners into the magazine. Make sure points of fasteners are in forward position. Also make sure fasteners are not damaged.
- Release the latch lever and slide pusher forward until it makes contact with nail strip.
- Add a few drops of tool oil daily into air inlet coupler before operating tool.
- Attach air hose with high flow quick disconnect.
- Regulate air pressure to obtain the air pressure to within the recommended working pressure range, (70~120 P.S.I.G.)
- Load fasteners into your tool following the instructions in this manual.
- Test for proper fastener penetration by driving nails into sample piece of wood. If fasteners do not achieve the desired depth, adjust the air pressure to a higher setting until the desired depth is achieved. If you are using tool with a depth-control device, turn the thumb wheel until the desired depth is achieved.
- Fastener Jammed in Fastener Discharge Area: Disconnect tool from air hose. Grab jammed fastener with pliers and remove nail. If tool is equipped with a quick release nose cover, open the cover and remove jammed fastener. Reset cover.
- Fastener Jam inside Magazine: Disconnect tool from air hose. Pull back on pusher until it latches at back of magazine. Remove jammed fastener from magazine, release pusher.
- Always disconnect tool from air hose before cleaning. Remove any build-up with WD-40 oil or a cleaning solution. Never soak tool in any cleaning solution. This can cause damage to rubber parts and gaskets.
OPERATING TRIGGER VALVE SELECT SWITCH
- Set the switching device under trigger to the full downward position otherwise it will not operate properly.
- With the tool off the work piece, pull the trigger lever. Depress the lever against the work piece. THE TOOL MUST OPERATE (FIRE).
See Diagram for details.
SEQUENTIAL FIRE (SINGLE FIRE) ACTUATION POSITION
- Set the switching device under trigger to the full upward position, otherwise it will not operate properly. TOOL MUST NOT LEAK AIR.
- Remove your finger from trigger lever and press the safety lever at the wood. TOOL MUST NOT FIRE.
- Without touching the trigger lever, depress the safety lever against work piece. Pull the trigger. THE TOOL MUST FIRE.
- Hold the trigger while separating the safety lever from wood, the blade will remain in the down position.
- Release your finger from the trigger lever; the driver blade will return to the top position.
ADJUSTING DEPTH OF DRIVE SAFETY
To assure that each nail is driven to the same depth, be sure that:
- Air pressure to the tool is consistent, and a regulator is installed and properly in line with the tool.
- The tool is always held firmly against the work piece. If nails are driven too shallow or too deep into the work piece, adjust the Safety Adjust Wheel on the Safety to the desired depth.
See Diagram for details.
TOOL MAINTENANCE AND INSPECTION
- Inspect the magazine; clean it by removing any plastic or wood chips that may have accumulated.
- Make sure the Pusher Lever operates smoothly in the magazine.
- Check that the Safety Lever operates smoothly and freely up and down.
- Lubricate moving parts daily for proper operation of the tool.
ADJUSTING AIR PRESSURE
Adjust air pressure at the recommended operating pressure of 70~120 psi (4.9~8.3 bar) according to the length of nails and the hardness of the work. Correct air pressure is the lowest pressure that will do the job. Use of pressure higher than required to drive nails to proper setting puts unnecessary stress on the tool and parts.
Information contained in this manual is designed to assist you in the operation of your tool. Some illustrations in this manual may show attachments that differ from those on your own tool.
Nailing operation switching device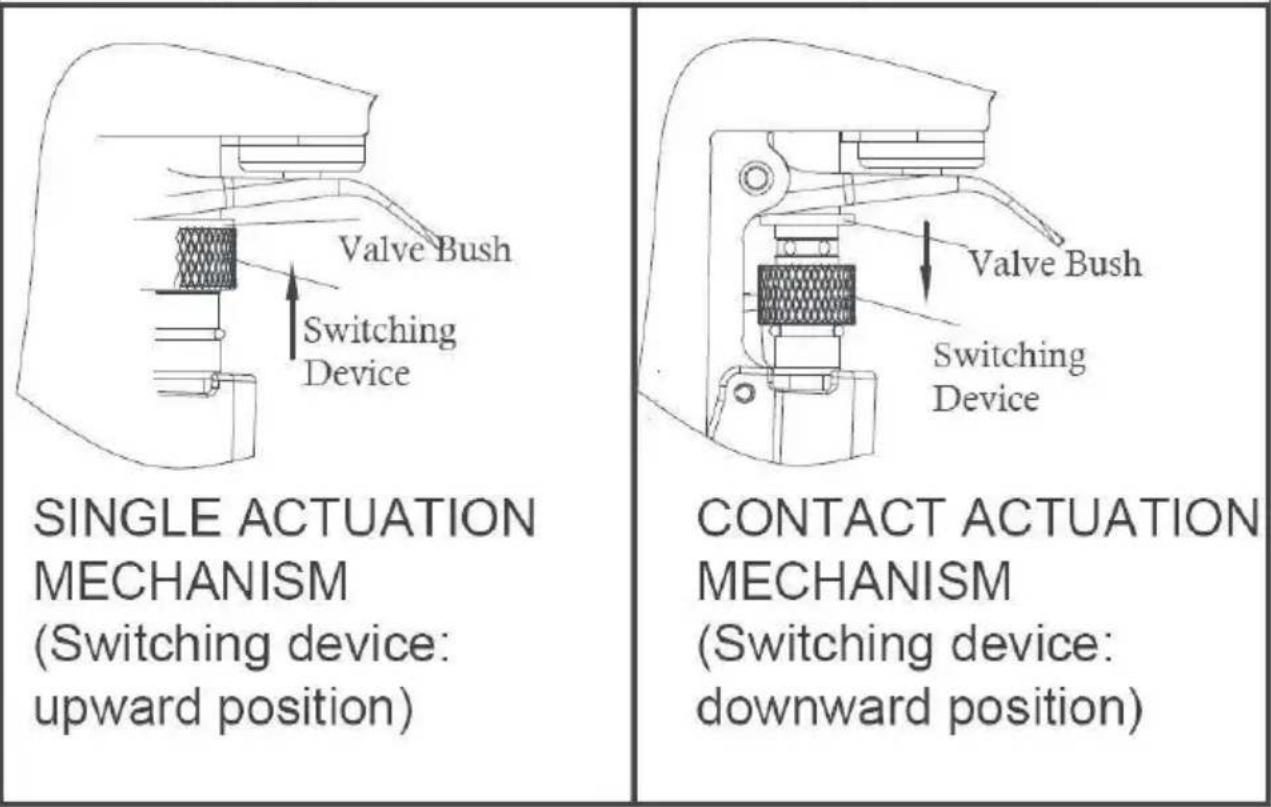
ADJUSTING NAILING DEPTH
(Only Model RHF9021NS with depth adjustment on safety)
Disconnect tool from air hose before turning the adjuster thumb wheel safety.
To assure that each nail penetrates to the same depth, be sure that
- Air pressure to the tool remains constant (regulator is installed and working properly), and
- The tool is always held firmly against the work piece. If nails are too deep or too shallow into the work piece, adjust the thumb wheel safety in the following order.
DISCONNECT AIR HOSE FROM TOOL
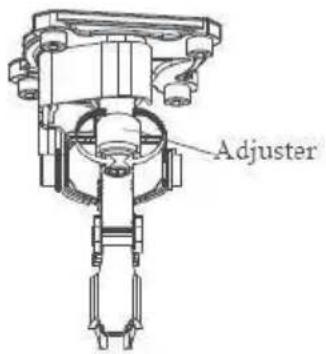
- If nails are driven too deep, turn adjuster to the shallow side.
Adjustments are in half-turn increments.
![graph TD A["Too Shallow"] --> B["Turn Adjuster"] C["Too Deep"] --> D["Turn Adjuster"] B --> E["Flush"] D --> F["Flush"]](/content/2026/04/736298/images/d364649c47a3c088dc92e97eab036b0a6d1908fa058340d3d2bd9abe4b4852d6.jpg)
If nails are driven too shallow, turn adjuster to the deep side.
- Stop turning the adjuster when a suitable position is reached 1 nailing test.
- Connect the air hose. ALWAYS WEAR EYE PROTECTION. Perform a nailing test.
Manufacturer: Shanghaimuxinmuyeyouxiangongsi
Address: Shuangchenglu 803nong11hao1602A-1609shi, baoshanqu, shanghai 200000 CN.
Imported to AUS: SIHAO PTY LTD. 1 ROKEVA STREETEASTWOOD NSW 2122 Australia
Imported to USA: Sanven Technology Ltd. Suite 250, 9166 Anaheim Place, Rancho Cucamonga, CA 91730
YH CONSULTING LIMITED. C/O YH Consulting Limited Office 147, Centurion House, London Road, Staines-upon-Thames, Surrey, TW18 4A>
Technical Support and E-Warranty Certificate
www.vevor.com/support
VEVOR®
| No. | Description | Qty. | No. | Description | Qty. |
| 01 | Hex bolt M6X45 | 3 | 24 | Gun body | 1 |
| 02 | Spring washer 6 | 9 | 25 | O-ring | 1 |
| 03 | Air Deflector | 1 | 26 | Bumper | 1 |
| 04 | Hex bolt M6X25 | 4 | 27 | Compressed spring | 1 |
| 05 | Hex bolt M4X4 | 1 | 28 | O-ring 4.5X1.8 | 2 |
| 06 | Cylinder cover | 1 | 29 | Pusher | 1 |
| 07 | Head valve washer | 1 | 30 | O-ring 10*2 | 2 |
| 08 | Sealing plug | 1 | 31 | Valve pole | 1 |
| 09 | Head valve | 1 | 32 | O-ring (9X1.8) | 3 |
| 10 | O-ring 50X3.55 | 1 | 33 | Valve pole Sleeve | 1 |
| 11 | Main piston | 1 | 34 | O-ring (6.1 X1.8) | 1 |
| 12 | O-ring 79.3x2.5 | 1 | 35 | Compressed spring | 1 |
| 13 | O-ring 69.3x2.5 | 1 | 36 | Flat washer 5 | 1 |
| 14 | Cylinder | 1 | 37 | Pusher pin | 1 |
| 15 | O-ring 62.8X2.65 | 1 | 38 | Gasket | 1 |
| 16 | O-ring 95 x2 5 . | 3 | 39 | Dirve guide | 1 |
| 17 | Upper collar | 1 | 40 | Pin | 2 |
| 18 | Nether collar | 1 | 41 | Compressed spring | 1 |
| 19 | Sealing washer | 1 | 42 | Safety yoke assembly | 1 |
| 20 | Compressed spring | 1 | 43 | Adjust nut | 1 |
| 21 | Spring washer | 1 | 44 | Compressed spring | 2 |
| 22 | Washer | 1 | 45 | Steel ball | 2 |
| 23 | Sealing washer | 1 | 46 | Flat washer 6 | 3 |
| 47 | Bolt M6*10 | 1 | 70 | Flat washer 4 | 2 |
| 48 | Safety nose | 1 | 71 | Baffle | 1 |
| 49 | Bolt M8*20 | 4 | 72 | Bolt M5*10 | 1 |
| 50 | Trigger | 1 | 73 | Nut | 1 |
| 51 | Safety seat | 1 | 74 | Latch | 1 |
| 52 | Pin 3*30 | 1 | 75 | Latch spring | 1 |
| 53 | Spring | 1 | 76 | Pin sleeve | 1 |
| 54 | O-ring 7 x 1.9 | 2 | 77 | Nut M4 | 1 |
| 55 | Pusher | 1 | 78 | Nail guide bar | 1 |
| 56 | Fixed piece | 1 | 79 | Fixed seat | 1 |
| 57 | Switch seat | 1 | 80 | Nut M6 | 2 |
| 58 | Switch pole | 1 | 81 | O-ring 11.2*1.85 | |
| 59 | Bolt M6*18 | 2 | 82 | Pin | 1 |
| 60 | Fixed block | 1 | 83 | Bolt M8*16 | 1 |
| 61 | Locating pin | 1 | 84 | Handle sleeve | 1 |
| 62 | Scroll spring | 1 | 85 | End cap washer | 1 |
| 63 | Spring core | 1 | 86 | End cap | 1 |
| 64 | Pusher assembly | 1 | 87 | Spring washer 5 | 3 |
| 65 | Pin 4*25 | 1 | 88 | Bolt M5*18 | 3 |
| 66 | Protector block | 1 | 89 | Air coupler | 1 |
| 67 | Aluminum magazine | 1 | 90 | Coupler plug | 1 |
| 68 | Bolt M6*12 | 2 | | | |
| 69 | Bolt M4*25 | 1 | | | |
AVERTISSEMENT:
Nailing operation switching device
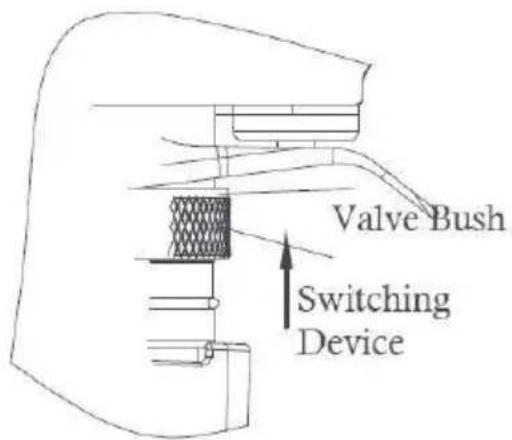
SINGLE ACTUATION
MECHANISM
(Switching device: upward position)
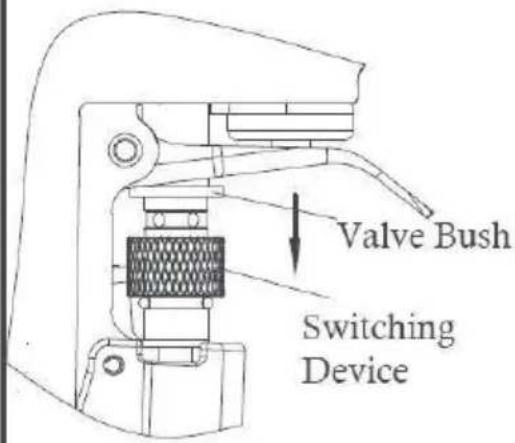
CONTACT ACTUATION
MECHANISM
(Switching device: downward position)
RÉGLAGE DE LA PROFONDEUR DE CLOUAGE
Lieu, Rancho Cucamonga, CA 91730
YH CONSULTING LIMITED. C/O YH Consulting Limited Office 147, Centurion House, London Road, Staines-upon-Thames, Surrey, TW18 4A>
www.vevor.com/support
FRAME NAILER
MODEL: RHF9021NS
| No. | Description | Qty. | No. | Description | Qty. |
| 01 | Hex bolt M6X45 | 3 | 24 | Gun body | 1 |
| 02 | Spring washer 6 | 9 | 25 | O-ring | 1 |
| 03 | Air Deflector | 1 | 26 | Bumper | 1 |
| 04 | Hex bolt M6X25 | 4 | 27 | Compressed spring | 1 |
| 05 | Hex bolt M4X4 | 1 | 28 | O-ring 4.5X1.8 | 2 |
| 06 | Cylinder cover | 1 | 29 | Pusher | 1 |
| 07 | Head valve washer | 1 | 30 | O-ring 10*2 | 2 |
| 08 | Sealing plug | 1 | 31 | Valve pole | 1 |
| 09 | Head valve | 1 | 32 | O-ring (9X1.8) | 3 |
| 10 | O-ring 50X3.55 | 1 | 33 | Valve pole Sleeve | 1 |
| 11 | Main piston | 1 | 34 | O-ring (6.1 X1.8) | 1 |
| 12 | O-ring 79.3x2.5 | 1 | 35 | Compressed spring | 1 |
| 13 | O-ring 69.3x2.5 | 1 | 36 | Flat washer 5 | 1 |
| 14 | Cylinder | 1 | 37 | Pusher pin | 1 |
| 15 | O-ring 62.8X2.65 | 1 | 38 | Gasket | 1 |
| 16 | O-ring 95 x2 5 . | 3 | 39 | Dirve guide | 1 |
| 17 | Upper collar | 1 | 40 | Pin | 2 |
| 18 | Nether collar | 1 | 41 | Compressed spring | 1 |
| 19 | Sealing washer | 1 | 42 | Safety yoke assembly | 1 |
| 20 | Compressed spring | 1 | 43 | Adjust nut | 1 |
| 21 | Spring washer | 1 | 44 | Compressed spring | 2 |
| 22 | Washer | 1 | 45 | Steel ball | 2 |
| 23 | Sealing washer | 1 | 46 | Flat washer 6 | 3 |
| 47 | Bolt M6*10 | 1 | 70 | Flat washer 4 | 2 |
| 48 | Safety nose | 1 | 71 | Baffle | 1 |
| 49 | Bolt M8*20 | 4 | 72 | Bolt M5*10 | 1 |
| 50 | Trigger | 1 | 73 | Nut | 1 |
| 51 | Safety seat | 1 | 74 | Latch | 1 |
| 52 | Pin 3*30 | 1 | 75 | Latch spring | 1 |
| 53 | Spring | 1 | 76 | Pin sleeve | 1 |
| 54 | O-ring 7 x 1.9 | 2 | 77 | Nut M4 | 1 |
| 55 | Pusher | 1 | 78 | Nail guide bar | 1 |
| 56 | Fixed piece | 1 | 79 | Fixed seat | 1 |
| 57 | Switch seat | 1 | 80 | Nut M6 | 2 |
| 58 | Switch pole | 1 | 81 | O-ring 11.2*1.85 | |
| 59 | Bolt M6*18 | 2 | 82 | Pin | 1 |
| 60 | Fixed block | 1 | 83 | Bolt M8*16 | 1 |
| 61 | Locating pin | 1 | 84 | Handle sleeve | 1 |
| 62 | Scroll spring | 1 | 85 | End cap washer | 1 |
| 63 | Spring core | 1 | 86 | End cap | 1 |
| 64 | Pusher assembly | 1 | 87 | Spring washer 5 | 3 |
| 65 | Pin 4*25 | 1 | 88 | Bolt M5*18 | 3 |
| 66 | Protector block | 1 | 89 | Air coupler | 1 |
| 67 | Aluminum magazine | 1 | 90 | Coupler plug | 1 |
| 68 | Bolt M6*12 | 2 | | | |
| 69 | Bolt M4*25 | 1 | | | |
WARNING:
Nailing operation switching device
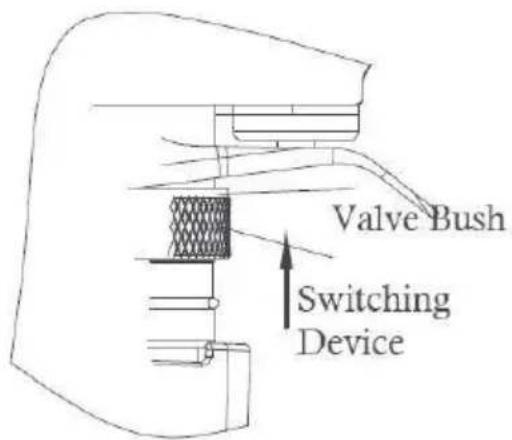
SINGLE ACTUATION MECHANISM (Switching device: upward position)
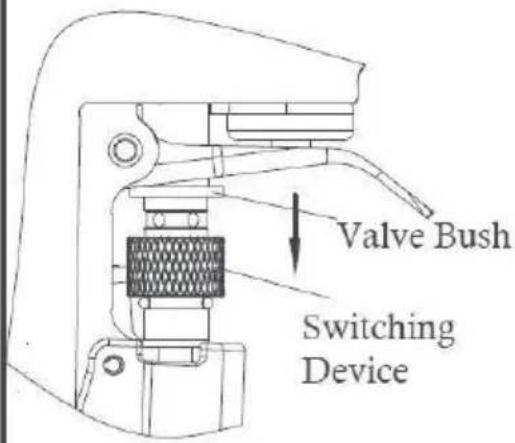
CONTACT ACTUATION MECHANISM (Switching device: downward position)
YH CONSULTING LIMITED. C/O YH Consulting Limited Office 147, Centurion House, London Road, Staines-upon-Thames, Surrey, TW18 4A>
www.vevor.com/support
VEVOR®
| No. | Description | Qty. | No. | Description | Qty. |
| 01 | Hex bolt M6X45 | 3 | 24 | Gun body | 1 |
| 02 | Spring washer 6 | 9 | 25 | O-ring | 1 |
| 03 | Air Deflector | 1 | 26 | Bumper | 1 |
| 04 | Hex bolt M6X25 | 4 | 27 | Compressed spring | 1 |
| 05 | Hex bolt M4X4 | 1 | 28 | O-ring 4.5X1.8 | 2 |
| 06 | Cylinder cover | 1 | 29 | Pusher | 1 |
| 07 | Head valve washer | 1 | 30 | O-ring 10*2 | 2 |
| 08 | Sealing plug | 1 | 31 | Valve pole | 1 |
| 09 | Head valve | 1 | 32 | O-ring (9X1.8) | 3 |
| 10 | O-ring 50X3.55 | 1 | 33 | Valve pole Sleeve | 1 |
| 11 | Main piston | 1 | 34 | O-ring (6.1 X1.8) | 1 |
| 12 | O-ring 79.3x2.5 | 1 | 35 | Compressed spring | 1 |
| 13 | O-ring 69.3x2.5 | 1 | 36 | Flat washer 5 | 1 |
| 14 | Cylinder | 1 | 37 | Pusher pin | 1 |
| 15 | O-ring 62.8X2.65 | 1 | 38 | Gasket | 1 |
| 16 | O-ring 95 x2 5 . | 3 | 39 | Dirve guide | 1 |
| 17 | Upper collar | 1 | 40 | Pin | 2 |
| 18 | Nether collar | 1 | 41 | Compressed spring | 1 |
| 19 | Sealing washer | 1 | 42 | Safety yoke assembly | 1 |
| 20 | Compressed spring | 1 | 43 | Adjust nut | 1 |
| 21 | Spring washer | 1 | 44 | Compressed spring | 2 |
| 22 | Washer | 1 | 45 | Steel ball | 2 |
| 23 | Sealing washer | 1 | 46 | Flat washer 6 | 3 |
| 47 | Bolt M6*10 | 1 | 70 | Flat washer 4 | 2 |
| 48 | Safety nose | 1 | 71 | Baffle | 1 |
| 49 | Bolt M8*20 | 4 | 72 | Bolt M5*10 | 1 |
| 50 | Trigger | 1 | 73 | Nut | 1 |
| 51 | Safety seat | 1 | 74 | Latch | 1 |
| 52 | Pin 3*30 | 1 | 75 | Latch spring | 1 |
| 53 | Spring | 1 | 76 | Pin sleeve | 1 |
| 54 | O-ring 7 x 1.9 | 2 | 77 | Nut M4 | 1 |
| 55 | Pusher | 1 | 78 | Nail guide bar | 1 |
| 56 | Fixed piece | 1 | 79 | Fixed seat | 1 |
| 57 | Switch seat | 1 | 80 | Nut M6 | 2 |
| 58 | Switch pole | 1 | 81 | O-ring 11.2*1.85 | |
| 59 | Bolt M6*18 | 2 | 82 | Pin | 1 |
| 60 | Fixed block | 1 | 83 | Bolt M8*16 | 1 |
| 61 | Locating pin | 1 | 84 | Handle sleeve | 1 |
| 62 | Scroll spring | 1 | 85 | End cap washer | 1 |
| 63 | Spring core | 1 | 86 | End cap | 1 |
| 64 | Pusher assembly | 1 | 87 | Spring washer 5 | 3 |
| 65 | Pin 4*25 | 1 | 88 | Bolt M5*18 | 3 |
| 66 | Protector block | 1 | 89 | Air coupler | 1 |
| 67 | Aluminum magazine | 1 | 90 | Coupler plug | 1 |
| 68 | Bolt M6*12 | 2 | | | |
| 69 | Bolt M4*25 | 1 | | | |
WARNING:
Nailing operation switching device
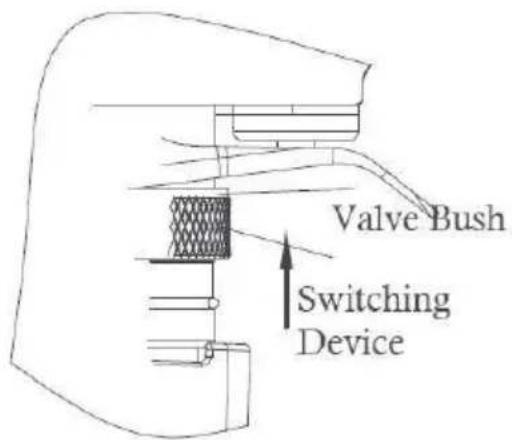
SINGLE ACTUATION MECHANISM (Switching device: upward position)
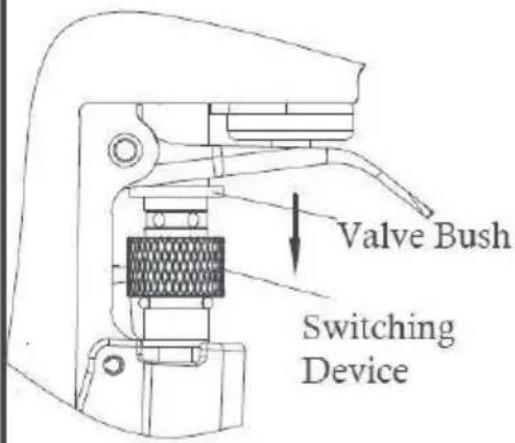
CONTACT ACTUATION MECHANISM (Switching device: downward position)
YH CONSULTING LIMITED. C/O YH Consulting Limited Office 147, Centurion House, London Road, Staines-upon-Thames, Surrey, TW18 4A>
| No. | Description | Qty. | No. | Description | Qty. |
| 01 | Hex bolt M6X45 | 3 | 24 | Gun body | 1 |
| 02 | Spring washer 6 | 9 | 25 | O-ring | 1 |
| 03 | Air Deflector | 1 | 26 | Bumper | 1 |
| 04 | Hex bolt M6X25 | 4 | 27 | Compressed spring | 1 |
| 05 | Hex bolt M4X4 | 1 | 28 | O-ring 4.5X1.8 | 2 |
| 06 | Cylinder cover | 1 | 29 | Pusher | 1 |
| 07 | Head valve washer | 1 | 30 | O-ring 10*2 | 2 |
| 08 | Sealing plug | 1 | 31 | Valve pole | 1 |
| 09 | Head valve | 1 | 32 | O-ring (9X1.8) | 3 |
| 10 | O-ring 50X3.55 | 1 | 33 | Valve pole Sleeve | 1 |
| 11 | Main piston | 1 | 34 | O-ring (6.1 X1.8) | 1 |
| 12 | O-ring 79.3x2.5 | 1 | 35 | Compressed spring | 1 |
| 13 | O-ring 69.3x2.5 | 1 | 36 | Flat washer 5 | 1 |
| 14 | Cylinder | 1 | 37 | Pusher pin | 1 |
| 15 | O-ring 62.8X2.65 | 1 | 38 | Gasket | 1 |
| 16 | O-ring 95 x2 5 . | 3 | 39 | Dirve guide | 1 |
| 17 | Upper collar | 1 | 40 | Pin | 2 |
| 18 | Nether collar | 1 | 41 | Compressed spring | 1 |
| 19 | Sealing washer | 1 | 42 | Safety yoke assembly | 1 |
| 20 | Compressed spring | 1 | 43 | Adjust nut | 1 |
| 21 | Spring washer | 1 | 44 | Compressed spring | 2 |
| 22 | Washer | 1 | 45 | Steel ball | 2 |
| 23 | Sealing washer | 1 | 46 | Flat washer 6 | 3 |
| 47 | Bolt M6*10 | 1 | 70 | Flat washer 4 | 2 |
| 48 | Safety nose | 1 | 71 | Baffle | 1 |
| 49 | Bolt M8*20 | 4 | 72 | Bolt M5*10 | 1 |
| 50 | Trigger | 1 | 73 | Nut | 1 |
| 51 | Safety seat | 1 | 74 | Latch | 1 |
| 52 | Pin 3*30 | 1 | 75 | Latch spring | 1 |
| 53 | Spring | 1 | 76 | Pin sleeve | 1 |
| 54 | O-ring 7 x 1.9 | 2 | 77 | Nut M4 | 1 |
| 55 | Pusher | 1 | 78 | Nail guide bar | 1 |
| 56 | Fixed piece | 1 | 79 | Fixed seat | 1 |
| 57 | Switch seat | 1 | 80 | Nut M6 | 2 |
| 58 | Switch pole | 1 | 81 | O-ring 11.2*1.85 | |
| 59 | Bolt M6*18 | 2 | 82 | Pin | 1 |
| 60 | Fixed block | 1 | 83 | Bolt M8*16 | 1 |
| 61 | Locating pin | 1 | 84 | Handle sleeve | 1 |
| 62 | Scroll spring | 1 | 85 | End cap washer | 1 |
| 63 | Spring core | 1 | 86 | End cap | 1 |
| 64 | Pusher assembly | 1 | 87 | Spring washer 5 | 3 |
| 65 | Pin 4*25 | 1 | 88 | Bolt M5*18 | 3 |
| 66 | Protector block | 1 | 89 | Air coupler | 1 |
| 67 | Aluminum magazine | 1 | 90 | Coupler plug | 1 |
| 68 | Bolt M6*12 | 2 | | | |
| 69 | Bolt M4*25 | 1 | | | |
WARNING:
Nailing operation switching device
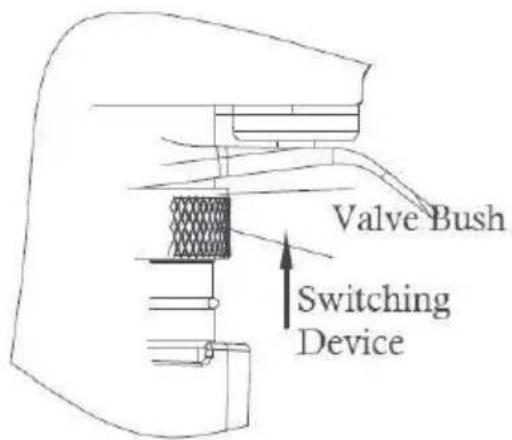
SINGLE ACTUATION MECHANISM (Switching device: upward position)
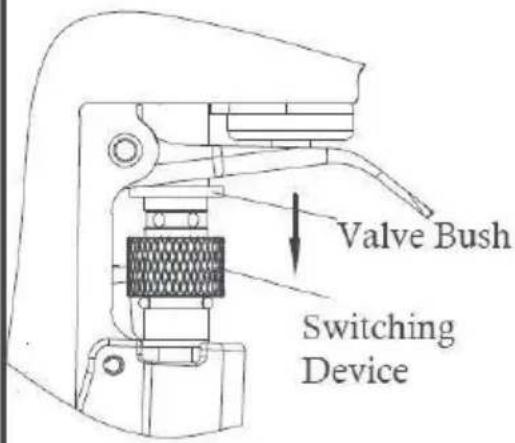
CONTACT ACTUATION MECHANISM (Switching device: downward position)
| No. | Description | Qty. | No. | Description | Qty. |
| 01 | Hex bolt M6X45 | 3 | 24 | Gun body | 1 |
| 02 | Spring washer 6 | 9 | 25 | O-ring | 1 |
| 03 | Air Deflector | 1 | 26 | Bumper | 1 |
| 04 | Hex bolt M6X25 | 4 | 27 | Compressed spring | 1 |
| 05 | Hex bolt M4X4 | 1 | 28 | O-ring 4.5X1.8 | 2 |
| 06 | Cylinder cover | 1 | 29 | Pusher | 1 |
| 07 | Head valve washer | 1 | 30 | O-ring 10*2 | 2 |
| 08 | Sealing plug | 1 | 31 | Valve pole | 1 |
| 09 | Head valve | 1 | 32 | O-ring (9X1.8) | 3 |
| 10 | O-ring 50X3.55 | 1 | 33 | Valve pole Sleeve | 1 |
| 11 | Main piston | 1 | 34 | O-ring (6.1 X1.8) | 1 |
| 12 | O-ring 79.3x2.5 | 1 | 35 | Compressed spring | 1 |
| 13 | O-ring 69.3x2.5 | 1 | 36 | Flat washer 5 | 1 |
| 14 | Cylinder | 1 | 37 | Pusher pin | 1 |
| 15 | O-ring 62.8X2.65 | 1 | 38 | Gasket | 1 |
| 16 | O-ring 95 x2 5 . | 3 | 39 | Dirve guide | 1 |
| 17 | Upper collar | 1 | 40 | Pin | 2 |
| 18 | Nether collar | 1 | 41 | Compressed spring | 1 |
| 19 | Sealing washer | 1 | 42 | Safety yoke assembly | 1 |
| 20 | Compressed spring | 1 | 43 | Adjust nut | 1 |
| 21 | Spring washer | 1 | 44 | Compressed spring | 2 |
| 22 | Washer | 1 | 45 | Steel ball | 2 |
| 23 | Sealing washer | 1 | 46 | Flat washer 6 | 3 |
| 47 | Bolt M6*10 | 1 | 70 | Flat washer 4 | 2 |
| 48 | Safety nose | 1 | 71 | Baffle | 1 |
| 49 | Bolt M8*20 | 4 | 72 | Bolt M5*10 | 1 |
| 50 | Trigger | 1 | 73 | Nut | 1 |
| 51 | Safety seat | 1 | 74 | Latch | 1 |
| 52 | Pin 3*30 | 1 | 75 | Latch spring | 1 |
| 53 | Spring | 1 | 76 | Pin sleeve | 1 |
| 54 | O-ring 7 x 1.9 | 2 | 77 | Nut M4 | 1 |
| 55 | Pusher | 1 | 78 | Nail guide bar | 1 |
| 56 | Fixed piece | 1 | 79 | Fixed seat | 1 |
| 57 | Switch seat | 1 | 80 | Nut M6 | 2 |
| 58 | Switch pole | 1 | 81 | O-ring 11.2*1.85 | |
| 59 | Bolt M6*18 | 2 | 82 | Pin | 1 |
| 60 | Fixed block | 1 | 83 | Bolt M8*16 | 1 |
| 61 | Locating pin | 1 | 84 | Handle sleeve | 1 |
| 62 | Scroll spring | 1 | 85 | End cap washer | 1 |
| 63 | Spring core | 1 | 86 | End cap | 1 |
| 64 | Pusher assembly | 1 | 87 | Spring washer 5 | 3 |
| 65 | Pin 4*25 | 1 | 88 | Bolt M5*18 | 3 |
| 66 | Protector block | 1 | 89 | Air coupler | 1 |
| 67 | Aluminum magazine | 1 | 90 | Coupler plug | 1 |
| 68 | Bolt M6*12 | 2 | | | |
| 69 | Bolt M4*25 | 1 | | | |
WARNING:
Nailing operation switching device
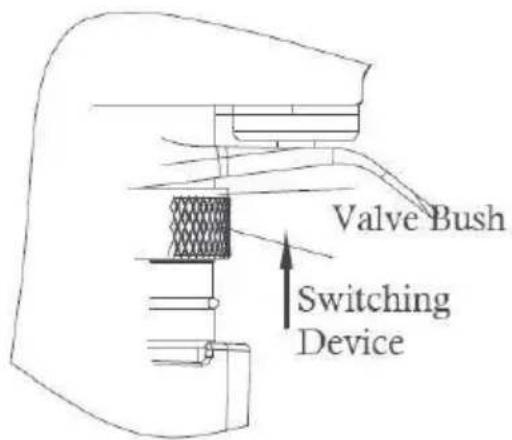
SINGLE ACTUATION MECHANISM (Switching device: upward position)
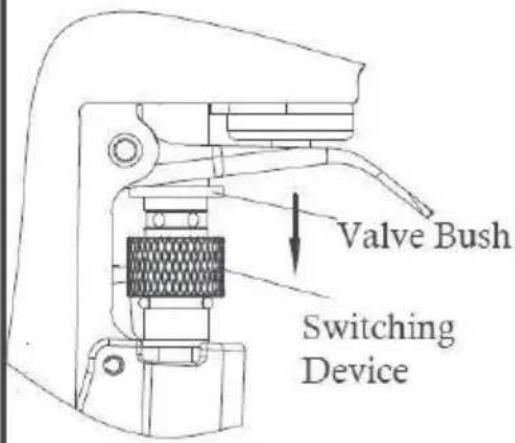
CONTACT ACTUATION MECHANISM (Switching device: downward position)
| No. | Description | Qty. | No. | Description | Qty. |
| 01 | Hex bolt M6X45 | 3 | 24 | Gun body | 1 |
| 02 | Spring washer 6 | 9 | 25 | O-ring | 1 |
| 03 | Air Deflector | 1 | 26 | Bumper | 1 |
| 04 | Hex bolt M6X25 | 4 | 27 | Compressed spring | 1 |
| 05 | Hex bolt M4X4 | 1 | 28 | O-ring 4.5X1.8 | 2 |
| 06 | Cylinder cover | 1 | 29 | Pusher | 1 |
| 07 | Head valve washer | 1 | 30 | O-ring 10*2 | 2 |
| 08 | Sealing plug | 1 | 31 | Valve pole | 1 |
| 09 | Head valve | 1 | 32 | O-ring (9X1.8) | 3 |
| 10 | O-ring 50X3.55 | 1 | 33 | Valve pole Sleeve | 1 |
| 11 | Main piston | 1 | 34 | O-ring (6.1 X1.8) | 1 |
| 12 | O-ring 79.3x2.5 | 1 | 35 | Compressed spring | 1 |
| 13 | O-ring 69.3x2.5 | 1 | 36 | Flat washer 5 | 1 |
| 14 | Cylinder | 1 | 37 | Pusher pin | 1 |
| 15 | O-ring 62.8X2.65 | 1 | 38 | Gasket | 1 |
| 16 | O-ring 95 x2 5 . | 3 | 39 | Dirve guide | 1 |
| 17 | Upper collar | 1 | 40 | Pin | 2 |
| 18 | Nether collar | 1 | 41 | Compressed spring | 1 |
| 19 | Sealing washer | 1 | 42 | Safety yoke assembly | 1 |
| 20 | Compressed spring | 1 | 43 | Adjust nut | 1 |
| 21 | Spring washer | 1 | 44 | Compressed spring | 2 |
| 22 | Washer | 1 | 45 | Steel ball | 2 |
| 23 | Sealing washer | 1 | 46 | Flat washer 6 | 3 |
| 47 | Bolt M6*10 | 1 | 70 | Flat washer 4 | 2 |
| 48 | Safety nose | 1 | 71 | Baffle | 1 |
| 49 | Bolt M8*20 | 4 | 72 | Bolt M5*10 | 1 |
| 50 | Trigger | 1 | 73 | Nut | 1 |
| 51 | Safety seat | 1 | 74 | Latch | 1 |
| 52 | Pin 3*30 | 1 | 75 | Latch spring | 1 |
| 53 | Spring | 1 | 76 | Pin sleeve | 1 |
| 54 | O-ring 7 x 1.9 | 2 | 77 | Nut M4 | 1 |
| 55 | Pusher | 1 | 78 | Nail guide bar | 1 |
| 56 | Fixed piece | 1 | 79 | Fixed seat | 1 |
| 57 | Switch seat | 1 | 80 | Nut M6 | 2 |
| 58 | Switch pole | 1 | 81 | O-ring 11.2*1.85 | |
| 59 | Bolt M6*18 | 2 | 82 | Pin | 1 |
| 60 | Fixed block | 1 | 83 | Bolt M8*16 | 1 |
| 61 | Locating pin | 1 | 84 | Handle sleeve | 1 |
| 62 | Scroll spring | 1 | 85 | End cap washer | 1 |
| 63 | Spring core | 1 | 86 | End cap | 1 |
| 64 | Pusher assembly | 1 | 87 | Spring washer 5 | 3 |
| 65 | Pin 4*25 | 1 | 88 | Bolt M5*18 | 3 |
| 66 | Protector block | 1 | 89 | Air coupler | 1 |
| 67 | Aluminum magazine | 1 | 90 | Coupler plug | 1 |
| 68 | Bolt M6*12 | 2 | | | |
| 69 | Bolt M4*25 | 1 | | | |
WARNING:
Nailing operation switching device
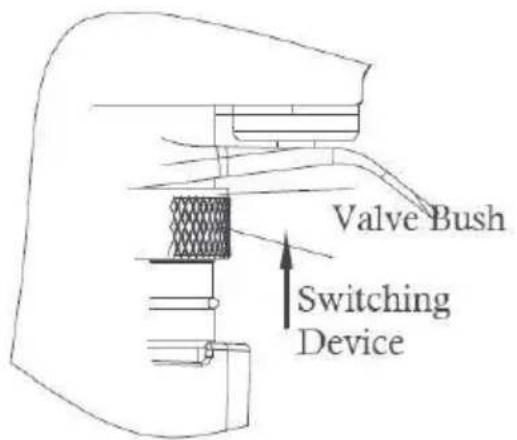
SINGLE ACTUATION MECHANISM
(Switching device: upward position)
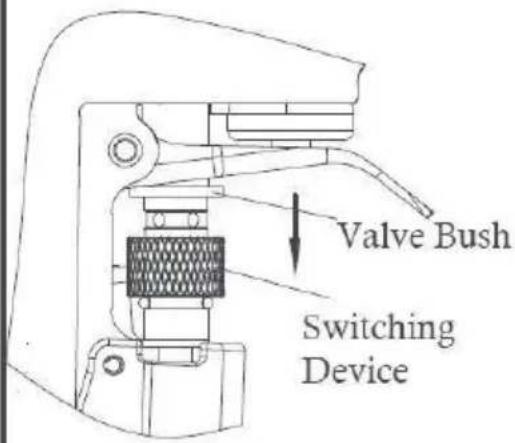
CONTACT ACTUATION MECHANISM
(Switching device: downward position)
ADJUSTING THE NAILING DEPTH
NEED HELP? CONTACT US!
| No. | Description | Qty. | No. | Description | Qty. |
| 01 | Hex bolt M6X45 | 3 | 24 | Gun body | 1 |
| 02 | Spring washer 6 | 9 | 25 | O-ring | 1 |
| 03 | Air Deflector | 1 | 26 | Bumper | 1 |
| 04 | Hex bolt M6X25 | 4 | 27 | Compressed spring | 1 |
| 05 | Hex bolt M4X4 | 1 | 28 | O-ring 4.5X1.8 | 2 |
| 06 | Cylinder cover | 1 | 29 | Pusher | 1 |
| 07 | Head valve washer | 1 | 30 | O-ring 10*2 | 2 |
| 08 | Sealing plug | 1 | 31 | Valve pole | 1 |
| 09 | Head valve | 1 | 32 | O-ring (9X1.8) | 3 |
| 10 | O-ring 50X3.55 | 1 | 33 | Valve pole Sleeve | 1 |
| 11 | Main piston | 1 | 34 | O-ring (6.1 X1.8) | 1 |
| 12 | O-ring 79.3x2.5 | 1 | 35 | Compressed spring | 1 |
| 13 | O-ring 69.3x2.5 | 1 | 36 | Flat washer 5 | 1 |
| 14 | Cylinder | 1 | 37 | Pusher pin | 1 |
| 15 | O-ring 62.8X2.65 | 1 | 38 | Gasket | 1 |
| 16 | O-ring 95 x2 5 . | 3 | 39 | Dirve guide | 1 |
| 17 | Upper collar | 1 | 40 | Pin | 2 |
| 18 | Nether collar | 1 | 41 | Compressed spring | 1 |
| 19 | Sealing washer | 1 | 42 | Safety yoke assembly | 1 |
| 20 | Compressed spring | 1 | 43 | Adjust nut | 1 |
| 21 | Spring washer | 1 | 44 | Compressed spring | 2 |
| 22 | Washer | 1 | 45 | Steel ball | 2 |
| 23 | Sealing washer | 1 | 46 | Flat washer 6 | 3 |
| 47 | Bolt M6*10 | 1 | 70 | Flat washer 4 | 2 |
| 48 | Safety nose | 1 | 71 | Baffle | 1 |
| 49 | Bolt M8*20 | 4 | 72 | Bolt M5*10 | 1 |
| 50 | Trigger | 1 | 73 | Nut | 1 |
| 51 | Safety seat | 1 | 74 | Latch | 1 |
| 52 | Pin 3*30 | 1 | 75 | Latch spring | 1 |
| 53 | Spring | 1 | 76 | Pin sleeve | 1 |
| 54 | O-ring 7 x 1.9 | 2 | 77 | Nut M4 | 1 |
| 55 | Pusher | 1 | 78 | Nail guide bar | 1 |
| 56 | Fixed piece | 1 | 79 | Fixed seat | 1 |
| 57 | Switch seat | 1 | 80 | Nut M6 | 2 |
| 58 | Switch pole | 1 | 81 | O-ring 11.2*1.85 | |
| 59 | Bolt M6*18 | 2 | 82 | Pin | 1 |
| 60 | Fixed block | 1 | 83 | Bolt M8*16 | 1 |
| 61 | Locating pin | 1 | 84 | Handle sleeve | 1 |
| 62 | Scroll spring | 1 | 85 | End cap washer | 1 |
| 63 | Spring core | 1 | 86 | End cap | 1 |
| 64 | Pusher assembly | 1 | 87 | Spring washer 5 | 3 |
| 65 | Pin 4*25 | 1 | 88 | Bolt M5*18 | 3 |
| 66 | Protector block | 1 | 89 | Air coupler | 1 |
| 67 | Aluminum magazine | 1 | 90 | Coupler plug | 1 |
| 68 | Bolt M6*12 | 2 | | | |
| 69 | Bolt M4*25 | 1 | | | |
WARNING:
Nailing operation switching device
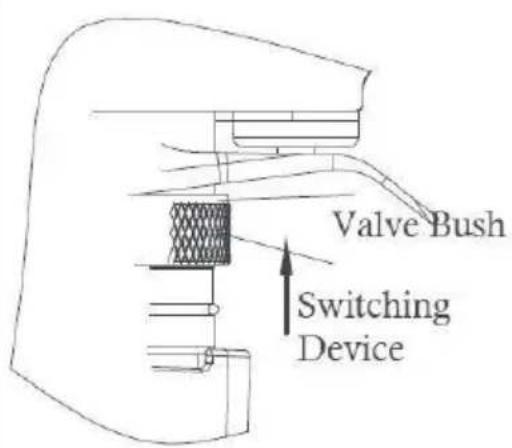
SINGLE ACTUATION MECHANISM (Switching device: upward position)
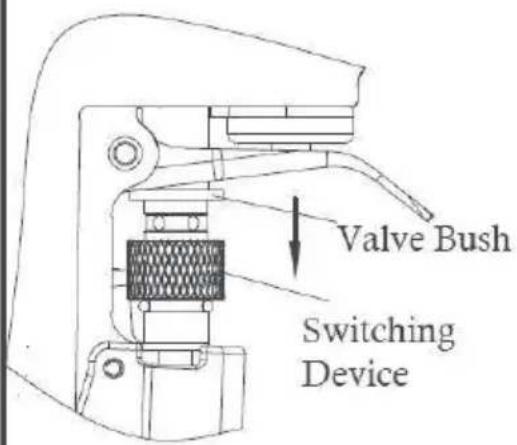
CONTACT ACTUATION MECHANISM (Switching device: downward position)
ADJUSTING THE NAILING DEPTH
www.vevor.com/support