
KT1103A - Plumbing tool Vevor - Free user manual and instructions
Find the device manual for free KT1103A Vevor in PDF.

| Product Type | Manual Ratchet Pipe Threader |
| Brand | Vevor |
| Model | KT1103A |
| Die Sizes | 1/2" (14 TPI), 3/4" (14 TPI), 1" (11.5 TPI) - NPT |
| Blade Material | 9SiCr Steel (Chrome-Silicon) |
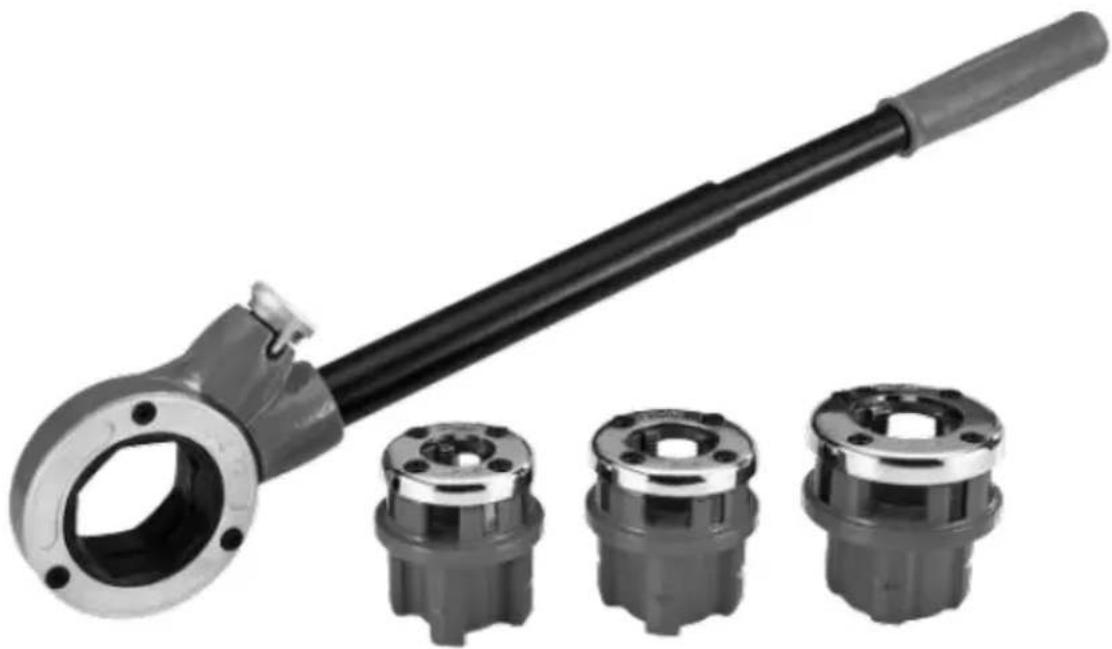
| Case Contents | 3 sets of blades (4 blades each), 3 covers, 3 ratchet couplings, ratchet, ratchet holder, stop ratchet, spring, reverse button, handle tube, handle, handle socket, oil can, carrying case |
| Compatible Materials | Copper, aluminum, galvanized pipes, iron (not recommended for stainless steel) |
| Mechanism | Reversible manual ratchet |
| Lubrication | Thread cutting oil (not included) |
| Safety | Wear safety glasses and work gloves; do not use handle extension; secure pipe in a vise |
| Maintenance | Clean with a damp cloth, lubricate regularly, replace worn blades by a qualified technician |
| Storage | In a dry place, out of reach of children |
| Technical Support | By email: ServiceClient@vevor.com |
| Warranty | Electronic warranty certificate available at www.vevor.com/support |
Frequently Asked Questions - KT1103A Vevor
User questions about KT1103A Vevor
0 question about this device. Answer the ones you know or ask your own.
Ask a new question about this device
Download the instructions for your Plumbing tool in PDF format for free! Find your manual KT1103A - Vevor and take your electronic device back in hand. On this page are published all the documents necessary for the use of your device. KT1103A by Vevor.
USER MANUAL KT1103A Vevor
Technical Support and E-Warranty Certificate www.vevor.com/support
MANUAL RATCHET PIPE THREADER USER MANUAL
Model: KT1103A
We continue to be committed to provide you tools with competitive price. "Save Half", "Half Price" or any other similar expressions used by us only represent of savings you might benefit from buying certain tools with us compared top brands and doses not necessarily mean to cover all categories of tools offered are kindly reminded to verify carefully when you are placing an order with us actually saving half in comparison with the top major brands.
VEVOR®
TOUGH TOOLS, HALF PRICE
MANUAL RATCHET PIPE THREADER
Model: KT1103A
natural_image
Close-up of a mechanical tool with flange and three separate cylindrical components (no text or symbols visible)Thanks for purchasing one of our products, please read carefully the assembl instructions before the installation.
NEED HELP? CONTACT US!
Have product questions? Need technical support? Please feel fr contact us:

CustomerService@vevor.com
This is the original instruction, please read all manual instruction carefully before operating. VEVOR reserves a clear interpretation user manual. The appearance of the product shall be subject to product you received. Please forgive us that we won't inform you there are any technology or software updates on our product.
PRODUCT PARAMETERS
| Model | Die Sizes | Screw Die Material | ||
| KT1103A | A:1/2" (14 TPI) | B:3/4" (14 TP) | C:1" (11.5 TP) | 9SiCr |
Manual pipe threader is designed to thread pipe or conduit using indi die heads for each size of pipe and a manually operated ratchet.
Suitable for copper pipes, aluminum pipes, galvanized pipes, iron pipes (not recommended for use with stainless steel pipes)
ASSEMBLY AND USE PRECAUTIONS
- Assemble needs to follow these instructions. Incorrect assembly can a hazard.
- Do not assemble when tired or under the influence of alcohol, drug medication.
- Keep bystanders out of the area in use.
- Use as intended only. Do not use handle extension to increase force
- Keep pipe lubricated with cutting oil (not included).
- Secure pipe to be threaded in clamp before use.
- Store idle equipment. When not in use, tools must be stored in a location to inhibit rust. Always lock up tools and keep out of reach of children.
- Maintain tools with care. Keep tools sharp and clean for better and performance. Follow instructions for lubricating and changing accessories. Check tool cords periodically. If they are damaged, have repaired by an authorized technician. The handles must be kept clean dry, and free from oil and grease at all times.
- Replacement parts and accessories. When servicing, use only identical replacement parts. Use of any other parts will void the warranty. Only accessories intended for use with this tool. Approved accessories are
available from Harbor Freight Tools.
- The warnings, precautions, and instructions discussed in this instruction manual cannot cover all possible conditions and situations that may of. The operator must understand that common sense and care are facto that cannot be built into the product but must be provided by the op

WARNING: TO PREVENT SERIOUS INJURY AND DEATH FROM
TIPPING:
- This product is not a toy. Do not allow children to play with or ap this item.
- Check before each use. Do not use the parts if they are loose or damaged.
- Wear safety goggles and heavy-duty work gloves in use.
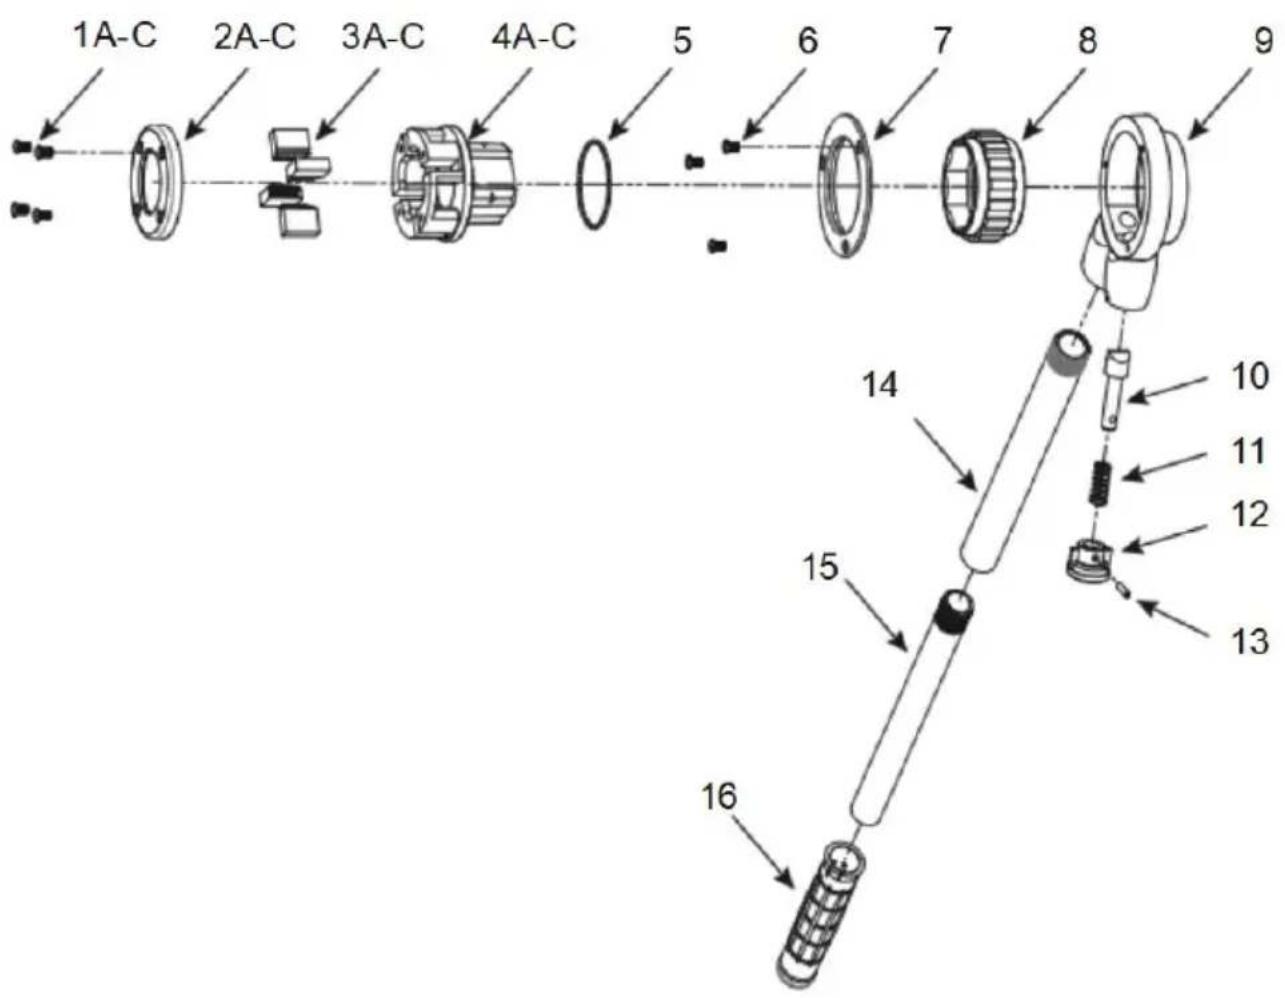
Parts List and Diagram
| Part | Description | Qty |
| 1A | 1/2" Die Screw | 4 |
| 2A | 1/2" Die Cover | 1 |
| 3A | 1/2" Die Blade Set | 4 |
| 4A | 1/2" Die Ratchet Coupling | 1 |
| 1B | 3/4" Die Screw | 4 |
| 2B | 3/4" Die Cover | 1 |
| 3B | 3/4" Die Blade Set | 4 |
| 4B | 3/4" Die Ratchet Coupling | 1 |
| 1C | 1" Die Screw | 4 |
| 2C | 1" Die Cover | 1 |
| 3C | 1" Die Blade Set | 4 |
| 4C | 1" Die Ratchet Coupling | 1 |
| 5 | Retaining Rind | 1 |
| 6 | Screw | 3 |
| 7 | Plate | 1 |
| Part | Description | Qty |
| 8 | Ratchet | 1 |
| 9 | Ratchet Holder | 1 |
| 10 | Pawl | 1 |
| 11 | Spring | 1 |
| 12 | Reversing Knob | 1 |
| 13 | Pin | 1 |
| 14 | Handle Tube | 1 |
| 15 | Handle | 1 |
| 16 | Handle Sleeve | 1 |
| 17 | Oil Can | 1 |
| 18 | Case (not shown) | 1 |
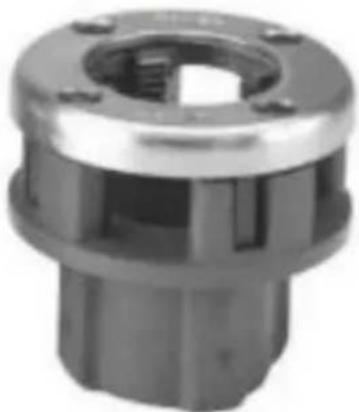
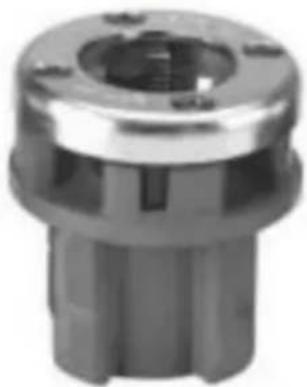
| A | 1/2" NPT Die | 1 |
| B | 3/4" NPT Die | 1 |
| C | 1" NPT Die | 1 |
natural_image
Close-up of a metallic mechanical component with a circular top and flange (no visible text or symbols)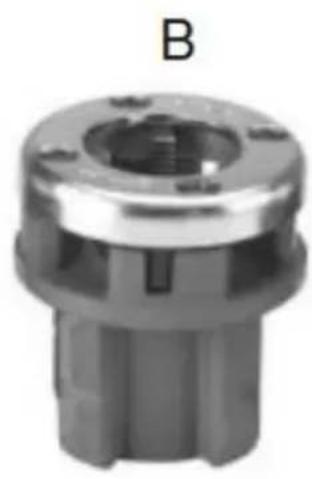
natural_image
Close-up of a mechanical component with a flanged top and hexagonal base (no visible text or symbols)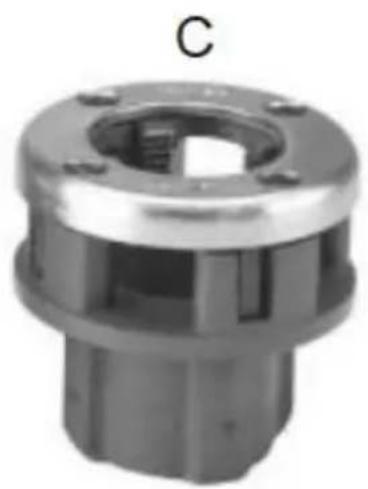
natural_image
Close-up of a metallic mechanical component with a central hole and flange (no visible text or symbols)Operating Instructions
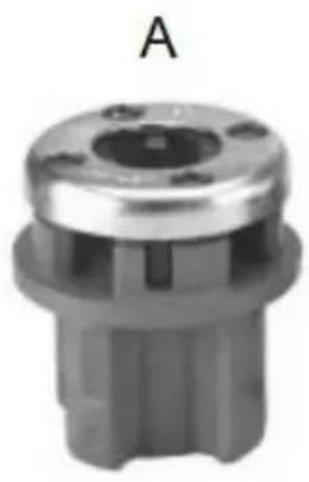
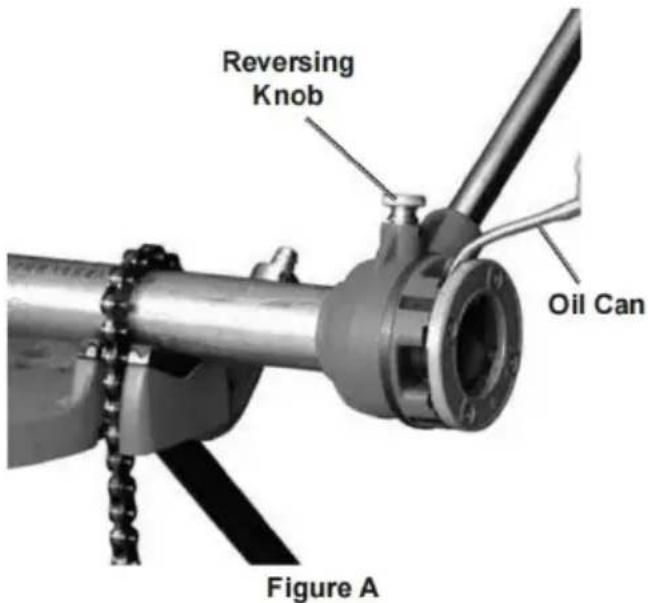
NOTICE: Make sure the pipe end and threads of the Die are sufficient, oiled at all times. Otherwise, Die life will be shortened and the threads be rough. See Figure A.
-
Assemble the Handle and insert the threaded portion of the Handle Tube in Ratchet Holder.
-
Determine the size of the pipe to be threaded.
-
Pick the appropriate Die to be used. Die sizes are stamped on the outside Die.
-
Place the rear of the Die next to the end of the pipe to be threaded. Veri inside diameter of the Die matches the outside diameter of the pipe.
-
Insert Die into Ratchet Holder. It is a forced fitting, and once the Die is in Ratchet Holder, it may require light tapping with a wooden mallet to remove
-
Fill the Oil Can with Thread Cutting Oil (sold separately). Keep it nearby during threading operation.
-
Make sure that the pipe to be threaded is properly secured in a vise (sold separately), and make sure the pipe end to be threaded is cut cleanly and so
-
Make sure that the Reversing Knob is seated all the way down into the g the Ratchet Holder and its arrow is pointing away from the handle.
-
Slide the pipe guide at the end of the ratchet holder through the pipe. With pressure is applied to the front end of the die, the handle is used to rotate ratchet support to engage the die to the pipe end. See Figure B. Continue operation until the desired thread length is achieved.
-
Stop threading when the end of the Die is flush with the end of the pi 11. To disengage the Die after threading is complete, pull out the Reversing turn it 180 degrees until the arrow points in the opposite direction (toward the handle), and drop it back into place. This will reverse the Pawl.
-
Use the Handle to rotate the Ratchet Holder in the opposite direction un Die disengages fully from the pipe end. Maintain control of the Ratchet Holder the Die slides off the pipe. Be careful not to damage newly cut threads.
-
Clean any spilled oil off the ground. Clean the threader and store it indoor dry clean area.
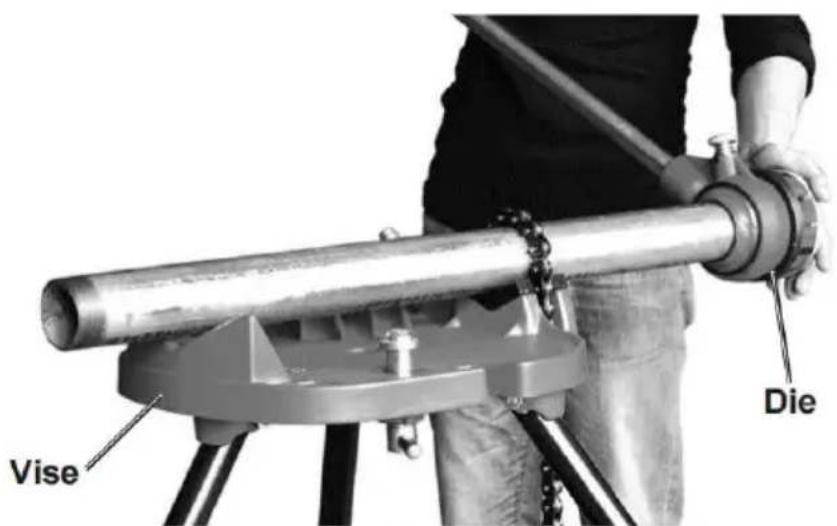
Figure B
Cleaning, Maintenance, and Lubrication
--For cleaning, wipe the surface with a damp (not wet) cloth or wipe with a clean lint free cotton cloth.
--DURING USE, ensure that pipe end and die threads are oiled with Thread Cutting Oil (not included) at all times.
-- Worn die blades will result in poor thread quality. If the blade is replace it with a qualified technician.
VEVOR®
TOUGH TOOLS, HALF PRICE
Technical Support and E-Warranty Certificate
www.vevor.com/support
Made In China
VEVOR®
TOUGH TOOLS, HALF PRICE
natural_image
Close-up of a black cylindrical tool with flange and three separate mechanical components (no text or symbols visible)PARAMÈTRES DU PRODUIT
natural_image
Close-up of a metallic mechanical component with a circular top and flange (no visible text or symbols)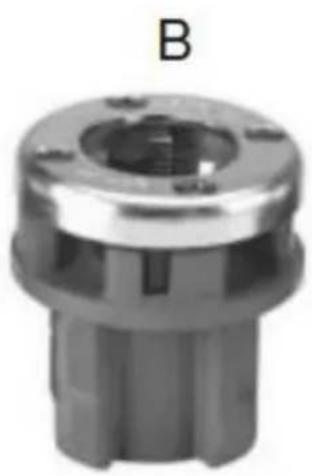
natural_image
Close-up of a metallic mechanical component with a circular top and flange (no visible text or symbols)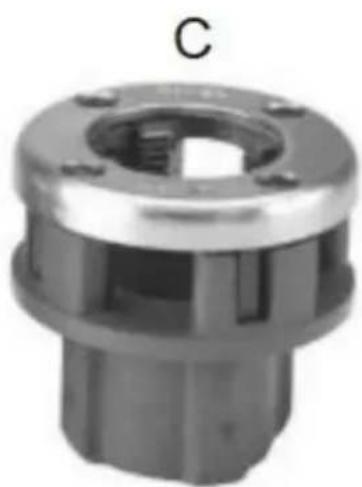
natural_image
Close-up of a metallic mechanical component with a central hole and flange (no visible text or symbols)Mode d'emploi
www.vevor.com/support
Fabriqué en Chine
VEVOR®
TOUGH TOOLS, HALF PRICE
natural_image
Close-up of a black cylindrical tool with flange and three separate mechanical components (no text or symbols visible)Kundenservice@vevor.com
natural_image
Close-up of a metallic mechanical component with a circular top and flanged base (no visible text or symbols)B

natural_image
Close-up of a metallic mechanical component with a circular top and flanged base (no visible text or symbols)C

natural_image
Close-up of a metallic mechanical component with a central hole and flange (no visible text or symbols)Bedienungsanleitung
www.vevor.com/support
natural_image
Close-up of a black cylindrical tool with flange and three separate mechanical components (no text or symbols visible)natural_image
Close-up of a metallic mechanical component with a circular top and flanged base (no visible text or symbols)B

natural_image
Close-up of a metallic mechanical component with a circular top and flanged base (no visible text or symbols)C
natural_image
Close-up of a metallic mechanical component with a central hole and flange (no visible text or symbols)©
www.vevor.com/support Made
In China
VEVOR®
TOUGH TOOLS, HALF PRICE
natural_image
Black and white photo of a mechanical tool with flange and three separate cylindrical components (no text or symbols visible)natural_image
Close-up of a metallic mechanical component with a circular top and flanged base (no visible text or symbols)B

natural_image
Close-up of a metallic mechanical component with a circular top and flanged base (no visible text or symbols)C

natural_image
Close-up of a metallic mechanical component with a central hole and flange (no visible text or symbols)www.vevor.com/support
Fabricado en China
VEVOR®
TOUGH TOOLS, HALF PRICE
natural_image
Close-up of a black cylindrical tool with flange and three separate mechanical components (no visible text or symbols)natural_image
Close-up of a metallic mechanical component with a circular top and flanged base (no visible text or symbols)B

natural_image
Close-up of a metallic mechanical component with a circular top and flanged base (no visible text or symbols)C

natural_image
Close-up of a metallic mechanical component with a central hole and flange (no visible text or symbols)Instrukcja obsługi
www.vevor.com/support
natural_image
Black and white photo of a mechanical tool with flange and three separate cylindrical components (no text or symbols visible)HULP NODIG? NEEM CONTACT MET ONS OP!
Klantenservice@vevor.com
natural_image
Close-up of a metallic mechanical component with a circular top and flanged base (no visible text or symbols)B

natural_image
Close-up of a metallic mechanical component with a circular top and flanged base (no visible text or symbols)C

natural_image
Close-up of a metallic mechanical component with a central hole and flange (no visible text or symbols)Gebruiksaanwijzing
www.vevor.com/support Made
In China
VEVOR®
TOUGH TOOLS, HALF PRICE
natural_image
Close-up of a black cylindrical tool with flange and three separate mechanical components (no visible text or symbols)natural_image
Close-up of a metallic mechanical component with a circular top and flanged base (no visible text or symbols)B
natural_image
Close-up of a metallic mechanical component with a circular top and flanged base (no visible text or symbols)C


