
RT450 - String Trimmer SCHEPPACH - Free user manual and instructions
Find the device manual for free RT450 SCHEPPACH in PDF.

| Product type | Electric grass trimmer |
| Brand | Scheppach |
| Model | RT450 |
| Cutting diameter | 280 mm |
| Max speed | 9500 min⁻¹ |
| Line length (both sides) | 4/8 m |
| Spool diameter | 1.6 mm |
| Motor | 220-240 V~ / 50 Hz |
| Motor power | 450 W |
| Weight | 2.4 kg |
| Sound pressure level (LpA) | 82 dB(A) |
| Sound power level (LWA) | 96 dB(A) |
| Vibration front handle | 1.59 m/s² |
| Vibration rear handle | 1.66 m/s² |
| Protection class | II (double insulation) |
| Pivoting cutting head | Yes, at 90° |
| Head tilt | Adjustable by push button |
| Telescopic handle | Yes, height adjustable |
| Line cutter guard | Integrated with blade |
| Power supply | Mains 230 V~ via cable |
| Use | Amateur gardening, edging and hard-to-reach areas |
| Wear parts | Carbon brushes, line spool |
| Included accessories | Guard, safety hoop, Allen key, 3-line spool, wheel |
| Maintenance and cleaning | Clean after each use with a dry cloth or gentle compressed air; do not use solvents or water |
| Safety | Double insulation, immediate stop by releasing the switch, line cutter guard |
Frequently Asked Questions - RT450 SCHEPPACH
User questions about RT450 SCHEPPACH
0 question about this device. Answer the ones you know or ask your own.
Ask a new question about this device
Download the instructions for your String Trimmer in PDF format for free! Find your manual RT450 - SCHEPPACH and take your electronic device back in hand. On this page are published all the documents necessary for the use of your device. RT450 by SCHEPPACH.
USER MANUAL RT450 SCHEPPACH
natural_image
Black metal detector tool with lever and handle, isolated on white background (no text or symbols visible)| DE | Elektro RasentrimmerOriginalbedienungsanleitung | 5 |
| GB | Electric grass trimmerTranslation of original instruction manual | 17 |
| FR | Coupe-bordures électriqueTraduction des instructions d'origine | 27 |
| IT | Tosaerba elettricoTraduzione delle istruzioni originali | 38 |
| NL | Elektrische grasmaaierVertaling van de originele gebruikshandleiding | 49 |
| ES | Cortacésped eléctricoTraducción de las instrucciones originales de funcionamiento | 60 |
| PL | Elektryczna podkaszarka do trawyTłumaczenie oryginału instrukcji obsługi | 71 |
| CZ | Elektrický zastřihovač trávyPřeklad originálního návodu k obsluze | 82 |
| SK | Elektrický vyžínačPreklad originálu návodu na obsluhu | 92 |
| HU | Elektromos fúkaszaAz eredeti használati útmutató fordítása | 102 |
natural_image
Close-up of a hand holding a power tool next to a mechanical component, with labeled parts A, B, and C (no text or symbols on the main image)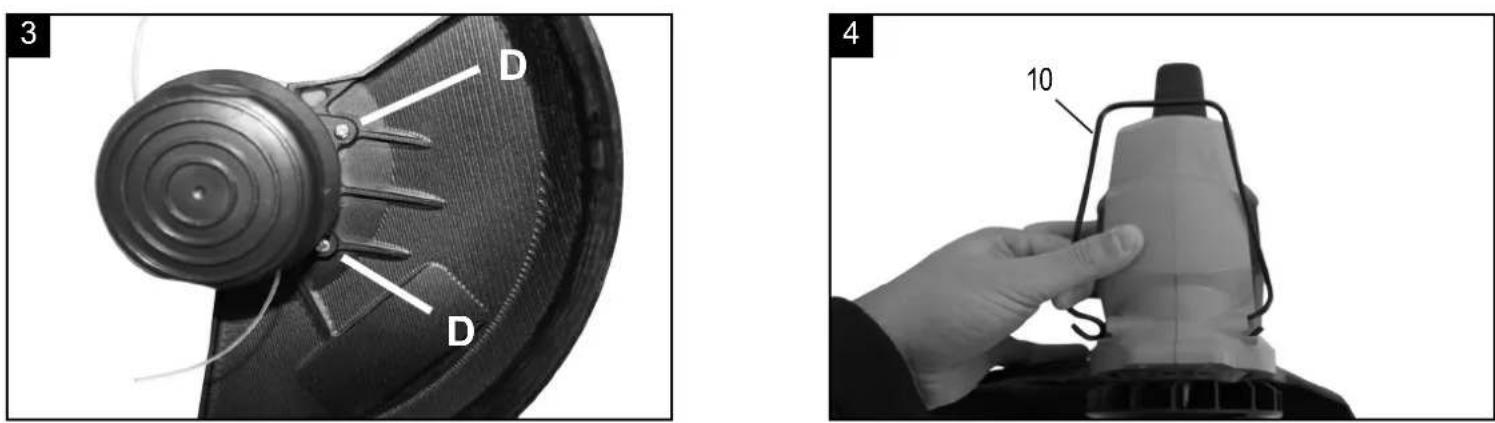
natural_image
Close-up of a mechanical tool with a lever and adjustment arrow, labeled '5' and '9' (no text or symbols on the device itself)
natural_image
Close-up of a mechanical device with labeled parts and rotation arrow (no readable text or symbols)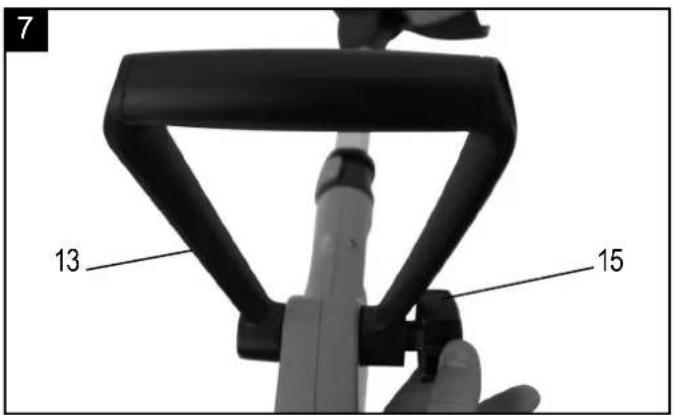

natural_image
Mechanical tool with rotating arm and lever mechanism, labeled with number 9 and 11 (no text or symbols on the diagram itself)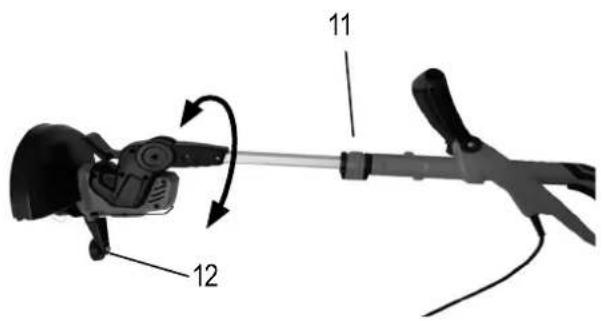
Günzburger Straße 69
D-89335 Ichenhausen
Verehrter Kunde,
Explanation of the symbols
 | Read instruction manual and safety instructions before starting up and pay attention! |
 | Warning! Denotes risk of personal injury, loss of life, or damage to the tool in case of non-observance. |
 | Wear robust footwear when using the device! |
 | Wear ear and eye protection. |
 | Keep bystanders away |
 | Protect the tool from getting wet. |
 | Switch off and unplug the device before cleaning or performing maintenance on it. |
 | Protection class II - double shielded |
 | The product complies with the applicable European directives and an evaluation method of conformity for this directives was done. |
 | Danger from passing parts while the engine is running. Be sure to maintain a safe distance. |
Table of contents: Page:
- Introduction.... 19
- Layout....19
- Scope of delivery....19
- Intended use....20
- Important information 20
- Technical data 23
- Attachment and operation 24
- Working instructions....24
- Maintenance....25
- Storage 25
- Disposal and recycling 25
- Troubleshooting....26
1. Introduction
Manufacturer:
scheppach
Günzburger Straße 69
D-89335 Ichenhausen
Dear Customer,
we hope your new tool brings you much enjoyment and success.
Note:
According to the applicable product liability laws, the manufacturer of the device does not assume liability for damages to the product or damages caused by the product that occurs due to:
- Improper handling,
• Non-compliance of the operating instructions, - Repairs by third parties, not by authorized service technicians,
- Installation and replacement of non-original spare parts,
- Application other than specified,
- A breakdown of the electrical system that occurs due to the non-compliance of the electric regulations and VDE regulations 0100, DIN 57113 / VDE0113.
We recommend:
Read through the complete text in the operating instructions before installing and commissioning the device.
The operating instructions are intended to help the user to become familiar with the machine and take advantage of its application possibilities in accordance with the recommendations.
The operating instructions contain important information on how to operate the machine safely, professionally and economically, how to avoid danger, costly repairs, reduce downtimes and how to increase reliability and service life of the machine.
In addition to the safety regulations in the operating instructions, you have to meet the applicable regulations that apply for the operation of the machine in your country.
Keep the operating instructions package with the machine at all times and store it in a plastic cover to protect it from dirt and moisture. Read the instruction manual each time before operating the machine and carefully follow its information. The machine can only be operated by persons who were instructed concerning the operation of the machine and who are informed about the associated dangers. The minimum age requirement must be complied with.
In addition to the safety notices contained in this operating manual and the particular instructions for your country, the generally recognised technical regulations for the operation of identical devices must be complied with.
We accept no liability for damage or accidents which arise due to non-observance of these instructions and the safety information.
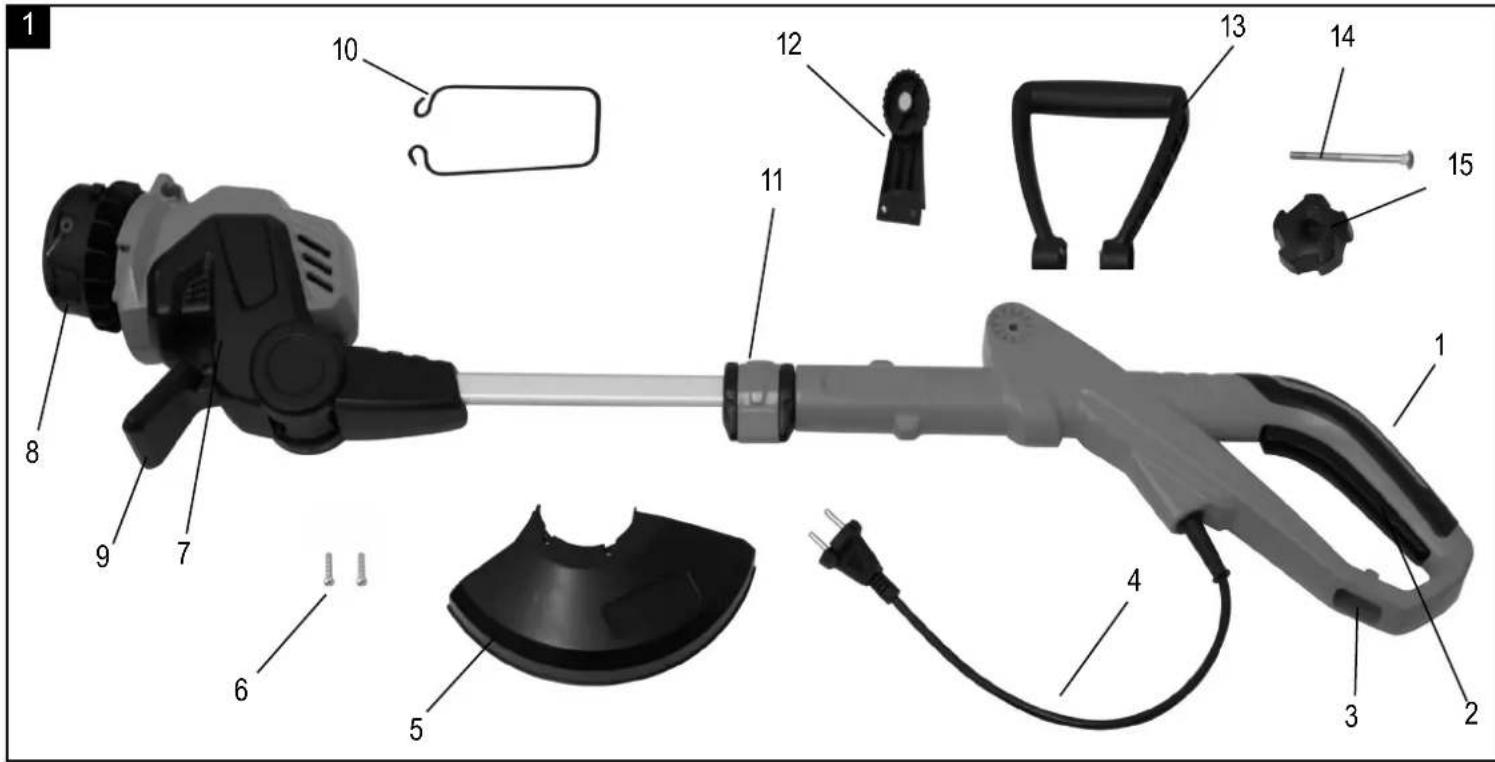
2. Layout (Fig. 1)
- Upper hand grip
- Start switch
- Cable strain relief
- Appliance plug
- Guard plate with line cutter
- Screws for guard plate
- Cutter head with motor
- Spool
- Adjustment button for cutter head
- Plant protection bar
- Quick release
- Wheel
- Additional hand grip
- Screw for hand grip
- Nut
Adjustable telescopic handle
The lawn trimmer is equipped with an adjustable telescopic handle. This allows the appliance to be set to individual body sizes, and allows the motor head to be swivelled.
Swivelling and adjustable cutter head
The grasstrimmer has a swivelling cutter head with an adjustable angle.
3. Scope of delivery
- Open the packaging and take out the equipment with care.
- Remove the packaging material and any packaging and/or transportation braces (if available).
- Check to see if all items are present.
- Inspect the equipment and accessories for transport damage. In case of complaints the supplier is to be informed immediately. Complaints received at a later date will not be acknowledged.
- If possible, keep the packaging until the end of the guarantee period.
- Read the operating instructions to make yourself familiar with the device prior to using it.
- After that, please dispose of it in an environmentally friendly way.
- Only use original parts for accessories as well as for wearing and spare parts. Spare parts are available from your specialized dealer.
-
Specify our part numbers as well as the type and year of construction of the device in your orders.
-
Motor
- Handle
- Protection shield
- Allen key
- 3 spools
- Wheel
⚠ Important!
The equipment and packaging material are not toys. Do not let children play with plastic bags, foils or small parts. There is a danger of swallowing or suffocating!
4. Intended use
The machine meets the currently valid EU machine directive.
- Before starting any work, all protective and safety devices must be in place.
- The machine has been designed to be operated by one person.
- The operator is responsible for third parties in the area of operations.
- All safety and hazard notices on the machine must be observed.
- All safety and hazard notices on the machine must be kept in a completely legible condition.
- Use the machine in a technically flawless condition only, as well as for its intended purpose, in a safe manner and being aware of dangers, in compliance with the operating instructions!
- Disruptions which can affect safety in particular must be eliminated straight away!
- The manufacturer's safety, operation and maintenance instructions as well as the technical data given in the calibrations and dimensions must be adhered to.
- Relevant accident prevention regulations and other generally recognized safety and technical rules must also be adhered to.
- The machine may only be used, maintained or repaired by trained persons who are familiar with the machine and have been informed about the dangers. Unauthorized modifications of the machine exclude a liability of the manufacturer for damages resulting from the modifications.
- The machine is intended for use only with original spare parts and original tools from the producer.
- Any other use is considered to be not intended. The manufacturer excludes any liability for resulting damages, the risk is exclusively borne by the user.
- For easy removal of grass and weed under bushes, banks and on edges.
- The device must not be used for commercial, technical or industrial applications.
- If you are not sure whether working conditions are safe or unsafe, do not work with the machine.
WARNING! For your own safety, please thoroughly read this manual and the general safety instructions before turning the device on. If you give the device to third parties, always include these instructions.
The equipment is allowed to be used only for its prescribed purpose. Any other use is deemed to be a case of misuse. The user/operator and not the manufacturer will be liable for any damage or injuries of any kind resulting from such misuse.
5. Important information
General safety instructions for electric tools
⚠ CAUTION: Read all safety regulations and instructions. Any failures made in following the safety regulations and instructions may result in an electric shock, fire and/or serious injury.
Keep all safety regulations and instructions in a safe place for future use.
The term "electric tool" used in the safety instructions refers to electric tools operated from the mains power supply (with a power cable) and to battery operated electric tools (without a power cable).
1 Workplace safety
- Keep your work area clean and well illuminated. Untidy or unlit work areas can result in accidents.
- Do not operate the electric tool in an environment where there is a risk of explosions and where there are inflammable liquids, gases or dust. Electric tools produce sparks which could set the dust or vapours alight.
- Keep the electric tool out of the reach of children and other persons. If there is a distraction, you may lose control of the appliance.
2 Electrical safety
- The connector plug from this electric tool must fit into the socket. The plug should never be altered in any way. Never use adapter plugs together with earthed electric tools. Unaltered plugs and correct sockets reduce the risk of an electric shock.
- Avoid bodily contact with earthed surfaces such as pipes, heating, ovens and fridges. The risk of electric shock is increased if your body is earthed.
- Keep the tool out of the rain and away from moisture. The ingress of water into an electric tool increases the risk of an electric shock.
-
Do not use the cable to carry the electric tool, to hang it up or to pull it out of the socket. Keep the cable away from heat, oil, sharp edges and moving parts of the appliance. Damaged or entangled cables increase the risk of an electric shock.
-
If you are working outdoors with an electric tool, only use extension cables which are designed specifically for this purpose. Using specially designed outdoor extension cables, the risk of electric shock is reduced.
- If operation of the electric tool in a damp environment can not be avoided, use a earthleakage circuit-breaker. The earth-leakage circuit-breaker reduces the risk of an electric shock.
Warning! This electric tool generates an electromagnetic field during operation. This field can impair active or passive medical implants under certain conditions. In order to prevent the risk of serious or deadly injuries, we recommend that persons with medical implants consult with their physician and the manufacturer of the medical implant prior to operating the electric tool.
3 Safety of persons
- Be careful, watch what you are doing and use an electric tool sensibly. Do not use the tool if you are tired or under the influence of drugs, alcohol or medication. A moment of inattention when using the electric tool can result in serious injuries.
- Wear personal protection equipment and always wear safety goggles. Wearing personal protection (such as dust masks, non-slip safety shoes, safety helmet or ear protection, depending upon the type and use of the electric tool) reduces the risk of injury.
- Make sure that the appliance cannot start up accidentally. Ensure that the electric tool is switched off before you connect it to the power supply and/or insert the battery, or pick up or carry the tool. If your finger is on the switch whilst carrying the electric tool or if you connect the appliance to the mains when it is switched on, this can lead to accidents.
- Remove keys and wrenches before switching on the electric tool. A tool or key which comes into contact with rotating parts of the appliance can lead to injuries.
- Avoid abnormal working postures. Make sure you stand squarely and keep your balance at all times. In this way, you can control the electric tool better in unexpected circumstances.
- Wear suitable work clothes. Do not wear loose clothing or jewellery. Keep hair, clothes and gloves away from moving parts. Loose clothing, jewellery or long hair can get trapped in moving parts.
- If vacuuming devices and draining devices can be fitted, make sure that these are correctly attached and correctly used. The use of a dust extraction system can reduce the danger posed by dust.
4 Usage and treatment of the electric tool
- Do not overload the appliance. Use the correct tool for your work. You will be able to work better and more safely within the given performance boundaries.
- Do not use an electric tool with a defective switch. An electric tool that cannot be switched on or off is dangerous and must be repaired.
- Pull the plug out of the socket and/or remove the battery before making any adjustments to the appliance, changing accessories or put the appliance down. This safety measure prevents starting the electric tool unintentionally.
- Keep unused electric tools out of the reach of children. Do not allow people who are not familiar with the appliance or who have not read these instructions to use the appliance. Electric tools are dangerous if they are used by inexperienced people.
- Clean your electric tool carefully. Check whether moving parts are functioning properly and not jamming, whether parts are broken or damaged enough that the functioning of this electric tool is affected. Have damaged parts repaired before using the appliance. Many accidents are caused by badly maintained electric tools.
- Make sure to use electric tools, accessories, attachments, etc. in accordance with these instructions. Take the conditions in your work area and the job in hand into account. Using electric tools for any purpose other than the one for which they are intended can lead to dangerous situations.
5 Service
- Have your electric tool repaired only by trained personnel using only genuine spare parts. This will ensure that your electric tool remains safe to use.
Safety regulations for grass trimmer Important: The nylon line continues to rotate for a few seconds after the motor is switched off. The equipment does not start.
- Before you switch on the grass trimmer, make sure that there are no stones or other objects touching the nylon line.
- Keep the cable out of the cutting zone. During operation the cable may be covered by grass and cut through by accident.
- If the grass trimmer is turned over or if it is not in working position, do not switch it on.
-
Switch off the motor and pull out the power plug when you are not using the grass trimmer, when you leave the trimmer unattended, when you are checking the trimmer, if the power cable is damaged, when you want to remove and replace the spool, and when you are moving the trimmer to another location.
-
Keep the grass trimmer away from other persons, particularly children and pets. There may be stones and other objects in the flying cut grass.
- Keep at least 5 m away from other persons and animals when you are working with the grass trimmer.
- To prevent injury to yourself and damage to the grass trimmer, never cut against hard objects.
- Use the edge of the guard to keep the grass trimmer away from walls, changes of surface and fragile objects.
- Never use the grass trimmer without a guard.
CAUTION! The guard is vital for your safety and for the safety of others, and it is also essential for the grass trimmer to work correctly. Failure to observe this instruction will not only create a potential hazard, it will also result in the loss of your rights under the warranty.
- Never try to stop the cutter (nylon line) with your hands. Wait until it stops by itself.
- It is imperative to use only the original nylon line. Never use metal wire instead of the nylon line.
- Beware of injuring yourself on the line cutting device.
- Keep the air vents clear of dirt.
- After use, unplug the machine and check it for damage.
- Never attempt to cut grass that is not growing on the ground. For example, do not try to cut grass growing on walls, rocks, etc.
- Within the working radius of the grass trimmer the user is responsible for any damage caused to third persons by use of the trimmer.
- Never cross roads or pebble paths with the grass trimmer switched on. When you are not using the grass trimmer, keep it in a dry place out of the reach of children.
Specific safety information
Please read this safety information and the directions for use carefully and be sure to follow the instructions to the letter.
1 Always remove the power plug from the socketoutlet before you perform any work on the grass trimmer, e.g.
• repairing a damaged cable
- troubleshooting
- cleaning and maintenance or before leaving the tool unattended.
2 The grass trimmer can cause serious injuries! Read the directions for use carefully in order to acquaint yourself with the correct way to handle, set up, service, start and put down the machine. Familiarize yourself with all the machine's control elements and its proper use.
3 Always handle the grass trimmer with both hands.
4 When working with the grass trimmer, wear sturdy shoes and make sure of your footing.
5 Never work with the grass trimmer in the rain or on wet grass and never leave the grass trimmer outdoors. The grass trimmer must not be used if it is wet.
6 We recommend that you wear safety goggles and ear-muffs when working with the grass trimmer.
7 Wear suitable working clothes such as rubber gloves and non-slip shoes. Do not wear loose garments.
8 Avoid abnormal postures and make sure of your footing.
9 Be sure to hold the grass trimmer well away from your body when it is switched on.
10 Make sure there are no other persons or animals within your working area (radius of swing).
11 Carry the grass trimmer only by its guide handle.
12 Keep cables clear of where you are cutting.
13 Before you use the grass trimmer, examine the power cable for signs of damage and aging.
14 Use the grass trimmer only when the power cable is in good working order.
15 Do not remove the power plug from the socketoutlet by pulling on the cable. Never carry the tool by its cable. Take care not to damage the cable in any way.
16 Protect cables from heat, caustic fluids and sharp edges. Replace damaged cables immediately.
17 Keep the grass trimmer in a dry place out of children's reach.
18 Take care not to overload the grass trimmer and do not use it on jobs for which it is not intended, i.e. you are allowed to use the grass trimmer only to cut grass and weed.
19 Use only cables and connectors approved for outdoor use:
- power cable HO7RN-F 2x1.0 with integral two-
plug plug;
- extension cable HO7RN-F 3G1.5 with rainwater- protected earthing-pin plug and earthing-contact coupling.
- The use of a leakage-current or earth-leakage circuit-breaker is recommended for operating electric tools. Ask your electrician!
20 The grass trimmer requires regular inspection and maintenance. Always replace damaged blades in pairs. If the grass trimmer suffers any damage from impact (falling on hard ground etc.), have it checked immediately by a specialist.
21 Look after your grass trimmer carefully. Keep it clean and sharp to ensure efficient and safe cutting. Follow the maintenance and cleaning instructions.
22 The German Farmers Union, for example, prohibits the use of electric grass trimmers by persons aged 17 or less. Persons aged 16 and above may only use electric grass trimmers if supervised by an adult.
23 Do not use the grass trimmer with a damaged or excessively worn cutting system.
24 Check your surroundings and take note of any potential dangers which you may not be able hear due to the machine's noise.
25 Never try to work with an incomplete machine or a machine with unapproved modifications.
26 It is advisable not to use the grass trimmer when other persons, and particularly children, are nearby.
27 Children are not allowed to use the grass trimmer.
28 The machine may exceed 85 db (A) at the workplace. The operator will require noise protection measures and ear muffs if this is the case.
29 Always ensure that all the handles and safety equipment is fitted when the grass trimmer is in use.
30 This equipment is not designed to be used by people (including children) with limited physical, sensory or mental capacities or those with no experience and/or knowledge unless they are supervised by a person who is responsible for their safety or they have received instructions from such a person in how to use the equipment safely. Children must always be supervised in order to ensure that they do not play with the equipment.
Do not lose this safety information.
Residual risks
The machine has been built using modern technology and in accordance with recognized safety rules.
Some hazards, however, may still remain.
- Risk of injury to fingers and hands from the tool in operation during improper use.
- Electrical hazards when unsuitable electric connections are used.
- Safety hazard from the grass trimmer in case of loose clothing; Wear personal protective equipment such as tight work clothing.
- Although having regarded all considerable rules there may still remain not obvious remaining hazards.
- Minimize remaining hazards by following the instructions in "Safety Rules", "Use only as authorized" and in the entire operating manual.
6. Technical data
Cutting width 280 mm
| Engine speed max 9500 min | -1 |
| Cutting string length/both sides 4/8 m | |
| Spool of string 1,6 mm | |
| Engine 220-240~ / 50 Hz | |
| Engine output 450 W | |
| Weight 2,4 kg |
Subject to technical changes!
Information concerning noise emission measured according to relevant standards:
Sound pressure L_pA = 73.05 dB(A)
Sound power L_WA = 93.05 dB(A)
Uncertainty K_PA = 1,03 dB(A)
Wear ear-muffs.
The impact of noise can cause damage to hearing.
Vibration A_hw = 5,035 m/s^2
Uncertainty K_PA = 1.5 m/s^2
The specified vibration value was established in accordance with a standardized testing method. It may change according to how the electric equipment is used and may exceed the specified value in exceptional circumstances.
The specified vibration value can be used to compare the equipment with other electric powertools.
Warning!
The specified vibration value was established in accordance with a standardized testing method. It may change according to how the electric equipment is used and may exceed the specified value in exceptional circumstances. The specified vibration value can be used to compare the equipment with other electric power tools. The specified vibration value can be used for initial assessment of a harmful effect.
Reduce noise generation and vibration to a minimum!
- Use only equipment that is in perfect condition.
- Maintain and clean the equipment regularly.
- Adopt your way of working to the equipment.
- Do not overload the equipment.
- Have the equipment checked if necessary.
- Switch off the equipment when not in use.
- Wear gloves.
In these operating instructions we have marked the places that have to do with your safety with this sign: △
7. Attachment and operation
ATTENTION! Before working on the device - cleaning, inspection, maintenance or other work - always turn off the device and separate it from the power supply.
Assembly:
Install the guard plate Fig. 3
- Fasten the guard plate with the two screws (D) on the housing of the grass trimmer.
Install the plant protection bar Fig 4
- Put the plant protection bar (10) on the housing of the cutter head.
Adjustment of the Auxiliary hand grip (14) Fig. 7
Use the handle (13) in the auxiliary hand grip to adjust the inclination.
Adjusting the telescopic handle Fig. 8
Set the telescopic handle to the individual physique.
- Press Locking button for telescopic handle (11) for varying the length.
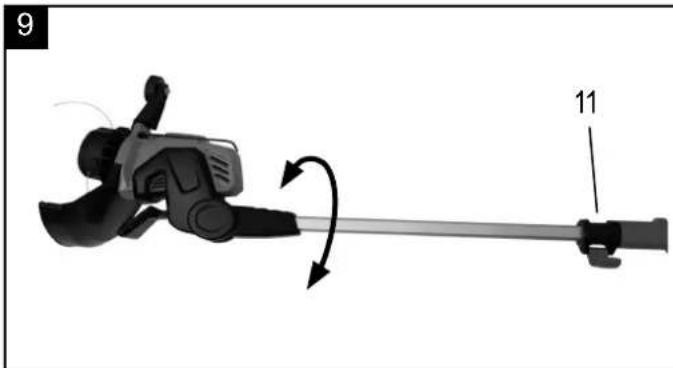
Swivelling the cutter head Fig. 9
To trim lawn edges, for example, it is possible to swivel the cutter head through 90^
Pull apart the cutting head on telescopic handle (11) slightly for rotate by 90°.
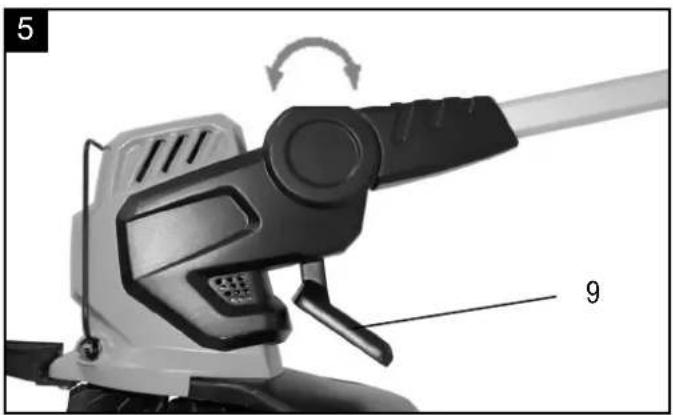
Angling the cutter head Fig.5/6
By changing the pivot angle, it is also possible to trim areas that are difficult to access, e.g. under benches, overhangs, etc.
- Press the locking button (9).
- Engage the cutter head in the required angle.
- Release the locking button.
⚠ Warning! Use only original manufacturer's replacement parts, accessories and attachments. Failure to do so can cause poor performance, possible injury and may void your warranty. Never use the machine without the guard assembled!
Commissioning:
The tool can be plugged into any socket-outlet (with 230 V AC) that is equipped with a 10 A fuse or higher. The socket-outlet has to be safeguarded by an earthleakage circuit breaker (e.l.c.b.). The operating current must not exceed 30 mA.
AC motor
- The mains voltage must be 230 V\~
- Extension cables up to 25 m long must have a cross-section of 1.5 mm ^2 .
Mounting of the extension cable
Plug the female connector of the extension cable on the male connector of the device.
- Thread the extension cable through the cable hook (3) as a loop and hang it up.
- Make sure that the extension cable has enough free motion.
Do not use an electric tool with a defective switch. An electric tool that cannot be switched on or off is dangerous and must be repaired.
Start and stop the grass trimmer Fig. 1
- Starting unit: Press the ON / OFF switch (2) on the handle Stop unit: Release the switch (2).
Cutting the edge
Open the quick release (11) and turn the device in the desired working posture. Please use the wheel(12). Now follow the edge of the cutting line for a good result
Switch on the appliance before approaching the grass to be cut. Angle the appliance forwards slightly, and walk forwards slowly. Sweep the appliance to the right and left in order to cut the grass.
Long grass must be cut in several passes. Always proceed from top to bottom.
Use the plant protection car in order to hold the appliance at the correct distance from obstacles. Make sure the motor is stopped before you remove any cuttings.
8. Working instructions
⚠ WARNING!
The grass trimmer must not be used or switched on until it has been fully assembled.
For your own safety, please thoroughly read this manual and the general safety instructions before turning the device on. If you give the device to third parties, always include these instructions.
- Remove all grass and weed remnants at regular intervals to prevent the shaft tube overheating. Lawn, grass and weed remnants become trapped under the safety shield and prevent the shaft tube from receiving adequate ventilation. Remove the remnants carefully using a screwdriver or the like.
- Swing the trimmer from side to side in a scything motion. Always keep the line spool parallel to the ground. Check the site and decide which cutting height you require. Guide and hold the line spool at the required height to obtain an even cut.
- The line trimmer may only be used for cutting grass and weeds underneath bushes, on edges, corners and slopes which cannot be reached by a lawn-mower. Alternative use not specified in these instructions can damage the device or severely injure the user. Therefore, it is explicitly excluded from the list of possible applications.
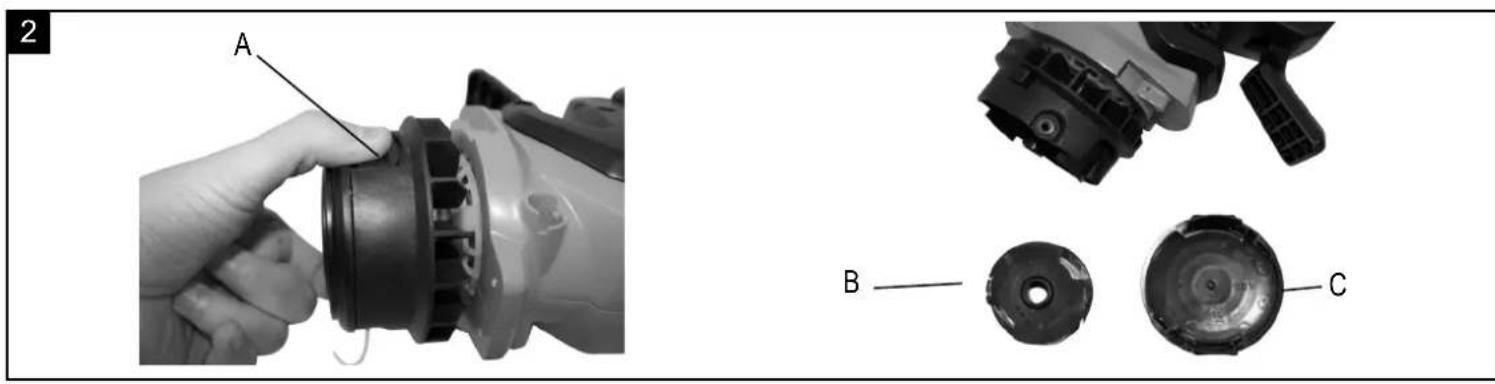
Automatic thread feeding
The thread is automatically added during operation by means of the centrifugal force. If a thread breaks off, you can manually pull the thread out again.
Please disconnect the power plug from the mains beforehand to avoid injuries.
Press the button (A / Fig.2) and pull on both ends of the thread to achieve your desired thread length. Should one of the thread ends be too long, the thread is cut to the correct length by the integrated knife in the plate.
9. Maintenance
The appliance must always be switched off before any servicing and cleaning. Wait until it fully stops. Unplug it.
Servicing works not specified in these Operating Instructions must be performed by authorised staff as there may be dangerous situations the operator is unable to handle. Spare parts may only be replaced by authorised staff.
Cleaning
- Every time the appliance has been used, it should be cleaned by a clean cloth, brush or blown with compressed air under low pressure.
- Do not use cleaning agents and solvents as they may damage the plastic parts of the appliance.
- Do not spray on the grass trimmer.
Changing the spool Fig. 2
CAUTION! Before changing the spool (B) Unplug the power plug!
- Press the two locking catches to open the cover (C)
- Remove the empty spool
- Insert the new spool
- Make sure that the spring is re-inserted
- Put on the cover (C) and engage the locking catches.
During the first start-up of the cutting head the thread will be cut to the correct length by the knife on the guard.
Now you can restart the machine.
Service information
Please note that the following parts of this product are subject to normal or natural wear and that the following parts are therefore also required for use as consumables.
Wear parts*: carbon brushes, blade
* Not necessarily included in the scope of delivery!
10. Storage
Storage
- Disconnect the grass trimmer from the electricity supply when it is not being used.
- Oil the blades to prevent rust
- Store the device in a dry place beyond the reach of children.
- When the device is not being used, store it so it cannot be started by unauthorised persons.
WARNING!
Do not store the device without protection outside or in a damp environment.
11. Disposal and recycling
The equipment is supplied in packaging to prevent it from being damaged in transit. The raw materials in this packaging can be reused or recycled. The equipment and its accessories are made of various types of material, such as metal and plastic. Defective components must be disposed of as special waste. Ask your dealer or your local council.
Old devices must not be disposed of with household waste!

This symbol indicates that this product must not be disposed of together with domestic waste in compliance with the Directive (2012/19/EU) pertaining to waste electrical electronic equipment (WEEE). This product must disposed of at a designated collection point. This occur, for example, by handing it in at an author-collecting point for the recycling of waste elec-and electronic equipment. Improper handling waste equipment may have negative consequences-the environment and human health due to poly-hazardous substances that are often con- in electrical and electronic equipment. By early disposing of this product, you are also con-ing to the effective use of natural resources. An obtain information on collection points for equipment from your municipal administration, waste disposal authority, an authorised body e disposal of waste electrical and electronic ment or your waste disposal company.
12. Troubleshooting
The table below contains a list of fault symptoms and explains what you can do to remedy the problem if your equipment fails to work properly. If the problem still persists after working through the list, please contact your nearest service workshop.
| Fault Possible cause Remedy | ||
| Machine does not start | · Supply voltage not on· On/Off switch faulty· Worn carbon brushes· Motor faulty· Power cable damaged | · Check the socket or the electricity supply; if required, arrange repair by an authorised electrician.· Contact the service centre· Contact the service centre· Contact the service centre· Check the extension lead and have it replaced, if required. |
| Machine works with interruptions | · Power cable damaged· Internal connections are loose· On/Off switch faulty | · Check the extension lead and have it replaced, if required.· Contact the service centre· Contact the service centre |
| Appliance not cutting | · Spool of string is too short or is empty | · Adjust the spool of string or Change the spool |
Günzburger Straße 69
D-89335 Ichenhausen
Chers clients,
Günzburger Straße 69
D-89335 Ichenhausen
Egregio cliente,
Günzburger Straße 69
D-89335 Ichenhausen
Geachte klant,
Günzburger Straße 69
D-89335 Ichenhausen
Estimado cliente,
Günzburger Straße 69
D-89335 Ichenhausen
Szanowny kliencie,
Günzburger Straße 69
D-89335 Ichenhausen
Vážený zákazníku,
Günzburger Straße 69
D-89335 Ichenhausen
Vážený zákazník,
Günzburger Straße 69
D-89335 Ichenhausen
Tisztelt vásárló!
CE - Declaration of Conformity
| 2014/29/EU | 2004/22/EC | 89/686/EC_96/58/EC | X 2000/14/EC_2005/88/EC | ||||
| X | 2014/35/EU | 2014/68/EU | 90/396/EC | Annex V | |||
| X | 2014/30/EU | X | 2011/65/EU* | Annex VINoise: measured L_WA = 93.05 dB(A); guaranteed L_WA = 96 dB(A)P = xx KW; L/∅ = cmNotified Body: CUN-17NO0724TCSP-1Notified Body No.: | |||
 | |||||||
| Annex IVNotified Body:Notified Body No.:Certificate No.: | 2010/26/EC | ||||||
| Emission. No: | |||||||
Standard references:
EN 60335-1:2012+A11:2014; EN 50636-2-91:14; EN 62233:2008; EN 55014-1; EN 55014-2; EN 61000-3-2; EN 61000-3-3;
This declaration of conformity is issued under the sole responsibility of the manufacturer.
Apparent defects must be notified within 8 days from the receipt of the goods. Otherwise, the buyeris rights of claim due to such defects are invalidated. We guarantee for our machines in case of proper treatment for the time of the statutory warranty period from delivery in such a way that we replace any machine part free of charge which provably becomes unusable due to faulty material
or defects of fabrication within such period of time. With respect to parts not manufactured by us we only warrant insofar as we are entitled to warranty claims against the upstream suppliers. The costs for the installation of the new parts shall be borne by the buyer. The cancellation of sale or the reduction of purchase price as well as any other claims for damages shall be excluded.
Garantie FR


- Verehrter Kunde,
- Table of contents: Page:
- Introduction
- Manufacturer:
- scheppach
- Dear Customer,
- Note:
- We recommend:
- Layout (Fig. 1)
- Scope of delivery
- ⚠ Important!
- Intended use
- Important information
- General safety instructions for electric tools
- Workplace safety
- Electrical safety
- Safety of persons
- Usage and treatment of the electric tool
- Service
- Safety regulations for grass trimmer Important: The nylon line continues to rotate for a few seconds after the motor is switched off. The equipment does not start.
- CAUTION! The guard is vital for your safety and for the safety of others, and it is also essential for the grass trimmer to work correctly. Failure to observe this instruction will not only create a potential hazard, it will also result in the loss of your rights under the warranty.
- Specific safety information
- Do not lose this safety information.
- Residual risks
- Technical data
- Subject to technical changes!
- Warning!
- Attachment and operation
- Assembly:
- Install the guard plate Fig. 3
- Install the plant protection bar Fig 4
- Adjustment of the Auxiliary hand grip (14) Fig. 7
- Adjusting the telescopic handle Fig. 8
- Swivelling the cutter head Fig. 9
- Angling the cutter head Fig.5/6
- Commissioning:
- AC motor
- Mounting of the extension cable
- Start and stop the grass trimmer Fig. 1
- Cutting the edge
- Working instructions
- ⚠ WARNING!
- Automatic thread feeding
- Maintenance
- The appliance must always be switched off before any servicing and cleaning. Wait until it fully stops. Unplug it.
- Cleaning
- Changing the spool Fig. 2
- CAUTION! Before changing the spool (B) Unplug the power plug!
- Service information
- Storage
- Storage
- Disposal and recycling
- Old devices must not be disposed of with household waste!
- Troubleshooting
- Chers clients,
- Egregio cliente,
- Geachte klant,
- Estimado cliente,
- Szanowny kliencie,
- Vážený zákazníku,
- Vážený zákazník,
- Tisztelt vásárló!
- CE - Declaration of Conformity
- Standard references:
- Garantie FR
Brand : SCHEPPACH
Model : RT450
Category : String Trimmer