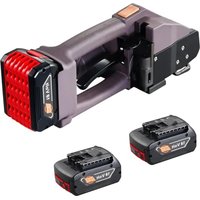
DS-16 - Packaging machine Vevor - Free user manual and instructions
Find the device manual for free DS-16 Vevor in PDF.

| Product type | Portable strapping machine |
| Brand | Vevor |
| Model | DS-16 |
| Dimensions (L x W x H) | 360 x 130 x 140 mm |
| Power supply | Lithium-ion battery 18 V, 5000 mAh |
| Charger | Input AC 100-240 V, output 21 V / 2.5 A, charging time approx. 90 minutes |
| Compatible strapping materials | PET and PP straps, width 9-16 mm, thickness 0.4-1.2 mm |
| Max tension force | 3200 N (adjustable from 600 to 3200 N in 9 levels) |
| Strap feeding speed | 50-150 mm/s |
| Operating modes | Semi-automatic (continuous press) and automatic (one-touch) |
| Cycles per charge | Up to 600 cycles (depending on use) |
| Operating temperature | 5 to 45 °C (optimal 15-25 °C) |
| Main functions | Tensioning, friction welding, automatic cutting |
| Safety | Automatic stop in case of jamming, overload protection |
| Replaceable wear parts | Knife, lower toothed plate, tension wheel, lower friction piece |
| Maintenance | Regularly check wear parts, replace if damaged |
| Warranty | Electronic warranty certificate, technical support at www.vevor.com/support |
Frequently Asked Questions - DS-16 Vevor
User questions about DS-16 Vevor
0 question about this device. Answer the ones you know or ask your own.
Ask a new question about this device
Download the instructions for your Packaging machine in PDF format for free! Find your manual DS-16 - Vevor and take your electronic device back in hand. On this page are published all the documents necessary for the use of your device. DS-16 by Vevor.
USER MANUAL DS-16 Vevor
Technical Support and E-Warranty Certificate
www.vevor.com/support
Strapping Machine
MODEL: DS-16
We continue to be committed to provide you tools with competitive price. "Save Half", "Half Price" or any other similar expressions used by us only represent of savings you might benefit from buying certain tools with us compared to top brands and does not necessarily mean to cover all categories of tools offered are kindly reminded to verify carefully when you are placing an order with us actually saving half in comparison with the top major brands.
Model: DS-16

natural_image
Blue DS-16 lithium-ion charging station with 18V power cord and 5.0Ah battery (no text or symbols on device body)NEED HELP? CONTACT US!
Have product questions? Need technical support? Please feel fr contact us:
Technical Support and E-Warranty Certificate www.vevor.com/support
This is the original instruction, please read all manual instruction carefully before operating. VEVOR reserves a clear interpretation user manual. The appearance of the product shall be subject to product you received. Please forgive us that we won't inform you there are any technology or software updates on our product.
INSTRUCTIONS
Thank you very much for choosing this Strapping Machine - Please read all of the instructions before using it. The information will you achieve the best possible results.
The products carried in this catalog may be different in color than the item.
1. Safety instructions
Correct training is required. Personnel who are not properly trained not allowed to operate the strapping machine. Incorrect operation may result in equipment damage or personal injury.
1.1 Battery operation
*Environmental protection
Please do not throw the used battery into the household gas can or wastewater bucket, please do not hit or burn the wasted battery.
* Short circuit hazard
Do not store the batteries with other metal objects. Please do disassemble the batteries yourself and store them in a dry and frost-resistant room. The ambient temperature must not be higher than 12 degrees.
Do not charge used batteries and please replace them with ones when they are damaged or unusable.
1.2 Eye injury hazards
Please wear eye protection to prevent damage to your eyes w using this product.
1.3 Operation
Please read the instructions carefully and train properly before using Persons who have not been properly trained are not allowed to operate baler, before tightening the straps, if the instructions are not followed by the strapping is loaded unreasonably can lead to breakage of the strand or machine failure. Do not put your hands on the binding area, the
area or the cutting area of the cutter until you are familiar with the baler. Place your hand on the binding area, the gluing area and the cutter cut-out.
1.4 Friction welding area
You should check the condition of the friction welding area and familiarise yourself with the control and adjustment of the friction time tightening time. Irregular friction time may result in poor bonding and to serious damage, so please do not ship or transport boxes that have been properly packed and handled.
1.5 Packing straps distribution
Please use the specially designed belt tray carriage to dispense straps. When not in use, secure the end of the straps in the strappi opening.
1.6 Straps warning
Do not use straps to drag or lift loads as this may result in to objects or personal injury.
1.7 Hazards of strap breakage
Improper operation; excessive tightened; not using the strapping as required will cause the tension force to be lost or the strapping which may eventually cause the box/cargoes to be damaged and the object to be broken, the operator to lose balance and fall, or the str machine and the strapping to fly rapidly into the operator's face toget causing injury
Note:

* If the load is packed with sharp edges please add edge pro
* Wrap the straps around the appropriate area to be strapped.
* The operator should not be in the same straight line position strapping machine during tightening and friction to prevent the baler a the straps from tipping over into the operator's face. And remind or as bystanders to stay away from the operating area during operation. Please also use the strapping with the recommended width and strength specifications, which will help to improve the quality and efficiency of
packaging, as unsuitable strapping may cause the strapping to break the box to come loose during transportation.
1.8 Cutting straps
When cutting the straps, please use the appropriate cutting tool keep a safe distance from people, not in the same line as the strap away from the loose direction of the strapping. Please use the tools specifically designed for cutting straps, no hammers, pliers, axes, hacksaws etc.
1.9 Slip and fall hazards
Please keep the strapping area clean and tidy, as untidy work areas can cause accidents and falls can occur if you do not land w unbalanced before tension, especially in small work areas such as stairwells. Try to keep your balance when handling. Both feet must b flat and firm surface at the same time. Do not operate the device w are unwell or in a difficult physical condition.
Please note the precautions mentioned specifically for the work area.
1.10 Dangers of the baler
* Good maintenance of the baler is very necessary.
* Check the baler parts regularly, if there is wear or damage, do not continue to use the baler until the parts are replaced.
* Do not use the baler without the straps
* Do not modify the baler as this may cause personal injury.
2.Technical parameters
2.1 Description of the battery strapping tool
DS-16 battery strapping tool comes with a perfect sealing performance. It can make users enjoy an efficient way of strapping.DS has its max tension power at 2500N and 9 grades can be adjusted by digital display operation. It is powered by a high-capacity 6000mah lit battery, which makes it work 600 cycles per full charge. One of the selling points is that it is economical compared with the similar ones
market. It is a good product for dealers to explore and grasp the m DS-16 is such a powerful tool and can be widely used in most indu
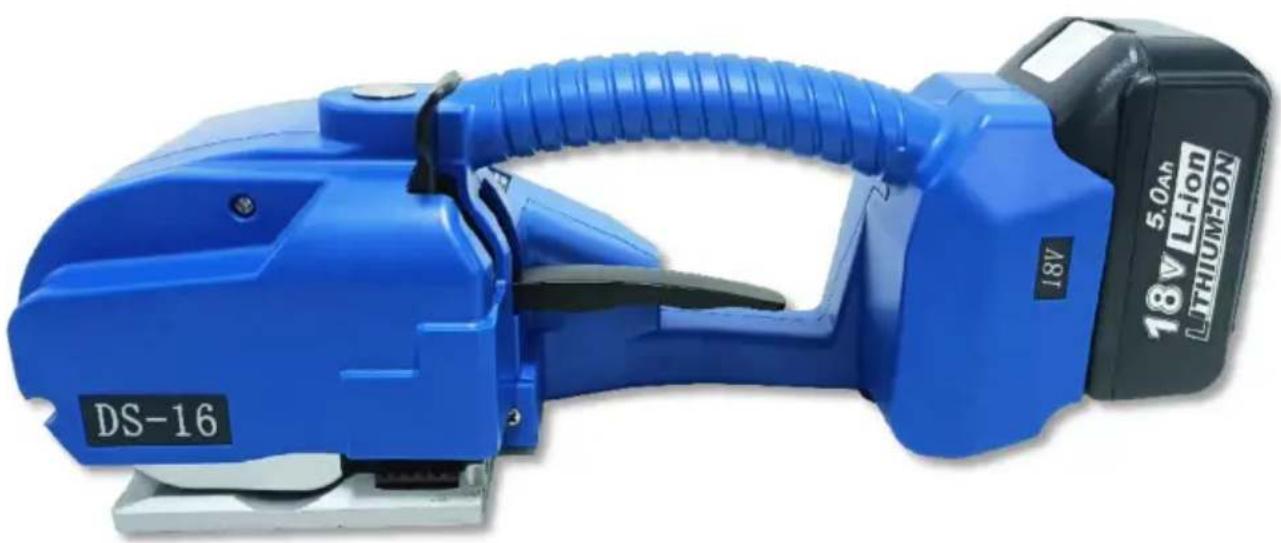
2.2 Baler dimensions
Length: 360MM
Width: 130MM
Height: 140MM
2.3 Strapping materials
Straps material: PET (polyester) and PP (polypropylene) tape with flat or embossed surface.
Straps specifications: width 9-16MM, thickness 0.4-1.2MM.
Please choose the straps of the appropriate size according to the baler you buy.
2.4 Straps strength
Stretching force: adjustable from 600 to 3200 N, maximum value determined by the material of the straps.
Strap feeding in speed: 50-150MM/S. Friction strength: approx. 7 of the strength value of the straps.
2.5 Working environment
The ambient temperature for operation is 5-45°C, with an optimal working temperature of 15-25°C.
Use or store with care to protect against water and moisture.
3.Accessories

Note: Please use the attachments or accessories mentioned in the manual, the usage of other attachments may cause damage to equipment or may cause personal injury.
3.1 Rechargeable portable baler
As the baler uses nickel-cadmium (Nicd) nickel-metal hydride (NiMH) batteries, please purchase the batteries separately according to the following parameters.
Type: Lithium Battery
Voltage: 18V
Capacity: 5000MAH
3.2 Battery charger
Direct charging (optional)
Charger input voltage: AC100-240V
Output voltage: 21V, 2.5A
Charging time: about 90 minutes.
4. Operations
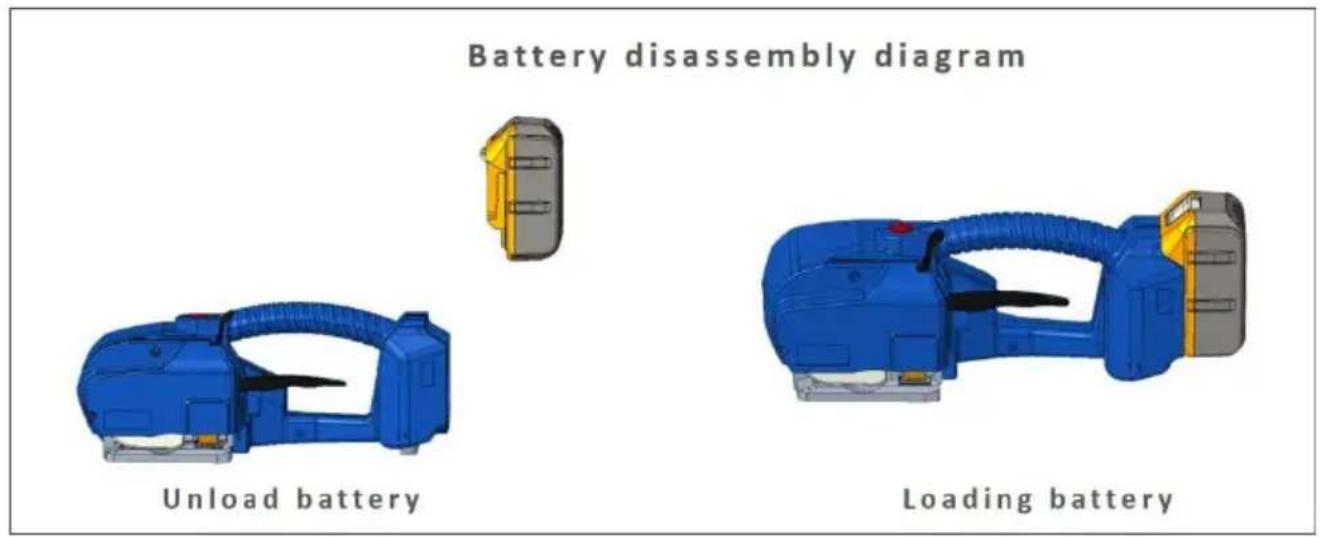
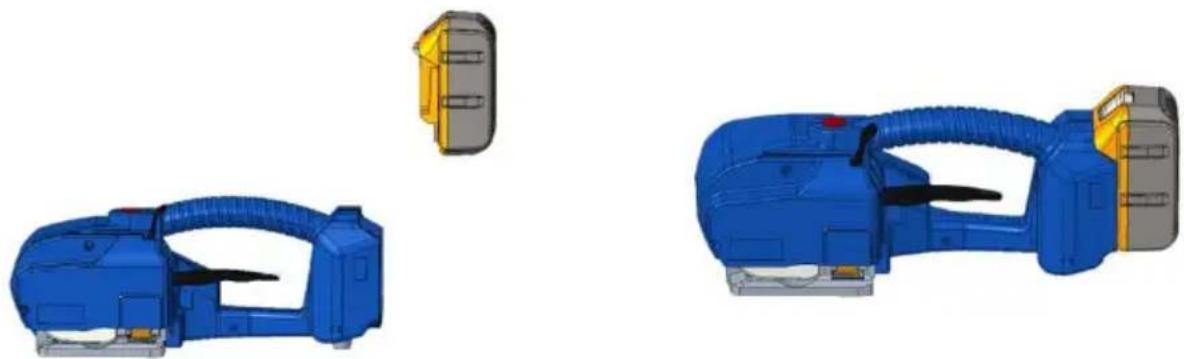
4.1 Battery installation
* Do not leave baler batteries in the rain or water.
* For safety reasons the battery is delivered uncharged and separated from the device, please follow the instructions for assembly.
* Remove the battery by pressing the battery Clip Snap with yo thumb and extracting it upwards or by releasing the Clip Snap after the battery.
* The indicator light is red when the battery is low, the indicator red when charging, and the charging indicator light is green when ch is complete.
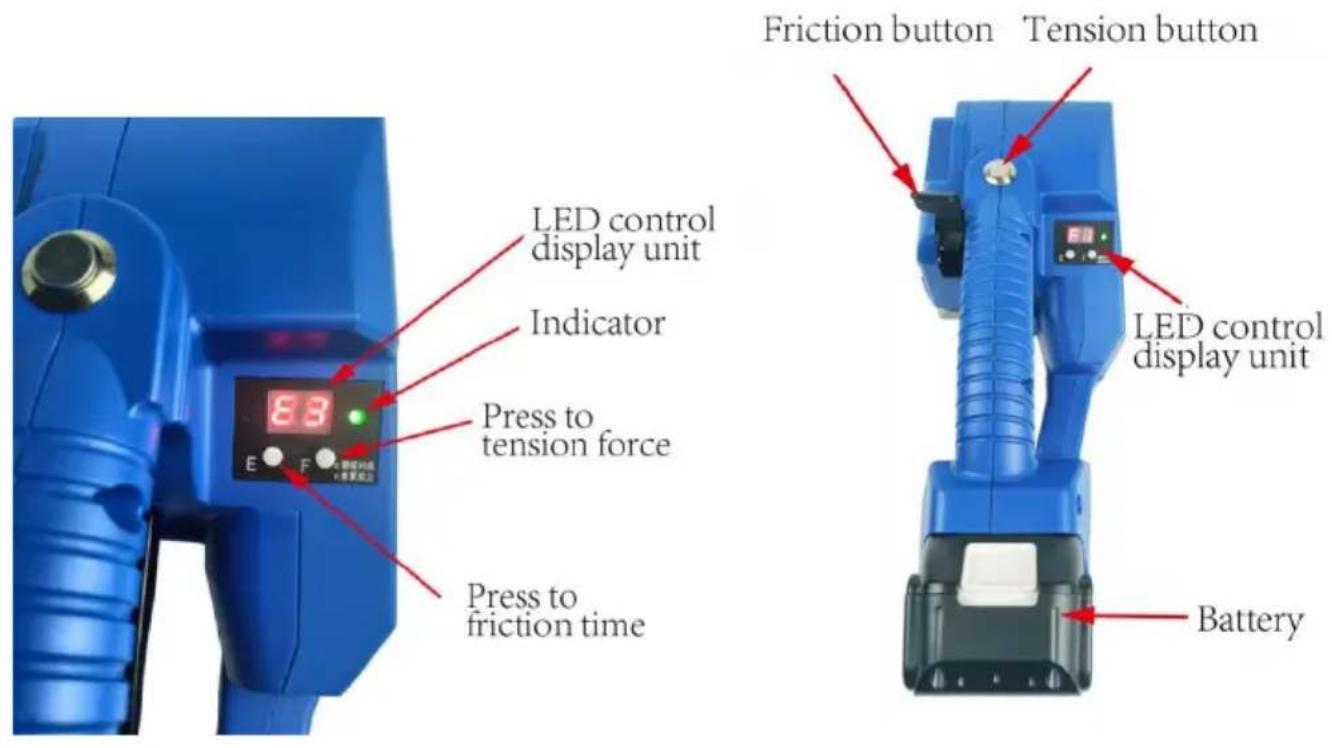
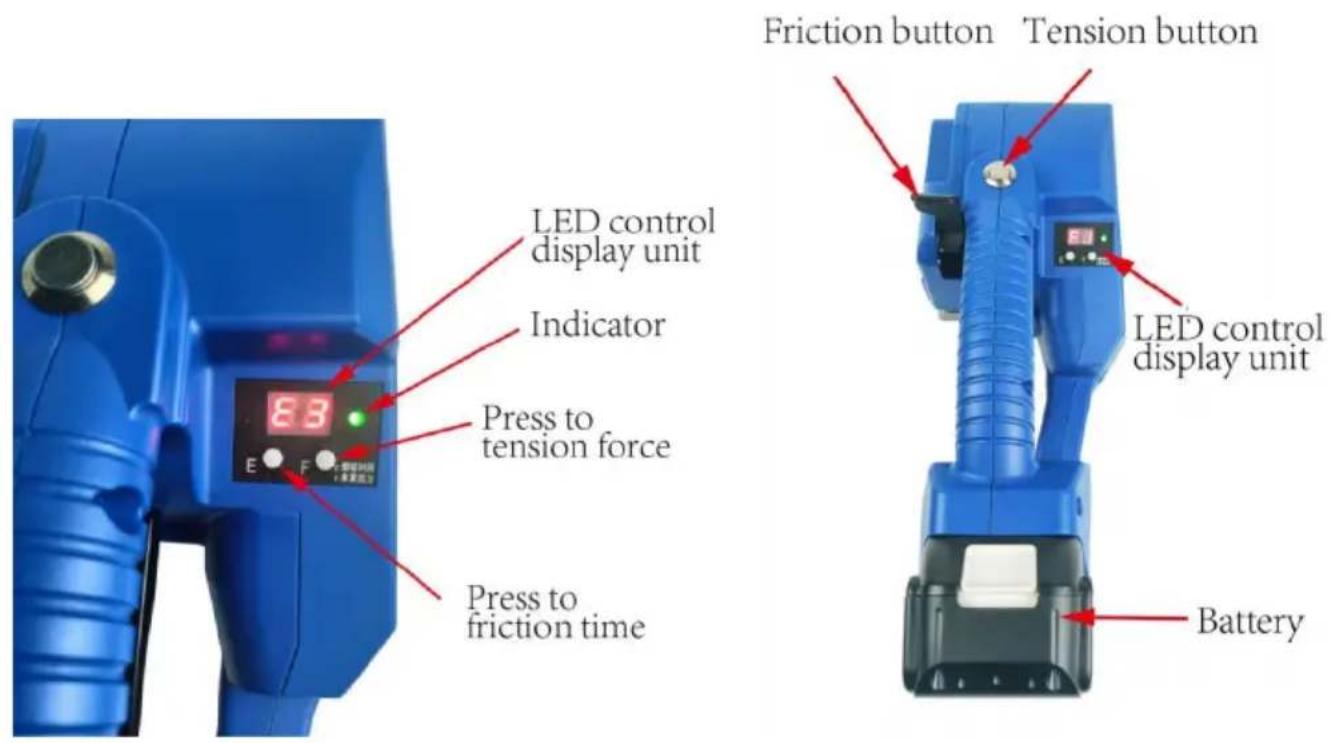
4.2 Operating elements

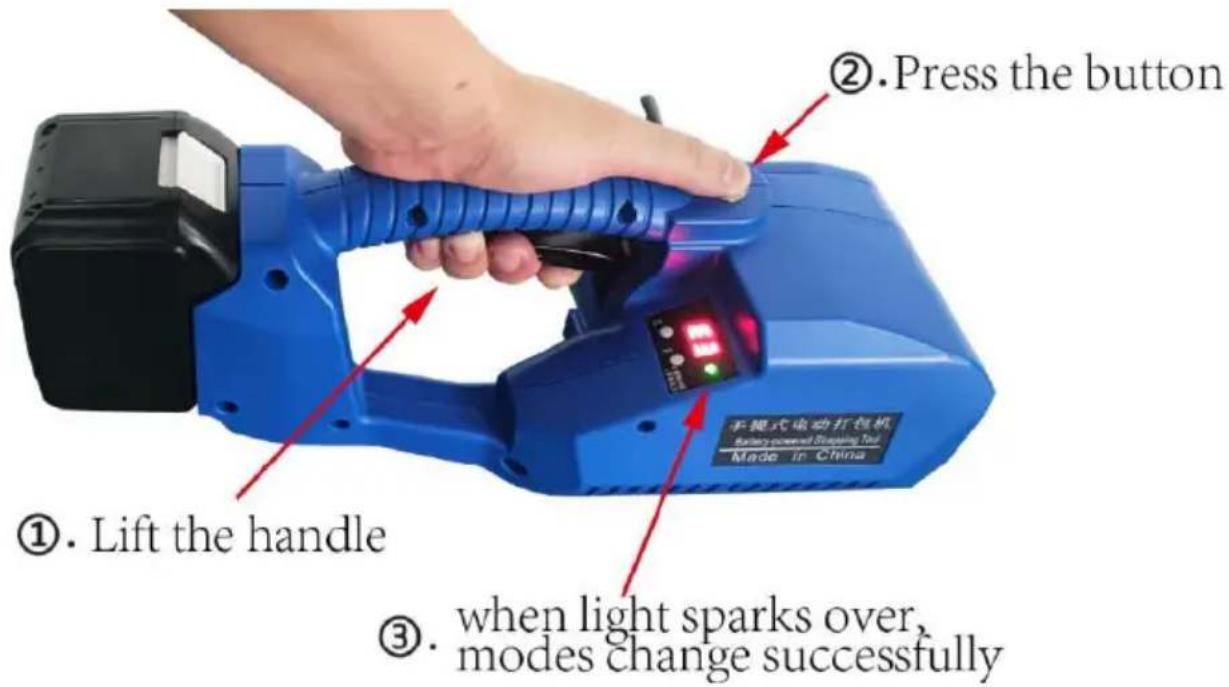
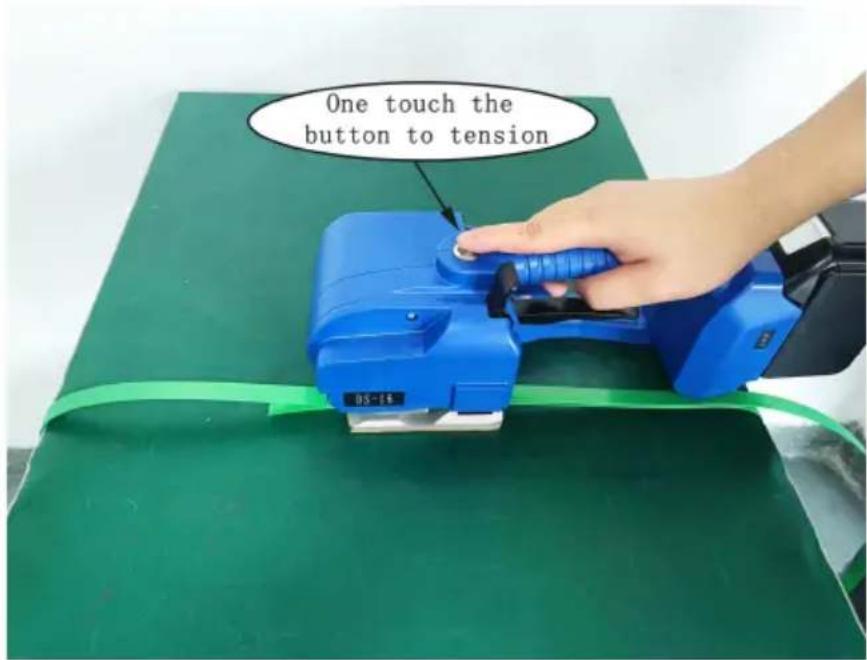
4.3 Semi-auto mode and auto mode
L-16 has 2 tension modes: one touch to tension and press button continuously to tension. How to make mode conversion? Just press the tension button and lift the handle at one time and when the indicator flashes alternately, the mode conversion is done.
4.4 Baler operations
*Semi-auto tension mode (press button continuously to tension)
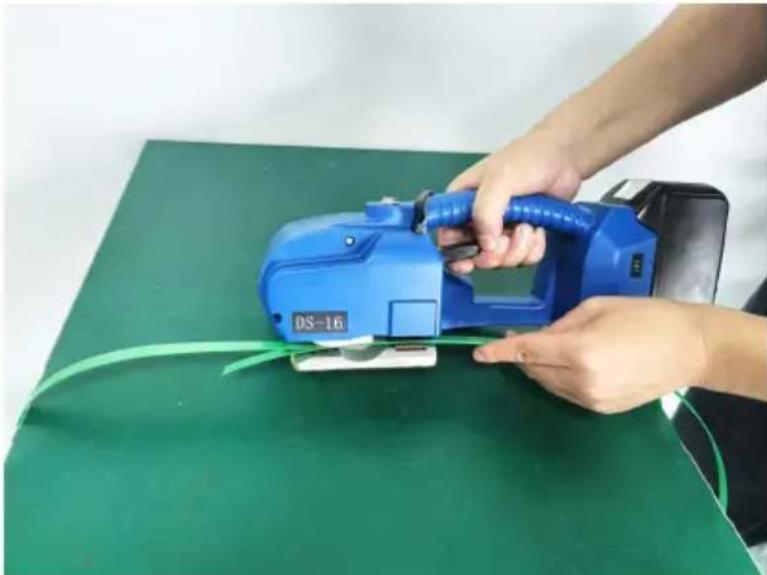
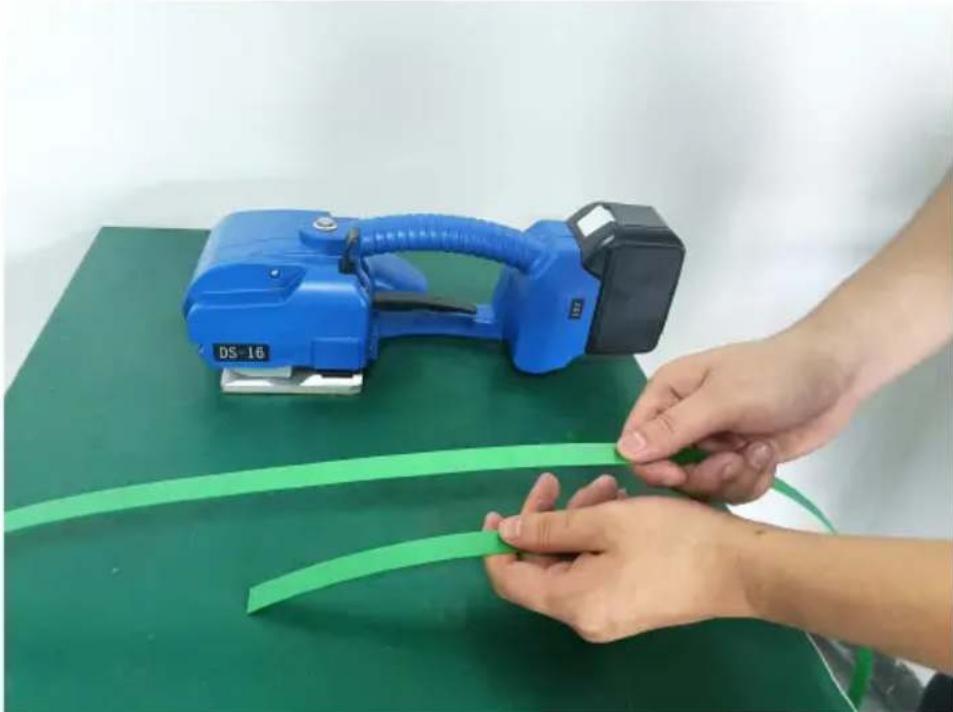
Step 1 Wrap and stack the straps
Please wrap the straps in the way as shown and do not allow the get wet with oil or other debris at any time.

natural_image
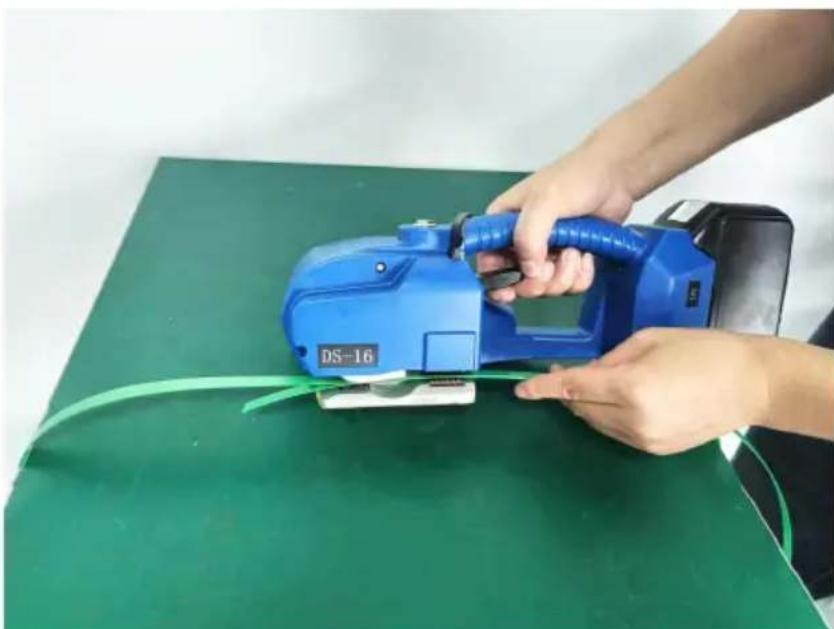
Close-up of hands assembling a green cable with a blue handheld device on a green table (no text or symbols visible)Step 2 inserts the straps into baler
When inserting the straps, the straps in the direction of tension must be stacked at the top end, the bottom strapping should be stre to the bottom of the feeding wheel to cover the front of the tooth p
5-10MM longer, when inserting the straps, please lift the handle with your right hand, insert the straps with your left hand, the upper and lower of straps must be stacked parallel to each other after releasing the I handle.
natural_image
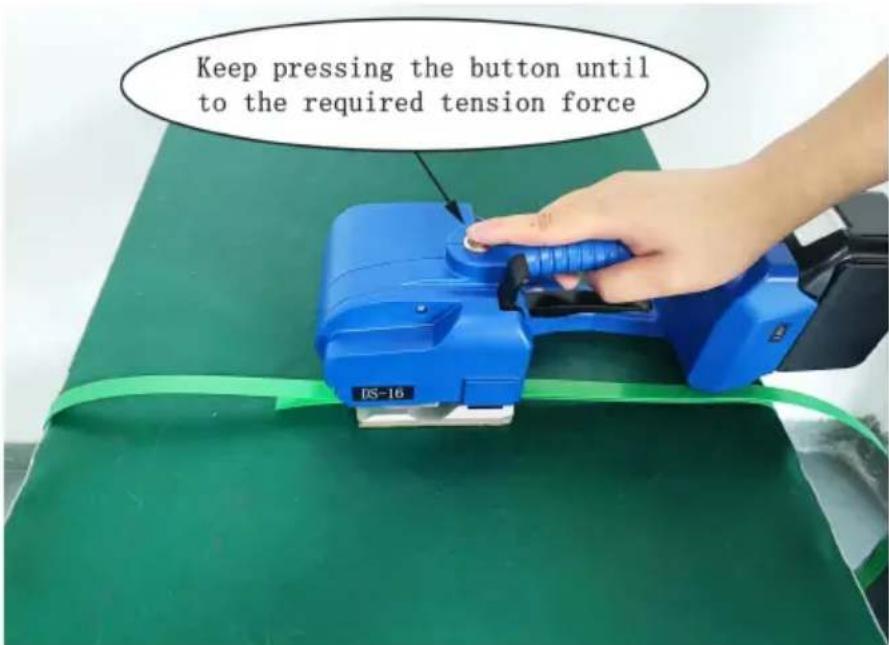
Person using a blue power tool on a green table, with a coiled cable nearby (no visible text or symbols)Step 3 Tighten or feeding in the straps
When you press the tension button and release it, the baler will you the default preset tightening time. When the tightness is not enough too tight, just increase or decrease the tension power grade appropriate until it is appropriate. When tightening, keep the baler moving in para and the forward direction of the baler free of sundries.
Step 4 Welding the straps
After pressing friction the button, the baler automatically seals a
cuts the straps(the time is preset by the system and can be increased decreased adjust the friction time grade).
natural_image
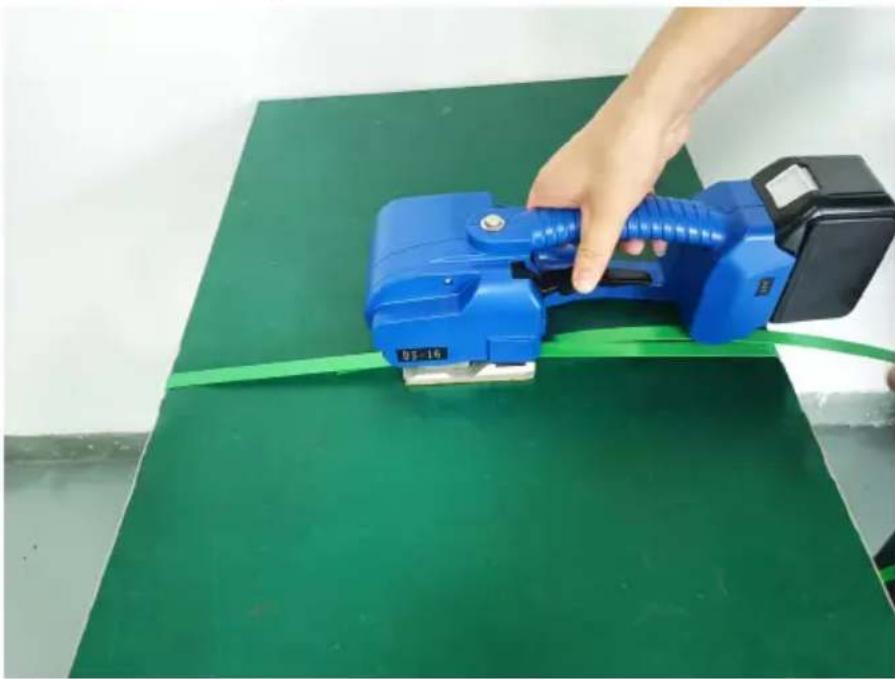
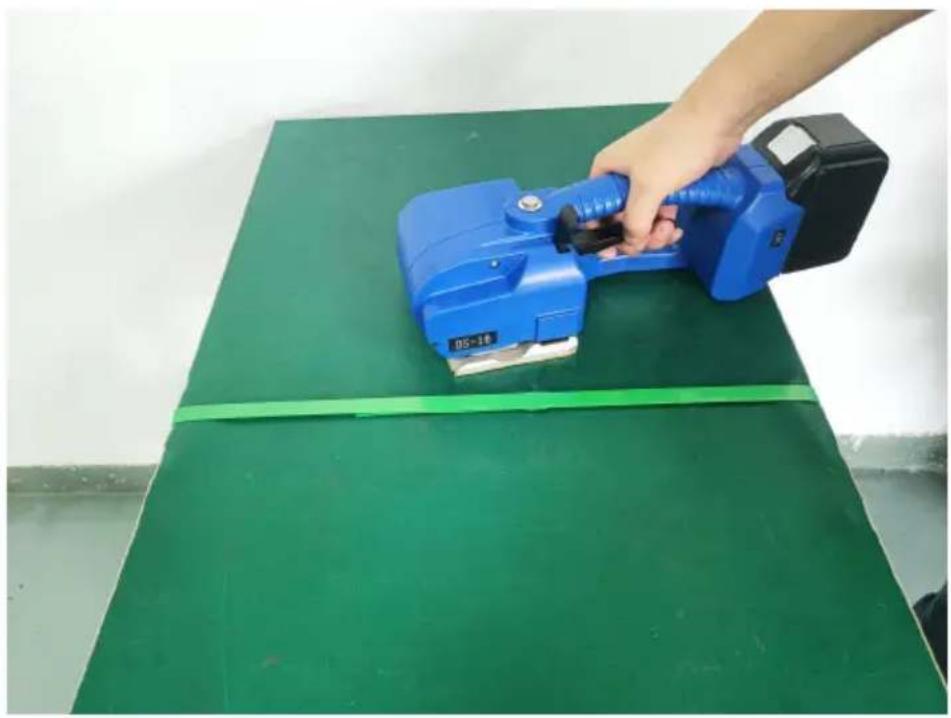
Hand operating a blue electric shaver on a green surface, no visible text or symbolsStep 5 Move away the baler
When the bonding operation is complete, lift the handle and feeding wheel run reversely to loose the straps accordingly and then away the baler.

natural_image
Hand operating a blue industrial machine on a green workbench, with a green horizontal bar at the bottom (no visible text or symbols)\*One touch to tension mode
Step 1 Wrap and stack the straps
Please wrap the straps in the way as shown and do not allo
straps to get wet with oil or other debris at any time.
natural_image
Hands assembling a green plastic strip on a green table with a blue DS-16 power tool nearby (no text or symbols visible)Step 2 inserts the straps into baler
When inserting the straps, the straps in the direction of tension must be stacked at the top end, the bottom strapping should be stre to the bottom of the feeding wheel to cover the front of the tooth p 5-10MM longer, when inserting the straps,please lift the handle with y right hand, insert the straps with your left hand, the upper and lower of straps must be stacked parallel to each other after releasing the I handle.
natural_image
Person using a blue DS-16 power tool on a green table, with visible wiring and clamps (no text or symbols)Step 3 Tighten straps
When you press the tension button and release it, the baler v tension straps automatically.
Step 4 Welding the straps
After pressing friction the button, the baler automatically seals cuts the straps(the time is preset by the system and can be increased decreased adjust the friction time grade).

natural_image
Hand operating a blue handheld device on a green surface, no visible text or symbolsStep 5 Move away the baler
When the bonding operation is complete, lift the handle and feel wheel run reversely to loose the straps accordingly and then move at
the baler.
natural_image
Hand operating a blue industrial power tool on a green workbench, with a yellow band and label 'DS-18' visible (no text or symbols on the device itself)- Electrical connections
6. Wear parts replacement & bonding state adjustment
■ Note: Please disconnect the power switch and remove the bat before each service.
6.1 Wear parts replacement
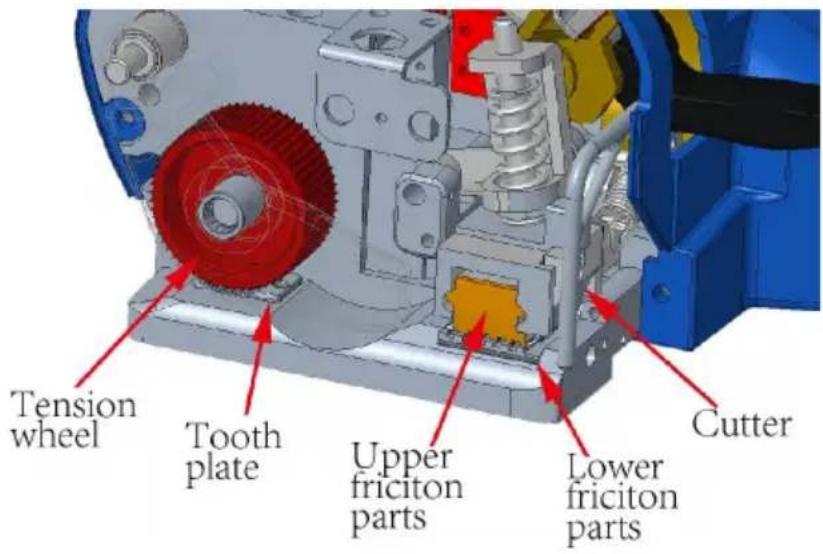
Cutter (JD-PSE-G016): First loosen the screw on the left cove plate (JD-L16-G01) and remove it, then remove the screw on the cut and remove the cutter for replacement. After installing the cutter, insta reverse order.
Lower toothed plate (JD-PSE-G011): first remove the screws first the toothed plate and remove it, then replace the ejected toothed plate. After replacement, assemble it in the reverse order.
Tension wheel (JD-PSE-G012): please remove the left cover plat as described above, remove the nut fixed on the connecting shaft (JD-L16-G021), remove the Tension wheel cover(JD-L16-G007), replace the restraining wheel and replace it in reverse order.
Lower friction part (JD-PSE-G013): First loosen and remove the headless screws fixed on the shaft of the lower friction part, push out the lower friction part from the bottom for replacement, and then replace it in reverse order.
6.2 Tightening, bonding and cutting adjustments
①. If the tightening slips, loosen the screws fixed on the tooth and install the tooth plate gasket (JD-PSE-G028) to raise the tooth plate replace the tooth plate.
②. When using different packing belts with a thickness of 0.4-1.2MM, timely adjust the gap between the upper friction part (JD-PSE-G008) and the lower friction part, otherwise poor welding will occur. When adjusting the clearance between the upper and lower friction part, first remove the left cover plate, then loosen the remove sealing button (JD-PSE-G005), fix the lower compression shaft of the bonding plate (JD-PSE-G022) with a slotted screwdriver, and then turn the nut the connecting shaft clockwise or counterclockwise. When rotating clockwise, the clearance between the upper and lower friction part becomes larger, and when rotating counterclockwise, the clearance becomes smaller.
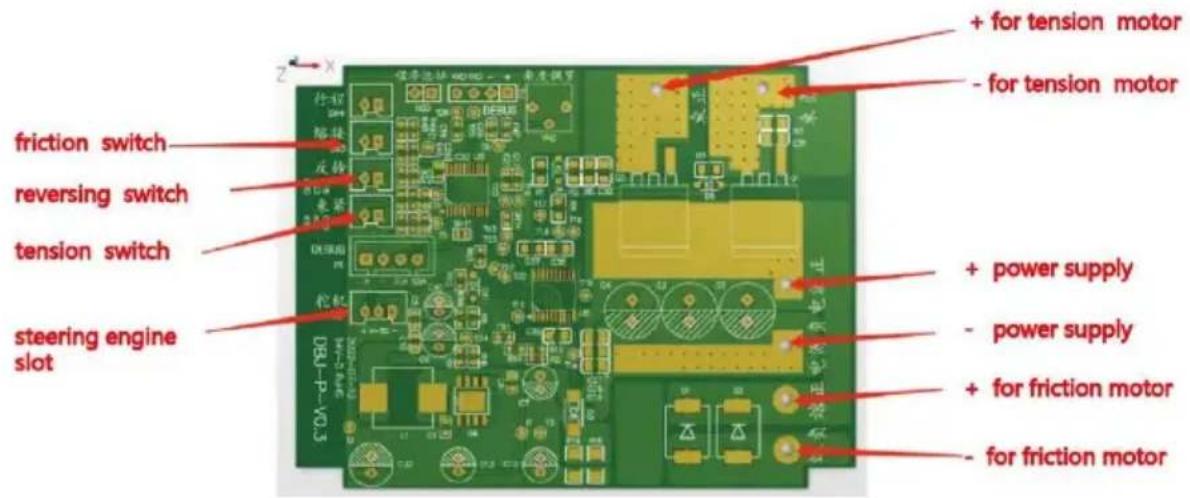
③. The bonding time and the tightening force are adjusted through the digital display windows E and F on the right cover. Key E adjusts the time, and key F adjusts the tightening force, increasing from grade 1 to grade 9.
④. Refer to the following chart for wear part replacement and bonding & welding time (effect) adjustment.

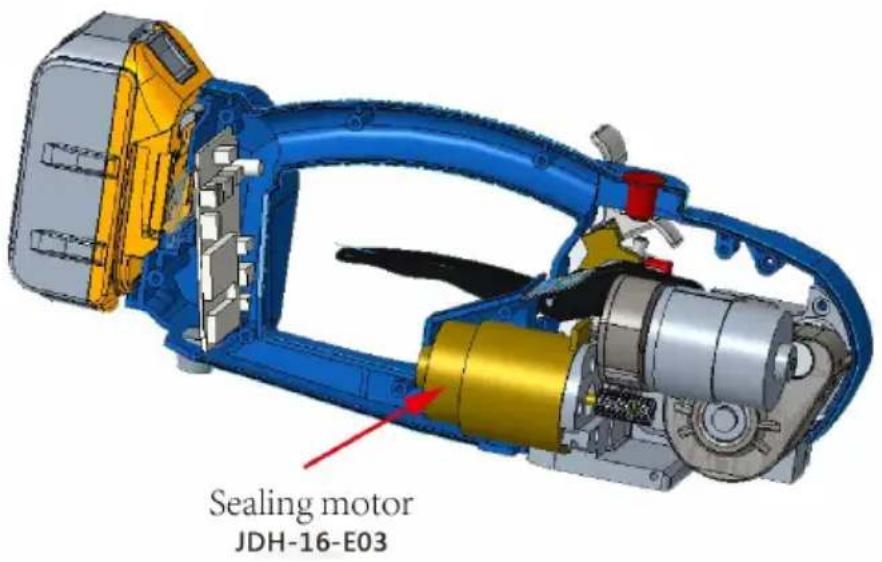
Diagram of welding &bonding effect

natural_image
Simple black rectangle divided horizontally with no text or symbolsPerfect friction time

natural_image
Simple black oval shape centered on a white background (no text or symbols)Friction time is too shc

natural_image
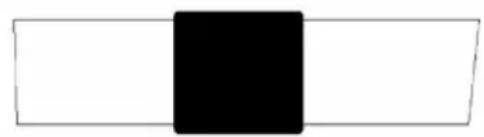
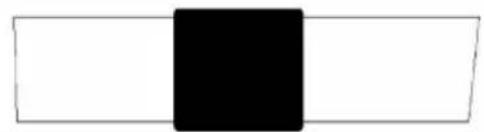
Simple black rectangle centered on a white rectangular background (no text or symbols)Friction time is too long
7.Common electrical faults
In the process of use, the baler tool suddenly jammed and LED sh when the baling belt stuck in the machine can not be taken out, ple immediately turn power off, cut off the straps to remove the straps s the tool, promptly charge the battery or replace the battery.When confirming the battery has power and the fault is not eliminated, you remove the left and right plastic covers after removing the battery to the tool, such as checking the switches or the wiring on each switch motors has not fallen off, or replace the micro switch or replace the sealing motor.
8、Product exploded view and parts list
| Item | Part name | Specification | Material code | Qty. |
| 1 | PCB | JD-A16-E019 | 1 | |
| 2 | Battery adapter slot | JD-L16-G06 | 1 | |
| 3 | PVC sticker | JD-L16-G07 | 1 | |
| 4 | LED display unit | JD-L16-G05 | 1 | |
| 5 | Right house | JD-L16-G03 | 1 | |
| 6 | Tension button | OD16 | JD-PSE-E039 | 1 |
| 7 | Left house | JD-L16-G02 | 1 | |
| 8 | Battery | 18V, 5.0A | JD-PSE-E051 | 1 |
| 9 | Left side cover | JD-L16-G01 | 1 | |
| 10 | Lift | JD-L16-G004 | 1 | |
| 11 | Reducer cover plate | JD-L16-G003 | 1 | |
| 12 | Connect-gear for worm | JD-PSE-G033 | 1 | |
| 13 | Variable speed gear D | JD-L16-G036 | 1 | |
| 14 | Double gear | JD-PSE-G031 | 1 | |
| 15 | Worm gear | JD-PSE-G030 | 1 | |
| 16 | Bearing 607 | JD-PSE-E012 | 1 | |
| 17 | Bearing BK0810 | JD-PSE-E015 | 1 | |
| 18 | Gear box tooth sleeve | JD-L16-04 | 1 | |
| 19 | gear B | JD-PSE-G032 | 1 | |
| 20 | Tension motor | JD-L16-E01 | 1 | |
| 21 | Reduction gear box | JD-L16-G002 | 1 | |
| 22 | Switch B | JD-PSE-E007 | 1 | |
| 23 | Ball bearing A 6900 | JD-PSE-E010 | 2 | |
| 24 | Reducer cover | JD-PSE-G015 | 1 | |
| 25 | Body | JD-L16-G001 | 1 | |
| 26 | Tooth plate | JD-PSE-G011 | 1 | |
| 27 | M6 boss pivot pin | JD-L16-G021 | 1 | |
| 28 | Reset torsion spring | JD-PSE-G019 | 1 | |
| 29 | Tension wheel DB-009 | JD-PSE-G012 | 1 | |
| 30 | Tension wheel cover | JD-L16-G007 | 1 | |
| 31 | Sealing button | JD-PSE-G005 | 1 | |
| 32 | Cam unit | JD-PSE-G014 | 1 | |
| 33 | Spring cavity DB-021 | JD-PSE-G010 | 1 | |
| 34 | Compression spring | JD-PSE-G020 | 1 |
| Item | Part name | Specification | Material code | Qty. |
| 35 | Shaft | JD-PSE-G022 | 1 | |
| 36 | Cam driver | JD-PSE-G038 | 1 | |
| 37 | 4*12.5 pin | JD-PSE-E022 | 1 | |
| 38 | Shaft pin | JD-PSE-G023 | 1 | |
| 39 | Sealing switch A | JD-PSE-E006 | 1 | |
| 40 | Curved umbrella tooth | JD-PSE-G029 | 1 | |
| 41 | Drag spring | JD-PSE-G017-2 | 1 | |
| 42 | Synchronous wheel A | JD-PSE-G034 | 1 | |
| 43 | Lower friction parts | JD-PSE-G013 | 1 | |
| 44 | Cutter | JD-PSE-G016 | 1 | |
| 45 | Bearing A 101712 | JD-PSE-E014-1 | 1 | |
| 46 | Upper friction parts | JD-PSE-G008 | 1 | |
| 47 | Bearing B 606 | JD-PSE-E011 | 2 | |
| 48 | Friciton part bracket | JD-PSE-G009 | 1 | |
| 49 | Eccentric shaft | JD-PSE-G024 | 1 | |
| 50 | Sealing motor | JDH-16-E03 | 1 | |
| 51 | Synchronous wheel B | JD-PSE-G035 | 1 |
Address: Shuangchenglu 803nong11hao1602A-1609shi, baoshanqu, shanghai 200000 CN.
Imported to AUS: SIHAO PTY LTD, 1 ROKEVA STREETEASTWOOD NS 2122 Australia
Imported to USA: Sanven Technology Ltd., Suite 250, 9166 Anaheim Pla Rancho Cucamonga, CA 91730
| EC | REP |
E-CrossStu GmbH
Mainzer Landstr.69, 60329 Frankfurt am Ma
| UK | REP |
YH CONSULTING LIMITED.
C/O YH Consulting Limited Office 147, Centurion H
London Road, Staines-upon-Thames, Surrey, TW18 4
VEVOR®
TOUGH TOOLS, HALF PRICE
Technical Support and E-Warranty Certificate
www.vevor.com/support
VEVOR®
TOUGH TOOLS, HALF PRICE
We continue to be committed to provide you tools with competitive price. "Save Half", "Half Price" or any other similar expressions used by us only represent estimate of savings you might benefit from buying certain tools with us compared top brands and does not necessarily mean to cover all categories of tools offered are kindly reminded to verify carefully when you are placing an order with us actually saving half in comparison with the top major brands.
Modèle : DS-16
natural_image
Blue DS-16 water heater with attached 5.0Ah lithium-ion battery (no text or symbols on device body)NEED HELP? CONTACT US!
Have product questions? Need technical support? Please feel fr contact us:
Technical Support and E-Warranty Certificate www.vevor.com/support
This is the original instruction, please read all manual instruction carefully before operating. VEVOR reserves a clear interpretation user manual. The appearance of the product shall be subject to product you received. Please forgive us that we won't inform you there are any technology or software updates on our product.
INSTRUCTIONS
natural_image
Close-up of hands assembling a green plastic strip with a blue handheld device on a green surface (no text or symbols visible)natural_image
Person using a blue power tool on a green table, with a green cable wrapped around it (no text or symbols visible)natural_image
Hand operating a blue industrial power tool on a green workbench (no text or symbols visible)natural_image
Hand operating a blue industrial power tool on a green workbench, with a green horizontal band at the bottom (no text or symbols visible)natural_image
Close-up of hands assembling a green plastic strip on a green table with a blue handheld device (no text or symbols visible)natural_image
Person using a blue power tool on a green cutting board, no visible text or symbolsnatural_image
Hand operating a blue handheld device on a green table, with a green cable wrapped around it (no visible text or symbols)natural_image
Hand operating a blue power tool on a green workbench, with a green horizontal stripe at the bottom (no text or symbols visible)natural_image
Simple black rectangle divided horizontally with white top and bottom edges (no text or symbols)Perfect friction time

natural_image
Simple black oval shape centered on a white background (no text or symbols)Friction time is too shc

natural_image
Simple black rectangle centered within a white rectangular border (no text or symbols)Friction time is too long
| Item | Part name | Specification | Material code | Qty. |
| 1 | PCB | JD-A16-E019 | 1 | |
| 2 | Battery adapter slot | JD-L16-G06 | 1 | |
| 3 | PVC sticker | JD-L16-G07 | 1 | |
| 4 | LED display unit | JD-L16-G05 | 1 | |
| 5 | Right house | JD-L16-G03 | 1 | |
| 6 | Tension button | OD16 | JD-PSE-E039 | 1 |
| 7 | Left house | JD-L16-G02 | 1 | |
| 8 | Battery | 18V, 5.0A | JD-PSE-E051 | 1 |
| 9 | Left side cover | JD-L16-G01 | 1 | |
| 10 | Lift | JD-L16-G004 | 1 | |
| 11 | Reducer cover plate | JD-L16-G003 | 1 | |
| 12 | Connect-gear for worm | JD-PSE-G033 | 1 | |
| 13 | Variable speed gear D | JD-L16-G036 | 1 | |
| 14 | Double gear | JD-PSE-G031 | 1 | |
| 15 | Worm gear | JD-PSE-G030 | 1 | |
| 16 | Bearing 607 | JD-PSE-E012 | 1 | |
| 17 | Bearing BK0810 | JD-PSE-E015 | 1 |
| Item | Part name | Specification | Material code | Qty. |
| 18 | Gear box tooth sleeve | JD-L16-04 | 1 | |
| 19 | gear B | JD-PSE-G032 | 1 | |
| 20 | Tension motor | JD-L16-E01 | 1 | |
| 21 | Reduction gear box | JD-L16-G002 | 1 | |
| 22 | Switch B | JD-PSE-E007 | 1 | |
| 23 | Ball bearing A 6900 | JD-PSE-E010 | 2 | |
| 24 | Reducer cover | JD-PSE-G015 | 1 | |
| 25 | Body | JD-L16-G001 | 1 | |
| 26 | Tooth plate | JD-PSE-G011 | 1 | |
| 27 | M6 boss pivot pin | JD-L16-G021 | 1 | |
| 28 | Reset torsion spring | JD-PSE-G019 | 1 | |
| 29 | Tension wheel DB-009 | JD-PSE-G012 | 1 | |
| 30 | Tension wheel cover | JD-L16-G007 | 1 | |
| 31 | Sealing button | JD-PSE-G005 | 1 | |
| 32 | Cam unit | JD-PSE-G014 | 1 | |
| 33 | Spring cavity DB-021 | JD-PSE-G010 | 1 | |
| 34 | Compression spring | JD-PSE-G020 | 1 | |
| 35 | Shaft | JD-PSE-G022 | 1 | |
| 36 | Cam driver | JD-PSE-G038 | 1 | |
| 37 | 4*12.5 pin | JD-PSE-E022 | 1 | |
| 38 | Shaft pin | JD-PSE-G023 | 1 | |
| 39 | Sealing switch A | JD-PSE-E006 | 1 | |
| 40 | Curved umbrella tooth | JD-PSE-G029 | 1 | |
| 41 | Drag spring | JD-PSE-G017-2 | 1 | |
| 42 | Synchronous wheel A | JD-PSE-G034 | 1 | |
| 43 | Lower friction parts | JD-PSE-G013 | 1 | |
| 44 | Cutter | JD-PSE-G016 | 1 | |
| 45 | Bearing A 101712 | JD-PSE-E014-1 | 1 | |
| 46 | Upper friction parts | JD-PSE-G008 | 1 | |
| 47 | Bearing B 606 | JD-PSE-E011 | 2 | |
| 48 | Friciton part bracket | JD-PSE-G009 | 1 | |
| 49 | Eccentric shaft | JD-PSE-G024 | 1 | |
| 50 | Sealing motor | JDH-16-E03 | 1 | |
| 51 | Synchronous wheel B | JD-PSE-G035 | 1 |
Adresse : Shuangchenglu 803nong11hao1602A-1609shi, baoshanqu, Shanghai 200000 CN.
Importé en Australie : SIHAO PTY LTD, 1 ROKEVA STREETASTWOOD NSW 2122 Australie
C/O YH Consulting Limited Office 147, Centurion H, London Road, Staines-upon-Thames, Surrey, TW18 2
VEVOR®
TOUGH TOOLS, HALF PRICE
We continue to be committed to provide you tools with competitive price. "Save Half", "Half Price" or any other similar expressions used by us only represent estimate of savings you might benefit from buying certain tools with us compared top brands and does not necessarily mean to cover all categories of tools offered are kindly reminded to verify carefully when you are placing an order with us actually saving half in comparison with the top major brands.
Modell: DS-16

natural_image
Blue DS-16 lithium-ion charging station with flexible hose and 18V power button (no text or symbols on device body)NEED HELP? CONTACT US!
Have product questions? Need technical support? Please feel fr contact us:
Technical Support and E-Warranty Certificate www.vevor.com/support
This is the original instruction, please read all manual instruction carefully before operating. VEVOR reserves a clear interpretation user manual. The appearance of the product shall be subject to product you received. Please forgive us that we won't inform you there are any technology or software updates on our product.
INSTRUCTIONS
4.2 Bedienelemente
natural_image
Child's hands assembling a green cable with a blue handheld device on a green table (no text or symbols visible)natural_image
Person using a blue power tool on a green table, with a coiled cable nearby (no text or symbols visible)natural_image
Hand operating a blue handheld device on a green surface, no visible text or symbolsnatural_image
Hand operating a blue power tool on a green workbench, with a yellow band and white wall in the background (no text or symbols visible)natural_image
Hands assembling a green cable with a blue-handled tool on a green table (no text or symbols visible)natural_image
Person using a blue power tool on a green cutting board, no visible text or symbolsnatural_image
Hand operating a blue handheld device on a green surface, no visible text or symbolsnatural_image
Hand holding a blue power tool on a green surface, with a green horizontal band at the bottom (no text or symbols visible)natural_image
Simple black rectangle divided horizontally with no text or symbolsPerfect friction time

natural_image
Simple black oval shape centered on a white background (no text or symbols)Friction time is too shc

natural_image
Simple black rectangle centered on white background (no text or symbols)Friction time is too long
| Item | Part name | Specification | Material code | Qty. |
| 1 | PCB | JD-A16-E019 | 1 | |
| 2 | Battery adapter slot | JD-L16-G06 | 1 | |
| 3 | PVC sticker | JD-L16-G07 | 1 | |
| 4 | LED display unit | JD-L16-G05 | 1 | |
| 5 | Right house | JD-L16-G03 | 1 | |
| 6 | Tension button | OD16 | JD-PSE-E039 | 1 |
| 7 | Left house | JD-L16-G02 | 1 | |
| 8 | Battery | 18V, 5.0A | JD-PSE-E051 | 1 |
| 9 | Left side cover | JD-L16-G01 | 1 | |
| 10 | Lift | JD-L16-G004 | 1 | |
| 11 | Reducer cover plate | JD-L16-G003 | 1 | |
| 12 | Connect-gear for worm | JD-PSE-G033 | 1 | |
| 13 | Variable speed gear D | JD-L16-G036 | 1 | |
| 14 | Double gear | JD-PSE-G031 | 1 | |
| 15 | Worm gear | JD-PSE-G030 | 1 | |
| 16 | Bearing 607 | JD-PSE-E012 | 1 | |
| 17 | Bearing BK0810 | JD-PSE-E015 | 1 |
| Item | Part name | Specification | Material code | Qty. |
| 18 | Gear box tooth sleeve | JD-L16-04 | 1 | |
| 19 | gear B | JD-PSE-G032 | 1 | |
| 20 | Tension motor | JD-L16-E01 | 1 | |
| 21 | Reduction gear box | JD-L16-G002 | 1 | |
| 22 | Switch B | JD-PSE-E007 | 1 | |
| 23 | Ball bearing A 6900 | JD-PSE-E010 | 2 | |
| 24 | Reducer cover | JD-PSE-G015 | 1 | |
| 25 | Body | JD-L16-G001 | 1 | |
| 26 | Tooth plate | JD-PSE-G011 | 1 | |
| 27 | M6 boss pivot pin | JD-L16-G021 | 1 | |
| 28 | Reset torsion spring | JD-PSE-G019 | 1 | |
| 29 | Tension wheel DB-009 | JD-PSE-G012 | 1 | |
| 30 | Tension wheel cover | JD-L16-G007 | 1 | |
| 31 | Sealing button | JD-PSE-G005 | 1 | |
| 32 | Cam unit | JD-PSE-G014 | 1 | |
| 33 | Spring cavity DB-021 | JD-PSE-G010 | 1 | |
| 34 | Compression spring | JD-PSE-G020 | 1 | |
| 35 | Shaft | JD-PSE-G022 | 1 | |
| 36 | Cam driver | JD-PSE-G038 | 1 | |
| 37 | 4*12.5 pin | JD-PSE-E022 | 1 | |
| 38 | Shaft pin | JD-PSE-G023 | 1 | |
| 39 | Sealing switch A | JD-PSE-E006 | 1 | |
| 40 | Curved umbrella tooth | JD-PSE-G029 | 1 | |
| 41 | Drag spring | JD-PSE-G017-2 | 1 | |
| 42 | Synchronous wheel A | JD-PSE-G034 | 1 | |
| 43 | Lower friction parts | JD-PSE-G013 | 1 | |
| 44 | Cutter | JD-PSE-G016 | 1 | |
| 45 | Bearing A 101712 | JD-PSE-E014-1 | 1 | |
| 46 | Upper friction parts | JD-PSE-G008 | 1 | |
| 47 | Bearing B 606 | JD-PSE-E011 | 2 | |
| 48 | Friciton part bracket | JD-PSE-G009 | 1 | |
| 49 | Eccentric shaft | JD-PSE-G024 | 1 | |
| 50 | Sealing motor | JDH-16-E03 | 1 | |
| 51 | Synchronous wheel B | JD-PSE-G035 | 1 |
Adresse : Shuangchenglu 803nong11hao1602A-1609shi, Baoshanqu, Shanghai 200000 CN.
C/O YH Consulting Limited Office 147, Centurion H, London Road, Staines-upon-Thames, Surrey, TW18 2
VEVOR®
TOUGH TOOLS, HALF PRICE
We continue to be committed to provide you tools with competitive price. "Save Half", "Half Price" or any other similar expressions used by us only represent of savings you might benefit from buying certain tools with us compared to top brands and does not necessarily mean to cover all categories of tools offered are kindly reminded to verify carefully when you are placing an order with us actually saving half in comparison with the top major brands.
Modello: DS-16

natural_image
Blue DS-16 water heater with 18V and 5.0Ah lithium-ion model (no text or symbols on device body)NEED HELP? CONTACT US!
Have product questions? Need technical support? Please feel fr contact us:
Technical Support and E-Warranty Certificate www.vevor.com/support
This is the original instruction, please read all manual instruction carefully before operating. VEVOR reserves a clear interpretation user manual. The appearance of the product shall be subject to product you received. Please forgive us that we won't inform you there are any technology or software updates on our product.
INSTRUCTIONS
natural_image
Close-up of hands assembling a green cable with a blue handheld device on a green table (no text or symbols visible)natural_image
Person using a blue power tool on a green table, with a green cable wrapped around it (no text or symbols visible)natural_image
Hand operating a blue cylindrical power tool on a green surface, no visible text or symbolsnatural_image
Hand operating a blue power tool on a green workbench, with a green horizontal bar at the bottom (no text or symbols visible)natural_image
Hands assembling a green cable with a blue handheld device on a green table (no text or symbols visible)natural_image
Person using a blue electric power tool on a green table, with a green cable being inserted (no visible text or symbols)natural_image
Hand operating a blue handheld device on a green surface, no visible text or symbolsnatural_image
Hand operating a blue power tool on a green workbench, with a green horizontal bar at the bottom (no text or symbols visible)natural_image
Simple black rectangle divided horizontally with white top and bottom edges (no text or symbols)Perfect friction time

natural_image
Simple black oval shape centered on a white background (no text or symbols)Friction time is too shc
natural_image
Simple black rectangle centered on a white rectangular background (no text or symbols)Friction time is too long
| Item | Part name | Specification | Material code | Qty. |
| 1 | PCB | JD-A16-E019 | 1 | |
| 2 | Battery adapter slot | JD-L16-G06 | 1 | |
| 3 | PVC sticker | JD-L16-G07 | 1 | |
| 4 | LED display unit | JD-L16-G05 | 1 | |
| 5 | Right house | JD-L16-G03 | 1 | |
| 6 | Tension button | OD16 | JD-PSE-E039 | 1 |
| 7 | Left house | JD-L16-G02 | 1 | |
| 8 | Battery | 18V, 5.0A | JD-PSE-E051 | 1 |
| 9 | Left side cover | JD-L16-G01 | 1 | |
| 10 | Lift | JD-L16-G004 | 1 | |
| 11 | Reducer cover plate | JD-L16-G003 | 1 | |
| 12 | Connect-gear for worm | JD-PSE-G033 | 1 | |
| 13 | Variable speed gear D | JD-L16-G036 | 1 | |
| 14 | Double gear | JD-PSE-G031 | 1 | |
| 15 | Worm gear | JD-PSE-G030 | 1 | |
| 16 | Bearing 607 | JD-PSE-E012 | 1 | |
| 17 | Bearing BK0810 | JD-PSE-E015 | 1 | |
| 18 | Gear box tooth sleeve | JD-L16-04 | 1 | |
| 19 | gear B | JD-PSE-G032 | 1 | |
| 20 | Tension motor | JD-L16-E01 | 1 | |
| 21 | Reduction gear box | JD-L16-G002 | 1 | |
| 22 | Switch B | JD-PSE-E007 | 1 | |
| 23 | Ball bearing A 6900 | JD-PSE-E010 | 2 | |
| 24 | Reducer cover | JD-PSE-G015 | 1 | |
| 25 | Body | JD-L16-G001 | 1 | |
| 26 | Tooth plate | JD-PSE-G011 | 1 | |
| 27 | M6 boss pivot pin | JD-L16-G021 | 1 | |
| 28 | Reset torsion spring | JD-PSE-G019 | 1 | |
| 29 | Tension wheel DB-009 | JD-PSE-G012 | 1 | |
| 30 | Tension wheel cover | JD-L16-G007 | 1 | |
| 31 | Sealing button | JD-PSE-G005 | 1 | |
| 32 | Cam unit | JD-PSE-G014 | 1 | |
| 33 | Spring cavity DB-021 | JD-PSE-G010 | 1 | |
| 34 | Compression spring | JD-PSE-G020 | 1 |
| Item | Part name | Specification | Material code | Qty. |
| 35 | Shaft | JD-PSE-G022 | 1 | |
| 36 | Cam driver | JD-PSE-G038 | 1 | |
| 37 | 4*12.5 pin | JD-PSE-E022 | 1 | |
| 38 | Shaft pin | JD-PSE-G023 | 1 | |
| 39 | Sealing switch A | JD-PSE-E006 | 1 | |
| 40 | Curved umbrella tooth | JD-PSE-G029 | 1 | |
| 41 | Drag spring | JD-PSE-G017-2 | 1 | |
| 42 | Synchronous wheel A | JD-PSE-G034 | 1 | |
| 43 | Lower friction parts | JD-PSE-G013 | 1 | |
| 44 | Cutter | JD-PSE-G016 | 1 | |
| 45 | Bearing A 101712 | JD-PSE-E014-1 | 1 | |
| 46 | Upper friction parts | JD-PSE-G008 | 1 | |
| 47 | Bearing B 606 | JD-PSE-E011 | 2 | |
| 48 | Friciton part bracket | JD-PSE-G009 | 1 | |
| 49 | Eccentric shaft | JD-PSE-G024 | 1 | |
| 50 | Sealing motor | JDH-16-E03 | 1 | |
| 51 | Synchronous wheel B | JD-PSE-G035 | 1 |
Indirizzo : Shuangchenglu 803nong11hao1602A-1609shi, baoshanqu, shanghai 200000 CN.
Importato in AUS: SIHAO PTY LTD, 1 ROKEVA STREETEASTWOOD NS 2122 Australia
C/O YH Consulting Limited Office 147, Centurion H
London Road, Staines-upon-Thames, Surrey, TW18 4
VEVOR®
TOUGH TOOLS, HALF PRICE
www.vevor.com/support
VEVOR®
TOUGH TOOLS, HALF PRICE
We continue to be committed to provide you tools with competitive price. "Save Half", "Half Price" or any other similar expressions used by us only represent estimate of savings you might benefit from buying certain tools with us compared to top brands and does not necessarily mean to cover all categories of tools offered are kindly reminded to verify carefully when you are placing an order with us actually saving half in comparison with the top major brands.
Modelo: DS-16

natural_image
Blue DS-16 water heater with attached 5.0Ah lithium-ion battery (no text or symbols on device body)NEED HELP? CONTACT US!
Have product questions? Need technical support? Please feel fr contact us:
Technical Support and E-Warranty Certificate www.vevor.com/support
This is the original instruction, please read all manual instruction carefully before operating. VEVOR reserves a clear interpretation user manual. The appearance of the product shall be subject to product you received. Please forgive us that we won't inform you there are any technology or software updates on our product.
INSTRUCTIONS
4.2 Elementos operativos
natural_image
Close-up of hands assembling a green plastic strip with a blue handheld tool on a green surface (no text or symbols visible)natural_image
Person using a blue power tool on a green table, with a green cable being inserted (no text or symbols visible)Paso 3 Apriete o introduzca las correas
natural_image
Hand holding a blue wire stripper device on a green surface (no text or symbols visible)natural_image
Hand operating a blue power tool on a green workbench, with a green horizontal bar at the bottom (no visible text or symbols)natural_image
Child's hands assembling a green plastic strip on a green table with a blue handheld device (no text or symbols visible)natural_image
Person using a blue electric power tool on a green table, with a green cable being inserted (no visible text or symbols)natural_image
Hand operating a blue handheld device on a green surface, no visible text or symbolsnatural_image
Hand operating a blue power tool on a green workbench, with a green horizontal bar at the bottom (no text or symbols visible)natural_image
Simple black rectangle divided horizontally with no text or symbolsPerfect friction time

natural_image
Simple black oval shape centered on a white background (no text or symbols)Friction time is too shc

natural_image
Simple geometric shape with a black rectangle centered on a white rectangular border (no text or symbols)Friction time is too long
| Item | Part name | Specification | Material code | Qty. |
| 1 | PCB | JD-A16-E019 | 1 | |
| 2 | Battery adapter slot | JD-L16-G06 | 1 | |
| 3 | PVC sticker | JD-L16-G07 | 1 | |
| 4 | LED display unit | JD-L16-G05 | 1 | |
| 5 | Right house | JD-L16-G03 | 1 | |
| 6 | Tension button | OD16 | JD-PSE-E039 | 1 |
| 7 | Left house | JD-L16-G02 | 1 | |
| 8 | Battery | 18V, 5.0A | JD-PSE-E051 | 1 |
| 9 | Left side cover | JD-L16-G01 | 1 | |
| 10 | Lift | JD-L16-G004 | 1 | |
| 11 | Reducer cover plate | JD-L16-G003 | 1 | |
| 12 | Connect-gear for worm | JD-PSE-G033 | 1 | |
| 13 | Variable speed gear D | JD-L16-G036 | 1 | |
| 14 | Double gear | JD-PSE-G031 | 1 | |
| 15 | Worm gear | JD-PSE-G030 | 1 | |
| 16 | Bearing 607 | JD-PSE-E012 | 1 | |
| 17 | Bearing BK0810 | JD-PSE-E015 | 1 |
| Item | Part name | Specification | Material code | Qty. |
| 18 | Gear box tooth sleeve | JD-L16-04 | 1 | |
| 19 | gear B | JD-PSE-G032 | 1 | |
| 20 | Tension motor | JD-L16-E01 | 1 | |
| 21 | Reduction gear box | JD-L16-G002 | 1 | |
| 22 | Switch B | JD-PSE-E007 | 1 | |
| 23 | Ball bearing A 6900 | JD-PSE-E010 | 2 | |
| 24 | Reducer cover | JD-PSE-G015 | 1 | |
| 25 | Body | JD-L16-G001 | 1 | |
| 26 | Tooth plate | JD-PSE-G011 | 1 | |
| 27 | M6 boss pivot pin | JD-L16-G021 | 1 | |
| 28 | Reset torsion spring | JD-PSE-G019 | 1 | |
| 29 | Tension wheel DB-009 | JD-PSE-G012 | 1 | |
| 30 | Tension wheel cover | JD-L16-G007 | 1 | |
| 31 | Sealing button | JD-PSE-G005 | 1 | |
| 32 | Cam unit | JD-PSE-G014 | 1 | |
| 33 | Spring cavity DB-021 | JD-PSE-G010 | 1 | |
| 34 | Compression spring | JD-PSE-G020 | 1 | |
| 35 | Shaft | JD-PSE-G022 | 1 | |
| 36 | Cam driver | JD-PSE-G038 | 1 | |
| 37 | 4*12.5 pin | JD-PSE-E022 | 1 | |
| 38 | Shaft pin | JD-PSE-G023 | 1 | |
| 39 | Sealing switch A | JD-PSE-E006 | 1 | |
| 40 | Curved umbrella tooth | JD-PSE-G029 | 1 | |
| 41 | Drag spring | JD-PSE-G017-2 | 1 | |
| 42 | Synchronous wheel A | JD-PSE-G034 | 1 | |
| 43 | Lower friction parts | JD-PSE-G013 | 1 | |
| 44 | Cutter | JD-PSE-G016 | 1 | |
| 45 | Bearing A 101712 | JD-PSE-E014-1 | 1 | |
| 46 | Upper friction parts | JD-PSE-G008 | 1 | |
| 47 | Bearing B 606 | JD-PSE-E011 | 2 | |
| 48 | Friciton part bracket | JD-PSE-G009 | 1 | |
| 49 | Eccentric shaft | JD-PSE-G024 | 1 | |
| 50 | Sealing motor | JDH-16-E03 | 1 | |
| 51 | Synchronous wheel B | JD-PSE-G035 | 1 |
Dirección : Shuangchenglu 803nong11hao1602A-1609shi, baoshanqu, shanghai 200000 CN.
Importado a AUS: SIHAO PTY LTD, 1 ROKEVA STREETEASTWOOD NS 2122 Australia
Importado a EE. UU.: Sanven Technology Ltd., Suite 250, 9166 Anaheim Place, Rancho Cucamonga, CA 91730
| EC | REP |
E-CrossStu GmbH
Mainzer Landstr.69, 60329 Frankfurt am Ma
| UK | REP |
YH CONSULTING LIMITED.
C/O YH Consulting Limited Office 147, Centurion H, London Road, Staines-upon-Thames, Surrey, TW18 2
VEVOR®
TOUGH TOOLS, HALF PRICE
www.vevor.com/support
Maszyna do spinania
MODEL: DS-16
We continue to be committed to provide you tools with competitive price. "Save Half", "Half Price" or any other similar expressions used by us only represent of savings you might benefit from buying certain tools with us compared to top brands and does not necessarily mean to cover all categories of tools offered are kindly reminded to verify carefully when you are placing an order with us actually saving half in comparison with the top major brands.
Model: DS-16

natural_image
Blue DS-16 lithium-ion charging station with flexible hose and 18V power button (no text or symbols on device body)NEED HELP? CONTACT US!
Have product questions? Need technical support? Please feel fr contact us:
Technical Support and E-Warranty Certificate www.vevor.com/support
This is the original instruction, please read all manual instruction carefully before operating. VEVOR reserves a clear interpretation user manual. The appearance of the product shall be subject to product you received. Please forgive us that we won't inform you there are any technology or software updates on our product.
INSTRUCTIONS
4.4 Operacje prasy
natural_image
Close-up of hands assembling a green cable with a blue handheld device on a green table (no text or symbols visible)natural_image
Person using a blue power tool on a green table, with a green cable being inserted (no text or symbols visible)natural_image
Hand operating a blue industrial power tool on a green workbench (no visible text or symbols)Krok 5 Odsuń prasę
natural_image
Hand operating a blue power tool on a green workbench, with a green horizontal band at the bottom (no visible text or symbols)natural_image
Hands assembling a green cable with a blue-handled tool on a green table (no text or symbols visible)natural_image
Person using a blue power tool on a green table, with a green cable being inserted (no text or symbols visible)natural_image
Hand operating a blue handheld device on a green surface, with a green tape band visible (no text or symbols)Krok 5 Odsuń prasę
natural_image
Hand operating a blue power tool on a green workbench, no visible text or symbolsnatural_image
Simple black rectangle divided horizontally with no text or symbolsPerfect friction time

natural_image
Simple black oval shape centered on a white background (no text or symbols)Friction time is too shc

natural_image
Simple black rectangle centered on white background (no text or symbols)Friction time is too long
| Item | Part name | Specification | Material code | Qty. |
| 1 | PCB | JD-A16-E019 | 1 | |
| 2 | Battery adapter slot | JD-L16-G06 | 1 | |
| 3 | PVC sticker | JD-L16-G07 | 1 | |
| 4 | LED display unit | JD-L16-G05 | 1 | |
| 5 | Right house | JD-L16-G03 | 1 | |
| 6 | Tension button | OD16 | JD-PSE-E039 | 1 |
| 7 | Left house | JD-L16-G02 | 1 | |
| 8 | Battery | 18V, 5.0A | JD-PSE-E051 | 1 |
| 9 | Left side cover | JD-L16-G01 | 1 | |
| 10 | Lift | JD-L16-G004 | 1 | |
| 11 | Reducer cover plate | JD-L16-G003 | 1 | |
| 12 | Connect-gear for worm | JD-PSE-G033 | 1 | |
| 13 | Variable speed gear D | JD-L16-G036 | 1 | |
| 14 | Double gear | JD-PSE-G031 | 1 | |
| 15 | Worm gear | JD-PSE-G030 | 1 | |
| 16 | Bearing 607 | JD-PSE-E012 | 1 | |
| 17 | Bearing BK0810 | JD-PSE-E015 | 1 | |
| 18 | Gear box tooth sleeve | JD-L16-04 | 1 | |
| 19 | gear B | JD-PSE-G032 | 1 | |
| 20 | Tension motor | JD-L16-E01 | 1 | |
| 21 | Reduction gear box | JD-L16-G002 | 1 | |
| 22 | Switch B | JD-PSE-E007 | 1 | |
| 23 | Ball bearing A 6900 | JD-PSE-E010 | 2 | |
| 24 | Reducer cover | JD-PSE-G015 | 1 | |
| 25 | Body | JD-L16-G001 | 1 | |
| 26 | Tooth plate | JD-PSE-G011 | 1 | |
| 27 | M6 boss pivot pin | JD-L16-G021 | 1 | |
| 28 | Reset torsion spring | JD-PSE-G019 | 1 | |
| 29 | Tension wheel DB-009 | JD-PSE-G012 | 1 | |
| 30 | Tension wheel cover | JD-L16-G007 | 1 | |
| 31 | Sealing button | JD-PSE-G005 | 1 | |
| 32 | Cam unit | JD-PSE-G014 | 1 | |
| 33 | Spring cavity DB-021 | JD-PSE-G010 | 1 | |
| 34 | Compression spring | JD-PSE-G020 | 1 |
| Item | Part name | Specification | Material code | Qty. |
| 35 | Shaft | JD-PSE-G022 | 1 | |
| 36 | Cam driver | JD-PSE-G038 | 1 | |
| 37 | 4*12.5 pin | JD-PSE-E022 | 1 | |
| 38 | Shaft pin | JD-PSE-G023 | 1 | |
| 39 | Sealing switch A | JD-PSE-E006 | 1 | |
| 40 | Curved umbrella tooth | JD-PSE-G029 | 1 | |
| 41 | Drag spring | JD-PSE-G017-2 | 1 | |
| 42 | Synchronous wheel A | JD-PSE-G034 | 1 | |
| 43 | Lower friction parts | JD-PSE-G013 | 1 | |
| 44 | Cutter | JD-PSE-G016 | 1 | |
| 45 | Bearing A 101712 | JD-PSE-E014-1 | 1 | |
| 46 | Upper friction parts | JD-PSE-G008 | 1 | |
| 47 | Bearing B 606 | JD-PSE-E011 | 2 | |
| 48 | Friciton part bracket | JD-PSE-G009 | 1 | |
| 49 | Eccentric shaft | JD-PSE-G024 | 1 | |
| 50 | Sealing motor | JDH-16-E03 | 1 | |
| 51 | Synchronous wheel B | JD-PSE-G035 | 1 |
Adres : Shuangchenglu 803nong11hao1602A-1609shi, baoshanqu, szanghaj 200000 CN.
Import do AUS: SIHAO PTY LTD, 1 ROKEVA STREETEASTWOOD NSW 2122 Australia
Import do USA: Sanven Technology Ltd., Suite 250, 9166 Anaheim Place Rancho Cucamonga, CA 91730
| EC | REP |
E-CrossStu GmbH
Mainzer Landstr.69, 60329 Frankfurt am Ma
| UK | REP |
YH CONSULTING LIMITED.
C/O YH Consulting Limited Office 147, Centurion H
London Road, Staines-upon-Thames, Surrey, TW18 4
www.vevor.com/support
VEVOR®
TOUGH TOOLS, HALF PRICE
Technische ondersteuning en e-garantiecertificaat www.vevor.com/support
Omsnoeringsmachine
MODEL: DS-16
We continue to be committed to provide you tools with competitive price. "Save Half", "Half Price" or any other similar expressions used by us only represent of savings you might benefit from buying certain tools with us compared to top brands and does not necessarily mean to cover all categories of tools offered are kindly reminded to verify carefully when you are placing an order with us actually saving half in comparison with the top major brands.
Model: DS-16

natural_image
Blue DS-16 lithium-ion charging station with flexible hose and 18V power button (no text or symbols on device body)NEED HELP? CONTACT US!
Have product questions? Need technical support? Please feel fr contact us:
Technical Support and E-Warranty Certificate www.vevor.com/support
This is the original instruction, please read all manual instruction carefully before operating. VEVOR reserves a clear interpretation user manual. The appearance of the product shall be subject to product you received. Please forgive us that we won't inform you there are any technology or software updates on our product.
INSTRUCTIONS
4.2 Bedieningselementen

natural_image
Close-up of hands assembling a green plastic strip with a blue handheld tool on a green surface (no text or symbols visible)natural_image
Person using a blue power tool on a green table, with a coiled cable nearby (no text or symbols visible)natural_image
Hand holding a blue industrial power tool on a green surface, no visible text or symbolsnatural_image
Hand operating a blue power tool on a green workbench, no visible text or symbolsnatural_image
Hands assembling a green plastic strip on a green table with a blue handheld device (no text or symbols visible)natural_image
Person using a blue electric power tool on a green table, with wires visible (no text or symbols)Stap 3 Trek de banden strak
natural_image
Hand operating a blue handheld device on a green surface, no visible text or symbolsnatural_image
Hand operating a blue power tool on a green workbench, with a green horizontal bar at the bottom (no text or symbols visible)natural_image
Simple black rectangle divided horizontally with white top and bottom edges (no text or symbols)Perfect friction time

natural_image
Simple black oval shape centered on a white background (no text or symbols)Friction time is too shc
natural_image
Simple geometric shape with a black rectangle centered on a white rectangular border (no text or symbols)Friction time is too long
| Item | Part name | Specification | Material code | Qty. |
| 1 | PCB | JD-A16-E019 | 1 | |
| 2 | Battery adapter slot | JD-L16-G06 | 1 | |
| 3 | PVC sticker | JD-L16-G07 | 1 | |
| 4 | LED display unit | JD-L16-G05 | 1 | |
| 5 | Right house | JD-L16-G03 | 1 | |
| 6 | Tension button | OD16 | JD-PSE-E039 | 1 |
| 7 | Left house | JD-L16-G02 | 1 | |
| 8 | Battery | 18V, 5.0A | JD-PSE-E051 | 1 |
| 9 | Left side cover | JD-L16-G01 | 1 | |
| 10 | Lift | JD-L16-G004 | 1 | |
| 11 | Reducer cover plate | JD-L16-G003 | 1 | |
| 12 | Connect-gear for worm | JD-PSE-G033 | 1 | |
| 13 | Variable speed gear D | JD-L16-G036 | 1 | |
| 14 | Double gear | JD-PSE-G031 | 1 | |
| 15 | Worm gear | JD-PSE-G030 | 1 | |
| 16 | Bearing 607 | JD-PSE-E012 | 1 | |
| 17 | Bearing BK0810 | JD-PSE-E015 | 1 |
| Item | Part name | Specification | Material code | Qty. |
| 18 | Gear box tooth sleeve | JD-L16-04 | 1 | |
| 19 | gear B | JD-PSE-G032 | 1 | |
| 20 | Tension motor | JD-L16-E01 | 1 | |
| 21 | Reduction gear box | JD-L16-G002 | 1 | |
| 22 | Switch B | JD-PSE-E007 | 1 | |
| 23 | Ball bearing A 6900 | JD-PSE-E010 | 2 | |
| 24 | Reducer cover | JD-PSE-G015 | 1 | |
| 25 | Body | JD-L16-G001 | 1 | |
| 26 | Tooth plate | JD-PSE-G011 | 1 | |
| 27 | M6 boss pivot pin | JD-L16-G021 | 1 | |
| 28 | Reset torsion spring | JD-PSE-G019 | 1 | |
| 29 | Tension wheel DB-009 | JD-PSE-G012 | 1 | |
| 30 | Tension wheel cover | JD-L16-G007 | 1 | |
| 31 | Sealing button | JD-PSE-G005 | 1 | |
| 32 | Cam unit | JD-PSE-G014 | 1 | |
| 33 | Spring cavity DB-021 | JD-PSE-G010 | 1 | |
| 34 | Compression spring | JD-PSE-G020 | 1 | |
| 35 | Shaft | JD-PSE-G022 | 1 | |
| 36 | Cam driver | JD-PSE-G038 | 1 | |
| 37 | 4*12.5 pin | JD-PSE-E022 | 1 | |
| 38 | Shaft pin | JD-PSE-G023 | 1 | |
| 39 | Sealing switch A | JD-PSE-E006 | 1 | |
| 40 | Curved umbrella tooth | JD-PSE-G029 | 1 | |
| 41 | Drag spring | JD-PSE-G017-2 | 1 | |
| 42 | Synchronous wheel A | JD-PSE-G034 | 1 | |
| 43 | Lower friction parts | JD-PSE-G013 | 1 | |
| 44 | Cutter | JD-PSE-G016 | 1 | |
| 45 | Bearing A 101712 | JD-PSE-E014-1 | 1 | |
| 46 | Upper friction parts | JD-PSE-G008 | 1 | |
| 47 | Bearing B 606 | JD-PSE-E011 | 2 | |
| 48 | Friciton part bracket | JD-PSE-G009 | 1 | |
| 49 | Eccentric shaft | JD-PSE-G024 | 1 | |
| 50 | Sealing motor | JDH-16-E03 | 1 | |
| 51 | Synchronous wheel B | JD-PSE-G035 | 1 |
Adres : Shuangchenglu 803nong11hao1602A-1609shi, baoshanqu, shanghai 200000 CN.
Anaheim Place, Rancho Cucamonga, CA 91730
| EC | REP |
E-CrossStu GmbH
Mainzer Landstr.69, 60329 Frankfurt am Ma
| UK | REP |
YH CONSULTING LIMITED.
C/O YH Consulting Limited Office 147, Centurion H
London Road, Staines-upon-Thames, Surrey, TW18 4
VEVOR®
TOUGH TOOLS, HALF PRICE
Technische ondersteuning en e-garantiecertificaat www.vevor.com/support
VEVOR®
TOUGH TOOLS, HALF PRICE
www.vevor.com/support
Bandning M achine
MODELL: DS-16
We continue to be committed to provide you tools with competitive price. "Save Half", "Half Price" or any other similar expressions used by us only represent of savings you might benefit from buying certain tools with us compared top brands and does not necessarily mean to cover all categories of tools offered are kindly reminded to verify carefully when you are placing an order with us actually saving half in comparison with the top major brands.
Modell: DS-16
natural_image
Blue DS-16 lithium-ion charging station with flexible hose and 18V power button (no text or symbols on device body)NEED HELP? CONTACT US!
Have product questions? Need technical support? Please feel fr contact us:
Technical Support and E-Warranty Certificate www.vevor.com/support
This is the original instruction, please read all manual instruction carefully before operating. VEVOR reserves a clear interpretation user manual. The appearance of the product shall be subject to product you received. Please forgive us that we won't inform you there are any technology or software updates on our product.
INSTRUCTIONS
Battery disassembly diagram
natural_image
Three blue industrial robotic devices with attached yellow and gray components, shown from different angles (no text or symbols visible)Unload battery
Loading battery
4.2 Manöverelement
4.4 Balpressoperationer
natural_image
Close-up of hands assembling a green plastic strip on a green table with a blue handheld device nearby (no text or symbols visible)natural_image
Person using a blue power tool on a green table, with a coiled cable nearby (no visible text or symbols)Steg 4 Svetsa remmarna
natural_image
Hand operating a blue handheld device on a green surface, no visible text or symbolsSteg 5 Flytta bort balpressen
natural_image
Hand operating a blue power tool on a green workbench, with a green band and white wall in the background (no text or symbols visible)natural_image
Close-up of hands assembling a green cable with a blue-handled tool on a green table (no text or symbols visible)natural_image
Person using a blue power tool on a green table, with wires visible (no text or symbols)Steg 4 Svetsa remmarna
natural_image
Hand operating a blue handheld device on a green surface, with a green tape band visible (no text or symbols)Steg 5 Flytta bort balpressen
natural_image
Hand operating a blue power tool on a green workbench, no visible text or symbolsnatural_image
Simple black rectangle divided horizontally with white top and bottom edges (no text or symbols)Perfect friction time

natural_image
Simple black oval shape centered on a white background (no text or symbols)Friction time is too shc

natural_image
Simple black rectangle centered within a white rectangular border (no text or symbols)Friction time is too long
7.Vanliga elektriska fel
| Item | Part name | Specification | Material code | Qty. |
| 1 | PCB | JD-A16-E019 | 1 | |
| 2 | Battery adapter slot | JD-L16-G06 | 1 | |
| 3 | PVC sticker | JD-L16-G07 | 1 | |
| 4 | LED display unit | JD-L16-G05 | 1 | |
| 5 | Right house | JD-L16-G03 | 1 | |
| 6 | Tension button | OD16 | JD-PSE-E039 | 1 |
| 7 | Left house | JD-L16-G02 | 1 | |
| 8 | Battery | 18V, 5.0A | JD-PSE-E051 | 1 |
| 9 | Left side cover | JD-L16-G01 | 1 | |
| 10 | Lift | JD-L16-G004 | 1 | |
| 11 | Reducer cover plate | JD-L16-G003 | 1 | |
| 12 | Connect-gear for worm | JD-PSE-G033 | 1 | |
| 13 | Variable speed gear D | JD-L16-G036 | 1 | |
| 14 | Double gear | JD-PSE-G031 | 1 | |
| 15 | Worm gear | JD-PSE-G030 | 1 | |
| 16 | Bearing 607 | JD-PSE-E012 | 1 | |
| 17 | Bearing BK0810 | JD-PSE-E015 | 1 | |
| 18 | Gear box tooth sleeve | JD-L16-04 | 1 | |
| 19 | gear B | JD-PSE-G032 | 1 | |
| 20 | Tension motor | JD-L16-E01 | 1 | |
| 21 | Reduction gear box | JD-L16-G002 | 1 | |
| 22 | Switch B | JD-PSE-E007 | 1 | |
| 23 | Ball bearing A 6900 | JD-PSE-E010 | 2 | |
| 24 | Reducer cover | JD-PSE-G015 | 1 | |
| 25 | Body | JD-L16-G001 | 1 | |
| 26 | Tooth plate | JD-PSE-G011 | 1 | |
| 27 | M6 boss pivot pin | JD-L16-G021 | 1 | |
| 28 | Reset torsion spring | JD-PSE-G019 | 1 | |
| 29 | Tension wheel DB-009 | JD-PSE-G012 | 1 | |
| 30 | Tension wheel cover | JD-L16-G007 | 1 | |
| 31 | Sealing button | JD-PSE-G005 | 1 | |
| 32 | Cam unit | JD-PSE-G014 | 1 | |
| 33 | Spring cavity DB-021 | JD-PSE-G010 | 1 | |
| 34 | Compression spring | JD-PSE-G020 | 1 |
| Item | Part name | Specification | Material code | Qty. |
| 35 | Shaft | JD-PSE-G022 | 1 | |
| 36 | Cam driver | JD-PSE-G038 | 1 | |
| 37 | 4*12.5 pin | JD-PSE-E022 | 1 | |
| 38 | Shaft pin | JD-PSE-G023 | 1 | |
| 39 | Sealing switch A | JD-PSE-E006 | 1 | |
| 40 | Curved umbrella tooth | JD-PSE-G029 | 1 | |
| 41 | Drag spring | JD-PSE-G017-2 | 1 | |
| 42 | Synchronous wheel A | JD-PSE-G034 | 1 | |
| 43 | Lower friction parts | JD-PSE-G013 | 1 | |
| 44 | Cutter | JD-PSE-G016 | 1 | |
| 45 | Bearing A 101712 | JD-PSE-E014-1 | 1 | |
| 46 | Upper friction parts | JD-PSE-G008 | 1 | |
| 47 | Bearing B 606 | JD-PSE-E011 | 2 | |
| 48 | Friciton part bracket | JD-PSE-G009 | 1 | |
| 49 | Eccentric shaft | JD-PSE-G024 | 1 | |
| 50 | Sealing motor | JDH-16-E03 | 1 | |
| 51 | Synchronous wheel B | JD-PSE-G035 | 1 |
Adress : Shuangchenglu 803nong11hao1602A-1609shi, baoshanqu, shanghai 200000 CN.
Importerad till AUS: SIHAO PTY LTD, 1 ROKEVA STREETEASTWOOD NSW 2122 Australien
Importerad till USA: Sanven Technology Ltd., Suite 250, 9166 Anaheim Place, Rancho Cucamonga, CA 91730
| EC | REP |
E-CrossStu GmbH
Mainzer Landstr.69, 60329 Frankfurt am Ma
| UK | REP |
YH CONSULTING LIMITED.
C/O YH Consulting Limited Office 147, Centurion H
London Road, Staines-upon-Thames, Surrey, TW18 4