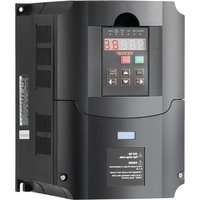
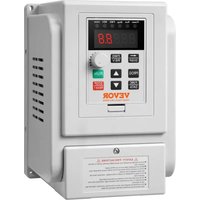
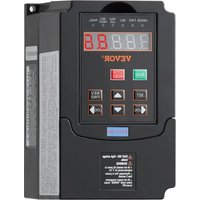
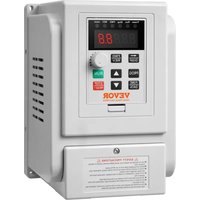
USER MANUAL A2-8075 Vevor
Technical Support and E-Warranty Certificate www.vevor.com/support
Inverter
MODEL: A2-8007M/A2-8015/A2-8075
We continue to be committed to providing you with tools at competitive prices. "Save Half", "Half Price", or any other similar expressions used by us only represent an estimate of savings you might benefit from buying certain tools compared to the major top brands and do not necessarily mean to cover categories of tools offered by us. You are kindly reminded to verify carefully when placing an order with us if you are actually saving half in comparison to top major brands.
MODEL: A2-8007M/A2-8015/A2-8075
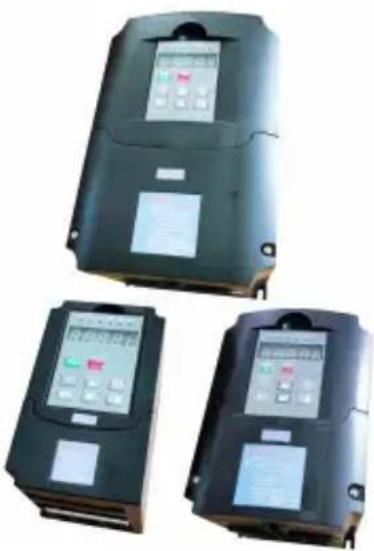
Have product questions? Need technical support? Please feel free to contact us:
Technical Support and E-Warranty Certificate
www.vevor.com/support
This is the original instruction. Please read all manual instructions carefully before operating. VEVOR reserves a clear interpretation of our user manual. The appearance of the product shall be subject to the product you received. Please forgive us that we will not inform you again if there are any technology or software updates on our product.
IMPORTANT SAFEGUARDS

Read all safety warnings, instructions, illustrations, and specifications provided with this inverter. Failure to follow all instructions listed below may result in electric shock,
fire and/or serious injury.
WARNING:
This equipment is a high voltage device. Please do not attempt to disassemble this equipment at any time to avoid danger. After a device failure, if the external switch fails to restart the device, please contact your reseller for handling.
WARNING: ELECTRICAL SHOCK AND FIRE HAZARD!
- Failure to comply with this instruction could result in an electrical failure, fire and electrocution.
- DO NOT DISASSEMBLE.
- Do not submerge inverter.
- Do not connect two or more transformers in parallel.
- Plug the power supply unit directly into a GFCI wet location outlet.
- Do not use an extension cord.
- Installation of this inverter and related wiring must be done by a qualified electrician in compliance with all applicable electrical codes.
WARNING:
Changes or modifications to this unit not expressly approved by the party responsible for compliance could void the user's authority to operate the equipment.
SAVE THESE INSTRUCTIONS
CAUTION: Changes or modifications not expressly approved by the party responsible for compliance could void the user's authority to operate the equipment!
This device complies with Part 15 of the FCC Rules. Operation is subject to the following two conditions:
1) This product may cause harmful interference. 2) This product must accept any interference received, including interference that may cause undesired operation.
WARNING: Changes or modifications to this product not expressly approved by the party responsible for compliance could void the user's authority to operate the product.
Note: This product has been tested and found to comply with the limits for a Class B digital device pursuant to Part 15 of the FCC Rules. These limits are designed to provide reasonable protection against harmful interference in a residential installation.
This product generates, uses and can radiate radio frequency energy, and if not installed and used in accordance with the instructions, may cause harmful interference to radio communications. However, there is no guarantee that interference will not occur in a particular installation. If this product does cause harmful interference to radio or television reception, which can be determined by turning the product off and on, the user is encouraged to try to correct the interference by one or more of the following measures.
- Reorient or relocate the receiving antenna.
- Increase the distance between the product and receiver.
- Connect the product to an outlet on a circuit different from that to which the receiver is connected.
- Consult the dealer or an experienced radio/TV technician for assistance.
Correct Disposal
This product is subject to the provision of European Directive 2012/19/EC. The symbol showing a wheelie bin crossed through indicates that the product requires separate refuse collection in the European Union. This
applies to the product and all accessories marked with this symbol. Products marked as such may not be discarded with normal domestic waste, but must be taken to a collection point for recycling electrical and electronic devices.
1. Safety Precautions
1.1 Safety precautions
- Environment cannot contain any explosive gas.
- It must be wired by professional wiring staff. Otherwise, it may cause electric shock.
- Cut off the power supply before wiring. Otherwise, it may cause electric shock.
- Do not touch any control port, internal boards and their electronic components while the electricity is turned on. Otherwise, it may cause electric shock.
- Please make sure that the product's ground wiring port is correctly connected according to national electricity safety standards or other related standards.
- Do not touch any internal board or component until 10 minutes after power shutdown. Please do electricity check before internal board maintenance. Otherwise, it may cause electronic shock.
- It is forbidden to connect AC power to product's output port (U,V,W) or other control ports except Lk,Lb,Lz. Otherwise, it may cause damage to the inverter.
- Since internal IC can be destroyed by electrostatic, please do not touch any PCB, IC or IGBT components without any protection. Otherwise, it may cause unknown fault.
- Make sure that any unexpected conductor such as screws, gasket, etc., is not left inside the inverter during maintenance. Otherwise, it may cause damage to the inverter or even fire.
- If overcurrent happens during starting up, please check the wiring and start up again.
- Do not stop machine by cut off power. Power can be cut off after the motor stops.
- Do not leave inverter in the sunshine. Otherwise, it may cause damage to the inverter.
1.2 Package inspection
A2 series inverter production undergoes strictly qualification test. Please check the damage caused by delivery and the type specification during package inspection.
- Accessories: 1 Inverter, 1 user manual.
- If anything is missing, please contact local dealer or Isacon's custom service center.
2. User Setup
2.1 Environment requirement
- No corrosive gas, vapour and oily dust. Without direct sunshine.
- No floating dust or metal particles. • Air moisture 20%~90%. • Vibration < 5.8m/s2 (0.6g).
- No electromagnetic interference.
- Temperature: -10°C~50°C, make sure proper ventilation if the temperature is greater than 40°C.
- Without any inflammable or explosive gas, liquid and solid.
- Please use electric cabinet or remote operation in non-standard environment. Make sure proper ventilation.
2.2 Install space
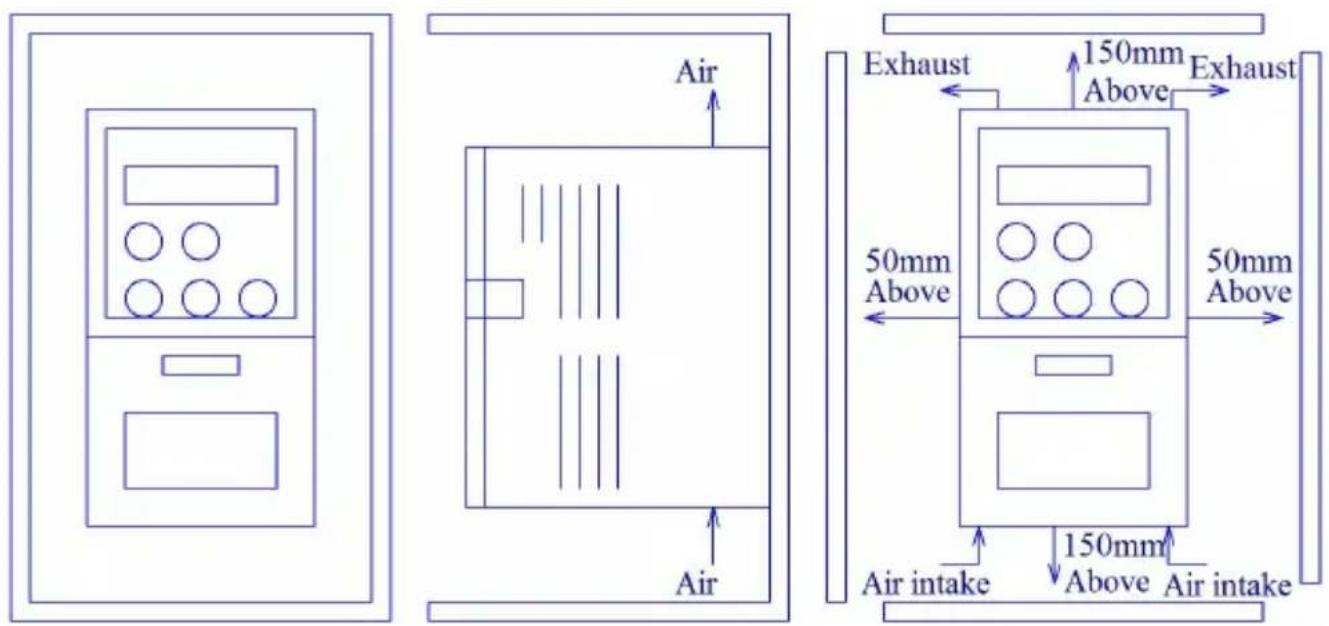
2.3 Basic wiring
There are two wiring parts: main-loop and control-loop. Please do wiring correctly according to the following two figures.
Wiring figure (single phase)![graph TD A["Single phase input"] --> B["FWD"] A --> C["REV"] A --> D["RST"] A --> E["D0/+"] A --> F["D1/-"] A --> G["D2/JOG"] A --> H["GND"] I["External control signal"] --> J["The external analog signal given 0-5V,0-10V,0-20mA"] J --> K["5V_IN 10V_IN 0-20mA_IN GND"] J --> L["5V_OUT 5V_IN"] M["IGP"]…](/content/2026/04/734987/images/55ba39c1380022491f41cd138d7e45b150e7fa7fe7f1ae1590dec1c462a81926.jpg)
main-loop port
control-loop port
| Port name | Description |
| L N | Single phase power input。 |
| U V W | Three phase AC output ports can only connect to p resistance or inductance load such as motors or electric heater. |
Wiring figure (three phase)![graph TD A["three-phase input"] --> B["R"] A --> C["S"] A --> D["T"] B --> E["FWD/STOP"] C --> F["REV/STOP"] D --> G["RESET"] E --> H["Multi speed D0 / Digital frequency up"] F --> I["Multi speed D1 / Digital frequency down"] G --> J["Multi speed D2 / External point moving enable"] H --> K["Common c…](/content/2026/04/734987/images/84aa70a15d1d2f227e77042d7940859dac0f51e313add424e303415855850fe9.jpg)

main-loop port
control-loop port
| Port name | Description |
| R S T | Single phase 220V power connect R and T. Three phase 220V power connect R, S, T. Voltage specifications: 8xxx, single phase 220 input connection R and T |
| U V W | Three phase AC output ports can only connect to resistance or inductance load such as motors or electric heater. |
3. Control Panel
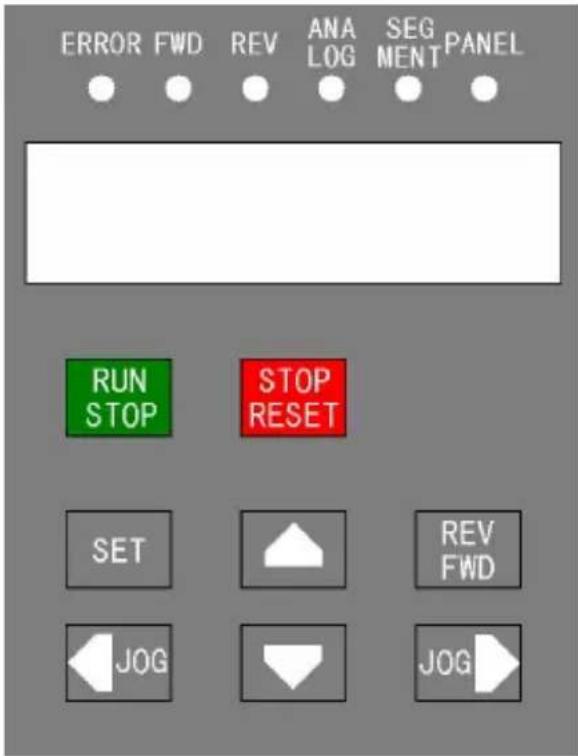
| Button | Description |
| RUN STOP | Switch between run and stop state by single pre |
| STOP ESET | It has different meanings to push this button duri different modes: 1.if the inverter is running, it wo stop; 2. If a fault happens, the inverter would be reset; 3. If it is operated on menus, it returns to parent menu. |
| REV | Change the inverter's direction. It also works duri the runtime. |
| SET | Enter menu mode. If it is on item, the data wou saved and lower level menu would be displayed. |
| ▲▼ | Change items in the menu or modify the parame data. |
| ◀▶ | Modify the menu content and point move in pane |
| Potentiometer | Change runtime frequency. |
| Content | Description |
| ERROR | Fault indicator. |
| FWD | Clockwise rotation indicator. |
| REV | Anticlockwise rotation indicator. |
| ANALOG | Analog input frequency indicator. |
| SEGMENT | Segment input frequency indicator. |
| PANEL | Panel input frequency indicator. |
| Digital tube | Inverter runtime frequency. If inverter stops, it flashes. The display data is given by “Pn01” data. |
4. Parameter Set Method
4.1 Parameter set and modification
Set parameter when inverter is stopped and the parameter is not locked (Pn32=1). First, enter parameter set menu by push button “SET”. Second, push button ▲/▼ to choose the certain item. Third, push button “SET” again to enter the item. Fourth, push button ◀/▶ to choose certain bit and push ▲/▼ to modify the value. Finally, push button “SET” to save the new parameter or push button “STOP” to parent menu without any saving.
Push button “SET” to save the new parameter or push button “STOP” to parent menu without any saving.
When modify parameters, long push ▲/▼ to rolling number of current bit between 0-9.
- Table of Configure Parameters
| Item | DescriptionModify by button▲ or ▼ | RangeModify by button▲ or ▼ | Default Value |
| Default(3) | Default(6) |
| Pn 01 | Default display content | 1—30000 | 1 | 1 |
| Pn 02 | Initial start up frequency by panel o other method | 0.01—400.00.00 | 400Hz | 50 |
| Pn 03 | Source of runtime frequency | 1—7 | 2 | 1 |
| Pn 04 | Source of runtime command | 1—2 | 1 | 1 |
| Pn 05 | clockwise / anticlockwise disable | 1—3 | 3 | 3 |
| Pn 06 | Method to stop inverter | 1—2 | 2 | 2 |
| Pn 07 | Start again by external signal | 1—2 | 1 | 1 |
| Pn 08 | Acceleration time | 000.01S—50.00S | 50S | 10S |
| Pn 09 | Deceleration time | 000.01S—50.00S | 50S | 10S |
| Pn 10 | Maximum runtime frequency | 000.10Hz—400.00Hz | 400Hz | 50Hz |
| Pn 11 | Minimum runtime frequency | 000.10Hz—400.00Hz | 1.5Hz | 1.5Hz |
| Pn 12 | Motor rating frequency | 010.00Hz—400.00Hz | 400Hz | 50Hz |
| Pn 13 | Torque compensation | 0.0—4.0 | 0.0 | 0.0 |
| Pn 14 | Torque compensation frequency | 0.01Hz—600.00Hz | 500Hz | 80Hz |
| Pn 15 | Startup DC braking voltage | 1V—100V | 30V | 30V |
| Pn 16 | Startup DC braking time | 000.00S—650.00S | 0S | 0S |
| Pn 17 | Stop DC braking voltage | 1V—100V | 30V | 30V |
| Pn 18 | Stop DC braking time | 000.00S—650.00S | 0S | 0S |
| Pn 19 | Source of multi-segment speed 0 | 1—5 | 1 | 1 |
| Pn 20 | Multi-segment speed 1 frequency | 000.10 Hz—400.00Hz | 10 | 10 |
| Pn 21 | Multi-segment speed 2 frequency | 000.10 Hz—400.00Hz | 20 | 20 |
| Pn 22 | Multi-segment speed 3 frequency | 000.10 Hz—400.00Hz | 30 | 30 |
| Pn 23 | Multi-segment speed 4 frequency | 000.10 Hz—400.00Hz | 40 | 40 |
| Item | Description Modify by button ▲ or ▼ | Range Modify by button ▲ or ▼ | Default Value |
| Default (3) | Default (6) |
| Pn 24 | Multi-segment speed 5 frequency | 000.10 Hz—400.00Hz | 50 | 50 |
| Pn 25 | Multi-segment speed 6 frequency | 000.10 Hz—400.00Hz | 60 | 60 |
| Pn 26 | Multi-segment speed 7 frequency | 000.10 Hz—400.00Hz | 70 | 70 |
| Pn 27 | Point move frequency | 000.10 Hz—400.00Hz | 10Hz | 10Hz |
| Pn 28 | Choice of relay output | 1—6 | 3 | 3 |
| Pn 29 | 2rd acceleration time | 000.01S—650.00S | 2S | 2S |
| Pn 30 | 2rd deceleration time | 000.01S—650.00S | 2S | 2S |
| Pn 31 | 2rd deceleration stop frequency | 000.01Hz—400.00Hz | 1Hz | 1Hz |
| Pn 32 | Parameter management | 1—6 | 1 | 1 |
| Pn 33 | Software version | 32029 | ***** | ***** |
| Pn 34 | Auto recover while lost power suddenly | 0—99Hz | 0 | 0 |
| Pn 35 | Production date | * | ***** | ***** |
Please refer Chapter 7 for detail description of each item
Remark: If over-voltage happens during deceleration, it will stop.
Note:
If over-voltage happens during deceleration, inverter will stop deceleration until the voltage goes back to normal level. If better deceleration is needed, please switch to inverter with braking.
6. Description of Control Ports

| Port name | Port Description |
| 12V OUT | 12V output, with maximum currency 200mA. |
| 5V OUT | 5V output, with maximum currency 50mA. |
| 5V IN | 5V input, analog input, with maximum effective voltage 5V, no more than 6V |
| 10V IN | 10V input, analog input, with maximum effective voltage 10V, no more than 12V |
| 20mA IN | 20mA input, analog input, with maximum effective current 20mA, no more than 25mA |
| 5V Fout | Frequency signal output, maximum output voltage 5V |
| GND | Power source ground 0V. |
| FWD | External clockwise rotation input |
| REV | External anticlockwise rotation input |
| RST | External reset signal |
| D0 + | Multi-segment speed D0 input, external “+” signal mean clockwise point move input |
| D1 - | Multi-segment speed D1 input, external “-” signal means anticlockwise point move input |
| D2 JOG | Multi-segment speed D2 input, external enable signal in |
| Lk | Relay ON |
| Lb | Relay OFF |
| Lz | Relay ON/OFF |
Pn 01 Default display content: 1—30000
RUN: 1 means it will display runtime frequency
Otherwise, it displays motor's synchronization speed.
2——30000 is motor synchronization speed
STOP: it will display frequency given by external signal.
Pn 02 Initial startup frequency by panel or other method
Range : 000.01Hz - 400.00Hz, the initial panel data and external signal frequency during startup.
Pn 03 Source of runtime frequency with range: 1—7
1 Potentiometer 2 Panel button 3 External 0-5V signal 4 External 0-10V signal 5 External 0-20mA signal 6 External digital signal 7 Multi-segment signal
Pn 04 Source of runtime command with range: 1—2
1 Panel button control 2 External signal control
Pn 05 clockwise / anticlockwise disable with range: 1—3
1 clockwise enable only 2 anticlockwise enable only 3 clockwise / anticlockwise enable
Pn 06 Method to stop inverter with range: 1—2
1 stop by itself 2 stop by deceleration
Pn 07 Start again by external signal with range: 1—2
1 disable 2 enable
Description: when the power on the external operation of the signal is allowed to start effectively.
Pn 08 Acceleration time with range: 000.01S—650.00S
Accelerate time (from 0Hz to Pn10).
Pn 09 Deceleration time with range: 000.01S—650.00S
Decelerate time (from Pn10 to 0Hz).
Pn 10 Maximum runtime frequency with range: 000.10Hz—400.00Hz
Maximum output frequency by inverter.
Pn 11 Minimum runtime frequency with range: 000.10Hz—400.00Hz
If the frequency from command below this value, inverter will stop. It wouldn't recover until command frequency up this value.
Pn 12 Motor rating frequency with range: 010.00Hz—400.00Hz
It is used for modify the V/F curve.
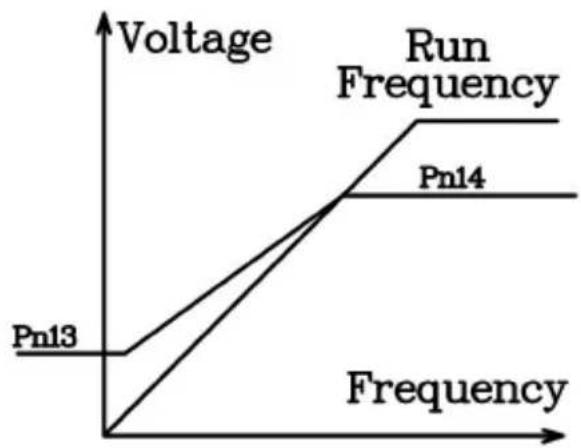
Pn 13 Torque compensation with range: 0.0—4.0
Large parameter may cause damage to the motor.
Pn 14 Torque compensation frequency: 0.01Hz—400.00Hz
Inverter doesn't provide torque compensation if runtime frequency is larger than this value.
Pn 15 Startup DC braking voltage: 1V—100V
By proper tuning of this parameter, motor can start normally from fully stop state without any difficult caused by motor's free motion and rotate direction.
Pn 16 Startup DC braking time: 000.00S—650.00S
DC braking time before motor startup to ensure that motor is started from fully stop state.
Pn 17 Stop DC braking voltage: 1V—100V
Braking voltage during DC braking period to ensure that motor is fully stopped in brake time.
Pn 18 Stop DC braking time: 000.00S—650.00S
DC braking time to prevent the slide move after stopping.
Pn 19 Source of multi-segment speed 0: 1—5
Multi-segment speed mode 0-segment frequency source:
1 Potentiometer 2 Panel button 3 External 0-5V signal 4 External 0-10V signal 5 External 0-20mA signal
Pn 20 Multi-segment speed 1 frequency: 000.10 Hz—400.00Hz
Multi-segment speed mode 1-segment frequency
Pn 21 Multi-segment speed 2 frequency: 000.10 Hz—400.00Hz
Multi-segment speed mode 2-segment frequency Pn 22 Multi-segment speed 3 frequency: 000.10 Hz—400.00Hz
Multi-segment speed mode 3-segment frequency Pn 23 Multi-segment speed 4 frequency: 000.10 Hz—400.00Hz
Multi-segment speed mode 4-segment frequency Pn 24 Multi-segment speed 5 frequency: 000.10 Hz—400.00Hz
Multi-segment speed mode 5-segment frequency Pn 25 Multi-segment speed 6 frequency: 000.10 Hz—400.00Hz
Multi-segment speed mode 6-segment frequency Pn 26 Multi-segment speed 7 frequency: 000.10 Hz—400.00Hz
Multi-segment speed mode 7-segment frequency Pn 27 Point move frequency: 000.10 Hz—400.00Hz
Point move frequency Pn 28 Choice of relay output: 1—6
1 Stop inverter 2 Run inverter
3 Inverter fault 4 Frequency increasing
5 Frequency decreasing 6 Frequency reached
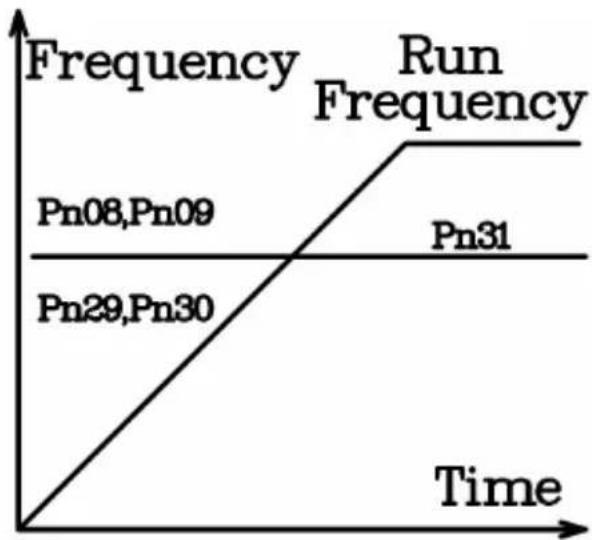
If output condition is satisfied, ON/OFF states reverse. Pn 29 2rd acceleration time: 000.01S—650.00S 2rd acceleration time Pn 30 2rd deceleration time: 000.01S—650.00S 2rd deceleration time Pn 31 2rd deceleration stop frequency: 000.10 Hz—400.00Hz When runtime frequency is larger than this value, acceleration /
deceleration time is defined by Pn08, Pn09
When runtime frequency is smaller than this value, acceleration /deceleration time is defined by Pn29, Pn30
As shown in Figure:
Pn 32 Parameter management: 1—3
1 modification enable 2 modification disable
3 initialization for 400Hz parameters
4 read OEM initialization parameter
5 write OEM initialization parameter
6 initialization for 50Hz parameters
Note: the password for the OEM parameter is: 61633
Pn 33 Software version
Pn 34 Auto recover while lost power suddenly0 disable this function 99 means do auto recover in infinite time, starting from low frequency Other value:
If indicator displays LU-X(any code) during runtime and power source recovers in 2 seconds, inverter would start up again and reduce runtime frequency with magnitude of under voltage time(s) multiply frequency of this component(Hz).
The maximum power lost time is 2.5s. Beyond this time, it would be seen as over voltage without any auto recover.
8. Operation Examples
8.1 Operation by panel
Pn 04 = 1 (Command from panel), Pn 03 = 1 (Frequency from potentiometer)
Push button “RUN” on the panel, inverter starts up and running indicator is on.
Push the button again, inverter would stop.
8.2 Operation by external signal
Pn 04=2 (command from port "FWD/REV")
Pn 03=3 (frequency from port "5V")
8.3 Multi-segment speed
Pn 04=2(command from port "FWD/REV")
Pn 03=7 (frequency from multi-segment 0-7)
8.4 Point move by panel
Command (Pn 04) must come from panel (=1). Frequency (Pn 03) must be specified by button (=2). After inverter stops, push button “←” to clockwise point move and “→” to anticlockwise point move.
8.5 Point move by external signal
Command (Pn 04) must come from port "FWD/REV" (=2).
Frequency (Pn 03) must come from external digital port (=6). After inverter stops, connect "D0" and "JOG" to "GND" to point move
clockwise, connect "D1" and "JOG" to "GND" to point move anticlockwise.
9. Error Message and Fault Diagnosis
9.1 Fault table
| Display | Meaning | Cause | Diagnosis |
| OU -o | Overvoltage | Overvoltage of power source | Check voltage of power source |
| OU -u | Acceleration overvoltage | Overvoltage of power source | Check voltage of power source |
| OU -d | Deceleration overvoltage | Overvoltage of power source or large inertia | Overvoltage of power source, increase deceleration time, add brake components |
| OU -r | Steady state Overvoltage | Overvoltage of power source | Check voltage of power source |
| LU -o | Stop state undervoltage | Undervoltage of power source | Check voltage of power source |
| LU-u | Acceleration undervoltage | Undervoltage of power source, small acceleration time | Check voltage of power source, increase acceleration time |
| LU -d | Deceleration undervoltage | Undervoltage of power source | Check voltage of power source |
| LU -r | Steady state undervoltage | Undervoltage of power source or large inertia | Check voltage of power source, decrease load |
| OC -o | Stop state overcurrency | Component fail, interference | Push “RESET”. Component fail if it happens again. |
| Display | Meaning | Cause | Diagnosis |
| OC -u | Acceleration overcurrency | Small acceleration time or component fail | Increase acceleration time |
| OC -d | Deceleration overcurrency | Small deceleration time or component fail | Increase deceleration time |
| OC -r | Steady state overcurrency | overload or component fail | Check motor load |
| OT -o | Overheat while stop | High environment temperature or fail temperature sensor | Check whether air temperature is over 50, check CZ55 connection |
| OT -u | Overheat while acceleration | High environment temperature, small acceleration time | Check whether air temperature is over 50, increase acceleration time |
| OT -d | Overheat while deceleration | High environment temperature, small deceleration time | Check whether air temperature is over 50, increase deceleration time |
| OT -r | Overheat in steady state | High environment temperature, overload | Check whether air temperature is over 50, check overload |
9.2 Other unexpected fault
- Inverter is in normal condition but without any output
- Internal fuse fail
- Internal drive module fail
10. Maintenance and Repair
Due to the environment influence such as temperature, humidity, dust and vibration etc., and aging component, inverter may be fail at some time. So it needs periodic maintenance and repair.
Notice: please check the following items before maintenance and repair.
Otherwise, it may cause electric shock.
- Power source is cut off.
- Indicator on panel is OFF.
- Maintenance is performed by professionals.
10.1 Daily maintenance and repair
The inverter must be installed in the standard environment according to this manual. There may be some unexpected situations during runtime. Please perform daily maintenance according to the following table. Keep a good runtime environment, log daily data, and detect fault causes early. This can extend the life of the inverter.
| Item | Check | Criterion |
| Content | Period | Method |
| environment | (1) temperature, humidity(2) dust, water(3) corrosive gas | anytime | (1) thermometer, hygrometer(2) watch(3) smell | (1) temperature range 10°C ~+40°C(2) any mark of water(3) odor |
| inverter | (1) heat, vibration(2) noise | anytime | (1) touch shell(2) sound | (1) steady vibration, normal temperature(2) abnormal sound |
| motor | (1) heat(2) noise | anytime | (1) touch(2) sound | (1) abnormal heating(2) abnormal sound |
10.2 Periodic maintenance
The inverter needs periodic maintenance every 1 or 3 months, depending on the runtime environment.
Notice: Machine maintenance or component replacement must be performed by professionals. If any metal objects such as screws or washers are left inside the machine, it could cause fatal damage to the inverter!
Check items:
- Whether the control port screws are loose or not;
- Whether the main loop ports are loose or not. Or is there any sign of overheating in the line of the main loop;
- Is there any trauma in power and control cables. Especially, check the rubber skin in contact with other metal;
- Is the insulation bandage of the power cable loose;
- Use a vacuum cleaner to clean dust on the board and ventilation channel.
- If the motor needs examination, please disconnect the motor wire from the inverter's U, V, W ports. Otherwise, it may cause fatal damage to the inverter.
Notice: The inverter has already passed the pressure test. Any improper test may cause fatal damage to the inverter!
10.3 Replace the wearing parts
The wearing parts include the cooling fan and filter electrolytic capacitor, whose lifetime depends on environment and load. When the temperature is 25°C, the lifetime of the cooling fan is 20~40Kh and that of the capacitor is 30~50Kh. The user can decide when to replace these components.
1. Cooling fan
Cause of damage: worn bearing, aging fan, heavy dust environment. Criterion: rips in fans, abnormal vibration during runtime.
2. Filter electrolytic capacitor
Cause of damage: high environment temperature, frequent load changes, long-time full load.
Criterion: liquid leak, wrong position of safety valve, capacity measurement.
10.4 Storage of inverter
Precautions for storing the inverter:
- It cannot be stored in high temperature, moist, dusty, metal dust, or corrosive gas places.
- It will speed up the capacitor aging during long-time storage. Make sure to turn on the inverter once every year. The operation time cannot be below 8 hours. And the input voltage increases slowly to the rating value.
10.5 Warranty
Range: inverter itself;
If any of the following situations occur, Isacon will provide warranty:
Any fault or damage that occurs during standard use within 18 months.
Beyond 18 months, Isacon will charge for maintenance and repair. If any of the following situations occur, even within 18 months, Isacon may still charge for maintenance and repair:
A. Damage caused by incorrect operation; B. Damage caused by abnormal voltage or natural disasters such as fire and floods, etc.; C. Use of the inverter in non-standard applications.
Costs will be calculated as per the contract or actual costs.
11. Type Description
11.1 Type Description
A2-xxxxB
A2 is the VFD series.
xxxx represents power and voltage levels.
B is the brake unit.
11.2 Power Description
1XXX 1: Input 3-phase 220V, output 3-phase 220V
2XXX 2: Input 1-phase 220V, output 3-phase 220V
3XXX 3: input 3-phase 380V, output 3-phase 380V
5XXX 5: input 1-phase 220V, output 3-phase 380V
6XXX 6: input 1-phase 380V, output 3-phase 380V
Note: three-phase input can also be used.
8XXX 8: input 1-3-phase 220V, output 3-phase 220V
XXX Power specification:
007 0.75kW
015 1.5kW
300 30kW
11.3 Model examples
A2-2022: single-phase 220V input, three-phase 220V output, 2.2kW. A2-2022B: single-phase 220V input, three-phase 220V output, 2.2kW, with braking unit.
A2-3075: three-phase 380V input, three-phase 380V output, 7.5kW. A2-3075B: three-phase 380V input, three-phase 380V output, 7.5kW, with braking unit.
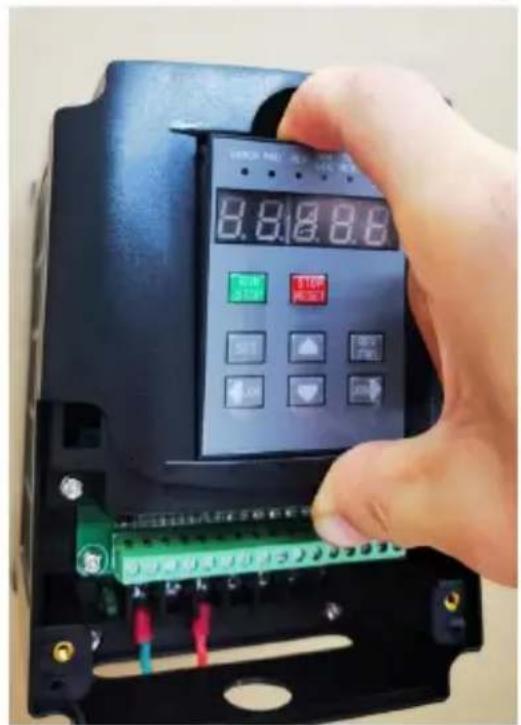
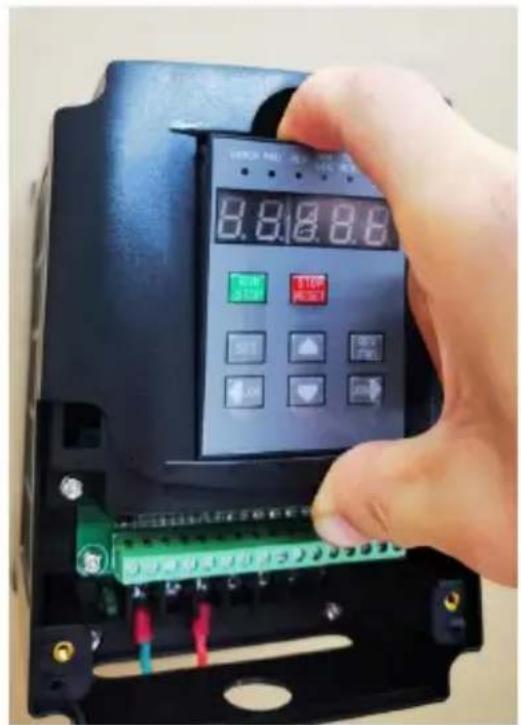
Removal method of keyboard without connecting wire: Step 1
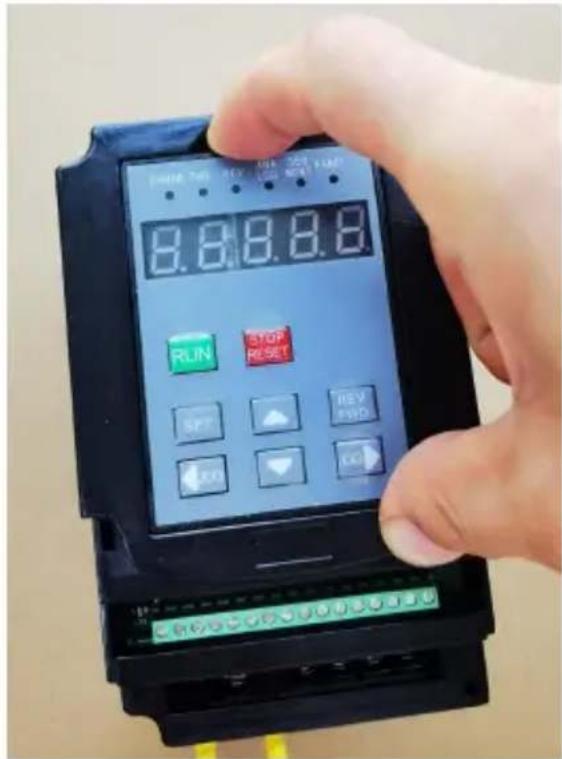
Step 2
Pull up the finger gap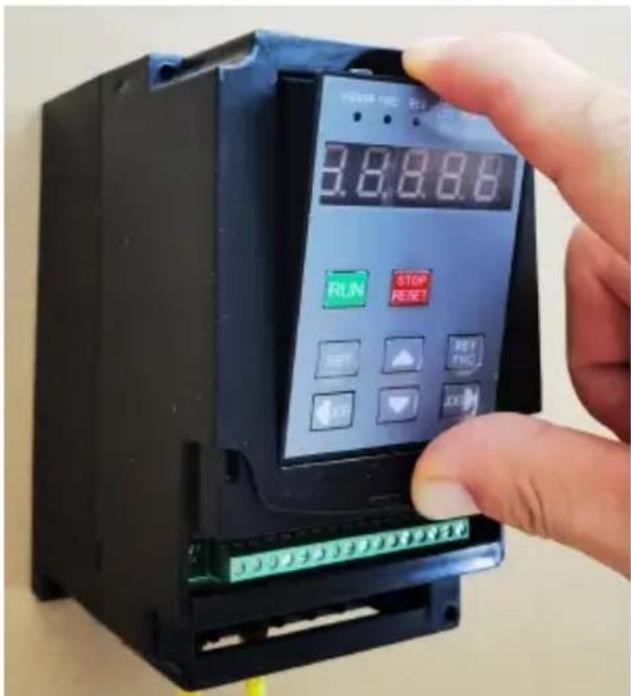
Step 3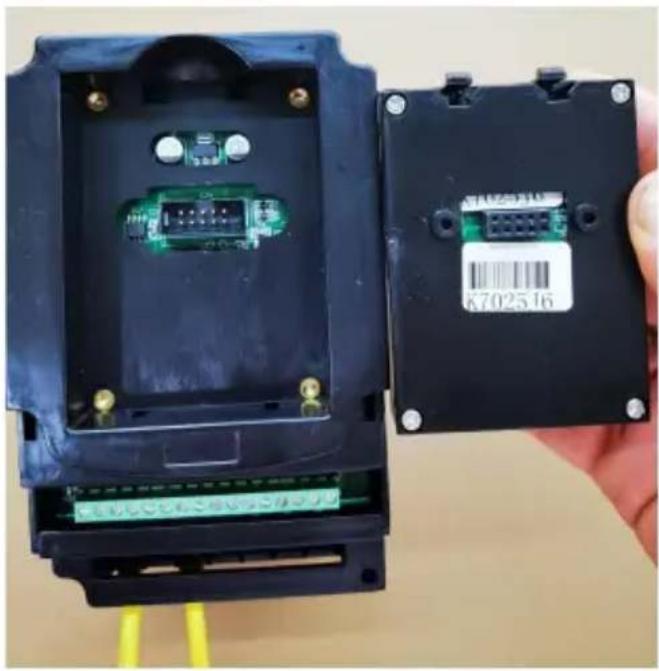
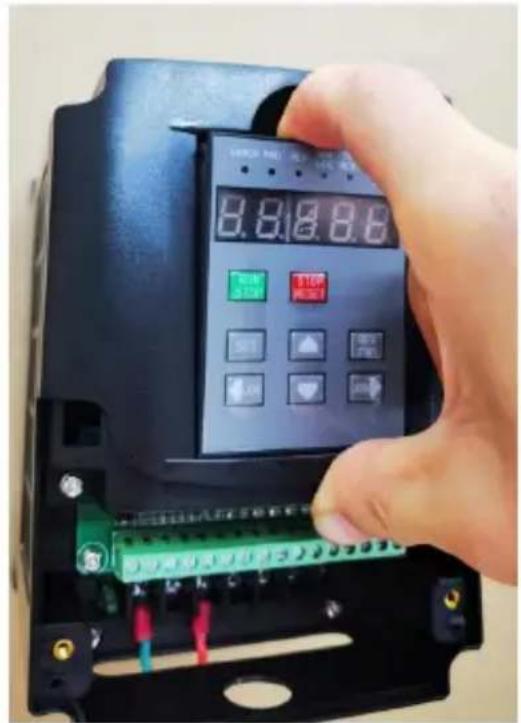
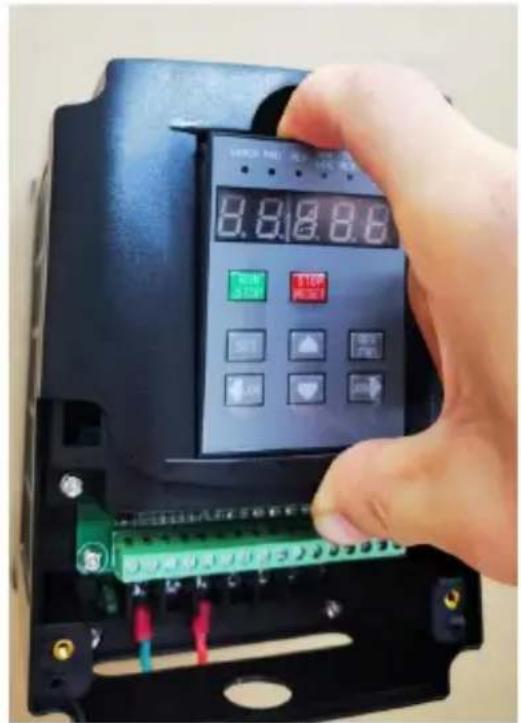
Installation method of keyboard without connecting line
Step 1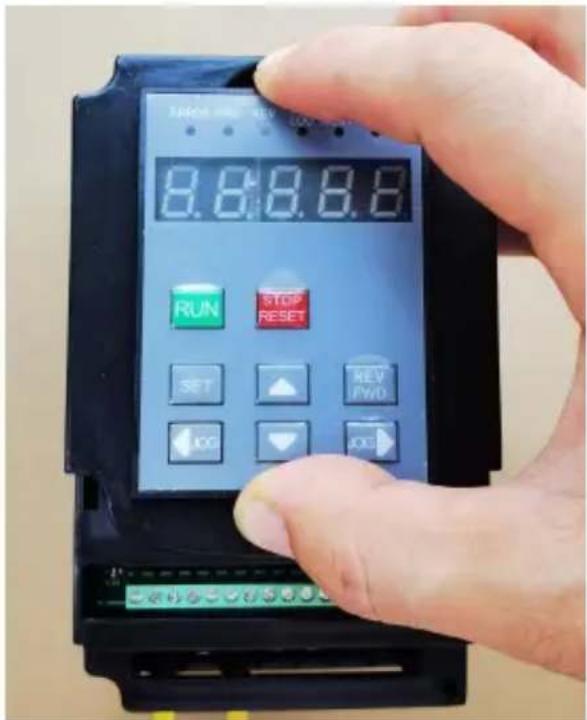
Step 2
Put it horizontally with the same height on both sides of the fingers.
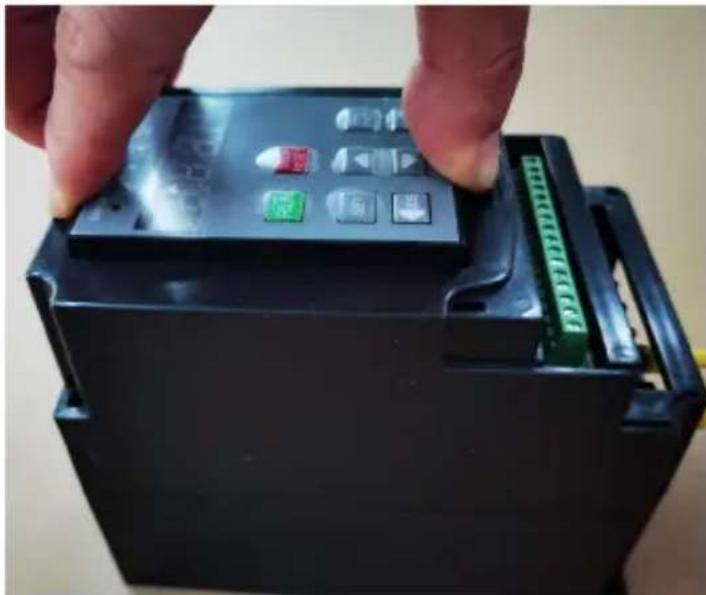
Step 3
Press both fingers with the same force at the same time
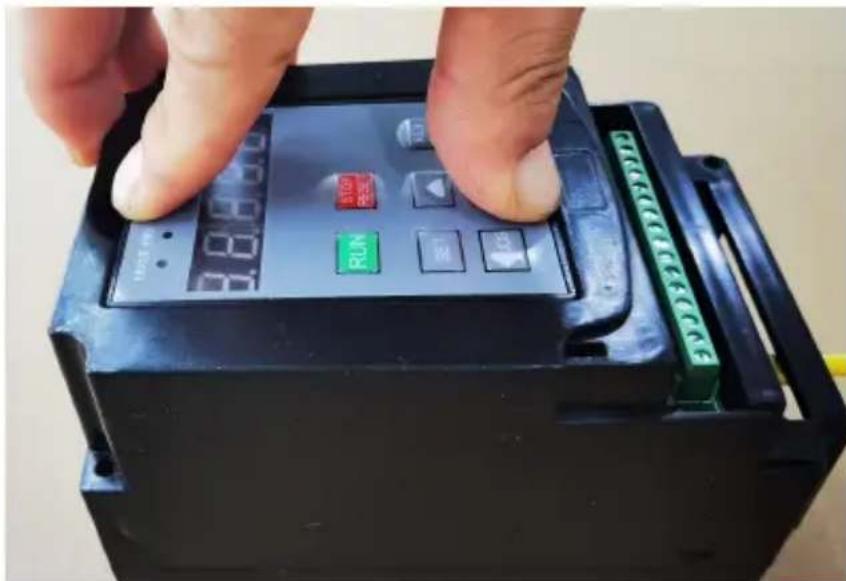
Disassembly method of keyboard with connecting wire Step 1 Step 2
Pull up the finger gap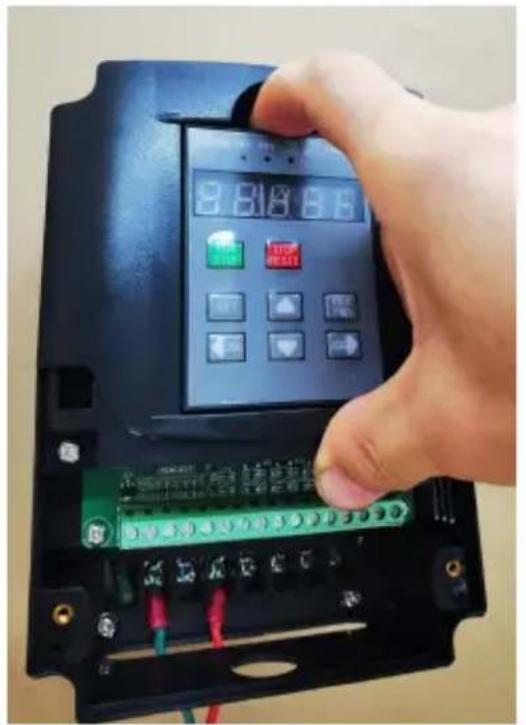
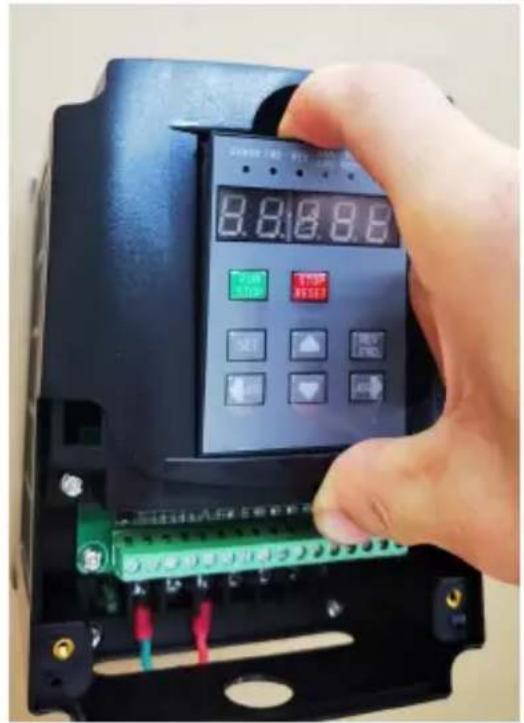
Step 3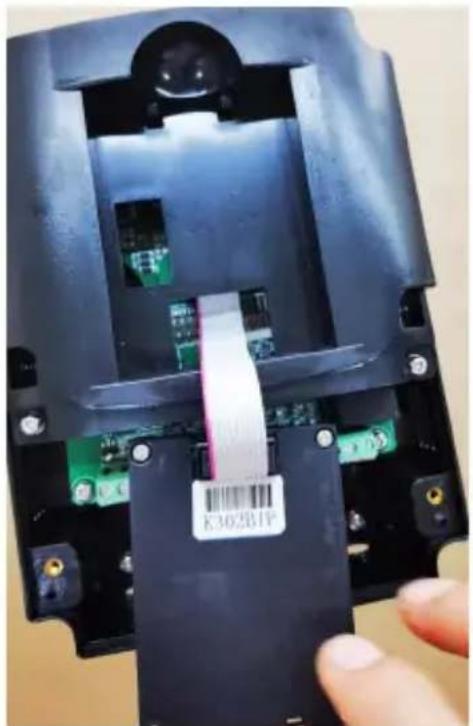
Installation mode of keyboard with connecting line Step 1
Put it in obliquely. Put it to the end on the wired side

Step 2
Press in gently
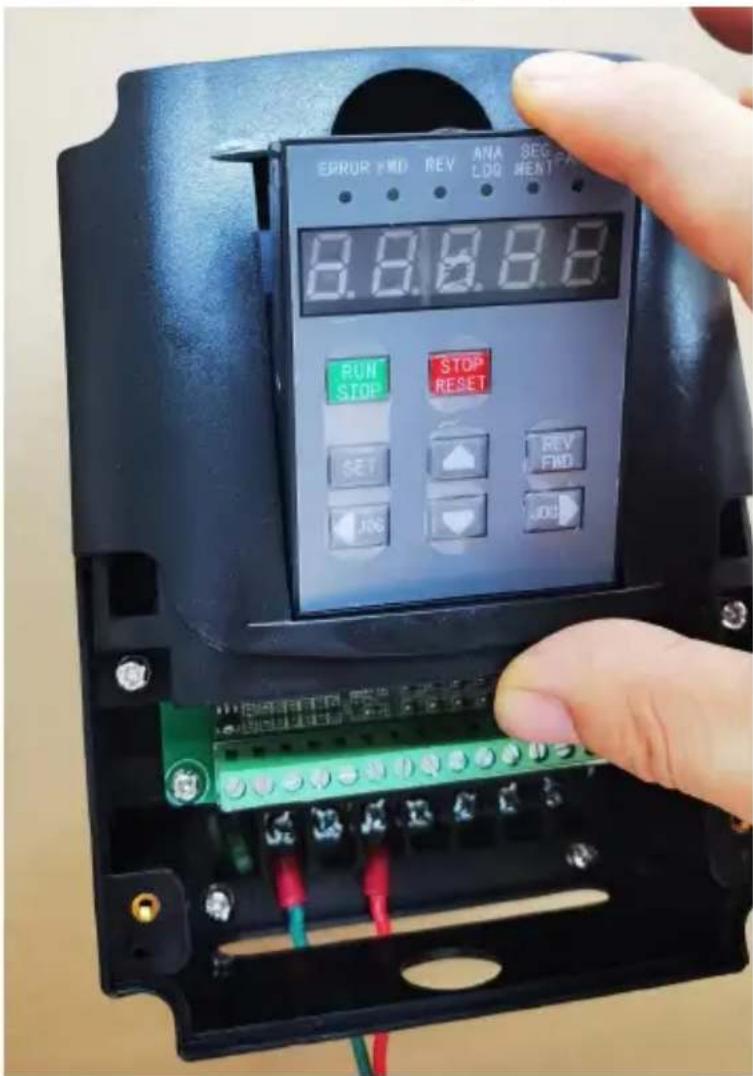
Step 3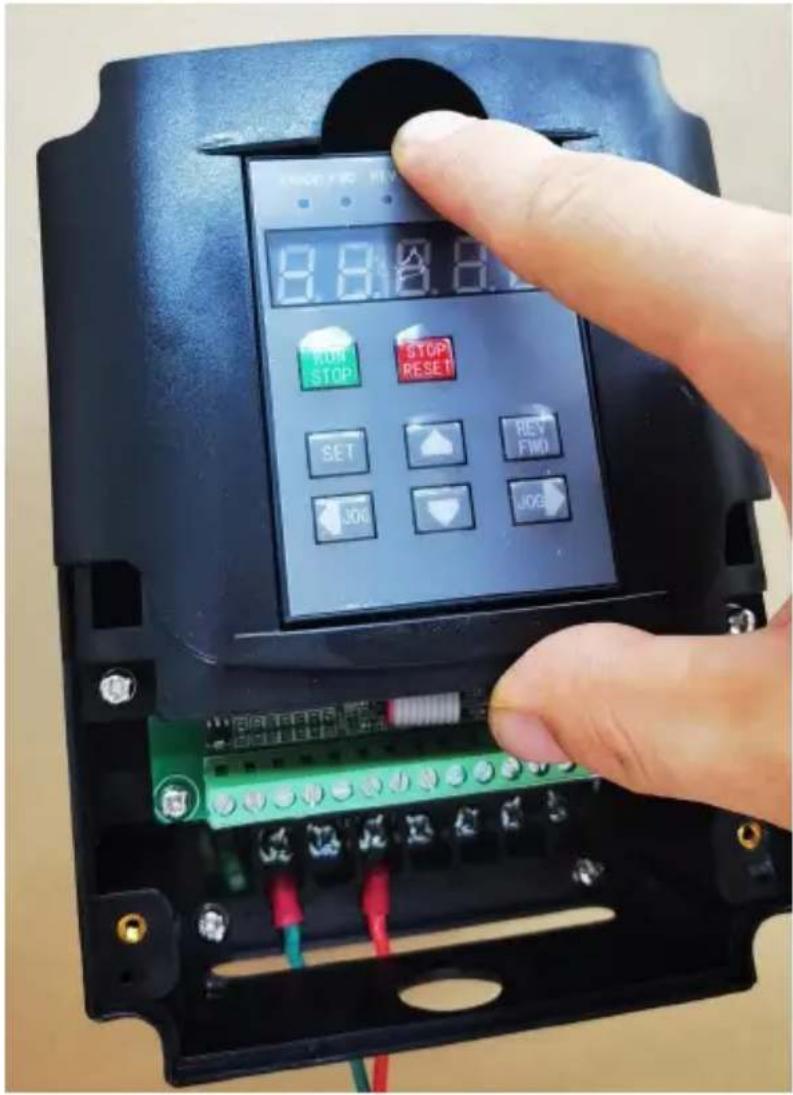
![graph TD A["Received a frequency converter inspection, a frequency converter and a manual"] --> B["Three phase air switch"] B --> C["Number of power supply phases"] C --> D["Single phase"] D --> E["Single phase air switch"] E --> F["Connect the motor"] F --> G["UVW terminal is connected to the motor…](/content/2026/04/734987/images/023eca27a86abfd54d163b7bbd1e1e5595edde974248df9d1fbfec95b55d9cb3.jpg)
![graph TD A["Brief introduction of frequency converter parameter setting"] --> B["Start signal control mode"] B --> C["External switch"] C --> D["Frequency source"] D --> E["Panel buttons Pn03=2"] D --> F["5V Voltage Pn03=3"] D --> G["10V Voltage Pn03=4"] D --> H["0-20mA current Pn03=5"] D --> I["Ext…](/content/2026/04/734987/images/e85d73f40d28ad25287fa213387a1208d2552399fae9f2fe26b2c8853d04f6d7.jpg)
![graph TD A["OC-x Exclusion process"] --> B["Disconnect the output connection line (UVW) of the inverter and start the operation"] B --> C["Problem solving"] C --> D["The motor may be damaged or the parameters may be wrong"] D --> E["There is no problem with the motor"] E --> F["Check whether the pn1…](/content/2026/04/734987/images/f552f37c8251a7c0a4ac796e7559892c20178da8f7b701328be8254a7ebb6210.jpg)
![graph TD A["OT-x over temperature fault handling process"] --> B{Press reset to see if it can be reset} B -->|Yes| C["Check whether the ambient temperature is higher than 50 ℃, whether the frequency converter has been overloaded, and whether the frequency converter is installed with good heat dissip…](/content/2026/04/734987/images/af5757494e817620f30737635ffc12a9ba8d4f42bef58872ccfd468b64e34834.jpg)
![graph TD A["Lu-x exclusion method"] --> B["Check the supply voltage"] B --> C{Higher than ac180v (220V level)} B --> D{Higher than ac260v (380V level)} C --> E["Check whether the external power cord is loose or the wire diameter is too small"] E --> F["Are not the above situation, please tell us the…](/content/2026/04/734987/images/bcbc5e18e212aec92a9f2b9aa040767cf473214f80e13be7bbaa238aff0e1b51.jpg)
![graph TD A["Ou-x"] --> B["Check the input voltage\nHigher than ac-270v (220V level)\nHigher than ac-525v (380V level)"] B --> C["Below detection voltage"] C --> D["The fault code is ou-d"] D --> E["Yes"] E --> F["Increase the time of pn09 parameter."] F --> G["Are not the above situation, please tel…](/content/2026/04/734987/images/e1975ebe8018aca42a046862bbf156f5e318fd419a170a354c95ac710abb2039.jpg)
VEVOR®
TOUGH TOOLS, HALF PRICE
Technical Support and E-Warranty Certificate
www.vevor.com/support
VEVOR®
7-segment signal
Step 3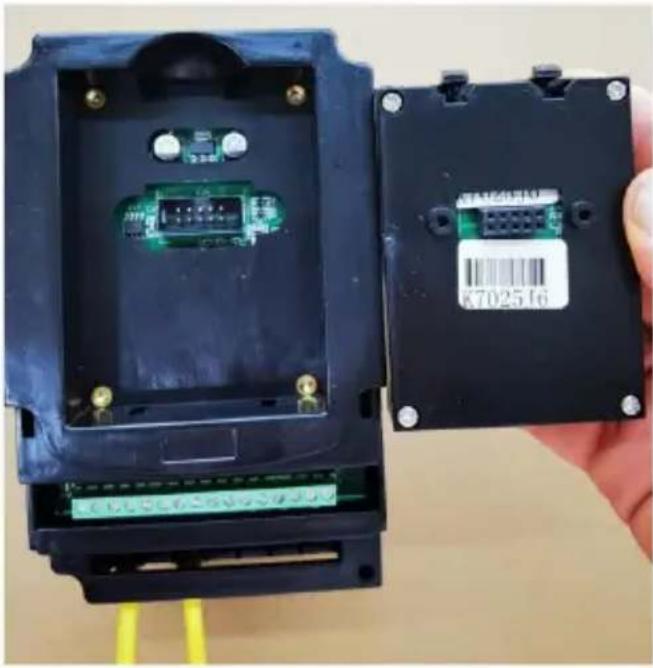
Step 2
Step 3
Step 3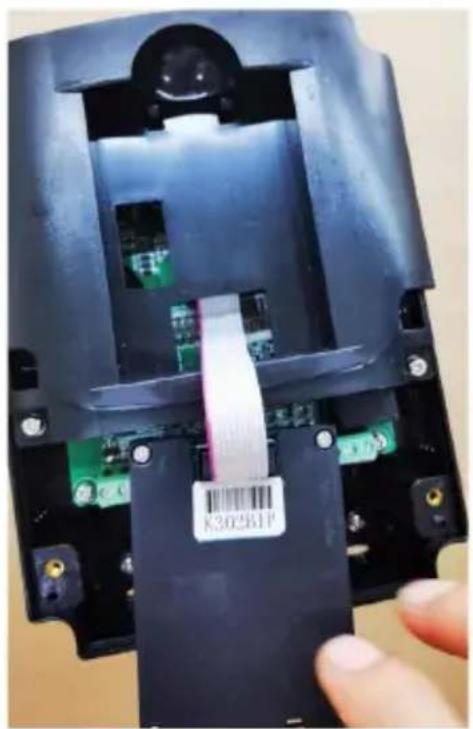
![graph TD A["Received a frequency converter inspection, a frequency converter and a manual"] --> B["Three phase air switch"] B --> C["Number of power supply phases"] C --> D["Single phase"] D --> E["Single phase air switch"] E --> F["Connect the 3-phase power supply to the rst of the frequency conver…](/content/2026/04/734987/images/93436b372ad5ef3ffacdf1c3bd186b7d977aec2660a072104de7df66c9508cbc.jpg)
![graph TD A["Brief introduction of frequency converter parameter setting"] --> B["Start signal control mode"] B --> C["External switch"] C --> D["Frequency source"] D --> E["Panel buttons Pn03=2"] D --> F["5V Voltage Pn03=3"] D --> G["10V Voltage Pn03=4"] D --> H["0-20mA current Pn03=5"] D --> I["Ext…](/content/2026/04/734987/images/c2b13fc05efb9f0ad816176220b993fd742d9eb8c00cfcf0f5db642d84d2bc9d.jpg)
![graph TD A["OC-x Exclusion process"] --> B["Disconnect the output connection line (UVW) of the inverter and start the operation"] B --> C["Problem solving"] C --> D["The motor may be damaged or the parameters may be wrong"] D --> E["There is no problem with the motor"] E --> F["Check whether the pn1…](/content/2026/04/734987/images/157b3a7c602c1b371822661ecb919d5fd6c6f5f2cf40165fd2960fcdf4e94893.jpg)
![graph TD A["OT-x over temperature fault handling process"] --> B{Press reset to see if it can be reset} B -->|Yes| C["Check whether the ambient temperature is higher than 50 °C, whether the frequency converter has been overloaded, and whether the frequency converter is installed with good heat dissi…](/content/2026/04/734987/images/d5d8ffa4db817d0e6d74d52e2ba65a3c33b4e8d5e50397ebb6e9fe750f799648.jpg)
![graph TD A["Lu-x exclusion method"] --> B["Check the supply voltage"] C["The voltage is too low, please check the power supply voltage"] --> B B --> D["Higher than ac180v (220V level)<br>higher than ac260v (380V level)"] D --> E["Check whether the external power cord is loose or the wire diameter is…](/content/2026/04/734987/images/c579ed40c1dc8792d005e1bd27949aa98106645c7b69a0ad522a4c63ed228949.jpg)
![graph TD A["0u-x"] --> B["Check the input voltage\nHigher than ac-270v (220V level)\nHigher than ac-525v (380V level)"] B --> C["Below detection voltage"] C --> D["The fault code is ou-d"] D --> E["Yes"] E --> F["Increase the time of pn09 parameter."] F --> G["Are not the above situation, please tel…](/content/2026/04/734987/images/d2e5e83038a94467e8c25f756c612e48eb9b883956d4b2632207133f0a8c047e.jpg)
VEVOR®
Step 3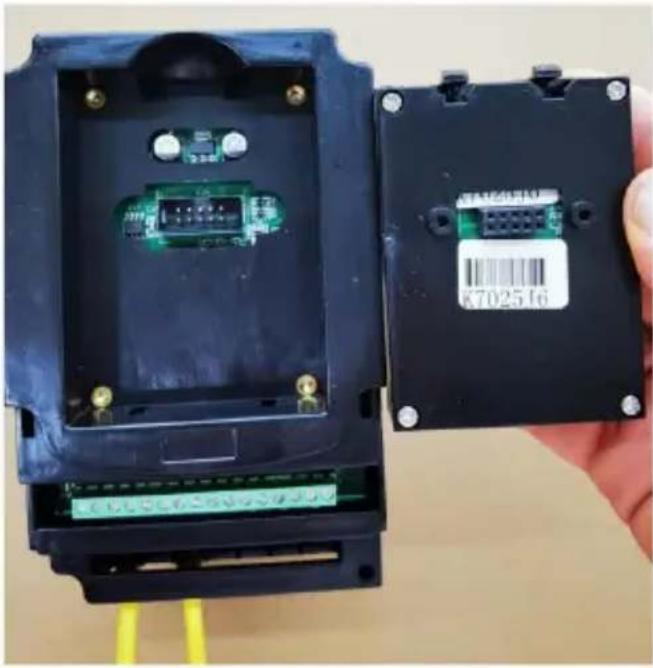
Step
Step 3
Step 3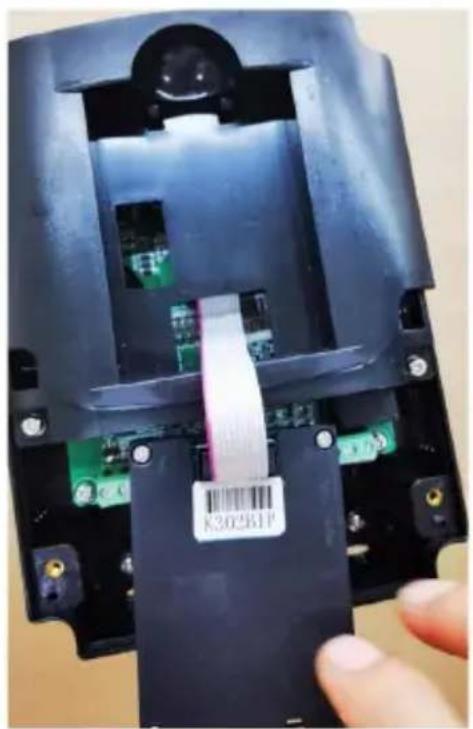
Step 3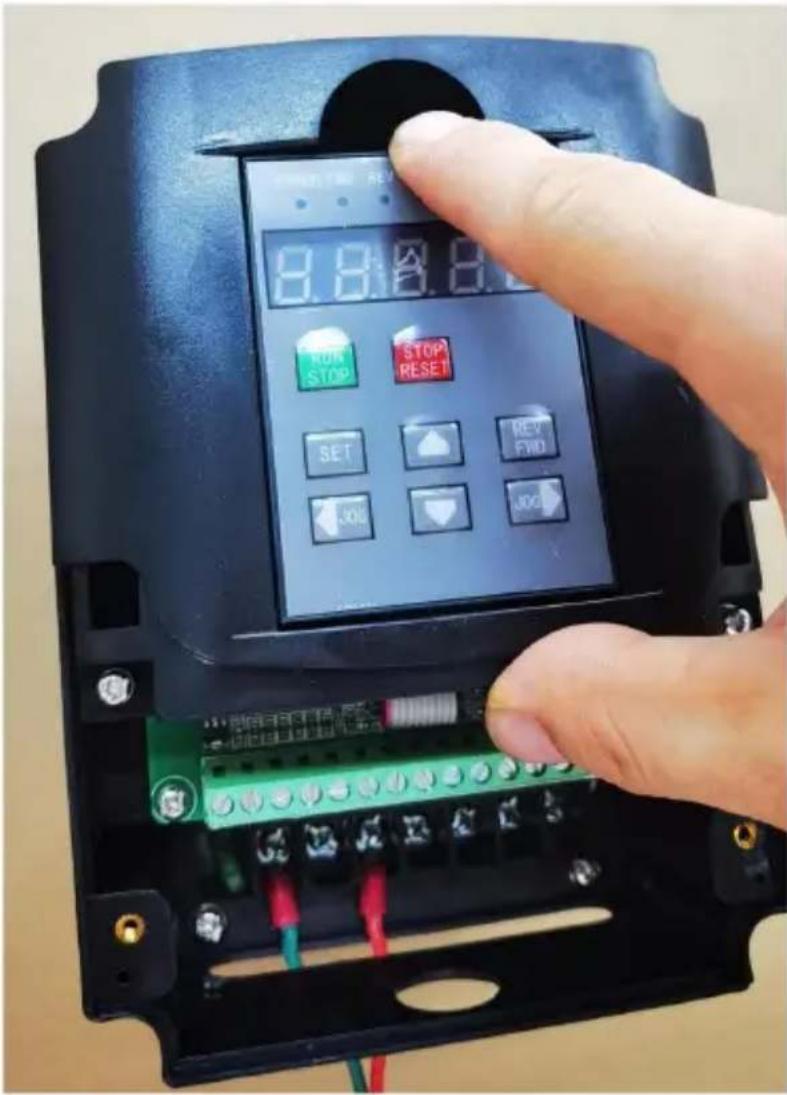
![graph TD A["Received a frequency converter inspection, a frequency converter and a manual"] --> B["Three phase air switch"] B --> C["Number of power supply phases"] C --> D["Single phase air switch"] D --> E["Connect the 3-phase power supply to the rst of the frequency converter. Please pay attentio…](/content/2026/04/734987/images/7ab8b96dfad8eef3cded77479d69904fcc0885fa1da1b7a44c85c2078d07e55a.jpg)
![graph TD A["Brief introduction of frequency converter parameter setting"] --> B["Start signal control mode"] B -->|External switch| C["PN04=2"] B --> D["PN04=1"] D --> E["Frequency source"] E --> F["Panel buttons Pn03=2"] E --> G["5V Voltage Pn03=3"] E --> H["10V Voltage Pn03=4"] E --> I["0-20mA cur…](/content/2026/04/734987/images/124d10012ca59410382d339f9a60bce70f33473f22518418ce541c482dfa96c0.jpg)
![graph TD A["OC-x Exclusion process"] --> B["Disconnect the output connection line (UVW) of the inverter and start the operation"] B --> C["Problem solving"] C --> D["The motor may be damaged or the parameters may be wrong"] D --> E["There is no problem with the motor"] E --> F["Check whether the pn1…](/content/2026/04/734987/images/f846fc9905376a91458f4537228157ba38380550f9f55cd1553ac6349edc550c.jpg)
![graph TD A["OT-x over temperature fault handling process"] --> B{Press reset to see if it can be reset} B -->|Yes| C["Check whether the ambient temperature is higher than 50 °C, whether the frequency converter has been overloaded, and whether the frequency converter is installed with good heat dissi…](/content/2026/04/734987/images/a0ad20bb1f7aeb726143a4906c0a6e6653a1b8ae33865fb8669f3575d08f5767.jpg)
![graph TD A["Lu-x exclusion method"] --> B["Check the supply voltage"] C["The voltage is too low, please check the power supply voltage"] --> B B --> D["Higher than ac180v (220V level)<br>higher than ac260v (380V level)"] D --> E["Check whether the external power cord is loose or the wire diameter is…](/content/2026/04/734987/images/b93677f8c7204d4507558318e7c1749f028b3bd8d6288b695df03ab7ad0746de.jpg)
![graph TD A["0u-x"] --> B["Check the input voltage\nHigher than ac-270v (220V level)\nHigher than ac-525v (380V level)"] B --> C["Below detection voltage"] C --> D["The fault code is ou-d"] D --> E["Yes"] E --> F["Increase the time of pn09 parameter."] F --> G["Are not the above situation, please tel…](/content/2026/04/734987/images/22c53a7febe1f65d55c4357b2acded0ac11ab199c7f3bfcfcb8da726b714fc69.jpg)
VEVOR®
TOUGH TOOLS, HALF PRICE
www.vevor.com/support
Phase 2
Step 3
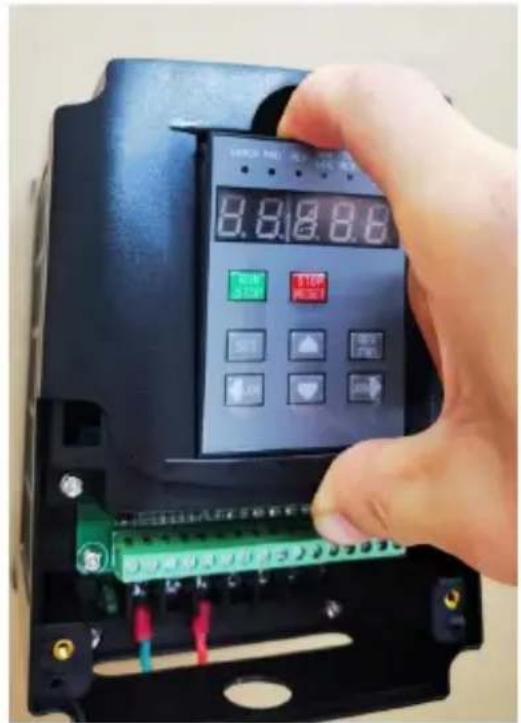
Step 3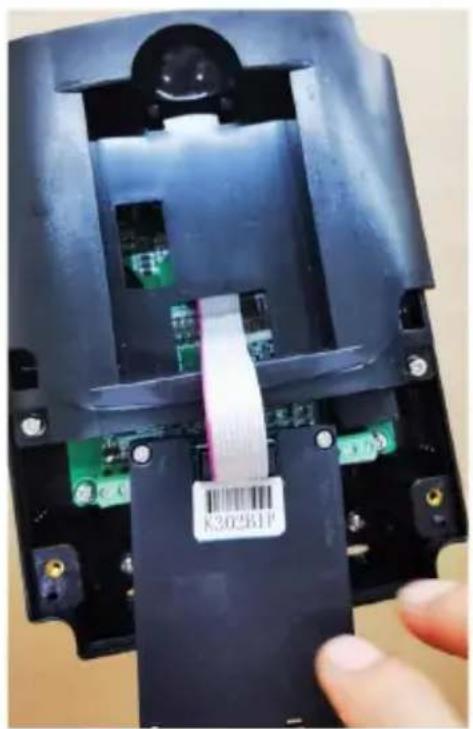
Step 3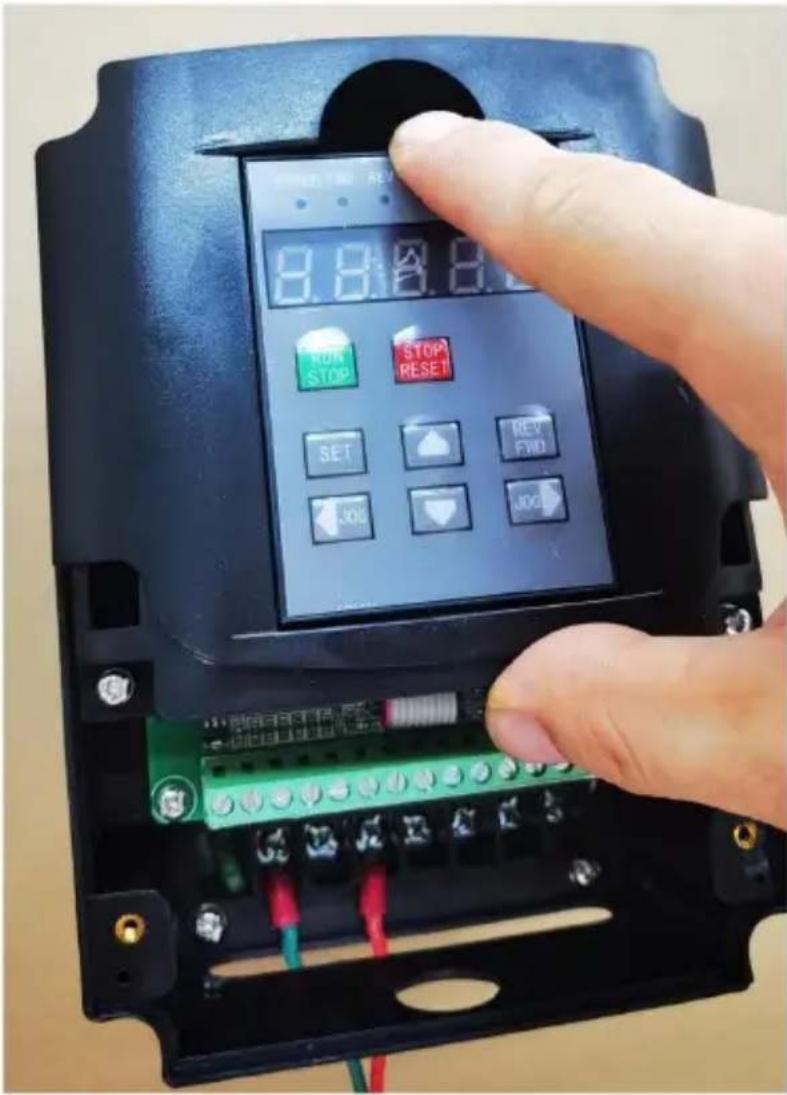
![graph TD A["Received a frequency converter inspection, a frequency converter and a manual"] --> B["Three phase air switch"] B --> C["Number of power supply phases"] C --> D["Single phase"] D --> E["Single phase air switch"] E --> F["Connect the 3-phase power supply to the rst of the frequency conver…](/content/2026/04/734987/images/244e8069aef16ea8527c3c7312809c9183804107722bffa6ccc8d72f55c12284.jpg)
![graph TD A["Brief introduction of frequency converter parameter setting"] --> B["Start signal control mode"] B -->|External switch| C["PN04=2"] B --> D["PN04=1"] D --> E["Frequency source"] E --> F["Panel buttons Pn03=2"] E --> G["5V Voltage Pn03=3"] E --> H["10V Voltage Pn03=4"] E --> I["0-20mA cur…](/content/2026/04/734987/images/f2b4358d71f37903bec197badf96aff06686d288a345dbad81da4a0eb74dfa63.jpg)
![graph TD A["OC-x Exclusion process"] --> B["Disconnect the output connection line (UVW) of the inverter and start the operation"] B --> C["Problem solving"] C --> D["The motor may be damaged or the parameters may be wrong"] D --> E["There is no problem with the motor"] E --> F["Check whether the pn1…](/content/2026/04/734987/images/7b6ac538b94ad81762c39c81eddaded3c307c68e3f2ce248bd3913699802561f.jpg)
![graph TD A["OT-x over temperature fault handling process"] --> B{Press reset to see if it can be reset} B -->|Yes| C["Check whether the ambient temperature is higher than 50 °C, whether the frequency converter has been overloaded, and whether the frequency converter is installed with good heat dissi…](/content/2026/04/734987/images/20a2dd51ec516c4bb9505bc28856034c23cb897513c08d8db892706973e7ef03.jpg)
![graph TD A["Lu-x exclusion method"] --> B["Check the supply voltage"] C["The voltage is too low, please check the power supply voltage"] --> B B --> D["Higher than ac180v (220V level)<br>higher than ac260v (380V level)"] D --> E["Check whether the external power cord is loose or the wire diameter is…](/content/2026/04/734987/images/1959b0c28aed4dc95bec2ebc4a5dfa2a6747fe3893093067f49aadb7aa927e6d.jpg)
![graph TD A["0u-x"] --> B["Check the input voltage\nHigher than ac-270v (220V level)\nHigher than ac-525v (380V level)"] B --> C["Below detection voltage"] C --> D["The fault code is ou-d"] D --> E["Yes"] E --> F["Increase the time of pn09 parameter."] F --> G["Are not the above situation, please tel…](/content/2026/04/734987/images/164ef148f734cfea22c90ec329b7b2a8ad3a4155911ac31a08ba0cbd149677db.jpg)
VEVOR®
TOUGH TOOLS, HALF PRICE
Step 2
Step 3
Step 3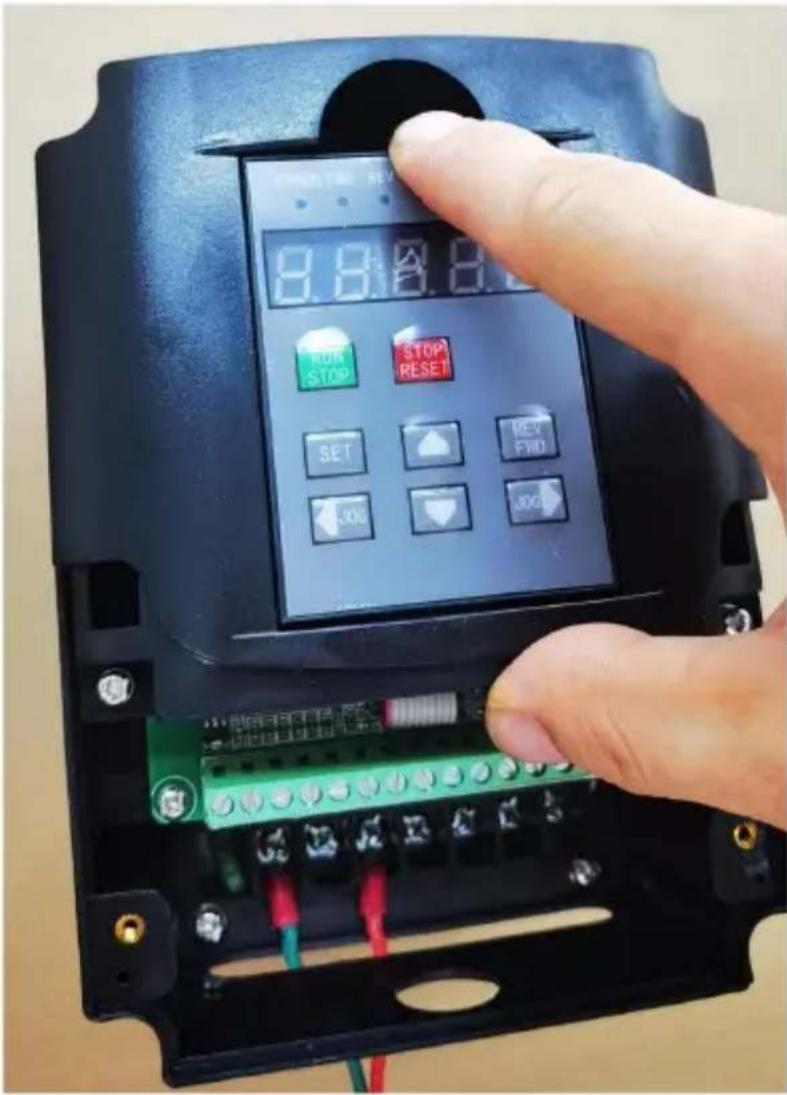
![graph TD A["Received a frequency converter inspection, a frequency converter and a manual"] --> B["Three phase air switch"] B --> C["Number of power supply phases"] C --> D["Single phase"] D --> E["Single phase air switch"] E --> F["Connect the motor"] F --> G["UVW terminal is connected to the motor…](/content/2026/04/734987/images/68a963862876f000413bf8e504ed6ec796b465a23902d2e10f0827cc8dda9e03.jpg)
![graph TD A["Brief introduction of frequency converter parameter setting"] --> B["Start signal control mode"] B --> C["External switch"] C --> D["Frequency source"] D --> E["Panel buttons Pn03=2"] D --> F["5V Voltage Pn03=3"] D --> G["10V Voltage Pn03=4"] D --> H["0-20mA current Pn03=5"] D --> I["Ext…](/content/2026/04/734987/images/a9e967ed59779467afba60591f4fc391f570b8d242ae74bd498211e3ba0e445f.jpg)
![graph TD A["OC-x Exclusion process"] --> B["Disconnect the output connection line (UVW) of the inverter and start the operation"] B --> C["Problem solving"] C --> D["The motor may be damaged or the parameters may be wrong"] D --> E["There is no problem with the motor"] E --> F["Check whether the pn1…](/content/2026/04/734987/images/72efe156a4a4689bdb6a6ece78e0bb087ccfc97a0f10a9a252a99fd5c28c6c05.jpg)
![graph TD A["OT-x over temperature fault handling process"] --> B{Press reset to see if it can be reset} B -->|Yes| C["Check whether the ambient temperature is higher than 50 °C, whether the frequency converter has been overloaded, and whether the frequency converter is installed with good heat dissi…](/content/2026/04/734987/images/db73f57068a6ddc28495a9553302102452a61f3a174b8efe96aff7015c7875ab.jpg)
![graph TD A["Lu-x exclusion method"] --> B["Check the supply voltage"] C["The voltage is too low, please check the power supply voltage"] --> B B --> D["Higher than ac180v (220V level)"] B --> E["Higher than ac260v (380V level)"] D --> F["Check whether the external power cord is loose or the wire dia…](/content/2026/04/734987/images/29a7a5f096cb712d81795f18316ce683cc18fc0240d0704e4d4566eeb85357cf.jpg)
![graph TD A["0u-x"] --> B["Check the input voltage\nHigher than ac-270v (220V level)\nHigher than ac-525v (380V level)"] B --> C["Below detection voltage"] C --> D["The fault code is ou-d"] D --> E["Yes"] E --> F["Increase the time of pn09 parameter."] F --> G["Are not the above situation, please tel…](/content/2026/04/734987/images/d7ebb048a0b5c34899e459e24119f23cd9fc3f2124b31146078557d13ee5fd78.jpg)
VEVOR®
NEED HELP? CONTACT US!
Step 3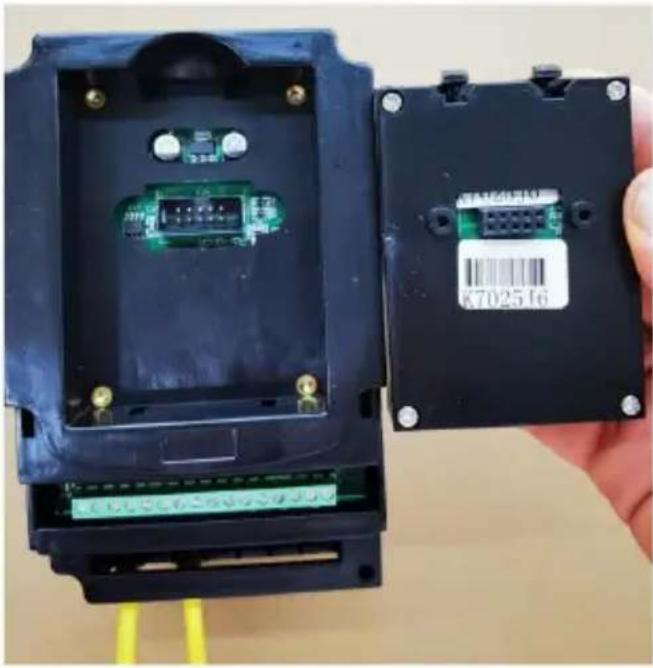
Step 2
Step 3
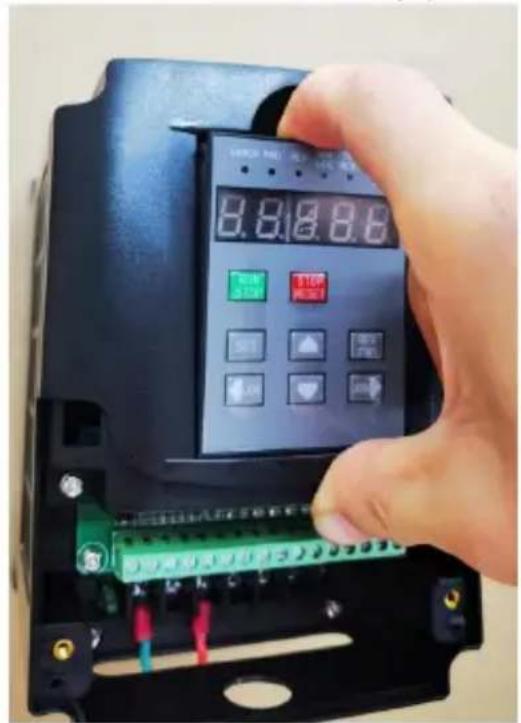
Step 3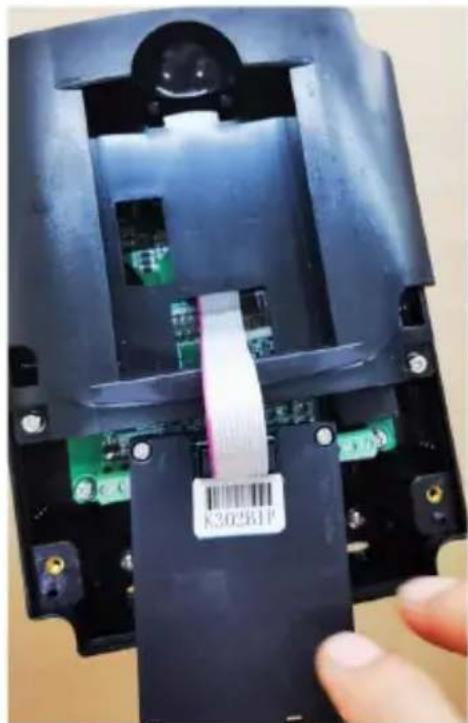
![graph TD A["Received a frequency converter inspection, a frequency converter and a manual"] --> B["Three phase air switch"] B --> C["Number of power supply phases"] C --> D["Single phase"] D --> E["Single phase air switch"] E --> F["Connect the 3-phase power supply to the rst of the frequency conver…](/content/2026/04/734987/images/9e3156b52e4e0c0756ab6eb3386d7923060ffcfad2d95c98573a5e15f0c6994c.jpg)
![graph TD A["Brief introduction of frequency converter parameter setting"] --> B["Start signal control mode"] B --> C["External switch"] C --> D["Frequency source"] D --> E["Panel buttons Pn03=2"] D --> F["5V Voltage Pn03=3"] D --> G["10V Voltage Pn03=4"] D --> H["0-20mA current Pn03=5"] D --> I["Ext…](/content/2026/04/734987/images/d34c27d7cf4e6c4772e4da301c487c0ec4f4b22cd3856cec1e3b9726630bc2f8.jpg)
![graph TD A["OC-x Exclusion process"] --> B["Disconnect the output connection line (UVW) of the inverter and start the operation"] B --> C["Problem solving"] C --> D["The motor may be damaged or the parameters may be wrong"] D --> E["There is no problem with the motor"] E --> F["Check whether the pn1…](/content/2026/04/734987/images/b6911bb18b7c62d5e600f4e680782f4a1e83277464d45a3f462518f91c1b5e00.jpg)
![graph TD A["OT-x over temperature fault handling process"] --> B{Press reset to see if it can be reset} B -->|Yes| C["Check whether the ambient temperature is higher than 50 °C, whether the frequency converter has been overloaded, and whether the frequency converter is installed with good heat dissi…](/content/2026/04/734987/images/f43997e7cd3f5ecbb2b7429c3e447ee01b743007b24566825fdf5b95333e8542.jpg)
![graph TD A["Lu-x exclusion method"] --> B["Check the supply voltage"] C["The voltage is too low, please check the power supply voltage"] --> B B --> D["Higher than ac180v (220V level)<br>higher than ac260v (380V level)"] D --> E["Check whether the external power cord is loose or the wire diameter is…](/content/2026/04/734987/images/7fd0a0a85fb435fc09d0d76e3786f1dd919e2042c2b22225d8fede2345086cb9.jpg)
![graph TD A["0u-x"] --> B["Check the input voltage\nHigher than ac-270v (220V level)\nHigher than ac-525v (380V level)"] B --> C["Below detection voltage"] C --> D["The fault code is ou-d"] D --> E["Yes"] E --> F["Increase the time of pn09 parameter."] F --> G["Are not the above situation, please tel…](/content/2026/04/734987/images/eead66ba510554927afb7720adbefb2df4af59051efd9f5d843cf464cd0e71d6.jpg)
VEVOR®

Pn 15 Start-up DC braking voltage: 1V—100V
via panel Pn 04 = 1 (Command
Step 2
Step 3
Step 3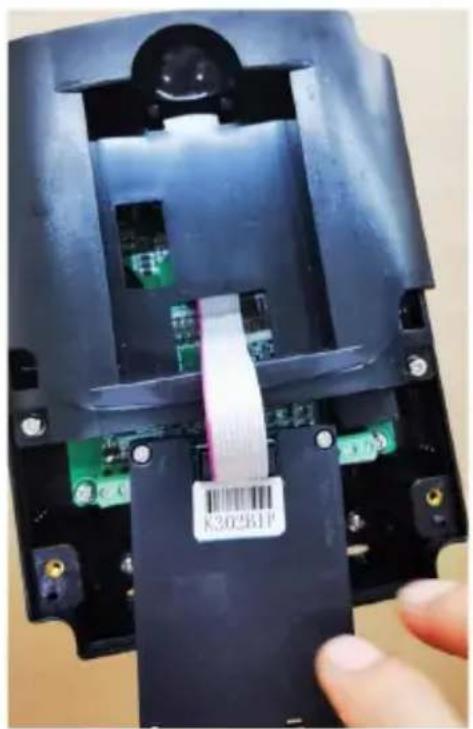
Step 3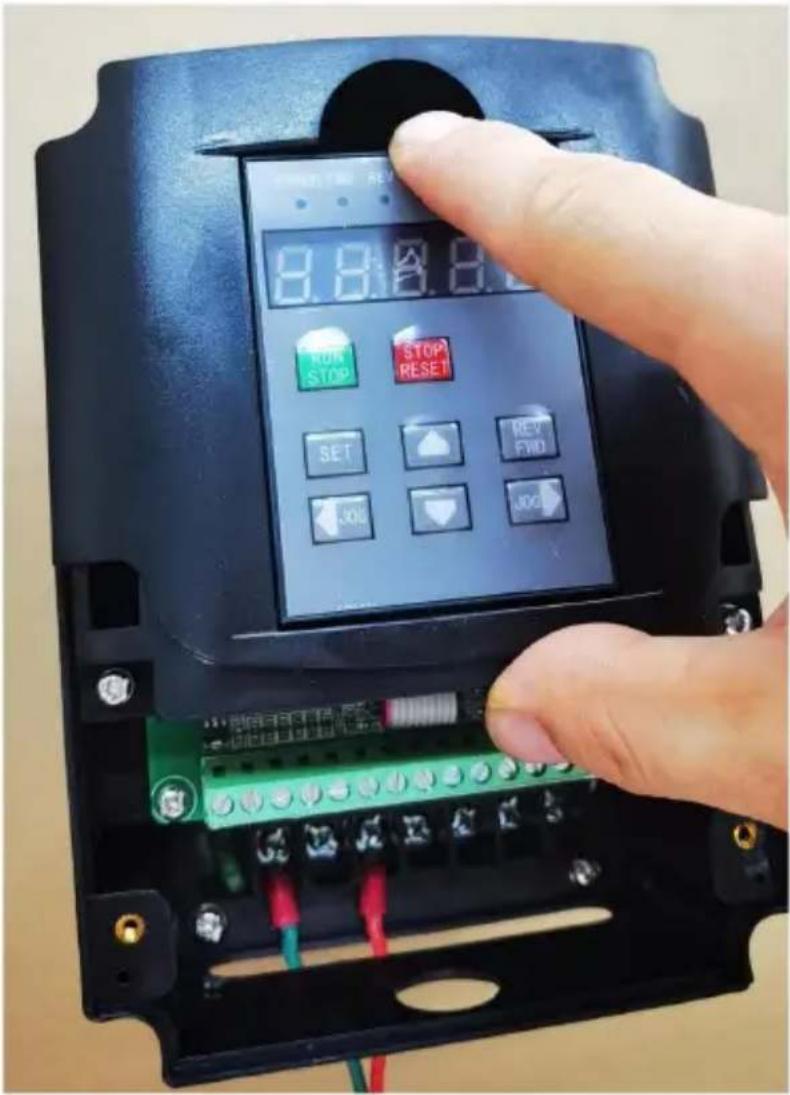
![graph TD A["Received a frequency converter inspection, a frequency converter and a manual"] --> B["Three phase air switch"] B --> C["Number of power supply phases"] C --> D["Single phase"] D --> E["Single phase air switch"] E --> F["Connect the 3-phase power supply to the rst of the frequency conver…](/content/2026/04/734987/images/12741fdabc9b1401fd189b638bfa4e57faa0a92c5d9251154a9ff8b54b10772c.jpg)
![graph TD A["Brief introduction of frequency converter parameter setting"] --> B["Start signal control mode"] B -->|External switch| C["PN04=2"] B --> D["PN04=1"] D --> E["Frequency source"] E --> F["Panel buttons Pn03=2"] E --> G["5V Voltage Pn03=3"] E --> H["10V Voltage Pn03=4"] E --> I["0-20mA cur…](/content/2026/04/734987/images/9d415b095eb69739ddc1f561e8f2fac1483ee49d3ef00d6c5809e5c9da53763e.jpg)
![graph TD A["OC-x Exclusion process"] --> B["Disconnect the output connection line (UVW) of the inverter and start the operation"] B --> C["Problem solving"] C --> D["The motor may be damaged or the parameters may be wrong"] D --> E["There is no problem with the motor"] E --> F["Check whether the pn1…](/content/2026/04/734987/images/267d868948d5e2a495860d4b7d9d04f7e2bdbbd9897b9b0032fa48832789cd26.jpg)
![graph TD A["OT-x over temperature fault handling process"] --> B{Press reset to see if it can be reset} B -->|Yes| C["Check whether the ambient temperature is higher than 50 °C, whether the frequency converter has been overloaded, and whether the frequency converter is installed with good heat dissi…](/content/2026/04/734987/images/1763fe0bb486f6631dc7325cc47f60863209cdffdf796ad45aea7ac609852164.jpg)
![graph TD A["Lu-x exclusion method"] --> B["Check the supply voltage"] C["The voltage is too low, please check the power supply voltage"] --> B B --> D["Higher than ac180v (220V level)<br>higher than ac260v (380V level)"] D --> E["Check whether the external power cord is loose or the wire diameter is…](/content/2026/04/734987/images/00e792a3077ab90bffc22cf0c9db9d04036daf892b49a7690dc5324b00e76de0.jpg)
![graph TD A["0u-x"] --> B["Check the input voltage\nHigher than ac-270v (220V level)\nHigher than ac-525v (380V level)"] B --> C["Below detection voltage"] C --> D["The fault code is ou-d"] D --> E["Yes"] E --> F["Increase the time of pn09 parameter."] F --> G["Are not the above situation, please tel…](/content/2026/04/734987/images/6efce72f33663c7abc794ae751ab7c092cb1766e7aeaed9f3a7bc277b3aa68d1.jpg)
VEVOR®
TOUGH TOOLS, HALF PRICE
Technical support and e-warranty certificate www.vevor.com/support
VEVOR®
NEED HELP? CONTACT US!
6 External digital signal
7 Multi-segment signal
Pn 15 Start DC braking voltage 1V—100V
Pn 32 Parameter management 1—3 1
modification activation 3
2 modification deactivated
Step 3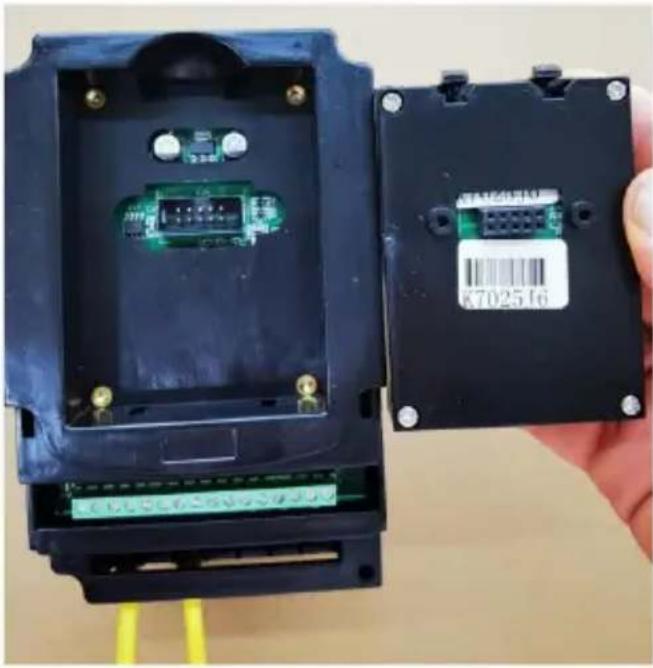
Step 2
Step 3
Step 3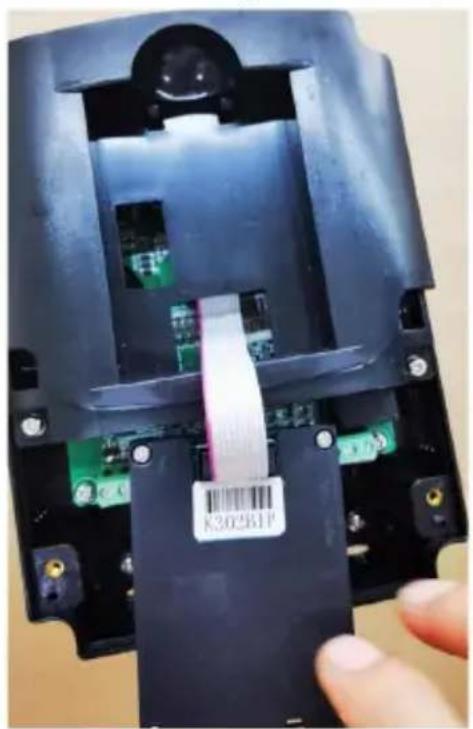
![graph TD A["Received a frequency converter inspection, a frequency converter and a manual"] --> B["Three phase air switch"] B --> C["Number of power supply phases"] C --> D["Single phase"] D --> E["Single phase air switch"] E --> F["Connect the 3-phase power supply to the rst of the frequency conver…](/content/2026/04/734987/images/08b1605122b5e3c151ba34238cdaffc4c495246906e1bd9fd2c54635e6e9c072.jpg)
![graph TD A["Brief introduction of frequency converter parameter setting"] --> B["Start signal control mode"] B --> C["External switch"] C --> D["Frequency source"] D --> E["Panel buttons Pn03=2"] D --> F["5V Voltage Pn03=3"] D --> G["10V Voltage Pn03=4"] D --> H["0-20mA current Pn03=5"] D --> I["Ext…](/content/2026/04/734987/images/fdc4a7fe68339f6f97323f9e56d43b0960e338c1586b091b8d98e2d68042111a.jpg)
![graph TD A["OC-x Exclusion process"] --> B["Disconnect the output connection line (UVW) of the inverter and start the operation"] B --> C["Problem solving"] C --> D["The motor may be damaged or the parameters may be wrong"] D --> E["There is no problem with the motor"] E --> F["Check whether the pn1…](/content/2026/04/734987/images/10cb20d42ca4977aa5a050b4f3b5e6e4aa02f9cda7c0cd62882d9fde6501fd28.jpg)
![graph TD A["OT-x over temperature fault handling process"] --> B{Press reset to see if it can be reset} B -->|Yes| C["Check whether the ambient temperature is higher than 50 °C, whether the frequency converter has been overloaded, and whether the frequency converter is installed with good heat dissi…](/content/2026/04/734987/images/2719dbf5c2f8cd505f2ed8ae71da1d54b0b90b709015b23322b8e5c060b38395.jpg)
![graph TD A["Lu-x exclusion method"] --> B["Check the supply voltage"] C["The voltage is too low, please check the power supply voltage"] --> B B --> D["Higher than ac180v (220V level)<br>higher than ac260v (380V level)"] D --> E["Check whether the external power cord is loose or the wire diameter is…](/content/2026/04/734987/images/22ded50f4abbdeb8ee49bbd0d91490b73e92b72f2baafa6ededb8e83a9b22cbe.jpg)
![graph TD A["0u-x"] --> B["Check the input voltage\nHigher than ac-270v (220V level)\nHigher than ac-525v (380V level)"] B --> C["Below detection voltage"] C --> D["The fault code is ou-d"] D --> E["Yes"] E --> F["Increase the time of pn09 parameter."] F --> G["Are not the above situation, please tel…](/content/2026/04/734987/images/ca9be3d8a01dc856ed2c7ab239ccc487601ead582c6f0559b8dfffd212e1f163.jpg)
VEVOR®
TOUGH TOOLS, HALF PRICE