C260 - Measuring equipment Vevor - Free user manual and instructions
Find the device manual for free C260 Vevor in PDF.

User questions about C260 Vevor
0 question about this device. Answer the ones you know or ask your own.
Ask a new question about this device
Download the instructions for your Measuring equipment in PDF format for free! Find your manual C260 - Vevor and take your electronic device back in hand. On this page are published all the documents necessary for the use of your device. C260 by Vevor.
USER MANUAL C260 Vevor
Technical Support and E-Warranty Certificate www.vevor.com/support
TPMS
MODEL:C260
We continue to be committed to provide you tools with competitive price. "Save Half", "Half Price" or any other similar expressions used by us only repeat estimate of savings you might benefit from buying certain tools with us compared top brands and does not necessarily mean to cover all categories of tools offered are kindly reminded to verify carefully when you are placing an order with us actually saving half in comparison with the top major brands.
MODEL:C260
NEED HELP? CONTACT US!
Have product questions? Need technical support? Please feel fr contact us:
Technical Support and E-Warranty Certificate www.vevor.com/support
This is the original instruction, please read all manual instruction carefully before operating. VEVOR reserves a clear interpretation user manual. The appearance of the product shall be subject to product you received. Please forgive us that we won't inform you there are any technology or software updates on our product.
PART LIST
| Name | Quantity |
| wrench | 1 |
| Anti-theft nut | 1 |
| Data cable | 1 |
| 3M sticker | 1 |
| Host machine | 4 |
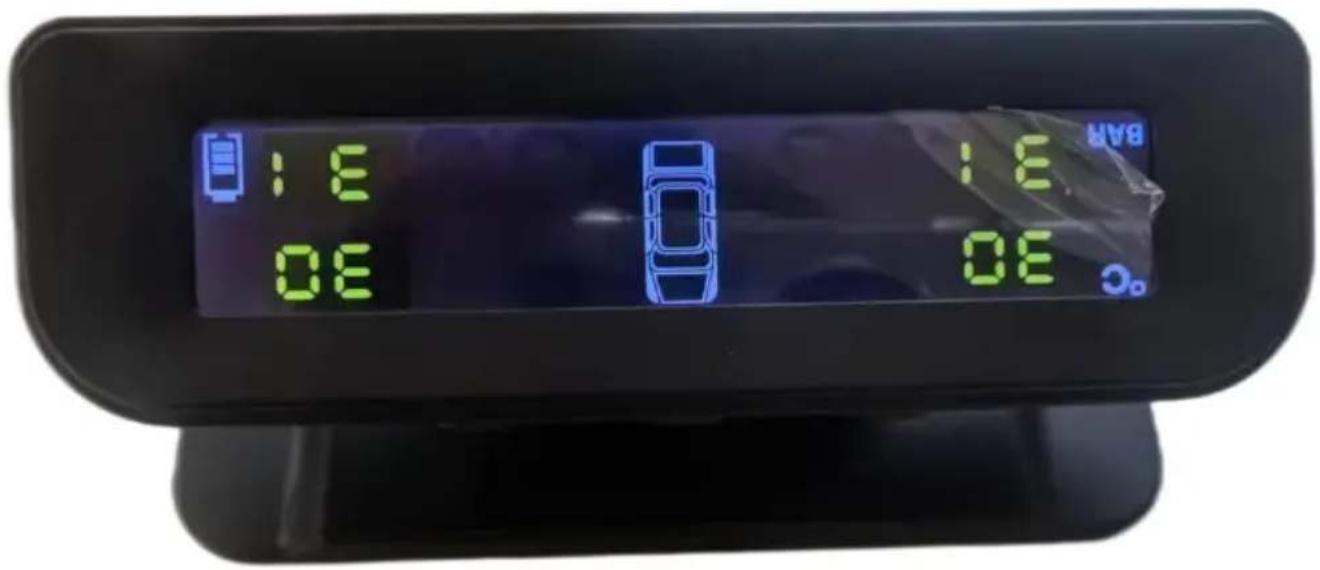
Display Instruction
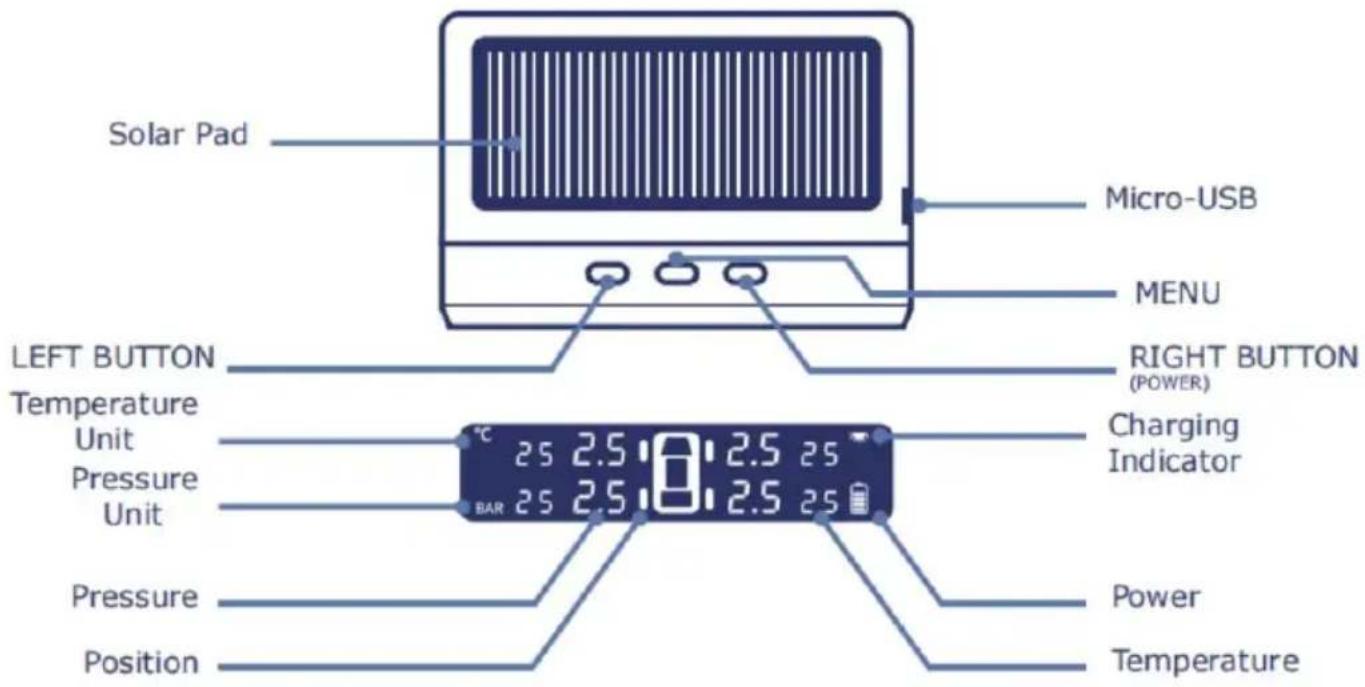
Component: Display1; Sensors6; User Manual1; Nut Wrent1

Power On: Press and hold on RIGHT button for 3 seconds
Power Off: Press and hold on RIGHT button for 3 seconds

Sensors will be activated when speed up to 25Km/h , and Display updates real-time data automatically
Set Up

When finished setting, press and hold on Menu button to save and
1. Enter setup mode
Press and hold on MENU button for 4 seconds to enter setup mode, and pre-MENU button to select.( pressure unit->temperature unit->pressure Hi/Lo limit -: temperature limit
2. Pressure Unit Setting
Select Pressure Unit, press LEFT/RIGHT button to choose BAR/PSI, press ME button to save and get into next step.
3. Pressure Setting
Select pressure HI/LO, press LEFT/RIGHT button to adjust data, and press M button to save and get into next step
Default Pressure HI setting: 3.30Bar
Default Pressure LO setting: 1.70Bar
Adjustable Setting Range: 2.60~6.00 Bar
4. Temperature Setting
Select Temperature HI, press LEFT/RIGHT button to adjust data, and press M button to save and get into next step.

Default Temperature HI setting: 80^
Adjustable Setting Range: 70 90^
5. Save & Exit
When finished setting, press and hold on Menu button for 4 seconds to save exit.

TIPS: System will exit to normal mode after 3 minute if no operations during setup mode
TPMS Sensor Pairing
Inflation and Pairing
Press "+" button 8 times, enter pairing mode after "beep". Left front tire "icon flash, press "+" or "-" to select tire. Tire icon and pressure keep flashing, then inflate relative tire (external sensors will be added on air nozzle). Will Display pressure value. Then press "+" or "-" to select another tire to set. After all tires been set, hold "SET" 3 seconds and release a beep to save the data. (Pairing mode will quit automatically if no action minutes)
Tire Exchange
When you exchange tires, you should pay attention to the tire shows on mo keep tires on the same position of both monitor and actual location. This fun simple and useful, please do it as following (for example, left rear tire and tire exchange)
1. Enter Tire exchange interface
Press “-” button 8 times quickly, then you enter tire exchange interface. Left tire start to flash, then press “-” to select first tire which you want to excha example left rear tire:

- Press “SET” to confirm first tire which you want to exchange, press “+ to select second tires which you want to exchange, (for example right rear t Now Left and right rear tire icon flash at the same time:

- Hold “ SET ” to confirm exchanging and save the data, quit exchanging and back to normal display as below:

Display Installation

Alarm Instruction
When alarm beeps, the corresponding icon on display will flash.
1 Leakage Alarm

Slow Leak: Bi--Bi--Bi--
Fast Leak: Bi-Bi-Bi-
BAR

Check if caused by nail or aging tire valve.
2 High/Low Pressure Alarm

Bi-Bi-Bi--
Alarm when Pressure Exceeds HI Limit. (Default setting 3.3B)
Alarm when Pressure Exceeds LO Limit. (Default setting 1.7E)

3 High Temperature Alarm

Bi-Bi-Bi---
Alarm when Temperature Exceeds HI Limit (Default setting 80

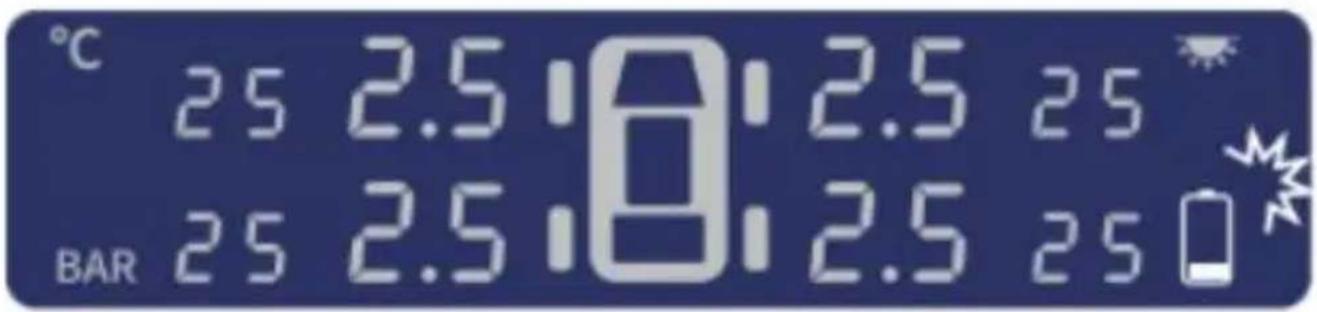
4 Display Low power Alarm
When battery icon flashes, power will run out soon. Please charge by Micro-USB if rainy/cloudy weather.
Specification
Display
Frequency: 315MHZ Voltage: 3.7V
Current: workings≤15mA; standbys≤50uA
Working Environment: -20^ +70^
Sensors
Frequency: 315MHz Voltage: 2.0 3.6V
Current: statics ≤ 1 uA, dynamics ≤ 15 mA
Working Environment: Internal: -40^ +120^ External: -20^ +85^
Monitoring
Range: pressure 0~8.0Bar Accuracy: pressure ±0.1Bar
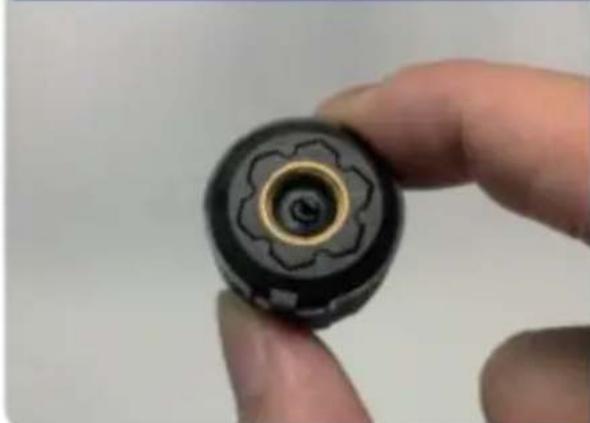
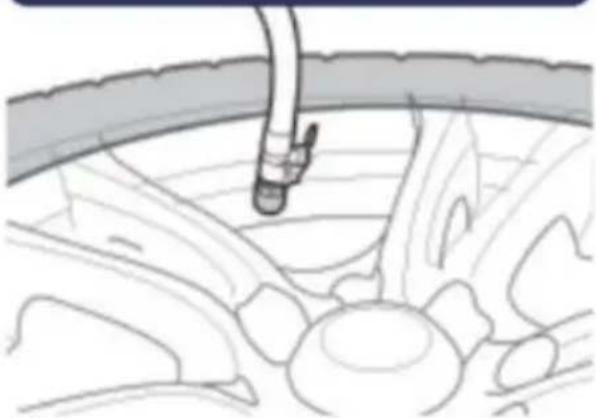
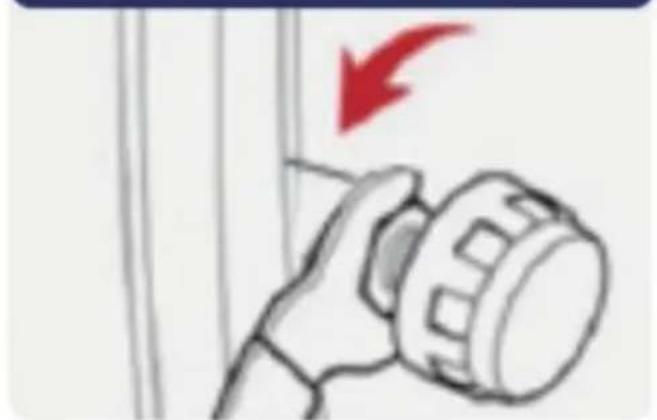
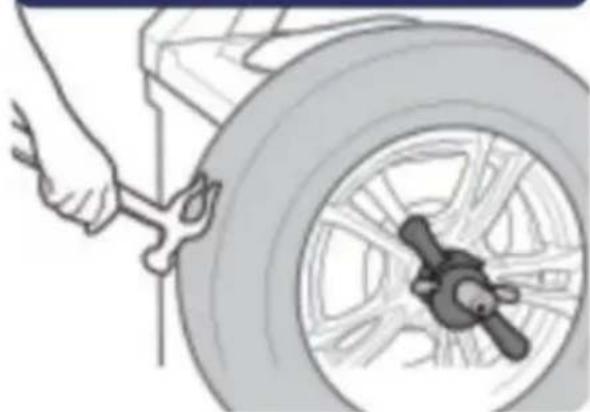
External Sensor Installation
Cover

Battery

Anti-dismantl gasket

Main
Body

Hex Nuts


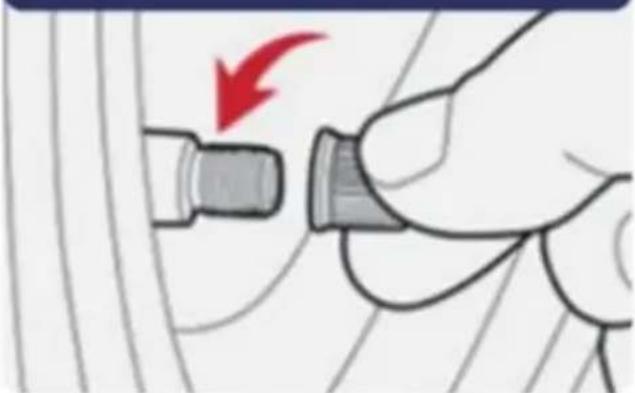
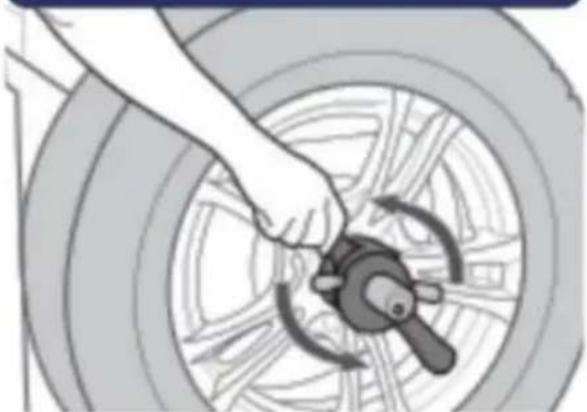
1 Screw out the tire valve dust cap

2 Insert anti -dismantl gasket
3 to corresponding position.

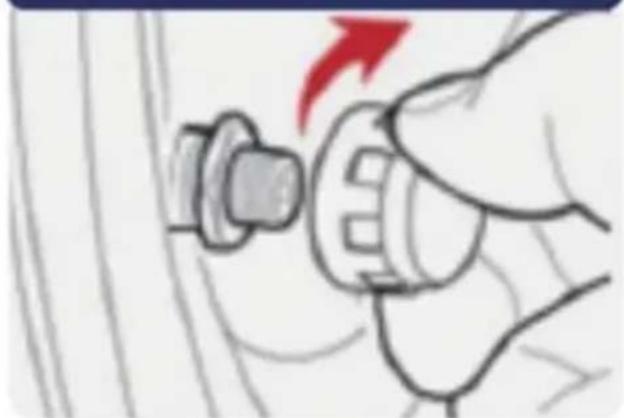
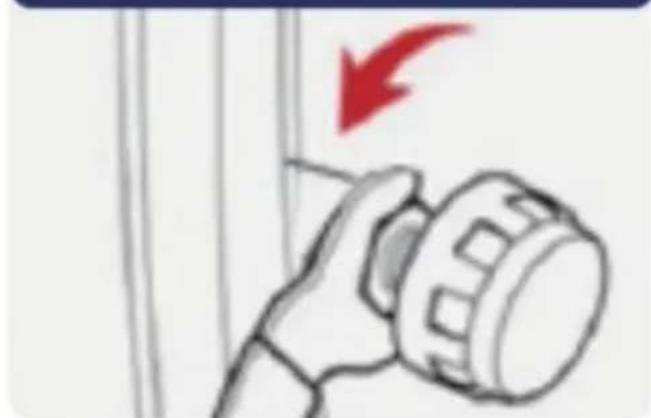
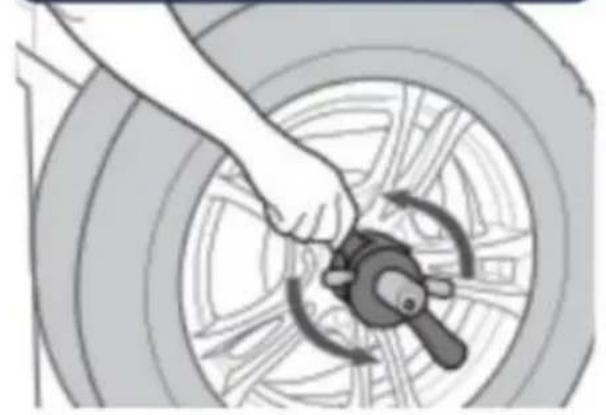
4 Screw tight with nut wrench
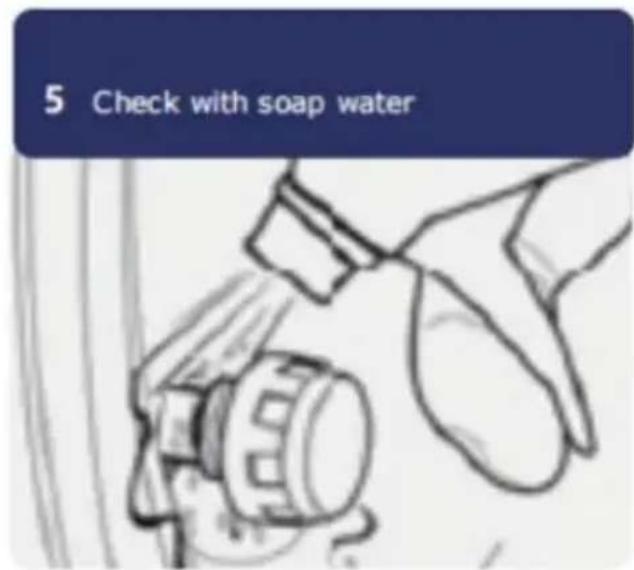
5 Check with soap water

Reset
Press left and right button at the same time, all data will be reset to factory settings
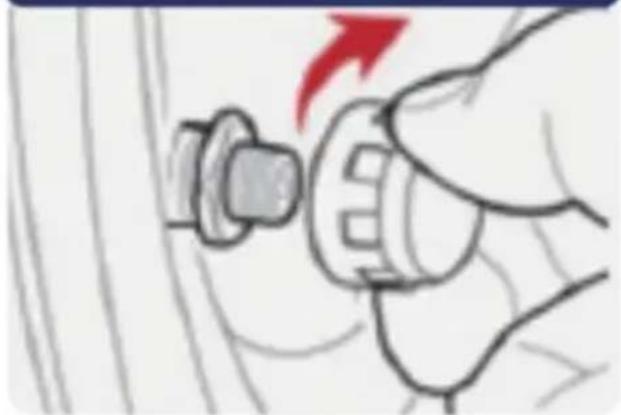
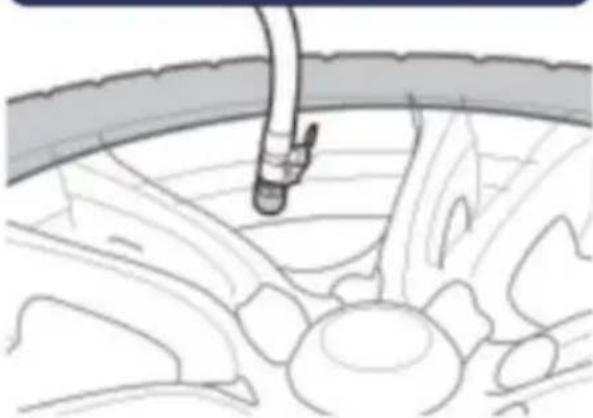
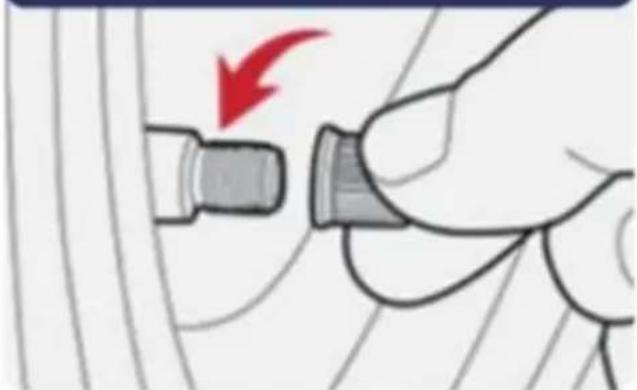
Internal Sensor Installation
1 Remove the original tire valve

2 Install tire sensor

Notice & Statement
Please install sensors after monitor is on
This device can apply to cars, which are not equipped with TPMS by factory standards and with a limit tire pressure within 3.50Bar.
(Best with 12V accumulator)
Stop the vehicle safely when alarm is beeping.
This device can not detect sudden tires damage.
Do not operate the device during driving.
Battery life of sensors will depend on vehicle mileage.
Please park vehicle to safe place. If any stolen happens to the device, Wetake no responsibility. Tire temperature and pressure will increase (0.1~0.3Bar)
when driving.
WARNING
Please do stick the Warning Lable beside the valve to reminder that sensor has been installed and prevent damage when disassemble happens.
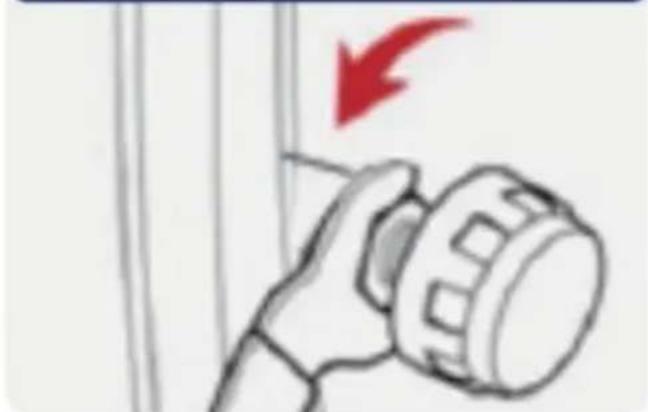
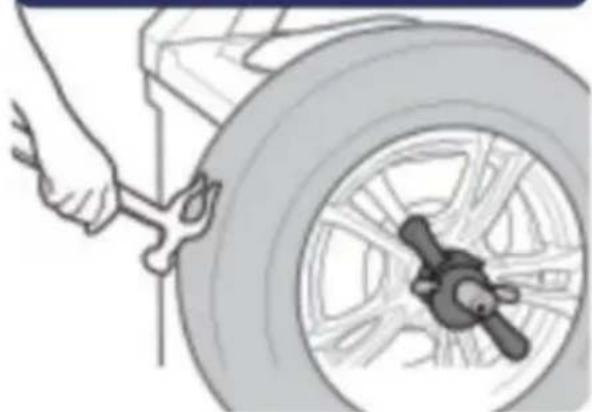
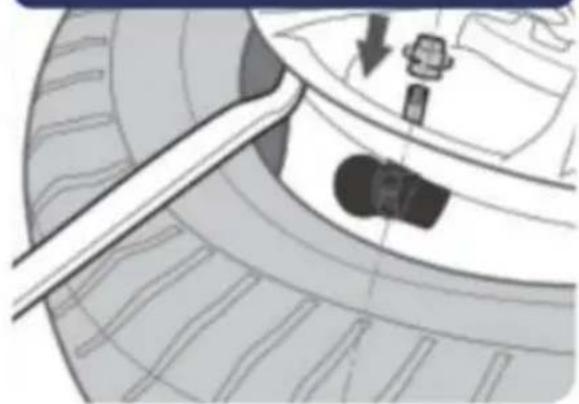
Sensor battery Disassembly
1 Anti-slip gasket
3 Use wrench to open

Testing
2 Installation is completed when 4 wheels' temperature and pressure date has been detected.
25 2.5:0:2.5 25 25 2.5:0:2.5 25
If no shock been detected, Display gets into Auto Sleep Mode.
Manufacturer: Shanghaiuxinmuyeyouxianggsi
Address: Shuangchenglu 803nong11hao1602A-1609shi, baoshanqu, shanghai 200000 CN.
Imported to AUS: SIHAO PTY LTD. 1 ROKEVA STREETEASTWOOD NSW 2 Australia
Imported to USA: Sanven Technology Ltd. Suite 250, 9166 Anaheim Place, Rancho Cucamonga, CA 91730

YH CONSULTING LIMITED.
C/O YH Consulting Limited Office 147,
Centurion House, London Road,
Staines-upon-Thames, Surrey, TW18 4AX

E-CrossStu GmbH
Mainzer Landstr.69,
60329 Frankfurt am Main.
VEVOR®
TOUGH TOOLS, HALF PRICE
Technical Support and E-Warranty Certificate
www.vevor.com/support
VEVOR
TOUGH TOOLS, HALF PRICE
Assistance technique et certificat de garantie electronique www.vevor.com/support
TPMS
MODELE:C260
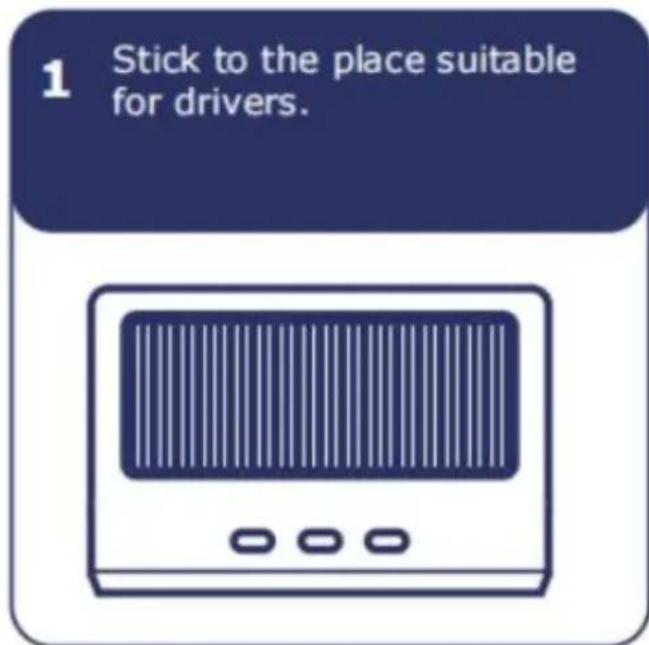
1 Stick to the place suitable for drivers.

2 When Display is low power, you can charge by Micro-USB (Andriod Type).

Cigarette Charger (Buy separately)
Alarm Instruction

When alarm beeps, the corresponding icon on display will flash.
1 Leakage Alarm

Slow Leak: Bi--Bi--Bi--
Fast Leak: Bi-Bi-Bi-

2 High/Low Pressure Alarm

Bi-Bi-Bi- - -
3 High Temperature Alarm

Bi-Bi-Bi- - -
Plage: pressure 0 ~ 8,0 Bar
Precislon:pression ± 0,1 Bar
1 Screw out the tire valve dust cap

2 Insert anti-dismantl gasket
3 Screw in the sensor cover to corresponding position.
4 Screw tight with nut wrench
Reset Press left and right button at the same time, all data will be reset to factory settings
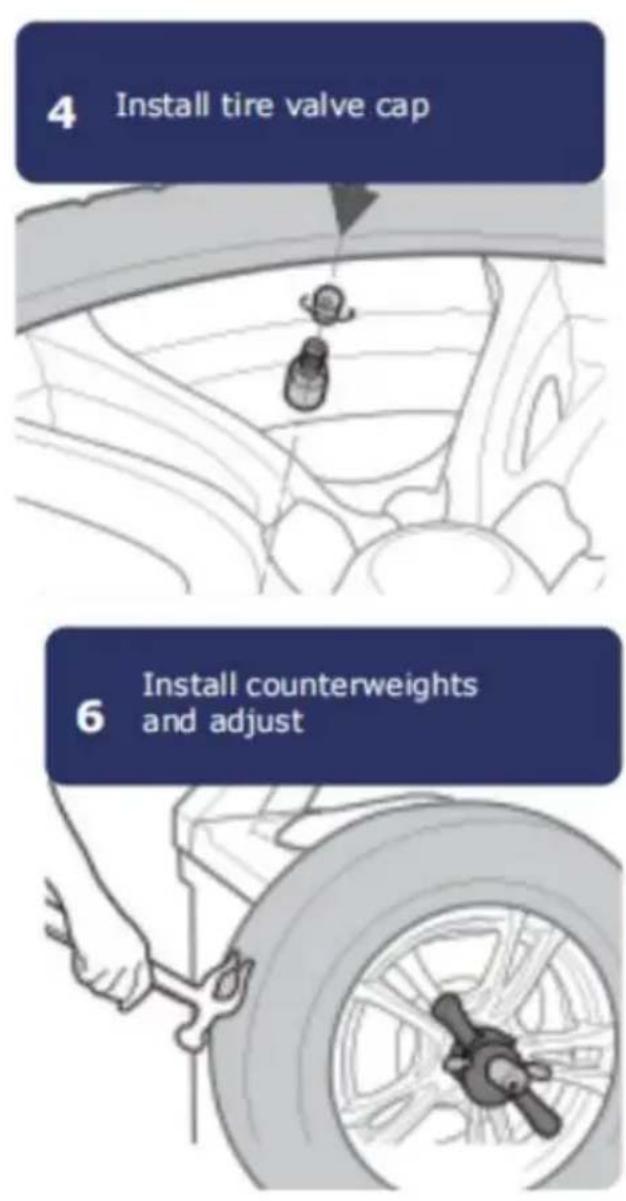
4 Install tire valve cap

5 Test Dynamic balancer

6 and adjust

Avis et déclaration
3 Use wrench to open

Testing
2 Installation is completed when 4 wheels' temperature and pressure date has been detected.

If no shock been detected, Display gets into Auto Sleep Mode.
Fabricant:Shanghaiuxinmuyeyouxianggsi
Adresse: Shuangchenglu 803nong11hao1602A-1609shi, baoshanqu, Shanghai 200 000 CN.
Importé en Australie: SIHAO PTY LTD. 1 ROKEVA STREETASTWOOD NSW 2122 Australia
C/O YH Consulting Limited Bureau 147,
Maison Centurion, London Road,
Staines-upon-Thames, Surrey, TW18 4AX

E-CrossStu GmbH
Mainzer Landstr.69,
1 Stick to the place suitable for drivers.

2 When Display is low power, you can charge by Micro-USB (Andriod Type).

Cigarette Charger (Buy separately)
Alarm Instruction

When alarm beeps, the corresponding icon on display will flash.
1 Leakage Alarm

Slow Leak: Bi--Bi--Bi--
Fast Leak: Bi-Bi-Bi-

2 High/Low Pressure Alarm

Bi-Bi-Bi- - -
3 High Temperature Alarm

Bi-Bi-Bi- - -
Anti-dismantl gasket

Main Body

Hex Nuts


1 Screw out the tire valve dust cap

2 Insert anti-dismantl gasket

3 to corresponding position.

4 Screw tight with nut wrench
5 Check with soap water

Reset
Press left and right button at the same time, all data will be reset to factory settings
Interne Sensorinstallation
1 Remove the original tire valve

2 Install tire sensor

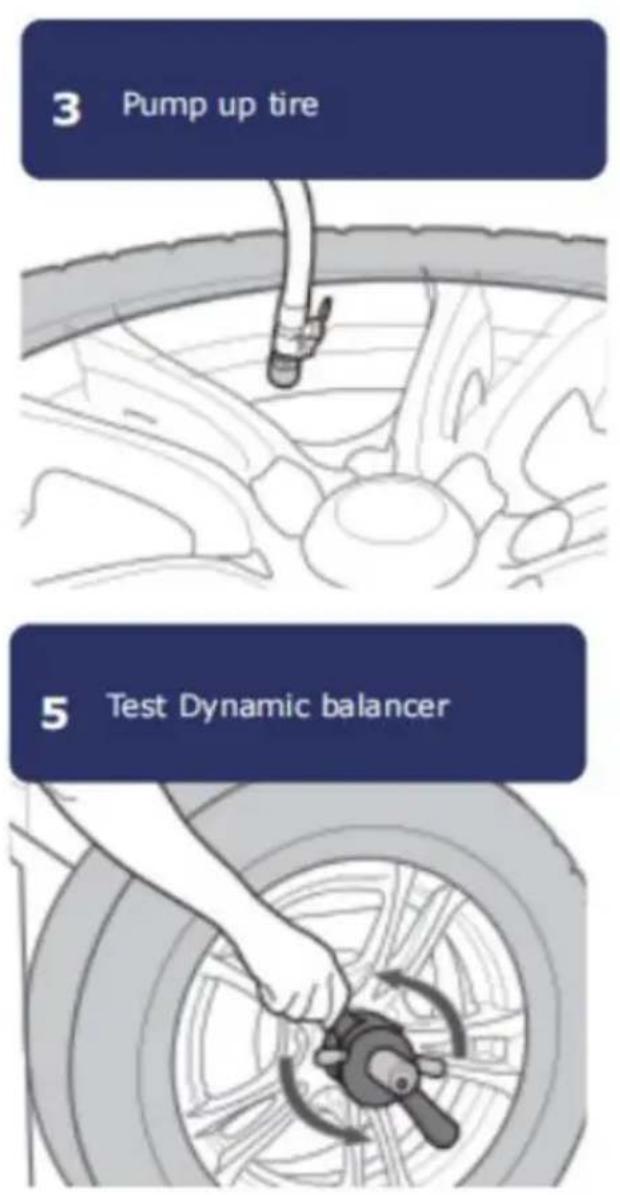
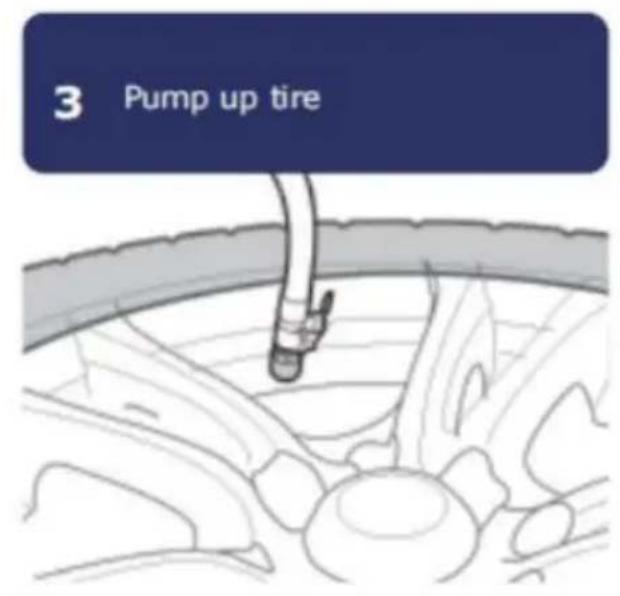
3 Pump up tire
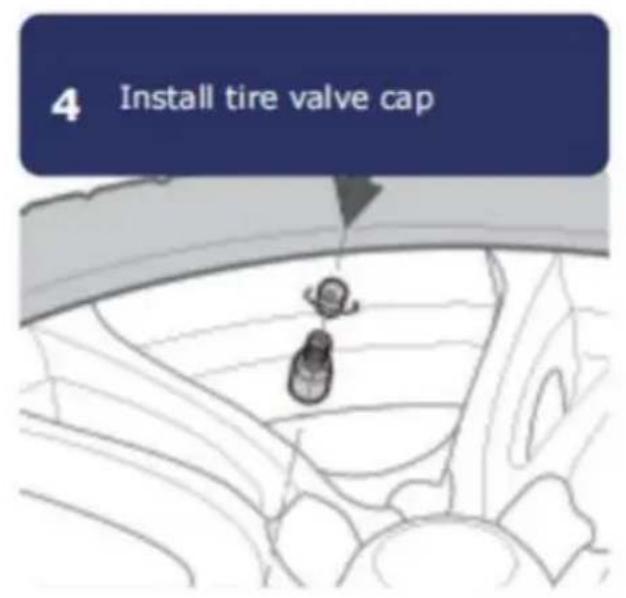
4 Install tire valve cap

5 Test Dynamic balancer

6 and adjust

Hinweis & Erklärung
3 Use wrench to open

Testing
2 Installation is completed when 4 wheels' temperature and pressure date has been detected.
25 2.5 8:2.5 25 25 2.5 8:2.5 25
If no shock been detected, Display gets into Auto Sleep Mode.
Hersteller: Shanghaiuxinmuyeyouxiangonsi
Adresse: Shuangchenglu 803nong11hao1602A-1609shi, Baoshanqu, Shanghai 200000 CN.
Nach AUS importiert: SIHAO PTY LTD. 1 ROKEVA STREETEASTWOOD NSW 2122 Australien
Importiert in die USA: Sanven Technology Ltd. Suite 250, 9166 Anaheim Place, Rancho Cucamonga, CA 91730

YH CONSULTING LIMITED.
C/O YH Consulting Limited Office 147,
Centurion House, London Road,
Staines-upon-Thames, Surrey, TW18 4AX
E-CrossStu GmbH
Mainzer Landstr.69,
60329 Frankfurt am Main.
VEVOR
TOUGH TOOLS, HALF PRICE
www.vevor.com/support
VEVOR®
TOUGH TOOLS, HALF PRICE
1 Stick to the place suitable for drivers.

2 When Display is low power, you can charge by Micro-USB (Andriod Type).

Cigarette Charger (Buy separately)
Alarm Instruction

When alarm beeps, the corresponding icon on display will flash.


Anti-dismantl gasket

Main Body

Hex Nuts


1 Screw out the tire valve dust cap

2 Insert anti-dismantl gasket

3 to corresponding position.
4 Screw tight with nut wrench

Reset Press left and right button at the same time, all data will be reset to factory settings
4 Install tire valve cap

5 Test Dynamic balancer
6 and adjust

3 Use wrench to open

Testing
2 Installation is completed when 4 wheels' temperature and pressure date has been detected.
25 2.5 8:2.5 25 25 2.5 8:2.5 25
If no shock been detected, Display gets into Auto Sleep Mode.
Produture: Shanghaiuxinmuyeyouxiangongsi
Indirizzo: Shuangchenglu 803nong11hao1602A-1609shi, baoshanqu, shanghai 200000 NC.
Importato in AUS: SIHAO PTY LTD. 1 ROKEVA STREETEASTWOOD NSW 2122 Australia
C/O YH Consulting Limited Ufficio 147,
Casa del Centurione, London Road,
Staines-upon-Thames, Surrey, TW18 4AX

E-CrossStu GmbH
Mainzer Landstr.69,
60329 FrancofortesulMeno.
VEVOR
TOUGH TOOLS, HALF PRICE
1 Stick to the place suitable for drivers.

2 When Display is low power, you can charge by Micro-USB (Andriod Type).

Cigarette Charger (Buy separately)
Alarm Instruction

When alarm beeps, the corresponding icon on display will flash.
1 Leakage Alarm

Slow Leak: Bi--Bi--Bi--
Fast Leak: Bi-Bi-Bi-
BAR

2 High/Low Pressure Alarm

Bi-Bi-Bi- - -
3 High Temperature Alarm

Bi-Bi-Bi- - -

1 Screw out the tire valve dust cap

2 Insert anti-dismantl gasket

3 Screw in the sensor cover to corresponding position.
4 Screw tight with nut wrench

Reset Press left and right button at the same time, all data will be reset to factory settings
4 Install tire valve cap

5 Test Dynamic balancer

6 and adjust
Aviso y declaración
C/O YH Consulting Limited Oficina 147, Casa Centurion, London Road, Staines upon Thames, Surrey, TW18 4A
E-CrossStu GmbH
Mainzer Landstr.69, 60329 Francfort del Meno.
VEVOR
TOUGH TOOLS, HALF PRICE
Soporte专业技术o y certificate de garantia electrònica www.vevor.com/support
VEVOR
TOUGH TOOLS, HALF PRICE
1 Stick to the place suitable for drivers.

2 When Display is low power, you can charge by Micro-USB (Andriod Type).

Cigarette Charger (Buy separately)
Alarm Instruction

When alarm beeps, the corresponding icon on display will flash.
1 Leakage Alarm

Slow Leak: Bi--Bi--Bi--
Fast Leak: Bi-Bi-Bi-
BAR

Sprawdz,czy jest to
2 High/Low Pressure Alarm

Bi-Bi-Bi- - -
3 High Temperature Alarm

Bi-Bi-Bi- - -

1 Screw out the tire valve dust cap

2 Insert anti-dismantl gasket

3 Screw in the sensor cover to corresponding position.

4 Screw tight with nut wrench
5 Check with soap water

Reset
Press left and right button at the same time, all data will be reset to factory settings
1 Remove the original tire valve

2 Install tire sensor

3 Pump up tire
4 Install tire valve cap

5 Test Dynamic balancer

6 and adjust
3 Use wrench to open

Testing
2 Installation is completed when 4 wheels' temperature and pressure date has been detected.

If no shock been detected, Display gets into Auto Sleep Mode.
Producent:Shanghaiuxinmuyeyouxianggsi
Adres: Shuangchenglu 803nong11hao1602A-1609shi, baoshanqu, Szanghaj 200 000 CN.
Import do AUS: SIHAO PTY LTD. 1 ROKEVA STREETEASTWOOD NSW 2122 Australia
Import do USA: Sanven Technology Ltd. Suite 250, 9166 Anaheim Place, Rancho Cucamonga, CA 91730

YH CONSULTING SPOLKA Z OGRANICZONA, ODPOWIEDZIALNOSCIA.
C/O YH Consulting Limited Biuro 147, Dom Centuriona, London Road, Staines-upon-Thames, Surrey, TW18 4A

E-CrossStu GmbH
Mainzer Landstr.69, 60329 Frankfurt nad Menem.
VEVOR
TOUGH TOOLS, HALF PRICE
www.vevor.com/support
VEVOR
TOUGH TOOLS, HALF PRICE
Technische ondersteuning en e-garantiecertificaat www.vevor.com/support
TPMS
MODEL:C260
HULP NODIG? NEEM CONTACT MET ONS OP!
1 Stick to the place suitable for drivers.

2 When Display is low power, you can charge by Micro-USB (Andriod Type).

Cigarette Charger (Buy separately)
Alarm Instruction

When alarm beeps, the corresponding icon on display will flash.
1 Leakage Alarm

Slow Leak: Bi--Bi--Bi--
Fast Leak: Bi-Bi-Bi-

2 High/Low Pressure Alarm

Bi-Bi-Bi- - -
3 High Temperature Alarm

Bi-Bi-Bi- - -
Reset Press left and right button at the same time, all data will be reset to factory settings
4 Install tire valve cap

5 Test Dynamic balancer

6 and adjust

Kennisgeving en verklaring
Installer sensoren nadat de monitor is ingeschakeld
3 Use wrench to open

Testing
2 Installation is completed when 4 wheels' temperature and pressure date has been detected.
25 2.5 0:2.5 25 25 2.5 0:2.5 25
If no shock been detected, Display gets into Auto Sleep Mode.
Fabrikant: Shanghaiixinmuyeyouxianggsi
Adres: Shuangchenglu 803nong11hao1602A-1609shi, baoshanqu, shanghai 200.000 CN.
Geimporteerd aan AUS: SIHAO PTY LTD. 1 ROKEVA STREETEASTWOOD NSW 2122 Australia
Geimporteerd maar de VS: Sanven Technology Ltd. Suite 250, 9166 Anaheim Place, Rancho Cucamonga, CA 91730

YH CONSULTING LIMITED.
C/O YH Consulting Limited Kantoor 147,
Centurion House, London Road,
Staines-upon-Thames, Surrey, TW18 4AX

E-CrossStu GmbH
Mainzer Landstr.69,
60329 Frankfurt am Main.
VEVOR
TOUGH TOOLS, HALF PRICE
garantiecertificaat www.vevor.com/support
VEVOR
TOUGH TOOLS, HALF PRICE
Standardinstalling for tryck LO: 1.70Bar
Justerbart installningsomrade: 2.60~6.00 Bar

1 Stick to the place suitable for drivers.

2 When Display is low power, you can charge by Micro-USB (Andriod Type).

Cigarette Charger (Buy separately)
Alarm Instruction

When alarm beeps, the corresponding icon on display will flash.
1 Leakage Alarm

Slow Leak: Bi--Bi--Bi--
Fast Leak: Bi-Bi-Bi-

Kontrollera om det orsakas av spik eller aldrande dackventil.
2 High/Low Pressure Alarm

Bi-Bi-Bi- - -
3 High Temperature Alarm

Bi-Bi-Bi- - -
External sensorinstallation


Main Body

Hex Nuts

1 Screw out the tire valve dust cap

2 Insert anti-dismantl gasket

3 to corresponding position.

4 Screw tight with nut wrench
5 Check with soap water

Reset
Press left and right button at the same time, all data will be reset to factory settings
Intern sensorinstallation
1 Remove the original tire valve

2 Install tire sensor


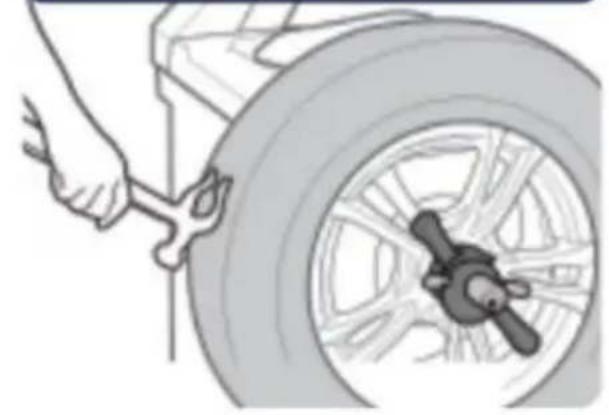
3 Use wrench to open

Testing
2 Installation is completed when 4 wheels' temperature and pressure date has been detected.
25 2.5 8:2.5 25 25 2.5 8:2.5 25
If no shock been detected, Display gets into Auto Sleep Mode.
Tillverkare: Shanghaiixinmuyeyouxiangongsi
Adress: Shuangchenglu 803nong11hao1602A-1609shi, baoshanqu, shanghai 200 000 CN.
Importerad till AUS: SIHAO PTY LTD. 1 ROKEVA STREETEASTWOOD NSW 2122 Australia
Importerad till USA: Sanven Technology Ltd. Suite 250, 9166 Anaheim Place, Rancho Cucamonga, CA 91730

YH CONSULTING LIMITED.
C/O YH Consulting Limited Office 147,
Centurion House, London Road,
Staines-upon-Thames, Surrey, TW18 4AX

E-CrossStu GmbH
Mainzer Landstr.69,
60329 Frankfurt am Main.
VEVOR
TOUGH TOOLS, HALF PRICE
www.vevor.com/support