
YY-F100-433 - Wireless communication system Vevor - Free user manual and instructions
Find the device manual for free YY-F100-433 Vevor in PDF.

| Product Type | Wireless communication system for restaurant (pager) |
| Brand | Vevor |
| Model | YY-F100-433 |
| Transmission frequency | 433 MHz |
| Modulation | KAM (FSK) |
| Transmitter power supply | 9V 1A AC adapter (included) |
| Receiver power supply | Built-in rechargeable Li-Ion battery |
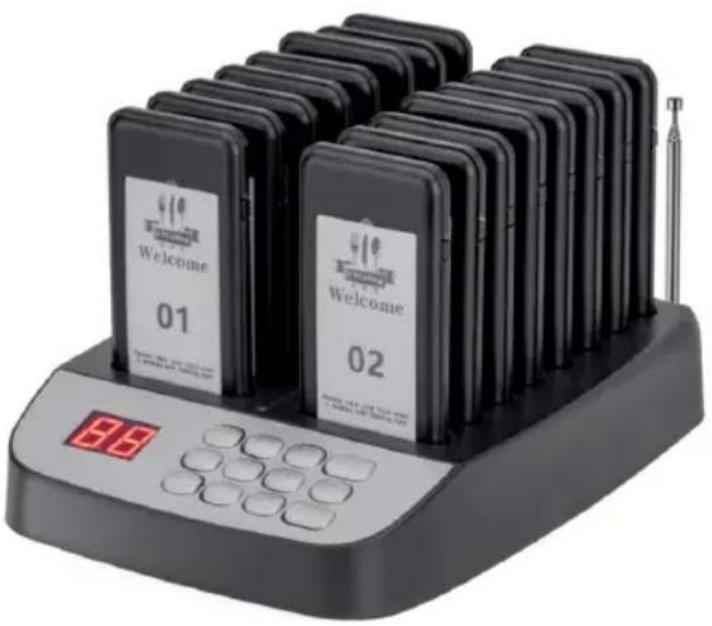
| Number of supported receivers | Up to 99 |
| Transmission range | Approximately 500 meters in open area |
| Call modes | Beep, vibration, flashing (combinable) |
| Adjustable vibration duration | 40 s, 8 s, 16 s, 24 s, 32 s or 40 s depending on LED |
| Digital display | Yes, on the transmitter |
| Dimensions (approx.) | Receiver: 10 × 5 × 2 cm; Transmitter: 20 × 15 × 5 cm |
| Weight (approx.) | Receiver: 100 g; Transmitter: 500 g |
| Material | ABS plastic |
| Care and cleaning | Wipe with a soft dry cloth. Do not immerse. Clean charging contacts regularly. |
| Safety | Do not disassemble, do not expose to water or heat, keep out of reach of children. |
| Spare parts and repairability | Additional receivers and transmitters available. AC adapter supplied. |
| Certifications | CE, UKCA, FCC (Part 15) |
| Intended use | Staff paging in restaurants, cafes, hotels |
Frequently Asked Questions - YY-F100-433 Vevor
User questions about YY-F100-433 Vevor
0 question about this device. Answer the ones you know or ask your own.
Ask a new question about this device
Download the instructions for your Wireless communication system in PDF format for free! Find your manual YY-F100-433 - Vevor and take your electronic device back in hand. On this page are published all the documents necessary for the use of your device. YY-F100-433 by Vevor.
USER MANUAL YY-F100-433 Vevor
Technical Support and E-Warranty Certificate www.vevor.com/support
RESTAURANT PAGER
MODEL:YY-F100-433
We continue to be committed to provide you tools with competitive price. "Save Half", "Half Price" or any other similar expressions used by us only represent the estimate of savings you might benefit from buying certain tools with us compared to top brands and does not necessarily mean to cover all categories of tools offered. Are kindly reminded to verify carefully when you are placing an order with us actually saving half in comparison with the top major brands.
MODEL: YY-F100-433
NEED HELP? CONTACT US!
Have product questions? Need technical support? Please feel fr contact us:
Technical Support and E-Warranty Certificate www.vevor.com/support
This is the original instruction, please read all manual instruction carefully before operating. VEVOR reserves a clear interpretation user manual. The appearance of the product shall be subject to product you received. Please forgive us that we won't inform you there are any technology or software updates on our product.
| Warning-To reduce the risk of injury, user must read instructi manual carefully. | |
| CORRECT DISPOSAL This product is subject to the provision of European Directive 2012/19/EC. The symbol showing a wheelie bin crossed through indicates that the product requires separate refuse collection in European Union. This applies to the product and all accessory marked with this symbol. Products marked as such may not discarded with normal domestic waste, but must be taken to collection point for recycling electrical and electronic devices | |
| To minimize hazards to health and the environment at the end product's life, laws dealing with Waste Electrical and Electr Equipment (WEEE) and The Waste Battery Directive require you dispose of this product at a suitable collection facility where it sent in order to remove the batteries and for appropriate recycling.Please contact your local authorities for more details recycling and safe disposal of these in your area. | |
| Compliance is a EC & UK security certification. |

Move away from any potential source of ignition immed the battery leaks or emits an unusual odor. When you unusual smell, heat, discoloration, deformation, or any of unusual situations in the process of using, charging, or batteries, you should immediately remove them from the or charger and stop using them.
IMPORTANT SAFEGUARDS
Thank you for using this product. In order to make sure that you can operate the machine correctly, read this instruction carefully before operation and keep it properly for future reference. Please be sure to the precautions and safety rules on this page to ensure your safe use. This manual will outline safety warnings and precautions, operating, maintenance and cleaning. The warnings and instructions reviewed in manual cannot cover all possible conditions and situations that may o Caution and common sense are not built into this product, since we that the uses will comply with these codes. If you have any problem please call us. Do not try to fix the problems yourself, or it will cause or property damage.
Please read ALL the instructions before using your machine.
- If the battery is low, please charge it in time.
- Do not let children, minors, and pets get close to or touch the n
- Do not immerse the appliance in water or any other liquid.
- Do not disassemble the product.
- Using any accessories or attachments that are not provided or recommended by the manufacturer may cause injury.
- If the machine is not to be used for a long period of time, remove pagers. Do not use other adapters than the included AC adapter.
-
Do not leave the product hanging over the edge of table or court it come into contact with any hot surfaces.
-
Do not place the product on or near hot air, electric burners or I
- Do not apply this unit to any other purposes than the indicated u
- KEEP IT OUT OF CHILDREN'S REACH.
- DO NOT CLEAN IT WITH ANY ABRASIVE MATERIAL.
- Please clean it regularly, at least once a month.
- This appliance is not intended for use by persons (including children with educated physical, sensory or mental capabilities, or lack of experience or knowledge, unless they have been given supervision or instruction concerning the use of the appliance by a person responsible for their
FCC INFORMATION
CAUTION: Changes or modifications not expressly approved by the par responsible for compliance could void the user's authority to operate t equipment!
This device complies with Part 15 of the FCC Rules. Operation is such that the following two conditions:
1) This product may cause harmful interference.
2) This product must accept any interference received, including interference that may cause undesired operation.
WARNING: Changes or modifications to this product not expressly approved by the party.responsible for compliance could void the user's authority to operate the product.
Note: This product has been tested and found to comply with the IIR a Class B digital device pursuant to Part 15 of the FCC Rules, The are designed to provide reasonable protection against harmful interferer in a residential installation.
This product generates, uses and can radiate radio frequency energy, if not installed and used in accordance with the instructions, may cause harmful interference to radio communications. However, there is no guarantee that interference will not occur in a particular installation. If product does cause harmful interference to radio or television reception, which can be determined by turning the product off and on, user is encouraged to try to correct the interference by one or more following measures.
- Reorient or relocate the receiving antenna.
- Increase the distance between the product and receiver.
- Connect the product to an outlet on a circuit different from that to the receiver is connected.
· Consult the dealer or an experienced radio/TV technician for assista
PRODUCT PARAMETERS
| Model | YY-F100-433 |
| Working frequency | 433MHZ(ASK) |
| Modulation | OOK AM |
| Power adapter In put | AC100-240V 50/60Hz |
| Power adapter Out Pu | DC9V 1A |
| Pagers | 16PCS+ 1PCS (Free gift) |
BEFORE USING
- Before using the appliance for the first time, peel off any promotic packaging materials and check that the product is clean and dust-free
- Please dispose of all plastic bags carefully and keep them away from children and pets.
- Check all components provided according to the list in this manual, sure you have all of the parts listed.
ABOUT SIGNAL INTERFERENCE
Each transmitter is given a unique host number when produced, so e nearby shops use the same product, it won't cause signal interference when transmitters from close stores share the same host number, sign interference may occur. In this case, changing the host number of eit transmitter can help, but all its receivers should be re-registered to the transmitter.
EXTENSION STATEMENT
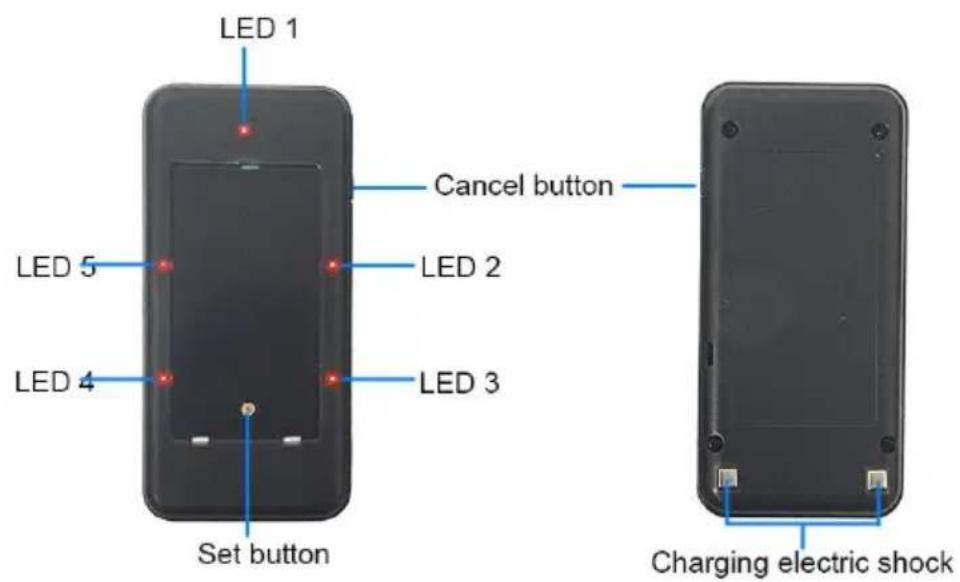
CHARGING THE RECEIVER
- Insert the receiver down into the charging slot with its charging cc facing backward.
- After the receiver is inserted, LED 1 lights up and the receiver st charging. (When plugged in, the receiver is automatically switched on.)
REGISTERING THE RECEIVER ID
- Remove the pager number holder and the pager ID card.
- Hold the CANCEL button and press the setting button (the yellow button) until LED 2 and 3 light up. (When LED 2 and 3 are on, it
the receiver has entered standby mode.)
Note:
The setting button can be difficult to press with fingers alone. To pre button, you can use a small object such as a paperclip or a ballpoint tip.
- Enter the ID number (1~98) through the keypad. (You can't register
- Press the CALL button after entering the number, and the receiver beep, flash and vibrate, which means that the pager is successfully programmed with the desired ID number. And then press the CANCEL button to stop it from beeping, flashing and vibrating.
- After the programming, LED 2 and LED 3 go out, and LED 1 be flashing. (When LED 1 flashes, it means that the receiver has entered standby mode.)
- Place the pager ID card and its holder back onto the receiver.
SETTING THE CALLING MODE OF THE RECEIVER
- Remove the pager number holder and the pager ID card.
- Press the setting button to enter the setting mode.
- Press the setting button until the number of LED lights that are c accordance with the desired calling mode. (Please refer to the followir chart.)
- Choose any calling mode and press the CANCEL button. (If the CANCEL button is not pressed, the calling mode setting will be automatically completed after a few seconds.)
- Place the pager ID card and its holder back onto the receiver.
| The number of powered-on LED light | 0 | 1 | 2 | 3 | 4 | 5 |
| Paging duration | 40s | 8s | 16s | 24s | 32s | 40s |
| Beep | NO | YES | ||||
| Vibrate | YES | |||||
| Flash | YES | |||||
OPERATING METHODS
1. Giving pagers
When the pager is removed from the charging base, all LED will go enter receiving mode. Please confirm the pager ID and give it to the Note:
- Pagers can go into service after 40 minutes of charging. (A full call takes 4 hours.)
- If the battery of the pager is low, it won't respond to the call of transmitter.
- Since the pager is unable to show its remaining battery level, please a charged pager to the guest.
2. Calling pagers
- Input the pager ID of the receiver to be called on the keypad and the CALL button.
- The call can be stopped by pressing the CANCEL button on the
- Retrieving pagers and putting them back onto the charging base
The beep will stop after the pager is plugged back to the transmitter
Note: - The receiver can not respond to the call when charging.
3. Turn On/Off
- Put the extension back on the charging base, Type 99 and press the CALL button to turn it off.
- Put the extension back on the charging base and replug it into the supply to turn it on.
ADDING ADDITIONAL RECEIVERS
To add additional receivers, it is necessary to purchase extra receiver transmitters. If you need to use more than 10 receivers, or if you w use two or more transmitters, please follow the procedures below to them. For example, add another transmitter (Transmitter B) to the transmitter that is already in service (Transmitter A).
- Confirming the host number of Transmitter A
a. Keep pressing the “Delete” button right after connecting Transmitter A
electricity, until the host number appears on the number display. (Gen speaking, the host number will appear after pressing the "Delete" button 3~5 times. And note that if Transmitter A has been connected to the supply for some time, the host number will fail to appear.)
b.The display screen will show the host number of Transmitter A. Ple write it down.
Note:
- Please be careful not to change the host number. Otherwise, all receivers need to be re-registered to the transmitter.
- If the host number is accidentally changed, restoring it back to the original one can re-register all receivers to the transmitter.
c. Press the "Call" button to return to the standby screen(--).
- Changing the host number of Transmitter B
a. Keep pressing the "Delete" button right after connecting Transmitter / the power supply, until the host number appears on the number display. b.Input the host number of Transmitter A and press the "Call" button.
Registering the pager ID of additional receivers
Please refer to the "Registering the receiver ID".
TROUBLESHOOTING
Attention: Please don't disassemble or repair the device if you are a qualified technician.
| Scenarios | Problems | Solutions |
| Having pressed the keypad area, the transmitter has no response OR the number display shows nothing | The AC adapter is plugged. | Please plug the AC adapter the socket. |
| The power connector is not connected to the transmitter. | Please connect the power connector to the transmitter. | |
| The power cord of the AC adapter is broken. | Please inquire customer service staff for assistance. | |
| The keypad area is stained. | Please wipe off the stain with soft dry cloth. | |
| The receiver can't | The receiver has a | Please insert it into the |
| respond to the call. | low battery level. | transmitter for charging. (40 minutes of charging can enable it to be ready for use.) |
| The receiver is out its working distance. | The receiver has a reception range of approximately 500 meters in an open area. | |
| Walls or metal (like cars) can block the signal sent from the transmitter to the receiver. | The thickness and material of walls may weaken the signal. Also, in an enclosed spaces made of metal, the radio wall may have difficulty reaching the receiver. Both of the circumstances may impair the working distance of the receiver. Please reduce your distance from the transmitter. (It may possible to receive signals by opening the car window.) | |
| The host number of the transmitter is changed. | If the receivers have been paired with the transmitter, changing the host number of transmitter will disconnect them from each other. Please re-register all receivers to the transmitter, or restore the host number. | |
| The receivers can't be charged | The charging contacts are dirty. | Please wipe off the dirt with soft dry cloth. |
| There are foreign objects in the charging slot. | Please clean out the charging slot. | |
| The receivers can vibrate and flash, but | The calling mode is set at “No Sound | Please alter the calling mode. |
| fail to beep. | Mode". |
CLEANING AND STORAGE
- If the machine is not to be used for a long period of time, Remove clean and cover it and store it in a dry and safe place.
- Wipe with a soft, dry cloth. Be sure to keep the product dry
- Please put the pager and host together.
Manufacturer: Shanghaiuxinmuyeyouxianggsi
Address: Shuangchenglu 803nong11hao1602A-1609shi, baoshanqu, shanghai 200000 CN.
Imported to AUS: SIHAO PTY LTD. 1 ROKEVA STREETEASTWOOD NSW 2122 Australia
Imported to USA: Sanven Technology Ltd. Suite 250, 9166 Anaheim Place, Rancho Cucamonga, CA 91730

E-CrossStu GmbH
Mainzer Landstr.69, 60329 Frankfurt am Main.

YH CONSULTING LIMITED.
C/O YH Consulting Limited Office 147, Centurion House, London Road, Staines-upon-Thames, Surrey, TW18 4AX
VEVOR
TOUGH TOOLS, HALF PRICE
TechnicalSupportandE-WarrantyCertificate
www.vevor.com/support
VEVOR®
TOUGH TOOLS, HALF PRICE
London Road, Staines-upon-Thames, Surrey, TW18 4
ACHSE
VEVOR
TOUGH TOOLS, HALF PRICE
www.vevor.com/support
Rancho Cucamonga, CA 91 730

E-CrossStu GmbH
Mainzer Landstr.69, 6 0329 Frankfurt am Main.

YHCONSULTING LIMITED.
C/OYHConsulting Limited Off ice 147, Centurion Hus, London Road, Staines-upon-Thames, Surrey, TW18 4 AXE
VEVOR®
TOUGH TOOLS, HALF PRICE
www.vevor.com/support
VEVOR®
TOUGH TOOLS, HALF PRICE
www.vevor.com/support
www.vevor.com/support
www.vevor.com/support
C/OYHConsulting Limited Biuro 147, Centurion Dom, London Road, Staines-upon-Thames, Surrey, TW18 4 OSI
VEVOR®
TOUGH TOOLS, HALF PRICE
www.vevor.com/support
VEVOR®
TOUGH TOOLS, HALF PRICE
www.vevor.com/support
RESTAURANT PAGINA
MODEL:JJ-F100-433
BEHOEFTE Hulp? CONTACT ONS!
www.vevor.com/support
certificaat www.vevor.com/support
VEVOR
TOUGH TOOLS, HALF PRICE
www.vevor.com/support
RESTAURANTE BUSCAPPERSONAS
MODELO: YY-F100-433
www.vevor.com/support
www.vevor.com/support
RISTORANTE CERCAPERSONE
MODELLO: YY-F100-433
www.vevor.com/support
Importato in AUS: SIHAO PTY LTD. 1 ROKEVA STRADAESTWOOD
Nuovo Galles del Sud 2122 Australia
elettronica www.vevor.com/support


