T55K - Fridge Vevor - Free user manual and instructions
Find the device manual for free T55K Vevor in PDF.


User questions about T55K Vevor
0 question about this device. Answer the ones you know or ask your own.
Ask a new question about this device
Download the instructions for your Fridge in PDF format for free! Find your manual T55K - Vevor and take your electronic device back in hand. On this page are published all the documents necessary for the use of your device. T55K by Vevor.
USER MANUAL T55K Vevor
Technical Support and E-Warranty Certificate www.vevor.com/support
CAR REFRIGERATOR
USER MANUAL
We continue to be committed to provide you tools with competitive price. "Save Half", "Half Price" or any other similar expressions used by us only represent of savings you might benefit from buying certain tools with us compared top brands and doses not necessarily mean to cover all categories of tools offered are kindly reminded to verify carefully when you are placing an order with us actually saving half in comparison with the top major brands.
T35K T45K T55K
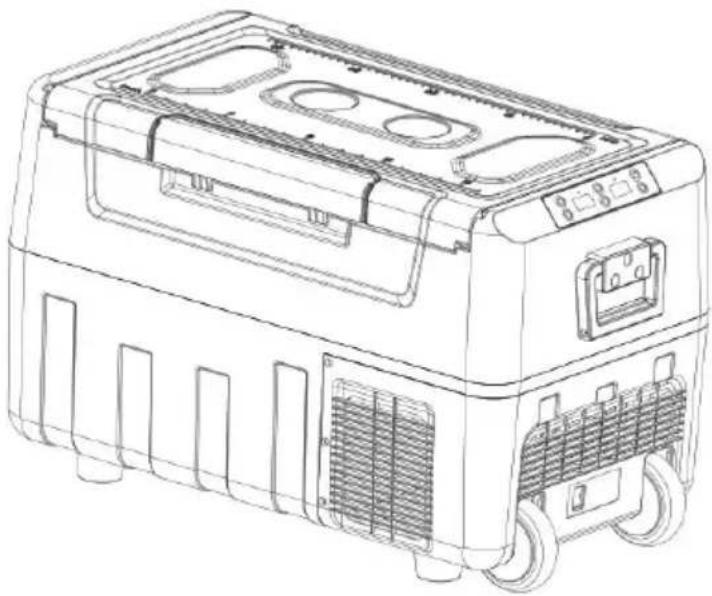
natural_image
Line drawing of a portable electronic device with cooling fans and ventilation slots (no text or symbols)NEED HELP? CONTACT US!
Have product questions? Need technical support? Please feel fr contact us:
CustomerService@vevor.com
This is the original instruction, please read all manual instruction carefully before operating. VEVOR reserves a clear interpretation user manual. The appearance of the product shall be subject to product you received. Please forgive us that we won't inform your use there are any technology or software updates on our product
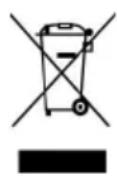
This product is subject to the provision of european Directive 2012/19/EU. The symbol showing a wheelie bin crossed through indicates that the product requires separate refuse collection in European Union. This applies to the product and all accesso marked with this symbol. Products marked as such may not discarded with normal domestic waste, but must be taken to acollection point for recycling electrical and electronic devices.
Attentions
Before using the refrigerator, please read this manual carefully and keep it properly.
- Before using the refrigerator, clean it inside and outside with a damp cloth.
- Do not fill the refrigerator with corrosive liquids. Do not directly pour liquids the refrigerator.
- When the refrigerator is not used for a long time, please disconnect the supply and keep it dry.
- Regularly clean the inner chamber to prevent odor and bacteria and ensure food safety.
- This manual applies to T35K/T45K /T55K refrigerators (American and Europe markets).
Connect the Power Supply
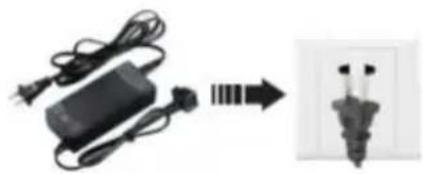
- Find the DC power cord in the kit. Connect DC plug to the power outlet
car refrigerator.
- Well place the refrigerators in the car (back-up, seats....).
- Lay out power cords per your car's interior space. Then, insert the cigarette lighter plug (one side of the power cord) into the car cigarette lighter hole.
- Press "ON/OFF" for 3 seconds, and the car refrigerator can be turned on.
natural_image
Electric charger connected to a wall-mounted plug, showing wiring and power input (no text or symbols visible)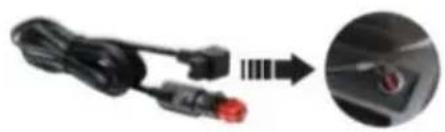
natural_image
Close-up of a black cable with red connectors and a magnified inset showing a close-up of a red circular component (no text or symbols visible)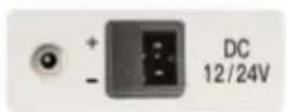
Adapter Connect the car cigarette lighter Connect the car refrigerator
The product can be connected to more than one power supply.
The onboard refrigerator is directly connected to the DC12V/24V DC power supply.
The car refrigerator equipped with an AC100-240V AC adapter can be used home with a voltage of AC100-240V.
Instructions
Car battery protection voltage reference:
Built-in ECO electronic control module can automatically monitor the vehicle battery voltage. Before the power consumption affects the standard ignition of vehicle, the onboard refrigerator will automatically disconnect the power supply ensure that the vehicle battery power will not be too low to affect the stand ignition of the vehicle.
| Battery Voltage | Factory default voltage protection value H | ||
| H (high) level | M (medium) leve | L (low) level | |
| DC12V | DC11.3V OFF | DC10.1V OFF | DC9.6V OFF |
| DC12.5V ON | DC11.4V ON | DC10.9V ON | |
| DC24V | DC24.6V OFFDC26.0V ON | DC22.3V OFFDC23.7V ON | DC21.3V OFFDC22.7V ON |
Note: When the power supply is connected and the refrigerator is turned on, disconnecting or starting refers to disconnecting or starting the compressor.
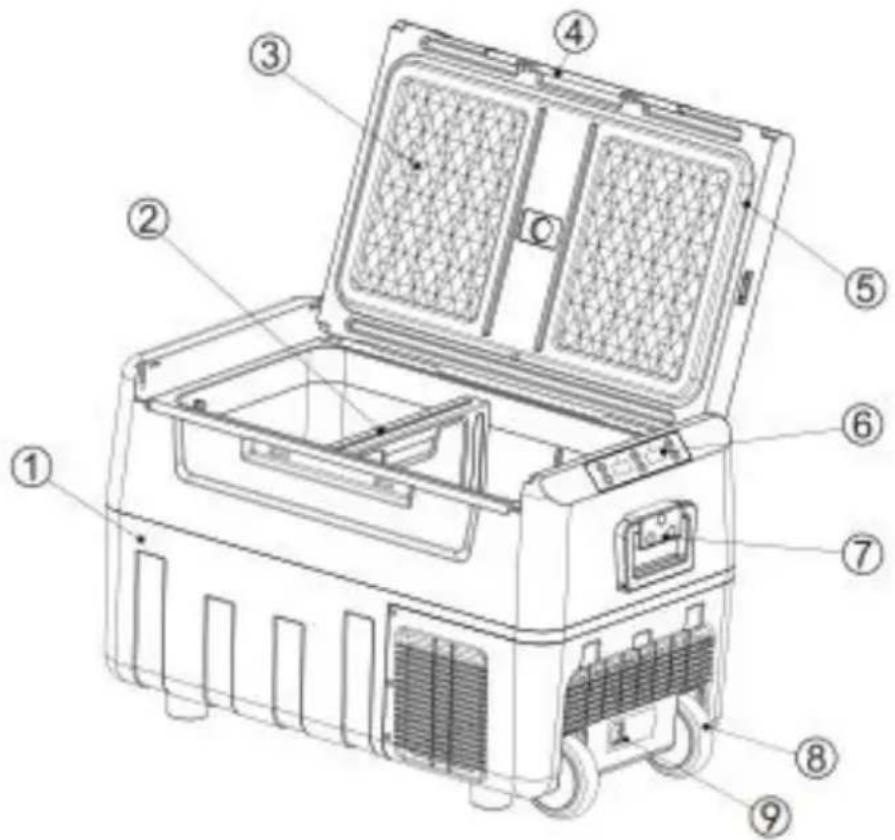
Component Diagram
- Cabinet 2. Classified plate
- Case Cover 4. Door buckle
- Sealing Strip 6. Control panel
- Handle ( optional ) 8. Wheel ( optional )
- Power Interface
text_image
Technical diagram of a portable electronic device with numbered components for identification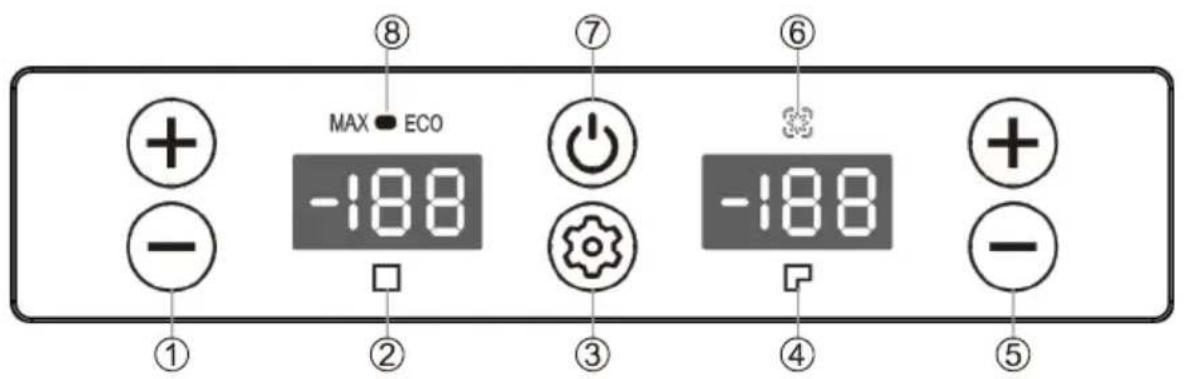
text_image
MAX ECO -188 ⑧ ⑦ ⑥ -188 ① ② ③ ④ ⑤①Setting for large compartment large compartment ③Setting button ④Small compartment ⑤Setting for small compartment ⑥Cooling indicator ⑦ON/OFF button ⑧Max/Eco
△Function Introduction
After power-on, the digital display screen will be fully lit for 1 second and displayed normally. The default is the last memory function. The display screen temperature figure will be permanently lit in the middle in standby mode.
1. Open and Close
After the power is turned on, the refrigerator will be in standby mode.
Now, press the ON/OFF button to open the refrigerator. After the refrigerator opened, the display will show the current temperature of the storage room. It start running.
Warning: The displayed temperature is only the temperature around the senso. The temperature of different points in the storage room is different.
Therefore, this is normal if the displayed temperature differs from the measure temperature.
Press the ON/OFF button when the refrigerator is running, and the refrigerator return to standby.
2. Temperature Setting
1) Switch on the fridge, press to raise the set temperature and reduce the storage compartment's temperature. Each press will change by 1 °C, and the maximum can be set to 10 °C, and the minimum can be set to -20 °C. Please note the clapboard shall be located in the correct position before the set temperature of the large compartment
2) If the clapboard is removed from the compartment, the temperature display of the compartment will be off. In this condition, there is only one storage compartment.
3) The temperature display will flash for 3 seconds and then fix the setting after adj the temperature and no more action on buttons. The setting temperature will be mem and the display will turn back to show the actual temperature of the storage compa
4) The default value for an initial startup is 0 °C/32 °F.
3.MAX / ECO Mode Conversion
Directly press key to switch to MAX mode or ECO mode.
MAX running mode: the fridge will work hard to reduce temperature fast.
ECO running model: the fridge will work longer to reduce the temperature to save er
Press and hold the "+" key and the setting key on the left (large box) for over 3 s switch.
- Battery Protection Levels: H1 (High) N2 (Low) L3 (Medium)
Press key for 3s to enter the battery protection setting. Press the key again to switch H1 N2 L3 levels in turns.
If no operations were detected, the set level will flash for 3s, then exit and save the current setting.
Model Parameter Table:
| Model No. | Capacity | Voltage | AC Power | DC Power | TemperatureAdjustable | Plug type |
| T35K | 35L | AC100~24 0V(50/60Hz)DC12V/24V | Cooling: 60W | Cooling60W | 50~-4°F | USApugDCplug |
| T35K | 35L | AC100~240V(50/60Hz)DC 12V/24V | Cooling: 60W | Cooling60W | 10~-20°C | EUplugDCplug |
| T45K | 45L | AC100~240V(50/60Hz)DC 12V/24V | Cooling: 60W | Cooling:60W | 50~-4°F | USApugDCplug |
| T45K | 45L | AC100~240V(50/60Hz)DC 12V/24V | Cooling: 60W | Cooling:60W | 10~-20°C | EUpugDCplug |
| T55K | 55L | AC100~240V(50/60Hz)DC 12V/24V | Cooling: 60W | Cooling:60W | 50~-4°F | USApugDCplug |
| T55K | 55L | AC100~240V(50/60Hz)DC 12V/24V | Cooling: 60W | Cooling:60W | 10~-20°C | EUpugDCplug |
Notice for Temperature Setting
Insert the clapboard in the correct position of the storage compartment, and switch on the fridge. The display will show the temperature of two storage compartments. When adjusting temperature, setting the temperature of the small compartment(TS) is not able to be higher than setting the temperature of the compartment (TL).
TS ≤TL
For example, if the set temperature of the small compartment (TS) to -10^ (°F), the range of setting temperature of the large compartment (TL) is from 14^ to 10^ (50°F). Tips: use a large compartment for fresh food and a small compartment for frozen food.
Power-off Memory Function
There is a power-off memory function for car refrigerators. When the power i the working state (On/Off status, working mode, etc.) before power-off can be automatically recovered at the next startup; no need to set it again.
ECO: Energy-saving coolingMAX: Powerful cooling
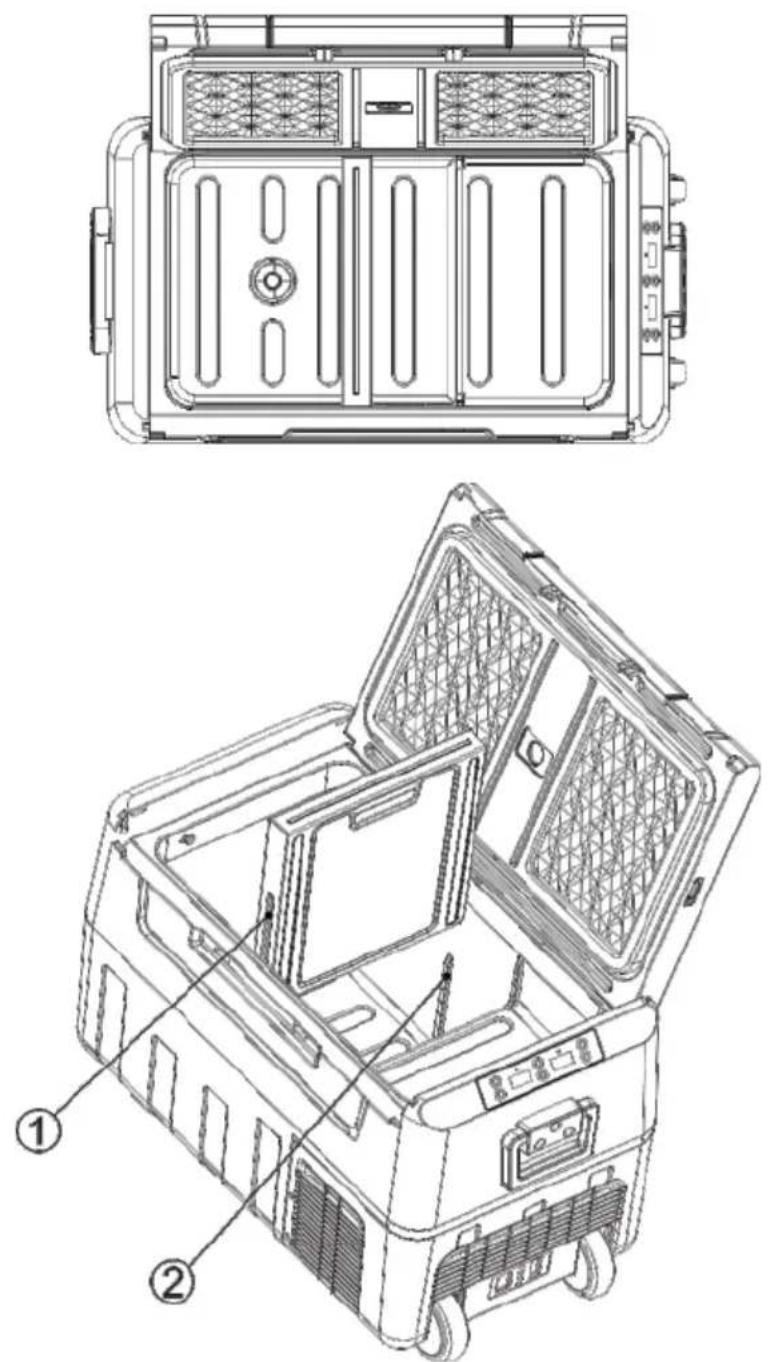
Use Clapboard
-
Align with two rails on inner liner.
-
Vertically push clapboard to bottom of liner.
natural_image
Technical line drawing of a multi-compartment electronic device with internal compartments and housing (no text or symbols)Simple Fault Analysis
Advice: If abnormal situations cannot be resolved through a simple fault analysis please get in touch with professional customer service for assistance.
I. Car Refrigerator Does Not Work
- Check if the power is connected correctly. (check If the plug is loosened or positive and negative poles are reversed).
- Check if the power switch on the operation panel is turned on.
- Check if the cooling ventilation is normal.
- Check if the fuse is blown.
II. Poor Cooling Performance
- Check if the lid is closed correctly.
- Check if the door seal is damaged or deformed.
- Check if there is poor ventilation around the fridges.
- Check if the temperature is set correctly.
△Definition Of Error Codes On The Display
| Error Code | Error Type |
| E1 | Low Input Voltage |
| E2 | Fan Fault |
| E3 | Compressor start failed |
| E4 | Low Rotational Speed of Compressor |
| E5 | Controller module temperature too high |
| E6 | Open or Short Circuit of NTC |
III. Abnormal Noise
- The car refrigerator needs to be placed smoothly.
- Touch a wall or other object.
3.There are parts loose or falling off inside.
IV. Condensation on Refrigerator Surface
When the ambient air humidity exceeds 75%, slight condensation will occur of the box surface, which is normal.
Failures and Solutions
△E1: Low Input Voltage
Failure 1: Insert the refrigerator power cord into the cigarette lighter before the starts. Solution 1: Wait a while to connect the car after it starts.
Failure 2: The input voltage of the adapter is too low.
Solution 2: Adjust the battery protection level to middle-voltage or low-voltage. doesn't work, please replace a new adapter.
△E2: Fan Fault
Please replace a new fan when you identify there is a fan malfunction.
△E3: Input Voltage Fault Due to Compressor Frequently Start
When the refrigerator is used in the car, and E3 appears, Please shut it do minutes and restart it.
If it doesn't work, that can be identified to be EI fault; please solve it accor the solution of EI.
When the refrigerator is connecting with the adapter and E3 appearing
① Please adjust the battery protection level to the middle or low level.
② If it doesn't work, please replace a new adapter.
△E4: Low Rotational Speed of Compressor
Please adjust the input voltage and repower it.
△E5: Overheating of Controller Chip
Please power off for 5 minutes and check if the lousy ventilation around the
compressor causes the overheating.
Use Suggestions
- If equipped with a backup battery, you can maintain any temperature you under any circumstances without worries.
- When placing ice cream, please adjust the temperature to the lowest; it is powered on for a long time.
- Prevent the health problems of drinking bottled water caused by high temperatures.
- Frozen food, rare seafood, and vehicle-mounted refrigerators let frozen fresh food accompany the journey.
- Healthcare products, insulin, and imported drugs need to be refrigerated, a the precise temperature control of onboard refrigerators will escort health along the way.
- The tea leaves are effectively kept fresh in the car refrigerator, and you drink fresh and delicious tea anytime during the self-driving tour.
- The best storage temperature of red wine is 10 ^ - 18 ^ (50 - 64.4 ^ ). The precise temperature control of the car refrigerator can effectively ensure the storage temperature of red wine.
- The storage time of high-grade fruit in the car at high summer temperature be at least 2 hours. The storage time is shorter even if the air conditioner on. Using a car refrigerator can effectively preserve high-grade fruit.
- The coating of high-grade sunglasses will fall off under the high temperature summer. The car refrigerator is an ideal place to place it.
- High-grade cosmetics quickly deteriorate under high temperatures in the car. Carry cosmetics with the car; the car refrigerator will be your better choice.
Safety Precautions
(1) Ensure that the power voltage connected to the onboard refrigerator is cc
at any time (The parameters are labeled with the approved voltage parameter the onboard refrigerator).
(2) Do not pour liquid directly into the car refrigerator.
(3) Modifying the refrigerator without permission is forbidden to avoid danger.
(4) This appliance is not intended for use by persons (including children) with reduced physical, sensory, or mental capabilities or lack of experience and knowledge unless they have been given supervision or instruction concerning the use of the appliance by a person responsible for their safety.
(5) Children should be supervised to avoid playing with the appliance.
(6) This appliance can be used by children aged from 8 years and above a persons with reduced physical, sensory or mental capabilities or lack of experience and knowledge if they have been given supervision or instruction concerning use of the appliance in a safe way and understand the hazards involved. Children shall not play with the appliance. Cleaning and user maintenance shall not be made by children without supervision.
(7) To avoid a hazard due to the instability of the appliance, it must be fixed the instructions.
(8) Do not store explosive substances such as aerosol cans with a flammable propellant in this appliance.
WARNING: This appliance contains flammable foaming agent cyclopentane:
1) Please avoid contact fire when you transport and use it.
2) Please ask a professional for servicing when the machine breaks down.
3) Please send it to your local appointed disposal station when you discard it.

WARNING: During use, service, and disposal of the appliance, pleas
pay attention to a symbol similar to the left side, which is located on the re appliance (rear panel or compressor) and with yellow or orange color. It's a fire warning symbol. There are flammable materials in refrigerant pipes and compressors. Please be far away fire source during use, service, and disposa
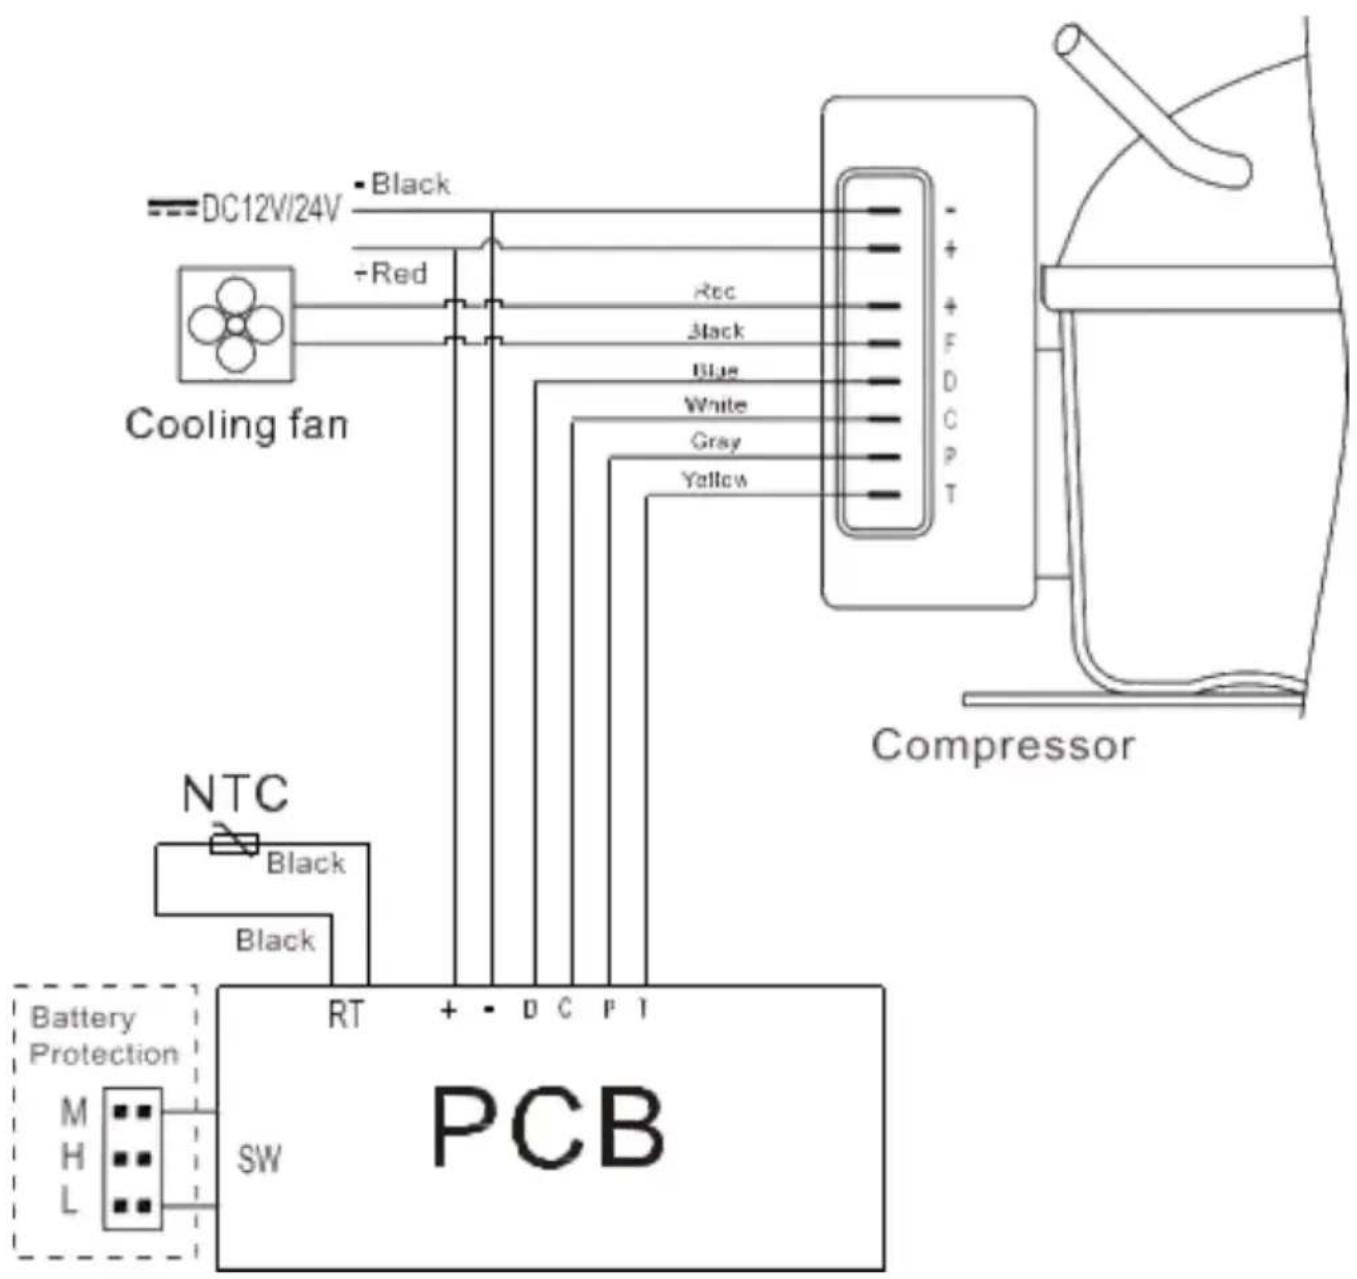
flowchart
graph TD
    A["Cooling fan"] -->|DC12V/24V - Black| B["Compressor"]
    A -->|Red| B
    C["NTC"] -->|Black| D["Switch"]
    E["Battery Protection"] --> F["SW"]
    G["+ Red"] --> H["+ Black"]
    I["Rec"] --> J["Blue"]
    K["Black"] --> L["White"]
    M["Gray"] --> N["Yellow"]
    O["+ F"] --> P["+ D"]
    Q["+ C"] --> R["+ P"]
    S["T"] --> T["+ T"]
VEVOR®
TOUGH TOOLS, HALF PRICE
Technical Support and E-Warranty Certificate
https://www.vevor.com/support
VEVOR®
TOUGH TOOLS, HALF PRICE
natural_image
Line drawing of a portable industrial device with cooling fans and ventilation slots (no text or symbols)text_image
Technical diagram of a portable electronic device with numbered components for identification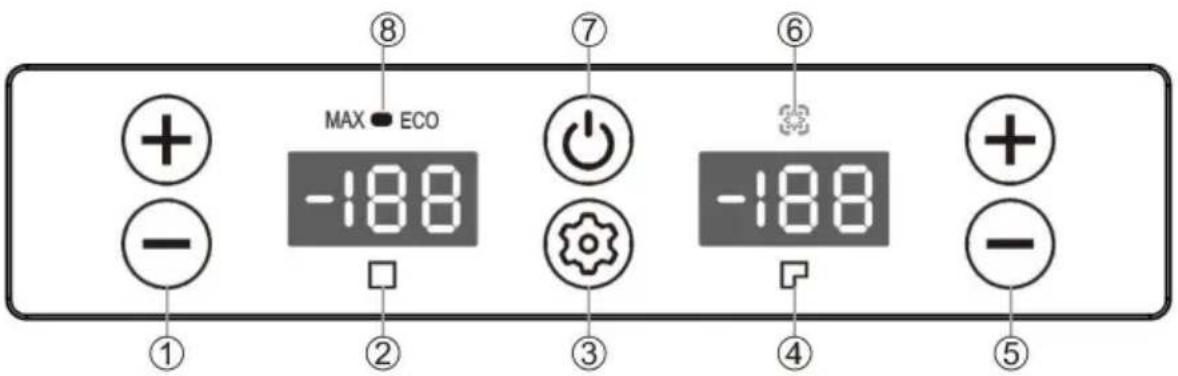
text_image
MAX ECO -188 ① ② ③ ④ ⑤ ⑥ ⑦ ⑧text_image
Technical diagram of a portable electronic device with labeled components, showing front and side views with numbered parts.natural_image
Line drawing of a portable electronic device with cooling fans and ventilation slots (no text or symbols)Kundenservice@vevor.com
natural_image
Electric charger connected to a wall-mounted plug, showing wiring and power connection (no text or symbols visible)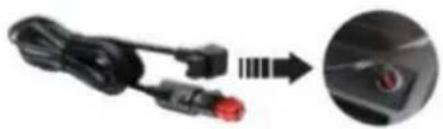
natural_image
Close-up of a black cable with red connectors and a magnified inset showing a close-up of a red circular button (no text or symbols visible)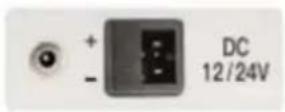
Adapter
text_image
Technical diagram of a portable electronic device with numbered components for identification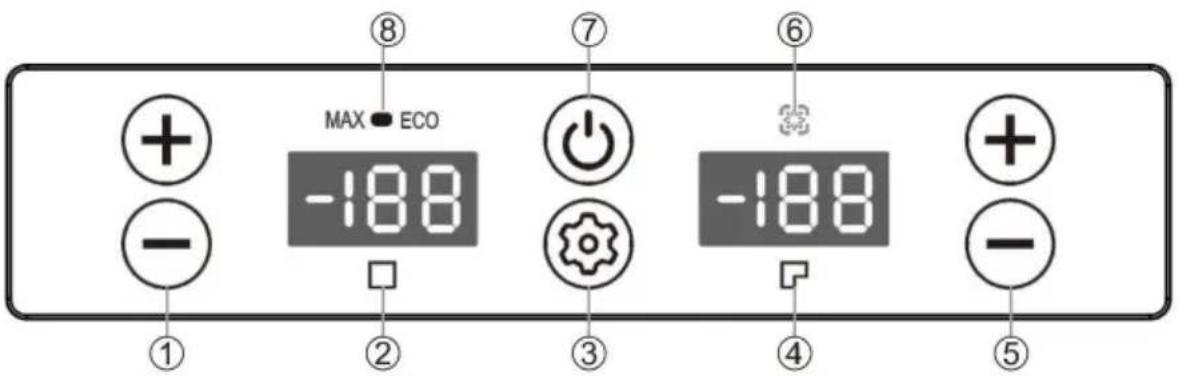
text_image
MAX ECO -188 ① ② ③ ④ ⑤ ⑥ -188natural_image
Technical line drawing of a rectangular electronic device with internal compartments and ventilation grilles (no text or symbols)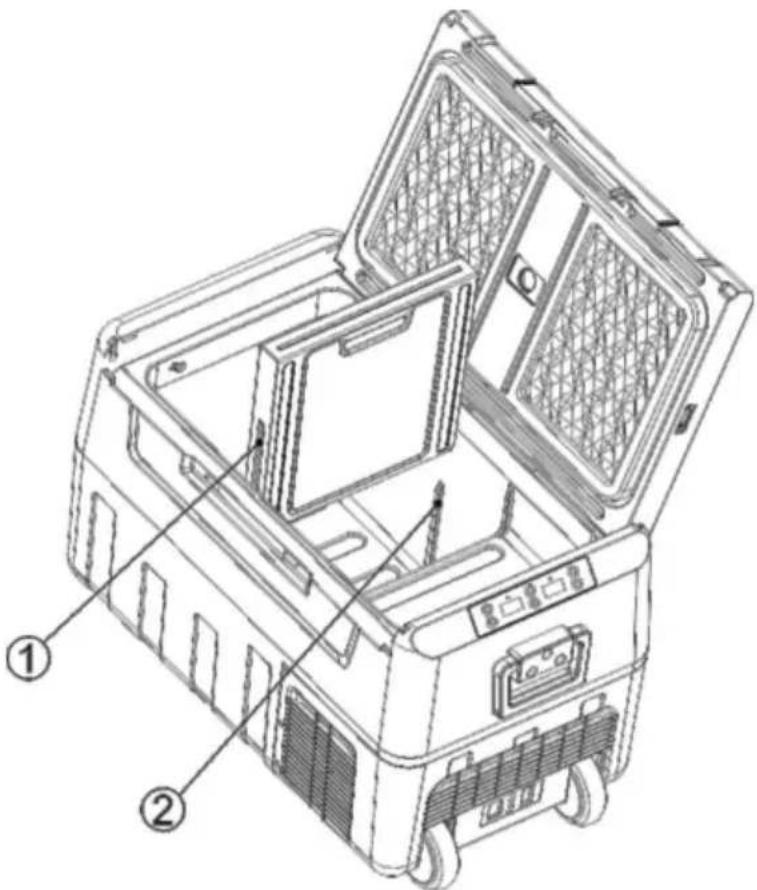
text_image
Technical diagram of a portable electronic device with labeled parts, showing internal compartments and housing structure.https://www.vevor.com/support
VEVOR®
TOUGH TOOLS, HALF PRICE
natural_image
Line drawing of a portable electronic device with cooling fans and ventilation slots (no text or symbols)natural_image
Electric charger connected to a wall-mounted plug, showing wiring and power connection (no text or symbols visible)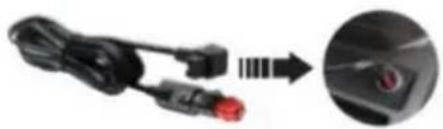
natural_image
Close-up of a black cable with red connectors and a magnified inset showing a close-up of a red circular button (no text or symbols visible)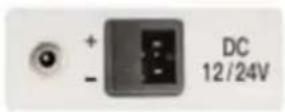
Adattatore
text_image
Technical diagram of a portable electronic device with numbered components for identification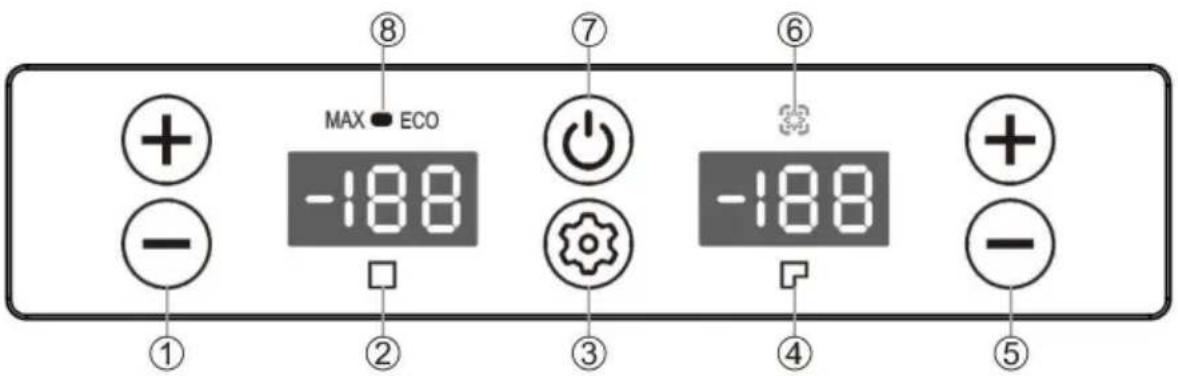
text_image
MAX ECO -188 ⑧ ⑦ ⑥ -188 ① ② ③ ④ ⑤Machine Translated by Google
text_image
Technical diagram of a portable electronic device with labeled components and internal compartmentselettronica https://www.vevor.com/support
VEVOR®
TOUGH TOOLS, HALF PRICE
natural_image
Line drawing of a portable electronic device with cooling fans and ventilation slots (no text or symbols)text_image
Technical diagram of a portable electronic device with numbered components for identification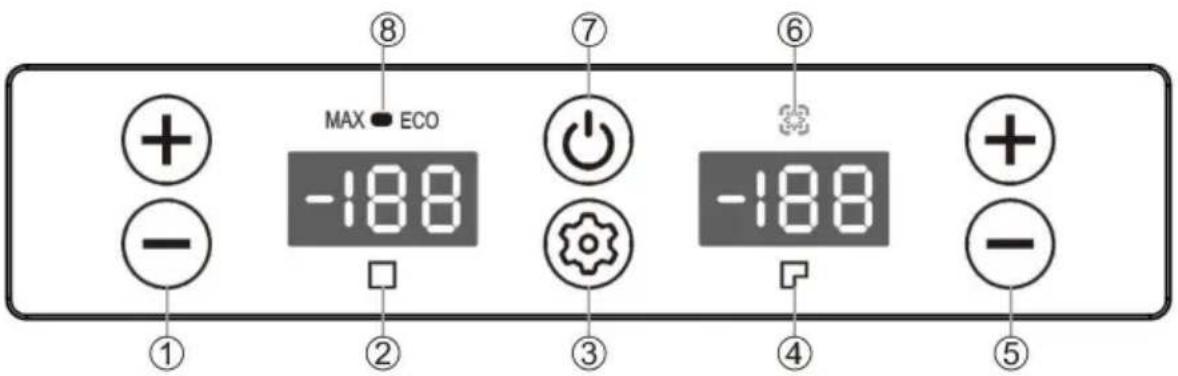
text_image
MAX ECO -188 ⑧ ⑦ ⑥ -188 ① ② ③ ④ ⑤text_image
Technical diagram of a portable electronic device with labeled components and internal compartmentsnatural_image
Line drawing of a portable electronic device with cooling fans and ventilation slots (no text or symbols)POTRZEBUJESZ POMOCY? SKONTAKTUJ SIĘ Z NAMI!
natural_image
Electric charger connected to a plug, shown in a simple line drawing (no text or symbols)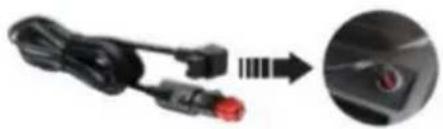
natural_image
Close-up of a black cable with red connectors and a magnified inset showing a close-up of a red button (no text or symbols visible)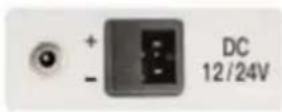
Adapter
text_image
Technical diagram of a portable electronic device with numbered components for identification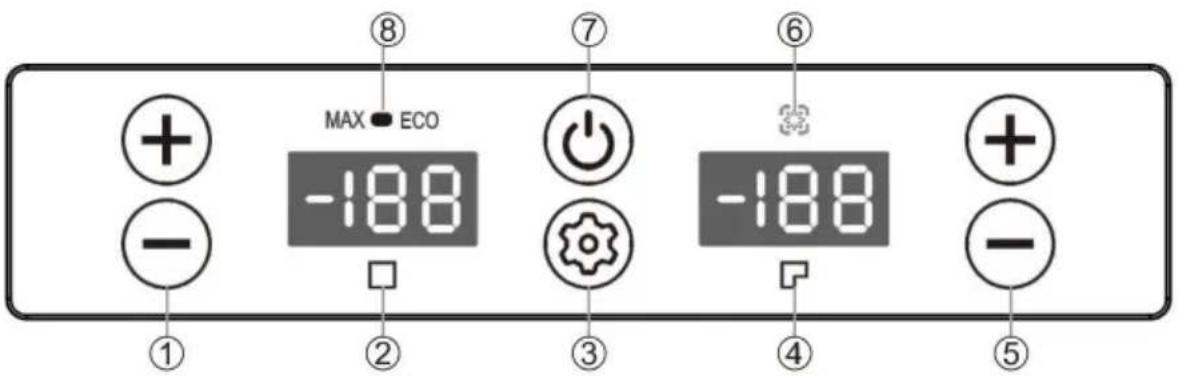
text_image
MAX ECO -188 ⑧ ⑦ ⑥ -188 ① ② ③ ④ ⑤natural_image
Technical line drawing of a rectangular device with internal compartments and ventilation grilles (no text or symbols)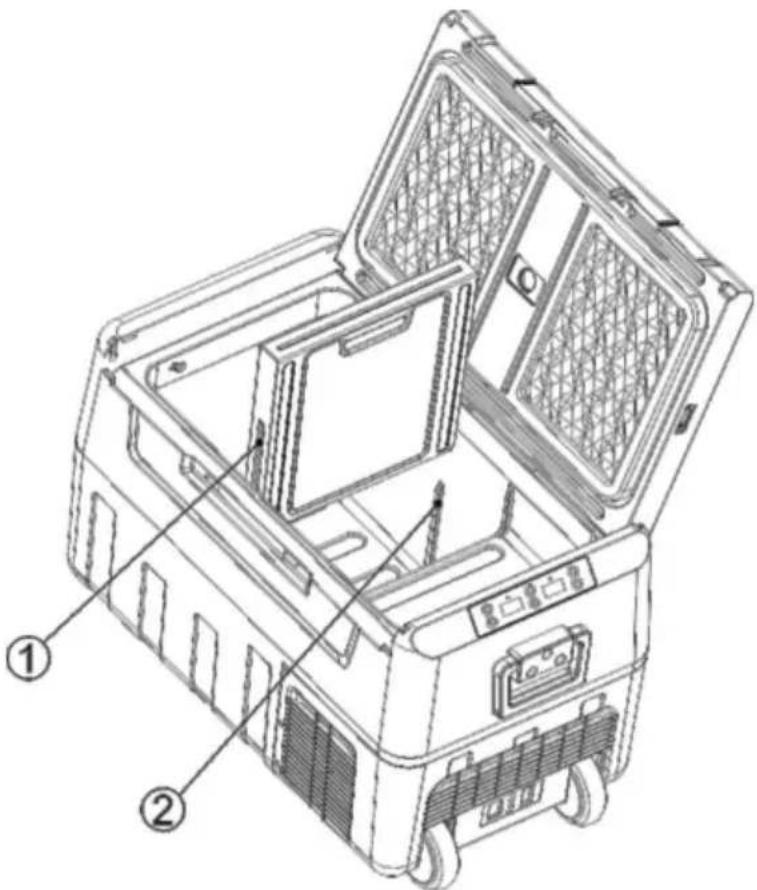
text_image
Technical diagram of a portable electronic device with labeled parts, showing internal compartments and housing structure.E2: Awaria wentylatora
natural_image
Line drawing of a portable industrial device with cooling fans and ventilation slots (no text or symbols)HULP NODIG? NEEM CONTACT MET ONS OP!
Klantenservice@vevor.com
text_image
Technical diagram of a portable electronic device with numbered components for identification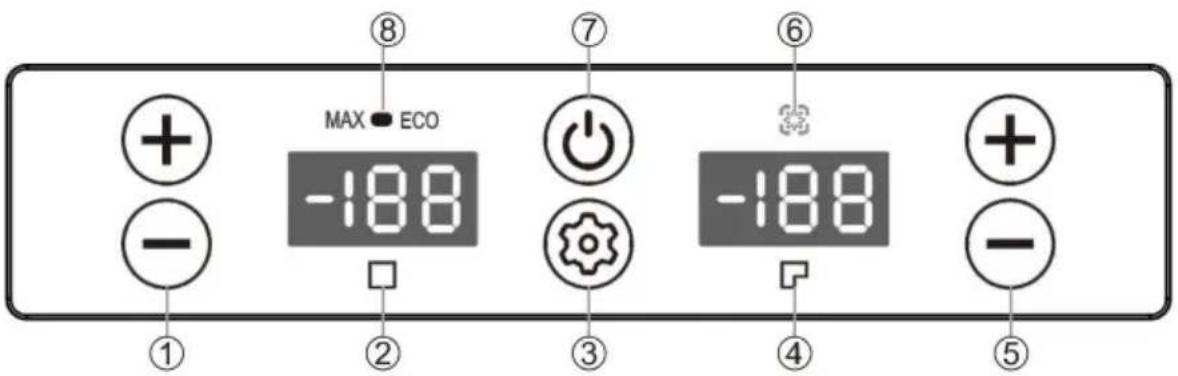
text_image
MAX ECO -188 ⑧ ⑦ ⑥ -188 ① ② ③ ④ ⑤text_image
Technical diagram of a portable electronic device with labeled components and internal compartmentsnatural_image
Line drawing of a portable industrial device with cooling fans and ventilation slots (no text or symbols)BEHÖVER HJÄLP? KONTAKTA OSS!
text_image
Technical diagram of a portable electronic device with numbered components for identification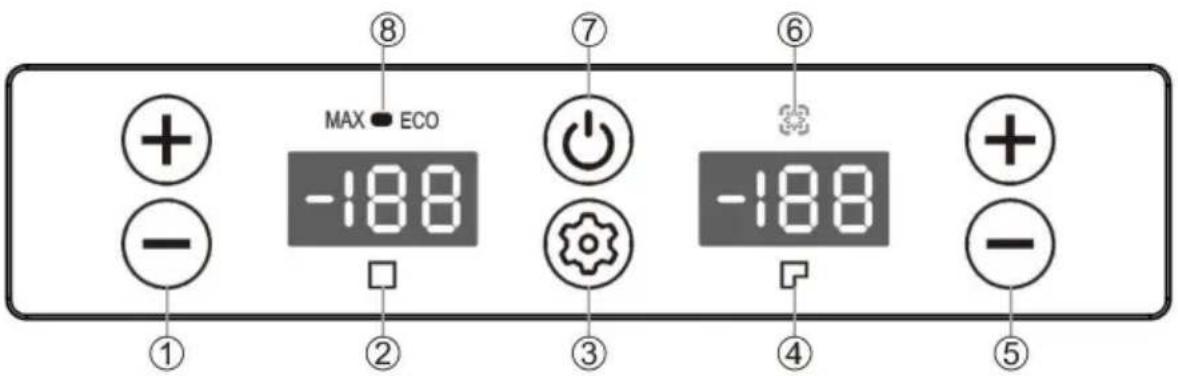
text_image
MAX ECO -188 ⑧ ⑦ ⑥ -188 ① ② ③ ④ ⑤text_image
Technical diagram of a device with labeled components, showing top and side views of internal compartments.Enkel felanalys
www.vevor.com/support