Steril 'n' Dry - Bottle sterilizer BEABA - Free user manual and instructions
Find the device manual for free Steril 'n' Dry BEABA in PDF.

User questions about Steril 'n' Dry BEABA
0 question about this device. Answer the ones you know or ask your own.
Ask a new question about this device
Download the instructions for your Bottle sterilizer in PDF format for free! Find your manual Steril 'n' Dry - BEABA and take your electronic device back in hand. On this page are published all the documents necessary for the use of your device. Steril 'n' Dry by BEABA.
USER MANUAL Steril 'n' Dry BEABA
natural_image
Two industrial sprayers with clear lids, one labeled 'steril'n'dry' and the other showing food containers (no visible text beyond label)FR Notice d'utilisation
EN Instructions
NL Handleiding
DE Gebrauchsanweisung
ES Folleto de Instrucciones
IT Istruzioni per l'uso
RU Инструкция
PT Instruções de utilização
PL Instrukcja obsługi
CN 操作说明
CT 使用說明
AR
الإرشادات
natural_image
Simple line drawing of a cylindrical object with a central hole and labeled number 9 (no text or symbols on the object itself)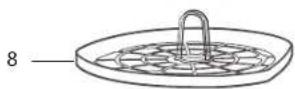

text_image
7 6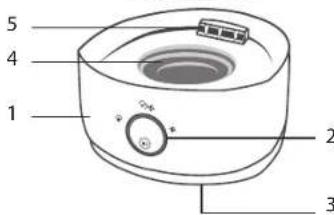
text_image
1 2 3 4 5text_image
Diagram showing a three-step cooking process of a kitchen appliance, with labeled parts and directional arrows.
text_image
Diagram showing a multi-step cooking process of a blender with labeled parts and a 'OK' button.
text_image
Diagram showing a cooking or processing step with labeled components and directional arrows indicating sequence.NULLITE DE LA GARANTIE
SAFETY INSTRUCTIONS/IMPORTANT
- Incorrect use of the appliance may cause injury: always follow these instructions.
- This appliance heats water up to 100°C, never handle the product when it is in use.
- When in use, the appliance contains hot water and steam:
CAUTION BURNING RISK Do not lift the lid while the appliance is in use.
- Never launch a cycle without any water in heating unit.
- Never touch the heating plate with hand at the end of cycle, as it releases residual heat even after use.
- Wash your hands well before handling your baby's products and food.
• Always use the appliance on a stable and even surface. - Do not place the appliance near a heat source, hotplates, etc.
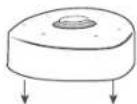
- Do not move the appliance or cover it when in use.
USE
- This appliance shall not be used by children. Keep the appliance and its cord out of reach of children.
- Appliances can be used by persons with reduced physical, sensory or mental capabilities or lack of experience and knowledge if they have been given supervision or instruction concerning use of the appliance in a safe way and understand the hazards involved.
- This appliance is intended to be used in household and similar applications such as: - staff kitchen areas in shops, offices and other working environments;
- arm houses; - by clients in hotels, motels and other residential type environments;
- bed and breakfast type environments.
- Be careful not to exceed the indicated MAX tank level.
ELECTRICAL CONNECTION
• This device must not be submerged.
- Unplug the appliance if you are leaving it unsupervised.
- Do not use the appliance if the power cable is damaged*.
- Unplug the appliance if it is not working correctly*.
- Unplug the appliance if it has been damaged (dropped, broken, etc.)*
* contact the After-Sales Service immediately.
- If the supply cord is damaged, it must be replaced by the manufacturer, its service agent or similarly qualified persons in order to avoid a hazard.
VIGILANCE/CHILDREN
- Keep the appliance and its cord out of reach of children.
• The appliance should not be cleaned by a child.
• The appliance should not be maintained by a child.
• Children shall not play with the appliance.
natural_image
Simple 3D diagram of a rounded rectangular object with a central hole and a labeled dimension '9' (no text or symbols beyond the number)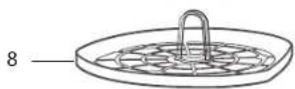

text_image
7 6 BETA
text_image
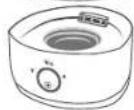
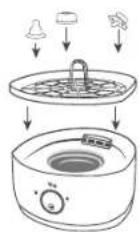
1 2 3 4 51 Electrical base
② Selection knob
③ Filter
4 Heating unit with water tank
5 Air outlet
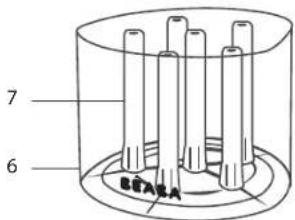
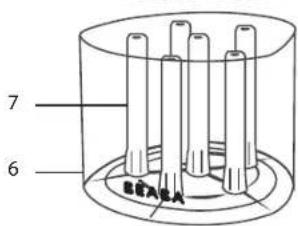
6 Main basket
7 Steam nozzles
8 Basket for accessories
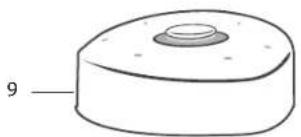
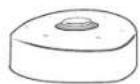
9 Lid
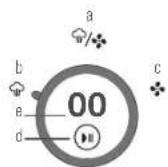
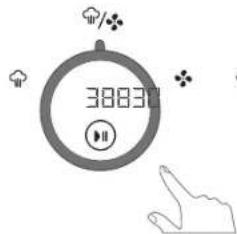
| 2 Selection button | |
| a | 2 in 1 mode(sterilization + drying) - 38 min |
| b | Sterilization mode - 8 min |
| c | Drying mode - 30 min |
| d | Cycle start / pause button |
| e | ning time display |
IMPORTANT PLEASE READ THESE INSTRUCTIONS CAREFULLY AND KEEP THEM FOR FUTURE REFERENCE
INSTRUCTIONS FOR USE
Before first use
- Complete a sterilization cycle with 50 ml of white vinegar mixed with 150 ml of water, in the heating unit, without bottles or any accessories.
• Empty the remaining water into the heating unit. - Run a sterilization cycle with 200 ml of water, in the heating unit, to rinse.
- Drain remaining water.
Usage
- Before each sterilization cycle, clean all the bottles and accessories with a bottle brush and soapy water and then rinse.
To start a cycle:
- Pour 120 ml minimum of water into the water tank
It is preferable not to exceed the MAX limit indicated on the water tank.
CAUTION: do not pour water into the air outlet.
- Connect the appliance to a suitable power socket.
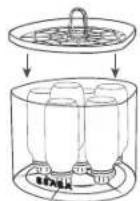
- Arrange bottles and accessories as shown :

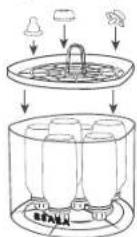
- Select the desired cycle mode;
a. 2 in 1 mode
(sterilization + drying) - 38 min
b. Sterilization mode
8 min
c. Drying mode
30 min
text_image
38830
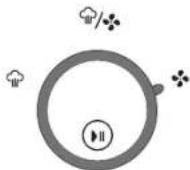
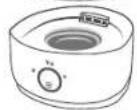
- Press 🎯 to start.
- The cycle can be paused during drying, if required, by pressing
It is not advisable to pause the cycle during sterilization, to avoid any risk of contamination.
- At the end of the cycle, the sterilizer switches off automatically and screens shows 00. To reset the product, press and hold ⏻.
- Wait for 3 minutes before opening the appliance
• CAUTION BURNING RISK product is hot. - Remove the bottles and accessories.
- For safety reasons, leave the appliance to cool for about 20 minutes before repeating a sterilization operation.
- CAUTION! Both the steam released from the lid and the cover are very hot at the end of the cycle!
- The device switches off automatically after 2 minutes of inactivity and can be switched back on by pressing the selection button.
MAINTENANCE
Always disconnect the appliance before cleaning.
Clean the tank and the surfaces with a damp cloth or a sponge. Dry carefully.
- Descale the heating unit from time to time using the Beaba cleaning liquid or an equivalent white vinegar-based product:
Please refer to the section: «Before using for the first time».
- Repeat the operation, if necessary, until all the limescale has disappeared.
- Then clean inside the tank with a damp cloth.
- Never use a chemical descaling product or a descaling product for coffee machines in the tank.
- Never immerse the appliance in water or place it under a running tap.
- Check regularly that the tank is clean.
- Regular descaling is ESSENTIAL for ensuring your appliance's lifespan.
| PROBLEMS PROBLEMS PROBLEMS | ||
| The appliance does not work | The appliance does not work | The appliance does not work |
| There is not enough steam | There is not enough steam | There is not enough steam |
| The selection knob display shows E1 | The unit has not been able to complete a full sterilization cycle, there is not enough water in the water tank. | Press and hold ⏻ to reset the display. Pour a minimum of 120 ml of water into the tank and restart the desired cycle. |
SPECIFICATIONS
Voltage: 230 V – 50 Hz
Power: 600 W.
ENVIRONMENT AND RECYCLING
European directive 2012/19/EU on Waste from Electrical and Electronic Equipment (WEEE), requires that used household appliances are not thrown into the normal municipal waste stream. Used appliances must be collected separately in order to optimize the rate of recovery and recycling of materials that compose them, and to reduce the impact on human health and on the environment. The crossed bin symbol is affixed to all the products to remind you of the obligations of separated collection.
WARRANTY
The BEABA Le STERIL 'N' DRY benefits from a 24-month warranty from the date of purchase. During this period, we guarantee the free repair of any defect resulting from a material defect or a manufacturing defect. This warranty is subject to the final evaluation of the importer.
If you require assistance or additional information, consult the Beaba website or contact the Beaba consumer service.
If you notice a fault, start by consulting the user manual.
In the absence of a clear answer in the manual, contact this video baby monitor's supplier via the website www.beaba.com.
INVALIDATION OF THE WARRANTY
In the case of inappropriate use, a connection error, the use of non-original parts or accessories, negligence, and in the case of faults caused by humidity, fire, floods, lightning, or natural disasters.
In the case of unauthorised modifications and/or repairs by third parties.
In the case of the unsuitable transport of the device without appropriate packaging, as well as in the case of purchase being absent.
The warranty does not cover connection cables and plugs.
All other responsibility, in particular in terms of indirect damages, is excluded.
For further information, download the Beaba & Moi app on the App Store or Google Play.
NL
VEILIGHEIDSINSTRUCTIES / LET OP:
natural_image
Simple line drawing of a cylindrical object with a central hole and labeled number 9 (no text or symbols on the object itself)

text_image
7 6 BETA A
text_image
1 2 3 4 5natural_image
Simple 3D diagram of a rounded rectangular object with a central hole and a labeled dimension '9' (no text or symbols beyond the number)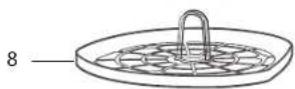
text_image
7 6 BETA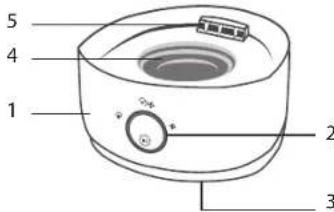
text_image
5 4 1 2 3text_image
Diagram showing a three-step cooking process of a kitchen appliance, with labeled parts and directional arrows.
text_image
Diagram showing a multi-step cooking process with labeled components and directional arrows indicating steps.
text_image
Diagram showing a cooking or cleaning process with labeled steps and componentsnatural_image
Simple circular diagram with a play button and surrounding icons (no text or labels)text_image
Diagram showing a three-step cooking process of a food appliance, with labeled parts and directional arrows.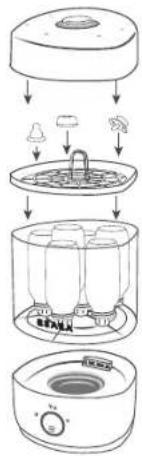
text_image
Diagram showing a multi-step cooking process with labeled components and directional arrows indicating steps.
text_image
Diagram showing a cooking or processing step with labeled components and directional arrows indicating sequence.natural_image
Simple circular diagram with a play button and surrounding icons (no text or labels)
natural_image
Simple circular diagram with a play button and surrounding icons (no text or labels)natural_image
Simple 3D diagram of a rounded rectangular object with a central hole and a labeled dimension '9' (no text or symbols beyond the number)

text_image
7 6 BETA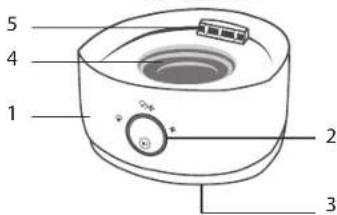
text_image
1 2 3 4 5text_image
Diagram showing a cooking or processing setup with three vertical sticks above a pot, indicating a step or procedure.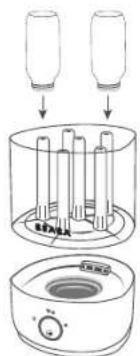
text_image
Diagram showing a laboratory setup with two bottles and a beaker, labeled with Chinese text.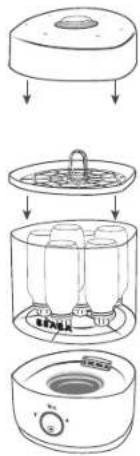
text_image
Diagram showing a three-step cooking process of a portable oven, with labeled components and directional arrows.
text_image
Diagram showing a multi-step cooking process with labeled components including a blender and fan.
text_image
Diagram showing a cooking or processing step with labeled components and directional arrows indicating sequence.text_image
Diagram showing a three-step cooking process of a kitchen appliance, with labeled parts and directional arrows.
text_image
Diagram showing a multi-step cooking process with labeled components and directional arrows indicating steps.
text_image
Diagram showing a cooking or cleaning process with labeled steps including bell, funnel, and fan.natural_image
Simple circular diagram with a play button and surrounding icons (no text or labels)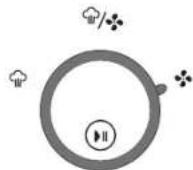
natural_image
Simple 3D diagram of a rounded rectangular object with a central hole and a labeled dimension '9' (no text or symbols beyond the number)

text_image
7 6 BETA
text_image
1 2 3 4 5text_image
Diagram showing a multi-step cooking process with labeled parts and directional arrows indicating steps.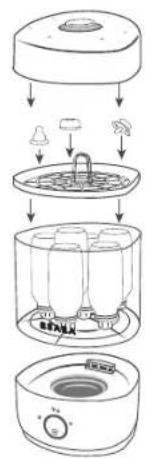
text_image
Diagram showing a cooking process with labeled steps including condenser, mixer, and oven
text_image
Diagram illustrating a cooking process with labeled steps including bell, funnel, and pantext_image
Diagram showing a three-step cooking process of a kitchen appliance, with labeled parts and directional arrows.
text_image
Diagram showing a multi-step cooking process with labeled components and directional arrows indicating steps.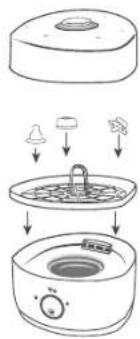
text_image
Diagram showing a cooking or cleaning process with labeled steps including bell, funnel, and fan.- 选择想要的模式:
natural_image
Simple line drawing of a cylindrical object with a central hole and a label '9' on the side (no text or symbols on the object itself)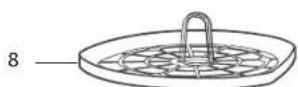
text_image
7 6
text_image
5 4 1 2 3text_image
Diagram showing a three-step cooking process of a kitchen appliance, with labeled parts and directional arrows.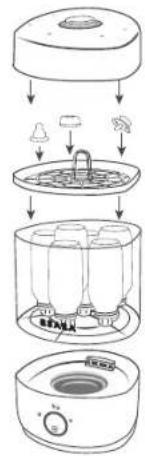
text_image
Diagram showing a multi-step cooking process of a blender with labeled parts and a 'OK' button.
text_image
Diagram showing a cooking or processing step with labeled components and directional arrows indicating sequence.- 選擇想要的模式:
text_image
Diagram showing a three-step cooking process of a food appliance, with labeled parts and directional arrows.
text_image
Diagram showing a multi-step cooking process with labeled components and directional arrows indicating steps.
text_image
Diagram showing a cooking or processing step with labeled components and directional arrows indicating sequence.natural_image
Simple circular diagram with a play button and surrounding icons (no text or labels)
اضغط على Ⓜ للبدء.
text_image
Diagram showing a device with three vertical tubes and a base with a control knob, illustrating a process or setup.