
HYP-E ACE - Protective helmet ABUS - Free user manual and instructions
Find the device manual for free HYP-E ACE ABUS in PDF.

| Product type | Protective helmet for cyclists |
| Brand | Abus |
| Model | HYP-E ACE |
| Category | Personal protective equipment (PPE) Category II |
| Standards | EN 1078:2012+A1:2012, EU Regulation 2016/425 |
| Weight (approx.) | Approx. 350 g |
| Helmet power supply | Rechargeable lithium polymer battery 3.7 V / 1600 mAh |
| Remote controls power supply | Rechargeable lithium polymer battery 3.7 V / 70 mAh (each) |
| Battery life (helmet) | From 6 h (Steady mode) to 40 h (Eco mode) |
| Lighting modes | Steady, Power, Flow, Pulse, Flash, Eco |
| Connected functions | Turn signals (remote control), brake light (OxiBrake braking sensor) |
| Radio frequency | 2.4 GHz, transmission power 0 dBm |
| Remote controls | Remote Control Indicator Light (turn signal) and Remote Control Brake Light (brake light) |
| Visor | Filter categories 0 to 3 (ISO 12312-3:2022), not suitable for night driving |
| Maintenance and cleaning | Hand cleaning with lukewarm water and a soft cloth, without solvent; do not immerse |
| Spare parts | Replaceable battery and lighting with Abus parts (Phillips screw, torque 0.3-0.5 Nm) |
| Warranty | Legal warranty, material or manufacturing defects; see manual |
| Operating temperature | -20 °C to +50 °C; do not expose to >60 °C |
| Lifespan | 4 to 5 years after first use, max 8 years after production date |
Frequently Asked Questions - HYP-E ACE ABUS
User questions about HYP-E ACE ABUS
0 question about this device. Answer the ones you know or ask your own.
Ask a new question about this device
Download the instructions for your Protective helmet in PDF format for free! Find your manual HYP-E ACE - ABUS and take your electronic device back in hand. On this page are published all the documents necessary for the use of your device. HYP-E ACE by ABUS.
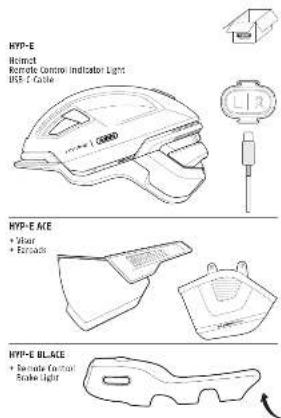
USER MANUAL HYP-E ACE ABUS
INSTRUCTION MANUAL HYP-E HYP-E ACE HYP-E BL.ACE
| 14 | Schussrechtwicklung | 5 - 8 |
| 15 | Intervention manuscript | 8 - 10 |
| 16 | Mode d'emploi | 19 - 20 |
| 17 | Schulftsaumwähring | 21 - 29 |
| 18 | Introduktionen de l'uso | 37 - 37 |
| 19 | Instangtes de uso | 33 - 38 |
| 20 | Strahlung per l'uso | 29 - 44 |
| 21 | Struppenswing | 45 - 50 |
| 22 | Bruttoanswähring | 51 - 56 |
| 23 | Strukturanswing | 57 - 62 |
| 24 | Systienje | 61 - 68 |
| 25 | Instinigte sonstig | 69 - 76 |
| 26 | Slaved na putative | 79 - 80 |
| 27 | Named ne poussive | 81 - 88 |
| 28 | Neonstell utrachie | 87 - 92 |
| 29 | Inbendid | 91 - 98 |

[Figure]
DE
Congratulations! You are now the owner of a top quality ABUS bicycle helmet. This
helmet has been produced under strict conditions and is certified according to the following standards:
- Please read and follow these safety instructions. Non-observance of these instructions
could lead to fire, injury to persons and/or device damage! - Keep packaging material away from children: Danger of suffocation!
• ABUS August Bremicker Söhne KG hereby declares that this helmet is Category II personal protective equipment (PPE), and complies with Regulation (EU) 2016/425. - ABUS August Bremicker Söhne KG hereby declares that the radio equipment type HYP-E, Remote Control Indicator Light and Remote Control Brake Light (OxiBrake) is in compliance with Directives 2014/53/EU and 2011/65/EU. The full Declaration of Conformity can be found online at: docs.abus.com
• EN 1078:2012+A1:2012 – European standard for cyclists, skateboarders and inline skaters.
• This helmet has been certified by KIWA Nederland B.V., Wilmersdorf 50, 7327 AC Apeldoorn, The Netherlands, NB 0063.
Attention: Please note that no helmet is indestructible and will not prevent all head injuries.
For the best possible protection, please observe the following guidelines:
1. Usage
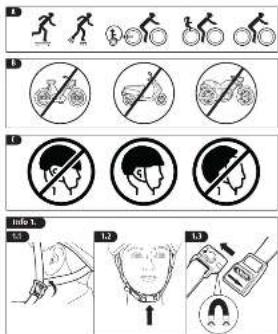
This helmet is recommended as protective equipment for the following activities (fig. A). It is not suitable for the following activities (fig. B).
Attention: Please note that it is necessary for children to remove their helmets before entering playgrounds. This helmet should not be used by children while climbing or doing other activities when there is a risk of strangulation/hanging if the child gets trapped with the helmet.
2. Optimum fit
• The helmet should not be pulled too far down the forehead so that visibility is not impaired.
- The forehead must be protected. The helmet should therefore not be pushed too far over the back of the head.
• The helmet is correctly fitted when it sits horizontally on the head.
The prerequisite for your helmet to fulfil a protective function is that it fits correctly. You should therefore try out different sizes and choose the one that sits firmly and comfortably on your head (fig. C).
3. Adjustment of the head ring
Almost all ABUS helmets are available in three sizes. Adjusting the helmet to the individual head size can be achieved, depending on the type, with the following easy to use fitting systems.
4. Adjustment of the straps (fig. Info 1)
When wearing the helmet for the first time, please adjust the straps so that they meet tautyly and comfortably beneath the ears. The easily adjustable triangular locks on both sides, with their optional fastener help you in doing so. The child proof lock must be engaged properly, before first use, with an audible "click" to prevent accidental displacement. Make sure the chin-guard, which must be locked before every ride, doesn't lie on the jaw-bone. After adjustment, the overlapping straps can be secured with the strap clip. Should the straps be too long, please cut them down to the required length and seal the ends with a match flame to prevent fraying.
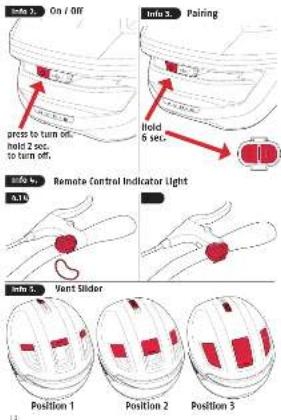
5. Switching the helmet light on and off (fig. Info 2)
To switch on, briefly press the On/Off button on the back of the helmet once. To switch off, press and hold the On/Off button for 2 seconds until the switch-off animation initiates switching off the helmet. The Remote Control Brake Light and Remote Control Indicator Light are automatically operational as soon as the helmet is switched on. This means that no separate switching on/off is necessary.
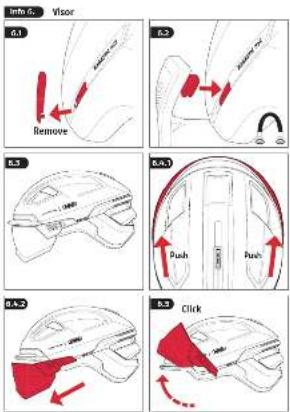
- Visor (fig. Info 6.)
Filter category Description Usage Symbol
| ISO 12312-3:2022 | 0 | Light tint sunglasses | Very limited reduction of sunglare Limited UV protection | IEC 60417-5955 |
| 1 | Limited protection against sunglare Moderate UV protection | ISO 7000-2948 | ||
| 2 | General purpose Sunglasses | Good protection against sunglare Good UV protection | ISO 7000-2949 | |
| 3 | High protection against sunglare Good UV protection | ISO 7000-2950 |
Please clean the lenses with mild soapy water. Drying should be done with a soft cloth. Note: Scratched lenses cannot provide adequate protection from the sun! Not suitable for direct observation of the sun. Not suitable for protection against radiation from artificial light sources, such as those used in solaria. The filter has a luminous transmittance lower than 75% and higher than 8%. Not suitable for driving in twilight or at night.
7. Charging
Open the charging port cover on the back of the helmet and plug the USB-C cable into the charging port. During charging, the charging status is indicated by the centre area of the rear light. As soon as the battery is fully charged, the light goes out. A full charge of the helmet takes a maximum of 4 hours. Please do not use the helmet while charging.
- Modes incl. running times
| No. | Mode Running time | Lumen at front Lumen at rear | ||
| 1 | Steady 6 h. 8 8,5 | |||
| 2 | Power 2 h. 50 24 | |||
| 3 | Flow 11 h. 9 2-7,5 | |||
| 4 | Pulse | 27 h. | 0-4 | 0-6 |
| 5 | Flash | 8 h. | 0-28 | 0-40 |
| 6 | Eco | 40 h. | 0 | 0-6 |
Note: When the brake is used, the running time is reduced by approx. 20% with average use.
9. Remote controls
a) Remote Control Indicator Light, fig. Info 4.
- Pairing: It is not necessary to pair the remote control with the helmet after purchase as they are already paired. To pair additional remote controls, switch on the helmet, press and hold the On/Off button and press and hold the L and R buttons on the remote control. The helmet and remote control flash and are paired. Up to four remote controls can be paired with one HYP-E helmet. Any number of HYP-E helmets can be paired with one remote control.
- Mounting on the handlebar: Elastic rubber rings are supplied for attaching the remote control to the handlebar. Select the rubber rings with the most suitable length so that the remote control is firmly and securely attached to the handlebar.
- Charging: The remote control is powered by an integrated rechargeable battery. If the battery is empty (LED continuously lit up red), it must be charged using the USB-C cable. The charging socket is located on the underside of the remote control. Depending on use, the remote control must be charged approximately every 2-4 months.
- Activating: Press the buttons (L: left, R: right) on the remote control to activate the indicator light. It is therefore important to ensure correct left-right assignment during installation. As long as the indicator light is switched on, a light flashes on the remote control and an acoustic signal sounds as a reminder.
- Switching the acoustic signal on/off: The acoustic signal of the indicator light can be switched off by holding the On/Off button for 5 seconds when the system is switched off until an acoustic signal sounds. Repeat the procedure to switch the acoustic signal back on.
- Unpairing: Press and hold the L and R buttons on the remote control until the LEDs light up orange, then press the left button twice and the right button twice. The LED lights up red to confirm that the remote control and helmet are unpaired.
ATTENTION: The direction indicator function of the helmet is a supplementary feature and does not replace legally required hand signals when turning. Make sure that you use the correct side when activating the indicator light. Be sure to switch off the indicator light after turning by pressing the button again. If the indicator light is not switched off, it will switch itself off automatically after 40 seconds. The use of direction indicator lights may be regulated by law in different countries.
Observe the laws of the respective country!
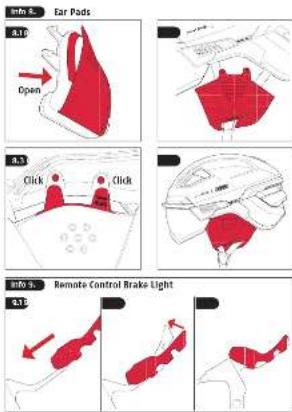
b) Remote Control Brake Light (OxiBrake), fig. Info 9.
- Pairing: Before using for the first time, the brake sensor must be paired with the helmet (HYP-E and HYP-E ACE variants). Switch on the helmet lighting. Press the On/Off button for at least 6 seconds until the rear light flashes orange. Then press the button on the brake sensor for at least 6 seconds until the status LED flashes red and green. The rear light of the helmet lights up orange for a few seconds and then switches off. The status LED of the brake sensor lights up red and green for a few seconds and then switches off. The helmet and brake sensor are now paired.
- Mounting: Slide the silicone sleeve of the Remote Control Brake Light (OxiBrake) over the brake lever on the handlebar. Adjust the Remote Control Brake Light (OxiBrake) to the shape of the brake lever by bending it between 0^ and 45^ . ATTENTION! Do not bend the Remote Control Brake Light (OxiBrake) multiple times. Bending too often can damage the material.
- Charging: Fully charge the battery before starting up the brake sensor. The status LED flashes red during charging. When the status LED goes out, the battery is fully charged. To check the battery level during use, press the button on the Remote Control Brake Light (OxiBrake). The light lights up green when the battery is sufficiently charged – and red when the charge level is low. When the battery charge is low, the light also flashes red three times when the Remote Control Brake Light (OxiBrake) is no longer being used. Depending on use, the remote control must be charged approximately every 2-4 weeks.
- Activating: The brake sensor switches on automatically when you touch the sensor surface when operating the brake lever.
- Unpairing: Press the On/Off button on the Remote Control Brake Light (OxiBrake) for at least 6 seconds until it flashes red and green. Then press the button three times in quick succession within 4 seconds.
ATTENTION: Before the start of every ride, make sure that the brake function of the brake lever works without faults as it did in the original delivery state. Check the correct position of the Remote Control Brake Light (OxiBrake) before the start of every ride.
10. Proper maintenance and care
- Check the helmet at regular intervals for visible defects.
- Never modify, alter or misuse the helmet or remove original parts, as this reduces the protective effect of the helmet.
- Do not paint or stick anything on the helmet, as harmful substances can reduce its stability and protective effect.
- The helmet must never be exposed to temperatures above 60^ (147°F), otherwise it may lose its protective properties. Do not store behind glass, e.g. in a car (burning glass effect), near heaters etc.
- If you suspect that the helmet has received a large impact, even if there is no visible damage, please purchase a new helmet.
- Depending on the frequency of use and the specific operational conditions, a bicycle helmet must be replaced 4 - 5 years after the first time it is used. In view of the unavoidable material fatigue, the helmet must, however, be replaced at most 8 years after its production date even if it displays no clear visible or technical defects
- The helmet shell, adjustment wheel and removable inner pads can be cleaned by hand (lukewarm water, soft cloths, solvent-free cleaner). This also applies to sun visors.
Do not immerse the helmet and accessory components in water.
- The helmet lights are a supplementary feature and do not replace the legally required lighting equipment on bikes.
- Only use spare parts from ABUS.
11. Battery instructions
These products contain:
- Helmet HYP-E: 3.7 V lithium polymer battery (capacity 1600 mAh)
- Remote Control Indicator Light: 3.7 V lithium polymer battery (capacity 70 mAh)
- Remote Control Brake Light: 3.7 V lithium polymer battery (capacity 70 mAh)
Radio frequency: 2,4 GHz, transmission power 0dB M.
- Do not charge or use the product in environments where there is a risk of explosion, e.g. from flammable liquids, gases or dust. Never burn the product! The battery could explode in the fire. This would also release toxic substances.
- Only use a suitable standard micro USB C charging cable in conjunction with a suitable charger (5V DC power supply unit) for charging! Do not leave the product unattended while it is charging!
- Do not use or store the products in areas where the temperature could reach below -20^ or above +50^ . Do not expose the product to direct sunlight for long periods of time.
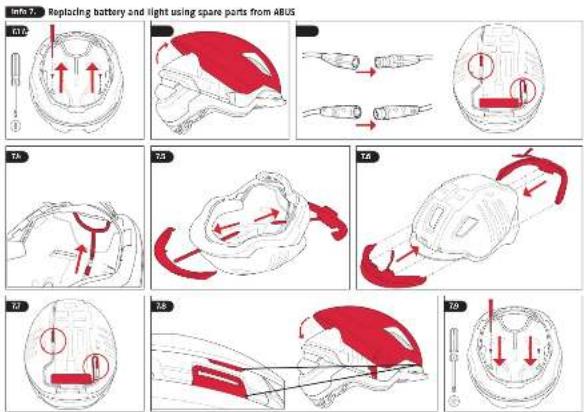
12. Replacement of battery and light using ABUS spare parts, fig. Info 7.
For safe use of the helmet, it must be in its original condition again after replacement. The adjustment system must be fixed again and the helmet shell must be securely connected to the inside of the helmet at the intended points. If you have any questions, please contact your specialist dealer or ABUS customer service
Fig. 7.1: Undo and remove the screws with a Phillips screwdriver.
Fig. 7.2: Remove the shell from the back to the front, as it is hooked in at the front.
Fig. 7.3: Disconnect both plug connections by pulling them out and not turning them
Fig. 7.4: Move the adjustment system all the way down to access the hole for removing the lights. Pull the rail out of the guide, otherwise the hole cannot be reached.
Fig. 7.5: Use a blunt object, e.g. a pencil, to push the lights out through the existing holes at the front and rear. Do not use a sharp object as this can damage the lights
Fig. 7.6: The new light can be installed. Insert the lights into the device provided. The same applies to the battery.
Fig. 7.7: Reconnect both plug connections (press, do not twist!)
Fig. 7.8: The shell can be reattached from front to back. Insert the shell into the device provided.
Fig. 7.9: Replace the screws using the Phillips screwdriver. Tighten them to 0.3 - 0.5 Nm.
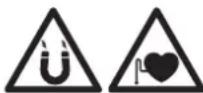
13. Be careful when using magnets
ATTENTION: Magnets can damage credit cards or other cards with magnetic strips. Magnets can also have an adverse effect on pacemakers or other implanted devices. So ensure sufficient distance (approx. 20 cm) between the magnet and the implanted devices – Danger to life!
14. Disposal
This product contains valuable raw materials. At the end of its service life, dispose of the product in accordance with the applicable legal requirements. Electrical appliances, rechargeable batteries and batteries must not be disposed of with household waste.
Disposal must be carried out in accordance with Directive 2012/19/EU on waste electrical and electronic equipment (WEEE), or Directive 2006/66/EC on batteries and accumulators and waste batteries and accumulators. Please contact the local authority responsible for disposal if you have any queries. You can obtain information on collection points for your old appliances, for example, from the local municipal or city administration, the local waste disposal companies, or your specialist dealer. Dispose of the packaging according to type. Separate the cardboard, foil and plastic elements for recycling.
15. Warranty
ABUS products are designed, manufactured and tested in accordance with applicable regulations with great care. The warranty exclusively covers faults that are caused by material or manufacturing defects. If a material or manufacturing defect can be proven, the product will be repaired or replaced at the discretion of the warrantor. In such cases, the warranty ends with the termination of the original warranty period. Any further claims are expressly excluded.
ABUS assumes no liability for defects or damage that has been caused by external influences (e.g. transport, external forces), improper use, normal wear and tear or non-compliance with this operating and installation instructions document. If a warranty claim is asserted, the product must be returned with the original receipt with date of purchase and a brief written description of the fault.
Information regarding ICES certification for Canada
CAN ICES-003 (B) Contains IC: 33614-HYPE
Contains IC: 33614-RCIL
This device contains licence-exempt transmitter(s)/receiver(s) that comply with Innovation, Science and Economic Development Canada's licence-exempt RSS(s). Operation is subject to the following two conditions:
-
This device may not cause interference.
-
This device must accept any interference, including interference that may cause undesired operation of the device.
Subject to technical alterations. No liability for mistakes and printing errors.
FR
natural_image
Line drawing of a car's front view showing the logo and structural elements (no text or symbols beyond the label)natural_image
Line drawing of a car's head and front view showing the logo 'ABUS' (no text or symbols beyond the label)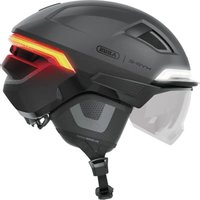
- DE
- Attention: Please note that no helmet is indestructible and will not prevent all head injuries.
- Usage
- Optimum fit
- Adjustment of the head ring
- Adjustment of the straps (fig. Info 1)
- Switching the helmet light on and off (fig. Info 2)
- Charging
- Remote controls
- a) Remote Control Indicator Light, fig. Info 4.
- Observe the laws of the respective country!
- b) Remote Control Brake Light (OxiBrake), fig. Info 9.
- Proper maintenance and care
- Battery instructions
- Replacement of battery and light using ABUS spare parts, fig. Info 7.
- Be careful when using magnets
- Disposal
- Warranty
- Information regarding ICES certification for Canada
- FR
Brand : ABUS
Model : HYP-E ACE
Category : Protective helmet