BCRDW3BAB - Robot vacuum BOSCH - Free user manual and instructions
Find the device manual for free BCRDW3BAB BOSCH in PDF.

| Product type | Robot vacuum |
| Brand | Bosch |
| Model | BCRDW3BAB |
| Dimensions (robot) | 353 × 351 × 99 mm (L × l × h) |
| Maximum runtime | 160 minutes |
| Charging time | 5 hours |
| Battery type | S34-LI-144-5700 (Li-ion) |
| Input voltage | 20 V (2 A) |
| Input power (station) | 220-240 V ~50-60 Hz, 0.5 A |
| Dimensions (service station) | 394 × 443 × 527.5 mm |
| Navigation | LiDAR and AIVI camera |
| Connectivity | Wi-Fi, Bluetooth, Home Connect |
| Mopping function | Rotating mopping system |
| Sensors | Obstacle detection, carpet sensor, wall sensor |
| Child lock | Yes (activation via button) |
| Maximum operating altitude | 2000 m |
| Use | Domestic, enclosed rooms |
| Regular maintenance | Cleaning brushes, filters and sensors |
| Spare parts | Side brush, main brush, filters, cleaning pads |
| Warranty | See terms on Bosch website |
Frequently Asked Questions - BCRDW3BAB BOSCH
User questions about BCRDW3BAB BOSCH
0 question about this device. Answer the ones you know or ask your own.
Ask a new question about this device
Download the instructions for your Robot vacuum in PDF format for free! Find your manual BCRDW3BAB - BOSCH and take your electronic device back in hand. On this page are published all the documents necessary for the use of your device. BCRDW3BAB by BOSCH.
USER MANUAL BCRDW3BAB BOSCH
now at MyBosch and enjoy benefits free of charge:
bosch-home.com/ welcome
Robot Vacuum & Mop
BCRDW3B BCRDW3BAB BCRDW3BX
[en] Information for Use Robot Vacuum & Mop 18
https://digitalguide.bsh-group.com/?mat-no=8001344864
[en] You can find additional information and explanations online. Scan the QR code on the title page.
natural_image
Diagram of a device with a blue cable inserted into a housing, showing a black arrow pointing to a small component (no text or symbols present)2
natural_image
Diagram of a device with internal components and directional arrows indicating flow or movement (no text or symbols)3
4

6
7
natural_image
Illustration of a hand using a power button to press or install a small electronic device (no text or symbols present)8
9
10
11

12
natural_image
Diagram of a mechanical device with internal components and an upward arrow indicating motion (no text or symbols)13
The image is too blurry to recognize any text content.

natural_image
Diagram of a robotic device showing internal components and a blue arrow indicating direction (no text or symbols)15
Sicherheit
natural_image
Simple line drawing of a room with a lamp, chairs, and a table, showing two checkmarks (no text or symbols)- Read this instruction manual carefully.
- Keep the instruction manual and the product information safe for future reference or for the next owner.
■ Do not connect the appliance if it has been damaged in transit.
Only use this appliance:
■ with genuine parts and accessories. Damage caused by using third-party products is not covered under the warranty.
■ To clean textile and hard flooring.
■ To clean in prepared areas.
■ in private households and in enclosed spaces in a domestic environment at room temperature.
■ up to an altitude of max. 2000 m above sea level.
Only use the wiping system:
■ For applications that are described in these instructions.
■ For vacuuming and mopping smooth, moisture-resistant hard floors.
Do not use the appliance:
■ To clean people or animals.
■ for vacuuming up harmful, sharp-edged, hot or burning substances.
■ for vacuuming up damp substances or liquids.
■ for vacuuming up highly flammable or explosive materials and gases.
■ To vacuum up ash and soot.
■ for vacuuming up toner dust from printers and photocopiers.
■ for vacuuming up building rubble.
Do not use the wiping system:
■ To clean unsealed/untreated floors and cork floors.
■ To clean very rough surfaces (e.g. concrete, asphalt)
■ To clean carpets, upholstery and mattresses.
■ To vacuum up liquids or sticky, viscous substances.
Disconnect the appliance from the power supply when:
■ cleaning the appliance.
This appliance may be used by children aged 8 or over and by people who have reduced physical, sensory or mental abilities or inadequate experience and/or knowledge, provided that they are
supervised or have been instructed on how to use the appliance safely and have understood the resulting dangers.
Do not let children play with the appliance.
Cleaning and user maintenance must not be performed by children unless they are being supervised.
Safety instructions
Observe the safety tips.
▶ Never let the power cord come into contact with hot appliance parts or heat sources.
▶ Never let the power cord come into contact with sharp points or edges.
▶ Never kink, crush or modify the power cord.
- Connect and operate the appliance only in accordance with the specifications on the rating plate.
- Connect the appliance to a power supply with alternating current only via a properly installed socket with earthing.
- The protective conductor system of the domestic electrical installation must be properly installed.
- Repairs to the appliance should only be carried out by trained specialist staff.
▶ Only use genuine spare parts when repairing the appliance.
If the power cord of this appliance is damaged, it must be replaced by the manufacturer, the manufacturer's Customer Service or a similarly qualified person in order to prevent any risk.
▶ Never operate a damaged appliance or station. Call customer service. → Page 27
▶ Never operate an appliance with a cracked or fractured surface.
▶ Never pull on the power cord to unplug the appliance. Always unplug the appliance at the mains.
▶ Never pull or carry the appliance by the power cord.
▶ If the appliance or the power cord is damaged, immediately unplug the power cord or switch off the fuse in the fuse box.
▶ Only use the appliance in enclosed spaces.
▶ Never expose the appliance to intense heat or humidity.
- Do not use steam- or high-pressure cleaners to clean the appliance.
▶ Do not clean excessively wet floors.
▶ Do not immerse in liquids or hold under running water.
en Safety
- Repairs to the accessory should only be carried out by trained specialist staff.
- Remove all cables and electrical objects from the floor before cleaning.
▶ Protect the battery against fire, heat and constant sunlight.
▶ Protect the battery against water and penetrating moisture.
▶ Never open the battery. - When not in use, keep the battery away from metal objects, e.g. paper clips, coins, keys, nails or screws.
▶ Only trained specialist staff are permitted to replace the battery.
▶ Never charge the battery outside of the appliance. - Only use the VXBSDW_W service station supplied with the appliance to charge the battery.
- When cleaning the appliance, do not use flammable substances or substances that contain alcohol.
- Only use adapters and power cords approved by the manufacturer.
▶ Never step on the device.
▶ Never stand on the service station. - Keep packaging material away from children.
▶ Do not let children play with packaging material.
▶ If fumes are escaping from a damaged battery, supply fresh air.
▶ If there are any problems, seek medical advice from a doctor.
▶ If liquids are escaping from a damaged battery and they come into contact with the skin, rinse immediately with water.
▶ If these come into contact with the eyes, seek medical help.
▶ Allow damp floors to dry.
▶ Proceed carefully on damp flooring. - Keep hands, hair, clothing and utensils away from rotating parts.
▶ Do not mop up sharp-edged or pointed objects.
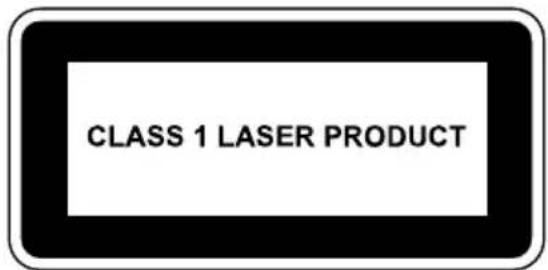
Information on using infrared lasers
The sensor block for LiDAR navigation and the cliff sensors emit laser class 1 infrared light during operation.
Laser product intended for consumers
■ EN 50689:2021
■ IEC 60825-1:2014
■ EN 60825-1:2014+A11:2021
- Do not direct the laser beam at people, as the glare may cause accidents.
- Do not look directly into the laser beam or into reflections of the laser beam.
- Never make any technical modifications to the appliance or its features.
Preventing material damage
▶ If liquid escapes from a damaged battery, check and clean any wet objects.
▶ Replace damaged objects.
Before use, clear the area to be cleaned.
- Secure steps and landings so that the appliance does not fall over edges.
▶ Never use the appliance in rooms where children or babies are sleeping.
▶ Never use the appliance in rooms with lit candles or fragile objects.
- Do not operate the service station on moisture-sensitive floors.
- Do not leave the robot to stand in one place outside of the service station for an extended period with wet mopping pads.
▶ Never operate the appliance without a dust container and filter.
▶ Never operate the service station without a dust bag or motor protection filter.
▶ Do not fill with hot water above 50 °C.
▶ Dose cleaning additives according to the manufacturer's instructions.
- Do not use wax, oils or cleaning additives that cannot be diluted with water.
- Do not use any non-transparent, milky, chlorinated, acidic and foaming cleaning additives (e.g. dishwasher detergent).
▶ Only use neutral multi-purpose cleaning agents.
- Do not place any objects on the service station and do not step on the service station.
Installation and connection
You can find out where and how best to install your appliance here. You will also find out how to connect your appliance to the power supply.
Note
Follow these recommendations for setting up:
■ The area around the station must be clear of objects and obstacles.
■ Remove any reflective objects from the immediate vicinity.
■ Place the station on a hard surface in order to be able to use all the functions of the appliance.
■ Place the station directly against the wall.
Fitting the service station
- Slide the base plate into the service station and engage it audibly.
$$ \rightarrow \text { F i g . } 1 $$
- Connect the power cord to the service station.
$$ \rightarrow \text { Fig. } 2 $$
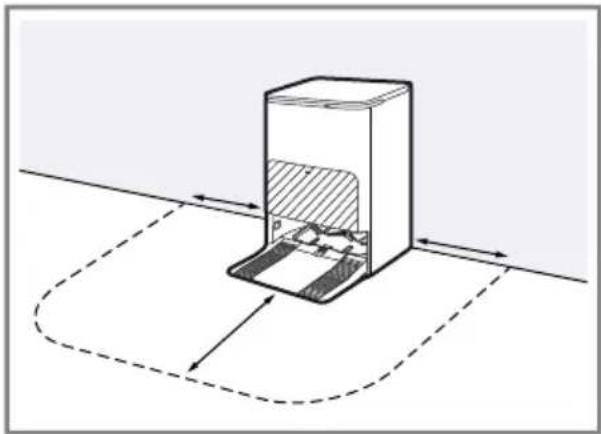
Setting up the service station
Note: Empty the water tanks of the service station before moving the service station to another location.
- Wind the power cord up to the desired length on the cord storage.
en Familiarising yourself with your appliance
- Place the station on a level, firm surface.
→Fig. 3
The area of at least 50 mm next to the station and 70 mm in front of the station must be clear of objects and obstacles.
- Position the station so that it is directly in contact with the wall.
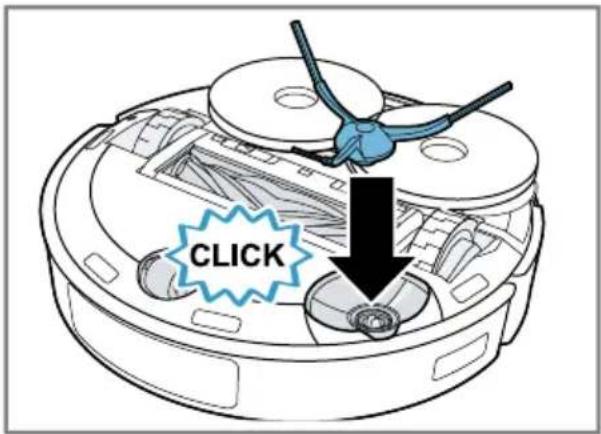
Securing the side brush
- Insert the side brush into the recess on the underside of the appliance and lock it in place.
→Fig. 4
Familiarising yourself with your appliance
Product overview
You can find an overview of the parts of your appliance here.
→Fig. 5
A Cleaning robot
B Rotating wiping system
1 LiDAR navigation module
2 Buttons
3 Camera indicator light ^1
4 Environment detection sensor
5 AIVI camera ^1
6 Wall sensor
7 Cover
8 Bumper
9 Side brush
10 Carpet detection sensor
11 Castor
12 Main brush
13 Mounting bracket for rotating plates
14 Connection for filling with fresh water
15 Main brush cover
16 Drive unit
17 Cliff sensor
18 Fine dust filter
19 Foam filter ^1
20 Fluff filter
21 Release tab for dust container
22 Dust container handle
23 Charging contacts
24 Dust container
25 Reset button and Wi-Fi display
26 Data exchange connection (for customer service only)
27 Rotating plates
28 Mopping pads
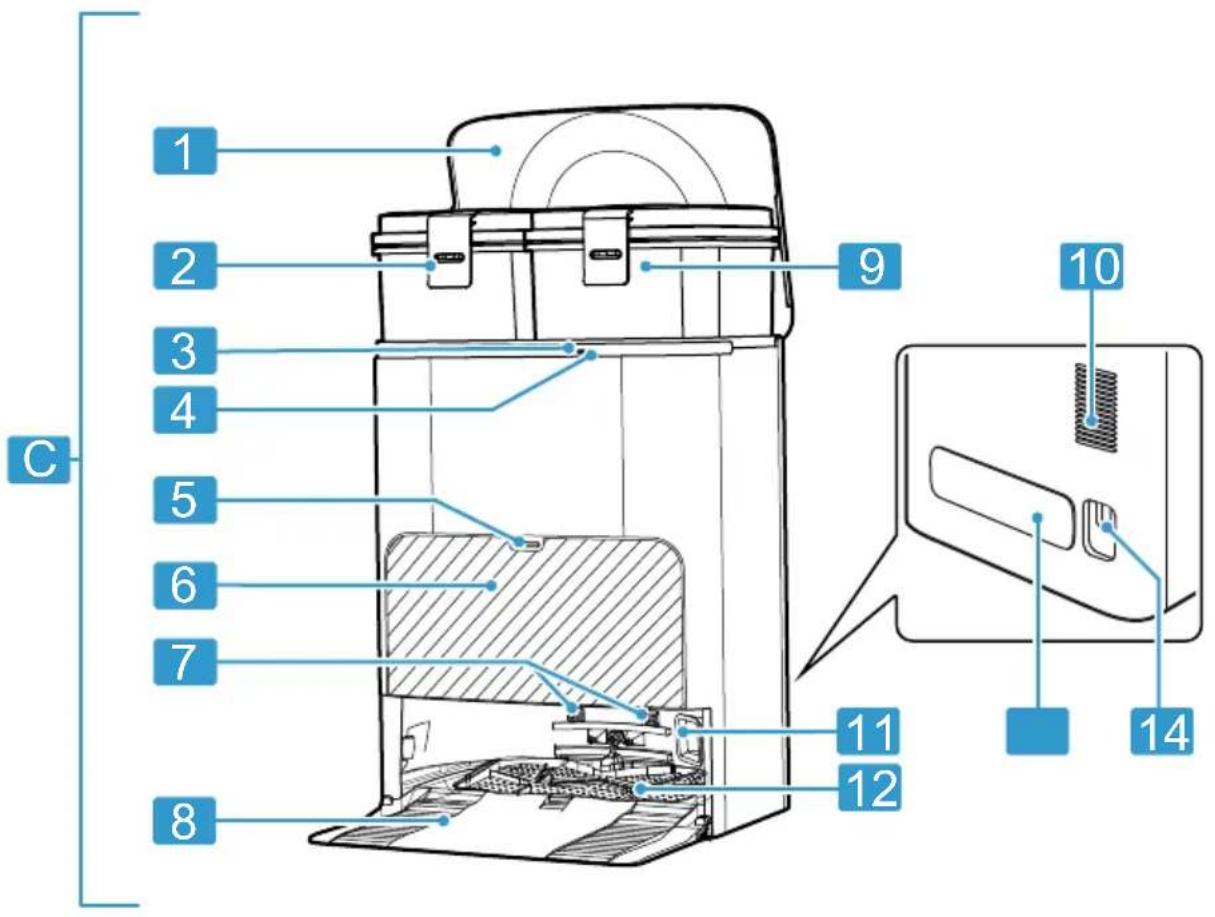
Service station overview
You can find an overview of the parts of the service station here.
→Fig. 6
C Service station
1 Service station cover
2 Used water tank
3 Service station button
4 Service station display
5 Dust bag compartment release button
6 Dust bag compartment flap
7 Station charging contacts
8 Base plate
9 Fresh water tank
10 Ventilation slots
11 Inlet opening for automatic emptying
12 Collecting tray with insert
13 Cord storage
14 Power cord connection
Control elements
You can find an overview of the controls for your appliance here.
Controls for the cleaning robot
Sym- Use bol

- Briefly press:
Cleaning is stopped.
Appliance moves to the station or to where it started cleaning.
Sym- Use bol

■ Briefly press:
Start or pause cleaning.
Continue interrupted cleaning.
■ Press and hold:
Switch the appliance on or off.

■ Briefly press: Start or end spot cleaning.
■ Press and hold:
Activate or deactivate the child-proof lock.

■ Briefly press:
Connect to Home Connect app.
■ Press and hold: Restore default settings and deactivate the Internet and Bluetooth connections.
■ Wi-Fi status display
Service station controls
Ele- Use ment
Button The cleaning robot is in the service station.
- Briefly press:
Start cleaning.
The mopping pads are cleaned in the service station before cleaning is started.
■ Press and hold: Start self-cleaning of the service station.
Status indicators
The status display indicates the different operating statuses.
Camera indicator light
Display Meaning
Lights up The camera records images of the surroundings.
Does not light up The camera is inactive.
Wi-Fi and Home Connect display
Display Meaning
Flashes slowly The appliance is not connected to the Wi-Fi.
Flashes quickly The appliance is waiting to connect to the Home Connect app.
Lights up The appliance is connected to the Home Connect app.
Wet-dry service station
Display Meaning
Lights up The station is in standby mode. The station is operating.
Does not light up The station is in rest mode. The station is disconnected from the power supply.
Lights up red Malfunction
Network interfaces
You can find information about your appli- ance's network interfaces here.
Designation Description
Bluetooth Activate Bluetooth to connect the robot to the network while setting up the Wi-Fi. Bluetooth uses GAP1800, GATT 1801 for secure configuration and data exchange.
Wi-Fi ^1 Robot Enables data transfer between the Home Connect app and the robot. Enables the appliance to be controlled via the Home Connect app.
Wi-Fi ^1 Service station Enables data transfer between the service station and the robot.
Infrared interface The infrared interface is only used for pairing the robot with the service station.
Designation Description
If pairing is successful, the infrared interface is closed and the robot and service station use wireless Wi-Fi ^1 communication.
Operation
Notes
■ To benefit from the appliance's full range of functions, connect to and operate the cleaning robot using the Home Connect app.
Cleaning can also be started directly on the appliance, with fewer functions available.
■ Information and explanations on operating the service station can be found on-
line by scanning the QR code on the cover page, in the Home Connect app and on our website www.bosch-home.com.
Tip
The use of water alone is sufficient for effective cleaning. If, however, you still want to use a cleaning additive, this must meet the following requirements.
- Do not use wax, oils or cleaning additives that cannot be diluted with water.
- Do not use any non-transparent, milky or foaming cleaning additives (e.g. dish-washer detergent), or those containing chlorine.
- Only use neutral multi-purpose cleaning agents.
■ Dose cleaning additives according to the manufacturer's instructions.
Requirements for the cleaning area
Find out here how to prepare the cleaning area and therefore increase the cleaning efficiency.
Installation location Requirements
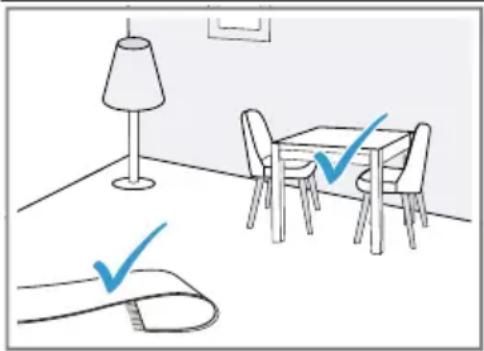
natural_image
Simple line drawing of a room with a lamp, two chairs, and a checkmark on the floor (no text or symbols)Place furniture, e.g. chairs, in their designated place.
Before cleaning, prepare the floor as follows:
■ Remove objects such as cables, cloths, slippers, etc. from the floor.
■ Fold over any rugs with fringes.
■ Leave corridors and narrow areas to avoid blocking the appliance.
Note: Reflective objects, such as floor-level windows and mirrors, can impede the appliance's navigation.
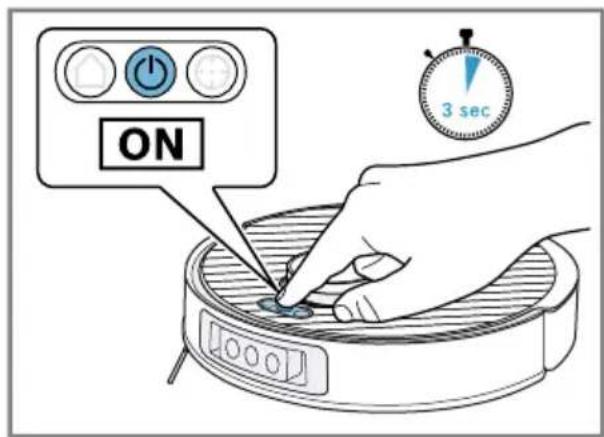
Switching on the appliance
- Press and hold the start button for three seconds.
→Fig. 7
√ The startup sound is played.
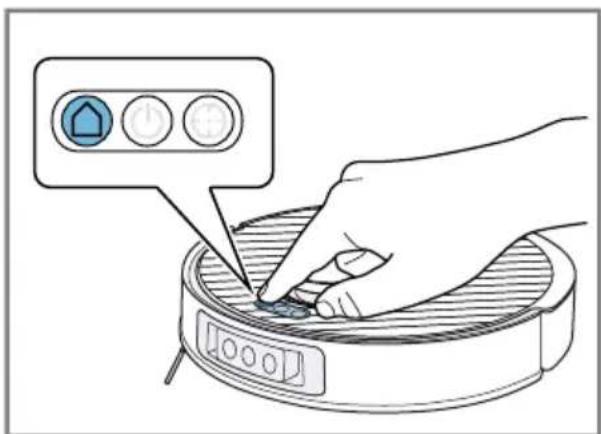
Starting and pausing cleaning
Note: Start the cleaning robot from the station; the battery will automatically charge in the station during cleaning.
Requirement: The cleaning area is ready.
▶ Briefly press the start button.
→Fig. 8
√ The appliance starts cleaning the accessible area in the preset mode.
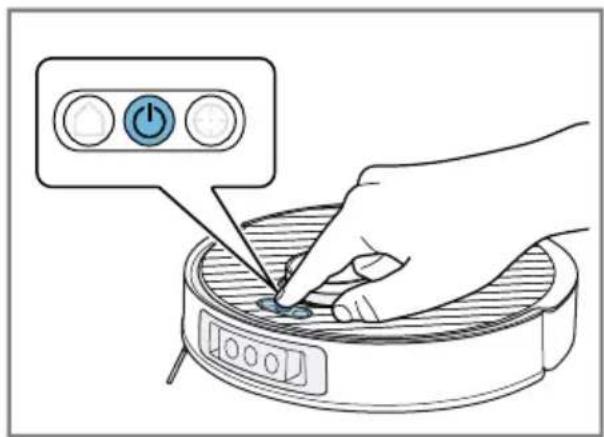
Ending cleaning
▶ Briefly press
→Fig. 9
√ The cleaning process ends and the appliance returns to its starting position.
√ If the cleaning robot started from the station, it automatically returns to the station.
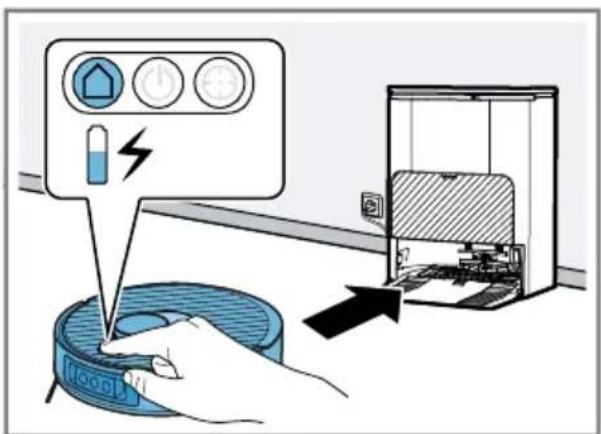
Charging the appliance
Notes
■ The appliance is charged at the station.
■ Only charge the appliance in the temperature range between 10 °C and 40 °C.
- If the cleaning process was started from the station, press △
→Fig. 10
√ The appliance automatically returns to the station.
√ The appliance is charged at the station.
- If the appliance does not return to the station, take it to the station. Position the appliance's charging contacts so that they make contact with the station's charging contacts.
√ The appliance is charged at the station.
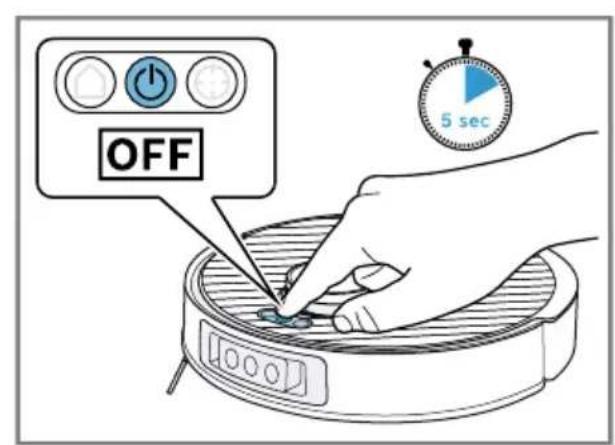
Switching off and storing the appliance
- Press and hold the start button for five seconds.
→Fig. 11
Note
Note the following information regarding storage:
■ Only store the appliance when it is fully charged and switched off.
■ Switch the appliance on and fully charge it again after six months at the latest.
■ We recommend storing the appliance switched on at the station so that the battery is charged.
Home Connect
This appliance is network-capable. Connecting your appliance to a mobile device lets you control its functions via the Home Connect app, adjust its basic settings and monitor its operating status. The Home Connect services are not available in every country. The availability of the Home Connect function depends on the availability of the Home Connect services in your country. You can find information about this at: www.home-connect.com. To be able to use Home Connect, you must first set up the connection to the WLAN home network (Wi-Fi ^1 ) and to the Home Connect app.
The Home Connect app guides you through the entire login process. Follow the instructions, noting the information in the Home Connect app.
Notes
- Please note the safety precautions in this instruction manual and make sure that they are also observed when operating the appliance via the Home Connect app.
→ "Safety", Page 18
- Operating the appliance on the appliance itself always takes priority. During this time it is not possible to operate the appliance using the Home Connect app.
Setting up Home Connect
Requirement: The appliance is receiving signals from the WLAN home network (Wi-Fi) at its installation location.
- Scan the following QR code.
→Fig. 12
You can install the Home Connect app and connect your appliance via the QR code.
- Follow the instructions in the Home Connect app.
Data protection
Please see the information on data protection.
The first time your appliance is registered on a home network connected to the Internet, your appliance will transmit the following types of data to the Home Connect server (initial registration):
■ Unique appliance identification (consisting of appliance codes as well as the MAC address of the installed Wi-Fi communication module).
■ Security certificate of the Wi-Fi communication module (to ensure a secure data connection).
■ The current software and hardware version of your appliance.
■ Status of any previous resetting to factory settings.
en Cleaning and servicing
This initial registration prepares the Home Connect functions for use and is only required when you want to use the Home Connect functions for the first time.
Note: Please note that the Home Connect functions can only be utilised with the Home Connect app. Information on data protection can be retrieved in the Home Connect app.
Cleaning and servicing
To keep your appliance working efficiently for a long time, it is important to clean and maintain it carefully.
Tip: Information and explanations on cleaning and care can be found online by scanning the QR code on the cover page, in the Home Connect app and on our website www.bosch-home.com.
- Do not use abrasive cloths or cleaning agents.
- Do not use cleaning agents containing alcohol or spirits.
▶ Only clean the appliance with a soft cloth without any cleaning agent. - Do not use any sharp, pointed or metal objects.
Troubleshooting
Tip: Information and explanations on troubleshooting can be found online by scanning the QR code on the cover page, in the Home Connect app and on our website www.bosch-home.com.
Removing the battery
- Carefully remove the battery and keep it away from sharp metal objects, such as screw drivers or tools.
Notes
■ To replace the battery, contact trained and authorised specialist staff.
Technical specifications
Appliance
| Model description VXSRPR_W / VXSRPRC_W |
| Dimensions LxWxH in mm 353x351x99 |
| Rated input power 20 V 2 A == |
| Run time in min. max. 160 |
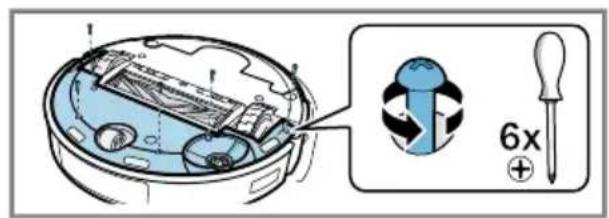
■ Remove the battery when it is either low or completely flat.
Requirement: The appliance is switched off. → Page 25
- Turn the appliance over and lay it on a level surface.
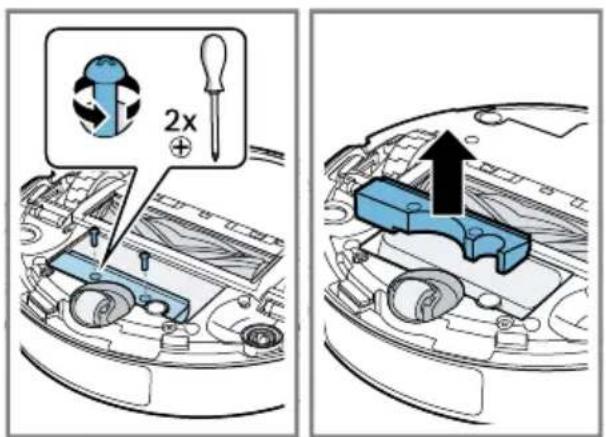
- Remove the six screws from the battery cover.
- Remove the cover from the appliance. →Fig. 13
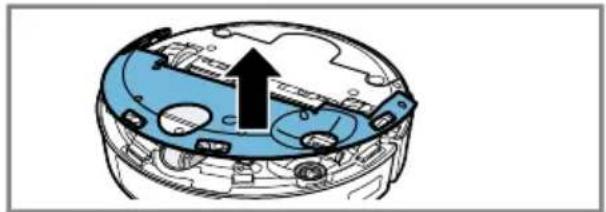
- Remove the two screws as illustrated and take the weight out of the appliance. →Fig. 14
- Disconnect the plug and remove the battery from the appliance. →Fig. 15
- Dispose of the battery.→Page 26
Disposing of old appliance
- Dispose of the appliance in an environmentally friendly manner. Information about current disposal methods are available from your specialist dealer or local authority.
This appliance is labelled in accordance with European Directive 2012/19/EU concerning used electrical and electronic appliances (waste electrical and electronic equipment - WEEE).
The guideline determines the framework for the return and recycling of used appliances as applicable throughout the EU.
Disposing of batteries
Batteries should be recycled in an environmentally friendly manner. Do not dispose of the batteries in the household rubbish.
- Dispose of batteries in an environmentally friendly manner.
| Battery type S34-LI-144-5700 |
| Battery charging time in hrs 5 |
| Wet-dry service station |
| Model description VXBSDW_W |
| Dimensions LxWxH in mm 394x443x527,5 |
| Rated input power 220-240 V ~50-60 Hz 0,5 A |
| Rated power output 20 V 2 A === |
| Input power (emptying) 1000 W |
| Input power (mopping pad clean- 1650 W ing) |
Additional information
Due to its intended function, the appliance has no standby mode or comparable state in terms of energy efficiency, nor does it have the ability to disable wireless network connections.
Energy consumption may be higher than for other appliance types with the same functional requirements.
You can find more detailed information about consumption values online at www.bosch-home.com on the product and service pages for your appliance, in the user manual and additional documents.
RF exposure
To comply with the requirements of the RF radiation exposure guidelines, a minimum distance of 20 cm must be maintained between the appliance and persons when operating this appliance.
To ensure compliance with the guidelines, the distance should not be less than this during operation.
The antenna used for this transmitter must not be co-located with any other antenna or transmitter.
Consumer information about this product (BCRDW3BAB)
The dust bag uses the biocide active ingredient silver nitrate (CAS No.: 7761-88-8, EC No.: 231-853-9).
The fine dust filter uses the biocide active ingredient polyhexamethylene biguanide hydrochloride (CAS No.: 1802181-67-4, EC No. n/a).
This active ingredient protects the product from the development of odours and the growth of bacteria, proven by tests carried out at an external institute in accordance with GB 21551.2-2010 (Test method 2 – Determination of antibacterial activity/absorption methods).
Customer Service
Detailed information about the warranty period and the warranty conditions in your country is available via the QR code on the enclosed document on service contacts and warranty conditions, from our customer service or on our website.
You can find the contact details for our customer service via the QR code on the enclosed document on service contacts and warranty conditions or on our website.
You can find the information required as per Regulation (EU) 2023/826 online at www.bosch-home.com on the product and service pages for your appliance, in the area of user manuals and additional documents.
Declaration of Conformity
BSH Hausgeräte GmbH hereby declares that the appliance with Home Connect functionality conforms to the essential requirements and other relevant provisions of Directive 2014/53/EU.
A detailed RED Declaration of Conformity can be found online at www.bosch-home.com among the additional docu-
ments on the product page for your appli- ance.
CE
Hereby, BSH Hausgeräte GmbH declares that the appliance with Home Connect functionality is in compliance with relevant statutory requirements. ^1
A detailed Declaration of Conformity can be found online at www.bosch-home.co.uk among the additional documents on the product page for your appliance. ^1
UK CA
2.4 GHz band (2400–2483.5 MHz): Max. 65 mW
Statement of Compliance for Great Britain
The full Statement of Compliance according to the Product Security and Telecommunications Infrastructure (Security Requirements for Relevant Connectable Products) Regulations 2023 can be found online at www.bosch-home.co.uk among the additional documents on the product page for your appliance.
Product type
This statement of compliance covers the products described in this information for use whose model identifier group is seen on the title page. The full model identifier is made up of the characters before the slash in the product number (E no.) which can be found on the rating plate. Alternatively, you can also find the model identifier in the first line of the UK Energy Label.
Name and address of manufacturer
This statement of compliance is prepared by the manufacturer.
The manufacturer, BSH Hausgeräte GmbH deems that it has complied with
■ provision 5.1-1 of ETSI EN 303 645 v2.1.1 and, where relevant, provision 5.1-2 of ETSI EN 303 645 v2.1.1;
■ provision 5.2-1 of ETSI EN 303 645 v2.1.1;
■ provision 5.3-13 of ETSI EN 303 645 v2.1.1.
Support period
BSH Hausgeräte GmbH will provide security updates that are necessary to maintain the main functions free of charge until at least 30/04/2030.
Information regarding Free and Open Source Software
This product includes software components that are licensed by the copyright holders as free software or open source software. You can download the licence information on the brand product website. (Please search for your appliance model and additional documents on the product website.)
Sécurité
natural_image
Simple line drawing of a room with a lamp, chairs, and a table, showing two checkmarks (no text or symbols)Configurer Home Connect
natural_image
Simple line drawing of a room with a lamp, chairs, and a table, showing two blue checkmarks (no text or symbols)1 Deksel servicestation
3 Knop servicestation
4 Display servicestation
natural_image
Simple line drawing of a room with a lamp, a table, and a checkmark on the floor (no text or symbols)3 Tast servicestation
4 Indikator servicestation
5 Oplåsningstast støvposerum
6 Klap støvposerum
natural_image
Simple line drawing of a table and chairs in an indoor setting with a lamp and checkmark indicators (no text or symbols)natural_image
Simple line drawing of a room with a lamp, chairs, and a table, marked with blue checkmarks (no text or symbols)natural_image
Simple line drawing of a room with a lamp, two chairs, and a table, plus a checkmark icon (no text or symbols)natural_image
Simple line drawing of a table and chairs in a room with a lamp and a checkmark (no text or symbols)natural_image
Simple line drawing of a table and chairs in an indoor setting with a lamp and checkmark indicators (no text or symbols)natural_image
Simple line drawing of a room with a lamp, chairs, and a table, showing two blue checkmarks (no text or symbols)natural_image
Simple line drawing of a room with a lamp, chairs, and a table, marked with checkmarks (no text or symbols)natural_image
Simple line drawing of a room with a lamp, chairs, and a table, marked with checkmarks (no text or symbols)natural_image
Simple line drawing of a room with a lamp, chairs, and a table, showing two checkmarks (no text or symbols)natural_image
Simple line drawing of a table and chairs in an indoor setting with a lamp and checkmark indicators (no text or symbols)natural_image
Simple line drawing of a room with a lamp, chairs, and a table, showing two checkmarks (no text or symbols)Many thanks for choosing a Bosch home appliance!
Register your new appliance now on MyBosch and benefit directly from:
- Expert advice and tips to make the most of your appliance
- Options for warranty extension
• Discounts on spare parts and accessories
• Digital information for use and all appliance data to hand - Easy access to Bosch Home Appliance Service
Simple to register, free of charge – including on mobile devices: www.bosch-home.com/welcome
BOSCH HOME APPLIANCES SERVICE
Need some help? You can find it here.
Expert advice on your Bosch home appliances, help with problems or repairs by professionals from Bosch.
Discover all the different ways Bosch can assist you:
www.bosch-home.com/service
The contact details of all countries are listed in the attached service directory.
BSH Hausgeräte GmbH
Carl-Wery-Straße 34
81739 München, GERMANY
www.bosch-home.com
A Bosch Company
Valid within Great Britain:
Imported to Great Britain by
BSH Home Appliances Ltd.
Grand Union House
Old Wolverton Road
Wolverton, Milton Keynes
MK12 5PT
United Kingdom

8001371468 (051016)
de, en, fr, it, nl, da, fi, no, sv, pl, el, es, pt, tr, hu, uk