Roxxter BCR1ACP2 - Robot vacuum BOSCH - Free user manual and instructions
Find the device manual for free Roxxter BCR1ACP2 BOSCH in PDF.

Frequently Asked Questions - Roxxter BCR1ACP2 BOSCH
User questions about Roxxter BCR1ACP2 BOSCH
0 question about this device. Answer the ones you know or ask your own.
Ask a new question about this device
Download the instructions for your Robot vacuum in PDF format for free! Find your manual Roxxter BCR1ACP2 - BOSCH and take your electronic device back in hand. On this page are published all the documents necessary for the use of your device. Roxxter BCR1ACP2 by BOSCH.
USER MANUAL Roxxter BCR1ACP2 BOSCH
natural_image
Black circular vacuum cleaner with visible control panel and 'CornerClean' branding (no text or symbols on device body)
MyBosch
Register your new device on MyBosch now and get free benefits:
bosch-home.com/ welcome
BCR1..., BSR1...
[en] Instruction manual Robot vacuum 60
Pause → Stop → Go Home .....24
Leistungsmodi 26
Home Connect 27
Straight line test 57
Software Update 57
Entsorgung 58
Output: 8.0-19.0 V --- 3.0 A
Gerät
Batteriezellenart:
Li-Ionen
Nominalspannung:
14,4
V
Kamera
Videoauflösung
natural_image
3D rendering of a metallic rectangular electronic device with mounting holes (no text or symbols visible)A Akku BRZ1AL
natural_image
3D rendered mechanical component with internal gear-like structure (no text or symbols visible)B Bürstenwalze BRZ1AB
natural_image
3D rendering of a mechanical fan or impeller component (no text or symbols visible)natural_image
Close-up of a mechanical device with an arrow pointing to a circular component inside a box (no text or symbols visible)Auspacken
Bild 1
natural_image
Illustration of a car on a gravel surface with a railing and fence, marked with 'X' symbols (no text or labels)natural_image
3D rendering of a vacuum cleaner with a black arrow indicating rotation (no text or symbols)natural_image
Two-step diagram showing a mechanical component with arrows indicating direction of movement, no text or symbols present.Akku laden
Achtung
text_image
9 Main G00 SPOTBild 9
natural_image
Simple floor plan diagram with three rooms and hatched walls (no text or labels)Reinigungsprogramme
natural_image
Pure architectural floor plan lines without any text, numbers, or symbolsnatural_image
Architectural floor plan diagram with hatched walls and a central square (no text or labels)text_image
13 V24 00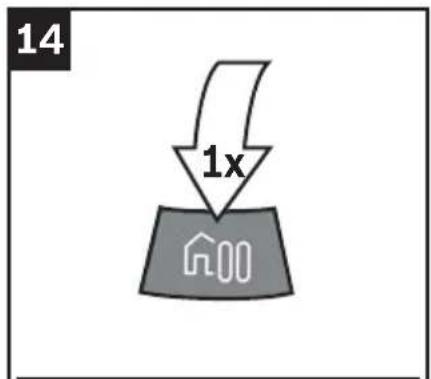
text_image
14 1x 000
natural_image
Pure schematic diagram of a room layout with directional arrows and no text or symbolsPause → Stop → Go Home
text_image
18 Home connectflowchart
graph TD
    A["Sensor Input"] --> B["Switch with Wi-Fi icon"]
    B --> C["Hand interacting with screen"]
    C --> D["User Interface Check"]
    D --> E["User Interface Check with 'OK' icon"]
    E --> F["User Interface Check with 'OK' icon"]
natural_image
Simple line drawing of a bedroom with floor, wall curtains, nightstand, and scattered shoes (no text or symbols)Bild 25
natural_image
Hand holding a device with a label 'ST MOCA' on its side, no visible text or symbols beyond the label.Saugroboter starten
Bild 26
text_image
29 AP ALLBild 29
ALL
natural_image
Diagram of a device with battery and charging symbol, no readable text or labelsnatural_image
Close-up of a robotic vacuum cleaner device with a label '37' in the corner (no visible text or symbols on the device itself)Kamera (R-Cam)\*
Bild 37
natural_image
Close-up of hands pressing down on a device component with directional arrows (no text or symbols visible)natural_image
Abstract graphic with a white icon of a stylized 'U' and dotted lines on a gray background, no text or symbols present.natural_image
Two views of a robotic device showing internal components and mounting holes (no text or symbols visible)Kamera reinigen
natural_image
Illustration of a robotic car with a handle and gear shift, no text or symbols presentAchtung
natural_image
3D rendered mechanical component with no visible text or symbols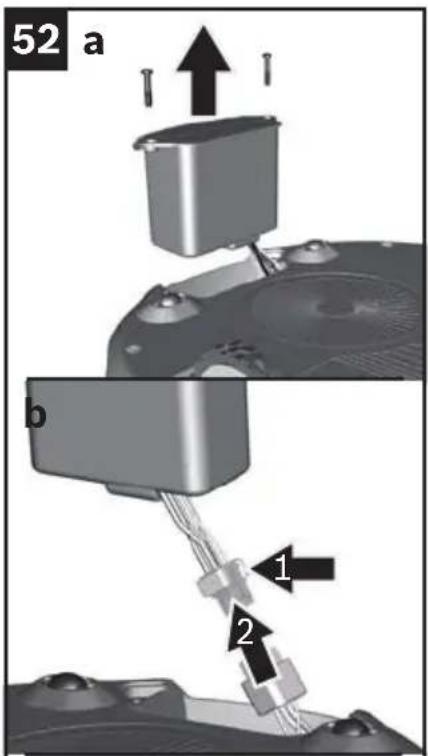
text_image
52 a b 1 2
natural_image
Mechanical component with a downward arrow indicating a process or assembly (no visible text or symbols)
natural_image
Close-up of a mechanical component with a curved arrow indicating rotation or movement (no text or symbols visible)Akku austauschen
Achtung
natural_image
Symbol of a trash bin crossed with no text or labelsLaser navigation system 65
Proper use 6 6
Li-ion battery 68
Camera 70
Transportation information 71
Your vacuum cleaner 72
Special accessories....74
Before starting 75
Unpacking 75
Setting up the charging station 75
Connecting the charging station 76
Before using the appliance for the first time . . . . . . . . . . . . . . . . . . . . . . . . . . . . . 7 6
Switching on the robot vacuum 77
Charging the battery 78
Cleaning programmes and operating modes 79
Cleaning programmes 79
Pause → Stop → Go Home .....82
Operating modes 84
Home Connect 85
Connecting to a wireless network 85
Setting up 86
Disconnecting/reconnecting 89
Restoring the robot vacuum to its factory settings . . . . . . . . . . . . . . . 9 0
Data protection information 91
Declaration of Conformity 91
RED mark 92
Networked energy-saving mode 92
Energy-saving mode 93
Operation 94
Starting requirements 94
Starting the robot vacuum 94
Buttons 95
Indicators and signals 97
Sensor location and function 100
Camera (R-Cam)*....100
Navigation sensors 101
Cleaning and care 102
Emptying the dust box 102
Filter care 105
Cleaning the brush roller 106
Cleaning the navigation sensors 108
Cleaning the camera 109
Cleaning the wheels and rollers 109
Cleaning the housing 110
Maintenance and repairs 111
Changing the battery 1 1 1
Changing the filter unit 112
Faults and troubleshooting .... 1 1 3
Fault indicator and error codes 1 1 3
Test mode and software updates ..... 1 1 5
Straight line test 115
Software updates 115
Disposal....116
Disposing of the appliance 116
Disposing of the battery 116
Disposing of the packaging 116
Customer Service 290
Customer Service Hotlines 293
Conditions of guarantee 294
Technical data en
Charging station
Input: 100-240 V \~50/60 Hz
Output: 8.0-19.0 V --- 3.0 A
Appliance
Battery cell type: Lithium-ion
Nominal voltage: 14.4 V
Camera
Video resolution indoor use Full HD (1080p) outdoor use WVGA (480p)
Video compression H.264
Video stream encryption AES 128
Congratulations on your purchase of a Bosch robot vacuum from the Roxxter series.
Please only use original Bosch accessories – these have been specially developed for your robot vacuum to achieve the best possible vacuuming results.
Please keep this instruction manual for future reference. Should you ever give your robot vacuum to another person, please provide them with this instruction manual.
Intended use
The robot vacuum is intended for domestic use and the household environment only. Only use the robot vacuum for cleaning carpets and hard flooring. The robot vacuum is intended for use up to a maximum height of 2000 metres above sea level. Only use the robot vacuum in accordance with the instructions and information provided in this instruction manual.
In order to prevent injuries and damage, the robot vacuum must not be used for:
■ Vacuuming:
- People or animals.
- Deep pile carpet, stairs, tabletops and shelves.
■ Vacuuming up:
- Hazardous, sharp-edged, hot or burning substances.
- Damp substances or liquids.
- Highly flammable or explosive substances and gases.
- Ash and soot, e.g. from tiled stoves and central heating systems.
- Toner dust from printers and copiers.
■ Use in:
- Bathrooms or other damp environments.
- Cellars or attics.
- Rooms monitored by an alarm system or motion detectors.
Spare parts, accessories
Our original spare parts and original (special) accessories are designed with the properties and requirements of our robot vacuums in mind. We therefore recommend that you only use our original spare parts and original (special) accessories.
This will ensure that your robot vacuum has a long service life and that the quality of its cleaning performance will remain consistently high.
Note
Using unsuitable or inferior-quality spare parts and (special) accessories may damage your robot vacuum. Damage caused by the use of such products is not covered by our guarantee.
Safety information
This robot vacuum complies with the generally accepted rules of good engineering practice and the relevant safety regulations.
■ The appliance may be used by children over the age of 8, by persons with reduced physical, sensory or mental capacity, or by persons with a lack of experience and/or knowledge provided that they are supervised or have been instructed on how to use the appliance safely and that they have understood the potential dangers of using the appliance.
■ Do not let children play with the appliance.
■ Cleaning and user maintenance must not be performed by children unless they are supervised.
■ Plastic bags and film must be kept out of reach of children or disposed of.
→ They pose a risk of suffocation.
Laser navigation system
Laser class 1 as per DIN EN 60825-1:2015-07
■ Do not direct the laser beam at people, as the glare may cause accidents.
■ Do not look directly into the laser beam or into reflections of the laser beam.
■ The robot vacuum must not be manipulated (modified) in any way.
■ The built-in laser navigation system merely captures the laser spectrum for navigation purposes – it is not a camera.
Proper use
■ Only charge the appliance using the power supply cable and the original charging station provided.
■ Connect and use the power supply cable and the original charging station as indicated on the rating plate.
■ If the power supply cable becomes damaged, stop using it and replace it with an original one.
■ Pull on the plug, not the cable, to unplug the power supply cable from the mains.
■ Do not pull the power supply cable over sharp edges or allow it to become trapped.
■ Do not use the power supply cable to carry/transport the charging station.
■ The appliance must only be stored and charged indoors.
■ To make best use of the battery capacity, the appliance should be stored and operated at room temperature.
■ Do not expose the appliance to temperatures below 0 °C or above 40 °C.
■ Never attempt to vacuum without the dust box and filter.
→ This may damage the appliance.
- Keep the vacuum cleaner away from your head. Do not move the appliance close to long hair, scarves, ties or similar.
→ This poses a risk of injury.
■ Never touch the rotating parts.
■ Do not insert sharp objects into the electrical contacts.
■ Do not modify the contacts.
■ Objects may fall over (including objects placed on tables or small items of furniture) if the robot vacuum knocks into them, however gently.
- Keep an eye on the robot vacuum the first couple of times you use it. If there are obstacles in the room that the robot vacuum cannot overcome, this will enable you to remove them in good time and thereby avoid unwanted interruptions.
■ The robot vacuum could become caught in telephone cables, electric cables, tablecloths, string, belts, etc. Remember that, in extreme cases, this could cause objects to fall down. Electric cables could also be damaged, which could result in electric shock, fire and/or serious injuries.
■ Do not cover the window on the charging station.
→ Covering the window will prevent the robot vacuum from detecting the charging station.
■ Do not cover the charging station.
→Overheating in the charging station could damage the appliance.
■ Never cover the sensors on the robot vacuum, as this will prevent the robot vacuum from orientating itself and navigating.
■ Do not place the charging station in an area that is exposed to direct sunlight for long periods of time.
■ Do not use the charging station or robot vacuum if damaged.
■ If a fault occurs, unplug the charging station/switch off the robot vacuum.
■ For safety reasons, only authorised after-sales service personnel are permitted to carry out repairs and fit replacement parts to the charging station and robot vacuum.
■ Do not add flammable substances or substances containing alcohol to the filter.
■ For safety reasons, the appliance is fitted with an overheating protection system to safeguard the battery and motors. The appliance will switch off automatically if it or the battery is too hot.
→ The appliance will need around 30 minutes to cool down before it can be used again.
■ The packaging protects the charging station/robot vacuum against damage during transit. We therefore recommend keeping the packaging in case the appliance needs to be transported in the future.
Li-ion battery
- Read all the safety information and instructions.
→Failure to act in accordance with the safety information and instructions may result in electric shock, fire and/or serious injury.
- Keep all the safety information and instructions for future reference.
■ Do not open the battery.
→ This poses a risk of short circuiting.
■ Protect the battery from heat sources, for example avoiding long periods in the sun and exposure to fire, as well as from water and moisture.
→ This poses a risk of explosion.
■ Fumes may be released if the battery is damaged or used improperly. Circulate fresh air, and seek medical assistance in the event of physical symptoms arising as a result of exposure.
→ The fumes may irritate the airway.
■ Only use the battery in your Bosch Roxxter.
→Dangerous overloading may occur if the battery is used in other appliances.
■ Only charge the battery fitted in the vacuum and with the original charging station.
→There is a risk of fire if a charger that is designed for a particular type of battery is used to charge other batteries.
- Only use the intended battery – type 4INR19/66-2 (special accessory BRZ1AL) – in the Bosch Roxxter.
→ Using a different battery may result in injury or fire.
■ The battery must be charged before putting the robot vacuum into storage for a long time.
■ If the robot vacuum will be in storage for several months, charge the battery fully and remove it from the appliance.
■ When not in use, keep the battery away from paper clips, coins, keys, nails, screws and other small metal objects that may cause the plug contacts to be bridged. Short circuiting between the plug contacts may result in burns or even fire.
■ If the battery is defective, liquid may leak out onto objects in the vicinity. Check any components that may be affected by this.
→Clean these components, or replace them if necessary. Avoid contact with this liquid.
■ If the battery is used incorrectly, liquid may leak out of the battery. Avoid touching the liquid. In the event of accidental contact, rinse the affected area with water. If the liquid comes into contact with the eyes, seek medical assistance.
→If battery liquid leaks, it can irritate or burn the skin.
■ Do not use defective batteries. Replace defective batteries immediately and dispose of them.
■ The battery may be damaged by sharp objects, such as nails and screwdriver bits, or by external forces. This can result in a short circuit and the battery burning, emitting smoke, overheating or exploding.
Camera
■ Please only use the camera in accordance with the legal regulations of the country in which you are using the appliance. Do not use the camera, for example, to intrude on the privacy of others without their consent.
■ Inform any persons present that a camera is being used. Only use the streaming function if any persons present have consented to this.
Transportation information
The li-ion battery provided is subject to regulations for transporting dangerous goods. The battery can be transported by the user by road without any further requirements. If it is shipped by a third party (e.g. transported by air or freight carrier), special requirements regarding packaging and identification must be met. In this case, a dangerous goods expert must be consulted when preparing the goods for dispatch.
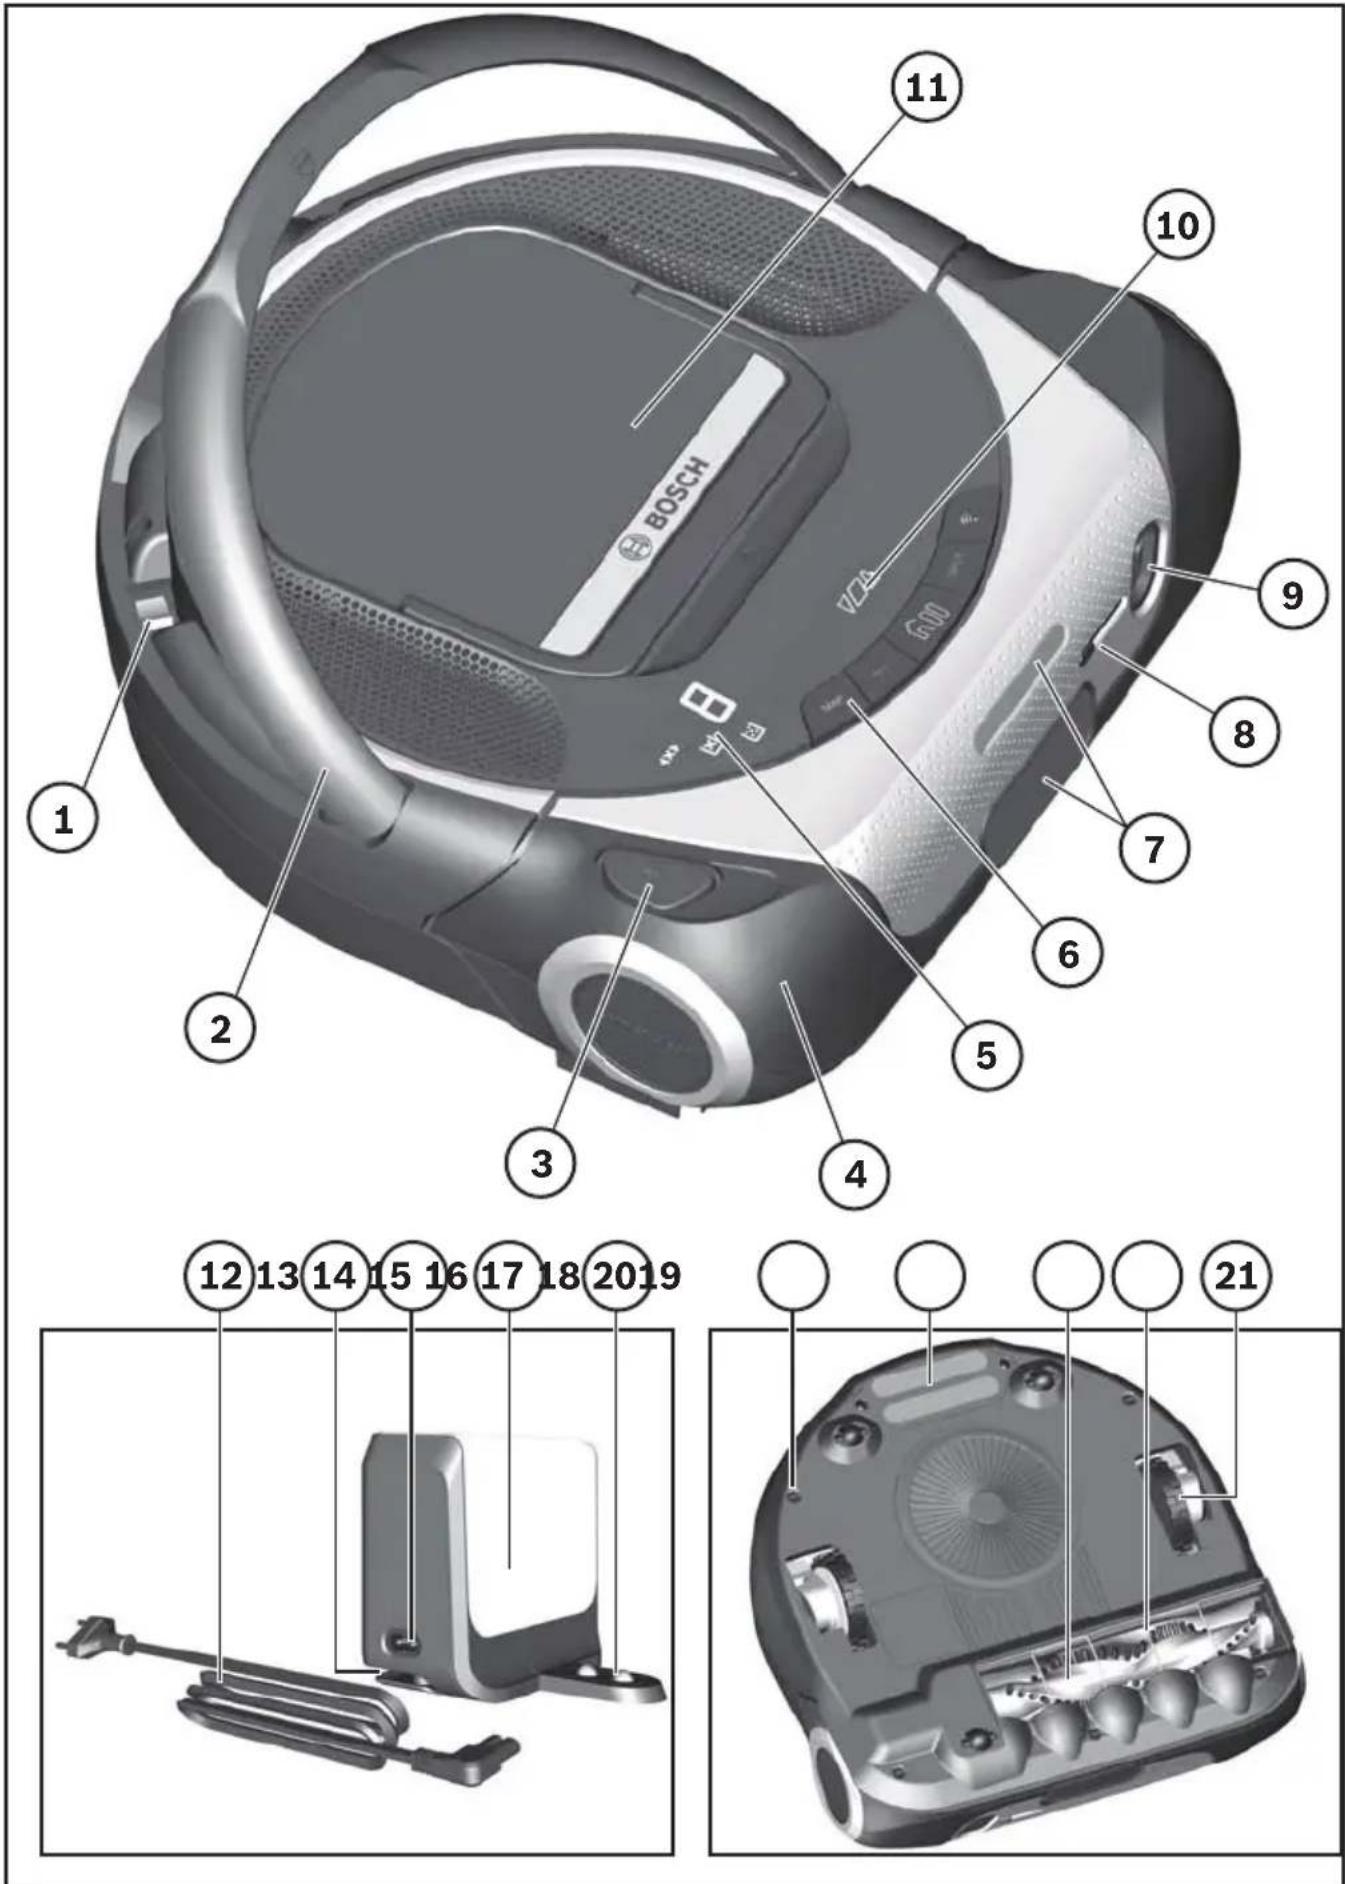
Your vacuum cleaner en
① On/off switch
② Carry handle
③Brush roller release button
④ Contact sensor
⑤ Error and fault indicators
⑥ Buttons for basic functions and cleaning programmes
⑦ Laser navigation system
⑧Slider for camera cover*
⑨ Camera (R-Cam)*
⑩ Charging indicator
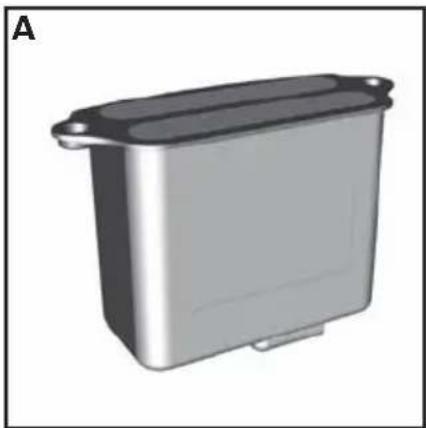
⑪ Filter unit with dust box
⑫ Charging station power cable
⑬ Charging station cable tidy
⑭ Power cable socket
⑮ Charging station
⑯ Charging station charging contacts
⑰ Drop sensor
⑱ Battery charging contacts
⑲ Brush roller
⑳ Cable guard
②1 Driving wheel
Special accessories en
Note
We recommend using original Bosch accessories. These are specially designed to fit your appliance. You can purchase original Bosch accessories online or from specialist retailers.
natural_image
3D rendering of a metallic rectangular device with rounded top and side mounting points (no text or symbols)A Battery: BRZ1AL
Li-ion battery with a long running time in the Bosch Roxxter.
natural_image
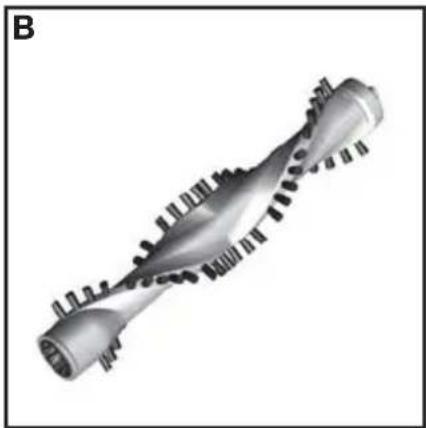
3D rendered mechanical component with threaded end and flanged shaft (no visible text or symbols)B Brush roller: BRZ1AB
High-performance brush roller for clean floors.
natural_image
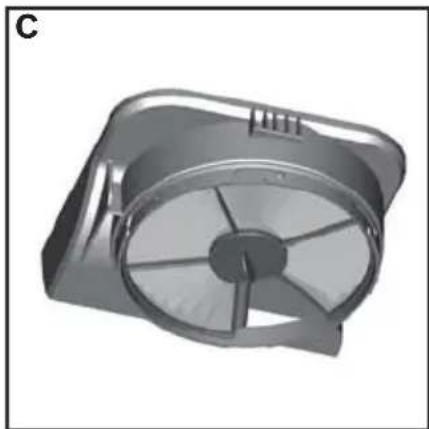
3D rendering of a mechanical fan or impeller component (no text or symbols visible)C Filter unit with lint filter: BRZ1AF
Pure Air filter for clean exhaust air.
We recommend replacing the filter unit with lint filter every six months.
Before starting en

natural_image
Close-up of a mechanical device with an arrow pointing to a circular component inside a box (no text or symbols visible)Unpacking
Fig. 1
When unpacking the appliance, check to ensure that all parts have been included. Please contact your dealer immediately if you notice that any parts are missing or any parts have been damaged during transit.
Setting up the charging station
Caution
- Choose a position for the charging station in which it will never be covered. If the station is covered, the robot vacuum will not be able to detect it.
natural_image
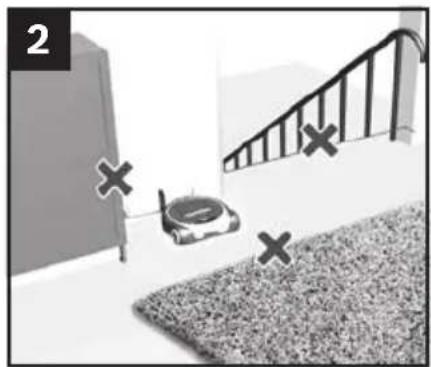
Illustration of a car on a gravel surface with a railing and fence, marked with 'X' symbols (no text or labels)Fig. 2 Recommendations
Follow these recommendations for setting up the charging station:
Place the charging station near a plug socket.
Place the charging station on a flat surface against a wall.
Do not place the charging station near stairs or items of furniture.
text_image
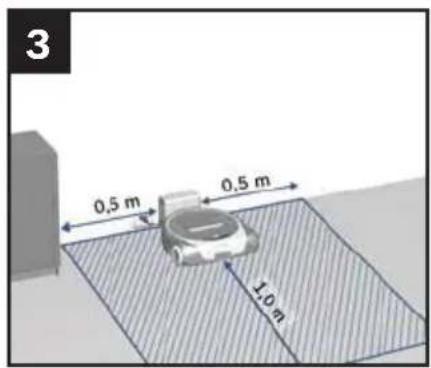
3 0,5 m 0,5 m 1,0 mFig 3 Charging station clearance
Keep at least 0.5 m clear to the left and right of the charging station.
Keep at least 1.0 m clear in front of the charging station (with the robot vacuum connected).
Note
By "clear" we mean that the area is flat and easily accessible, without any obstacles or differences in height.
Before starting en
text_image
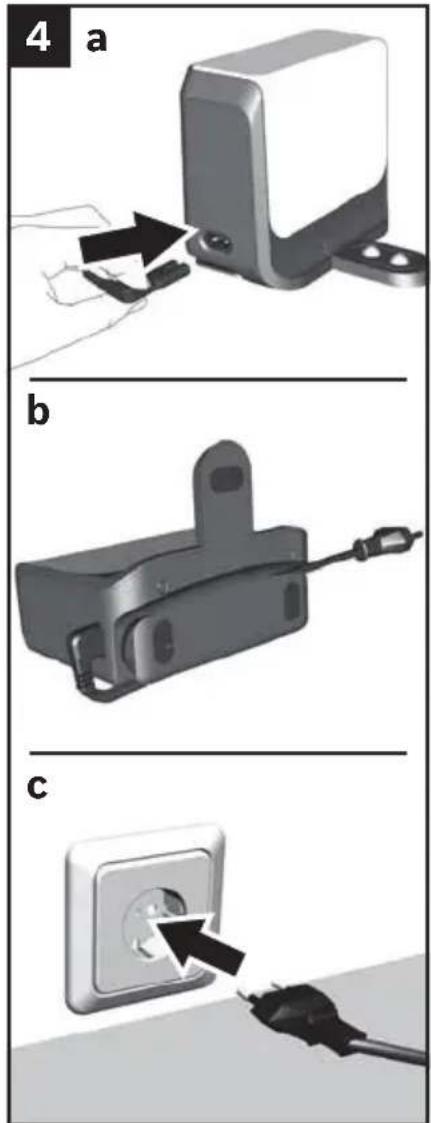
4 a b c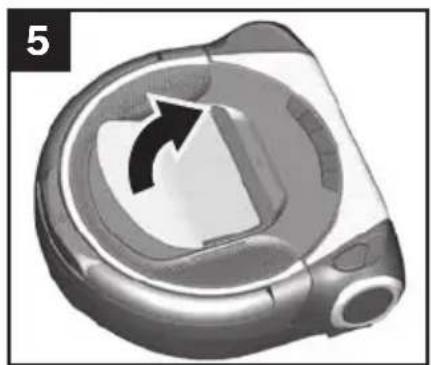
natural_image
3D rendered image of a robotic vacuum cleaner with a black arrow indicating rotation (no text or symbols)Connecting the charging station
Do not lay any cables in front of the charging station as they could prevent the robot vacuum from docking.
Fig. 4
a) Plug the charging cable into the charging station.
b) Wind the rest of the power cable around the cable tidy.
Do not wind the power cable more than necessary.
c) Plug the mains plug into a power socket.
Before using for the first time
The sensitive surfaces of your robot vacuum are covered with protective film during transit to prevent the appliance being damaged or scratched.
Fig. 5
Remove the protective film from the top of your robot vacuum before using it for the first time.
Before starting en
text_image
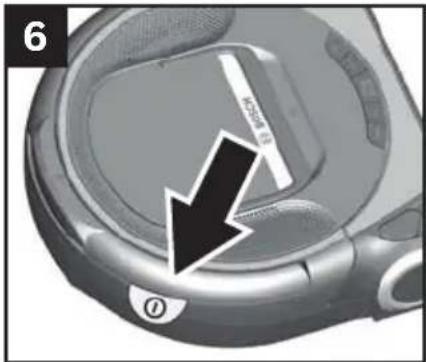
6 300000000Switching on the robot vacuum
Note
The red sticker on the robot vacuum's carry handle is designed to make it easier to find the on/off switch underneath the carry handle.
Fig. 6
Remove the sticker before starting the appliance.
Note
The on/off switch is underneath the robot vacuum's carry handle.
text_image
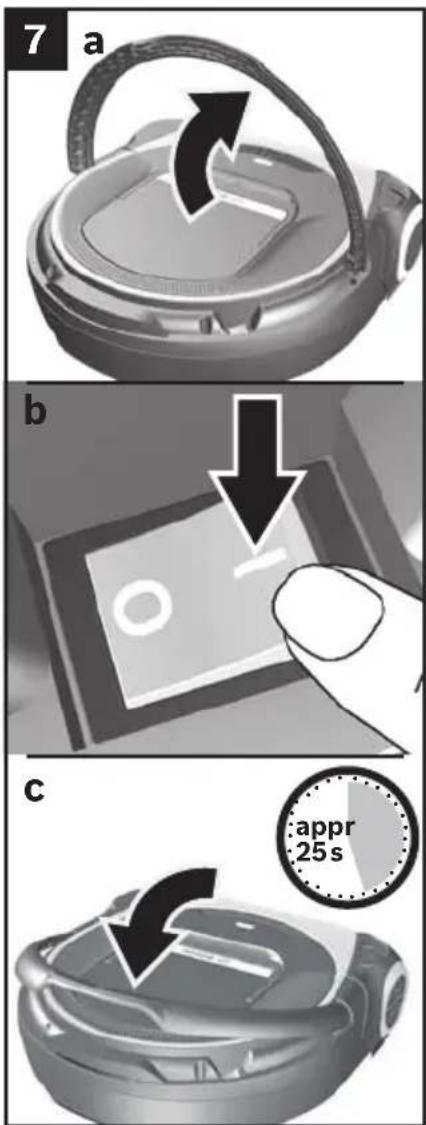
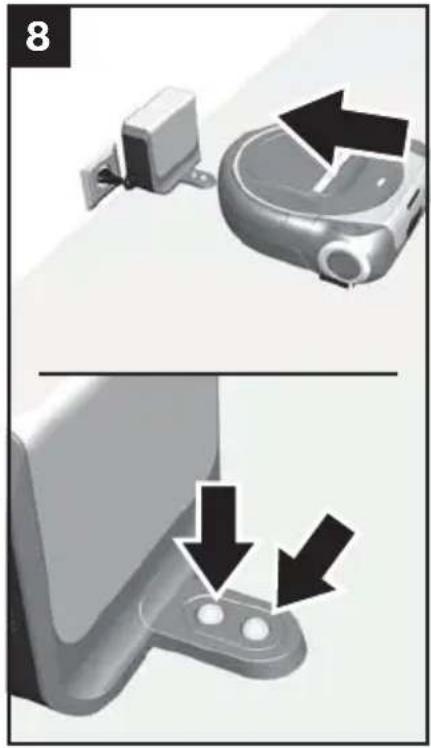
7 a b c appr 25 sFig. 7
a) Lift the robot vacuum's carry handle up.
b) Press the on/off switch in the direction of the arrow. The robot vacuum is started.
The buttons on the front of the appliance will light up from left to right and three short beeps will indicate that the vacuum is starting up.
Note
The robot vacuum takes approximately 25 seconds to start up.
c) Put the robot vacuum's carry handle down.
Caution
The battery in the robot vacuum must be fully charged before using it for the first time. Fig. 8
Before starting en
natural_image
Two-step diagram showing a mechanical component with arrows indicating direction of movement, no text or symbols present.Charging the battery
Caution
- Only charge the robot vacuum using the charging station provided.
Fig. 8
Position the robot vacuum with its back against the charging station and wait for charging to be indicated.
Note
If charging is not indicated, press the back of the robot vacuum onto the charging contacts.
Note
If you have not used the robot vacuum (and consequently the battery) for a long time, the battery may have discharged. The battery is protected to prevent it being damaged by this. If the battery has discharged, it may take up to two minutes for the battery indicator to light up once charging has started.
text_image
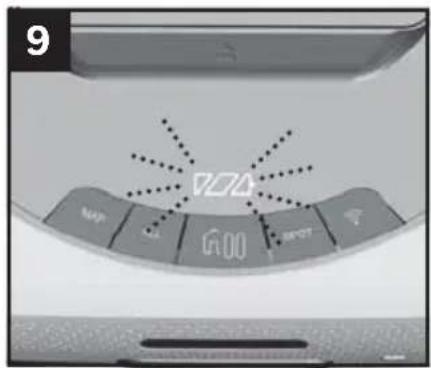
9 VCA MSP G00 SPOTFig. 9
The charging indicator will flash during the charging process.
Once the battery is fully charged, the charging indicator will stay lit and stop flashing.
It is completely normal and quite safe for the charging station and the robot vacuum to heat up while charging.
You can find detailed information about the charge indicator in the "Indicators and signals" section. Fig. 33
Cleaning programmes and operating modes en
10
natural_image
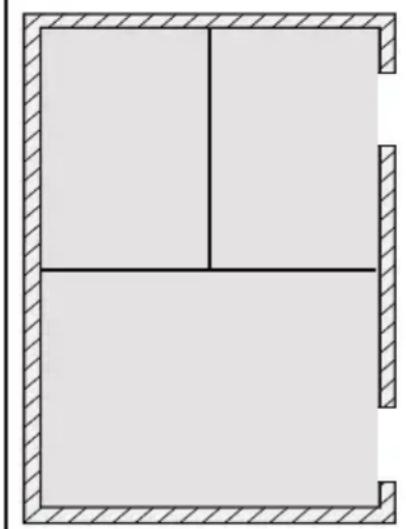
Pure architectural floor plan lines without any text, numbers, or symbolsCleaning programmes
The robot vacuum has various cleaning programmes for cleaning specific rooms or areas.
You can select and control the cleaning programmes using the controls on the robot vacuum or via the Home Connect app.
ALL cleaning programme
Fig. 10
With the ALL cleaning programme, the robot vacuum cleans all accessible rooms one after the other.
When you start the ALL cleaning programme, the robot vacuum will explore its immediate surroundings and create a temporary map. It will then start systematically cleaning the area it has explored.
Large rooms will be divided into areas of around 20 square metres each. The robot vacuum will divide rooms into smaller areas automatically.
It will then move over and clean the individual areas in lines parallel to the long side of the area boundary.
It will detect any areas it has missed and clean them separately at the end.
The cleaning programme can be used in the Silent, Eco and Power operating modes.
You can find detailed information about the operating modes in the "Operating modes" section. Fig. 17
Once all accessible rooms have been cleaned, the robot vacuum will go back to the place where it started cleaning.
If the battery level is too low, the robot vacuum will return to its original position and the programme will be paused. If cleaning started from the charging station, the robot will recharge itself (once only) and then resume cleaning. Otherwise, it will go into energy-saving mode.
Cleaning programmes and operating modes en
11

natural_image
Pure architectural floor plan lines without any text, numbers, or symbolsMAP cleaning programme
Fig. 11
With the MAP cleaning programme, the robot vacuum moves over and cleans the map of your house in a fixed cleaning pattern. You will need to create and confirm this map using the Home Connect app via the robot vacuum first.
We recommend that you leave all doors open when creating a new map. We also recommend having the robot explore a new map starting from the charging station. The robot vacuum will return to its original position after exploring a map in the MAP cleaning programme.
When you place the robot vacuum in a room and then start the MAP cleaning programme, the robot vacuum will orientate itself before starting cleaning. The same thing will happen if you lift up the robot vacuum while it is cleaning and then resume the paused MAP cleaning programme.
When you use the buttons on the robot vacuum, the robot vacuum will check whether the most recently saved map matches the room to be cleaned before starting. If the room is the same as the available map, the robot vacuum will start cleaning. If it is not, the cleaning programme will be cancelled.
When operating the robot vacuum using the Home Connect app, you can select one or more rooms for cleaning individually. You can also mark particular areas as "no-go zones". The robot vacuum will not enter these areas when cleaning and they will be missed out.
The cleaning programme can be used in the Silent, Eco and Power operating modes.
You can find detailed information about the operating modes in the "Operating modes" section. Fig. 17
If the battery level is low, the robot vacuum will return to the charging station. The programme will be resumed once it has recharged. This will only happen once – if the battery drains a second time, the robot vacuum will return to the charging station and stop cleaning.
Cleaning programmes and operating modes en

natural_image
Architectural floor plan diagram with hatched walls and a central square (no text or labels)SPOT cleaning programme
Fig. 12
With the SPOT cleaning programme, the robot vacuum thoroughly cleans an area measuring approximately one square metre.
When operating the robot vacuum using the buttons, it must be placed in the centre of this area; when usi the Home Connect App, the robot vacuum will move to this area automatically. The robot vacuum will then move over and clean this area in parallel lines.
Once the area has been cleaned, the robot vacuum will return to where it started.
This cleaning programme can only be used in Power mode.
You can find detailed information about the operating modes in the "Operating modes" section. Fig. 17
Cleaning programmes and operating modes en
text_image
13 V24 00
text_image
14 1x 000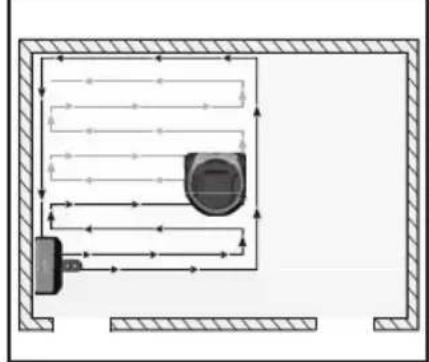
natural_image
Pure schematic diagram of a room layout with directional arrows and no text or symbolsPause → Stop → Go Home
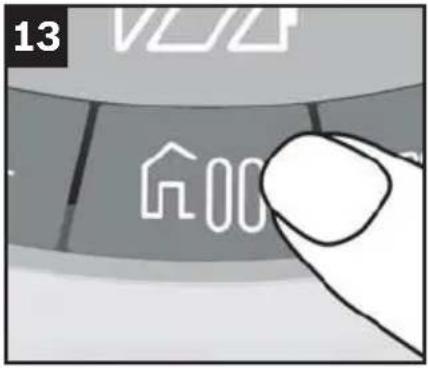
Fig. 13 "Go Home/Pause" button
You can pause, stop or send the robot vacuum back to where it started at any time by pressing the "Go Home/Pause" button on the robot vacuum.
Pausing the cleaning programme
Fig. 14
Press the "Go Home/Pause" button while a cleaning programme is in progress.
The robot vacuum will stop and pause the active cleaning programme.
The "Go Home/Pause" button and the button for the active cleaning programme will flash in the colour of the selected cleaning mode.
Press the relevant programme button again to un-pause the robot vacuum and resume the cleaning programme.
Note
If you pause the robot vacuum by pressing the "Go Home/Pause" button, for your own safety – or if you do not want to resume cleaning via the app – you should either deactivate your wireless network or switch the appliance off completely using the toggle switch.
Cleaning programmes and operating modes en
text_image
15 2x H00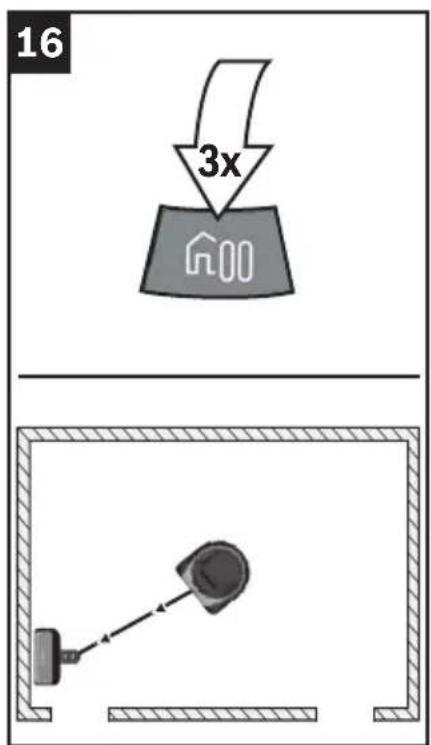
text_image
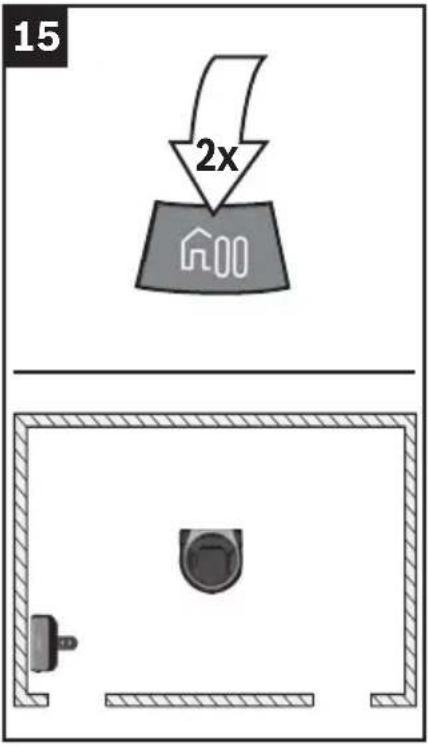
16 3xStopping the cleaning programme
Fig. 15
When paused, pressing the "Go Home/Pause" button again will stop the active cleaning programme.
The robot vacuum is ready to use. This will be indicated by the buttons flashing at 5 second intervals.
"Go Home" function
Fig. 16
Once stopped, pressing the "Go Home/Pause" button a third time will send the robot vacuum back to where it started cleaning.
If you have placed the robot vacuum somewhere it does not recognise and activated the "Go Home" function, the robot vacuum will spend 10 minutes trying to find the charging station.
If you have started and stopped a cleaning programme before activating the "Go Home" function, the robot vacuum will return to its original position.
If it started cleaning from the cleaning station, the robot vacuum will return to the charging station.
Note
If you send the robot vacuum back to where it started using the "Go Home" function, its journey cannot be paused. Pressing the "Go Home/Pause" button will stop the robot vacuum.
Cleaning programmes and operating modes en
text_image
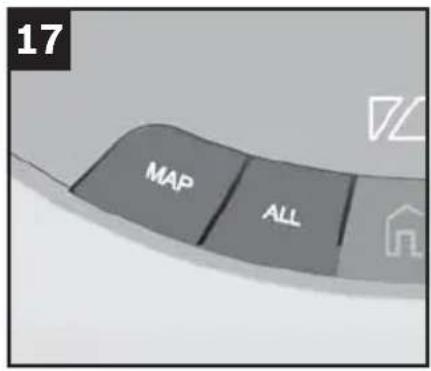
17 MAP ALLOperating modes

text_image
Fig. 17 → Silent → Eco → PowerIn the MAP d cl All.g programmes, you can switch between three different operating modes by pressing the relevant button.
Which operating mode is active is indicated by the button on the appliance lighting up a specific colour.
Silent mode: green
For simple cleaning tasks, with a very low operating noise and long battery life.
Eco mode: white
For normal cleaning tasks, with highly efficient cleaning and battery life.
Power mode: orange
Maximum power for demanding everyday cleaning tasks in medium-sized rooms.
Note
The SPOT cleaning programme can only be used in Power mode.
text_image
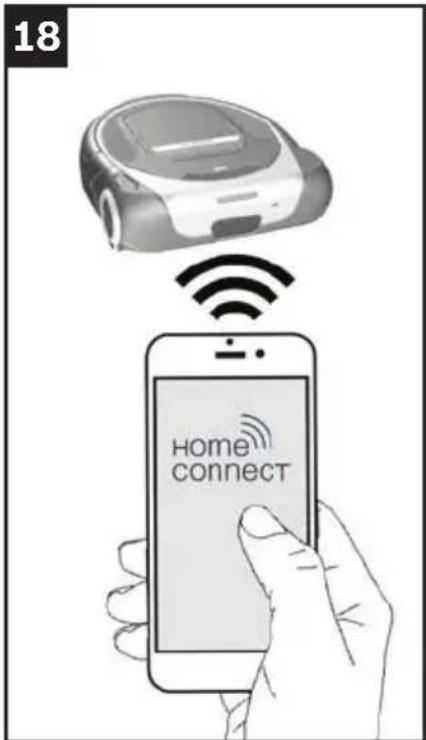
18 Home connectConnecting to a wireless network
Fig. 18
The robot vacuum can be wirelessly remote controlled using a mobile device such as a smartphone or tablet. The Home Connect app offers extra functions for making full use of the networked appliance.
If the robot vacuum is connected to a wireless local area network (home network), it can be controlled via the buttons.
Note
Please ensure that you always follow the safety instructions given at the beginning of this instruction manual, even when you are away from home and are operating the appliance via the Home Connect app. Please also follow the instructions in the Home Connect app.
Note
The availability of Home Connect functions depends on the availability of Home Connect services in your country. Home Connect services are not available in every country. You can find more information on this at www.home-connect.com.
Home Connect en
text_image
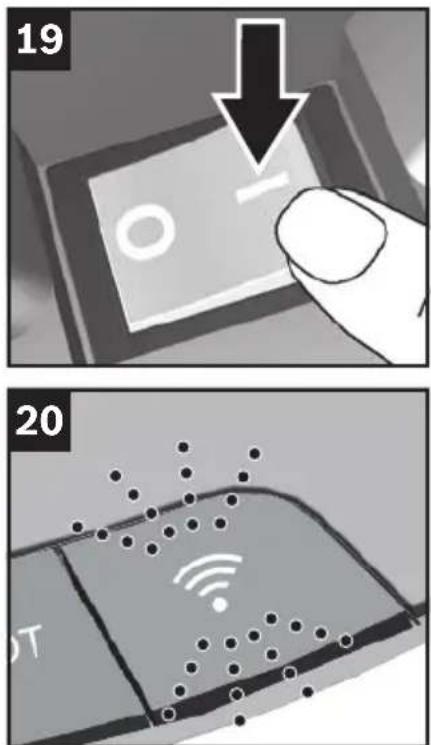
19 20Setting up
To configure settings via Home Connect, you will need to have installed the Home Connect app on a mobile device such as a smartphone or tablet. Refer to the Home Connect documents supplied for more information.
Follow the steps specified by the app to apply the settings.
Press the "Wireless network" button on the robot vacuum to connect it to your wireless local area network.
Fig. 19
Switch the robot vacuum on.
The robot vacuum is ready to use. This will be indicated by the buttons flashing at 5 second intervals.
Fig. 20
If the "Wireless network" button lights up white, the robot vacuum is active and can be connected to a wireless local area network.
Note
Please make sure your router is configured to support communication between devices with wireless networking functionality.
Note
Make sure that the robot vacuum is not in energy-saving mode.
Note
You can find out more about how to connect your Roxxter to the Home Connect app at https://www.home-connect.com/gb/en/help-support/set-up. The Home Connect app also contains other video tutorials about the Roxxter's functions.
text_image
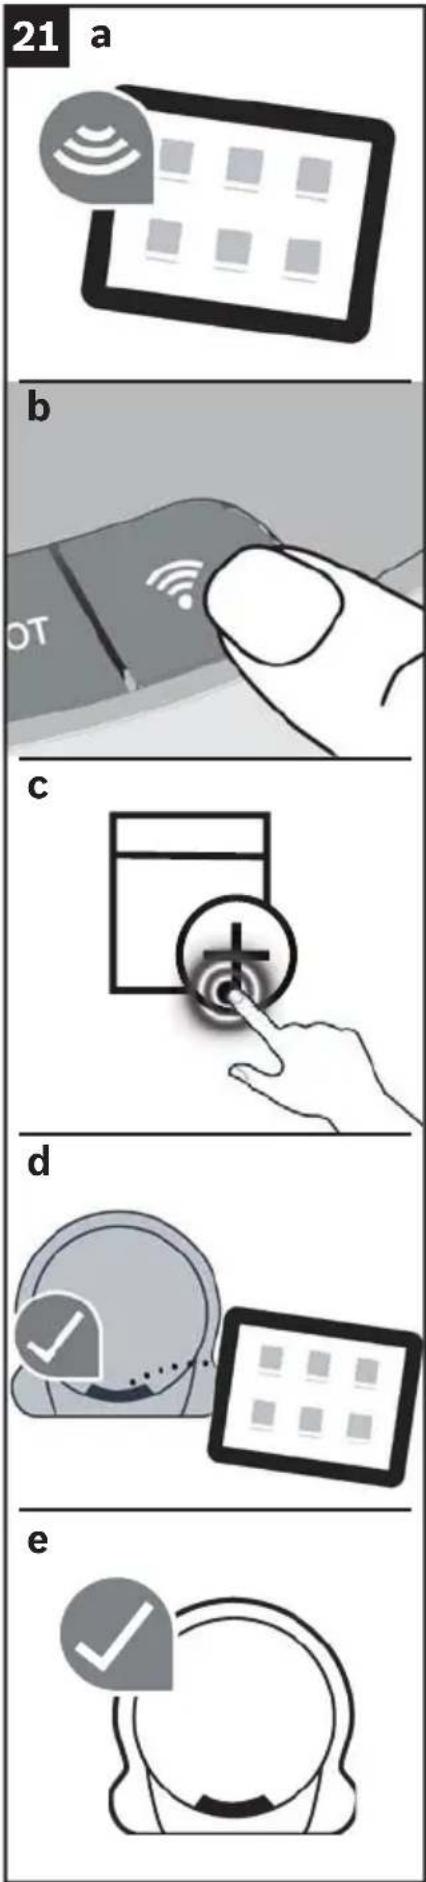
21 a b c d eConnecting to a wireless local area network automatically
Note
If your router has WPS functionality, please connect the robot vacuum to your wireless local area network as described here.
Fig. 21
Deactivate mobile data and activate wireless networking on your mobile device.
a) Connect your mobile device to your home network.
b) Press and hold the "Wireless network" button for at least 3 seconds until the the button flashes blue.
Press the WPS button on your router within the next 2 minutes.
Wait until the "Wireless network" button lights up green and three beeps indicate that connection has been successful.
c) Open the Home Connect app and select [Add appliance].
Alternatively, a small pop-up will appear showing the robot vacuum.
If this happens, select [Add].
If prompted to, confirm the important information shown in the app and select [Next].
Wait for the app to check the requirements for connecting the appliance.
If you did not already do so in the pop-up at point c), now select the robot vacuum you want to connect using [+].
If the Home Connect app requires confirmation on the appliance, briefly press the "Wireless network" button on your robot vacuum.
d) The robot vacuum will connect to the app.
Select [Next].
Set the time function you want in the app and confirm with [Done].
e) The functions of the robot vacuum can now be used in full via the app on the mobile device.
Connecting to a wireless local area network manually
Note
The robot vacuum sets up its own wireless local area network for the end device to access.
Fig. 22

text_image
22 a b c dDeactivate mobile data and activate wireless networking on your mobile device.
a) Connect your mobile device to your home network.
b) Open the Home Connect app and select [Add appliance].
- Confirm the important information shown in the app and select [Next].
Wait for the app to check the requirements for connecting the appliance.
If you have added other Home Connect appliances to your home network already, select [+] next to "Add another home appliance". If you have not added any Home Connect appliances to your home network yet, step-by-step instructions for connecting the appliance will appear. Select [Start]. If prompted to, enter the password for your wireless local area network and select [Next].
c) If the Home Connect app requires connection to be started on the appliance, briefly press the "Wireless network" button on your robot vacuum. The button will flash yellow for confirmation.
iOS: Now select [Next] and connect to "Home Connect" as described there. You will need to enter the password for your wireless local area network and confirm by selecting [Next].
Wait until the "Wireless network" button lights up green and three beeps indicate that connection has been successful. This may take a few minutes.
Android: Now select [Next].
d) The robot vacuum will connect to the app.
Select [Next].
Set the time function you want in the app and confirm with [Done].
Home Connect en
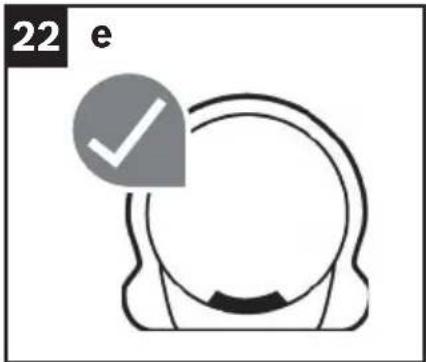
text_image
22 ee) The functions of the robot vacuum can now be used in full via the app on the mobile device.
text_image
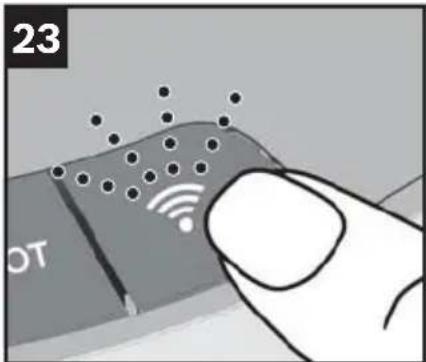
23 10TDisconnecting/reconnecting
You can disconnect the robot vacuum from your wireless local area network at any time.
Note
If the robot vacuum is disconnected from your wireless local area network, you will not be able to control it via Home Connect.
Fig. 23
Press the "Wireless network" button (which will be lit white or green) on the control panel twice within 1 second.
The "Wireless network" button will go out after approximately 2 seconds, indicating that the robot vacuum has been disconnected from the wireless local area network.
Pressing the "Wireless network" button again will reactivate the vacuum robot's wireless networking function. If the robot vacuum was connected to a wireless local area network before, it will reconnect to this network.
Note
The wireless local area network information will be retained indefinitely unless the robot vacuum is restored to its factory settings.
Home Connect en
text_image
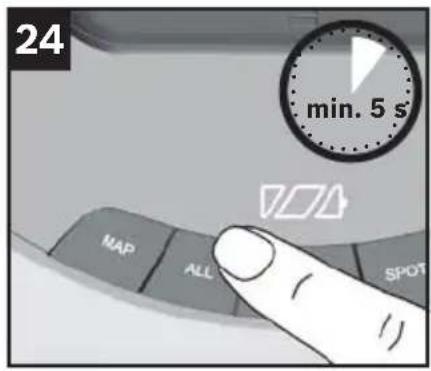
24 min. 5 s MAP ALL SPOTRestoring the robot vacuum to its factory settings
Restoring the robot vacuum to its factory settings will delete all personal data, such as information about the wireless local area network and saved maps.
Fig. 24
With the robot vacuum ready to use, press and hold the "ALL" button for at least 5 seconds.
The robot vacuum will be restored to its factory settings.
Note
The appliance should be restored to its factory settings before being given or sold to someone else.
Data protection information
When the robot vacuum is connected to a wireless local area network that is connected to the Internet for the first time, the robot vacuum transmits the following categories of data to the Home Connect server (initial registration):
- Unique appliance identification (consisting of appliance codes and the MAC address of the installed wireless networking communication module).
■ Security certificate of the wireless networking communication module (to ensure a secure IT connection). - The robot vacuum's current software and hardware versions.
■ Status of any previous restoration of the factory settings.
This initial registration prepares the Home Connect functions for use and is only required when you want to use these Home Connect functions for the first time.
Note
Please note that the Home Connect functions can only be used in conjunction with the Home Connect app. You can find information about data protection in the Home Connect app.
Declaration of Conformity
BSH Hausgeräte GmbH hereby declares that the appliance with Home Connect functionality meets the basic requirements and other relevant provisions of the Directive 2014/53/EU.
A detailed RED Declaration of Conformity can be found online at www.bosch-home.com among the additional documents on the product page for your appliance.
RED mark
2.4 GHz band: 100 mW max.
5 GHz band: 100 mW max.
|  | |||||||
| BE BG | CZ DK | DE EE | IE EL | ||||
| ES FR | HR IT C | CY LV LT | LU | ||||
| HU MT | NL AT | PL PT | RO SI | ||||
| SK FI | SE UK | NO CH | TR | ||||
| 5 GHz WLAN: for indoor use | |||||||
Networked energy-saving mode
In networked standby mode, the appliance requires a maximum of 2 W
Energy-saving mode
The appliance will automatically switch to energy-saving mode (standby) after 10 minutes of inactivity. The appliance can also be put into energy-saving mode using the app.
To show that the appliance is in energy-saving mode and ready to use, the battery indicator will flash briefly (for 250 ms) every 10 seconds. This flashing also helps to locate the appliance, for example in poorly lit rooms.
The appliance can be brought out of energy-saving mode either by pressing one of the buttons ("MAP", "ALL", "PAUSE" or "SPOT") or via the Home Connect app.
If the appliance is in energy-saving mode and the battery is being charged on the charging station, the charging indicator will be displayed.
Perparing your household for the robot vacuum
Caution
Do not leave cables lying around – risk of damage!
natural_image
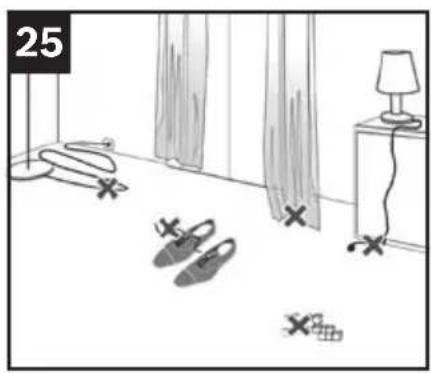
Simple line drawing of a bedroom with floor, wall curtains, nightstand, and scattered shoes (no text or symbols)Fig. 25
Do not leave any small items (or similar) on the floor when the robot vacuum is in operation, as these could present obstacles to the vacuum cleaner.
Potential obstacles include:
Magazines, books, newspapers, paper, clothing, toys, CDs, plastic bags, bottles, glasses, curtains on the floor and bathmats.
For your own safety, if the room does not meet these requirements or you do not want to start a cleaning programme via the app, either deactivate your wireless network or switch the appliance off completely using the toggle switch.
natural_image
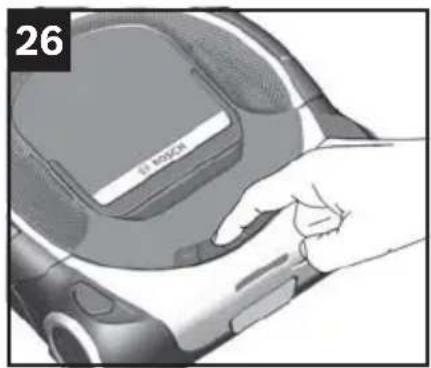
Hand holding a device with a label 'ST BOSCU' on its side, no visible text or symbols beyond the label.Starting the robot vacuum
Fig. 26
Start a cleaning programme by pressing one of the buttons on the robot vacuum or via the Home Connect app.
Select an operating mode either by pressing the button the necessary number of times or via the Home Connect app.
The robot vacuum will start cleaning with the selected cleaning programme and operating mode.
The button for the active cleaning programme will light up.
text_image
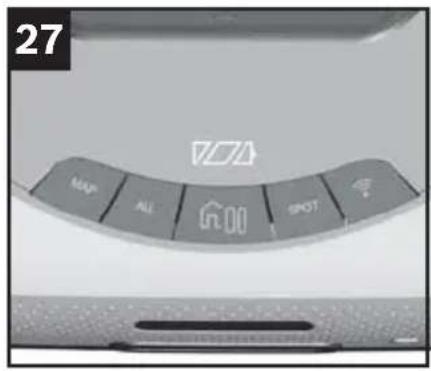
27 MAP ALL 600 SPOTButtons
Cleaning programme buttons
You can find detailed information about the cleaning programmes in the "Cleaning programmes and operating modes" section.
Fig. 27
The buttons are on the top of the robot vacuum.
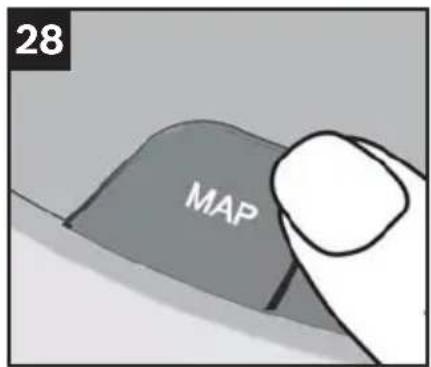
text_image
28 MAPFig. 28

If you have used the Home Connect app to create and select a map in your home, the robot vacuum will start cleaning systematically once it has orientated itself.
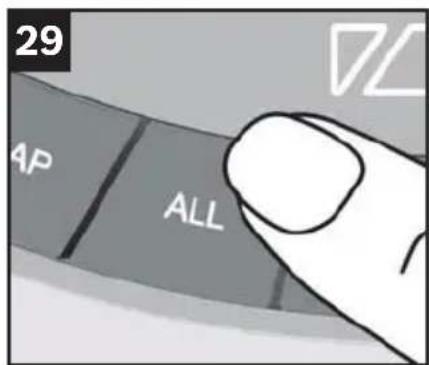
text_image
29 AP ALLFig. 29

When you start the robot vacuum, it will explore its immediate surroundings and create a temporary map. It will then start systematically cleaning the area it has explored.
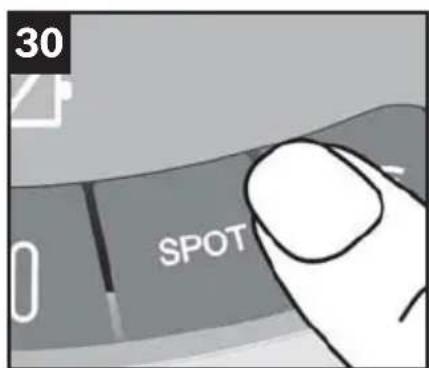
text_image
30 SPOTFig. 30

The robot vacuum will begin intensively cleaning an area of approximately one square metre around its starting point.
text_image
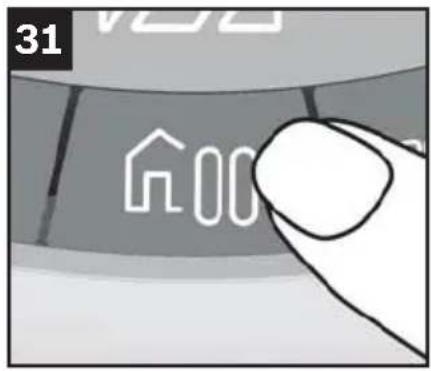
31 00Pause → Stop → Go Home button
Fig. 31

- Pressing the "Go Home" button once will pause the cleaning programme. (Pause)
- Pressing the button again will stop the cleaning programme. (Stop)
- Pressing the button one more time will send the robot vacuum back to where it started. (Go Home)
text_image
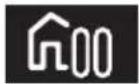
32 OT"Wireless network" button
Fig. 32

- Pressing this button lets you connect the appliance to your home network in conjunction with the Home Connect app.
You can find detailed information about this in the "Home Connect" section.
natural_image
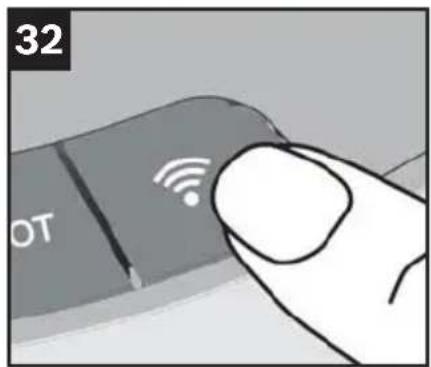
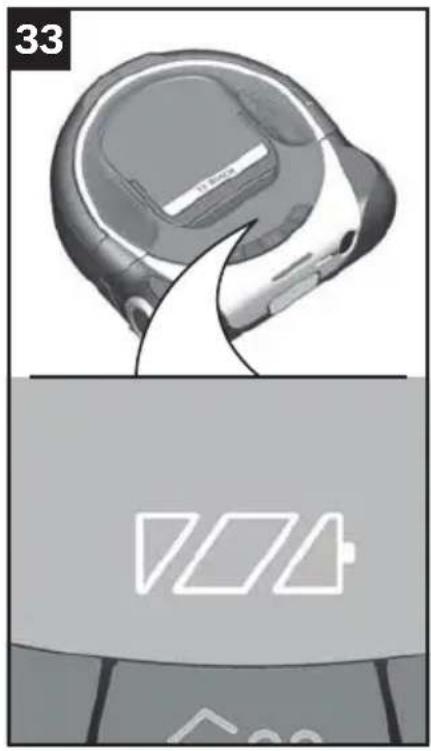
Diagram of a device with battery and charging symbol, no readable text or labelsIndicators and signals
Battery charging status indicator
Fig. 33
The LEDs indicate the battery's state of charge.
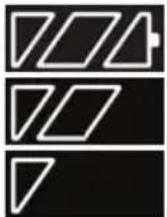
Battery fully charged
Battery semi-charged
Battery low
If the LED of the left of the charging indicator flashes, this means the battery needs recharging.
Note
If the LED on the left of the charging indicator flashes, the MAP or ALL cleaning programme will be stopped and the robot vacuum will return to the charging station or its original position. The cleaning programme that was paused will be resumed once the robot vacuum is fully charged.
If the battery runs low a second time, the robot vacuum will return to the charging station or its original position and stop the cleaning programme.
The SPOT cleaning programme can not be paused.
Instead, the robot vacuum will switch off automatically if the battery runs low, and you will need to place it on the charging station manually. You can find detailed information about this in the "Charging the battery" section. Fig. 8
text_image
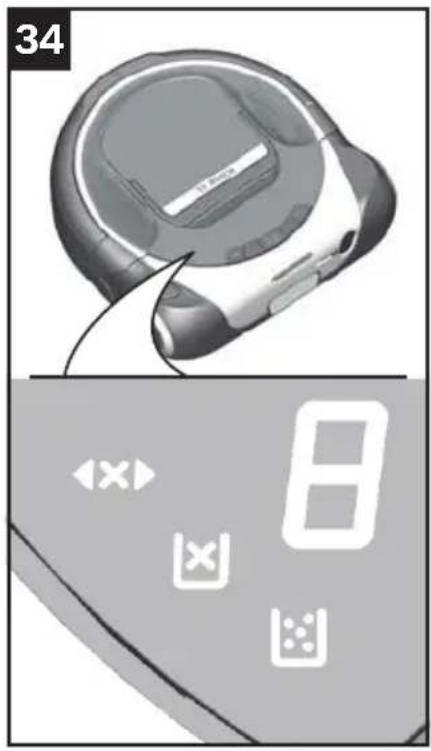
34 8Fault and error indicators
Fig. 34
The error indicators show possible faults with the robot vacuum.
You can find a list of fault messages and other troubleshooting information in the "Faults and troubleshooting" section.

Check if ready to use
Insert the dust box
Empty the dust box
Fault indicator
text_image
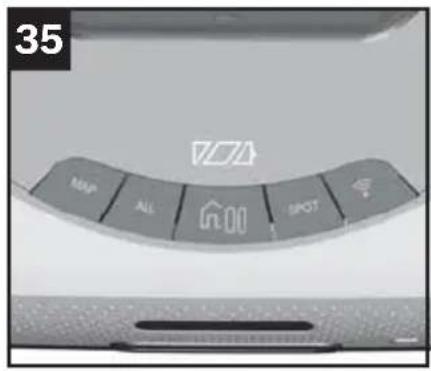
35 MAP ALL SPOTProgramme button status indicators
Fig. 35
The robot vacuum's current status is indicated by the lights on the buttons.
■ Ready to use flashing at intervals of 5s, all available programmes shown
■ Standby off
■ Operation lit
■ Mode "MAP", "ALL", "HOME" or "SPOT" button lit in the relevant colour
You can find detailed information about this in the "Cleaning programmes and operating modes" section.
text_image
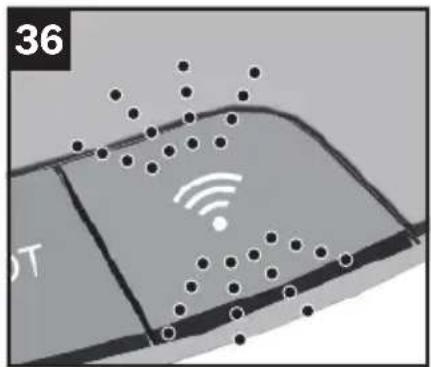
36 DT"Wireless network" button indicator
Fig. 36
The current status of the connection to a wireless local area network is indicated by the light on the "Wireless network" button.
■ Disconnected lit white
■ Connection in progress flashing blue or yellow at intervals of 1 s depending on the connection method
■ Connected lit green
■ Switched off off
■ Connection erroflashing red at intervals of 2 s
■ Video streaming flashing white at intervals of 0.5s active

natural_image
Close-up of a robotic vacuum cleaner device with a label '37' and an arrow pointing to the component (no readable text or symbols on the device itself)Camera (R-Cam)\*
Fig. 37
Some models in our robot vacuum series are fitted with a streaming camera to give the user a quick view into their home while they are out. Video data is sent from the robot vacuum to the user's Home Connect app via the BSH streaming service.
The transmission quality depends on the speed of your Internet connection at home and your mobile device.
To limit data consumption and save battery capacity, you should stop streaming in the Home Connect app when you are not watching it.
Streaming will stop automatically after around 7 minutes to preserve the Roxxter's battery life and limit data consumption. You can always start streaming again if you need to.
Video data is not saved; it is simply made available to the user as a stream. The video stream is encrypted. The stream is optimised (e.g. in terms of resolution, frame rate, etc.) for the user by the streaming service architecture. If paired with multiple apps, the stream will be made available to all users. Both the app and the appliance indicate when the the camera stream is currently active.
Please note that, with indoor use, only the primary user receives high transmission quality (full HD); all others users will see the stream in compressed format (WVGA).
Sensor location and function en
natural_image
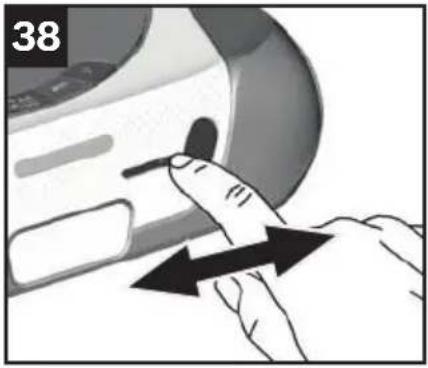
Close-up of a hand pressing down on a device component with directional arrows indicating motion (no text or symbols)Fig. 38 Camera cover\*
The camera can also be covered using the manual slider.
Move the cover slider to the left or right to open or close the camera.
Navigation sensors

text_image
39 2 1 3 3 4 4 4 4 4Fig. 39
The robot vacuum is fitted with numerous sensors to enable it to detect and circumnavigate objects and obstacles in the area being cleaned.
Laser navigation system (1) + (2)
Contact sensor (3)
- Drop sensors (4)
Cleaning and care en
natural_image
Abstract graphic with a white icon of a device and dotted lines, no text or symbols presentEmptying the dust box
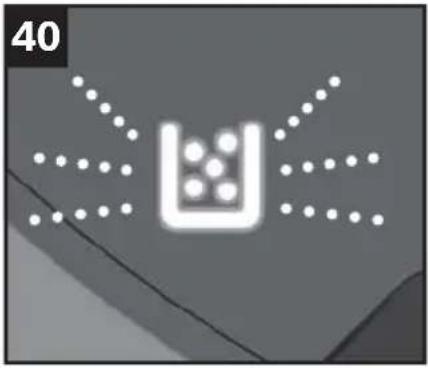
"Empty dust box" indicator
Fig. 40
If the "Empty dust box" indicator lights up, you should empty the dust box – even if it does not look full. The filter being dirty may also cause the "Empty dust box" indicator to light up.
When emptying the dust box, always check how dirty the lint filter Fig. 43 and cartridge filter Fig. 45 are, and clean these as instructed in the manual if necessary.
text_image
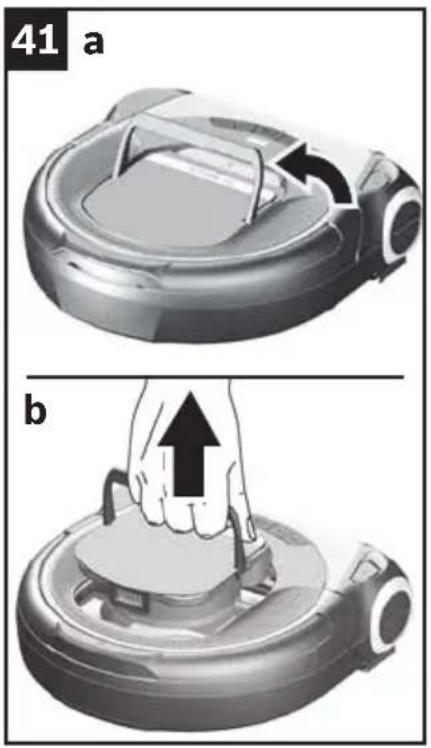
41 a bTaking out the filter unit with dust box
Fig. 41
a) Lift up the filter unit handle to unlock it.
b) Take the filter unit out of the robot vacuum by the handle.
Cleaning and care en
text_image
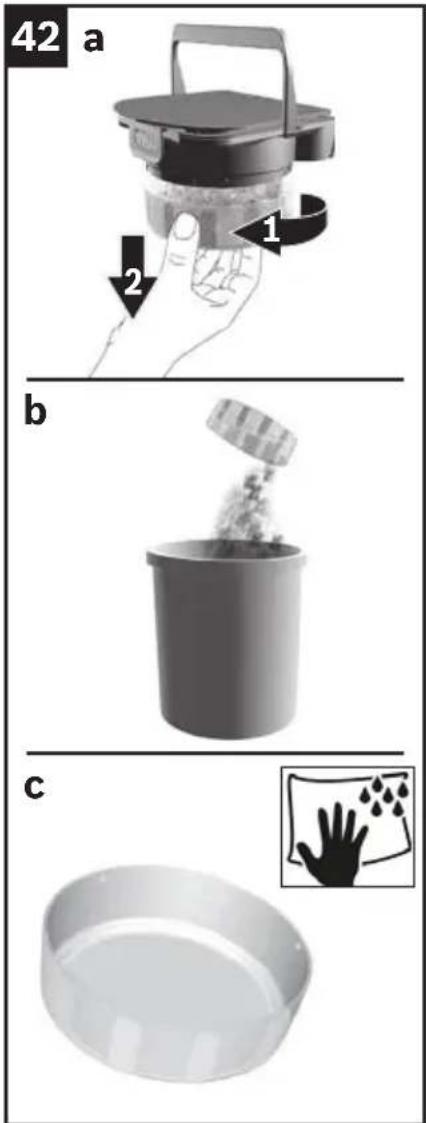
42 a 1 2 b cEmptying the dust box
Fig. 42
a) Turn the dust box anticlockwise to unlock it.
b) Take the dust box out of the filter unit and empty it.
c) Wipe around the inside of the dust box with a damp cloth if necessary.
Cleaning and care en
text_image
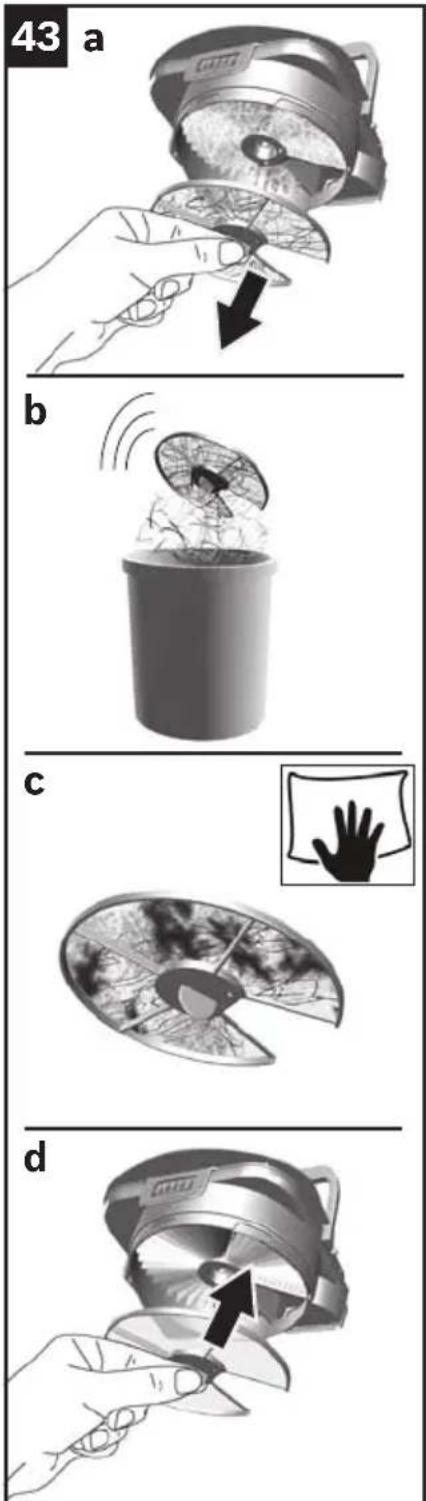
43 a b c dCleaning the lint filter
Fig. 43
The lint filter should be cleaned regularly to keep the robot vacuum working at its best.
Take the filter unit with dust box out of the robot vacuum. Fig. 41
Take the dust box out of the filter unit.
Fig. 42
© clean the lint filter.
a) Pull the lint filter out of the filter unit by the tab.
b) It is usually sufficient to lightly shake or tap out the lint filter when the dust box is emptied in order to dislodge any particles of dirt.
c) If this is not sufficient, you can use a dry cloth to remove dirt particles from the surface.
d) Put the lint filter back in the filter unit once you have cleaned it.
Note
Make sure you put the lint filter in the right way round. The filter unit may come loose during operation if the lint filter is not put in correctly.
Cleaning and care en
text_image
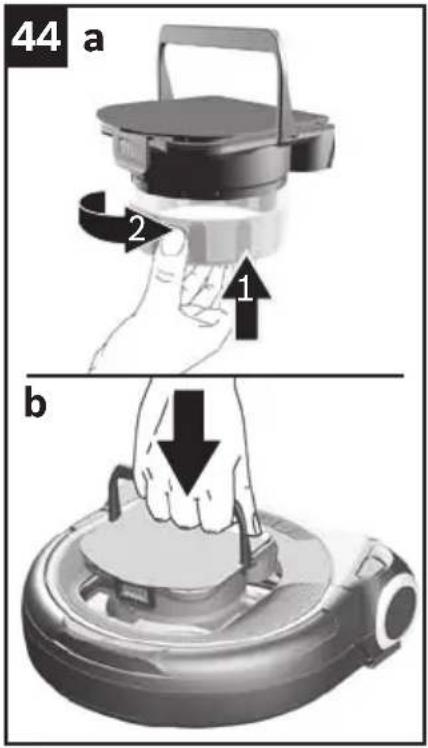
44 a 2 1 bPutting the filter unit with dust box back in
Fig. 44
a) Place the dust box on the filter unit and turn it clockwise to lock it.
The filter unit with dust box can only be inserted with the handle up.
b) Place the filter unit with dust box fully in the robot vacuum.
Move the filter unit handle down and lock it in the robot vacuum.
Note
If the filter unit is not placed and locked in the robot vacuum, the "Insert dust box" error indicator will light up and the robot vacuum will not start.
Caution
- The filter unit must only be placed in the robot vacuum together with the dust box.
Filter care
Cleaning the cartridge filter
Fig. 45
The filtering action of this filter will remain high, even if the surface of the filter becomes discoloured.
Take the filter unit with dust box out of the robot vacuum. Fig. 41
Take the dust box out of the filter unit. Fig. 42 Remove the lint filter from the filter unit. Fig. 43
a) It is usually sufficient to lightly shake or tap out the cartridge filter in order to dislodge any particles of dirt.
b) If this is not sufficient, carefully vacuum the cartridge filter with a vacuum cleaner on a low power setting.
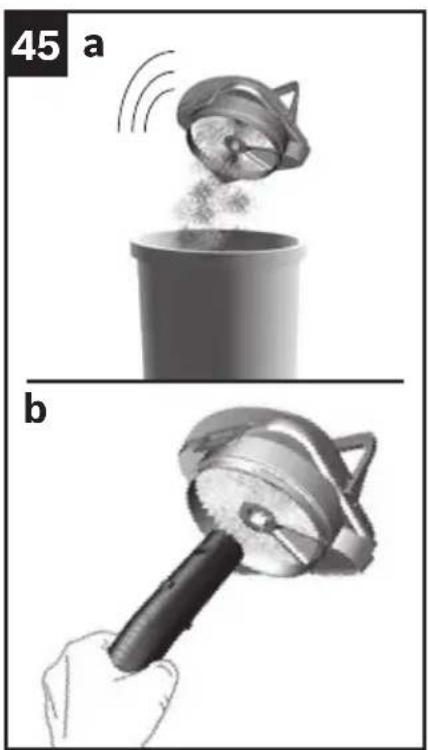
natural_image
Two-step illustration showing a coffee cup pouring milk into a container and a hand holding a spoon, labeled 'a' and 'b' (no text or symbols on the images themselves)Cleaning and care en
Note
The cartridge filter being dirty may cause the "Empty dust box" indicator to light up.
The cartridge filter should be cleaned regularly to keep the robot vacuum working at its best.
For more hygienic handling, we recommend changing the filter.
Cleaning the brush roller
Caution
- The robot vacuum must be switched off before cleaning the brush roller.
Note
The brush roller is also self-cleaning. Use scissors to cut the hairs and fibres lengthways on two opposite sides. Then operate the brush roller for 30 seconds to vacuum these up automatically.
Note
To avoid scratching the top of the appliance, place it on a soft surface when turning it over.
Fig. 46
a) Lift the robot vacuum up and turn it over.
b) Press the brush roller release button to remove it from the robot vacuum.
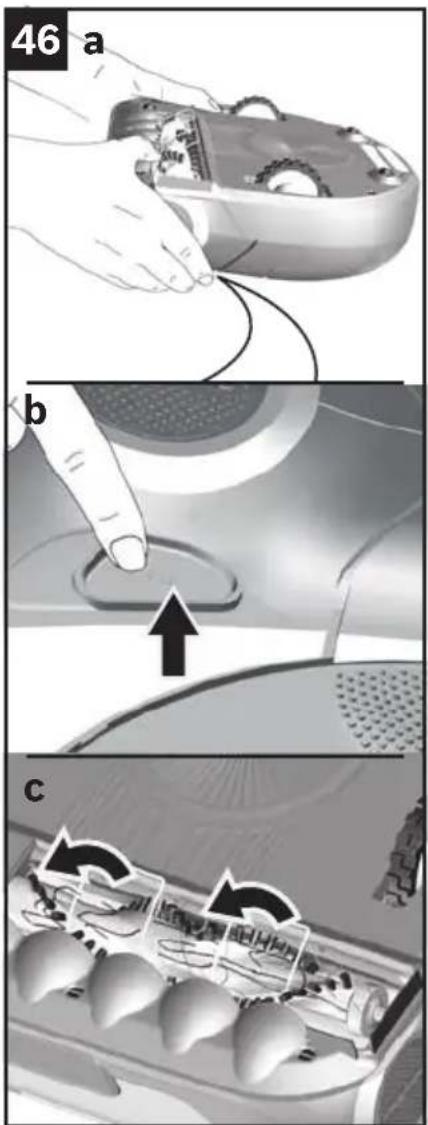
text_image
46 a b cc) Lift the cable guard up fully.
Cleaning and care en

text_image
46 d e f 1 2 gd) Take the brush roller out of the robot vacuum.
e) Use scissors to cut through threads and hairs wound round the brush and then remove them.
If necessary, carefully vacuum the brush roller with a vacuum cleaner.
f) Place the brush roller back in the robot vacuum. Make sure the brush roller is the right way round and lock it in place by pushing it into the robot vacuum.
g) Lower the cable guard and put the robot vacuum back in its working position.
Note
The robot vacuum will not work without the brush roller.
Cleaning and care en
Care tips
Do not use pointed or sharp cleaning aids.
Do not use cleaning products containing alcohol or spirits.
Do not use abrasive cloths or cleaning agents.
Cleaning the navigation sensors
Caution
- The sensors being dirty may cause the robot vacuum to malfunction. The sensors should be cleaned regularly to keep the robot vacuum working at its best.
Note
To avoid scratching the top of the appliance, place it on a soft surface when turning it over.
Fig. 47
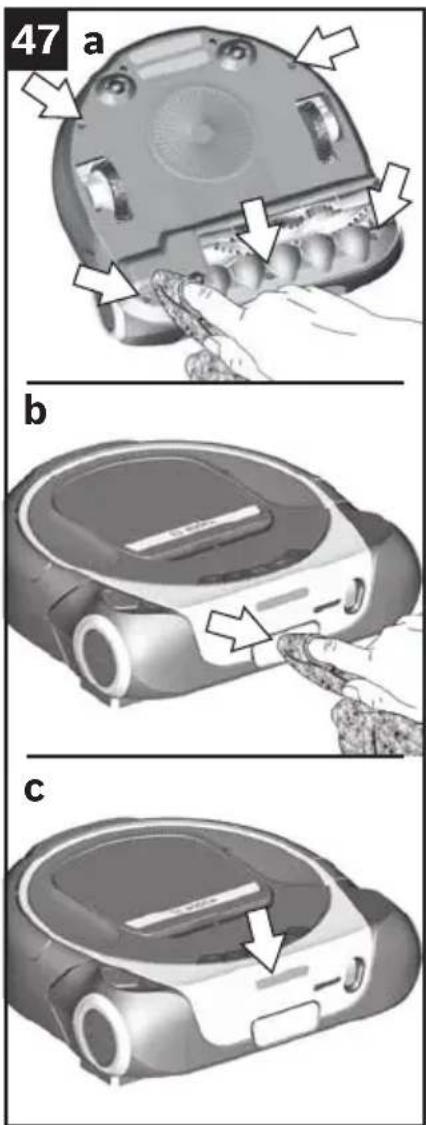
text_image
47 a b ca) Clean the drop sensors with a soft cloth or a brush.
b) Clean the bottom sensor window on the front of the robot vacuum with a soft cloth or a brush.
c) Check the (open) top sensor window for foreign bodies and remove these if present.
Cleaning and care en
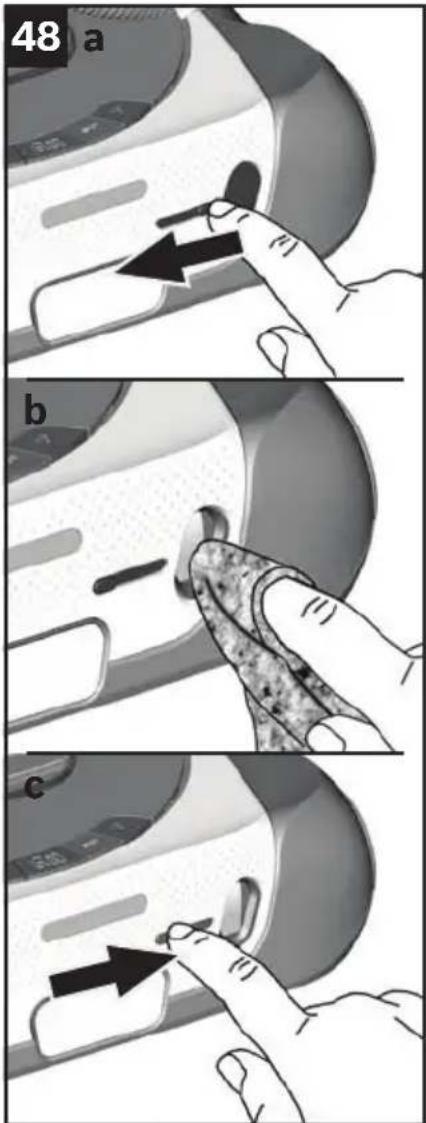
text_image
48 a b c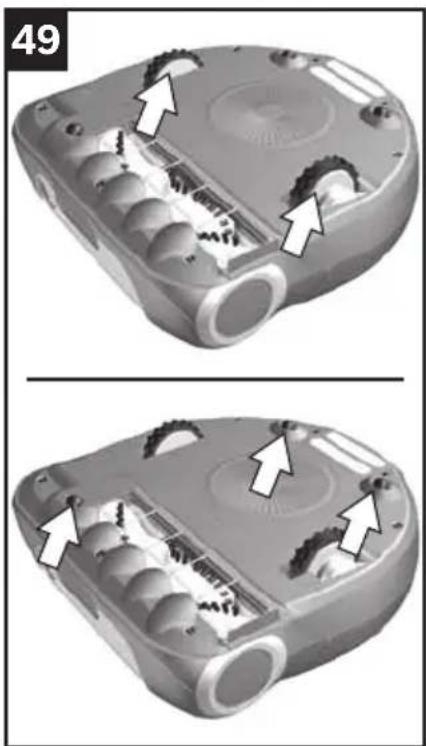
natural_image
Two views of a robotic device showing internal components and mounting features (no text or symbols visible)Cleaning the camera
If the live images from the camera are blurred or out of focus, check how dirty the camera window is.
The camera can be closed with a manual slider.
Fig. 48
●Check how easy it is to move the slider. You should be able to open and close the camera with ease.
a) Move the slider to the left to open the cover.
b) Clean the camera window with a clean, soft, lint-free cloth.
c) Move the slider to the right and close the cover.
©lean the surface of the cover with a clean, soft cloth.
Cleaning the wheels and rollers
Fig. 49
● clean the treads of the wheels if they are dirty.
Particles of dirt (such as sand) can get embed themselves in the treads and damage smooth, delicate flooring.
You should also remove foreign bodies and deposits from the wheel arches.
Cleaning and care en
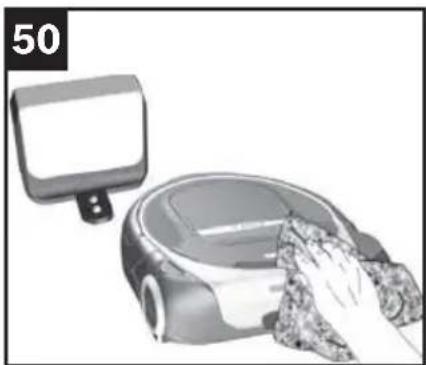
Cleaning the housing

Warning
Risk of electric shock!
Unplug the charging station before cleaning it.
natural_image
Illustration of a robotic car with a hand cleaning the dashboard (no text or symbols)Caution
- Switch off the robot vacuum before changing the battery.
Fig. 50
Clean the robot vacuum and the charging station with a clean, soft cloth.
Maintenance and repairs en
natural_image
3D rendered mechanical component with no visible text or symbols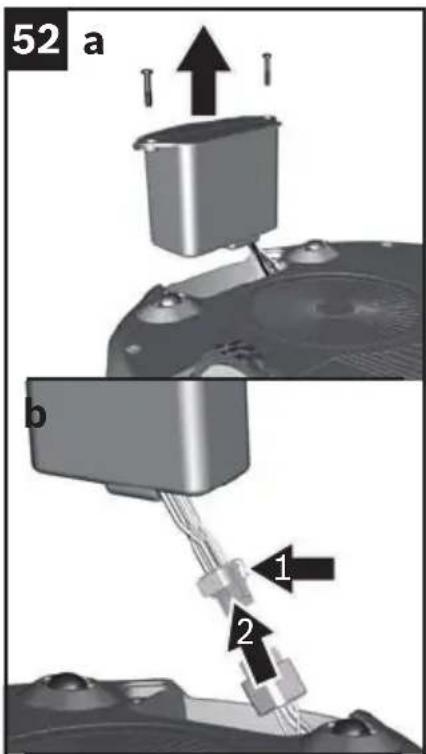
text_image
52 a b 1 2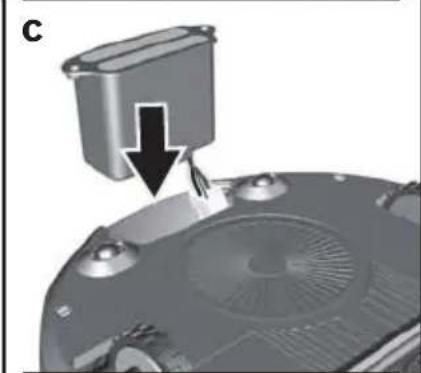
natural_image
Mechanical component with a downward arrow indicating a process or assembly (no visible text or symbols)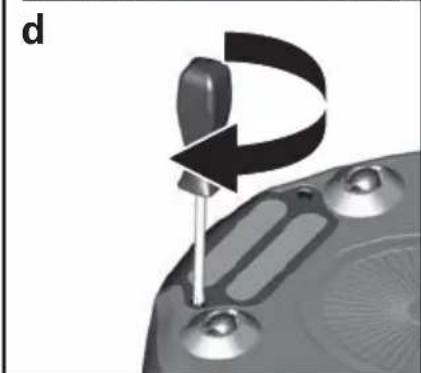
natural_image
Close-up of a computer mouse with a curved arrow indicating rotation or movement (no text or symbols)Changing the battery
Caution
- Switch off the robot vacuum before changing the battery.
Note
Like all li-ion batteries, the Roxxter battery is subject to natural wear. This means that the battery capacity and consequently battery life will decrease over time.
This aging process is natural and not the result of a material defect or manufacturing error.
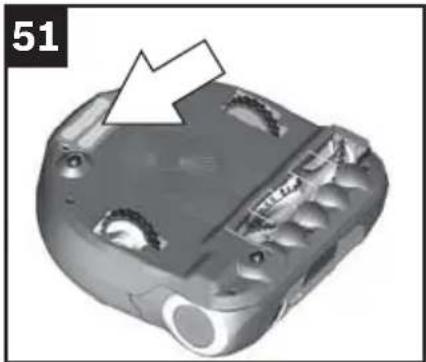
Fig. 51
The battery is at the bottom side of the robot vacuum.
Use an appropriate Pozidriv crosshead screwdriver to unscrew and screw in the screws. Optimal is the use of a PZ 2 screwdriver.
Fig. 52
a) Unscrew the two screws on the battery and remove the old battery.
b) Unlock the lock on the battery connection and pull the connector out.
Note
Only use the original Bosch Roxxter battery.
Plug the connector of the new battery into the connection on the robot vacuum.
Position the connection cable with connector in the recess on the left-hand side of the battery compartment.
c) Hold the connector in this position and place the new battery in the battery compartment.
d) Screw the battery into the robot vacuum by hand.
!Caution: Please dispose of the battery in an environ- • mentally friendly manner
Batteries contain substances that should not be released into the environment.
Please dispose of the battery at a designated collection point.
Maintenance and repairs en

text_image
53 a b cChanging the filter unit
We recommend replacing the filter unit with lint filter every six months.
Note
If the cartridge filter or lint filter is defective, the filter unit (without the cover) must be replaced.
Fig. 53
Take the filter unit with dust box out of the robot vacuum. Fig. 41
Take the dust box out of the filter unit.
Fig. 42
Take the cover off the filter unit.
a) Pull the tab and remove the cover from the filter unit.
b) Dispose of the old filter unit.
Note
The tab on the cover needs to be pulled hard.
c) Fit the cover on the new filter unit – you should hear it click into place.
●check that the cover is fitted on the filter unit correctly. The cover must lie flush with the filter unit.
Insert the filter unit with dust box. Fig. 44
Faults and troubleshooting en
Fault indicator and error codes
If a fault occurs in the robot vacuum, it will stop cleaning immediately. The fault indicator and/or a coloured error code will indicate a fault.
Eliminate the cause of the fault.
Start the (cleaning) programme again.
| Signal Cause Solution | ||
 | The robot vacuum cannot find the charging station. | Please place the robot vacuum on the charging station. |
| _YXCX] | The wheels are jammed. Check that the large driving wheels turn. If necessary, clean all the wheels as described in "Cleaning the wheels and rollers". | |
 | The brush roller can barely turn. | Check how easily the brush roller turns and, if necessary, clean the brush roller as described in "Cleaning the brush roller". |
 | The brush roller is jammed and does not move. | Check how easily the brush roller turns and, if necessary, clean the brush roller as described in "Cleaning the brush roller". Switch the appliance off and on again using the on/off switch. |
 | The blower is clogged. Take out the dust box and check the robot vacuum for foreign objects; remove if necessary. Switch the appliance off and on again using the on/off switch. | |
 | The robot vacuum cannot orientate itself in a saved map. The room may have changed too much. | Try restarting the appliance somewhere else in the room – but do not move the charging station. If the vacuum cleaner's surroundings have changed considerably, create a new map as described in "MAP cleaning programme". |
Faults and troubleshooting en
| Signal Cause Solution | ||
 | There is an unspecified fault with the robot vacuum. | Switch the appliance off and on again using the on/off switch.If the fault persists after switching the robot vacuum off and on again several times, switch it off and contact the after-sales service. |
 | A software update is in progress. | Please donotswitch off the robot vacuum. Wait for software installation to finish. |
 | The robot vacuum has got stuck, has lifted up, or is not correctly placed on the floor. The driving wheels cannot move the robot vacuum. | Please place the appliance on the ground and check that it is standing properly on the floor and can move freely. |
 | The dust box is missing or not placed in the robot vacuum correctly. | Please place the dust box in the robot vacuum or check that the dust box has been inserted correctly in the appliance and locked. |
 | The dust box is full or the filter unit is very dirty. | Please clean the dust box as described in "Emptying the dust box".Check how dirty the filter unit and lint filter are. If necessary, clean the filter unit and lint filter as described in "Cleaning the cartridge filter" or "Cleaning the lint filter". |
Note
You can find answers to frequently asked questions at http://www.bosch-home.com or in the Home Connect app under "Tops and Tricks".
Test mode and software updates en
Straight line test
For measuring dust collection performance in accordance with IEC 62885-7, testers can activate the "Straight line" programme by pressing and holding the "MAP" button for at least 5 seconds and then starting it via the app. Please note the that battery must be sufficiently charged. To deactivate this programme, switch the appliance off and on again using the on/off switch.
Software updates
We work continuously on improving our products. To benefit from these improvements, you can update the software on the appliance.
Note
To receive software updates on your robot vacuum, connection to the Home Connect server (backend connection) must be activated in the app. This is set to active by default.
For security reasons, updates can only be carried out if your mobile device is connected to the same network as the robot vacuum.
The app will notify you when an update is available. Confirmation is required to download the update.
Once the update has downloaded, the app will prompt you to confirm installation. You will then receive confirmation that the software update has been successful.
Caution
- Updates can only be downloaded and installed when the robot vacuum is on the charging station.
Do not switch off the robot vacuum during this time.
You will not be able to use the appliance while the software is updating.
Disposing of the appliance
natural_image
Symbol of a trash bin crossed with no visible text or labelsThis appliance is labelled in accordance with European Directive 2012/19/EU on waste electrical and electronic equipment (WEEE). This directive provides an EU-wide framework for returning and recycling old appliances.
Caution: Please dispose of old appliances in an environmentally friendly manner
- Remove the built-in battery first.
Old appliances contain valuable materials that can be reused and should be sent for recycling. Please dispose of old appliances at a designated collection point.
Disposing of the battery
Please remove the battery and dispose of it separately before disposing of the appliance.
Disposing of the packaging
The packaging protects the robot vacuum against damage during transit. It is made of environmentally friendly materials and can therefore be recycled. Dispose of packaging that is no longer required at an appropriate recycling point.
Caméra (R-Cam)*....158
natural_image
3D rendering of a metallic rectangular electronic device with a flat top and side mounting (no text or symbols visible)A Batterie BRZ1AL
natural_image
3D rendered mechanical component with threaded end and flanged shaft (no visible text or symbols)B Brosse rotative BRZ1AB
natural_image
3D rendering of a mechanical fan or impeller component (no text or symbols visible)natural_image
Close-up of a mechanical device with an arrow pointing to a circular component inside a box (no text or symbols visible)Déballage
Fig. 1
natural_image
Illustration of a car on a gravel surface with a railing and fence, marked with 'X' symbols (no text or labels)natural_image
3D rendered image of a robotic vacuum cleaner with a circular dial and arrow indicating rotation (no text or symbols)Raccordement de la station de charge
natural_image
Two-step diagram showing a mechanical component with arrows indicating motion, no text or symbols present.natural_image
Simple floor plan diagram with three equal sections and hatched walls (no text or labels)natural_image
Pure architectural floor plan lines without any text, numbers, or symbolsnatural_image
Architectural floor plan diagram with hatched walls and a central square (no text or labels)Programme de nettoyage SPOT
Fig. 12
text_image
13 V24 00text_image
18 Home connectnatural_image
Simple line drawing of a bedroom with floor, wall curtains, and scattered shoes (no text or symbols)Fig. 25
natural_image
Illustration of a hand holding a device with a label 'ST MOCA' on the cover (no other text or symbols)text_image
29 AP ALLFig. 29
ALL
natural_image
Diagram showing a device with battery and charging symbol, no readable text or labelsnatural_image
Close-up of a robotic vacuum cleaner device with a label '37' in the corner (no visible text or symbols on the device itself)Caméra (R-Cam)\*
Fig. 37
natural_image
Close-up of hands using a computer mouse to interact with a finger (no visible text or symbols)natural_image
Abstract graphic with a white icon of a stylized 'U' surrounded by dotted lines on a gray background (no text or symbols)natural_image
Two-step illustration showing a coffee cup pouring liquid into a container and a hand holding a metal object (no text or symbols)Entretien du filtre
natural_image
Two views of a robotic device showing internal components and mounting features (no text or symbols visible)natural_image
Illustration of a robotic car with a hand cleaning the interior (no text or symbols)Attention
natural_image
3D rendered mechanical component with no visible text or symbols
text_image
52 a b 1 2
natural_image
Close-up of a mechanical component with a downward arrow indicating a process or assembly (no visible text or symbols)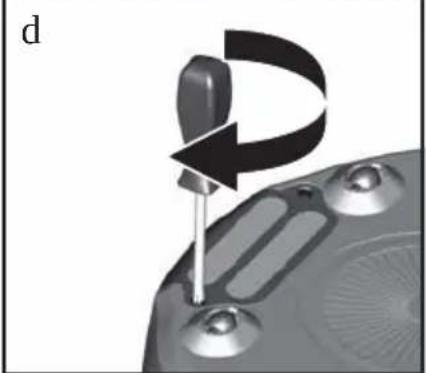
natural_image
Close-up of a mechanical component with a curved arrow indicating rotation or movement (no text or symbols visible)natural_image
Symbol of a trash bin crossed with no visible text or labelsSalida: 8,0-19,0 V --- 3,0 A
Aparato
natural_image
3D rendering of a metallic rectangular electronic device with a flat top and side mounting (no text or symbols visible)A Batería BRZ1AL
natural_image
3D rendered mechanical component with gear-like end and threaded shaft (no text or symbols visible)B Rodillo del cepillo BRZ1AB
natural_image
3D rendering of a mechanical fan or impeller component (no text or symbols visible)natural_image
Close-up of a mechanical device with an arrow pointing to a circular component inside a box (no text or symbols visible)Desembalar
Figura 1
natural_image
Illustration of a car on a gravel ground with a railing and fence, marked with 'X' symbols (no text or labels)natural_image
3D rendered mechanical component with a black arrow indicating rotation or direction (no text or symbols)natural_image
Two-step diagram showing a mechanical component with arrows indicating motion, no text or symbols present.Cargar la batería
Atención
natural_image
Simple architectural floor plan diagram with three rectangular sections and hatched walls (no text or labels)natural_image
Pure architectural floor plan lines without any text, numbers, or symbolsnatural_image
Architectural floor plan diagram with hatched walls and a central square (no text or labels)text_image
13 VDD 00Pause (Pausar) → Stop (Detener) → Go Home (Ir a inicio)
Figura 13 Tecla de control Go Home/Pause (Ir a inicio/Pausar)
text_image
18 Home connectnatural_image
Simple line drawing of a bedroom with floor, curtains, and scattered objects (no text or symbols)Figura 25
natural_image
Hand holding a device with a label 'ST BOSCU' on its cover, no visible text or symbols beyond the label.text_image
29 AP ALLFigura 29
ALL
natural_image
Diagram showing a device with battery and charging symbol, no readable text or labelsnatural_image
Close-up of a black and white robotic vacuum cleaner with a label '37' in the corner (no other text or symbols visible)Cámara (R-Cam)\*
Figura 37
natural_image
Close-up of a hand pressing down on a device component with directional arrows indicating motion (no text or symbols)natural_image
Abstract graphic with a white icon of a device and dotted lines on a gray background, no text or symbols present.natural_image
Two views of a robotic device showing internal components and mounting features (no text or symbols visible)natural_image
Illustration of a robotic device with a handle and a rectangular component, no visible text or symbolsAtención
natural_image
3D rendered mechanical component with no visible text or symbols
text_image
52 a b 1 2
natural_image
Close-up of a mechanical component with a downward arrow indicating a process or assembly (no visible text or symbols)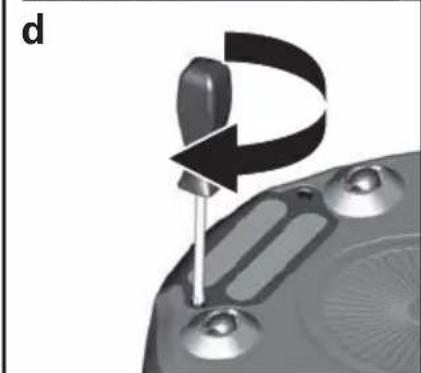
natural_image
Close-up of a computer mouse with a curved arrow indicating rotation or movement (no text or symbols visible)Cambiar la batería
Atención
natural_image
Symbol of a trash bin crossed with no visible text or labelsPauze → Stop → Go Home .....254
Vermogensmodi 256
Home Connect 257
Camera (R-Cam)*....272
Customer Service 290
Customer Service Hotlines 293
Output: 8.0-19.0 V --- 3.0 A
Apparaat
Type accucellen: Li-ion
Nominale spanning: 14,4 V
Camera
Videoresolutie interne applicatie FullHD (1080p) externe applicatie WVGA (480p)
Videocompressie H.264
- kelders of zolders.
natural_image
3D rendering of a metallic rectangular electronic device with a flat top and side mounting (no text or symbols visible)A Accu BRZ1AL
natural_image
3D rendered mechanical component with threaded end and flanged shaft (no visible text or symbols)B Borstelrol BRZ1AB
natural_image
3D rendering of a mechanical fan or impeller component (no text or symbols visible)natural_image
Close-up of a mechanical device with an arrow pointing to a circular component inside a box (no text or symbols visible)Uitpakken
Afb. 1
natural_image
Illustration of a car on a gravel surface with a railing and fence, marked with 'X' symbols (no text or labels)natural_image
3D rendered image of a robotic vacuum cleaner with a black arrow indicating rotational motion (no text or symbols)natural_image
Two-step diagram showing a mechanical component with arrows indicating direction of movement, no text or symbols present.Accu opladen
Let op
natural_image
Simple floor plan diagram with three equal sections and hatched walls (no text or labels)natural_image
Pure architectural floor plan lines without any text, numbers, or symbolsReinigingsprogramma MAP
Afb. 11
natural_image
Architectural floor plan diagram with hatched walls and a central square (no text or labels)Reinigingsprogramma SPOT
Afb. 12
text_image
13 V24 00Pauze → Stop → Go Home
Afb. 13 Bedieningsknop Go Home/Pauze
text_image
18 Home connectnatural_image
Simple line drawing of a bedroom with curtains, a lamp, and scattered shoes (no text or symbols)Afb. 25
natural_image
Hand holding a device with a label 'ST MOCA' on the cover (no other text or symbols visible)text_image
29 AP ALLAfb. 29
ALL
natural_image
Diagram showing a device with battery and charging symbol, no readable text or labelsnatural_image
Close-up of a black and white robotic vacuum cleaner with a label '37' in the corner (no visible text or symbols on the device itself)Camera (R-Cam)\*
Afb. 37
natural_image
Close-up of a hand pressing down on a device component with directional arrows indicating motion (no text or symbols)Afb. 38 Afdekking camera\*
natural_image
Abstract graphic with a white icon of a device and dotted lines, no text or symbols presentStofreservoir leegmaken
Indicatie "Stofreservoir leegmaken
Afb. 40
natural_image
Two-step illustration showing a container pouring liquid into a pot and a hand holding a tool, labeled 'a' and 'b' (no text or symbols on the objects themselves)natural_image
Two views of a robotic device showing internal components and mounting features (no text or symbols visible)Camera reinigen
natural_image
Illustration of a robotic car with a hand cleaning its interior (no text or symbols)Attentie
natural_image
3D rendered mechanical component with no visible text or symbols
text_image
52 a b 1 2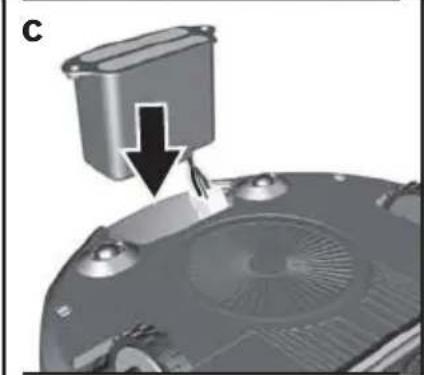
natural_image
Mechanical component with a downward arrow indicating a process or assembly (no visible text or symbols)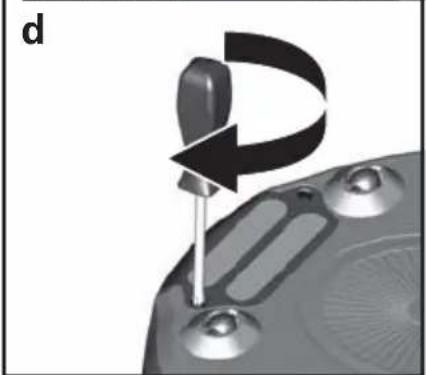
natural_image
Close-up of a mechanical component with a curved arrow indicating rotation or movement (no text or symbols visible)Accu vervangen
Attentie
natural_image
Symbol of a trash bin crossed with no visible text or labelsAE United Arab Emirates,

BSH Home Appliances FZE
Round About 13,
Plot Nr MO-0532A
Jebel Ali Free Zone – Dubai
Tel.: 04 881 4401
mailto:service.uae@bshg.com
www.bosch-home.com/ae
AL Republika e Shqiperise, Albania
ELEKTRO-SERVIS sh.p.k
Rr. Shkelqim Fusha, Selite,
Pallati "Matrix Konstruksion",
Kati 0 dhe +1
1023 Tirane
Tel.: 4 2278 130, -131
Fax: 4 2278 130
mailto:info@elektro-servis.com
EXPERT SERVIS
Rruga e Kavajes,
Kulla B Nr 223/1 Kati I
1023 Tirane
Tel.: 4 480 6061
Tel.: 4 227 4941
Fax: 4 227 0448
Cel: +355 069 60 45555
mailto:info@expert-servis.al
Gate 1, 1555 Centre Road
Clayton, Victoria 3168
Tel.: 1300 369 744*
Fax: 1300 306 818
mailto:aftersales.au@bshg.com
www.bosch-home.com.au
* Mo-Fr: 24 hours
BA Bosna i Hercegovina, Bosnia-Herzegovina
"HIGH" d.o.o.
Gradačačka 29b
71000 Sarajevo
Tel.: 061 10 09 05
Fax: 033 21 35 13
mailto:bosch_siemens_sarajevo@
yahoo.com
Business center FPI, floor 5,
Cherni vrah Blvd. 51B
1407 Sofia
Tel.: 0700 208 17
mailto:informacia.servis-bg@bshg.com
www.bosch-home.bg
BH Bahrain,
Khalaifat Est.
P.O. Box 5111
Manama
Tel.: 01 7400 553
mailto:service@khalafat.com
To arrange an engineer visit, to order
spare parts and accessories or for
product advice please visit
www.bosch-home.co.uk
or call Tel.: 0344 892 8979*
* Calls are charged at the basic rate, please check with your telephone service provider for exact charges
GR Greece, Ελλάς
BSH Ikiakes Siskeves A.B.E.
Central Branch Service
17 km E.O. Athinon-Lamias & Potamou 20
14564 Kifisia
Unit 1 & 2, 3rd Floor,
North Block, Skyway House,
3 Sham Mong Road
Tai Kok Tsui, Kowloon
Hong Kong
Tel.: 2565 6151
Fax: 2565 6681
mailto:bosch.hk.service@bshg.com
www.bosch-home.cn
HR Hrvatska, Croatia
www.bosch-home.com/hr
www.bosch-home.com/hu
IE Republic of Ireland
BSH Home Appliances Ltd.
M50 Business Park
Ballymount Road Upper
Walkinstown
Dublin 12
To arrange an engineer visit, to order spare parts and accessories or for product advice please call
Tel.: 01450 2655*
www.bosch-home.ie
* Calls are charged at the basic rate, please check with your telephone service provider for exact charges.
IL Israel,
תָרְשָׁ
C/S/B/ Home Appliance Ltd.
1, Hamasger St
North Industrial Park
Lod, 7129801
Tel.: 08 9777 222
Fax: 08 9777 245
mailto:csb-serv@csb-ltd.co.il
www.bosch-home.co.il
IN India, Bhārat, भारत
BSH Household Appliances Mfg. Pvt. Ltd.
Arena House, Main Bldg, 2nd Floor,
Plot No. 103, Road No. 12,
MIDC, Andheri East
Mumbai 400 093
Toll Free 1800 266 1880*
www.bosch-home.com/in
* Mo-Sa: 8.00am to 8.00pm
(exclude public holidays)
IS Iceland
Smith & Norland hf.
Noatuni 4
105 Reykjavik
Tel.: 0520 3000
Fax: 0520 3011
www.sminor.is
IT Italia, Italy
www.bosch-home.com/it
LT Lietuva, Lithuania
Senuku prekybos centras UAB
Jonavos g. 62
44192 Kaunas
Tel.: 037 212 146
Fax: 037 212 165
www.senukai.lt
UAB "AG Service"
R. Kalantos g. 32
52494 Kaunas
Tel.: 070 055 655
Fax: 037 331 363
mailto:servisas@agservice.lt
www.agservice.lt
Baltic Continent Ltd.
Lukšio g. 23
09132 Vilnius
Tel.: 870 055 595
Fax: 052 741 722
mailto:info@balticcontinent.lt
www.balticcontinent.lt
UAB Emtoservis
S.R.L. "Rialto-Studio"
ул. Щусева 98
2012 Кишинев
Unit F 2, 4 Orbit Drive
Mairangi Bay
Auckland 0632
Tel.: 0800 245 700*
Fax: 0800 256 535
mailto:aftersales.nz@bshg.com
www.bosch-home.co.nz
* Mo-Fr: 8.30 am to 5.00 pm
(exclude public holidays)
PL Polska, Poland
SA Kingdom Saudi Arabia,
and Airconditioning Co. Ltd.
BOSCH Service centre
Kilo 5 Old Makkah Road
(Next to Toyota), Jamiah Dist.
P.O.Box 7997
Jeddah 21472
Tel.: 800 127 9999
mailto:palakkaln@alj.com
www.aljelectronics.com.sa
SE Sverige, Sweden
BSH Home Appliances AB
Landsvägen 32
169 29 Solna
Tel.: 0771 19 70 00 local rate
Tel.: 0771 11 22 77 local rate
mailto:Bosch-Service-SE@bshg.com
www.bosch-home.se
SG Singapore, 新加坡
BSH Home Appliances Pte. Ltd.
Block 4012, Ang Mo Kio Avenue 10
01-01 Techplace 1
Singapore 569628
Tel.: 6751 5000*
Fax: 6751 5005
mailto:bshsgp.service@bshg.com
www.bosch-home.com.sg
* Mo-Fr: 8.30am to 7.00pm, Sa: 8.30am to 5.30pm
(exclude public holidays)
SI Slovenija, Slovenia
BSH Hišni aparati d.o.o.
Litostrojska 48
1000 Ljubljana
Tel.: 01 583 07 00
Fax: 01 583 08 89
mailto:informacije.servis@bshg.com
www.bosch-home.com/si
SK Slovensko, Slovakia
www.bosch-home.com/tr
BSH Home Appliances Private Limited
台北市內湖區洲子街80號11樓
11F., No.80, Zhouzi St., Neihu Dist.
Taipei City 11493
Tel.: 0800 368 888
Fax: 02 2627 9788
mailto:bshtzn-service@bshg.com
Service-General SH.P.K.
Rruga Mag Prishtine-Ferizaj
70000 Ferizaj
Tel.: 0290 321 434
Tel.: 0290 330 723
mailto:a_service@
gama-electronics.com
XS Srbija, Serbia
BSH Kućni aparati d.o.o.
15th Road Randjespark
Private Bag X36, Randjespark
1685 Midrand – Johannesburg
Tel.: 086 002 6724
Fax: 086 617 1780
mailto:applianceserviceza@bshg.com
www.bosch-home.com/za
| Service Hotline Bosch | Service Hotline Home Connect | ||
| DE D | Deutschland, Germany 0911 | 70 440 040 +49 (0)89 21 89 | 300 |
| AT Österreich, Austria 0810 550 | 511 +43 (0)810 550 560 | ||
| DK Danmark, Denmark 44 89 89 | 85 +45 44 89 80 80 | ||
| SV Sverige, Sweden 0771 11 22 | 77 + 46 (0) 10 472 1400 | ||
| FI Supmi, Finland 0207 510 700 | +358 207 510 737 | ||
| NO | Norge, Norway | 22 66 06 00 | +47 22 66 06 29 |
| RU Russia, Россия | 49 5 737 2961 | 8 800 200 29 61" | |
| TR Turkiye, Turkey | 0 216 444 6333 | 444 08 98 | |
| ES | España, Spain | 902 245 255976 305 713 | +34 (0) 902 100 979+34 (0) 976 30 57 41 |
| PT Portugal | 21 4 250 730 | +351 214 250 775 | |
| IT Italia, Italy | 800 829 120 | +39 800 24 19 99 | |
| FR | France | Service interventions à domicile:01 40 10 11 00;Service Consommateurs:0 892 698 010;Service Pièces Détachées et Accessoires:0 892 698 009 | 09 69 39 88 39 |
| BE Belgique, België, Belgium | 07 0 222 141 | +32 2 475 77 75 | |
| NL | Nederlande, Netherlands | 088 424 4010 | 088 4244525 |
| PL Polska, Poland | 801 191 534 | 801 002 133 | |
| HU | Magyarország, Hungary Hib | abejelentes:+361 489 5461;Alkatrészrendelés:+361 489 5463 | 06 80 200 201 |
| CZ | Česká Republika,Czech Republic | 0251 095 546 | +420 251 095 546 |
| GR | Greece, Eλλάς 181 82 | +30 18182 | |
| CN | China | 400 885 5888 400 828 989 | 8 |
| HK | Hong Kong, 香港 | 2565 6151 | |
| SG | Singapore, 新加坡 | 6751 5000 | |
| TW | Taiwan, 台湾 | 0800 368 888 | |
| US | USA | 800 944 2904 1-800-944-2 | 904 |
DE Garantie
GB Conditions of guarantee
For this appliance the guarantee conditions as set out by our representatives in the country of sale apply.
Details regarding same may be obtained from the dealer from whom the appliance was purchased.
For claims under guarantee the sales receipt must be produced.
FR Conditions de garantie
bosch-infoteam@bshg.com
Thank you for buying a Bosch Home Appliance!
Register your new device on MyBosch now and profit directly from:
- Expert tips & tricks for your appliance
- Warranty extension options
• Discounts for accessories & spare-parts
• Digital manual and all appliance data at hand - Easy access to Bosch Home Appliances Service
Free and easy registration – also on mobile phones:
www.bosch-home.com/welcome
BOSCH
HOME APPLIANCES
SERVICE
Looking for help?
You'll find it here.
Expert advice for your Bosch home appliances, need help with problems or a repair from Bosch experts.
Find out everything about the many ways Bosch can support you:
www.bosch-home.com/service
Contact data of all countries are listed in the attached service directory.
Bosch Home Appliance Group
P.O. Box 83 01 01
D-81701 Munich
Germany
www.bosch-home.com

8001055415
9807226