Erik - Electric heating Stadler Form - Free user manual and instructions
Find the device manual for free Erik Stadler Form in PDF.

User questions about Erik Stadler Form
0 question about this device. Answer the ones you know or ask your own.
Ask a new question about this device
Download the instructions for your Electric heating in PDF format for free! Find your manual Erik - Stadler Form and take your electronic device back in hand. On this page are published all the documents necessary for the use of your device. Erik by Stadler Form.
USER MANUAL Erik Stadler Form
Operating instructions
Gebrauchsanweisung
Mode d'emploi
natural_image
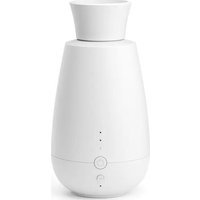
White spherical device with a circular opening showing internal heat or steam patterns (no text or symbols visible)Erik
text_image
Diagram of a portable stove with numbered parts labeled 1 to 5, showing internal airflow and ventilation.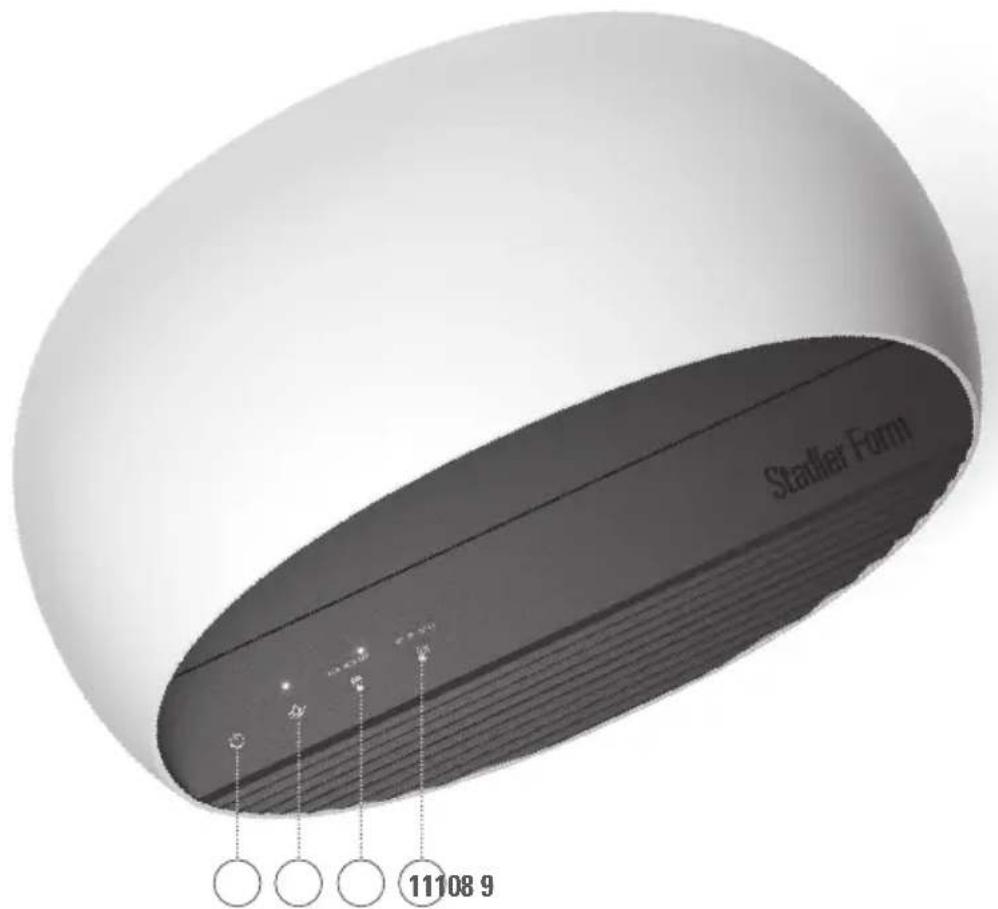
text_image
Stadler Form 11108 9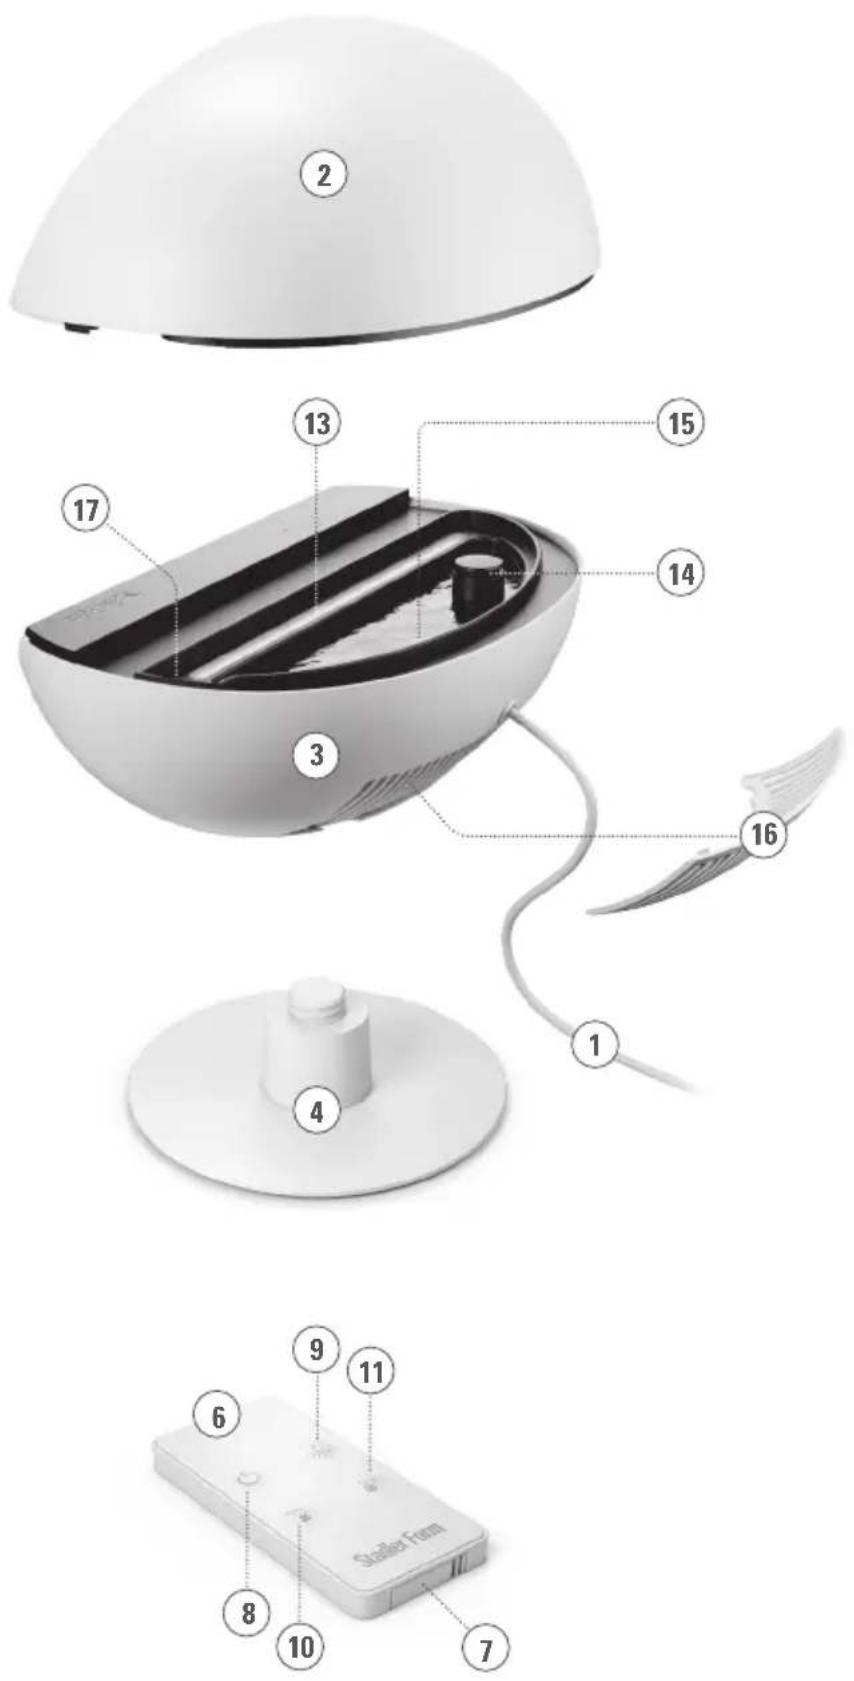
text_image
Exploded view diagram of a smart home control device with numbered parts and a digital display unit labeled 'Stable From'.2 YEAR SWARRANTY • 2 ANNEES DE CARGANATE • JAHARIE GARANTIE
Assembly
MONTAGE / MONTAGE / MONTAGGIO / MONTAZ / MONTAGE /
SAMLING / ASENNUS / MONTERING / MONTERING / CBOPKA
natural_image
Diagram of a white desk lamp with internal components and cable, showing internal structure and wiring (no text or symbols)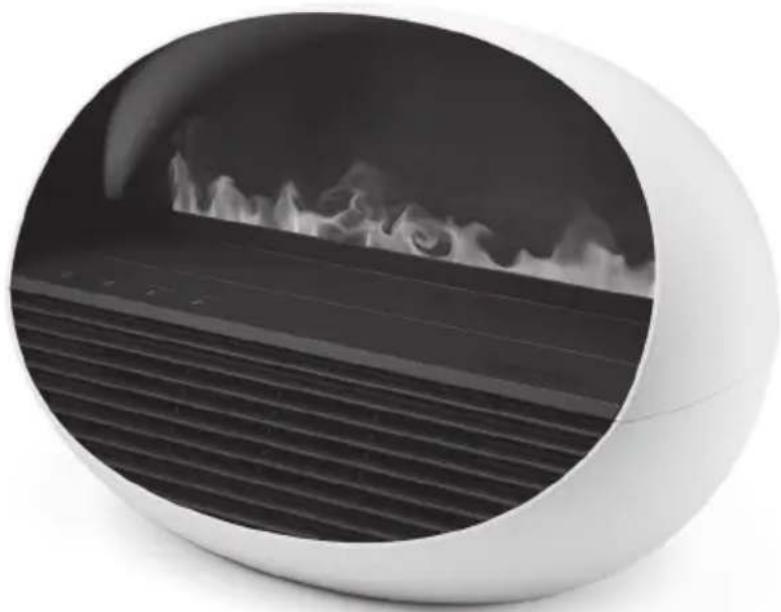
natural_image
Close-up of a white spherical device with a circular opening showing internal flames and ventilation grilles (no text or symbols visible)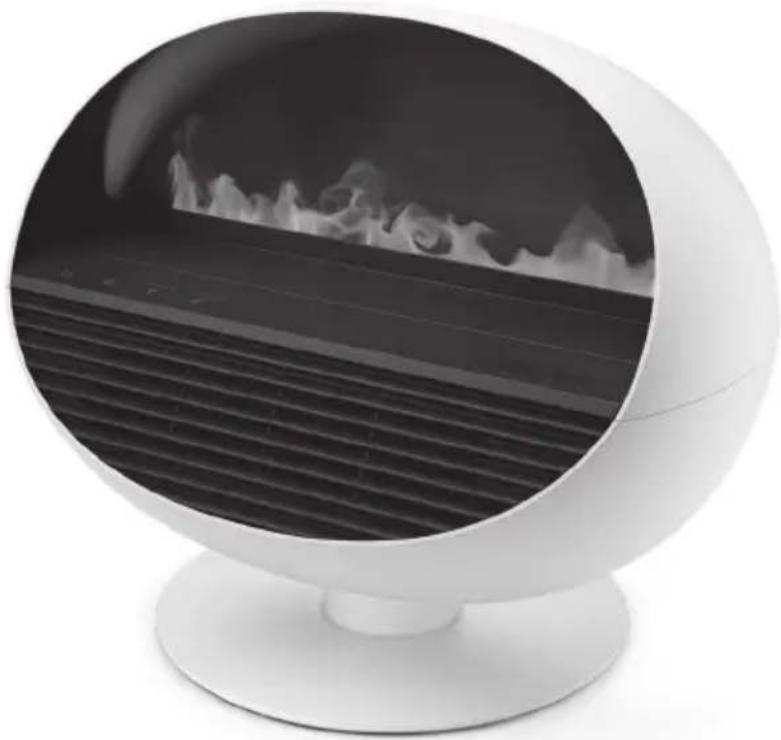
natural_image
Modern spherical device with a circular opening showing internal grating and smoke (no text or symbols visible)
Congratulations! You have just purchased ERIK, the exceptional 3 in 1 appliance (fan heater, aroma diffuser and fireplace effect). He will give you great pleasure and improve the indoor air for you.
As with all domestic electrical appliances, particular care is needed with this model also, in order to avoid injury, fire damage or damage to the appliance. Please study these operating instructions carefully before using the appliance for the first time and follow the safety advice on the appliance itself.
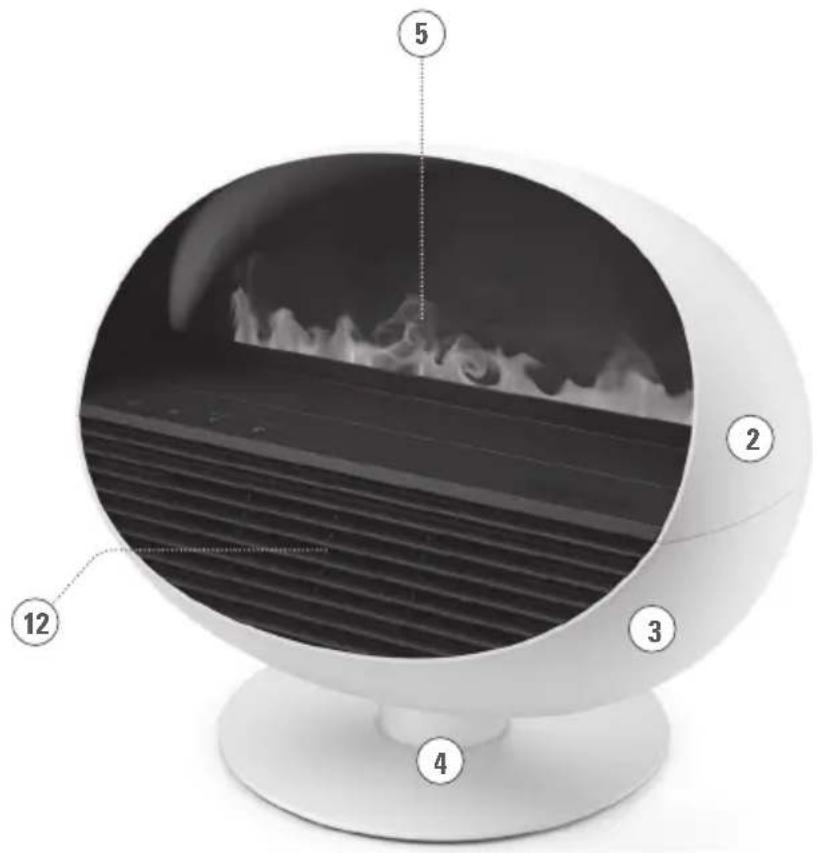
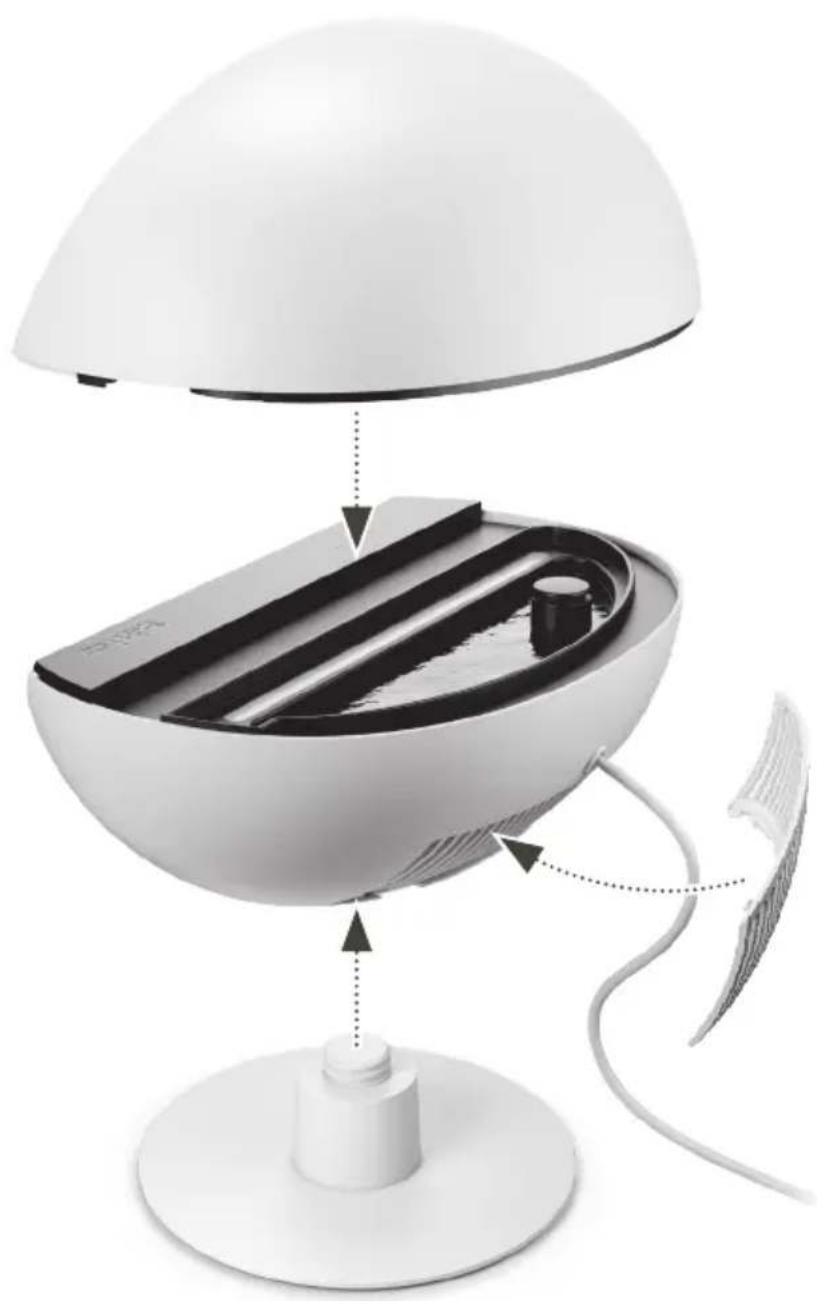
Description of the appliance
The appliance consists of the following main components:
- Mains cable for power supply
- Top part
- Bottom part / Water tray (fragrances can be added to this if wished)
- Foot
- Mist outlet
- Remote control
- Battery compartment remote control (type CR2032)
- On/Off button
- Button for controlling the fireplace effect and aroma diffuser (color change, light off, light and aroma diffuser off)
- Button for selection of heat output level: LOW, HIGH, OFF
- Button for the thermostat: 18^ C / 20^ C / 22^ C or "CO" (continuous operation)
- Air outlet (fan heater)
- LED strip for the fireplace effect
- Air outlet opening (Caution: no water may enter this opening!)
15.Ultrasonicmembrane - Air inlet with removable grille
- Wateroutlet
How your product works
Erik is a 3 in 1 appliance – fan heater, aroma diffuser and fireplace effect. The functions can be used together or individually. Fan heater: Equipped with two heat output levels and a thermostat, the desired temperature can be adjusted to suit your personal comfort. Aroma diffuser: Add a few drops of essential oil of your choice directly into the water to fragrance the room air. Fireplace effect: Erik produces an extra fine mist, whereby the special lighting creates a deceptively real fireplace. This effect is cool, harmless and soot-free. Four different colours can be chosen for the flame effect: Amber Light™, red, blue or green.
Important safety instructions
Please read through the operating instructions carefully before you use the appliance for the first time and keep them safely for later reference; if necessary pass them on to the next owner.
- This product is only suitable for well insulated spaces or occasional use.
- CAUTION — Some parts of this product can become very hot and cause burns. Particular attention has to be given where children and
vulnerable people are present. This appliance can be used by children aged from 8 years and above and persons with reduced physical, sensory or mental capabilities or lack of experience and knowledge if they have been given supervision or instruction concerning use of the appliance in a safe way and understand the hazards involved. Children shall not play with the appliance. Cleaning and user maintenance shall not be made by children without supervision.
- Children of less than 3 years should be kept away unless continuously supervised.
- Children aged from 3 years and less than 8 years shall only switch on/off the appliance provided that it has been placed or installed in its intended normal operating position and they have been given super-vision or instruction concerning use of the appliance in a safe way and understand the hazards involved.
- Children aged from 3 years and less than 8 years shall not plug in, regulate and clean the appliance or perform user maintenance.
-
If the supply cord is damaged, it must be replaced by the manufacturer, or its service agent, or a qualified person in order to avoid a hazard.
-
Stadler Form refuses all liability for loss or damage which arises as a result of failure to follow these operating instructions.
- The appliance is only to be used in the home for the purposes described in these instructions. Unauthorised use and technical modifications to the appliance can lead to danger to life and health.
- Never submerge the unit in water (danger of short circuiting).
- Never run a defective unit (e.g. supply cord).
- Never touch energized parts.
- Only connect the cable to alternating current. Observe the voltage information given on the appliance. Do not use extension cords.
- The heater must not be located directly below a socket-outlet.
- Do not open the appliance (repairs only by service agents).
- Do not run the power cord over sharp edges and make sure that it does not get trapped. Do not pull the plug from the socket with wet hands or by holding on to the power cord.
- Do not place the appliance near a heat source. Do not subject the power cord to direct heat (such as a heated hotplate, open flames, hot iron sole plates or heaters for example). Protect power cords from oil.
- Please make sure that the used socket remains accessible.
- Do not run the heater on an uneven or soft surface.
- CAUTION: In order to avoid a hazard due to inadvertent resetting of the thermal cut-out, this appliance must not be supplied through an external switching device, such as a timer.
- WARNING: In order to avoid overheating, do not cover the air inlet or air outlet – fire hazard!
- Do not use the heater in small rooms (below 4 min size), in explosive environment, or for drying laundry.
- WARNING: Do not use this heater in small rooms when they are occupied by persons not capable of leaving the room on their own, unless constant supervision is provided.
- WARNING: To reduce the risk of fire, keep textiles, curtains, or any other flammable material a minimum distance of 1 m from the air outlet.
- Do not touch the front part of the appliance, it might reach hot temperature.
- Use the heater only under supervision.
- Do not insert any object and/or finger into the openings of the heater.
- To extinguish burning appliances only use fire blankets.
- Do not use this heater in the immediate surroundings of a bath, a shower or a swimming pool (the appliance is not splash-proof).
- For indoor use only.
- Do not store the appliance outdoors.
- Store the appliance in a dry place inaccessible to children (pack the appliance).
- Prior to any maintenance, cleaning and after each use, switch off the appliance and unplug the mains cable from the socket.
- Repairs to electrical appliances must only be carried out by a qualified electrical technician.
- Make sure that the appliance is placed on a surface that is not sensitive to moisture (avoid parquet flooring or delicate carpets).
- Be aware that high humidity levels may encourage the growth of biological organisms in the environment.
- Unplug the appliance during filling and cleaning.
- Never leave water in the water tray when the appliance is not in use.
- Clean the water tank every 3 days
- Empty and clean the appliance before storage. Clean the appliance before next use.
- Warning: Micro-organisms that may be present in the water or in the environment where the appliance is used or stored, can grow in the water tank and be blown in the air causing very serious health risks.
Assembly (see page 4)
Note: The appliance can also be used without the foot and placed directly on the floor or a sideboard.
To use with a foot, screw the foot (4) clockwise onto the bottom part of the housing (3).
Caution: If you are using the appliance with the foot, the foot must be properly attached before using the appliance to avoid damage and hazards. Ensure that the foot is firmly tightened so that the appliance is stable and cannot tip over. Do not plug the power cable into the socket until you have finished assembling the device.
Setting up / operation
Note: Make sure that there is always sufficient space between the appliance and the wall or other large objects (> 50 cm). The air flow must not be blocked by objects of any kind. The functions can be used together or individually. For the fireplace effect and the aroma diffuser, please refer to points 1–7, 11. For the heating function, please refer to points 1, 3, 4 and 8–11.
-
Put Erik in the desired location on a flat surface. Connect the power cord (1) to a socket with the correct voltage rating.
-
If you would like to use the aroma diffuser function and the fireplace effect, lift off the top part (2) and fill the water tray (3) to the maximum mark with clean, cold tap water. Then put the top part (2) back on the bottom part (3). Important: Transport Erik very carefully and keep him upright when filled with water. The water could splash out of the interior tank and into the electronics. No water is required for the heating function.
-
Switch on the appliance by pressing the On/Off button (8) on the appliance or the remote control. When you put the device into operation, the aroma diffuser function and the fireplace effect (colour Amber Light™) are switched on by default. The heating function is deactivated. The LEDs above the control buttons light up white.
-
The remote control (6) operates via infrared – for this purpose, point the remote control at the infrared receiver on the front of the unit. The battery compartment (7) is located on the bottom of the remote control (6) and is equipped with a child safety lock. To open it, push the small slider inwards and pull out the battery compartment (Type CR2032 battery).
-
By pressing the button for controlling the fireplace effect (9) several times, you can change / deactivate the colour of the LED lighting (Amber Light™ - red - blue - green - light off - light and aroma diffuser off). If the fireplace effect and the aroma diffuser are switched off, the LED above the button (9) no longer lights up. To reactivate the lighting and the fireplace effect, press the button (9) again.
-
You can also use Erik to fragrance the room. We ask that you be sparing when dealing with fragrances as too much can lead to malfunctions and damage to the unit. To use fragrances, remove the top part (2) and add 2–3 drops of your favourite liquid fragrance directly into the water. It is not necessary to mix them as the ultrasonic membrane (15) does this for you. If the fragrance is not intensely enough, you can increase the number of drops.
-
The appliance switches off automatically when water needs to be refilled. Remove the top part (2) and fill the water up to the maximum mark. Place the top part (2) back on the bottom part (3) and press the button for controlling the fireplace effect (9). The appliance will resume operation after a few seconds. Note: If the heating function is activated, only the fireplace effect switches off and the fan heater continues to run.
-
To control the heating function, press the button for selection of heat output level (10). You can choose between three different modes:
LOW = 800 W (press once
HIGH = 1'500 W (press twice)
OFF = Heating function deactivated (press three times)
To reactivate the heating function, press the button for selection of heat output level (10) again. If the heating function is active, the LEDs above the control buttons light up red. "LOW" is activated by default.
- The target temperature can be set using the button for the thermostat (11). You can choose between four different modes: 18 °C (press once) / 20 °C (press twice) / 22 °C (press three times) or continuous operation "CO" (press four times). "CO" (continuous operation) is activated by default.
Info: The appliance switches off the heating element when the target temperature is reached. The fan remains switched on for 30 seconds at
the highest level to cool down the heating element. The current temperature is then measured approx. every 30 minutes (the fan runs for 1 minute at the lowest level). The appliance switches on again if the room temperature recorded drops below the set target temperature.
- Protection against overheating: the appliance is equipped with overheating protection which switches off the appliance in the event of a technical fault or improper use (the fan continues to run for some time at the highest level to cool down the appliance). Should this occur, rectify the fault or cease the improper use (e.g. 50 cm space around the appliance, do not cover the appliance, set the appliance up in an upright position). Once the appliance has cooled down it can be put back into service.
- If the device is not used on a daily basis, switch it off by pressing the On/Off button (8). If Erik was used with the aroma diffuser function and fireplace effect, empty the water out of the appliance via the water outlet (17). If the heating function was active, the fan remains switched on at the highest level for 30 seconds to cool down the heating element. Note: The device has a memory function and saves the last selected setting for 24 h when you switch off the device and disconnect it from the power supply.
Note: If you would like to change the fragrance, empty the water out of the appliance via the water outlet (17). Clean the water tray (3) with a damp cloth and a bit of dish detergent. Fill Erik once again and pour the drops into the device following the instructions.
Cleaning
Prior to any maintenance, cleaning and after each use, switch off the appliance (8) and unplug the mains cable (1) from the socket.
Attention: Never immerse the device in water (danger of short circuit).
Make sure that the air inlet (16) and air outlet (12) are cleaned regularly to prevent the build-up of dust. Use a dry paintbrush or the soft brush attachment for your vacuum cleaner to do this.
For hygienic reasons and to ensure proper operation, we recommend the following cleaning intervals when Erik is used as an aroma diffuser and/or as a fireplace effect:
- Daily: Fill the water tray (3) with fresh, cold tap water. If the appliance is not used for several days, empty the water from the water tray (3) beforehand and if necessary, clean it with a bit of dish detergent and a clean cloth. Pour the water out of the appliance via the water outlet (17). Fill fresh water into the water tray (3), before putting the appliance back into operation.
- Every 2 weeks: First remove the top part (2). Clean the inside of the water tray (3) thoroughly with a bit of dish detergent, warm water and a soft, clean cloth, sponge or brush. Use diluted descaling agent (mix according to the manufacturer's instructions) for lime deposits. Then rinse the water tray (3) thoroughly with cold water and put the top part (2) back on.
- Descaling at least 1x per month. Remove the top part (2). If limescale deposits form in the water tray (3) we recommend using Stadler Form Cleaner & Descaler (www.stadlerform.com/accessories). Alternatively, you can use a household decalcifier or vinegar. Fill a cup with 100 ml of tap water mixed with descaling agent (mix according to the manufacturer's
instructions). Pour the liquid carefully into the water tray (3). Be sure that no liquid enters the air outlet opening (14). This will damage the appliance and will void any claim to the warranty.
- Let the descaling agent allow to take effect according to manufacturer's instructions (approx. 30 min.). Check in the water tray (3) if the limescale on the ultrasonic membrane (15) has dissolved.
- For stubborn limescale, we recommend descaling the appliance several times in a row.
- First pour the descaling mixture out of the appliance via the water outlet (17). To rinse, now fill the cup with 100 ml of tap water and carefully pour the liquid into the water tray (3). Pour the water out of the appliance via the water outlet (17). Repeat the process until there is no more descaling agent in the water tray (3). Place the top part (2) back on the bottom part (3).
- Regularly as required: For external cleaning, rub with a damp cloth and then dry thoroughly. If the inside of the top part (2) shows water and/or fragrance deposits, please clean it using a damp cloth and a bit of dish detergent.
Repairs
- Repairs to electrical appliances must only be carried out by a qualified electrical technician. If improper repairs are carried out, the warranty lapses and all liability is refused.
- Never operate the appliance if the adaptor or plug is damaged, after it has malfunctioned, if it has been dropped or has been damaged in any other way (cracks/breaks in the casing).
- Do not push any object into the appliance.
- If the appliance is beyond repair, make it unusable immediately by cutting through the cable and hand it in at the collection point provided for the purpose.
- In the event of a repair, the following points must be observed before the appliance is shipped or taken to the dealer: completely empty the water in the appliance (water tray or water tank), and allow the appliance to dry completely. Appliances containing residual water may be damaged during transport, invalidating the warranty.
Disposal
The European directive 2012 / 19 / CE on Waste Electrical and Electronic Equipment (WEEE), requires that old household electrical appliances must not be disposed in the normal unsorted municipal waste stream. Old appliances must be collected separately in order to optimize the recovery and recycling of the materials they contain and reduce the impact on human health and the environment. The crossed out "wheeled bin" symbol on the
product reminds you of your obligation, that when you dispose of the appliance it must be separately collected. Consumers should contact their local authority or retailer for information concerning the correct disposal of their old appliance.
Specifications
| Rated voltage | 220 – 240 V ~ 50–60 Hz |
| Temperature range | 18°C / 20°C / 22°C / “CO” = Continuous operation |
| Power consumption | 12 W (min.) |
| Rated power | 1'500 W (max.) |
| Dimensions | 368 x 265 x 305 mm(width x height x depth) |
| Weight | 2.7 kg |
| Water tank capacity | 190 ml |
| Sound level | <38 dB(A) |
| Complies with EU | |
| Regulations | CE / WEEE / RoHS / EAC / ERP / UKCA |
All rights for any technical modifications are reserved
| Name | Manufacturer / Trade Mark | Type / Model | Technical Data |
| heater element | Dongguan Longkey Electronics Co., Ltd | RFB1500 | 220–240 V~50/60 Hz1500 W |
| fan motor | Dongguan Yijin Electronic Co., Ltd | 3010 RVL-P58/HD010277 | DC 5 V |
| Item Symbol Value Unit | |||
| Heat output | |||
| Nominal heat output P | nom | 1.500 kW | |
| Minimum heat output (indicative) P | min | 0.972 kW | |
| Maximum continuous heat output P | max,c | 1.500 kW | |
| Power consumption | |||
| in off mode P | g | N.A. W | |
| in standby mode P | sm | 0.24 W | |
| in idle mode | Pidle | 0.37 | W |
| in network standby | Pnsm | N.A. W | |
| Standby mode with display of information or status | - | - | [no] |
| Seasonal space heating energy efficiency in active mode | ns,on | 91.0 | % |
| Item Unit | ||
| Type of heat output / room temperature control | ||
| single stage heat output and no room temperature control [no] | ||
| Two or more manual stages, no room temperature control [no] | ||
| with mechanic thermostat room temperature control [no] | ||
| with electronic room temperature control [yes] | ||
| electronic room temperature control plus day timer [no] | ||
| electronic room temperature control plus week timer [no] | ||
| Other control options | ||
| room temperature control, with presence detection [no] | ||
| room temperature control, with open window detection [no] | ||
| with distance control option [no] | ||
| with adaptive start control [no] | ||
| with working time limitation [no] | ||
| with black bulb sensor [no] | ||
| Contact details | Stadler Form AktiengesellschaftChamerstrasse 174, 6300 Zug, Switzerland | |
HIGH = 1'500 W (tryk to gange)
OFF = varmefunktion deaktiveret (tryk tre gange)
LOW = 800 W (paina kerran))
natural_image
Circular digital display with abstract black and white patterns, no visible text or symbolsWarranty/Garantie/Garantie/Garanzia/Gwarancji Garantie/Garanti/Takuu/Garanti/Garanti
2 Years warranty
This warranty covers defects of construction, manufacturing and material. Excluded are all wearing parts and improper usage, or consequential damages due to lack of cleaning and/or descaling of the appliance.
2 Jahre Garantie
natural_image
Portrait of a man with glasses and beard, arms crossed (no text or symbols visible)Design by Fabian Zimmerli
Thanks to all people involved in this project: Charly Liu for his engagement and organization, Joey Yang, Harry Hou and Katrina Liu for the coordination, Alan Ai and Alex Ai for the main engineering and CAD work, Mario Rothenbühler for the photos, Fabian Zimmerli for the unique design, Matti Walker for the graphic work.
Martin Stadler, CEO Stadler Form Aktiengesellschaft
Subscribe to our newsletter!
www.stadlerform.com/newsletter
MANUFACTURER
Stadler Form
Aktiengesellschaft
Chamerstrasse 174
6300 Zug, Switzerland
Phone +41 41 720 48 48
DISTRIBUTION EU
Stadler Form Germany GmbH
Alt-Heerdt 104
40549 Düsseldorf, Germany
Phone +49 211 97531-640