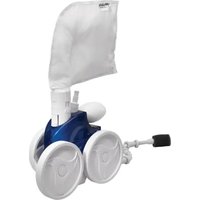
TornaX GT 2120 - Robot vacuum ZODIAC - Free user manual and instructions
Find the device manual for free TornaX GT 2120 ZODIAC in PDF.

| Product type | Pool robotic vacuum cleaner |
| Brand | Zodiac |
| Model | TornaX GT 2120 |
| Robot dimensions (L x W x H) | 37 x 29 x 30 cm |
| Robot weight | 5.5 kg |
| Packaged weight | 10.1 kg |
| Control box power supply | 100-240 VAC, 50/60 Hz |
| Robot power supply | 30 VDC |
| Maximum power consumption | 100 W |
| Floating cable length | 14 m or 16.5 m (depending on model) |
| Theoretical cleaning width | 17 cm |
| Cleaning modes | Floor only or floor + walls (depending on model) |
| Filtration capacity | Fine debris filter 100 µm, large debris filter 200 µm, very fine filter 60 µm (optional) |
| Recommended water temperature | 15°C to 35°C |
| Recommended water pH | 6.8 to 7.6 |
| Maximum chlorine | 3 mg/l |
| Protection rating | Requires a 30 mA residual current device |
| Recommended maintenance | Clean filter after each cycle, replace brush and filter every 2 years |
| Available spare parts | Filter, brush, tracks, propeller |
| Warranty | Void if safety instructions are not followed or unauthorized parts are used |
Frequently Asked Questions - TornaX GT 2120 ZODIAC
User questions about TornaX GT 2120 ZODIAC
0 question about this device. Answer the ones you know or ask your own.
Ask a new question about this device
Download the instructions for your Robot vacuum in PDF format for free! Find your manual TornaX GT 2120 - ZODIAC and take your electronic device back in hand. On this page are published all the documents necessary for the use of your device. TornaX GT 2120 by ZODIAC.
USER MANUAL TornaX GT 2120 ZODIAC
Instructi ons for installati on and use - English Electric cleaner Translati on of the original instructi ons in french
EN
- Failure to respect the warnings may cause serious damage to the pool equipment or cause serious injury, even death.
Only a person qualified in the technical fields concerned (electricity, hydraulics or refrigeration) is authorised to perform this procedure. The qualified technician working on the appliance must use/wear personal protective equipment (such as safety goggles and protective gloves, etc.) in order to reduce the risk of injury occurring when working on the appliance. - Before handling the appliance, ensure that it is switched off and isolated.
The appliance is intended to be used only for swimming pools and spas; it must not be used for any purpose other than that for which it has been designed.
It is important that the appliance is operated by people who are competent and qualified (both physically and mentally), after having read the instructions for use. All persons not meeting these criteria must not approach the appliance in order to avoid exposure to dangerous elements. - Keep the appliance out of the reach of children.
The appliance must be installed according to the manufacturer's instructions and in compliance with local standards. The installer is responsible for installing the appliance and for compliance with national installation regulations. Under no circumstances may the manufacturer be held liable in the event of failure to comply with applicable local installment on standards.
For any work other than the simple user maintenance described in this manual, the product should be referred to a qualified professional.
Incorrect installation and/or use may cause serious damage to property or serious injuries (possibly causing death).
All equipment, even postage and packing paid, travels at the risks and perils of the recipient. The latter shall issue reserves in writing on the carrier's delivery slip if damage is detected, caused during transport (confirmation to be sent to the carrier within 48 hours by registered letter). In the event that an appliance containing coolant has been turned on its side, mention your reservations in writing to the carrier.
If the appliance suffers a malfunction, do not try to repair it yourself; instead contact a qualified technician.
Refer to the warranty conditions for details of the permitted water balance values for operating the appliance. - In addition to using spare parts manufactured by unauthorised third-party manufacturers, deactivating, eliminating or by-passing any of the safety mechanisms integral to the appliance, will automatically void the warranty.
Do not spray insecticide or any other chemical (inflammable or non-inflammable) in the direction of the appliance, as this may damage the body and cause a fi re.
Zodiac® heat pump, filtration pump and filter appliances are compatible with the most commonly used types of pool water treatment systems. - Do not touch the fan and/or any moving parts and do not insert anything, including your fingers in the vicinity of the moving parts while the appliance is in operation.
WARNING ASSOCIATED WITH ELECTRICAL APPLIANCES
The electrical supply to the appliance must be protected by a dedicated 30mA differential residual current protection device (RCD), complying with the standards and regulations in force in the country where it is installed.
- Do not use an extension cord to plug in the appliance; plug it directly into a proper wall socket or outlet.
Before carrying out any operations, check that:
- The voltage indicated on the rating plate of the appliance corresponds to the mains voltage,
- The power grid is adapted to the power requirements of the appliance, and is grounded.
-
The plug (where applicable) is suitable for the socket.
-
In the event of abnormal function or signs of overheating such as a burning odour from the appliance, turn it of immediately, unplug it from its power supply and contact a professional.
- Before accessing the enclosure for any reason, ensure that all power to the appliance and also power to any accessories or external devices which may be connected to the appliance, is disconnected from the mains power supply.
- Do not disconnect and reconnect the appliance to the power supply when in operation.
- Do not pull on the power cord to disconnect it from the power supply.
If the supply cord is damaged, it must be replaced by the manufacturer, its service agent or similarly qualified persons in order to avoid a hazard. - Do not attempt to carry out any servicing or maintenance operations with wet hands or while the appliance is wet.
- Ensure that all terminals for mains power are free in good condition and free of corrosion and/or dirt/debris.
- For any component or sub-assembly containing a battery: do not recharge or dismantle the battery, or throw it into a fire. Do not expose it to high temperatures or direct sunlight.
- In stormy weather, unplug the appliance to prevent it from suffering lightning damage.
- Do not immerse the appliance in water (with the exception of cleaners) or mud.
SPECIFIC FEATURES APPLICABLE TO "Pool cleaners"
- The cleaner must operate in pool water with a temperature of between 15^ and 35^ .
- To avoid possible injury and damage to the cleaner, do not operate the cleaner out of the water.
In order to prevent possible injury, bathing is prohibited when your cleaner is in the pool. - Do not use the cleaner during shock chlorination.
- Do not leave the cleaner unatt ended for an extended period.
WARNING ON THE USE OF A CLEANER IN A POOL WITH A VINYL SURFACE:
- Before installing your new cleaner, carefully inspect the lining of your pool. If the liner has eroded in some areas, or if you notice gravel, folds, roots or corrosion caused by metal on the inner surface of the liner, or if you notice that the support (bottom and walls) is damaged, do not install the cleaner before performing the necessary repairs or before replacing the liner using a qualified professional. The manufacturer cannot be held liable in any way for damage caused to the liner.
- The surface of certain vinyl patterned surfaces can wear rapidly and the patterns disappear on contact from objects such as cleaning brushes, toys, inflatable buoys, chlorine distributors and automatic pool cleaners. The decoration on some vinyl surfaces can be scratched or worn by basic friction such as through the use of a pool brush. The colours of certain patterns can also be erased during use or when in contact with objects in the pool. The erased patterns, wear or scratching of vinyl surfaces are not the liability of the manufacturer and are not covered by the limited warranty.
Recycling

This symbol means that your appliance must not be thrown into a normal bin. It will be selectively collected for the purpose of reuse, recycling or transformation. If it contains any substances that may be harmful to the environment, these will be eliminated or neutralised.
Contact your retailer for recycling information.

- Before handling the appliance, it is vital that you read this installation and user manual, as well as the " warnings and warranty" booklet delivered with the appliance. Failure to do so may result in material damage or serious or fatal injury and will void the warranty.
- Keep and pass on these documents for later consultation during the appliance's service life.
- The distribution or modification of this document in any way is prohibited, without prior authorisation on from Zodiac®.
- Zodiac® is constantly developing its products to improve their quality. The information contained herein may therefore be modified without notice.
CONTENTS

1 Specific cati ons 3
1.1 Description 3
1.2 | Technical specifications and marking 4

2 Installation on 5
2.1 | Set-up 5
2.2 I Attachment to the base 5

Use 6
3.1 I Operating principle 6
3.21 Pool preparation 6
3.3 Immersing the cleaner 6
3.4 I Electricity supply connections 7
3.5 I Starting the cleaning cycle 8
3.6 I Ending the cleaning cycle 9

4 Maintenance 10
4.1 | Cleaning the fi I ter 10
4.21 Cleaning the propeller 11
4.3 I Replacing the brush 12
4.4 I Replacing the tracks 13

Troubleshooting
5.1 | Appliance behaviour 14
5.2 I User alerts 15

Tip: to make it easier to contact your retailer
Write down your retailer's contact details to help you find them more easily and fill in the "product" information on the back of the manual; your retailer will ask you for this information.

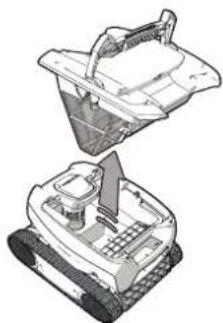
1 Specific cati ons
1.1 I Descripi on
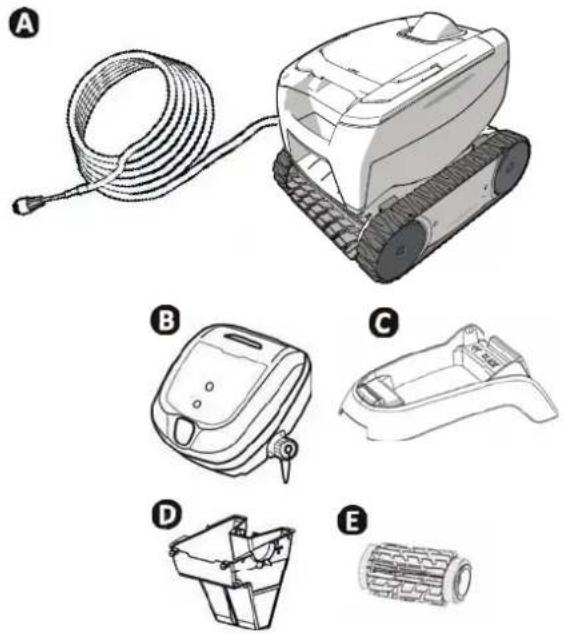
| A Cleaner + fl oati ng cable | ✔ | |
| B Control box | ✔ | |
| C Base for control box | ✔ | |
| D | 100μ fi ne debris fi lter | ✔ |
| 200μ large debris fi lter | ⊕ | |
| 60μ very fi ne debris fi lter | ⊕ | |
| E | Standard fl ap brush / Tile brush (depending on the model) | ✔ |
| Tile brush | ⊕ | |
| F | Caddy kit | ⊕ |

: Supplied

vailable as an opti on
| Symbol Designati on | ||
| Starti ng / Stopping the appliance: | ✔ | |
| "Bott om only" cleaning (2h) | Depending on the model | |
| "Bott om + Walls" cleaning (2h30) | Depending on the model | |
| i | "Control" indicator | ✔ |
| Surface to clean : “Bott om only” | Depending on the model | |
| “Bott om + Walls” | ||

Available

1.2 I Technical specificati ons and marking
1.2.1 Technical specifications
| Control box power supply voltage 100-240 VAC, 50/60 Hz | |
| Cleaner power supply voltage | 30 VDC |
| Maximum power input | 100 W |
| Cable length | 14 m or 16.5 m (depending on the model) |
| Cleaner size (L x W x h) | 37 x 29 x 30 cm |
| Package size (L x W x h) 56 x 37 x 38 cm | |
| Cleaner weight 5.5 kg | |
| Packaged weight 10.1 kg | |
| Theoretic cal cleaning width 17 cm | |
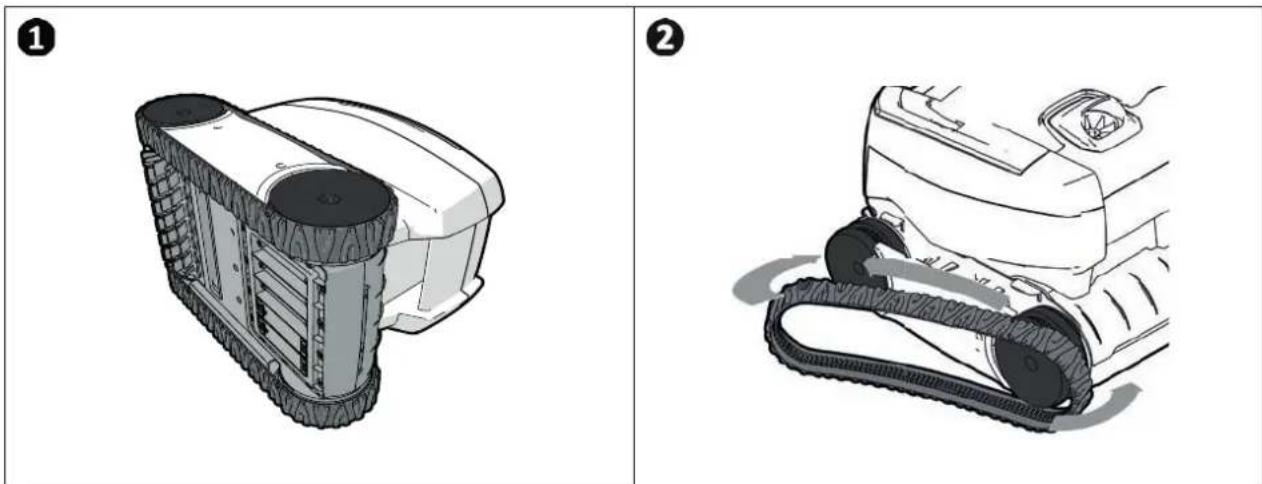
1.2.2 Marking
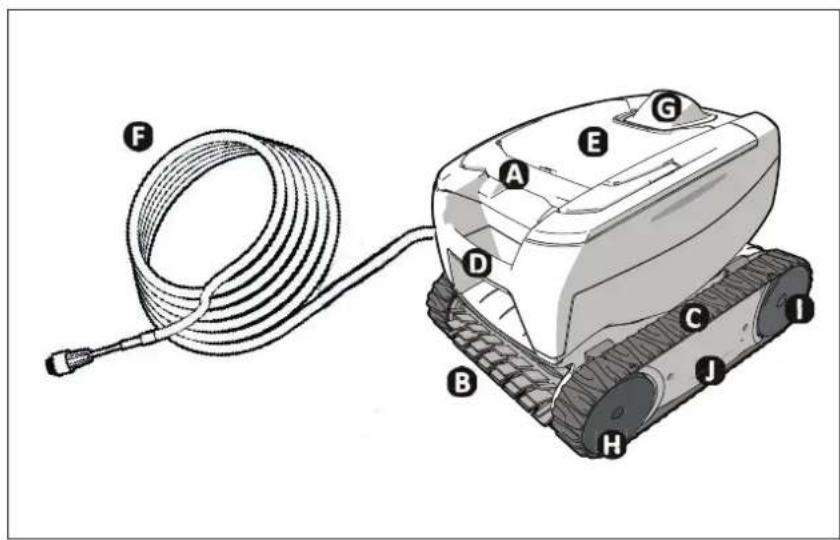
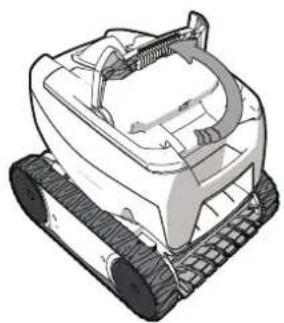
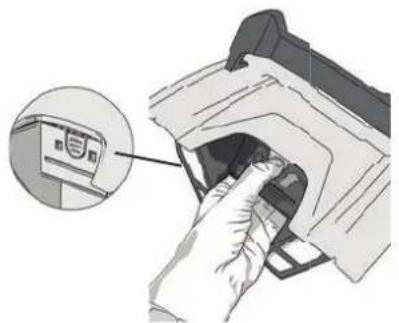
A:Filter access handle
B:Brush
C:Tracks
D:Transport handle
E:Transparent window (depending on the model)
F: Floating cable
G:External flow guide
H:Front wheels
0: Rear wheels
0: Cartridges
1.2.3 Product conformity
This appliance has been designed and built according to the following standards:
Low voltage directi ve: 2006/95/EC
Electromagnetic compatibility directly: 2004/108/EC
EN 55014-1:2000+A1:2001+A2:2002; EN 55014-2:1997+A1:2002
EN 60335-1: 2002 + A1:2004 + A2:2006 +A11:2004 + A12:2006; EN 60335-2-41: 2003 + A1:2004
Relativ to which it is compliant. The product has been tested under the normal condi ons of use.
SAFETY STANDARDS:
The cleaners are classified by Intertek (ETL) as being compliant with the appropriate requirements of IEC 60335-2-41.

IEC60335-2-41


Installation on
2.1I Set-up

A:Control box
B:Base
C:Cleaner
D:Floating cable
E:Plug
F:Power cord
2.2 I Attachment to the base


3 Use
3.1 I Operat ing principle
The cleaner is independent of the filtrati on system and can therefore operate autonomously. It just simply needs to be connected to the mains power supply.
It fi nds the best route to move around and clean the areas of the pool for which it has been designed (depending on the model: bott om only, bott om and walls). Debris is sucked in and stored in the cleaner's fi I tter.
The control box is used to remotely control your cleaner and provide initi al diagnostici cs indicators.
3.21 Pool preparation

-
This product is intended to be used in pools which are permanently installed. Do not use it in pools which may be dismantled. A permanent pool is built into the ground or on the ground and cannot be easily dismantled and stored.
-
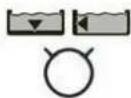
The appliance must operate in pool water with the following properti es:
Water temperature Between 15^ and 35^
| pH Between 6.8 and 7.6 | |
| Chlorine < 3 mg/l |
- When the pool is dirty, especially when commissioning, remove the largest debris using a net in order to optimise the appliance's performances.
- Remove any thermometers, toys and other objects that might damage the appliance.
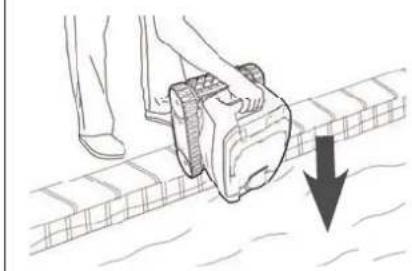
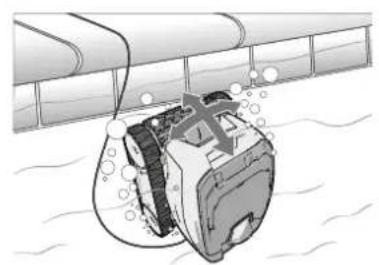
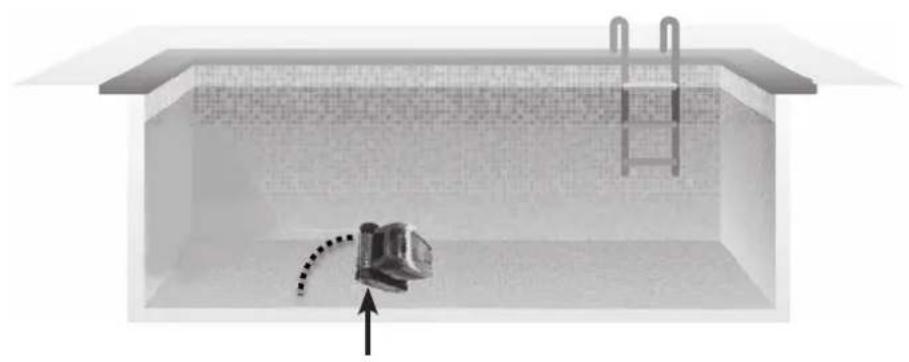
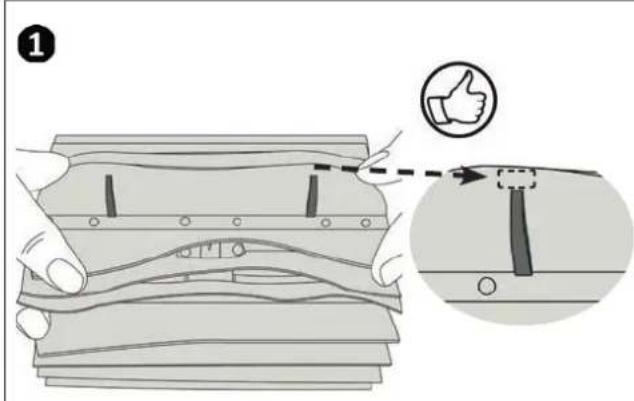
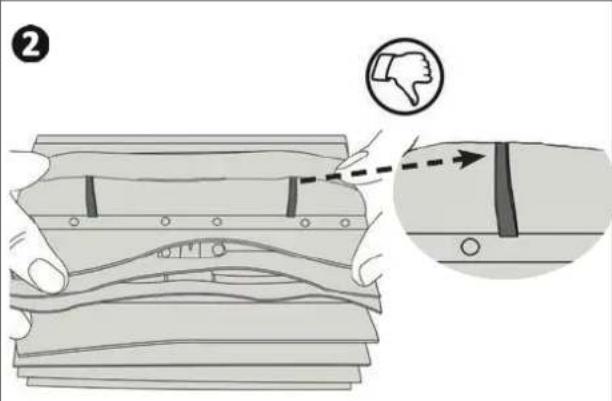
3.3 Immersing the cleaner
- Place as much of the fl oating cable as possible in the water.
- Place the cleaner into the water using the handle (see image 1
- Move it slightly in all directions so that the air contained in the cleaner escapes (see image
- It is essential that the appliance sinks on its own and settles on the pool bottom (see image 3).
1
2
3

3.4 I Electricity supply connecti ons

To prevent risk electrocuti on, fire, or serious injury, be sure to adhere to the following:
- Use of an electrical extension is prohibited when connecting the control box.
- Make sure that the socket can be easily accessed at all times and is protected from rain or splashes.
- The control box is splash-proof but must not be immersed. It must not be installed in a floodable area; keep it at least 3.5 metres away from the edge of the pool and avoid exposing it to direct sunlight.
-
Place the control box near the socket.
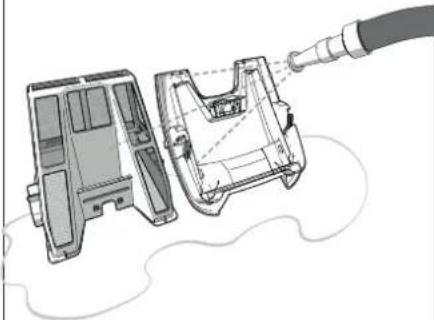
-
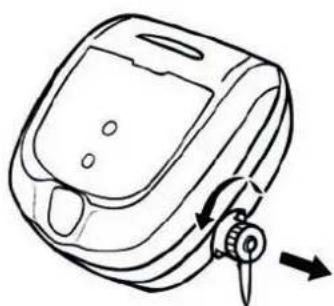
Unscrew the protective cap (see image 1)
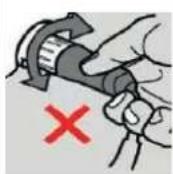
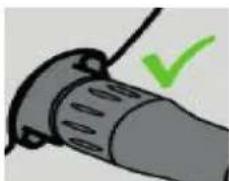
- Connect the floating cable to the control box and lock it in place by turning the ring only in the clockwise direction (to prevent damage to the fl oati ng cable) (seeimage 2, 3
- Make sure that the connector is fully pushed in so that no water can get in (see image 4).
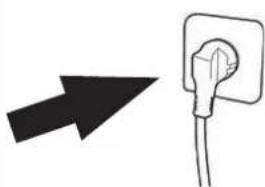
- Connect the power cord (see image 5). Only connect the control box to a power outlet protected by a 30mA maximum residual current device (if in doubt contact a quali ed technician).
1

2
3


4
5

Tip: positi oning the unit for better operati on
Place the control box in the centre of the pool's length, following the safety conditions relating to the electrical connecti on.
3.5 I Starting the cleaning cycle

To prevent risk of injury or property damage, be sure to adhere to the following:
- Bathing is prohibited when the appliance is in the pool.
- Do not use the appliance during shock chlorinati on.
- Do not leave the appliance unatt ended for an extended period.
- Do not use the appliance if the roller shutter is closed.
3.5.1 Launching the cleaning cycle
- Press and release, the LED lights up.
- The appliance starts the cleaning cycle in "bottom only" or "bottom + walls" mode (depending on the model).
Press and release
to select the "bott om only" or "bott om + walls" mode (depending on the model).

Tip to improve cleaning performance
Regular use of the cleaner (without exceeding 3 cycles per week) means that your pool will always be clean and the fi ler less clogged.
3.5.2 The cleaner rears up during certain rotati ons
- The more grip on the surface of the lining, the more the robot will tend to rear up.
3.6 I Ending the cleaning cycle

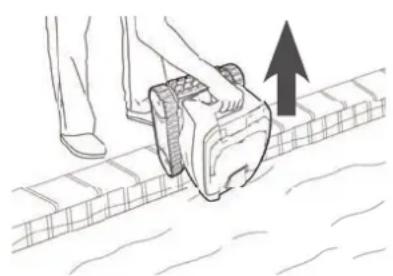
- To avoid damaging the unit, use the cleaner's handle to raise the cleaner and remove it from the pool. Do not pull on the floating cable.
- Take the appliance out of the water each time cleaning is complete.
- Do not leave the appliance to dry out in sunlight aft er use.
-
Store all the elements away from sunlight, humidity and bad weather.
-
Once the cycle is complete, the appliance stops and the LED on the control box switches off.
- To stop the appliance during cleaning, press the LED goes out.
- Carefully pull on the floating cable to bring the robot to the edge of the pool.
- When the cleaner is within arm's reach, pick it up by the handle and lift it gently out of the pool so that the water it contains drains into the pool (see image 1
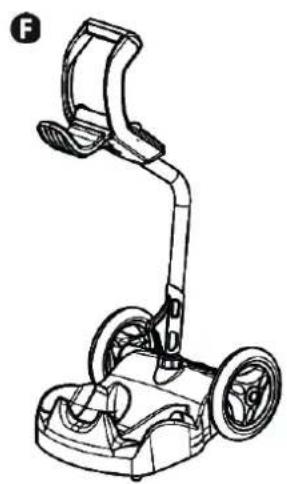
- Place the cleaner on the ground or vertically at the location provided on the caddy (available as an optional extra) for it to dry out quickly. Then store it with the control box away from sunlight and any splashes.
1

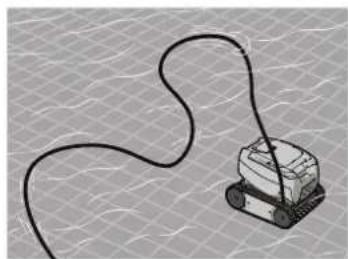
Tip to prevent the floating cable from becoming tangled
The appliance's behaviour is strongly impacted by the tangling of the cable. A cable that is correctly untangled will guarantee better coverage of the pool.
- Untangle the cable and lay it out in the sun so that it returns to its original shape.
- Then wind it up carefully and place it on the caddy handle (available as an optional extra) or on a fixed support.

4 Maintenance
- The appliance must be cleaned regularly using clean or slightly soapy water. Do not use solvents.
- Rinse the appliance thoroughly with clean water.
- Do not let your appliance dry in the sun by the pool.

Tip: replace the fi Iter and the brush every 2 years
You are encouraged to change the fi tter and the brush every 2 years to preserve the integrity of the appliance and guarantee optum performance.
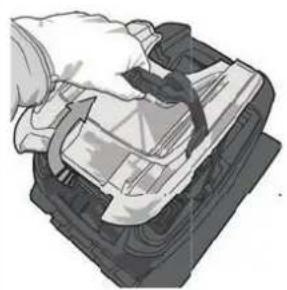
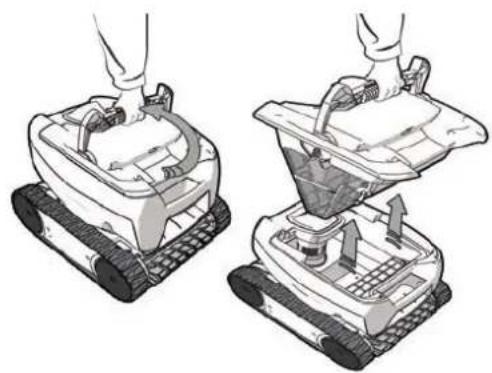
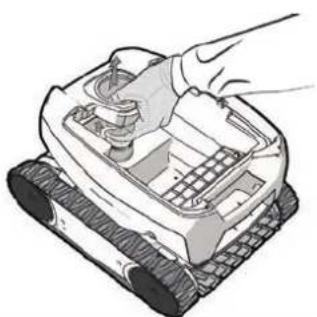
4.1 I Cleaning the fi lter

- The cleaner's performance may be reduced if the filter is full or dirty.
- Clean the filter with fresh water after each cleaning cycle, or several times per cycle depending on the state of the pool (for example on recommissioning).
1
2
3
4
5
6

Tip: If the filter is clogged
Clean the fi Iter with an acidic soluti on (such as spirit vinegar) at least once a year. The fi Iter may clog if not used for several months (winterising period).
4.2 I Cleaning the propeller

To avoid serious injury:
-
Disconnect the cleaner from the power supply.
-
Wear gloves when handling the propeller

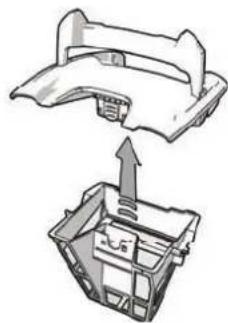
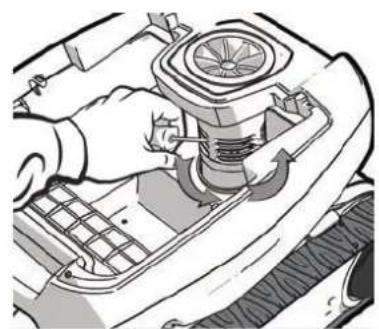
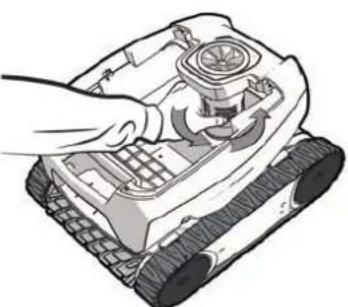
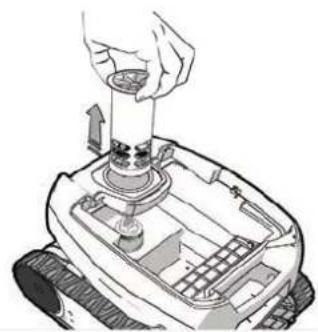
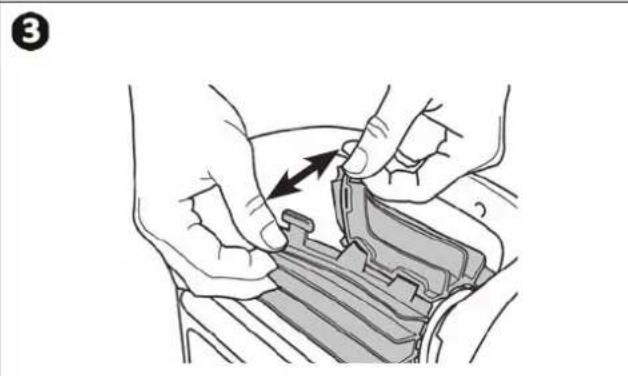
- Remove the fi Iter using the handle (see image 1
- Remove the external flow guide by lifting it so as to clear the clips (see image 2).
Upon first removal, you will notice that the internal flow guide is securely tightened, which is why we recommend inserting a screwdriver into the holes to loosen it by turning the screwdriver in the anti-clockwise direction (see image 3). - Once the internal flow guide has been loosened, unscrew it by hand (see image 4).
- Remove the internal flow guide (see image 5).
- Put on a pair of gloves and pull the propeller, holding it firmly to take it out (see image 6).
- Remove any debris (leaves, stones, etc.) which may be blocking the propeller (see image 7).
1

2
3
4
5
6

7
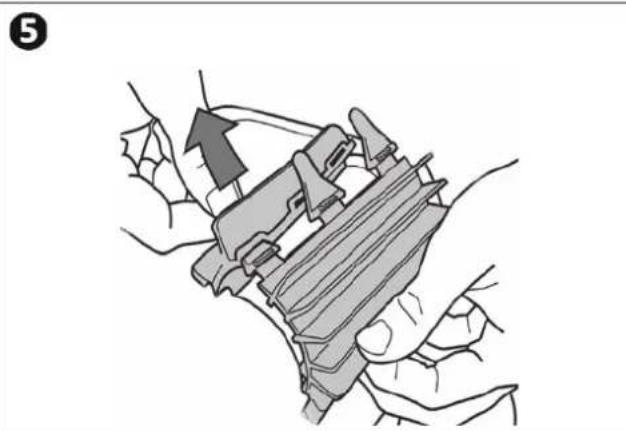
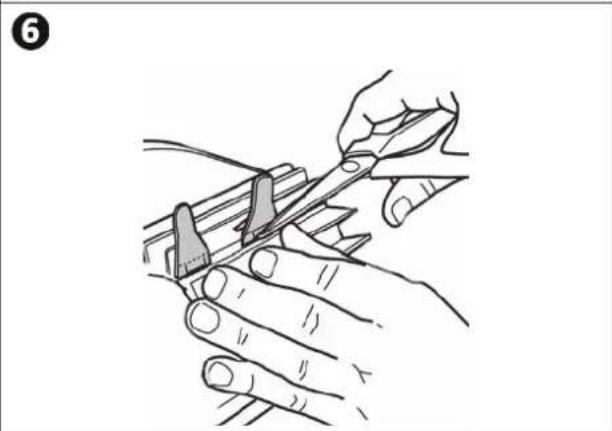
4.3 I Replacing the brush
- The brush is equipped with wear indicators; the distance between the indicators and the end of the brush indicates whether the brush is in good conditi on (see image).
- The brush is worn and should be replaced when the wear indicators appear as shown in image 2.
To remove the worn brush, remove the tabs from the holes in which they are fixed (see image 3).
To fit the new brush, start by fitting the side without tabs under the brush holder (see image 4). - Roll the brush around its support, slide the tabs into the attachment holes and pull on the end of each tab until its edge passes through the slit (see image 5).
- Cut the tabs using a pair of scissors for them to be below flap level (see image 6).
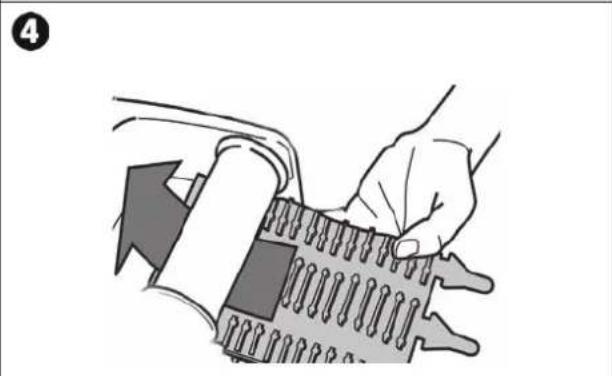

4.4 I Replacing the tracks
- Place the cleaner on its side (see image 1).
- Starting with one of the wheels, pull on the inside of the track to separate it from the wheel (see image ② Then remove the track from the cleaner.
- To install the new track, position the inside of the track on the first wheel's grooves.
- Stretch the track around the second wheel. Press down on the track to position it correctly on the wheel grooves.
- Make sure that the track passes under the guides (if the model includes track guides).

Troubleshooting

- If a problem occurs, before you contact your retailer, please carry out these few simple checks using the following tables.
- If the problem continues, contact your retailer.
Acti ons to be performed by a qualifi ed technician only
5.1 I Appliance behaviour
| When the cleaner moves forward in a straight line, it is no longer fl at on the floor. (To run on the bott om of the pool, it is normal for the front of the cleaner to rise) | ·There is still air in the appliance's casing. Repeat the cleaner immersion operati ons (see § "3.3 Immersing the cleaner"). ·The fi liter is full or dirty: simply clean it. ·The propeller is damaged, contact your retailer |
| The cleaner does not or no longer climbs the pool sides as it originally did. (It's electronic programme means that the cleaner does not systematci cally climb the walls). | ·The fi liter is full or dirty: simply clean it. ·The fi liter is clogged: clean it with an acidic soluti on (spirit vinegar, for example), or replace it where necessary. ·Even though the water seems clear, microscopic algae are present in your pool, they are not visible to the naked eye, and they make the sides slippery and prevent the cleaner from climbing. Carry out shock chlorinati on and slightly reduce the pH. Do not leave the cleaner in the water during shock treatment. If the problem conti nues contact your retailer |
| The cleaner does not move on start-up. | ·Check that the outlet to which the control box is connected is receiving a power supply. ·Check that the cleaning cycle has been launched and that the light is on. If the problem conti nues contact your retailer |
| The cable gets tangled | ·Check that you place as much of the fi oati ng cable as possible in the water. ·Stop the fi Iltrati on pump and begin a new cleaning cycle. ·Place the control box in the centre of the pool's length, following the safety conditi ons, see "3.4 I Electricity supply connecti ons". If cleaning is not opti mal, vary the locati on of the control box and the place at which the cleaner enters the pool. |
| The cleaner doesn't clean the enti re pool | |
| The cleaner's discharge nozzles become blocked | |
| The control box does not respond to any butt on presses | ·Unplug the cable from the mains socket, wait 10 seconds and plug it back in again. |
| The robot does not ti It upwards to climb the walls | ·The brush is worn: check the wear indicators "4.3 I Replacing the brush" and that the brush is properly att ached to its brush support. Replace the brush where necessary. ·The pool is ti led with a right angle between the bott om and the walls: the brush may require adaptati on to opti mise cleaning: contact your retailer |
| The cleaner climbs the walls slowly and stops under the water line | ·The cleaner may behave differently depending on the lining of the pool. A parameter may require changing. To do this, contact your retailer |
| The cleaner climbs the walls quickly and goes past the water line, aspirati ng air |

5.2 I User alerts
| Flashing LED: i | Soluti ons |
| 1s 1s 1s 1s | ·Check that the cleaner is correctly connected to the control box. If necessary, unplug it and reconnect it following the appropriate procedure. |
| 1s 1s 1s 1s | ·Check that there is nothing preventing the brush and support from turning. To do so, remove the tracks and manually rotate the wheels to check that there are no external elements jammed in a housing. |
| 1s 1s 1s | ·Cleaner operati ng outside the pool. Make sure you start the cleaner when it is in the water (see § "3.3 Immersing the cleaner"). |
| ·Check that there are no stones or hair in the propeller (see § "4.2 l Cleaning the propeller"). ·Clean or change the fi lter if necessary. | |
| 1s 1s 1s | ·Temperature too high in the control box: - Preferably install the box in a shaded locati on. - Allow the box to cool before starting a new cycle. |
| ·General cleaner surge current. Check the soluti ons for fl ashing indicator No. 2 and No. 3. | |
| 1s 1s 1s | ·The cleaner may be stuck in one area of the pool. Re-start a cycle or check the soluti ons for the fl ashing indicator No. 2. |