
SHBS 3.7 E1 - Hair and beard trimmer SILVERCREST - Free user manual and instructions
Find the device manual for free SHBS 3.7 E1 SILVERCREST in PDF.

User questions about SHBS 3.7 E1 SILVERCREST
0 question about this device. Answer the ones you know or ask your own.
Ask a new question about this device
Download the instructions for your Hair and beard trimmer in PDF format for free! Find your manual SHBS 3.7 E1 - SILVERCREST and take your electronic device back in hand. On this page are published all the documents necessary for the use of your device. SHBS 3.7 E1 by SILVERCREST.
USER MANUAL SHBS 3.7 E1 SILVERCREST
natural_image
Assorted hair styling tools including comb, clip, and clip (no text or symbols visible)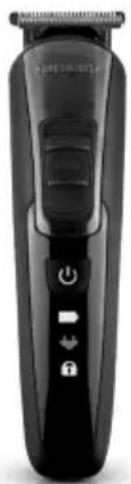
natural_image
Black hairbrush with black filter and control buttons (no visible text or symbols)HAAR- UND BARTSCHNEIDER/HAIR & BEARD TRIMMER/ TONDEUSE BARBE ET CHEVEUX SHBS 3.7 E1
DE AT CH
Operation and safety notes
Translation of the original instructions
NL BE
HAAR- EN BAARDTRIMMER
GB/IE Operation and safety notes Page 17
natural_image
Technical line drawing of a mechanical component with a hatched side, no visible text or symbols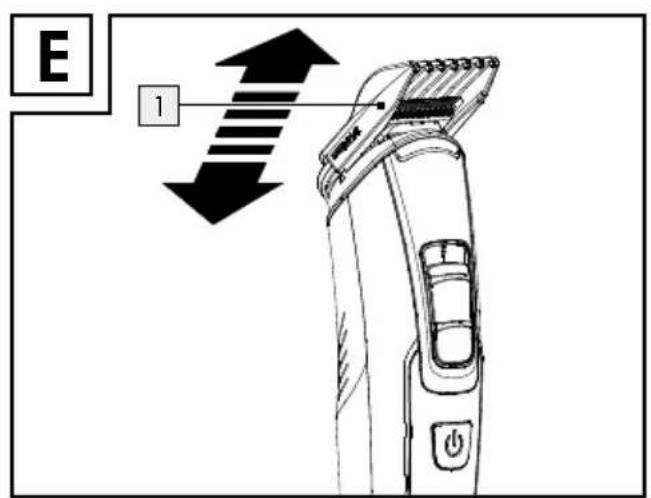
Website: www.optimex-shop.com
EU DECLARATION OF CONFORMITY (No IAN 444777\_2307)
IAN: 444777_2307
Intended use......Page 18
Parts description Page 18
Technical data......Page 18
Scope of delivery....Page 19
Safety notes......Page 19
Safety instructions for batteries/rechargeable batteries......Page 21
Charging the product....Page 22
Before first use....Page 22
Oiling the blades....Page 23
Transport lock....Page 23
Operation Page 23
Changing the cutting attachments....Page 23
Changing the comb attachments....Page 23
Cutting hair (Hair trimmer attachment) Page 23
Trimming a beard (Beard trimmer attachment) Page 23
Trimming the hairline (Precision trimmer attachment)......Page 24
Shaving (contours) (Shaving attachment) Page 24
Trimming nose and ear hair (Nose/ear hair trimmer attachment) Page 24
Cleaning with the cleaning brush....Page 24
Ordering replacement parts......Page 24
Cleaning and care....Page 24
Storage Page 25
Troubleshooting Page 25
Disposal Page 25
Warranty Page 25
Warranty claim procedure....Page 26
Service Page 26
EU declaration of conformity......Page 27
| List of pictograms used | |||
 | Read the instruction manual | Safety informationInstructions for use | |
 | Observe the warnings and safety information! Protection class III | ||
 | Volt ON/OFF button | ||
 | USB type C connector For indoor use only | ||
 | Direct current/voltage | CE | CE mark indicates conformity with relevant EU directives applicable for this product. |
approved for use with household appliances. SELV output: DC 5V, max. 1A.
Hair & beard trimmer
- Introduction
We congratulate you on the purchase of your new product. You have chosen a high quality product. The instructions for use are part of the product. They contain important information concerning safety, use and disposal. Before using the product, please familiarise yourself with all of the safety information and instructions for use. Only use the product as described and for the specified applications. If you pass the product on to anyone else, please ensure that you also pass on all the documentation with it.
Intendeduse
This product is only intended for cutting human hair. Only use the product on dry hair. This product is only intended for private household use and must not be used for commercial purposes. The product may only be used indoors. All other uses are considered improper and can lead to property damages or personal injuries. The manufacturer accepts no liability for damages caused by improper use.
WARNING! DANGER OF DAMAGE TO PROPERTY!
Do not use the product on artificial hair or animal hair.
- Verify the product is complete and undamaged immediately after unpacking.
■ Only use OEM parts.
Do not place the product on hot surfaces, near hot surfaces or near an open fire.
To prevent impermissible heating during use and charging, do not cover the USB Type A to C cable, the power supply and the product.
Do not use any corrosive or abrasive cleaning agents.
WARNING! To charge the rechargeable battery, use only a Class II power supply (not included in delivery)
Partsdescription
1 Adjustable comb attachment (3/4/5/6 mm) for the beard trimming attachment
2 Comb attachments (3/6/9/12 mm) for the hair trimmer attachment
3 Comb attachment with dial (1–10 mm) for the hair trim-mer attachment
4 Shaving attachment (for shaving hairlines)
5 Precision trimmer attachment
6 Nose/ear hair trimmer attachment
7 Hair trimmer attachment
8 Beard trimmer attachment
9 Hair and beard trimmer unit
10 Release button (for switch for cutting length fine tuning (1/2/3))
11 ON/OFFbutton
12 Batterysymbol
13 Plugsymbol
14 Lock symbol
15 USB Type A connector
16 USB Type A to C cable
17 USB Type C connector
18 USB Type C socket
19 Scissors
20 Blade oil
21 Cleaning brush
22 Barber comb
23 Storage bag
- Technicaldata
Hair & beard trimmer: HG11011
Input: 5V=1A
Battery: 1 x 3.7V Li-Ion, 500 mAh
- Scope of delivery
1 Hair and beard trimmer unit
1 Precision trimmer attachment
1 Nose/ear hair trimmer attachment
1 Hair trimmer attachment
1 Shaving attachment
1 Adjustable comb attachment (3/4/5/6 mm) for beard trimming attachment
4 Comb attachments (3/6/9/12 mm)
1 Adjustable comb attachment 1–10 mm for hair trimmer attachment
1 USB Type A to C cable
1 Scissors
1 Blade oil
1 Cleaning brush
1 Barber comb
1 Storage bag
1 Set of instructions

Safety notes
WARNING! DANGER TO LIFE
AND RISK OF ACCIDENTS FOR INFANTS AND CHIL-
DREN! Never leave children unattended with the packaging material or the product. There is a danger of suffocation.
This product may be used by children aged 8 years and up, as well as by persons with reduced physical, sensory or mental capacities, or those lacking experience and/or knowledge, as long as they are supervised or instructed in the safe use of the product and they understand the
associated risks. Do not allow children to play with the product. Never allow children to clean or maintain this product unsupervised.
! WARNING!
hand-held part from the USB Type A to C cable 16 before cleaning it in water.
Avoid the risk of fatal injury from electric shock
WARNING! Keep the product dry.
WARNING! Do not use this product near bathtubs, showers, basins or other vessels containing water.
WARNING! If the product falls into the water, immediately remove the USB Type A to C cable 16 from the power supply (not included in delivery) before you reach into the water.
WARNING! Never touch the USB Type A to C cable 16 with moist or wet hands, especially when you plug it into the socket or pull it out of the socket.
WARNING! Never submerge the product or the USB Type A to C cable 16 in water
or any other liquid and never rinse this/these under running water.
WARNING! Do not use the product while bathing.
For additional protection, the installation of a residual current device (RCD) having a rated residual operating current not exceeding 30 mA is advisable in the electrical circuit supplying the bathroom. Ask your installer for advice.
- Remove the USB Type A to C cable 16 from the power supply (not included in delivery)
- if a malfunction occurs,
- before you clean the product,
- if you have not used the product for a long time,
- during a thunderstorm and
- after each use.
When doing so, remove the USB Type A connector 15 directly from the socket and do not pull it out using the USB Type A to C cable 16.

Avoid risk of injury
- Do not change the accessories while the product is switched on.
- Do not use the product if you detect any kind of visible, external
damage. Never use a damaged product.
If liquid gets into the product, check before – using the product once more.
If you notice that the USB Type A to C cable 16, housing or another part has become damaged, the product can no longer be used.
■ Repairs should only be carried out by a specialist. Improper repairs may result in considerable danger to the user. This will also make any warranty claims void.
- Do not use defective attachments with the product as these could have sharp corners.
■ Defective components must always be replaced with original spare parts. Only by using original spare parts can you ensure that safety requirements are met.
For loading connect the USB Type A to C cable 16 to a power supply which is well within reach.
■ Never use the product unsupervised and only use it in accordance with the information stated on the type plate.
Connect the USB Type A to C cable 16 to the product before inserting it into the power supply.
■ The tips of the attachments are sharp.
■ Switch off the product before attaching or switching the attachments, as well as before cleaning.
- Lay the USB Type A to C cable 16 so nobody will step on or trip over it.
- Do not use the product if you have an open wound, cut, sunburn or blister.

Avoid the danger of damage to property
■ Electrical products may pose a hazard to animals. Animals can also damage the product. Always keep animals away from electrical products.
■ Protect the product from moisture, drops of water and splashing water.
■ Ensure that the USB Type A to C cable 16 does not get stuck in cupboard doors and that it is not pulled over hot surfaces. This could damage the USB Type A to C cable 16 insulation.
■ Use the original accessories only.
- Do not place the product on hot surfaces, near hot surfaces or near an open fire.
■ To prevent impermissible heating do not cover the power supply and the product during use and charging.
- Do not use any corrosive or abrasive cleaning agents.
- Keep the blade oil 20 out of reach of children. Do not ingest the blade oil 20, do not get it into your eyes. Keep it in a safe place if it is not being used.
■ ATTENTION! Risk of product damage! Do not expose the product to direct sunshine or heat.
The ideal ambient temperature is between +5 and +40 °C.
Extreme low or high temperature may damage the battery or the product.

Safetyinstructions for batteries/rechargeable batteries
WARNING!
pose of recharging the batteries, only use protection class II power supply (not provided) approved for use with household product. SELV output: DC 5V, max. 1A.
■ DANGER TO LIFE! Keep batteries/rechargeable batteries out
of reach of children. If accidentally swallowed seek immediate medical attention.


DANGER OF EXPLO-
SION! Never recharge
non-rechargeable batteries. Do not short-circuit batteries/rechargeable batteries and/or open them. Overheating, fire or bursting can be the result.
■ Never throw batteries/rechargeable batteries into fire or water.
Do not exert mechanical loads to batteries/rechargeable batteries.
Risk of leakage of batteries/rechargeable batteries
- Avoid extreme environmental conditions and temperatures, which could affect batteries/rechargeable batteries, e.g. radiators/direct sunlight.
■ f batteries/rechargeable batteries have leaked, avoid contact with skin, eyes and mucous membranes with the chemicals! Flush immediately the affected areas with fresh water and seek medical attention!


WEARPROTECTIVE
GLOVES! Leaked or
damagedbatteries/rechargeable batteries can cause burns on
contact with the skin. Wear suitable protective gloves at all times if such an event occurs.

This product has a built-in rechargeable battery which cannot be replaced by the user. This product contains a battery which is non-replaceable. When disposing of the product, it should be noted that this product contains a rechargeable battery.

Charging the product
Note: Charge the product for 90 minutes before using it for the first time and subsequent charging.
Note: Connect the USB Type C connector 17 to the USB type C socket 18 on the product. Connect the USB Type A connector 15 of the USB type A to C cable 16 to a suitable USB Type A socket of a protection class II power supply (not provided), that is approved for use with household products and has a SELV output of DC 5V, max. 1A. Connect the mains adapter (not provided) to the socket.
Note: The plug symbol ⏻ 13 will flash red when the battery is nearly drained.
Note: In order to lengthen the service life of the rechargeable battery, it is recommended that the product is used regularly and without long storage periods.
Note: After a quick charge for 5 minutes the product can be used for approx 3 minutes.
Note: When the battery is fully charged, the battery symbol
12 flashes in white. When the battery is fully charged, the product can be used for approx. 60 minutes without being connected to the power supply.

Before first use

WARNING! DANGER OF ELECTRIC SHOCK!
The hair and beard trimmer is not waterproof and therefore must not be used in the bathtub/shower.
- Please do not use the product if you have an open wound, cut, sunburn or blister.
The product is only intended for use on dry hair in dry, indoor spaces.
☐ The product can be used cordless only.
- Oiling the blades
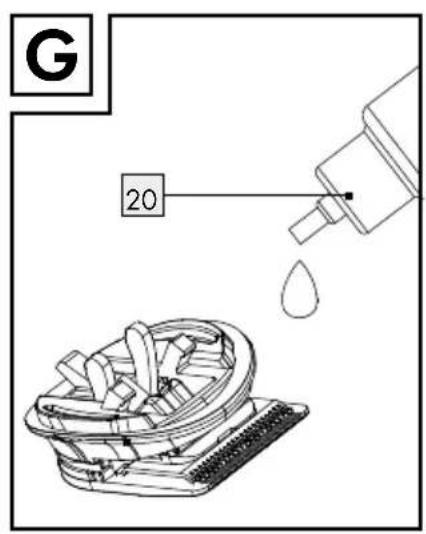
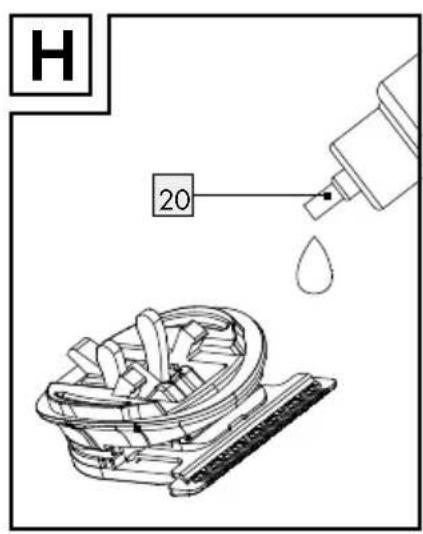
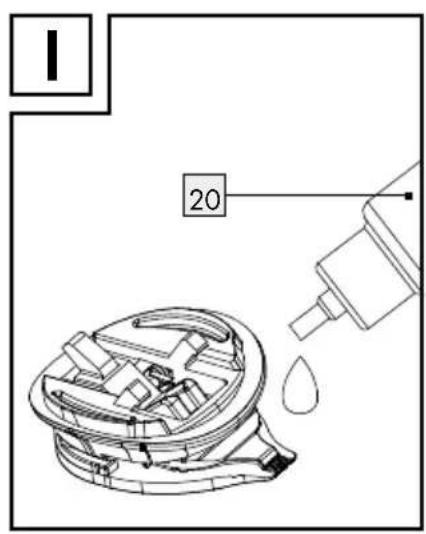
It is recommended that you oil the blades before first use and after cleaning to guarantee complete functionality (see Fig. G, H, I).
□ Always switch off the product before oil the blade.
□ Apply one or two drops of blade oil 20 between the blades and distribute them evenly.
☐ Wipe off any excess oil with a cloth.
☐ You can also use any acid-free oil (such as sewing machine oil).
Transportlock
The lock symbol 🔒 14 flashes white for a short time if a key is pressed when the transport lock is activated.
☐ Press and hold the ON/OFF button ⏻11 for approx. 3 seconds to activate/deactivate the transport lock. The lock symbol 🔒14 flashes for 3 times and then goes out.
Operation
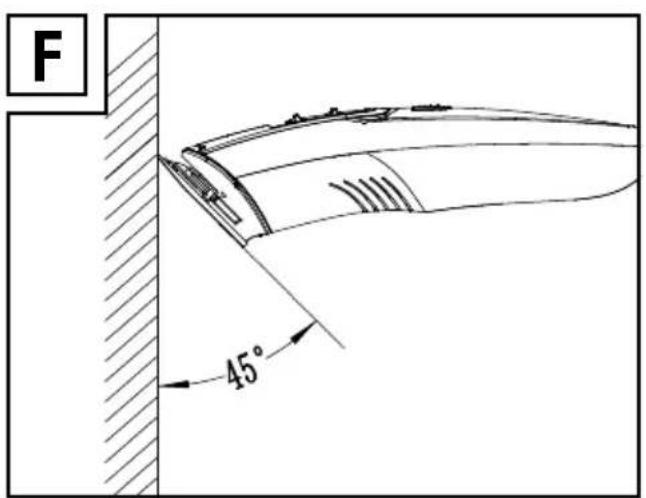
Note: For all applications hold the shaver with an angle of 45^ to your skin (see Fig. F).
Changing the cutting attachments 4, 5, 6, 7, 8
WARNING! RISK OF INJURY!
Switch off the hair and beard trimmer unit 9 before you attach or remove the attachments.
To attach the attachments 4, 5, 6, 7, 8 (see Fig. B), put the lower flap of the attachment 4, 5, 6, 7, 8 into the slot in the hair and beard trimmer unit 9 and press the upper part of the attachment against the hair trimmer until it audibly locks into place and sits firmly in position.
To remove the attachments 4, 5, 6, 7, 8 (see Fig. A) use your thumbs to press the attachment towards the rear of the hair and beard trimmer unit 9.
Changing the comb attachments 1, 2, 3
☐ To attach the comb attachments 1, 2, 3 carefully slide the appropriate comb attachment over the hair or bread trimmer attachment 7/8. Press the lower part of the comb attachments 2 and 3 firmly until they lock into place.
To remove the comb attachments 2 and 3 loosen the comb attachment at its lower end and pull it off the hair and beard trimmer unit 9. Slide the adjustable comb attachment 1 for the beard trimmer attachment 8 upwards from the hair and beard trimmer unit 9.
Cuttinghair (Hair trimmer attachment 7)
Note: The hair to be dressed must be dry. The cutting length may deviate depending on the cutting angle.
Place a sheet or cape around throat and neck to prevent cut-off hair from dropping into the collar.
Comb the hair well with included barber comb 22.
☐ First, start with a comb attachment ② with a longer cutting length and then, in the course of the cutting process, use shorter cutting lengths step by step.
☐ With the comb attachment with dial 3 you also start with a longer cutting length. Turn the dial anticlockwise to shorten the cutting length and clockwise to lengthen it. (see Fig. C).
☐ Start by cutting the hair in the neck or on the sides and cut towards the center of the head. Then, cut the front section of the hair towards the center of the head.
Hold the hair and beard trimmer unit 9 in such a way that the comb attachment 2 lies as flat as possible on the head. Move the hair and beard trimmer unit 9 evenly through the hair.
☐ Hold the hair and beard trimmer unit 9 with comb attachment 3 in such a way that the flat area above the dial lies on the head (see Fig. D).
☐ Cut against direction of hair growth.
In order to catch all the hair, move the hair and beard trimmer unit 9 several times through each section of the hair.
□ Comb the hair repeatedly and well.
☐ Using the switch for cutting length fine tuning 10 the cutting length can be slightly varies with three levels: 1/2/3 (1.8 mm - 0.8 mm).
☐ In order to achieve a straight cutting line for cutting lengths, the hair and beard trimmer unit ⑨ should be passed through the hair several times from different directions.
- Trimming a beard (Beard trimmer attachment 8)
Note: Please note that the cutting lengths will only be achieved if the switch for cutting length fine tuning 10 is at position 1 and the hair and beard trimmer unit 9 is held at a right angle to the skin surface.
□ Comb the beard in the direction that it grows.
☐ Trim the beard downwards from ear to chin. First trim one side, then the other.
□Combattachment 1: Adjust the cutting length with the slider according to the desired hair length and read off the cutting length using the marking on the side of the comb attachment 1 (3/4/5/6 mm) (see Fig. E). Now, shorten your beard step by step.
□ Using the beard trimmer attachment 4 without a comb attachment 1, to cut the beard very short or to cut a moustache and hairline.
☐ Using the switch for cutting length fine tuning 10 the cutting length can be slightly varied with three levels: 1/2/3 (1.8 mm - 0.8 mm).
- Trimming the hairline (Precision trimmer attachment 5)
☐ Use the precision trimmer attachment ☐ 5 to shorten and shape moustache, whiskers, sideburns or eyebrows.
☐ Put the edge of the attachment at the desired hairline height and move the hair and beard trimmer unit 9 downwards.
●Shaving(contours) (Shaving attachment 4)
Note: Your skin must be clean and dry. The shaving attachment is only suitable for shaving hairlines.
Hold the hair and beard trimmer unit 9 at a right angle to the skin surface and gently guide it over your face.
☐ Shave against the direction of your beard growth.
☐ Stretch your skin in complicated areas, such as the chin, to achieve better results.
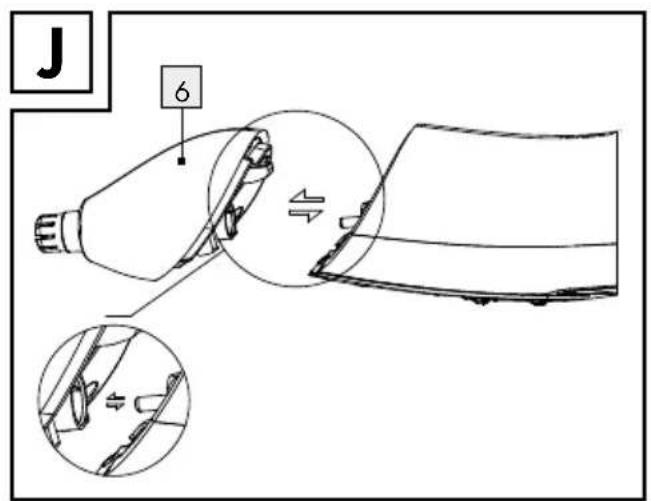
- Trimming nose and ear hair (Nose/ear hair trimmer attachment 6) (see Fig. J)
☐ Insert only the metal tip slowly into a nostril or an ear.
☐ Slowly move the hair and beard trimmer unit 9 with a circular motion to trim the hair.
- Cleaning with the cleaning brush
☐ Switch the product off using the ON/OFF button ⏻11. If cutting attachments (4-8) or comb attachments (1-3) is attached on the product, remove it before cleaning as described in the chapter "Operation". Remove the attachment by pressing the trimmer with your thumbs from the front (see Fig. A).
☐ Remove the hair remnants from the attachment using the cleaning brush ^[21] .
- Ordering replacement parts
Replacements for the following parts can be ordered online:
Shaving attachment 4 Precision trimmer attachment 5 Nose/ear hair trimmer attachment 6 Hair trimmer attachment 7 Beard trimmer attachment 8
Item number: 444777_2307 Website: www.optimex-shop.com
- Cleaning and care
Never immerse the product, the USB Type A to C cable ^16 and the power supply in water or other liquids during corded use or rinse under running water.
■ Always switch off the product before cleaning it.
The comb attachments 1, 2, 3 and nose/ear hair trimmer attachment 6 can be cleaned with water. Do not use any other liquids.
Note: Let them dry before using again.
- Do not use aggressive or abrasive cleaning agents.
☐ Wipe down the product with a slightly damp cloth.
☐ If you are not using the product for extended periods, store it in the storage bag 23.
Hair and beard trimmer unit 9
☐ Wipe the casing of the hair and beard trimmer unit 9 with a damp cloth.
Comb attachments 1, 2, 3
☐ Remove the comb attachment 1, 2, 3. Rinse the comb attachment 1, 2, 3 with water and let it dry before using again.
Precision trimmer 5, hair trimmer 7 and beard trimmer attachments 8
☐ Remove the attachment from the hair and beard trimmer unit 9 by pressing it with the thumb towards the rear (see Fig. A).
☐ Remove the hair remnants from the attachment using the cleaning brush 21 included in the delivery.
Note: It is recommended that you oil the blades before first use and after cleaning to guarantee complete functionality (see Fig. G, H, I). Always switch off the product before oil the blade. Apply one or two drops of blade oil 20 between the blades and distribute them evenly. Wipe off any excess oil with a cloth. You can also use any acid-free oil (such as sewing machine oil).
Note: The blades can be oiled with or without the comb attachment 1, 2 or 3.
Nose/ear hair trimmer attachment 6
☐ Remove the nose/ear hair trimmer attachment ☐. Rinse it with water and let it dry completely before using it again.
Shaving attachment 4
Do not detach the shaving foil from the shaving foil frame, and do not clean it using the cleaning brush [21].
Note: From time to time, oil the cutting blade with a few drops of acid-free oil (e.g. sewing machine oil). Attach the shaving attachment 4 to the hair and beard trimmer unit 9 and let it run for a few seconds without using it. Using a soft cloth, wipe off the surplus oil, if necessary.
☐ Remove the shaving attachment 4.
☐ Press the button on the side of the shaving attachment and remove the shaving foil frame. While removing the shaving foil frame, only hold it at the side and do not press against the shaving foil.
□ Clean the cutting blade using the included cleaning brush ^21 .
□ Clean the shaving foil in the shaving foil frame under running water and allow it to dry completely before putting it back on the shaving attachment [4].
Put the shaving foil frame back onto the shaving attachment 4. While attaching the frame, make sure that the fastening tabs on the shaving foil frame fit into the appropriate recesses on the shaving attachment 4, and press the shaving foil frame gently downwards until it audibly locks into place.
Troubleshooting
| Error Cause Solution | ||
| The product does not work. The battery may not be charged. Recharge the product. | ||
| Trimming is difficult. Hair may be stuck inside the blades. | Clean the cutting unit 1-8 and the product and oil it if necessary. | |
| The rechargeable battery cannot be charged or the battery performance is very poor. | The rechargeable battery has reached the end of its service life. | The product with the built-in rechargeable battery must be properly disposed of. |
●Disposal
The packaging is made entirely of recyclable materials, which you may dispose of at local recycling facilities.
Observe the marking of the packaging materials for waste separation, which are marked with abbreviations (a) and numbers (b) with following meaning: 1-7: plastics/20-22: paper and fibreboard/80-98: composite materials.
Contact your local refuse disposal authority for more details of how to dispose of your worn-out product.

To help protect the environment, please dispose of the product properly when it has reached the end of its useful life and not in the household waste. Information on collection points and their opening hours can be obtained from your local authority.

The product incl. accessories and packaging materials are recyclable and are subject to extended producer responsibility. Dispose them separately, following the illustrated Info-tri (sorting information), for better waste treatment. The Triman logo is valid in France only.
This product has a built-in rechargeable battery that cannot be replaced or removed by the user. When disposing of the product, it must be noted that this product contains a rechargeable battery.
Faulty or used batteries/rechargeable batteries must be recycled in accordance with Directive 2006/66/EC and its amendments. Please return the batteries/rechargeable batteries and/or the product to the available collection points.
Environmental damage through incorrect disposal of the batteries/rechargeable batteries!
Batteries/rechargeable batteries may not be disposed of with the usual domestic waste. They may contain toxic heavy metals and are subject to hazardous waste treatment rules and regulations. The chemical symbols for heavy metals are as follows:
Cd = cadmium, Hg = mercury, Pb = lead. That is why you should dispose of used batteries/rechargeable batteries at a local collection point.
Warranty
The product has been manufactured to strict quality guidelines and meticulously examined before delivery. In the event of material or manufacturing defects you have legal rights against the retailer of this product. Your legal rights are not limited in any way by our warranty detailed below.
The warranty for this product is 3 years from the date of purchase. The warranty period begins on the date of purchase. Keep the original sales receipt in a safe location as this document is required as proof of purchase.
Any damage or defects already present at the time of purchase must be reported without delay after unpacking the product.
Should the product show any fault in materials or manufacture within 3 years from the date of purchase, we will repair or replace it – at our choice – free of charge to you. The warranty period is not extended as a result of a claim being granted. This also applies to replaced and repaired parts.
This warranty becomes void if the product has been damaged, or used or maintained improperly.
The warranty covers material or manufacturing defects. This warranty does not cover product parts subject to normal wear and tear, thus considered consumables (e.g. batteries, rechargeable batteries, tubes, cartridges), nor damage to fragile parts, e.g. switches or glass parts.
- Warranty claim procedure
To ensure quick processing of your case, please observe the following instructions:
Please have the till receipt and the item number (IAN 444777_2307) available as proof of purchase.
You will find the item number on the rating plate, an engraving on the front page of the instructions for use (bottom left), or as a sticker on the rear or bottom of the product.
If functional or other defects occur, please contact the service department listed either by telephone or by e-mail.
You can return a defective product to us free of charge to the service address that will be provided to you. Ensure that you enclose the proof of purchase (till receipt) and information about what the defect is and when it occurred.
Service
GB Service Great Britain
Tel.: 0800 0569216
E-Mail: owim@lidl.co.uk
IE Service Ireland
Tel.:1800200736
E-Mail: owim@lidl.ie

● EU declaration of conformity
EU DECLARATION OF CONFORMITY (No IAN 444777_2307)
| IAN: | 444777_2307 |
| Product identification: | "Silvercrest" HAIR & BEARD TRIMMER |
| Model Number: | HG11011 |
The object of the declaration described above is in conformity with the relevant Union harmonisation legislation:
| Directive 2006/42/EC |
| Directive 2014/30/EU |
| Directive 2011/65/EU and all related amendments |
References to the relevant harmonised standards used or references to the other technical specifications in relation to which conformity is declared:
| N° / Parts |
| Directive 2006/42/EC |
| EN 60335-1:2012/A15:2021 |
| EN 60335-2-8:2015/A12:2022 |
| EN ISO 12100:2010 |
| EN 62233:2008 |
| Directive 2014/30/EU |
| EN IEC 55014-1:2021 |
| EN IEC 55014-2:2021 |
| EN IEC 61000-3-2:2019/A1:2021 |
| EN 61000-3-3:2013/A2:2021 |
The object of the declaration described above is in conformity with Directive 2011/65/EU of the European Parliament and of the Council of 8 June 2011 on the restriction of the use of certain hazardous substances in electrical and electronic equipment:
| N° / Parts |
| EN IEC 63000:2018 |
Keeper of the technical documentation: OWIM GmbH & Co.KG
Signed for and on behalf of:
This declaration of conformity is issued under the sole responsibility of the manufacturer.
Translation of the original declaration of conformity
Neckarsulm
Place
11.10.2023
Date
ppa. Stefan Haensel Authorised Signatory
ppa.Budmei ppa.uens Buchheim
Authorised Signatory
Site Web : www.optimex-shop.com
EU DECLARATION OF CONFORMITY (No IAN 444777_2307)
WAARSCHUWING! GEVAAR VOOR MATERIÈLE SCHADE!
WAARSCHUWING! LETSELGEVAAR!
Website: www.optimex-shop.com
EU DECLARATION OF CONFORMITY (No IAN 444777_2307)
| IAN: | 444777_2307 |
| Productidentificatie: | "Silvercrest" HAAR- EN BAARDTRIMMER |
| Modelnummer: | HG11011 |
EU DECLARATION OF CONFORMITY (No IAN 444777_2307)
EU DECLARATION OF CONFORMITY (No IAN 444777_2307)
| IAN: | 444777_2307 |
| Identifikace produktu: | "Silvercrest" ZASTŘIHOVAČ VLASŮ A VOUSŮ |
| Číslo modelu: | HG11011 |
NOSTE OCHRANNÉ RUKAVICE! Vytečené
EU DECLARATION OF CONFORMITY (No IAN 444777_2307)
| IAN: | 444777_2307 |
| Identifikácia produktu: | "Silvercrest" ZASTRIHÁVAČ VLASOV A BRADY |
| Číslo modelu: | HG11011 |
Página web: www.optimex-shop.com
EU DECLARATION OF CONFORMITY (No IAN 444777_2307)
Website: www.optimex-shop.com
Rengøring og pleje
EU DECLARATION OF CONFORMITY (No IAN 444777_2307)
| IAN: | 444777_2307 |
| Produktidentifikation: | "Silvercrest" HÄR- OG SKÆGTRIMMER |
| Modelnummer: | HG11011 |
Genstanden for erklæringen, som beskrevet ovenfor, er i overensstemmelse med den relevante EU-harmoniseringslovgivning:
Sito web: www.optimex-shop.com
- Pulizia e cura
EU DECLARATION OF CONFORMITY (No IAN 444777_2307)
Honlap: www.optimex-shop.com
Tisztítás és ápolás
EU DECLARATION OF CONFORMITY (No IAN 444777_2307)