
AF-GD82AE - Deep fryer SHARP - Free user manual and instructions
Find the device manual for free AF-GD82AE SHARP in PDF.

| Product type | Dual compartment air fryer |
| Brand and model | Sharp AF-GD82AE |
| Dimensions (L x H x D) | 395 x 305 x 362 mm |
| Net weight | 10.15 kg |
| Total capacity | 8 L (2 x 4 L) |
| Power supply | 220-240 V ~ 50 Hz |
| Rated power | 1800 W (per compartment) |
| Standby consumption | < 0.5 W |
| Temperature range | 60 °C to 200 °C |
| Automatic programs | 12 (fries, beef, vegetables, chicken, bacon, fish, potatoes, pizza, nuggets, shrimp, snacks, grilled sandwich) |
| Cooking functions | Air fry, roast, bake, dehydrate, reheat, keep warm, preheat, frozen cooking, Dual mode, Sync mode |
| Display type | LED digital |
| Interior coating | Non-stick |
| Frying tray dimensions | 146 x 208 mm |
| Inner pot dimensions | 163 x 128 x 227 mm |
| Power cord length | 1000 mm |
| Noise level | 56 dB |
| Cleaning | Trays and pots dishwasher safe; do not immerse the body |
| Safety | Auto shut-off, overheat protection, hot surfaces indicated |
| Included accessories | 2 inner pots, 2 frying trays |
Frequently Asked Questions - AF-GD82AE SHARP
User questions about AF-GD82AE SHARP
0 question about this device. Answer the ones you know or ask your own.
Ask a new question about this device
Download the instructions for your Deep fryer in PDF format for free! Find your manual AF-GD82AE - SHARP and take your electronic device back in hand. On this page are published all the documents necessary for the use of your device. AF-GD82AE by SHARP.
USER MANUAL AF-GD82AE SHARP
natural_image
Line drawing of a Sharp air fryer with digital display and control buttons (no text or symbols on the device itself)User manual
AF-GD82A
Air Fryer

*Product images are for illustration purpose only. Actual product may vary.
Attention:
Your product is marked with this symbol.
It means that used electrical and electronic products should not be mixed with general household waste. There is a separate collection system for these products.

www.sharpconsumer.com/contact/

www.sharpconsumer.com/support/

www.sharpconsumer.com/documents-of-conformity/
A. Information on Disposal for Users (private households)
1. In the European Union
Attention: If you want to dispose of this equipment, please do not use the ordinary dustbin!
Used electrical and electronic equipment must be treated separately and in accordance with legislation that requires proper treatment, recovery and recycling of used electrical and electronic equipment.
Following the implementation by member states, private households within the EU states may return their used electrical and electronic equipment to designated collection facilities free of charge*.
In some countries* your local retailer may also take back your old product free of charge if you purchase a similar new one.
* Please contact your local authority for further details.
If your used electrical or electronic equipment has batteries or accumulators, please dispose of these separately beforehand according to local requirements. By disposing of this product correctly you will help ensure that the waste undergoes the necessary treatment, recovery and recycling and thus prevent potential negative effects on the environment and human health which could otherwise arise due to inappropriate waste handling.
2. In other Countries outside the EU
If you wish to discard this product, please contact your local authorities and ask for the correct method of disposal.
For Switzerland: Used electrical or electronic equipment can be returned free of charge to the dealer, even if you don't purchase a new product.
Further collection facilities are listed on the homepage of www.swico.ch or www.sens.ch.
B. Information on Disposal for Business Users
1. In the European Union
If the product is used for business purposes and you want to discard it: Please contact your SHARP dealer who will inform you about the take-back of the product. You might be charged for the costs arising from take-back and recycling. Small products (and small amounts) might be taken back by your local collection facilities.
For Spain: Please contact the established collection system or your local authority for take-back of your used products.
2. In other Countries outside the EU
If you wish to discard of this product, please contact your local authorities and ask for the correct method of disposal.
CONTENTS
SAFETY INSTRUCTIONS .... 3
SPECIFICATIONS....6
AIR FRYER AND ACCESSORIES....7
CONTROL PANEL 8
BEFORE USING YOUR AIR FRYER 8
OPERATION INSTRUCTIONS....9
Automatic Cooking....10
Air Fry Cooking....12
Bake 13
Roast....14
Cook From Frozen 15
Pre-Heat....16
Reheat....17
Dehydrate....17
Keep Warm....18
SYNC FINISH 18
DUAL....19
MAINTENANCE WHILE IN USE 19
CLEANING INSTRUCTIONS 19
STORAGE 19
TROUBLESHOOTING....20
SAFETYINSTRUCTIONS
When using an electrical appliance, basic safety precautions should always be followed, including the following:
• Children should be supervised to ensure that they DO NOT play with the appliance.
- This appliance is not intended for use by persons (including children) with reduced physical, sensory or mental capabilities or lack of experience and knowledge, unless they have been given supervision or instruction concerning use of the appliance by a person responsible for their safety.
- Clean the air fry tray and inner pot with damp, soapy cloth. Make sure only use mild, soapy water.
- DO NOT clean with metal scouring pads. Pieces can break off the pad and touch electrical parts, creating a risk of electric shock. Damage to the surface will also occur.
- Dry the unit and all the assemblies with a soft cloth before storage or use.
- If there are any stains on the tray or inner pot which are too difficult to clean, let them soak in warm water for about 10 minutes before cleaning.
- The frying tray and inner pot can be cleaned in a dishwasher.
- DO NOT overfi ll when cooking. Overfi lling may cause personal injury or property damage or affect the safe use of the appliance.
- DO NOT use oil or any other liquid in the inner pot.
- DO NOT use this appliance for deep-frying.
- Ensure that food is correctly prepared and cooked to avoid any danger to health.
- Prevent food contact with heating elements.
- ALWAYS ensure the appliance is properly assembled before use.
- DO NOT place any of the following materials in the air fryer: cardboard, plastic, paper, or anything similar.
- DO NOT store any materials, other than the supplied accessories, in the air fryer when not in use.
- DO NOT use appliance for other than its intended use.
• DO NOT use outdoors. - If any advice is required regarding this product, contact your Sharp Help Line.
- Only hold the appliance by the correct handles and use such heat protection measures such as gloves or potholders.
- Read all of these instructions to ensure that you are familiar with the operation of this air fryer. DO NOT touch hot surfaces, where possible use handles or controls (dependent on model).
- The use of accessory attachments not recommended by as this may cause a hazard or injury.
- This appliance is for HOUSEHOLD USE ONLY.
- To prevent the inner pot dropping on the ground, put the inner pot on a stable surface before removing the air fry tray.
- When using ensure that the handle is pointing towards you.
- CAUTION: The mark means APPLIANCE SURFACES ARE HOT WHEN OR AFTER USE. DO NOT touch hot surfaces.
- DO NOT cover the air intake vent or air exhaust vent while unit is operating. Doing so will prevent even cooking and may damage the unit or cause it to overheat.
- DO NOT touch accessories during or immediately after cooking.
- Extreme caution must be used when the appliance contains hot food. Improper use may result in personal injury.
- Leave the unit after use so it has sufficient time to cool.
- Let your air fryer cool before cleaning.
- WARNING: As this air fryer gets hot during use and some surfaces may develop high temperatures. As people
perceive temperatures, this device should be used with care.
- Wear protective insulated gloves when touching hot surfaces or hot air fry tray, inner pot, and food.
- When using this appliance, provide adequate space above and on all sides for air circulation. ALWAYS ensure that the inner pot is properly closed before operating.
- DO NOT allow the power cable to hang over edge of the work surface or touch hot surfaces.
- DO NOT operate appliance if the mains lead or plug is damaged in any way or after the appliance malfunctions or has been damaged in any other way.
- DO NOT replace or modify the mains cable or plug.
- DO NOT use an extension cord.
- Ensure that the mains socket/switch is accessible when the air fryer is in use.
- This air fryer is not intended to be operated by means of an external timer or separate remote-control system.
- Unplug from the mains supply when not in use, or before cleaning.
- When unplugging the power plug from the mains supply, always hold the plug, never pull the cord.
- When you have stopped using the air fryer, press the STOP/CANCEL button to return the standby mode, then unplug from the mains supply.
- To protect against electric shock, DO NOT immerse the air fryer into water or other liquids.
- DO NOT cover any part of the air fryer while it is operating, as this will cause it to overheat.
- DO NOT place the air fryer on any hot surfaces, near hot gas/electric burners or in a heated oven.
- When operating the air fryer, keep at least 100mm of space on all sides to allow for adequate air circulation.
KEEP THESE INSTRUCTIONS IN A SAFE PLACE FOR FUTURE REFERENCE
SPECIFICATIONS
| Model name AF-GD82A | |
| Air Fryer Power (W) 1800 (each drawer) | |
| Air Fryer Temperature Levels (Celsius) 60 °C to 200 °C | |
| 12 Automatic Programmes | Fries, Beef, Vegetables, Small Chicken, Bacon, Fish, Potato, Pizza, Chicken Nuggets, Prawns, Snacks, Toasted Sandwich |
| 10 Functions | Pre-Heat, Reheat, Cook from Frozen, Keep Warm, Air Fry, Roast, Bake, Dehydrate, Dual, Sync |
| Capacity (litres) 8 (4 + 4) | |
| Control Panel Digital | |
| Frying Tray Coating Non stick | |
| Frying Tray Size (W x L in mm) 146 x 208 | |
| Inner Pot Coating Non-stick | |
| Inner Pot Size (W x H x D in mm) 163 x 128 x 227 | |
| Mains Lead Length (mm) 1000 | |
| Noise Level (dB) 56 | |
| Power Consumption (W) | 1800 |
| Power Requirements | 220-240V AC 50 Hz |
| Standby Power Consumption (W) | < 0.5 |
| Size (W x H x D in mm) | 395 x 305 x 362 |
| Weight (kg) | 10.15 |
This product complies with relevant Regulations and Standards for the UK and EU.
AS PART OF A POLICY OF CONTINUOUS IMPROVEMENT, WE RESERVE THE RIGHT TO ALTER DESIGN AND SPECIFICATIONS WITHOUT NOTICE.
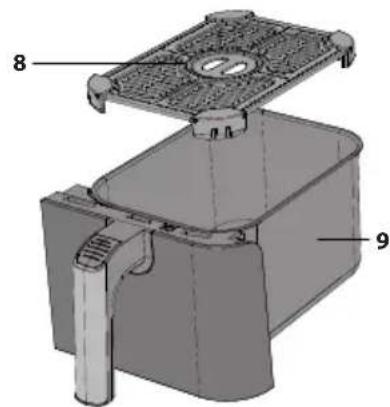
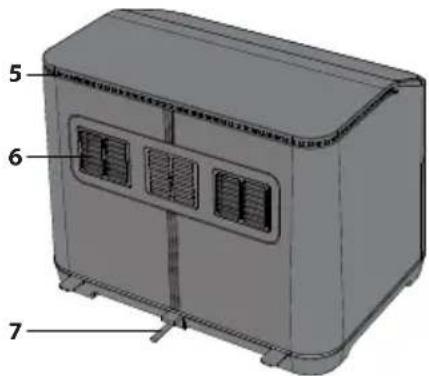
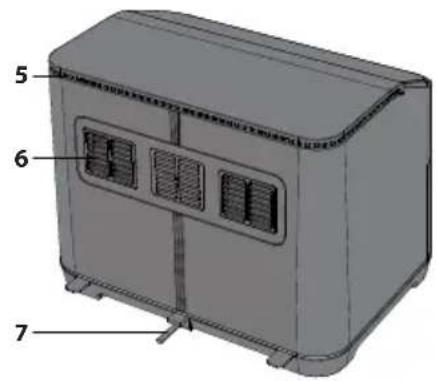
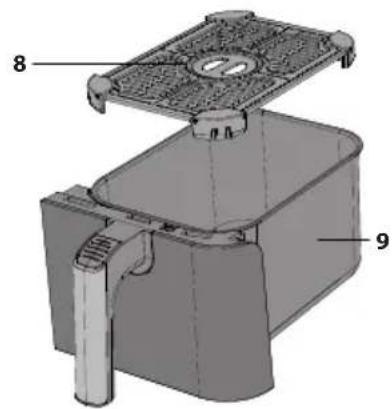
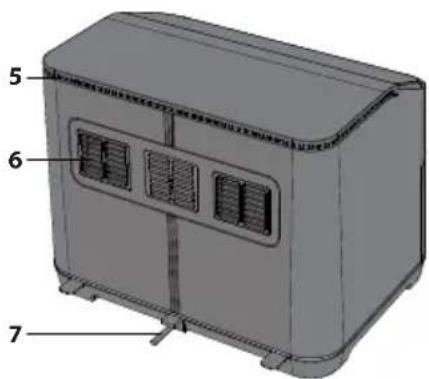
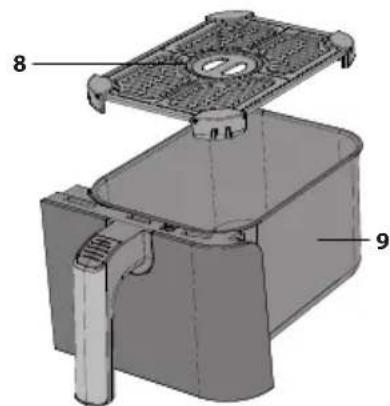
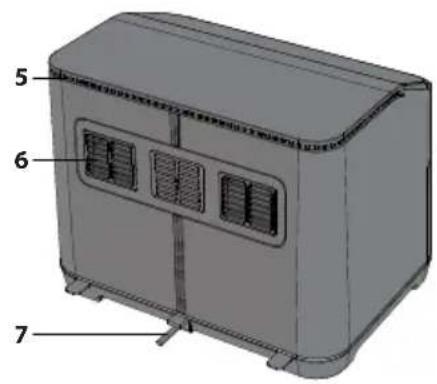
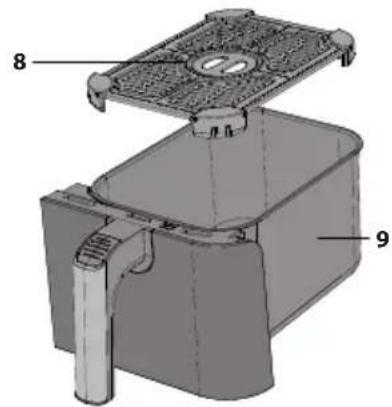
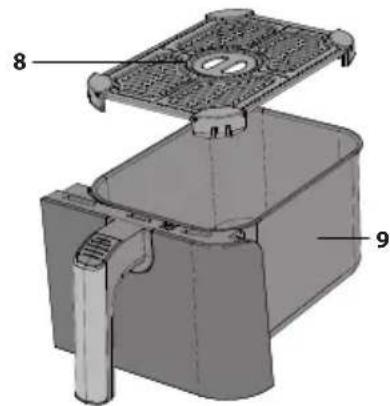
AIR FRYER AND ACCESSORIES
Please familiarize yourself with the following Air Fryer functions and accessories prior to first use:
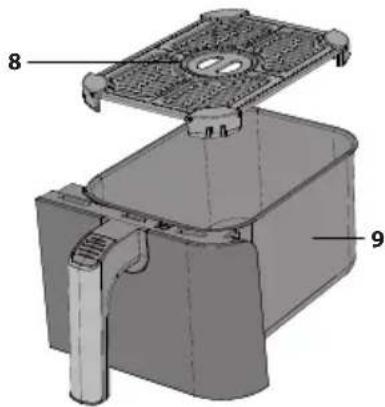
Inner pot: Place the frying tray onto the inner pot, and then put the inner pot into the air fryer.
Frying tray: Put the frying tray into the inner pot prior to using your air fryer.
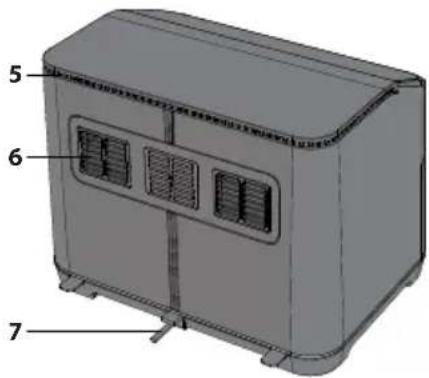
Air exhaust vent: There will be hot steam venting from the exhaust vent during use (this is normal), keep your hands and face away from the air exhaust vent when cooking to prevent scalding.
Handle: This is used for moving the inner pot and frying tray in and out of the air fryer.
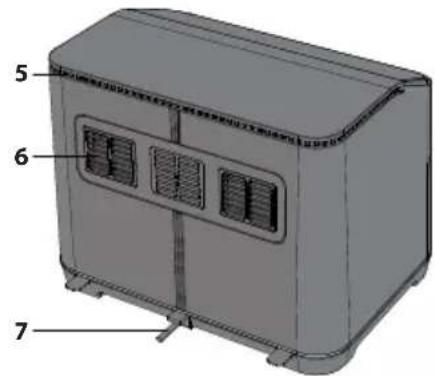
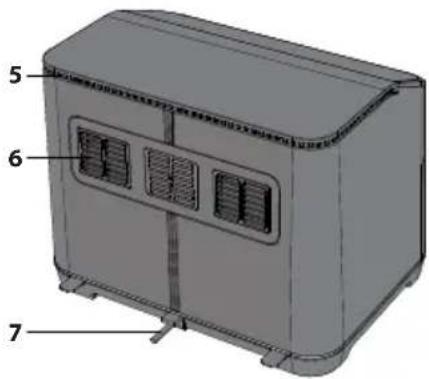
- Top cabinet
- Control Panel
- Inner Pot
- Frying Tray Handle
- Air Intake
- Air Exhaust Vent
- Mains Lead
- Air Frying Tray
- Inner Pot


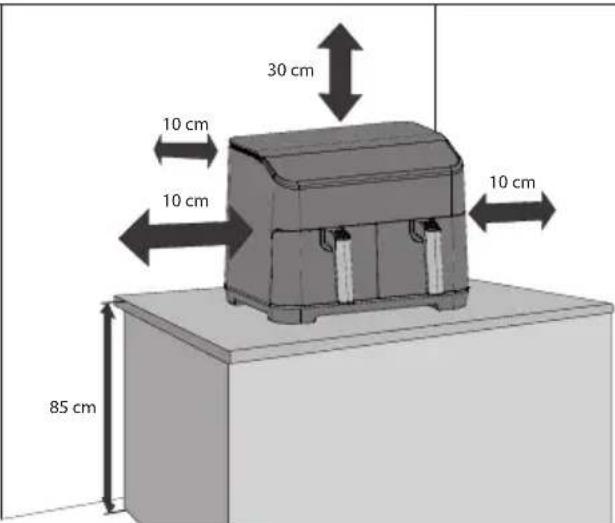
AIR FLOW DIRECTION
When cooking, the hot air from the element is moved around as shown in the picture below. This ensures that your food is cooked evenly at the set temperature and time period. Do not use any materials such as metal foil which may obstruct this air flow or over fill the frying tray.
natural_image
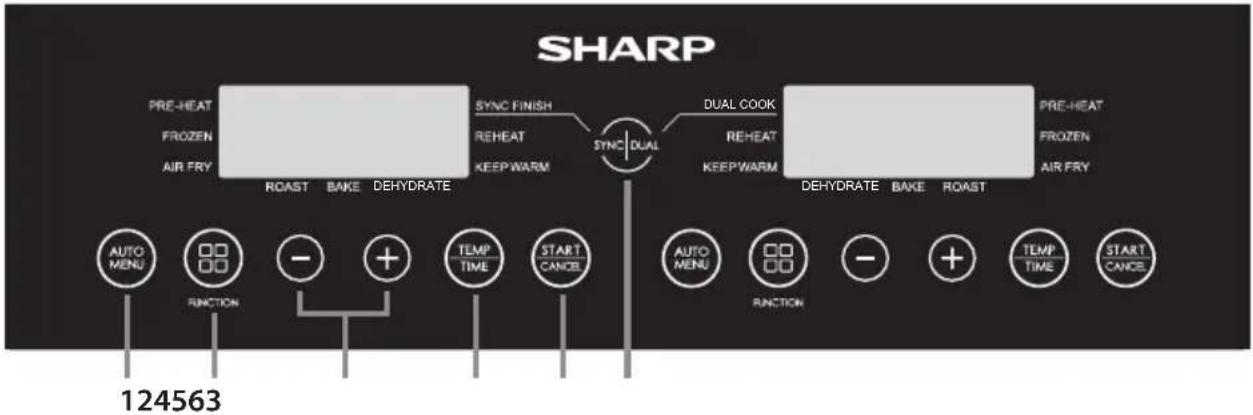
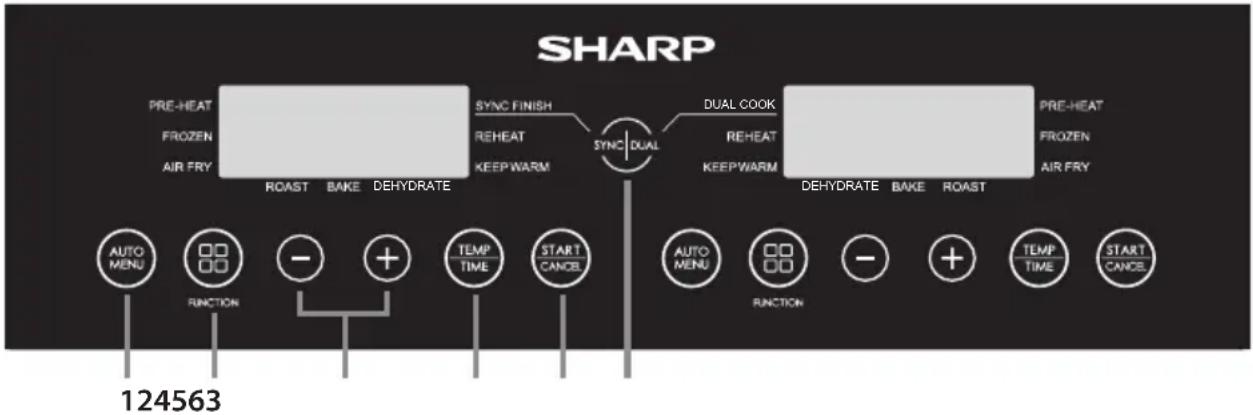
3D rendering of a device interior showing airflow direction arrows (no text or symbols)CONTROLPANEL
- Auto Menu – Press to select the cooking programmes, there are 12 options.
- Function - Select the installed functions.
- +/- - Use to manually set the cooking temperature and time.
- Temperature/Time - Use this button to control the temperature and time.
- Start/Cancel - Use to Start or stop a function.
- Sync/Dual – Place the unit into the Dual or Sync cooking mode.

BEFORE USING YOUR AIR FRYER
Before using your air fryer for the first time, it is recommended that after you have fully unpacked and removed any packaging that the inner pot and frying tray are cleaned in hot soapy water or in dishwasher. Then thoroughly dry all accessories and re-assemble in Air Fryer. Wipe the outer body and inner parts with damp cloth and dry before using. Plug into the mains supply and set the unit to cook Fries (do not put any food into the unit). This will turn the unit on at 180°C for 23 minutes, allowing any residue which may have adhered to the heating element during manufacture to dissipate.
It is advised to fully read these instructions before use.
OPERATION INSTRUCTIONS
Your Air Fryer has several modes of operation:
Automatic cooking – select one of the 12 pre-programmed cooking options.
Air Fry – set the temperature and time manually.
Bake – Bake food in your air fryer.
Roast – Use to roast your food.
Cook from Frozen – Cook from frozen (Vegetables, Pizza, Fries, Chicken Nuggets and Snacks only).
Dehydrate – Remove the moisture from your food.
Keep Warm – Keep your food warm.
Pre-Heat - Make sure that your Air Fryer is at the correct temperature before cooking.
Reheat – Reheat previously cooked food.
Dual - Copy the setting from one drawer to another.
Sync - Cooking will stop at the same time for both drawers.
Useful Information
- The amount of the food should not fill more than the 4/5 of total amount of the air frying pot.
- The cooking temperature and time can not be adjusted during the cooking cycle. If you need to change the temperature and/or time, the programme will have to be restarted and the temperature/time adjusted as required.
- To pause the cooking, open the draw. To restart push the draw back in and cooking will start automatically.
- To cancel the cooking, press the "START/CANCEL" button once.
- Some food will need to be stirred/shaken during the cooking: Pull the inner pot out of the unit, stir/shake as necessary and return the inner pot to the Air Fryer; the unit will restart the cooking automatically.
- Make sure that the food has cooked correctly. If the food is undercooked, then place back into the air fryer and cook again for few minutes.
- All cooking instructions are for guidance, actual results will vary depending on the quality and quantity of food being cooked.
- To prevent the inner pot dropping on the ground, put the inner pot on a stable and heat proof surface before lifting out the tray.
- Only cook food in this air fryer.
• DO NOT use for deep fat frying.
- If the air fryer is plugged into the mains supply and not buttons are pressed for 2 minutes, the display is show a moving "-" symbol. To stop this press any button.
- If no buttons are pressed for 1 minute, the display is show a moving "-" symbol. To stop this press any button.
- For some cooking programmes it will be necessary for the food to be shaken or turned over. When this required, the unit will make a sound and the following will appear in the display:
natural_image
Abstract pattern of white oval shapes on a black background, no text or symbols presentAutomatic Cooking
For your ease and convenience there are 12 automatic cooking programmes for use with the Air Frying function of your air fryer. These are easily accessed via the dedicated AUTO MENU button on the control panel.
| This operation can be skipped. | ||||||||
| Press AUTOMENU buttonuntil the desiredprogrammeappears. | Press TEMP/TIME to enterthe temperatureadjustment. | Press -/+ toadjust thetemperature. | Press TEMP/TIME to enter thetime adjustment. | Press -/+ toadjust thecooking time. | Press START/CANCEL to startthe cooking. | |||
 | → |  | → |  → → |  | → |  → → |  |
- Plug the air fryer into the mains supply.
- Ensure that the frying tray is correctly inserted into the inner pot.
- Place the food to be cooked evenly onto the frying tray and slide the inner pot into the air fryer.
- Select the desired food by pressing the AUTO MENU button on the control panel to select the food to cook. The default temperature and time will blink in the LED display.
a. If needed, press the "TEMP/TIME" button once, and then press "-" or "+" button to set the desired cooking temperature.
b. If needed, press the "TEMP/TIME" button once, and then press "-" or "+" button to set the desired cooking time.
- Press "START/CANCEL" button to start the cooking; the time counts down.
- When the cooking is complete the air fryer will make a sound, and the unit returns to standby mode.
- Pull out the inner pot with care and remove the food immediately or the heat remaining in the air fryer will continue to cook and dry out your food.
Note: If you are changing the cooking time for the auto cook foods it is only possible to increase the maximum by 30%. This is to avoid the potential of burning your food.
| Programme Number | Food Weight | Initial Food Temperature | Cooking Time | Maximum Extra Time | Turn Over Minutes From End of Cooking | Cook From Frozen Time | Tempera-ture | Comments | |
| A-01 Fries 300g to 700g | -180 Room temperature | 18 23 5 | 27 180 Do not overload the pot. | ||||||
| A-02 Beef 150g to 500g 12 16 6 - 200 | Upto 270g of beef steak can be cooked. | ||||||||
| A-03 Vegetable 100g to 400g 10 13 5 14 190 | Cut up vegetables into pieces 2 x 3cm. | ||||||||
| A-04 Chicken | 800g to 1000g | 30 39 5 | 190 | Small whole chicken or large pieces. | |||||
| A-05 Bacon 4 to 6 rashers 9 12 - | Evenly space the rashers of bacon in the frying tray. | ||||||||
| A-06 Fish | 100g to 500g 18 20 4 - 170 | Place fish pieces directly onto the base of the frying tray. | |||||||
| A-07 Potato | 250g each | 5 - 200 | Place up to 3 potatoes of 250g each into the frying tray. | ||||||
| A-08 Pizza | 100g to 400g 13 17 - 18 180 | Place whole or pizza pieces directly onto the frying tray. | |||||||
| A-09 | Chicken Nuggets | 300g | 15 20 5 | 20 180 | Do not overfill. Ensure that there is a small amount of space between the nuggets. | ||||
| A-10 Prawns | 300g | 15 20 5 | 180 | Space prawns evenly directly onto the frying tray. | |||||
| A-11 Snacks | 300g | 15 20 5 | 20 170 | Arrange snacks evenly on the frying tray. Do not overload. | |||||
| A-12 | Toasted Sandwich | 1 sand-wich | 12 17 4 | 180 | Prepair sandwich using buttered bread and cheese. Place whole sandwich onto the frying tray. Turn over 2/3 of the way through the cooking time. | ||||
When the set cooking time is above 10 minutes, the air fryer will remind to turn over the food when the remaining time is half of the total cooking time (or as shown in the table above). If the set cooking time is less than 10 minutes, no turn over reminder will appear.
Air Fry Cooking
When cooking manually in the air frying mode, first select the time, then the temperature.
For your convenience it is possible to cook manually with the Air Frying function. Refer to the suggested cooking options as shown in the table or use your own recipes.
| This operation can be skipped. | |||||
| Press the FUNCTION button until the AIR FRY light is illuminated in the display. | Press TEMP/TIME to enter the temperature adjustment. | Press -/+ to adjust the temperature. | Press TEMP/TIME to enter the time adjustment. | Press -/+ to adjust the cooking time. | Press START/CANCEL to start the cooking. |
 → → |  → →   → →  → →   → →  | ||||
- Plug the air fryer into the mains supply.
- Ensure that the frying tray is correctly inserted into the inner pot.
- Place the food to be cooked evenly onto the frying tray and slide the inner pot into the air fryer.
- Press the FUNCTION button until the AIR FRY light is illuminated in the display; the display will indicate the default time and temperature (12 minutes at 200^ C).
- To change the time, press the "TEMP/TIME" button and then use the +/- buttons to change to your desired time (1 to 60 minutes).
- Now press the "TEMP/TIME" button and then use the +/- buttons to change to your desired temperature (80 to 200°C).
- Press the "START/CANCEL" button to start the cooking process.
Some suggested cooking options are shown below.
| Food Weight | Initial Food Temperature | Cooking Time | Cooking Temperature | Shake/Turn Over Comments | |
| Frozen fries (thick) 300 to 700 | Frozen | 12 to 16 200 Yes | |||
| Frozen fries (thin) 300 to 700 12 to 20 200 Yes | |||||
| DIY Fries (0.7cm x 7/8cm) 300 to 800 | 1/2 spoon15 to 18 18018 to 22 180Room temperature15 18022 18015 18030 180 | 18 to 30 180 Yes Add oil: 1/2 spoon | |||
| DIY Chips 300 to 800 18 to 22 180 Yes Add oil: 1/2 spoon | |||||
| DIY Potato Pieces 300 to 750 12 to 18 180 Yes Add oil | |||||
| Hash Browns 250 | |||||
| Braised Cream Potato 500 | |||||
| Steak | 100 to 500 | 8 to 12 | 180 | ||
| Pork Chop | 100 to 500 10 to | ||||
| Hamburger | 100 to 500 | 7 to 14 | 180 | ||
| Sausage Roll | 100 to 500 12 to | ||||
| Drumstick | 100 to 500 18 to | ||||
| Chicken Breast | 100 to 500 10 to | ||||
| Fish 100 to 500 | 8 to 12 | ||||
| Prawn | 100 to 500 | 5 to 10 | 180 | ||
| Crab | 100 to 500 | 8 to 12 | 180 | ||
| Cake | 100 to 400 15 to | ||||
| Spring Rolls | 100 to 400 | 8 to 10 | 200 | Yes Instant Spring rolls | |
| Frozen Chicken Nuggets | 100 to 500 | Froze to 108 to 10 | 6 to 10 | 200 Yes | |
| Frozen Fish Strips 100 to 400 | 200 | ||||
| Frozen Cheese Snack 100 to 400 | 180 | ||||
| Yakitori | 100 to 400 | Room temperature45 200 | 8 to 10 | 200 | |
| Sweet Potato | 100 to 500 30 to | ||||
Bake
When using the bake function, first select the time, then the temperature.
For your convenience it is possible to bake with your Air Fryer. Refer to the suggested cooking options as shown in the table or use your own recipes.
| This operation can be skipped. | ||||||
| Press the FUNCTION button until the BAKE light is illuminated in the display. | Press TEMP/TIME to enter the temperature adjustment. | Press -/+ to adjust the temperature. | Press TEMP/TIME to enter the time adjustment. | Press -/+ to adjust the cooking time. | Press START/CANCEL to start the cooking. | |
 → → |  → →   → →  → →   → →  | |||||
- Plug your Air Fryer into the mains supply.
- Pull out the frying pan, place food into the frying tray and return the pan to the unit.
- Press the "START" button once; the display will indicate the default time and temperature (25 minutes at 200°C).
- To change the time, press the "TIME" button and then use the +/- buttons to change to your desired time (1 to 60 minutes).
- Now press the "TEMP" button and then use the +/- buttons to change to your desired temperature (80 to 200°C).
- Press the "START" button to start the cooking process.
Some suggested bake recipes:
| Food | Cooking temperature (°C) | Cooking time (minutes) | Ingredients Instructions | |
| Cornfl ake Flapjacks | 170 to 15 | 15 | 75g cornfl akes150g salted butter75g soft brown sugar30g runny honey150g porridge oats50g raisins and sultanas | Grease a heatproof dish with butter and line with grease proof paper.Melt the butter in a saucepan and add the sugar and honey; stir well.Remove from the heat and add the cornfl akes, porridge oats and fruit.Pour the mixture into the dish.Cook on the Bake function at 170^ until fi rm (10 to 15 minutes).Remove from the air fryer and allow to cool before eating. |
| Lemon Drizzle Cake | 170 | 20 to 25 | 200g unsalted butter200g caster sugar3 eggs200g plain fl our1 tbsp baking powderZest and juice of 1 lemonFor the drizzle:Juice of 1 lemon80g caster sugar" | Grease a small loaf tin with butter and line with baking paper. Set aside while you prepare the cake batter.In a large mixing bowl with an electric whisk, beat together the butter and caster sugar until light and fluffy. Add the eggs one at a time beating between each addition, then sift in the fl our baking powder and mix again to combine. Add the lemon juice and lemon juice and zest and mix again.Pour the batter into the prepared loaf tin and level out the top.le: Transfer to the air fryer and cook at 170^ for 20-25 minutes, checking it regularly after 15 minutes, until golden, risen and an inserted skewer comes out clean.When the cake is almost cooked, make the drizzle by combining the lemon juice and caster sugar in a bowl.When the cake is cooked, remove from the air fryer and prick all over the surface with a skewer. Slowly pour over the dazzle mixture, it to cover the surface of the allowing cool in the tin, then cake and seep into the holes. Leave to cool in the tin, the remove, slice and serve. |
| Cookies 180 to 12 | 150g salted butter at room temperature80g light brown muscovado sugar1 large egg, beaten225g plain fl our1/2 tsp bicarbonate of soda200g plain chocolate chips or chunks | In a large mixing bowl, beat together the butter, sugar, egg, plain flour and bicarbonate of soda until a fi rm dough is made.Add the chocolate chips or chunks and kneed until mixed in.Break the dough into pieces and roll into balls of about 3cm diameter.Line the frying tray with grease proof paper (do not go all the way to the edge of the frying pot) and evenly place the cookie dough balls on this. The dough will spread out as it cooks.Cook at 180^ for 10 to 12 minutes until golden brown.When cooked, leave to cool. Note that you may have to make several batches and/or use both draws to cook. |
When baking in an Air Fryer use less time and a lower temperature when compared to a conventional oven. The general rule is that you need to lower the temperature by 10^ C.
Note that results can vary depending on the quality of the food, its water content and size. Use the table above for guidance.
It is recommended to pre-heat the Air Fryer before baking.
During the bake function, the turn over function is disabled. This is to ensure that the cooking temperature remains stable during the whole cooking process.
Roast
When using the roast function, first select the time, then the temperature.
For your convenience it is possible to roast with your Air Fryer. Refer to the suggested cooking options as shown in the table or use your own recipes.
| This operation can be skipped. | ||||||
| Press the FUNCTION button until the ROAST light is illuminated in the display. | Press TEMP/TIME to enter the temperature adjustment. | Press -/+ to adjust the temperature. | Press TEMP/TIME to enter the time adjustment. | Press -/+ to adjust the cooking time. | Press START/CANCEL to start the cooking. | |
 → → |  → →   → →  → →   → →  | |||||
- Plug your Air Fryer into the mains supply.
- Pull out the frying pan, place food into the frying tray and return the pan to the unit.
- Press the "START" button once; the display will indicate the default time and temperature (40 minutes at 180°C).
- To change the time, press the "TEMP/TIME" button and then use the +/- buttons to change to your desired time (1 to 60 minutes).
- Now press the "TEMP/TIME" button and then use the +/- buttons to change to your desired temperature (80 to 200°C).
- Press the "START" button to start the cooking process.
Some suggested roast recipes:
| Food Weight | Cooking temperature (°C) | Cooking time (minutes) | Preparation Advice Note | ||
| Roast Potatoes | N/A 190 | 30 | Cut and peel your potatoes so that they are about 3-4cm round, then boil for 5 minute. Drain off the water and then coat in sunflower oil, season as necessary. Tip the potatoes into the air fryer and cook. | If the potatoes are not cooked enough, give then another 5 to 10 minutes. | |
| Roast Pork up | to 1kg 200/1 | 30 | 20/25 per 500g | Pat the meat dry with a paper towel, then score the rind with a sharp knife (do not cut into the meat). Let the meat dry and then rub in oil to the outer surface, add generous amount of salt into the scores. Place your pork joint into the air fryer with the rind up and cook on 200°C for 20 minutes, then cook at 180°C until cooked through (approx. 25 minutes for every 500g). | Season the meat as you desire. At the end of the cooking, make sure that the meat is cooked through. |
| Roast Chicken | up to 1kg 1 | 30 35 | Dry your chicken using paper towel, then cover with oil and seasoning. Place in the air fryer breast side up. Cook for half the time, then turn the bird over and cook for the remaining time. When the cooking is finished, leave to rest for 10 minutes before eating. | It is suggested to use a small chicken for roasting (500g to 1kg). At the end of the cooking, make sure that the meat is cooked through. | |
| Roast Beef up | to 1kg 200/1 | 30 | 5/15 per 450g | Season you meat then your beer into the air fryer and cook on 200°C for 5 minutes, then cook at 180°C until cooked through. Leave to rest for 10 to 15 minutes before carving. | For medium add 5 minutes per 450g for well done add 10 minutes per 450g. Note that times can vary due to the cut of meat and shape. |
When baking in an Air Fryer use less time and a lower temperature when compared to a conventional oven.
Note that results can vary depending on the quality of the food, size and shape. Use the table above for guidance.
It is recommended to pre-heat the Air Fryer before roasting.
Cook From Frozen
Your air fryer will turn on for longer to allow the food to safely defrost and cook Fries, Vegetables, Pizza, Chicken Nuggets and Snacks from frozen.
To cook from frozen, follow the instructions for automatic cooking as below.
| This operation can be skipped. | ||||||
| Press the FUNCTION button until the light by "FROZEN" appears in the display | Select the required frozen food to cook by pressing the AUTO MENU button. | Press TEMP/ TIME to enter the temperature adjustment. | Press -/+ to adjust the temperature. | Press TEMP/ TIME to enter the time adjustment. | Press -/+ to adjust the time. | Press START/ CANCEL to start the cooking. |
 → →  → →  → →  → →  → →  → →  → →  → →  | ||||||
- Plug the air fryer into the mains supply.
- Ensure that the frying tray is correctly inserted into the inner pot.
- Place the food to be cooked evenly onto the frying tray and slide the inner pot into the air fryer.
- Press the FUNCTION button until the light by "FROZEN" appears in the display.
- Select the required frozen food to cook by pressing the AUTO MENU button. The default temperature and time will blink in the LED display.
a. If needed, press the "TEMP/TIME" button once, and then press "-" or "+" button to set the desired cooking temperature.
b. If needed, press the "TEMP/TIME" button once, and then press "-" or "+" button to set the desired cooking time.
-
Press "START/CANCEL" button to start the cooking; the time counts down.
-
When the cooking is complete, the unit will make a sound, and return to the standby mode.
- Pull out the inner pot handle with care and take the food out.
Cooking from frozen is only possible for FRIES, VEGETABLES, PIZZA, CHICKEN NUGGETS and SNACKS.
For cooking of other frozen foods, please refer to the manual cooking advice.
If necessary, the Air Fryer can pre-heat before cooking from frozen. To do this Follow the process below:
- Plug the air fryer into the mains supply.
- Ensure that the frying tray is correctly inserted into the inner pot.
- Make sure that the pot is empty.
Press the FUNCTION button until the lights next to "PRE-HEAT" and "FROZEN" appears in the display.
- Select the required frozen food to cook by pressing the AUTO MENU button. The default temperature and time will blink in the LED display.
a. If needed, press the "TEMP/TIME" button once, and then press "-" or "+" button to set the desired cooking temperature.
b. If needed, press the "TEMP/TIME" button once, and then press "-" or "+" button to set the desired cooking time.
- Press "START/CANCEL", the air fryer will pre-heat. When the required temperature is reached, the unit will make a sound.
- Take the drawer out of the unit and place the food to be cooked evenly onto the frying tray, then slide it back into the air fryer. Be careful as the pot and tray will be hot.
- Cooking will start automatically when the drawer is pushed back in; the time counts down.
- When the cooking is complete, the unit will make a sound, and return to standby.
Pre-Heat
To ensure that your Air Fryer is at the correct temperature for cooking your food, there is a pre-heat function which can be used before auto cook, manual cook and cook from frozen functions. Just follow the instructions below to use this feature.
| This operation can be skipped. | ||||||
| Press the FUNCTION button until the light by "PRE-HEAT" appears in the display. | Select the food which you would like to cook by pressing the "AUTO MENU" button | Press TEMP/TIME to enter the temperature adjustment. | Press -/+ to adjust the temperature. | Press TEMP/TIME to enter the time adjustment. | Press -/+ to adjust the time. | Press START/CANCEL to start the Pre-heat. |
 → →  → →  → →  → →  → →  → →  → →  → →  | ||||||
- Place the frying tray into the inner pot. Insert the inner pot into the air fryer.
- Plug the air fryer into mains supply.
- Press the "FUNCTION" button until the light by "PRE-HEAT" appears in the display.
- Select the desired food selecting your chosen food from the Auto Menu by pressing the AUTO MENU button. The default temperature and time will blink in the LED display.
a. If needed, press the "TEMP/TIME" button once, and then press "-" or "+" button to b set the desired cooking temperature.
b. If needed, press the "TEMP/TIME" button once, and then press "-" or "+" button to set the desired cooking time.
-
Press the "START/CANCEL" button.
-
When the unit has reached the correct pre-heat temperature it will make a sound.
- The air fryer will turn on and start to preheat to the set temperature.
- Ensure that the frying tray is correctly inserted into the inner pot.
- Place the food to be cooked evenly onto the frying tray and slide the inner pot into the air fryer.
- When the draw is pushed back in, cooking will start automatically.
- When the cooking is complete, the unit will make a sound, and returns to the standby mode.
- Pull out the inner pot handle with care and take the food out immediately or the heat remaining in the air fryer will continue to cook and dry out your food.
Pre-heat can also be used when cooking from frozen. Follow the instruction below to pre-heat manually, then put the food into the drawer and select the Frozen Auto Menu required.
In addition, pre-heat can also be used when cooking manually; press the "FUNCTION" button until the light next to Pre-heat illuminates.
- Place the frying tray into the inner pot. Insert the inner pot into the air fryer.
- Plug the air fryer into mains supply.
- Press the "FUNCTION" button until the light next to Pre-heat illuminates.
- Press the "TEMP/TIME" button once, and then press "-" or "+" button to set the desired cooking temperature.
- Press the "START/CANCEL" button.
- The air fryer will turn on and start to preheat to the set temperature.
- When the unit has reached the correct pre-heat temperature it will make a sound.
- Ensure that the frying tray is correctly inserted into the inner pot.
- Place the food to be cooked evenly onto the frying tray and slide the inner pot into the air fryer.
- Set the time for your cooking by pressing the "TIME" button once, and then press "-" or "+" button to adjust the desired cooking time.
- When the draw is pushed back in, cooking will start automatically.
- When the cooking is complete, the unit will make a sound, and returns to the standby mode.
- Pull out the inner pot handle with care and take the food out immediately or the heat remaining in the air fryer will continue to cook and dry out your food.
Reheat
This function allows you to reheat food which has gone cold.
| Press the FUNCTION button until the light by "REHEAT" appears in the display | Press START/CANCEL to start the reheat and the display start to count down. |
 → →  → →  | |
- Plug the air fryer into the mains supply.
- Ensure that the frying tray is correctly inserted into the inner pot.
- Place the food to be reheated evenly onto the frying tray and slide the inner pot into the air fryer.
- Press the FUNCTION button until the light by "REHEAT" appears in the display.
- Press the "START/CANCEL" button. The Air Fryer will reheat.
- The Air Fryer will now reheat your food for 4 minutes at 180°C.
Note: It is not possible to adjust the time or temperature for the Reheat function.
Dehydrate
This function allows you to dehydrate your own foods so that they can be stored and used later. Follow the simple instructions below to use this feature on your air fryer. During the dehydrate function, the turn over function is disabled.
| Press PRE-HEAT/DEHYDRATE twice to choose DEHYDRATE function. | Press START to start the reheat and the display start to count down. | ||
 → → |  → → |  | |
- Plug the air fryer into the mains supply.
- Ensure that the frying tray is correctly inserted into the inner pot.
- Place the food to be dehydrated evenly onto the frying tray and slide the inner pot into the air fryer.
- Press the FUNCTION button until the light by "DEHYDRATE" appears in the display.
- Press the "START/CANCEL" button.
- The Air Fryer will now dehydrate your food for 3 hours at 60°C.
- The default temperature and time will blink in the LED display - this is 60°C for 3 hours.
a. If needed, press the "TEMP/TIME" button once, and then press "-" or "+" button to b set the desired temperature (up to 80°C)
b. If needed, press the "TEMP/TIME" button once, and then press "-" or "+" button to set the desired time (up to 4 hours)
Suggested food types and preparation details for dehydration:
| Food | Dehydrate temperature (°C) | Dehydration time (hours) | Preparation Advice |
| Apples 60 6 Core | apple and then cut into thin (3mm) segments. | ||
| Apricots 60 8 Rem | ove stones and cut in half. | ||
| Bannana 80 4 Peel | and cut into rounds of about 3mm thickness. | ||
| Beef 60 4 Cut into strips of about 6cm length and 4mm in thickness. | |||
| Lemons 80 3 Cut into thin slices (2mm) and lay on the Frying Tray. | |||
| Oranges 80 3 Cut into thin slices (2mm) and lay on the Frying Tray. | |||
| Strawberries | 60 3 | Carefully cut into wedges or rounds. | |
When placing items into your air fryer to dehydrate, ensue that the food is not stacked on top of each other and that there is a little space between each piece.
Note that results can vary depending on the quality of the food, its water content and size. Use the table above for guidance.
Keep Warm
Once you have cooked your food, it can be kept warm by using the KEEP WARM function.
Keep warm uses a low temperature to ensure that the food does not dry out too much and ensures that the food is hot enough to eat.
| This operation can be skipped. | ||||||
| Press the FUNCTION button until the light by "KEEP WARM" appears in the display. | Press TEMP/ TIME to enter the temperature adjustment. | Press -/+ to adjust the temperature. | Press TEMP/ TIME to enter the time adjustment. | Press -/+ to adjust the cooking time. | Press START/ CANCEL to start the cooking. | |
 |  |  |  |  |  |  |
- Plug the air fryer into the mains supply.
- Ensure that the frying tray is correctly inserted into the inner pot.
- Place the food to be kept warm evenly onto the frying tray and slide the inner pot into the air fryer.
- Press the "FUNCTION button until the light by "KEEP WARM" appears in the display.
- The default keep warm temperature is 80^ C with a time of 30 minutes. If required, this can be changed.
a. To change the time, press the "TEMP/TIME" button and then use the +/- buttons to change to your desired time (1 to 60 minutes).
b. Now press the "TEMP/TIME" button and then use the +/- buttons to change to your desired temperature (80 to 200°C).
- The Air Fryer will now keep your food warm at the set temperature and for the set time.
SYNC FINISH
Use this function when you are cooking foods which have different cooking times. For example the cooking times for steak and chips is different and this function allows you to cook both types of food so that they are ready at the same time.
- Remove the inner pots from the air fryer.
- Ensure that the frying tray in both pots are correctly inserted.
- Place the food to be cooked evenly onto the frying tray and slide the inner pots back into the air fryer.
- Set the cooking function for the first drawer.
- Set the cooking function for the second drawer.
- Press the "SYNC/DUAL" button once, the SYNC" light will illuminate in the display.
- Press either of the "START/CANCEL" buttons. The drawer with the longest cooking time will start first, the shorter one will start later to ensure that the end will be the same as the first.
- When the cooking is complete, the unit will make a sound, and return to the standby mode.
- Pull out the inner pot with care and take the food out of the air fryer immediately; this will prevent the heat remaining in the air fryer to continue to cook and dry out your food.
DUAL
Use this function when both drawers have the same cooking time and temperature. Should you have to cook a larger quantity of the same food, the Dual function allows you to easily programme both drawers by setting only one.
- Remove the inner pots from the air fryer.
- Ensure that the frying trays in both pots are correctly inserted.
- Place the food to be cooked evenly onto the frying tray and slide the inner pots back into the air fryer.
- Set the cooking function for either drawer. This can be an auto programme or other function.
- Press "SYNC/DUAL" button once and the "DUAL" light will illuminate in the display at the same time the programme will be copied to the other drawer.
- Press either of the "START/CANCEL" buttons and the air fryer will start to cook.
- When the cooking is complete, the unit will make a sound, and return to the standby mode.
- Pull out the inner pot with care and take the food out of the air fryer immediately; this will prevent the heat remaining in the air fryer to continue to cook and dry out your food.
MAINTENANCE WHILE IN USE
This appliance requires little maintenance when in use. Clean your Air Fryer after every use to prolong its useable lifetime.
This Air Fryer contains no user serviceable parts. Do not try to repair it yourself. In the unlikely event of failure, contact the SHARP Call Centre using the details at the start of this User Manual.
CLEANING INSTRUCTIONS
CAUTION: To protect against electrical shock, DO NOT IMMERSE THE AIR FRYER IN WATER OR ANY OTHER LIQUIDS.
Your air fryer should be cleaned regularly for best performance and long life. Regular cleaning will also reduce the risk of fire. To clean follow the instructions as below:
- Remove mains plug from electrical outlet. Allow your Air Fryer to cool down.
- Clean the air fry trasys and inner pots with damp, soapy cloth. Make sure to only use mild, soapy water. If the stains on the tray or inner pot are too difficult to clean, let them soak in warm water for about 10 minutes.
- Clean the heating elements will dry and soft cloth.
- Wipe the outside of your air fryer with a soft, damp cloth, then dry.
CAUTION: DO NOT USE ABRASIVE CLEANERS OR ANY TYPE OF SCOURING MATERIAL on the surface of the frying tray and inner pot. Make sure to only use mild, soapy water. Abrasive cleaners, scrubbing brushes and chemical cleaners will damage the coating on this unit.
Other than the recommended cleaning, no further user maintenance should be necessary.
Any other servicing should be performed by an authorized service representative.
STORAGE
Unplug unit, allow it to cool, and clean before storing. Store the air fryer in its box in a clean, dry place. Never store appliance while it is hot or still plugged in. Never wrap cord tightly around the Air Fryer. Do not put any stress on the cord where it enters the unit, as it could cause the cord to fray and break.
If storing the air fryer for long periods of time, make certain that the air fryer is clean and free of food particles. Store the air fryer in a dry location such as on a table or countertop or cupboard shelf.
TROUBLESHOOTING
If you are experiencing issues with your air fryer, follow the guidance below.
| The Air Fryer does not work | The appliance is either not plugged in or switched on. | Make sure the mains plug is inserted in an electrical wall socket and is switched on. |
| You have not set the time or tempertaure. | Set the time and temperature and then press "START/CANCEL". | |
| The inner pot is not properly locked into the unit Push | sh the inner pot into the Air Fryer so it "clicks". | |
| The ingredients fried with the Air Fryer are not done. | There is too much food in the frying pan. | Put smaller batches of ingredients in the frying pan. Smaller batches are fried more evenly. |
| The set temperature is too low. | Adjust the temperature to the required temperature setting. | |
| The cooking time is too short. Adjust the timer to the required preparation time. | ||
| Fried snacks are not crispy when they come out of the Air Fryer. | You used a type of snack meant to be prepared in a traditional deep fryer. | Use snacks made to be prepared in the oven, or lightly brush some oil onto the snacks for a crispier result. |
| It is difficult or not possible to slide the inner into the appliance properly. | There is too much food in the frying pan. Do not over fi ll the frying pan. | |
| White smoke comes out of the appliance. | You are preparing greasy ingredients. | When you fry greasy ingredients in the Air Fryer, a large amount of oil will leak into the pan. This oil may white smoke and the pan may heat up more than usual. This does not affect the appliance or the end result. |
| The pan still contains grease residues from previous use. | White smoke is caused by grease heating up in the inner pot; make sure you clean the frying tray and inner pot thoroughly after each use. | |
| Fresh fries are fried unevenly in the Air Fryer. | You did not use the right type of potato. | Use fresh potatoes and make sure they stay fi rm during frying. |
| You did not rinse the potato sticks properly before you fried them. | Rinse the potato sticks thoroughly to remove starch from the outside of the sticks. | |
| Fresh fries are not crispy when they come out of the Air Fryer. | The crispiness of the fries depends on the amount/ type of oil and water in the fries. | Make sure you dry the potato sticks properly before you add the oil. |
| Cut the potatoes into thinner sticks for a crispier result. | ||
| Add slightly more oil for a crispier result. | ||
Should you still have issues, please contact the SHARP Call Centre using the details at the start of this User Manual.
Внимание:
www.sharpconsumer.com/contact/

www.sharpconsumer.com/support/

www.sharpconsumer.com/documents-of-conformity/
ПОСОКА НА ВЪЗДУШНИЯ ПОТОК
natural_image
Interior view of a device casing showing airflow direction arrows (no text or symbols)ПАНЕЛ ЗА УПРАВЛЕНИЕ
natural_image
Abstract pattern of white oval shapes on a black background (no text or symbols)Автоматично готвене

www.sharpconsumer.com/contact/

www.sharpconsumer.com/support/

www.sharpconsumer.com/documents-of-conformity/


SMĚR PROUDĚNÍ VZDUCHU
natural_image
3D rendering of a device interior showing airflow direction arrows (no text or symbols)OVLÁDACÍPANEL
natural_image
Abstract pattern of white oval shapes on a black background (no text or symbols)Automatické vaření

www.sharpconsumer.com/contact/

www.sharpconsumer.com/support/

www.sharpconsumer.com/documents-of-conformity/
A. Information om bortskaff else til brugere (private husholdninger)


LUFTSTRÖMMENS RETNING
natural_image
3D rendering of a device interior showing airflow direction arrows (no text or symbols)KONTROLPANEL
natural_image
Abstract pattern of white oval shapes on a black background (no text or symbols)
www.sharpconsumer.com/contact/

www.sharpconsumer.com/support/

www.sharpconsumer.com/documents-of-conformity/

LUFTSTROMRICHTUNG
natural_image
3D rendering of a device interior showing airflow direction arrows (no text or symbols)BEDIENFELD
natural_image
Abstract pattern of white oval shapes on a black background (no text or symbols)Automatisches Garen

www.sharpconsumer.com/contact/

www.sharpconsumer.com/support/

www.sharpconsumer.com/documents-of-conformity/

natural_image
3D mechanical assembly diagram showing a container with internal components and labeled parts 8 and 9 (no text or symbols beyond labels)natural_image
3D rendering of a device interior showing airflow or movement arrows, no text or symbols presentΠΙΝΑΚΑΣΕΛΕΓΧΟΥ
natural_image
Abstract pattern of white oval shapes on a black background (no text or symbols)Αυτόματο μαγείρεμα

www.sharpconsumer.com/contact/

www.sharpconsumer.com/support/

www.sharpconsumer.com/documents-of-conformity/

natural_image
3D rendering of a device interior showing airflow or ventilation patterns (no text or symbols visible)PANEL DE CONTROL
natural_image
Abstract pattern of white oval shapes on a black background (no text or symbols)Cocción automática
www.sharpconsumer.com/contact/
www.sharpconsumer.com/support/
1. Euroopa Liidus
www.sharpconsumer.com/documents-of-conformity/
SISU
OHUTUSJUHISED 3
SPETSIFIKATSIOONID 6
ÖHUFRITÜÜR JA TARVIKUD....7
KONTROLLIPANEL 8
ENNE ÖHUFRITÜÜRIDE KASUTAMIST 8
TEGEVUSJUHISED....9


ÕHUVOOLU SUUND
natural_image
3D rendering of a device interior showing airflow direction arrows (no text or symbols)KONTROLLIPANEL
natural_image
Abstract pattern of white oval shapes on a black background (no text or symbols)
www.sharpconsumer.com/contact/

www.sharpconsumer.com/support/

www.sharpconsumer.com/documents-of-conformity/


ILMAVIRRAN SUUNTA
natural_image
3D rendering of a device interior showing airflow direction arrows (no text or symbols)OHJAUSPANEELI
natural_image
Abstract pattern of white oval shapes on a black background (no text or symbols)www.sharpconsumer.com/contact/

www.sharpconsumer.com/support/

www.sharpconsumer.com/documents-of-conformity/
Déshydratation....18
Restez au chaud 19
SYNC FINISH 19
DUAL 20
ENTRETIEN EN COURS D'UTILISATION ....20
INSTRUCTIONS DE NETTOYAGE 20
STOCKAGE 20
DÉPANNAGE 21
CONSIGNES DE SÉCURITÉ
DIRECTION DU FLUX D'AIR
natural_image
3D rendering of a device interior showing airflow direction arrows (no text or symbols)PANNEAU DE CONTRÔLE
natural_image
Abstract pattern of white oval shapes on a black background (no text or symbols)Cuisson automatique

www.sharpconsumer.com/contact/

www.sharpconsumer.com/support/

www.sharpconsumer.com/documents-of-conformity/

natural_image
3D rendering of a device interior showing airflow direction arrows (no text or symbols)UPRAVLJAČKAPLOČA
- Automatski izbornik – Pritisnite za odabir programa kuhanja, postoji 12 opcija.
- Funkcija – Odaberite instalirane funkcije.
- +/- - Koristite za ručno postavljanje temperature i vremena kuhanja.
- Temperatura/vrijeme – Koristite ovu tipku za kontrolu temperature i vremena.
- Početak/Odustani – Koristite za pokretanje ili zaustavljanje funkcije.
- Sync/Dual – Stavite jedinicu u Dual ili Sync način kuhanja.
PRIJE UPOTREBE FRITEZE
natural_image
Abstract pattern of white oval shapes on a black background (no text or symbols)Automatsko kuhanje
Za vašu jednostavnost i praktičnost postoji 12 automatskih programa kuhanja za korištenje s funkcijom Air Frying vaše friteze. Njima se lako pristupa putem namjenske tipke AUTO MENU na upravljačkoj ploči.
| Ova se operacija može preskočiti. | |||||||
| Pritisnite AUTOMATSKI IZBORNIK dok se ne pojavi željeni program. | Pritisnite TEMP/ VRIJEME za ulazak u podešavanje temperature. | Pritisnite -/+ za podešavanje temperature. | Pritisnite TEMP/ VRIJEME za ulazak u podešavanje vremena. | Pritisnite -/+ za podešavanje vremena kuhanja. | Pritisnite POKRENI/ PONIŠTI za početak kuhanja. | ||
| → | → | → | → | → | | |
- Uključite fritezu u utičnicu.
- Uvjerite se da je posuda za prženje pravilno umetnuta u unutarnji lonac.
- Stavite hranu koju želite ravnomjerno kuhati na pladanj za prženje i gurnite unutarnji lonac u fritezu.
- Odaberite željenu hranu pritiskom na AUTOMATSKI IZBORNIK gumb na upravljačkoj ploči za odabir hrane za kuhanje. Zadana temperatura i vrijeme će treptati na LED zaslonu.
a. Ako je potrebno, pritisnite "TEMP/VRIJEME" jednom, a zatim pritisnite "-" ili "+" za postavljanje željene temperature kuhanja.
b. Ako je potrebno, pritisnite "TEMP/VRIJEME" jednom, a zatim pritisnite "-" ili "+" za postavljanje željenog vremena kuhanja.
- pritisnite "POKRENI/PONIŠTI" za početak kuhanja; vrijeme se odbrojava.
- Kada je kuhanje završeno, friteza će se oglasiti i jedinica se vraća u stanje pripravnosti.
- Pažljivo izvucite unutarnji lonac i odmah uklonite hranu ili će toplina preostala u fritezi nastaviti kuhati i isušivati vašu hranu.
Napomena: Ako mijenjate vrijeme kuhanja za hranu s automatskim kuhanjem, maksimalno je moguće povećati samo za 30%. Ovo je kako biste izbjegli mogućnost zagorijevanja hrane.
| Broj programa | Hrana Težina | Početna temperatura hrane | Vrijeme za kuhanje | Maksi- malno dodatno vrijeme | Okrenite nekoliko minuta od kraja kuhanja | Kuhajte iz smrznutog vremena | Tempera- tura | Komentari | |
| A-01 Pomfrit | 300g do 700g | Soba temperatura | 18 23 5 | 27 180 | Nemojte preopteretiti lonac. | ||||
| A-02 Govedina | 150g do 500g | 12 16 6 | 200 | Može se ispeći do 270g goveđeg odreska. | |||||
| A-03 Povrće | 100g do 400g | 10 13 5 | 14 190 | Narežite povrće na komade 2 x 3 cm. | |||||
| A-04 Piletina | 800g do 1000g | 30 39 5 | 190 | Malo cijelo pile ili veliki komadi. | |||||
| A-05 Slanina 4 | do 6 osipa 9 | 2 -- 180 | Ravnomjerno rasporedite komadiće slanine u lim za prženje. | ||||||
| A-06 Riba | 100g do 500g | 18 20 4 | 170 | Stavite komade ribe izravno na dno posude za prženje. | |||||
| A-07 Krumpir 2 | 250g svaki 40 | 52 5 - 200 | U lim za pečenje stavite do 3 krumpira od po 250g. | ||||||
| A-08 Pizza | 100g do 400g | 13 17 - | 18 180 | Stavite cijele komade ili komade pizze izravno na pladanj za prženje. | |||||
| A-09 | Pileći medaljoni | 300g | 15 20 5 | 20 180 | Nemojte prepuniti. Pazite da postoji mali prostor između nuggetsa. | ||||
| A-10 kozice | 300g | 15 20 5 | 180 | Ravnomjerno rasporedite kozice izravno na pladanj za prženje. | |||||
| A-11 grickalice | 300g | 15 20 5 | 20 170 | Ravnomjerno rasporedite grickalice na lim za pržen- je. Nemojte preopteretiti. | |||||
| A-12 | Tostirani sendvič | 1 sendvič | 12 17 4 | 180 | Pripremite sendvič od kruha s maslacem i sira. Stavite cijeli sendvič na lim za prženje. Okrenite 2/3 vremena kuhanja. |
Kada je postavljeno vrijeme kuhanja iznad 10 minuta, friteza će vas podsjetiti da preokrenete hranu kada preostalo vrijeme bude polovica ukupnog vremena kuhanja (ili kako je prikazano u gornjoj tablici). Ako je postavljeno vrijeme kuhanja manje od 10 minuta, neće se pojaviti podsjetnik za preokret.
Kuhanje na zraku
Kod ručnog kuhanja u načinu prženja na zraku prvo odaberite vrijeme, a zatim temperaturu.
Za vašu udobnost moguće je kuhati ručno s funkcijom Air Frying. Pogledajte predložene mogućnosti kuhanja kao što je prikazano u tablici ili upotrijebite vlastite recepte.
| Ova se operacija može preskočiti. | |||||
| pritisniFUNKCIJA gumbdok se PRŽENJE NA ZRAKUsvijetli svjetlo na zaslonu. | Pritisnite TEMP/ VRIJEMEza ulazak u podešavanje temperature. | Pritisnite -/+ za podešavanje temperature. | Pritisnite TEMP/ VRIJEMEza ulazak u podešavanje vremena. | Pritisnite -/+ za podešavanje vremena kuhanja. | PritisnitePOKRENI/ PONIŠTI za početak kuhanja. |
| → | →  → → → →   → → | ||||

www.sharpconsumer.com/contact/

www.sharpconsumer.com/support/

www.sharpconsumer.com/documents-of-conformity/


LÉGÁRAMLÁS IRÁNYA
natural_image
3D rendering of a device interior showing airflow direction arrows (no text or symbols)VEZÉRLÓPANEL
natural_image
Abstract pattern of white oval shapes on a black background (no text or symbols)Automatikus főzés

www.sharpconsumer.com/contact/

www.sharpconsumer.com/support/

www.sharpconsumer.com/documents-of-conformity/


natural_image
3D rendering of a device interior showing airflow direction arrows (no text or symbols)PANNELLO DI CONTROLLO
natural_image
Abstract pattern of white oval shapes on a black background (no text or symbols)Cottura automatica
www.sharpconsumer.com/support/

www.sharpconsumer.com/documents-of-conformity/


ORO SRAUTO KRYPTIS
natural_image
3D rendering of a device interior showing airflow direction arrows (no text or symbols)VALDYMOPANELIS
natural_image
Abstract pattern of white oval shapes on a black background (no text or symbols)Automatinis gaminimas

www.sharpconsumer.com/contact/

www.sharpconsumer.com/support/

www.sharpconsumer.com/documents-of-conformity/
GAISA PLÜSMAS VIRZIENS
natural_image
3D rendering of a device interior showing airflow direction arrows (no text or symbols)KONTROLESPANELE
natural_image
Abstract pattern of white oval shapes on a black background (no text or symbols)
www.sharpconsumer.com/contact/

www.sharpconsumer.com/support/

www.sharpconsumer.com/documents-of-conformity/
SYNC AFWERKING....19
DUAL 20
ONDERHOUD TIJDENS GEBRUIK 20
REINIGINGSINSTRUCTIES 20
OPSLAG 20
PROBLEEMOPLOSSING....21
VEILIGHEIDSINSTRUCTIES


LUCHTSTROOMRICHTING
natural_image
3D rendering of a device interior showing airflow direction arrows (no text or symbols)BEDIENINGSPANEEEL
natural_image
Abstract pattern of white oval shapes on a black background (no text or symbols)Automatisch koken

www.sharpconsumer.com/contact/

www.sharpconsumer.com/support/

www.sharpconsumer.com/documents-of-conformity/
SPESIFIKASJONER....6
AIR FRYER OG TILBEH∅R 7
KONTROLLPANEL 8
F∅R DU BRUKER AIR FRYER....8
BRUKSINSTRUKSJONER 9
Air Fry Cooking....12
Bake 13
Stek....14
Cook From Frozen 15
Forvarming 16

LUFTSTR∅MRETNING
natural_image
3D rendering of a device interior showing airflow direction arrows (no text or symbols)KONTROLLPANEL
natural_image
Abstract pattern of white oval shapes on a black background (no text or symbols)
www.sharpconsumer.com/contact/

www.sharpconsumer.com/support/

www.sharpconsumer.com/documents-of-conformity/
natural_image
Interior view of a device showing airflow direction arrows (no text or symbols)PANELSTEROWANIA
natural_image
Abstract pattern of white oval shapes on a black background (no text or symbols)
www.sharpconsumer.com/contact/

www.sharpconsumer.com/support/

www.sharpconsumer.com/documents-of-conformity/
ESPECIFICAÇÕES......7
FRITADEIRA DE AR QUENTE E ACESSÓRIOS 8
PAINEL DE CONTROLO....9
ANTES DE UTILIZAR A FRITADEIRA DE AR QUENTE....9


natural_image
3D rendering of a device interior showing airflow direction arrows (no text or symbols)PAINEL DE CONTROLO
natural_image
Abstract pattern of white oval shapes on a black background (no text or symbols)Cozedura automática

www.sharpconsumer.com/contact/

www.sharpconsumer.com/suport/

www.sharpconsumer.com/documents-of-conformity/
INSTRUCTIUNI DE SIGURANTĂ....3
SPECIFICATII....7
FRITEUZĂ CU AER ȘI ACCESORII ....8
PANOU DE CONTROL 9
ÎNAINTE DE A UTILIZA APARATUL DE PRĂJIT CU AER....9
INSTRUCTIUNI DE OPERARE 10


DIRECTIA FLUXULUI DE AER
natural_image
3D rendering of a device interior showing airflow direction arrows (no text or symbols)PANOU DE CONTROL
natural_image
Abstract pattern of white oval shapes on a black background (no text or symbols)Gătire automată
www.sharpconsumer.com/contact/

www.sharpconsumer.com/support/

www.sharpconsumer.com/documents-of-conformity/


SMER PRÚDENIA VZDUCHU
natural_image
3D rendering of a device interior showing airflow direction arrows (no text or symbols)OVLÁDACÍPANEL
natural_image
Abstract pattern of white oval shapes on a black background (no text or symbols)Automatické varenie

www.sharpconsumer.com/contact/

www.sharpconsumer.com/support/

www.sharpconsumer.com/documents-of-conformity/


SMER PRETOKA ZRAKA
natural_image
3D rendering of a device interior showing airflow direction arrows (no text or symbols)OVLADALNAPANELJA
- Samodejni meni - Pritisnite, da izberete programe kuhanja, na voljo je 12 možnosti.
- Funkcija - Izberite nameščene funkcije.
- +/- - Uporabite za ročno nastavitev temperature in časa kuhanja.
- Temperatura/čas - S tem gumbom nastavite temperaturo in čas.
- Začetek/odpoved - Uporabite za zagon ali zaustavitev funkcije.
- Sync/Dual - Napravo prestavite v dvojni ali sinhronizacijski način kuhanja.
flowchart
graph LR
    A["PRE-HEAT"] --> B["FROZEN"]
    B --> C["AIR FRY"]
    C --> D["ROAST"]
    D --> E["BAKE"]
    E --> F["DEHYDRATE"]
    F --> G["SYNC FINISH"]
    G --> H["REHEAT"]
    H --> I["KEEPWARM"]
    I --> J["SYNC DUAL"]
    J --> K["DUAL COOK"]
    K --> L["REHEAT"]
    L --> M["KEEPWARM"]
    M --> N["DEHYDRATE"]
    N --> O["BAKE"]
    O --> P["ROAST"]
    P --> Q["PRE-HEAT"]
    R["AUTO MENU"] --> S["FUNCTION"]
    S --> T["-"]
    T --> U["+"]
    U --> V["TEMP TIME"]
    V --> W["START CANCEL"]
    W --> X["AUTO MENU"]
    X --> Y["FUNCTION"]
    Y --> Z["-"]
    Z --> AA["+"]
    AA --> AB["TEMP TIME"]
    AB --> AC["START CANCEL"]
PRED UPORABO ZRAČNEGA CVRTNIKA
natural_image
Abstract pattern of white oval shapes on a black background (no text or symbols)Samodejno kuhanje

www.sharpconsumer.com/contact/

www.sharpconsumer.com/support/

www.sharpconsumer.com/documents-of-conformity/


natural_image
3D rendering of a device interior showing airflow direction arrows (no text or symbols)КОНТРОЛНАТАБЛА
natural_image
Abstract pattern of white oval shapes on a black background (no text or symbols)Аутоматско кување

www.sharpconsumer.com/contact/

www.sharpconsumer.com/support/

www.sharpconsumer.com/documents-of-conformity/
LUFTFLÖDETS RIKTNING
natural_image
3D rendering of a device interior showing airflow direction arrows (no text or symbols)KONTROLLPANEL
natural_image
Abstract pattern of white oval shapes on a black background (no text or symbols)Automatisk matlagning

www.sharpconsumer.com/contact/

www.sharpconsumer.com/support/

www.sharpconsumer.com/documents-of-conformity/

natural_image
3D rendering of a device interior showing airflow direction arrows (no text or symbols)ПАНЕЛЬ УПРАВЛІННЯ
natural_image
Abstract pattern of white oval shapes on a black background (no text or symbols)Sharp Consumer Electronics Poland sp. z o.o.
Ostaszewo 57B, 87-148 Lysomice, Poland
SHARP CORPORATION
1 Takumi-cho, Sakai-ku
Sakai City, Osaka
590-8522, Japan
SDA/MAN/0311 V1
www.sharpconsumer.eu
SHARP
- User manual
- Attention:
- Information on Disposal for Users (private households)
- In the European Union
- In other Countries outside the EU
- Information on Disposal for Business Users
- CONTENTS
- SAFETYINSTRUCTIONS
- When using an electrical appliance, basic safety precautions should always be followed, including the following:
- AIR FRYER AND ACCESSORIES
- Please familiarize yourself with the following Air Fryer functions and accessories prior to first use:
- AIR FLOW DIRECTION
- CONTROLPANEL
- BEFORE USING YOUR AIR FRYER
- OPERATION INSTRUCTIONS
- Your Air Fryer has several modes of operation:
- Useful Information
- Automatic Cooking
- Air Fry Cooking
- Bake
- Roast
- Cook From Frozen
- If necessary, the Air Fryer can pre-heat before cooking from frozen. To do this Follow the process below:
- Pre-Heat
- Reheat
- Dehydrate
- Keep Warm
- SYNC FINISH
- DUAL
- MAINTENANCE WHILE IN USE
- CLEANING INSTRUCTIONS
- STORAGE
- TROUBLESHOOTING
- Внимание:
- ПОСОКА НА ВЪЗДУШНИЯ ПОТОК
- ПАНЕЛ ЗА УПРАВЛЕНИЕ
- Автоматично готвене
- SMĚR PROUDĚNÍ VZDUCHU
- OVLÁDACÍPANEL
- Automatické vaření
- Information om bortskaff else til brugere (private husholdninger)
- LUFTSTRÖMMENS RETNING
- KONTROLPANEL
- LUFTSTROMRICHTUNG
- BEDIENFELD
- Automatisches Garen
- ΠΙΝΑΚΑΣΕΛΕΓΧΟΥ
- Αυτόματο μαγείρεμα
- PANEL DE CONTROL
- Cocción automática
- Euroopa Liidus
- SISU
- ÕHUVOOLU SUUND
- KONTROLLIPANEL
- ILMAVIRRAN SUUNTA
- OHJAUSPANEELI
- CONSIGNES DE SÉCURITÉ
- DIRECTION DU FLUX D'AIR
- PANNEAU DE CONTRÔLE
- Cuisson automatique
- UPRAVLJAČKAPLOČA
- PRIJE UPOTREBE FRITEZE
- Automatsko kuhanje
- Kuhanje na zraku
- LÉGÁRAMLÁS IRÁNYA
- VEZÉRLÓPANEL
- Automatikus főzés
- PANNELLO DI CONTROLLO
- Cottura automatica
- ORO SRAUTO KRYPTIS
- VALDYMOPANELIS
- Automatinis gaminimas
- GAISA PLÜSMAS VIRZIENS
- KONTROLESPANELE
- VEILIGHEIDSINSTRUCTIES
- LUCHTSTROOMRICHTING
- BEDIENINGSPANEEEL
- Automatisch koken
- LUFTSTR∅MRETNING
- KONTROLLPANEL
- PANELSTEROWANIA
- PAINEL DE CONTROLO
- Cozedura automática
- DIRECTIA FLUXULUI DE AER
- PANOU DE CONTROL
- Gătire automată
- SMER PRÚDENIA VZDUCHU
- Automatické varenie
- SMER PRETOKA ZRAKA
- OVLADALNAPANELJA
- PRED UPORABO ZRAČNEGA CVRTNIKA
- Samodejno kuhanje
- КОНТРОЛНАТАБЛА
- Аутоматско кување
- LUFTFLÖDETS RIKTNING
- Automatisk matlagning
- ПАНЕЛЬ УПРАВЛІННЯ
Brand : SHARP
Model : AF-GD82AE
Category : Deep fryer