
AF-GS552AE-B - Deep fryer SHARP - Free user manual and instructions
Find the device manual for free AF-GS552AE-B SHARP in PDF.

| Product type | Air Fryer |
| Brand | Sharp |
| Model | AF-GS552AE-B |
| Power | 1650 W |
| Power supply | 220-240 V, 50 Hz |
| Capacity | 5.5 liters |
| Temperature range | 80 °C to 200 °C |
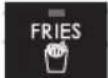
| Automatic programs | 8 programs: fries, beef, vegetables, chicken pieces, bacon, fish, potatoes, pizza |
| Additional functions | Preheat, reheat, cook from frozen, keep warm |
| Control type | Digital control panel with LED display |
| Basket coating | Non-stick |
| Tank coating | Non-stick |
| Basket dimensions (L x H x D) | 221 x 110 x 228 mm |
| Tank dimensions (L x H x D) | 248 x 128 x 253 mm |
| Appliance dimensions (L x H x D) | 313 x 318 x 395 mm |
| Weight | 6.8 kg |
| Power cord length | 900 mm |
| Noise level | 55-62 dB |
| Standby consumption | Less than 0.5 W |
| Maintenance and cleaning | Tank and basket dishwasher safe; wipe exterior with a damp cloth; do not use abrasive products |
| Safety | Do not immerse in water; hot surfaces; use handles; do not block air vents |
| Spare parts | Cooking basket and inner tank available as option |
| General information | For household use only; complies with EU and UK standards |
Frequently Asked Questions - AF-GS552AE-B SHARP
User questions about AF-GS552AE-B SHARP
0 question about this device. Answer the ones you know or ask your own.
Ask a new question about this device
Download the instructions for your Deep fryer in PDF format for free! Find your manual AF-GS552AE-B - SHARP and take your electronic device back in hand. On this page are published all the documents necessary for the use of your device. AF-GS552AE-B by SHARP.
USER MANUAL AF-GS552AE-B SHARP
natural_image
Line drawing of a Sharp air fryer with control panel and lid (no text or symbols on the device itself)User manual
AF-GS552A
Air Fryer

*Product images are for illustration purpose only. Actual product may vary.
Attention:
Your product is marked with this symbol.
It means that used electrical and electronic products should not be mixed with general household waste. There is a separate collection system for these products.

www.sharpconsumer.com/contact/

www.sharpconsumer.com/support/

www.sharpconsumer.com/documents-of-conformity/
A. Information on Disposal for Users (private households)
1. In the European Union
Attention: If you want to dispose of this equipment, please do not use the ordinary dustbin!
Used electrical and electronic equipment must be treated separately and in accordance with legislation that requires proper treatment, recovery and recycling of used electrical and electronic equipment.
Following the implementation by member states, private households within the EU states may return their used electrical and electronic equipment to designated collection facilities free of charge*.
In some countries* your local retailer may also take back your old product free of charge if you purchase a similar new one.
* Please contact your local authority for further details.
If your used electrical or electronic equipment has batteries or accumulators, please dispose of these separately beforehand according to local requirements. By disposing of this product correctly you will help ensure that the waste undergoes the necessary treatment, recovery and recycling and thus prevent potential negative effects on the environment and human health which could otherwise arise due to inappropriate waste handling.
2. In other Countries outside the EU
If you wish to discard this product, please contact your local authorities and ask for the correct method of disposal.
For Switzerland: Used electrical or electronic equipment can be returned free of charge to the dealer, even if you don't purchase a new product.
Further collection facilities are listed on the homepage of www.swico.ch or www.sens.ch.
B. Information on Disposal for Business Users
1. In the European Union
If the product is used for business purposes and you want to discard it: Please contact your SHARP dealer who will inform you about the take-back of the product. You might be charged for the costs arising from take-back and recycling. Small products (and small amounts) might be taken back by your local collection facilities.
For Spain: Please contact the established collection system or your local authority for take-back of your used products.
2. In other Countries outside the EU
If you wish to discard of this product, please contact your local authorities and ask for the correct method of disposal.
CONTENTS
SAFETY INSTRUCTIONS .... 3
SPECIFICATIONS....6
AIR FRYER AND ACCESSORIES....7
CONTROL PANEL 8
BEFORE USING YOUR AIR FRYER 8
OPERATION INSTRUCTIONS....9
Automatic Cooking....9
Manual Cooking....10
Cook From Frozen....11
Pre-Heat 12
Reheat....13
Keep Warm....13
MAINTENANCE WHILE IN USE 14
CLEANING INSTRUCTIONS ....14
STORAGE 14
TROUBLESHOOTING....15
SAFETYINSTRUCTIONS
When using an electrical appliance, basic safety precautions should always be followed, including the following:
- Children should be supervised to ensure that they DO NOT play with the appliance.
- This appliance is not intended for use by persons (including children) with reduced physical, sensory or mental capabilities or lack of experience and knowledge, unless they have been given supervision or instruction concerning use of the appliance by a person responsible for their safety.
- Clean the air fry basket and inner pot with damp, soapy cloth. Make sure only use mild, soapy water.
- DO NOT clean with metal scouring pads. Pieces can break off the pad and touch electrical parts, creating a risk of electric shock. Damage to the surface will also occur.
- Dry the unit and all the assemblies with a soft cloth before storage or use.
- If there are any stains on the basket or inner pot which are too difficult to clean, let them soak in warm water for about 10 minutes before cleaning.
- The frying basket and inner pot can be cleaned in a dishwasher.
- DO NOT overfi ll when cooking. Overfi lling may cause personal injury or property damage or affect the safe use of the appliance.
- DO NOT use oil or any other liquid in the inner pot.
- DO NOT use this appliance for deep-frying.
- Ensure that food is correctly prepared and cooked to avoid any danger to health.
- Prevent food contact with heating elements.
-
ALWAYS ensure the appliance is properly assembled before use.
-
DO NOT place any of the following materials in the air fryer: cardboard, plastic, paper, or anything similar.
- DO NOT store any materials, other than the supplied accessories, in the air fryer when not in use.
- DO NOT use appliance for other than its intended use.
• DO NOT use outdoors. - If any advice is required regarding this product, contact your Sharp Help Line.
- Only hold the appliance by the correct handles and use such heat protection measures such as gloves or potholders.
- Read all of these instructions to ensure that you are familiar with the operation of this air fryer. DO NOT touch hot surfaces, where possible use handles or controls (dependent on model).
- The use of accessory attachments not recommended by as this may cause a hazard or injury.
- This appliance is for HOUSEHOLD USE ONLY.
- To prevent the inner pot dropping on the ground, put the inner pot on a stable surface before lifting the air fry basket.
- When using ensure that the handle is pointing towards you.
- CAUTION: The mark means APPLIANCE SURFACES ARE HOT WHEN OR AFTER USE. DO NOT touch hot surfaces.
- DO NOT cover the air intake vent or air exhaust vent while unit is operating. Doing so will prevent even cooking and may damage the unit or cause it to overheat.
- DO NOT touch accessories during or immediately after cooking.
- Extreme caution must be used when the appliance contains hot food. Improper use may result in personal injury.
- Leave the unit after use so it has sufficient time to cool.
- Let your air fryer cool before cleaning.
-
WARNING: As this air fryer gets hot during use and some surfaces may develop high temperatures. As people perceive temperatures, this device should be used with care.
-
Wear protective insulated gloves when touching hot surfaces or hot air fry basket, inner pot, and food.
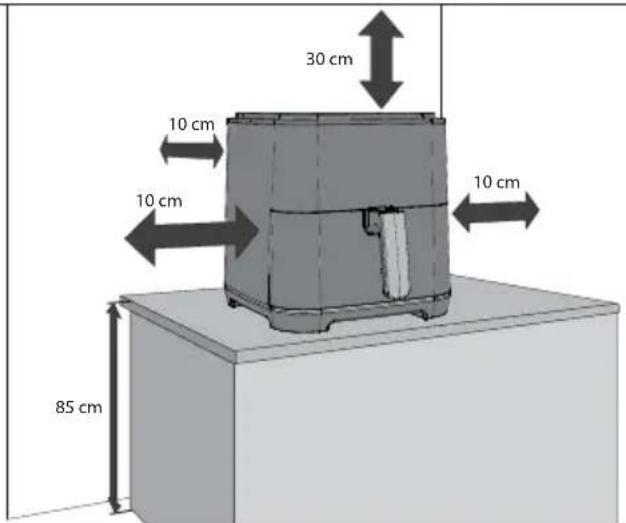
- When using this appliance, provide adequate space above and on all sides for air circulation. ALWAYS ensure that the inner pot is properly closed before operating.
- DO NOT allow the power cable to hang over edge of the work surface or touch hot surfaces.
- DO NOT operate appliance if the mains lead or plug is damaged in any way or after the appliance malfunctions or has been damaged in any other way.
- DO NOT replace or modify the mains cable or plug.
- DO NOT use an extension cord.
- Ensure that the mains socket/switch is accessible when the air fryer is in use.
- This air fryer is not intended to be operated by means of an external timer or separate remote-control system.
- Unplug from the mains supply when not in use, or before cleaning.
- When unplugging the power plug from the mains supply, always hold the plug, never pull the cord.
- When you have stopped using the air fryer, press the STOP/CANCEL button to return the standby mode, then unplug from the mains supply.
- To protect against electric shock, DO NOT immerse the air fryer into water or other liquids.
- DO NOT cover any part of the air fryer while it is operating, as this will cause it to overheat.
- DO NOT place the air fryer on any hot surfaces, near hot gas/electric burners or in a heated oven.
- When operating the air fryer, keep at least 100mm of space on all sides to allow for adequate air circulation.
KEEP THESE INSTRUCTIONS IN A SAFE PLACE FOR FUTURE REFERENCE
SPECIFICATIONS
| Model name AF-GS552A | |
| Air Fryer Power (W) 1650 | |
| Air Fryer Temperature Levels (Celsius) 80 °C to 200 °C | |
| 8 Automatic Programmes Fries, Beef, Vegetables, | Small Chicken, Bacon, Fish, Potato, Pizza |
| 4 Functions Pre-Heat, Reheat, Cook from Frozen, | Keep Warm |
| Capacity (litres) 5.5 | |
| Control Panel Digital | |
| Frying Basket Coating Non stick | |
| Frying Basket Size (W x H x D in mm) 221 x 110 x 228 | |
| Inner Pot Coating Non-stick | |
| Inner Pot Size (W x H x D in mm) 248 x 128 x 253 | |
| Mains Lead Length (mm) | 900 |
| Noise Level (dB) | 55 - 62 |
| Power Consumption (W) | 1650 |
| Power Requirements | 220-240V 50 Hz |
| Standby Power Consumption (W) | <0.5 |
| Size (W x H x D in mm) | 313 x 318 x 395 |
| Weight (kg) | 6.8 |
This product complies with relevant Regulations and Standards for the UK and EU.
AS PART OF A POLICY OF CONTINUOUS IMPROVEMENT, WE RESERVE THE RIGHT TO ALTER DESIGN AND SPECIFICATIONS WITHOUT NOTICE.
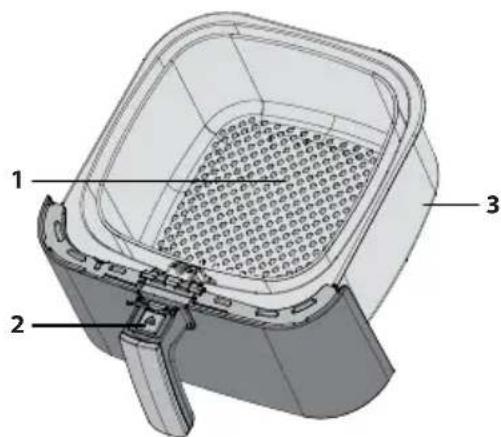
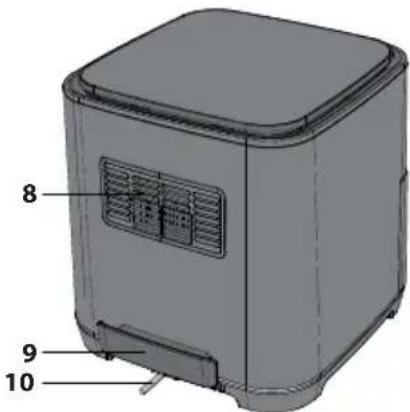
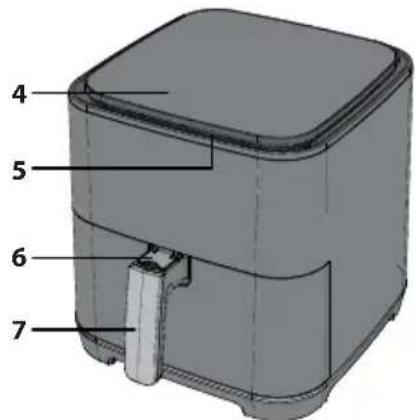
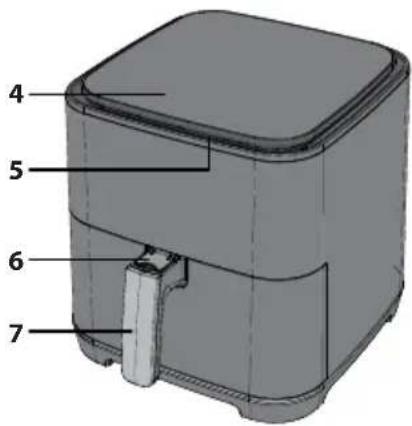
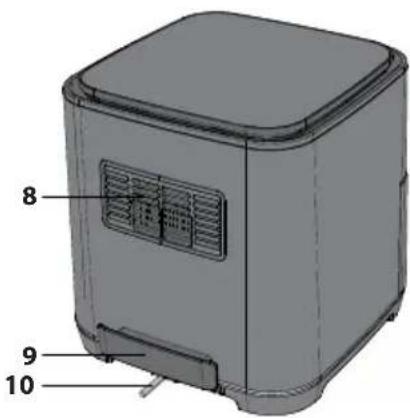
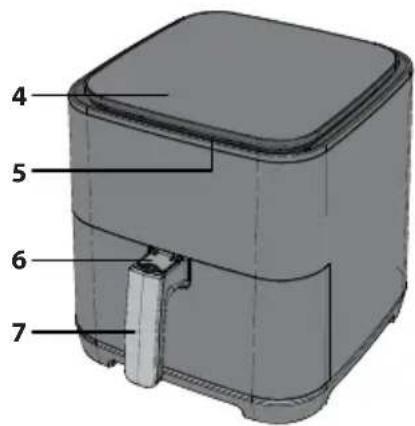
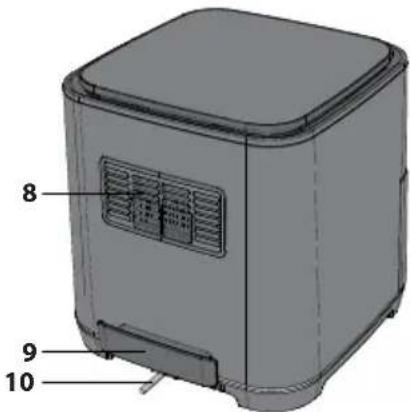
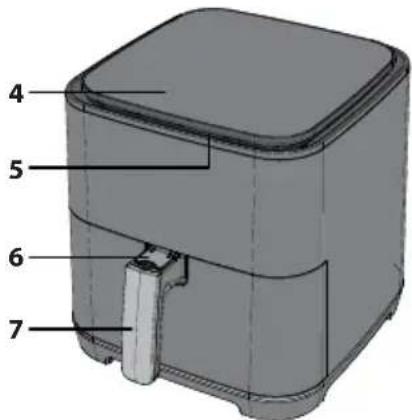
AIR FRYER AND ACCESSORIES
Please familiarize yourself with the following Air Fryer functions and accessories prior to first use:
Inner pot: Place the frying basket onto the inner pot, and then put the inner pot into the air fryer.
Frying basket: Place the food in the frying basket and then put the frying basket into the inner pot to cook.
Open button (For frying basket): To take out the frying basket, press the open button and then lift the frying basket.
NOTE: To prevent the inner pot dropping on the ground, put the inner pot on a stable surface before lifting out the frying basket.
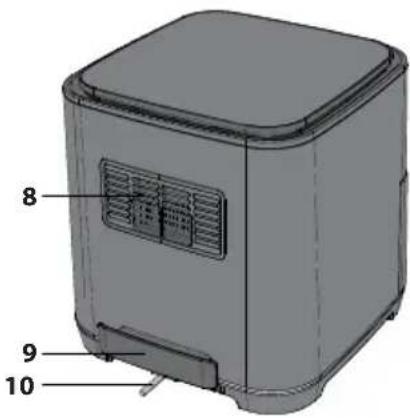
Air exhaust vent: There will be hot steam venting from the exhaust vent during use (this is normal), keep your hands and face away from the air exhaust vent when cooking to prevent scalding.
Button cover: This prevents the inner pot and frying basket from being mistakenly removed from the air fryer. Push up to reveal the open button.
Handle: This is used for moving the inner pot and frying basket in and out of the air fryer.
- Air Frying Basket
- Release Button
- Inner Pot
- Control Panel
- Air Intake
- Release Button Cover
- Frying Basket Handle
- Air Exhaust Vent
- Holding Handle
- Mains Lead
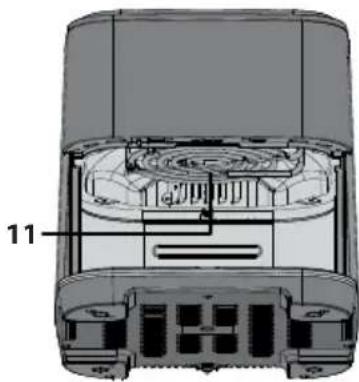
- Heating Element
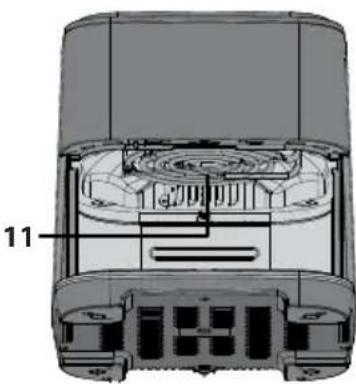
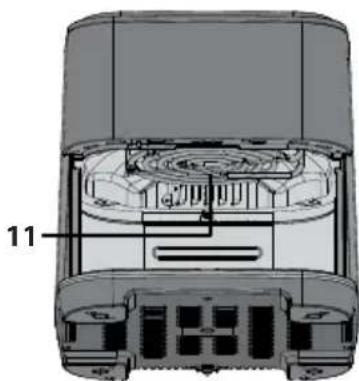
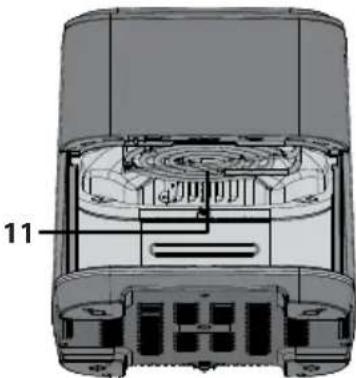
natural_image
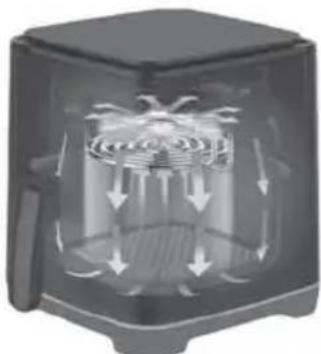
Cross-sectional diagram of a device showing internal components and labeled parts (no readable text or symbols)AIR FLOW DIRECTION
When cooking, the hot air from the element is moved around as shown in the picture below. This ensures that your food is cooked evenly at the set temperature and time period. Do not use any materials such as metal foil which may obstruct this airflow or over fill the frying basket.
natural_image
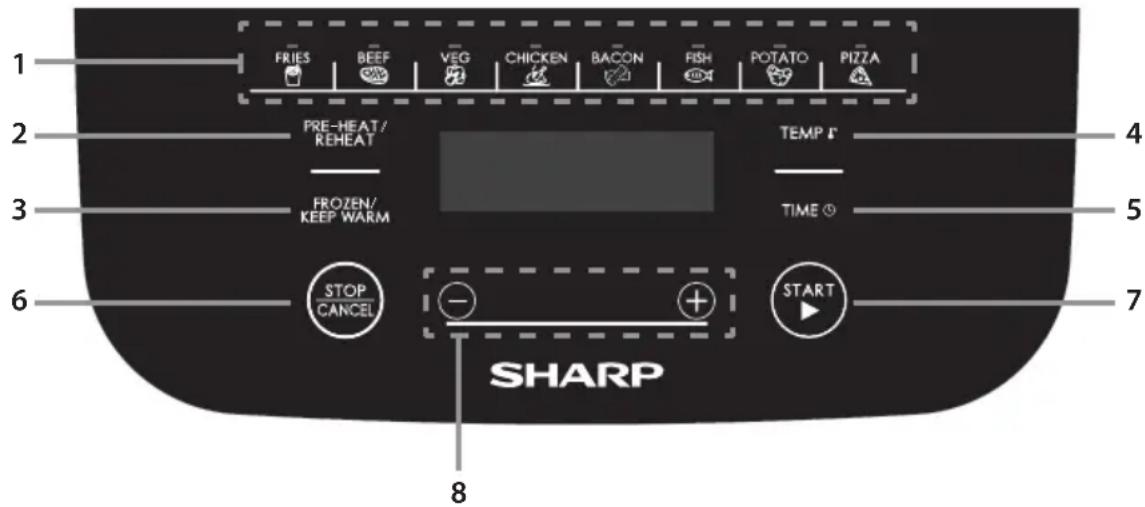
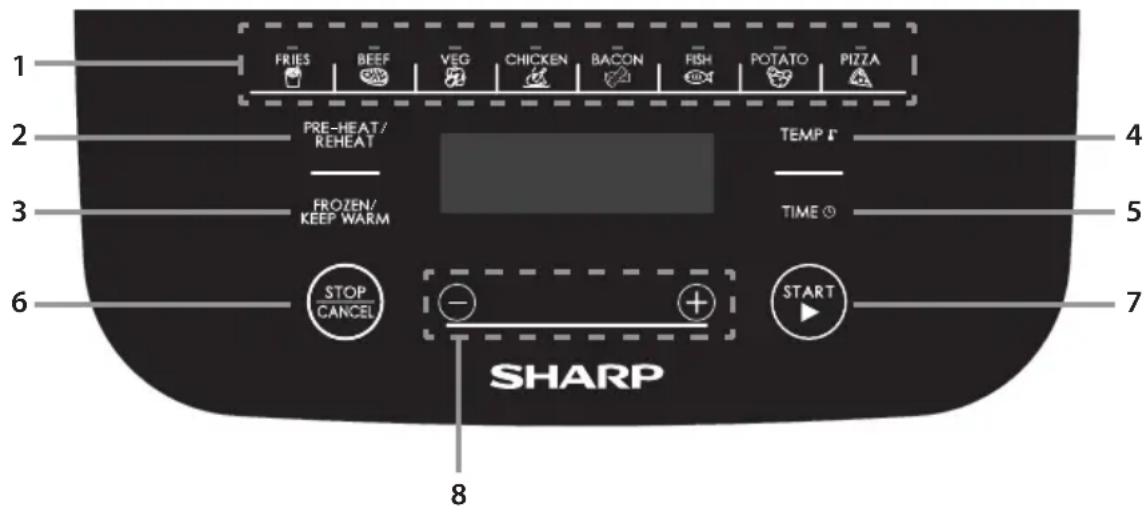
Cross-sectional diagram of a mechanical device showing internal airflow patterns (no text or symbols)CONTROLPANEL
- Auto Cook buttons – Automatic cooking programmes, select from 8 options.
- Pre-Heat/Reheat – For preheating the Air Fryer to the correct cooking temperature or reheating cold food.
- Frozen/Keep Warm - Cook from frozen or keep you food warm.
- Temperature – Use this button to control the temperature manually.
- Time – Use to manually set the cooking time.
- Stop/Cancel – Stop or pause a function.
- Start - Start the operation of the Air Fryer.
- Up/Down (for temperature and time) – Set the value of the temperature or time.
BEFORE USING YOUR AIR FRYER
Before using your air fryer for the first time, it is recommended that after you have fully unpacked and removed any packaging that the inner pot and frying basket are cleaned in hot soapy water or in dishwasher. Then thoroughly dry all accessories and re-assemble in Air Fryer. Wipe the outer body and inner parts with damp cloth and dry before using.
Plug into the mains supply and set the unit to cook Fries (do not put any food into the unit). This will turn the unit on at 180^ C for 23 minutes allowing any residue which may have adhered to the heating element during manufacture to dissipate.
It is advised to fully read these instructions before use.
OPERATION INSTRUCTIONS
Your Air Fryer has several modes of operation:
Automatic cooking – select one of the 8 pre-programmed cooking options.
Manual cooking - set the temperature and time manually.
Cook from Frozen – Cook from frozen (Vegetables, Pizza, and Fries only).
Pre-Heat – Make sure that your Air Fryer is at the correct temperature before cooking.
Reheat – Reheat previously cooked food.
Keep Warm – Keep your food warm.
Notes on cooking
- The amount of the food should not fill more than the 4/5 of total amount of the air fry basket.
- The cooking temperature and time can be adjusted during the cooking.
- To pause the cooking, press the "STOP/CANCEL" button once.
- To cancel the cooking, press the "STOP/CANCEL" button twice.
- Some food will need to be stirred/shaken during the cooking: Pull the inner pot out of the unit, stir/shake as necessary and return the inner pot to the Air Fryer; the unit will restart the cooking automatically.
- Make sure that the food has cooked correctly. If the food is undercooked, then place back into the air fryer and the press the "PRE-HEAT/REHEAT" button twice to cooking for few minutes.
- To prevent the inner pot dropping on the ground, put the inner pot on a stable and heat proof surface before lifting out the basket.
- Only cook food in the frying basket.
• DO NOT use for deep fat frying.
Automatic Cooking
For your ease and convenience there are 8 automatic cooking Programmes. These are easily accessed via the dedicated buttons on the control panel.
| Food Weight | Initial Food Temperature | Cooking Time | Maximum Extra Time | Turn Over Minutes From End of Cooking | Cook From Frozen Time | Temperature | Comments | |
| Fries 300g to 700g | 10 | Room temperature | 18 23 5 26 | 180 | Do not overload the basket. | |||
| Beef 150g to 500g | 12 | Upto 270g of beef steak can be cooked. | ||||||
| Vegetable | 100g to 400g | Cut up vegetables into pieces 2 x 3cm. | ||||||
| Chicken | 800g to 1000g | 30 39 5 - | 190 | Small whole chicken or large pieces. | ||||
| Bacon | 4 to 6 rashers | 9 | 12 | - | - | 180 | Evenly space the rashers of bacon in the frying basket. | |
| Fish | 100g to 500g | 12 | ||||||
| Potato | 250g each | 40 52 5 - | 200 | Place up to 3 potatoes of 250g each into the frying basket. | ||||
| Pizza | 100g to 400g | 13 |
When the set cooking time is above 10 minutes, the air fryer will remind to turn over the food when the remaining time is half of the total cooking time (or as shown in the table above). If the set cooking time is less than 10 minutes, no turn over reminder will appear.
In the example below, beef is being cooked. It is not necessary to adjust the temperature or time unless you would like your food cooked more or less.
| This operation can be skipped. | |||||
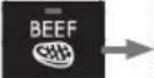
| Press BEEF once. | Press TEMP to enter the temperature adjustment. | Press -/+ to adjust the temperature. | Press TIME to enter the time adjustment. | Press -/+ to adjust the cooking time. | Press START to start the cooking. |
 |  |  |  |  |  |
- Evenly place the food to be cooked in the frying basket.
- Place the frying basket into the inner pot. Insert the inner pot into the air fryer.
- Plug the air fryer into mains supply.
- Select the desired food by pressing the auto cook button on the control panel. The default temperature and time will blink in the LED display.
a. If needed, press the "TEMP" button once, and then press "-" or "+" button to set the desired cooking temperature.
b. If needed, press the "TIME" button once, and then press "-" or "+" button to set the desired cooking time.
- Press "START" button to start the cooking; the time counts down.
- When the cooking is complete the air fryer will make a sound, and the unit returns to standby mode.
- Pull out the inner pot handle with care and take the food out of the air fry basket immediately or the heat remaining in the air fryer will continue to cook and dry out your food.
Note: If you are changing the cooking time for the auto cook foods it is only possible to increase the maximum by 30%. This is to avoid the potential of burning your food.
Manual Cooking
When cooking manually, first select the time, then the temperature.
| This operation can be skipped. | ||||
| Press TEMP to enter the temperature adjustment. | Press -/+ to adjust the temperature. | Press TIME to enter the time adjustment. | Press -/+ to adjust the cooking time. | |
 |  |  |  |  |
- Plug your Air Fryer into the mains supply.
- Pull out the frying pan, place food into the frying basket and return the pan to the unit.
- Press the "START" button once; the display will indicate the default time and temperature (15 minutes at 180°C).
- To change the time, press the "TIME" button and then use the +/- buttons to change to your desired time (1 to 60 minutes).
- Now press the "TEMP" button and then use the +/- buttons to change to your desired temperature (80 to 200°C).
- Press the "START" button to start the cooking process.
Some suggested cooking options are shown below.
| Food Weight | Initial Food Temperature | Cooking Time | Cooking Temperature | Shake/Turn Over Comments | |
| Frozen fries (thick) 300 to 700 | Frozen | 12 to 16 200 Yes | |||
| Frozen fries (thin) 300 to 700 12 to 20 200 Yes | |||||
| DIY Fries (0.7cm x 7/8cm) 300 to 800 | 4 180 Room temperature15 180 | ||||
| DIY Chips 300 to 800 18 to 22 180 Yes Add oil: 1/2 spoon | |||||
| DIY Potato Pieces 300 to 750 12 to 18 180 Yes Add oil | |||||
| Hash Browns 250 15 to 18 180 | |||||
| Braised Cream Potato 500 18 to 22 180 | |||||
| Steak 100 to 500 8 to 12 180 | |||||
| Pork Chop 100 to 500 10 to 14 180 | |||||
| Hamburger | 100 to 500 7 to | ||||
| Sausage Roll | 100 to 500 12 to | ||||
| Drumstick | 100 to 500 18 to | ||||
| Chicken Breast | 100 to 500 10 to | ||||
| Fish 100 to 500 8 to 12 180 | |||||
| Prawn | 100 to 500 5 to | ||||
| Crab | 100 to 500 8 to | ||||
| Cake | 100 to 400 15 to | ||||
| Spring Rolls | 100 to 400 8 to | 0 180 | |||
| 2 180 | |||||
| 30 180 | |||||
| 0 200 Yes | instant Spring rolls | ||||
| Frozen Chicken Nugget | 100 to 500 | Frozen | 6 to 10 200 Yes | ||
| Frozen Fish Strips 100 to 400 6 to 10 200 | |||||
| Frozen Cheese Snack 100 to 400 8 to 10 180 | |||||
| Yakitori | 100 to 400 | Room temperature45 200 | 8 to 10 200 | ||
| Sweet Potato | 100 to 500 30 to |
Cook From Frozen
To cook from frozen, follow the instructions for automatic cooking, but press the "FROZEN" button first.
| This operation can be skipped. | ||||||
| Press FROZEN/ KEEP WARM once. | Select food. | Press TEMP to enter the temperature adjustment. | Press -/+ to adjust the temperature. | Press TIME to enter the time adjustment. | Press -/+ to adjust the time. | Press START to start the cooking. |
 |  |  |  |  |  |  |
- Evenly place the food to be cooked in the frying basket.
- Place the frying basket into the inner pot. Insert the inner pot into the air fryer.
- Plug the air fryer into mains supply.
- Press the "FROZEN/KEEP WARM" button once.
- Select the desired function by pressing the function button on the control panel. The default temperature and time will blink in the LED display.
a. If needed, press the "TEMP" button once, and then press "-" or "+" button to set the desired cooking temperature.
b. If needed, press the "TIME" button once, and then press "-" or "+" button to set the desired cooking time.
- Press "START" button to start the cooking; the time counts down.
- When the cooking is complete, the unit will make a sound, and return to the standby mode.
- Pull out the inner pot handle with care and take the food out.
Cooking from frozen is only possible for FRIES, VEGETABLES and PIZZA.
For cooking of other frozen foods, please refer to the manual cooking advice.
Pre-Heat
To ensure that your Air Fryer is at the correct temperature for cooking your food, there is a pre-heat function which can be used before auto cook, manual cook and cook from frozen functions. Just press the pre-heat button once before selecting any other function.
| This operation can be skipped. | ||||||
| Press PRE-HEAT/REHEAT once. | Select food. | Press TEMP to enter the temperature adjustment. | Press -/+ to adjust the temperature. | Press TIME to enter the time adjustment. | Press -/+ to adjust the time. | Press START to start the Pre-heat. |
 |  |  |  |  |  |  |
- Place the frying basket into the inner pot. Insert the inner pot into the air fryer.
- Plug the air fryer into mains supply.
- Press the PRE-HEAT/REHEAT button once.
- Select the desired food by pressing the relevant auto cook button on the control panel. The default temperature and time will blink in the LED display.
a. If needed, press the "TEMP" button once, and then press "-" or "+" button to b set the desired cooking temperature.
b. If needed, press the "TIME" button once, and then press "-" or "+" button to set the desired cooking time.
- Press the "START" button.
- When the unit has reached the correct pre-heat temperature it will make a sound.
- Take out the inner pot and evenly place the food to be cooked in the frying basket.
- Return the inner pot/frying basket to the air fryer.
- Press "START" button to start the cooking; the time counts down.
- When the cooking is complete, the unit will make a sound, and returns to the standby mode.
- Press the open button and pull out the inner pot handle with care and take the food out of the air fry basket immediately or the heat remaining in the air fryer will continue to cook and dry out your food.
Pre-heat can also be used when cooking from frozen using the auto menus; press "PRE-HEAT/REHEAT" > "FROZEN/KEEP WARM" > auto cook function > "START".
In addition, pre-heat can also be used when cooking manually; press "PRE-HEAT/REHEAT" > set temperature >" START".
- Place the frying basket into the inner pot. Insert the inner pot into the air fryer.
- Plug the air fryer into mains supply.
- Press "PRE-HEAT/REHEAT"
- Press the "TEMP" button once, and then press "-" or "+" button to set the desired cooking temperature.
- Press the "START" button.
- When the unit has reached the correct pre-heat temperature it will make a sound.
- Take out the inner pot and evenly place the food to be cooked in the frying basket.
- Return the inner pot/frying basket to the air fryer.
- Set the time for your cooking by pressing the "TIME" button once, and then press "-" or "+" button to adjust the desired cooking time.
- Press "START" button to start the cooking; the time counts down.
- When the cooking is complete, the unit will make a sound, and returns to the standby mode.
- Press the open button and pull out the inner pot handle with care and take the food out of the air fry basket immediately or the heat remaining in the air fryer will continue to cook and dry out your food.
Reheat
This function allows you to reheat food.
Press START to
Press PRE-HEAT/REHEAT twice to choose start the reheat and REHEAT function. the display start to count down.
- Press the "PRE-HEAT/REHEAT" button twice.
- Take out the inner pot and place the food to be reheated into the frying basket, ensure that it is spaced evenly in the frying basket.
- Press the "START" button. The Air Fryer will reheat.
- The Air Fryer will now reheat your food for 4 minutes at 180°C.
Keep Warm
Once you have cooked your food, it can be kept warm by using the KEEP WARM function.
This operation can be skipped.
| Press FROZEN/KEEP WARM twice to choose KEEP WARM function. | Press TEMP to enter the temperature adjustment. | Press -/+ to adjust the temperature. | Press TIME to enter the time adjustment. | Press -/+ to adjust the cooking time. | Press START to start the cooking. |
- Press the "FROZEN/KEEP WARM" button twice.
- The default keep warm temperature is 80^ C with a time of 30 minutes. If required, this can be changed.
a. To change the time, press the "TIME" button and then use the +/- buttons to change to your desired time (1 to 60 minutes).
b. Now press the "TEMP" button and then use the +/- buttons to change to your desired temperature (80 to 200°C). - Take out the inner pot and place the food to be reheated into the frying basket, ensure that it is spaced evenly in the frying basket.
- The Air Fryer will now keep your food warm.
MAINTENANCE WHILE IN USE
This appliance requires little maintenance when in use. Clean your Air Fryer after every use to prolong its useable lifetime.
This Air Fryer contains no user serviceable parts. Do not try to repair it yourself. In the unlikely event of failure, contact the SHARP Call Centre using the details at the start of this User Manual.
CLEANING INSTRUCTIONS
CAUTION: To protect against electrical shock, DO NOT IMMERSE THE AIR FRYER IN WATER OR ANY OTHER LIQUIDS.
Your air fryer should be cleaned regularly for best performance and long life. Regular cleaning will also reduce the risk of fire. To clean follow the instructions as below:
- Remove mains plug from electrical outlet. Allow your Air Fryer to cool down.
- Clean the air fry basket and inner pot with damp, soapy cloth. Make sure to only use mild, soapy water. If the stains in the basket or inner pot are too difficult to clean, let them soak in warm water for about 10 minutes.
- Clean the heating elements will dry and soft cloth.
- Wipe the outside of your air fryer with a soft, damp cloth, then dry.
CAUTION: DO NOT USE ABRASIVE CLEANERS OR ANY TYPE OF SCOURING MATERIAL on the surface of the frying basket and inner pot. Make sure to only use mild, soapy water. Abrasive cleaners, scrubbing brushes and chemical cleaners will damage the coating on this unit.
Other than the recommended cleaning, no further user maintenance should be necessary.
Any other servicing should be performed by an authorized service representative.
STORAGE
Unplug unit, allow it to cool, and clean before storing. Store the air fryer in its box in a clean, dry place. Never store appliance while it is hot or still plugged in. Never wrap cord tightly around the Air Fryer. Do not put any stress on the cord where it enters the unit, as it could cause the cord to fray and break.
If storing the air fryer for long periods of time, make certain that the air fryer is clean and free of food particles. Store the air fryer in a dry location such as on a table or countertop or cupboard shelf.
TROUBLESHOOTING
If you are experiencing issues with your air fryer, follow the guidance below.
| The Air Fryer does not work | The appliance is either not plugged in or switched on. | Make sure the mains plug is inserted in an electrical wall socket and is switched on. |
| You have not set the time or tempertaure. | Set the time and temperature and then press "START". | |
| The inner pot is not properly locked into the unit Push the inner pot into the Air Fryer so it "clicks". | ||
| The ingredients fried with the Air Fryer are not done. | There is too much food in the frying basket. | Put smaller batches of ingredients in the frying basket. Smaller batches are fried more evenly. |
| The set temperature is too low. | Adjust the temperature to the required temperature setting. | |
| The cooking time is too short. Adjust the timer to the required preparation time. | ||
| Fried snacks are not crispy when they come out of the Air Fryer. | You used a type of snack meant to be prepared in a traditional deep fryer. | Use snacks made to be prepared in the oven, or lightly brush some oil onto the snacks for a crispier result. |
| It is difficult or not possible to slide the inner pot and frying basket into the appliance properly. | There is too much food in the frying basket. Do not over fill the frying basket. | |
| The frying basket in not placed properly into the inner pot | Push the frying basket down into the inner pot until you hear a slight click. | |
| White smoke comes out of the appliance. | You are preparing greasy ingredients. | When you fry greasy ingredients in the Air Fryer, a large amount of oil will leak into the pan. This oil may white smoke and the pan may heat up more than usual. This does not affect the appliance or the end result. |
| The pan still contains grease residues from previous use. | White smoke is caused by grease heating up in the inner pot; make sure you clean the frying basket and inner pot thoroughly after each use. | |
| Fresh fries are fried unevenly in the Air Fryer. | You did not use the right type of potato. | Use fresh potatoes and make sure they stay firm during frying. |
| You did not rinse the potato sticks properly before you fried them. | Rinse the potato sticks thoroughly to remove starch from the outside of the sticks. | |
| Fresh fries are not crispy when they come out of the Air Fryer. | The crispiness of the fries depends on the amount/ type of oil and water in the fries. | Make sure you dry the potato sticks properly before you add the oil. |
| Cut the potatoes into thinner sticks for a crispier result. | ||
| Add slightly more oil for a crispier result. | ||
Should you still have issues, please contact the SHARP Call Centre using the details at the start of this User Manual.
Внимание:

www.sharpconsumer.com/contact/

www.sharpconsumer.com/support/

www.sharpconsumer.com/documents-of-conformity/

natural_image
Cross-sectional diagram of a device showing internal components and labeled parts (no readable text or symbols)ПОСОКА НА ВЪЗДУШНИЯ ПОТОК
natural_image
Cross-sectional diagram of a mechanical device showing internal airflow patterns (no text or symbols)ПАНЕЛ ЗА УПРАВЛЕНИЕ

www.sharpconsumer.com/contact/

www.sharpconsumer.com/support/

www.sharpconsumer.com/documents-of-conformity/
natural_image
Cross-sectional diagram of a device showing internal components and labeled parts (no readable text or symbols)SMĚR PROUDĚNÍ VZDUCHU
natural_image
Cross-sectional diagram of a mechanical device showing internal airflow patterns (no text or symbols)OVLÁDACÍPANEL

www.sharpconsumer.com/contact/

www.sharpconsumer.com/support/

www.sharpconsumer.com/documents-of-conformity/
A. Oplysninger om bortskaff else for brugere (private husholdninger)
1. I EU

natural_image
Cross-sectional diagram of a device showing internal components and labeled parts (no readable text or symbols)RETNING AF LUFTSTRÖMMEN
natural_image
Cross-sectional diagram of a mechanical device showing internal airflow patterns (no text or symbols)BETJENINGSPANEL
- Auto-tilberedningsknapper – Automatiske tilberedningsprogrammer. Vælg mellem 8 muligheder.
- Pre-Heat/Reheat – (Forvarmning/genopvarmning) Bruges til at forvarme airfryeren til den indstillede tilberedningstemperatur eller til at genopvarme kold mad.
- Frozen/Keep Warm – (Frosset/Hold varm) Tilbered fra frossen tilstand, eller hold maden varm.
- Temperature – (Temperatur) Brug denne knap til at styre temperaturen manuelt.
- Time – (Tid) Manuel indstilling af tilberedningstiden.
- Stop/Cancel – Stop eller sæt en funktion på pause.
- Start – Sæt airfryeren i gang.
- Up/Down (op og ned) (for temperatur og tid) – Indstiller temperaturen eller tilberedningstiden.
F∅R DU BRUGER DIN AIRFRYER

www.sharpconsumer.com/contact/

www.sharpconsumer.com/support/

www.sharpconsumer.com/documents-of-conformity/


natural_image
Cross-sectional diagram of a device showing internal components and labeled parts (no readable text or symbols)LUFTSTROM-RICHTUNG
natural_image
Cross-sectional diagram of a mechanical device showing internal flow patterns (no text or symbols)BEDIENFELD

www.sharpconsumer.com/contact/

www.sharpconsumer.com/support/

www.sharpconsumer.com/documents-of-conformity/
www.sharpconsumer.com/documents-of-conformity/
ΠΕΡΙΕΧΟΜΕΝΑ
natural_image
Cross-sectional diagram of a device showing internal components and labeled parts (no readable text or symbols)natural_image
Cross-sectional diagram of a refrigerator interior showing airflow patterns (no text or symbols)ΠΙΝΑΚΑΣΕΛΕΓΧΟΥ

www.sharpconsumer.com/contact/

www.sharpconsumer.com/support/

www.sharpconsumer.com/documents-of-conformity/
natural_image
Cross-sectional diagram of a device showing internal components and labeled parts (no readable text or symbols)natural_image
Cross-sectional diagram of a device showing airflow or heat distribution around a central chamber (no text or symbols)PANEL DE CONTROL
- User manual
- Attention:
- Information on Disposal for Users (private households)
- In the European Union
- In other Countries outside the EU
- Information on Disposal for Business Users
- CONTENTS
- SAFETYINSTRUCTIONS
- When using an electrical appliance, basic safety precautions should always be followed, including the following:
- AIR FRYER AND ACCESSORIES
- AIR FLOW DIRECTION
- CONTROLPANEL
- BEFORE USING YOUR AIR FRYER
- OPERATION INSTRUCTIONS
- Your Air Fryer has several modes of operation:
- Notes on cooking
- Automatic Cooking
- Manual Cooking
- Cook From Frozen
- Pre-Heat
- Reheat
- Keep Warm
- MAINTENANCE WHILE IN USE
- CLEANING INSTRUCTIONS
- STORAGE
- TROUBLESHOOTING
- Внимание:
- ПОСОКА НА ВЪЗДУШНИЯ ПОТОК
- ПАНЕЛ ЗА УПРАВЛЕНИЕ
- SMĚR PROUDĚNÍ VZDUCHU
- OVLÁDACÍPANEL
- Oplysninger om bortskaff else for brugere (private husholdninger)
- I EU
- RETNING AF LUFTSTRÖMMEN
- BETJENINGSPANEL
- F∅R DU BRUGER DIN AIRFRYER
- LUFTSTROM-RICHTUNG
- BEDIENFELD
- ΠΕΡΙΕΧΟΜΕΝΑ
- ΠΙΝΑΚΑΣΕΛΕΓΧΟΥ
- PANEL DE CONTROL
Brand : SHARP
Model : AF-GS552AE-B
Category : Deep fryer