USER MANUAL PSZ 250 A1 PARKSIDE
natural_image
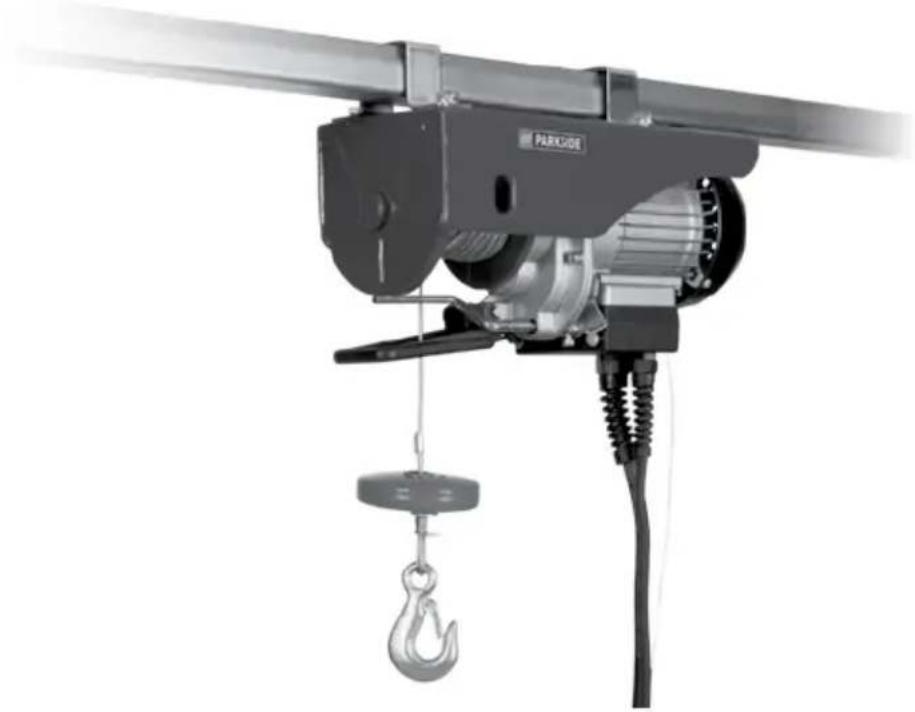
Industrial crane lifting a motor with a hook attachment (no visible text or symbols)
SEILHEBEZUG / ELECTRIC ROPE HOIST / PALAN ÉLECTRIQUE PSZ 250 A1
DE AT CH
SEILHEBEZUG
Operation and safety notes
Translation of the original instructions
FR BE
PALAN ÉLECTRIQUE
GB/IE Operation and safety notes Page 15
natural_image
Technical diagram showing mechanical assembly with bolts and a bracket, no text or symbols present
natural_image
Technical line drawing of mechanical components including bolts, nuts, and washers (no text or symbols)
natural_image
Simple line drawing of a curved path with a teardrop-shaped object and circular features, no text or symbols present.
natural_image
Line drawing of a mechanical lifting hook with wrench and nut (no text or symbols)
natural_image
Technical line drawing of a mechanical lifting device with two views (top and side), no text or symbols present.
Verwendete Warnhinweise und Symbole . . . . . . . . . . . . . . . . . . . . . . . . . . . . . . . . . . . . . . . . . . . . . . . . . . . . . . . . . . . . . . . . . . . . . . . . . . . . . . . . . . . 6
Einleitung . . . . . . . . . . . . . . . . . . . . . . . . . . . . . . . . . . . . . . . . . . . . . . . . . . . . . . . . . . . . . . . . . . 6
Warnings and symbols used ...... Page 16
Introduction...... Page 16
Intended use.... Page 16
Scope of delivery.... Page 17
Description of parts ...... Page 17
Technical data Page 17
Safety information Page 18
Assembly Page 19
Before first use.... Page 19
Operation.... Page 20
Winding/unwinding the cable.... Page 20
Lifting loads Page 20
Maximum/minimum length levers Page 20
Emergency off switch.... Page 20
Set-up as block and tackle.... Page 20
Cleaning and care ...... Page 21
Cleaning. Page 21
Maintenance Page 21
Repairs.... Page 21
Storage Page 22
Disposal Page 22
Warranty Page 22
EC Declaration of conformity Page 24
| Warnings and symbols usedThe following warnings are used in this user manual, on the packaging and on the rating plate: |
 | Read the user manual. | | This product is classified as protection class I and must be connected to a protective ground. |
 |
 | Observe all warnings and safety instructions! | | Alternating current |
 | The product is shielded against dust and splashing of water. | | Make sure that the steel cable is properly rolled onto the reel. The space between coils must be less than the diameter of the cable itself. |
 | Wear protective gloves! |
 | Wear ear protection! | | Set-up as fixed pulley. |
 | Wear safety goggles! |
 | Wear a dust mask! | | Set-up as block and tackle with 2 rope hoists and pulley. |
 | Wear suitable work boots! |
ELECTRIC ROPE HOIST PSZ 250 A1
● Introduction
We congratulate you on the purchase of your new product. You have chosen a high quality product. The instructions for use are part of the product. They contain important information concerning safety, use and disposal. Before using the product, please familiarise yourself with all of the safety information and instructions for use. Only use the product as described and for the specified applications. If you pass the product on to anyone else, please ensure that you also pass on all the documentation with it.
Intended use
This rope hoist (hereinafter referred to as "the product") is suitable for lifting and lowering loads. The load is fastened to a hook on the product.
The product is intended for use in indoor spaces (barns, garages, workshops, etc.).
The product is not suitable for exerting lateral tensile force.
The product is designed for household use; it is not suitable for commercial purposes.
Other uses or modifications to the product are considered improper use and may result in risks such as mortal danger, injury or damages. The manufacturer assumes no liability for damages arising from improper use. The product is not suitable for commercial use or other applications.
- Scope of delivery

WARNING!
The product and the packaging materials are not toys! Children shall not play with plastic bags, films and small parts! There is a risk of choking and suffocation!
1 x Electric rope hoist
1 x Extra hook with pulley
2x Mounting brackets
4 x Mounting screws (with non-removable spring washer and removable washer)
1 x Instruction manual
● Description of parts
1 Mounting bracket
2 Mounting screws (with non-removable spring washer and removable washer)
3 Motor
4 Remote control suspension cable
5 Control cable
6 Power cord with power plug
7 Emergency off switch
8 Control switch ( )
9 Remote control
10 Extra hook
11 Pulley
12 Hook
13 Shut-off weight
14 Steel cable
15 Minimum cable length lever
16 Maximum cable length lever
17 Drum
18 Mounting opening for hook
- Technical data
Rope hoist PSZ 250 A1
Nominal voltage: 230 V \~, 50 Hz
Nominal current: 2.2 A
Rated power: 500 W
Duty type: S3 20 % 10 min:
Permissible load: 125 kg ^ | 250 kg ^*
Lifting height: 12 m^ 16 m^*
strength: 1870 N/mm ^4
Protection class: I
Drive group: M1
Degree of protection: IP54
Operating conditions
(Height above sea level: 0 to +40 °C
Max. 1000 m): < 80 % relative humidity
Storage conditions: -25 to +55 °C
< 80 relative humidity
Net weight: 10 kg
* Set-up as fixed pulley
** Set-up as block and tackle with 2 rope hoists and pulley
Duty type S3 20 % 10 min:
S3= Intermittent duty without influence of the start-up process. Within a given 10 minute period, the maximum operating time is 20% (2 minutes).
The A-rated noise emissions at the operator's location is less than 86 dB(A).


WARNING!
Read all safety information, instructions, diagrams and technical specifications applied to the product. Failure to follow the safety information and the below instructions may result in electric shock, fire and/or serious injury.
- Keep children and other unauthorized persons away from the product.

DANGER!
Risk of electric shock! Never attempt to repair the product yourself. In case of malfunction, repairs are to be conducted by qualified personnel only.

DANGER!
Risk of electric shock! Turn off the product and disconnect it from the power supply before cleaning and when the product is not in use.

DANGER!
Risk of injury! Improper use may result in personal injury. Use the product only as described in the user manual. Never attempt to alter the product in any way.

DANGER!
Risk of injury! Never use a damaged product. Disconnect the product from the power supply and contact your retailer if the product is damaged.
■ Make sure that the nominal voltage on the rating plate complies with the supply voltage.
If possible, only operate the product on an electrical circuit protected by a fault current switch and a fuse of at least 10 A.
The use of extension cords is not recommended. If the use of an extension cord is necessary, it must be designed for a current flow of at least 10 A.
Shield the product, power cord and power plug from dust, direct sunlight, dripping and splashing water.
- Protect the power cord from damage. Do not allow the power cord to hang over sharp corners; do not crush or bend it. Keep the power cord away from any hot surfaces and open flames.
Do not operate the product if the power cord or power plug are damaged, nor if the product does not work or is damaged in any way.
If the power cord is damaged, it must be replaced by the manufacturer, its service agent or similarly qualified persons in order to avoid a hazard.
Do not disconnect the power plug from the socket outlet by pulling on the power cord.
- Persons who intend to use the product must first receive appropriate training or instructions.
It is prohibited to move persons with the product.
It is prohibited to lift loads in excess of the nominal load.
- Do not attempt to lift stuck or jammed loads.
The steel cable must be taut when lifting the load.
Do not pull the loads in horizontal direction.
- Avoid switching the product on and off rapidly (inching operation).
■ Always be attentive when operating the product.
- Do not leave hanging loads unattended without taking appropriate safety measures.
- Do not stand or work underneath raised loads.
The product has not been outfitted with a rated power limit. Do not attempt to lift the load further when the overheat protection limits operation. In this case, the load has exceeded the product's nominal power.
Do not use the maximum/minimum length levers 15 16 routinely as a stop mechanism. These levers serve as a stop mechanism only in emergencies.
Before you begin: Check whether
- the steel cable 4 is wound properly around the drum 17 and whether
- the space between coils is less than the diameter of the cable itself (Fig. D).
Assembly
(Fig. E)

DANGER!
The square tube must be able to bear a minimum load of 500 kg at the points where the product is fastened. If you are unsure, consult a professional (e.g. a structural engineer).
▶ Seek advice from a qualified technician to ensure all screws are tightened fully and correctly.
A qualified technician or a properly trained person should check the anchoring of the square tube before the product is started.
■ Fasten the product with the mounting brackets 1 and the mounting screws 2 to a suitable square tube.
■ Tighten the mounting screw2.
● Before first use
■ Remove the transport lock from the steel cable 14. Cut the rubber band and remove it.
Before you begin: Check whether
- the steel cable 4 is wound properly around the drum 17 and whether
- the space between coils is less than the diameter of the cable itself (Fig. D).
■ Make sure the steel cable passes the maximum/minimum length levers 15 16 properly and without touching them (Fig. B).
Operation
NOTE
The product has been outfitted with a thermostat switch. During operation, it may stop the motor 3 The motor can be only started again once it has cooled down.
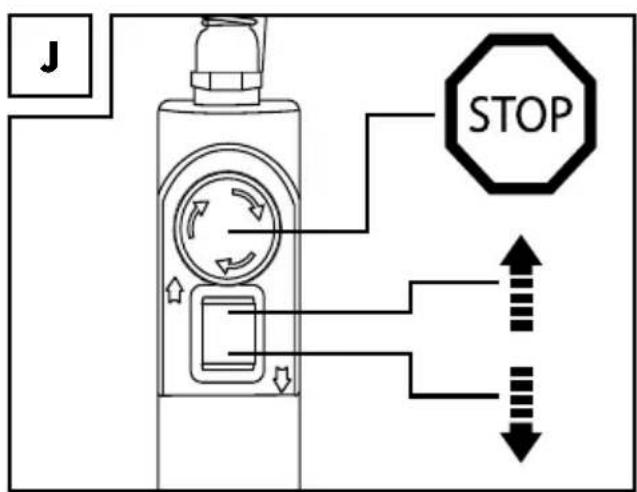
● Winding/unwinding the cable (Fig. J)
- Winding the cable: Press the control switch 8 upwards according to the arrow indication ↑.
- Unwinding the cable: Press the control switch 8 downwards according to the arrow indication ↓.
Lifting loads
■ Lower the steel cable so you can handle it comfortably.
- Fasten the load to the hod ^10 12. Use additional bungee cords where necessary. The load's centre of gravity must be beneath the product.
Wind up the steel cable until it is only taut. Then fully lift the load.
● Maximum/minimum length levers
NOTE
The maximum/minimum length levers 16 are not intended to regularly stop the product. Always attempt to stop the product before it triggers one of these levers.
Minimum cable length lever
When the steel cable 14 is fully wound up, the minimum cable length lever 15 will be triggered. The steel cable cannot be wound up any further. It can only be unwound.
Maximum cable length lever
When the steel cable 14 is fully unwound, the maximum cable length lever 16 will be triggered. The steel cable cannot be unwound any further. It can only be wound up.
Emergency off switch
(Fig. J)
In case of an emergency, press the emergency off switch 7 to stop lifting or lowering operation.
The product is then locked. To unlock the product, turn the emergency off switch 7 slightly clockwise (in the direction of the arrow) until it pops out.
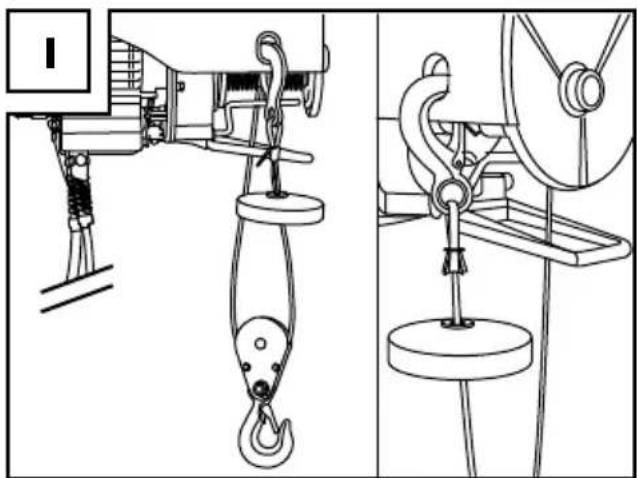
- Set-up as block and tackle
Setting up the product as a block and tackle distributes the load to 2 pulleys. This allows twice the weight to be lifted. However, the maximum lifting height and speed are reduced by half.
Accessories
The following tools are needed for the safe and proper use of the block and tackle function:
2 spanners (8 mm)
2 spanners (13 mm)

WARNING
Do not use any accessories not recommended by Parkside.
Fasten the hod ^12 to the intended mounting opening ^18 . The steel cable ^14 now forms a loop (Fig. C).
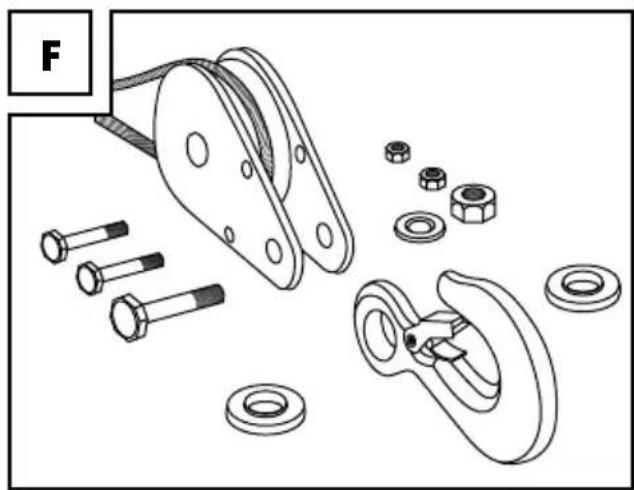
Dismantle the pulldyl of the extra hook: Remove the 3 screws (Fig. F).
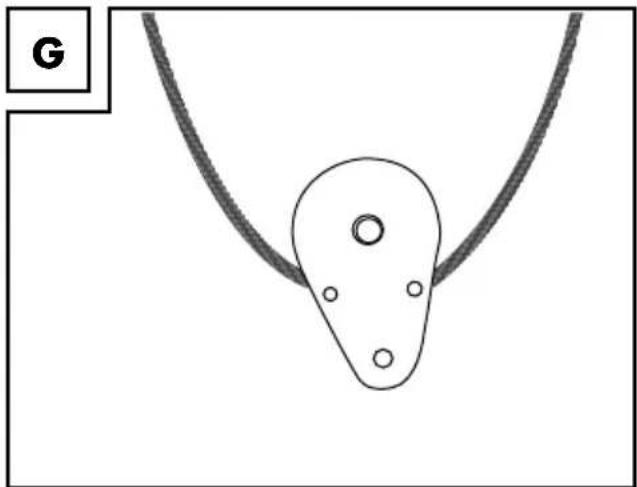
- Hang the pulley in the loop formed by the steel cable 14 (Fig. G).
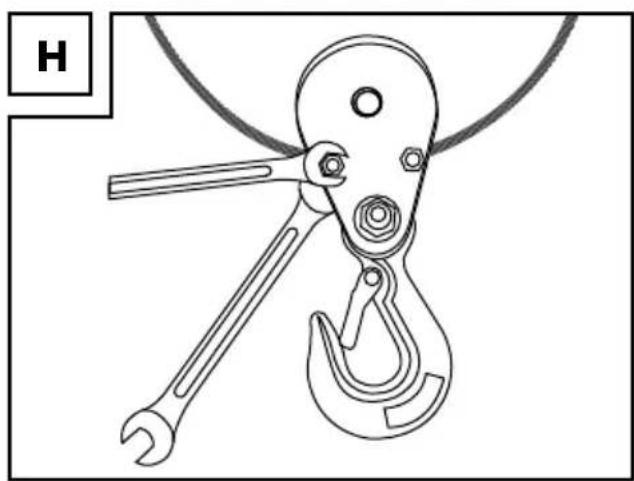
Attach the screws and the extra hod to the pulley 11 Fasten the 3 screws (Fig. H).
The block and tackle is now operational (Fig. 1).

Cleaning and care

WARNING!
Disconnect the device from the power supply before inspections, maintenance or cleaning!

Cleaning
- Ensure that no water enters the product interior.
- Regular, proper cleaning helps ensure safe operation and lengthens the service life of your product.
- Clean the product with a dry cloth. Use a soft brush for hard-to-reach areas.
NOTE
Do not use any chemical, alkaline, abrasive or otherwise aggressive cleaning or disinfecting agents to clean the product as they may damage its surfaces.

Maintenance
Test interval Procedure
| Before each use Check whether the emergency off switch 7 and control switch 8 are properly functioning. |
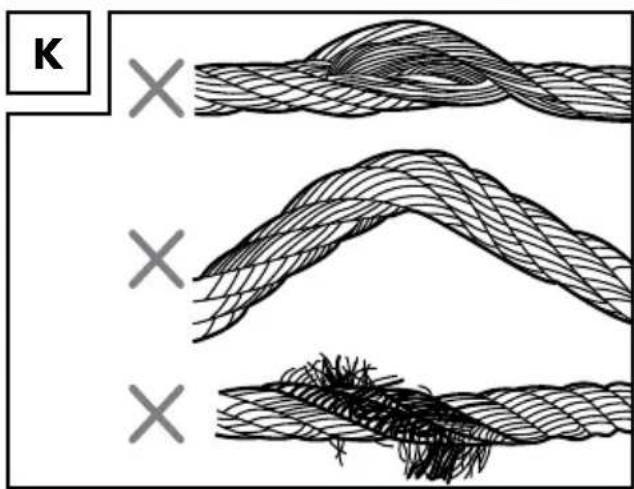
| Every 30 cycles* | Check the entire steel cable 14 for damages (Fig. K). Replace the steel cable if damaged (available at specialist retailers). |
| Every 100 cycles* | Check to ensure the maximum/minimum length levers 15 16 are fully functional without load. |
| Every 200 cycles* | Lubricate the steel cable 14 and the pulley 11. |
| Every 800 cycles* | Make sure all screws are securely fastened. Check the entire product for signs of wear. |
* One cycle corresponds to one upward and downward movement of a load.

Repairs
There are no parts in the product interior that can be repaired by the user. Contact a qualified professional to have the product checked and repaired.
Storage
■ Clean the product as described above.
■ Store the product and its accessories in a dark, dry, frost-free and well-ventilated location.
- Store the product at a location out of the reach of children. The ideal temperature for long-term storage is between +5 and +30 °C.
■ Store the product in its original packaging.
● Disposal
The packaging is made entirely of recyclable materials, which you may dispose of at local recycling facilities.
Observe the marking of the packaging materials for waste separation, which are marked with abbreviations (a) and numbers (b) with following meaning: 1 - 7: plastics / 20 - 22: paper and fibreboard / 80 - 98: composite materials.

The product and packaging materials are recyclable, dispose of it separately for better waste treatment.
The Triman logo is valid in France only.
Contact your local refuse disposal authority for more details of how to dispose of your worn-out product.
To help protect the environment, please dispose of the product properly when it has reached the end of its useful life and not in the household waste. Information on collection points and their opening hours can be obtained from your local authority.
Warranty
The product has been manufactured to strict quality guidelines and meticulously examined before delivery. In the event of product defects you have legal rights against the retailer of this product. Your legal rights are not limited in any way by our warranty detailed below.
The warranty for this product is 3 years from the date of purchase. Should this product show any fault in materials or manufacture within 3 years from the date of purchase, we will repair or replace it - at our choice - free of charge to you.
The warranty period begins on the date of purchase. Please keep the original sales receipt in a safe location. This document is required as your proof of purchase. This warranty becomes void if the product has been damaged, or used or maintained improperly.
The warranty applies to defects in material or manufacture. This warranty does not cover product parts subject to normal wear, thus possibly considered consumables (e.g. batteries) or for damage to fragile parts, e.g. switches, rechargeable batteries or glass parts.
Warranty claim procedure
To ensure quick processing of your case, please observe the following instructions:
Please have the till receipt and the item number (e.g. IAN 123456_7890) available as proof of purchase.
You will find the item number on the type plate, an engraving on the front page of the instructions (bottom left), or as a sticker on the rear or bottom of the appliance.
If functional or other defects occur, please contact the service department listed either by telephone or by e-mail.
You can return a defective product to us free of charge to the service address that will be provided to you. Ensure that you enclose the proof of purchase (till receipt) and information about what the defect is and when it occurred.
Service
GB
Service Great Britain
Tel.: 0800 404 7657
E-Mail: owim@lidl.co.uk
IE
Service Ireland
Tel.: 1890 930 034
(0,08 EUR/Min., (peak))
(0,06 EUR/Min., (off peak))
E-Mail: owim@lidl.ie
CE
B x
| IAN: | 320662 |
| Product identification: | Rope Hoist |
| Model Number: | HG05656 |
The object of the declaration described above is in conformity with the relevant Community harmonisation legislation:
| Directive 2006/42/EC |
| Directive 2014/30/EU |
| Directive 2011/65/EU |
References to the relevant harmonised standards used or references to the specifications in relation to which conformity is declared:
| N° / Parts |
| Directive 2006/42/EC |
| EN 14492-2:2006+A1 |
| EN 14492-2+A1/AC:2010 |
| EN 60204-32:2008 |
| Directive 2014/30/EU |
| EN 61000-3-2:2014 |
| EN 61000-3-3:2013 |
| Directive 2011/65/EU |
| EN 50581:2012 |
Additional information · Further related standards:
| N° / Parts |
| EN 55014-1:2006+A1+A2 |
| EN 55014-2:2015 |
Name and address of the manufacturer:
This declaration of conformity is issued under the sole responsibility of the manufacturer.
Original declaration of conformity

IAN: 320662
DEKLARACJA ZGODNOŚCI WE
IAN: 320662

