
Aroma 750 TSA4012 - Coffee machine Teesa - Free user manual and instructions
Find the device manual for free Aroma 750 TSA4012 Teesa in PDF.

| Product type | Automatic coffee machine with built-in grinder |
| Brand | Teesa |
| Model | Aroma 750 TSA4012 |
| Dimensions (L x W x H) | 460 x 240 x 340 mm |
| Weight | 9 kg |
| Power supply | 220-240 V ~ 50 Hz, 1450 W |
| Water tank capacity | 1.8 L |
| Bean hopper capacity | 200 g |
| Pump pressure | 19 bar |
| Grinder type | Steel grinder |
| Adjustable dispensing height | 75 - 130 mm |
| Power cable length | 95 cm |
| Display screen | Touchscreen LCD |
| Main functions | Espresso, double espresso, coffee, double coffee, hot water, milk frother, ground coffee, automatic cleaning, descaling reminder |
| Customizable settings | Volume (30-250 ml), strength (7-12 g), temperature (75-95 °C), grind level |
| Auto shut-off | Yes (adjustable: off, 0.5 h, 4 h, 8 h) |
| Removable brew group | Yes |
| Removable coffee grounds container | Yes |
| Included accessories | Spoon for ground coffee, cleaning brush |
| Maintenance and cleaning | Manual cleaning of removable parts, periodic descaling and degreasing recommended |
| Safety | Auto shut-off, overheating protection, shut-off when tank empty, burn hazard warnings |
| Repairability | Only an authorized service center can repair the device; no user repairs |
Frequently Asked Questions - Aroma 750 TSA4012 Teesa
User questions about Aroma 750 TSA4012 Teesa
0 question about this device. Answer the ones you know or ask your own.
Ask a new question about this device
Download the instructions for your Coffee machine in PDF format for free! Find your manual Aroma 750 TSA4012 - Teesa and take your electronic device back in hand. On this page are published all the documents necessary for the use of your device. Aroma 750 TSA4012 by Teesa.
USER MANUAL Aroma 750 TSA4012 Teesa
Automatic coffee machine with grinder
AROMA 750
TSA4012
Návod k obsluze
Bedienungsanleitung
Owner's manual
| CS DE EN FR | |||
| Zásobník na zmkovou kávu | Kaffeebohnenbehälter Bean coffee container | Réservoir a café en grains | |
| Přívod mleté kávy | Einfüllloch für Kaffeepulver | Ground coffee inlet Entrée de café moulu | |
| Zásobník na vodu Wasserbehälter Water tank Réservoir d'eau | |||
| Ohřivaci deska na šálky | Tassen-Wärmeplatte | Cup warming tray | Plaque chauffante pour les tasses |
| Dotyková obrazovka/ovládaci panel | Touch Screen/Kontrollpaneel | Touch screen/control panel | Écran tactile/panneau de commande |
| Napěňovač mléka Milchschaumer Milk frother Mousseur de lait | |||
| Výpustí kávy Kaffeeduse | Coffee spout | Sortie de café | |
| Odkapávací miska | Auffangschale | Drip tray | Égouttoir |
| Boční dvírka | Seitentüre | Side door | Porte latérale |
| Vypinač | EIN/AUS Schalter [ON/OFF] | ON/OFF switch | Interrupteur |
natural_image
3D cutaway view of a mechanical device showing internal components and housing (no text or symbols visible)Thank you for purchasing TEESA appliance. Read this instruction manual and keep it for future reference. Producer does not take responsibility for damages caused by inappropriate handling and use of the product.
SAFETY INSTRUCTIONS
In order to reduce the risk of injuries or damages, follow basic safety precautions applied when using any electrical device, including the following:
- Read the entire instruction manual before you start installation and assembly and keep it for future reference. Keep the manual for future reference.
- Before connecting the device to power supply socket, make sure the voltage indicated on the device corresponds to the voltage in the power supply socket.
- Appliance for household use only.
- Clean and store this appliance in accordance to instructions listed in "Cleaning" section.
- ALWAYS turn off the device and disconnect it from the mains supply:
- if it's not operating correctly
• If there's an uncommon voice when using
• before disassembling the device
- before cleaning
- when not in use
- When you disconnect the power cord of the device, grasp and pull the plug, not the cord/cable.
- Do not turn on the device if the water tank is empty.
- Danger of scalding! Never direct the jet of hot steam or water towards yourself or other people!
-
To operate the coffee machine always use handles or knobs.
-
Do not touch the coffee machine when it is working as this brings the risk of burning
-
When hot water is being generated from the nozzles keep your body at the distance from the coffee machine to prevent scorch.
-
Keep the device out of the reach of children.
- This appliance may be used by children who are above 8 years old and by persons with reduced physical, sensory or mental capabilities, or lack of experience and knowledge, if they are supervised and guided by a person who is responsible for their safety in a cautious manner for all the safety precautions being understood and followed. Children should be supervised to ensure that they do not play with the appliance. Children should not perform cleaning and servicing of the device unsupervised.
- Fixed power cable may only be replaced in an authorized service point.
-
Keep the device and its cord/cable away from heat, water, moisture, sharp edges and any other factor which may damage the appliance or its cord.
-
Make sure the power cord does not touch any hot or sharp elements.
- Do not use the product for purposes different from displayed in this operating manual.
- Do not place the appliance in water or any liquid; nor handle/use it with wet or moist hands.
- Do not leave the appliance unattended when it's working.
- ALWAYS disconnect the product form the power mains when it is not in use.
- DO NOT use this device if the cord or the plug is damaged, or the appliance is broken.
- Do not attempt to repair this device yourself. Only authorized and qualified personnel may repair this device. Never disassemble this device.
- Use only authorized accessories.
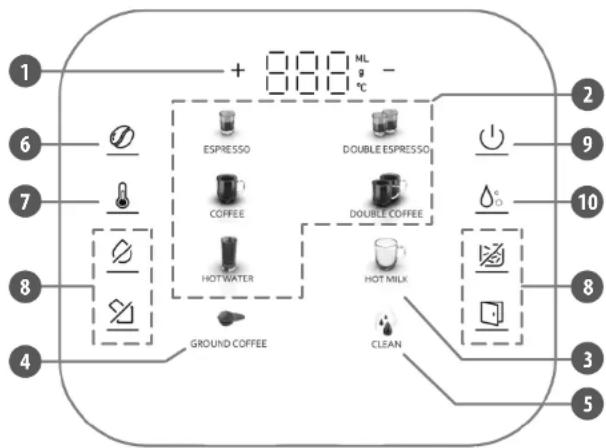
TOUCH SCREEN/CONTROL PANEL BEFORE FIRST USE
flowchart
graph TD
    A["1"] --> B["+ 800 ML °C"]
    C["2"] --> D["2 ESPRESSO"]
    E["3"] --> F["DOUBLE ESPRESSO"]
    G["4"] --> H["COFFEE"]
    I["5"] --> J["DOUTLE COFFEE"]
    K["6"] --> L["HOT WATER"]
    M["7"] --> N["HOT MILK"]
    O["8"] --> P["GROUND COFFEE"]
    Q["9"] --> R["CAUTION"]
    S["10"] --> T["COFFEE"]
    U["11"] --> V["HOT WATER"]
    W["12"] --> X["HOT MILK"]
    Y["13"] --> Z["CLEAN"]
- Display
- Beverage icon*
- Milk frohing
- Ground coffee function
- Clean function
- Coffee strength
- Coffee temperature
- Warning icons
- ON/OFF
- Coffee quantity
* Available beverages are: espresso, double espresso, coffee, double coffee, hot water.
I Locate the coffee machine:
• out of the reach of children,
• away from water and heat sources,
• on a stable and flat surface,
• in a place with sufficient air circulation,
- near the power mains socket.
II Make sure the brew unit is locked, waste container and drip tray is in right position.
III Fill the water tank:
• To fill the water tank, use only fresh, non-sparkling water. Never fill in other liquid.
- Do not use warm or hot water as this may damage the device.
- Do not exceed MAX marking on the water tank.
- Do not turn on the device if the water tank is empty.
- When the 📄 on appears on the screen, brewing coffee is no longer possible. You must refill the water tank first.
1. Open the water tank cover.
2. Grab the handle of the water tank and pull it out.
3. Fill the water tank with clean, fresh water. Do not exceed the MAX level.
4. Correctly reassemble the water tank back into place.
5. Close the water tank cover.
IV Fill the bean coffee container:
- Open the bean coffee container cover.
- Fill in at least 30 g of bean coffee in the container.
- Replace the cover.
Notes:
• Make sure the bean coffee container is always full.
- Do not overfill the bean coffee container to avoid damage to the grinder.
- Do not fill in any other type of coffee or liquid to the bean coffee container.
CONNECTION
- Connect the plug to the power outlet.
- Set the ON/OFF switch to the I position. The 🎨icon on the screen lights up and the appliance enters standby mode. Tap the 🔊icon to turn on the appliance.
- The appliance will start self-cleaning (it may take up few seconds). When all the icons on the display light up, the appliance is ready to be used. Note: Do not interrupt or open the side door during the self-cleaning.
BREWING COFFEE FROM BEAN COFFEE
- To make coffee, tap one of the beverage icons on the control panel.
- After selecting the desired beverage, you can adjust it to your preferences. Use the +/- icons on the control panel to adjust:
- coffee strength (7 - 12 g)
• coffee quantity (30 - 250 ml) - with the knob inside the bean coffee container adjust the grinding level (it should be adjusted only when the grinder is working).
- The icon of the selected beverage flashes while the coffee is being dispensed.
- You can stop the process any time by tapping the icon of the previously selected beverage.
FROTHING MILK
CAUTION Danger of scalding! Small jets of water may come out of the spout. The spout can become hot. Do not touch it directly with bare hands!
- Tap the Hot milk icon. It starts flashing what indicates that the appliance is heating to the steam temperature. When the icon stops flashing and keeps light on, it means that the steam is ready.
- Place a pitcher filled with milk under the milk frother.
- Tap the Hot milk icon again.
- Countdown starts on the display. Steam will be generated for 120 seconds and then it will automatically stop.
- If you want to stop frothing earlier, tap the Hot milk icon.
Note: When frothing is finished, it is recommended to make a short steaming again to push out the remaining milk inside the milk frother. Then use a clean cloth to scrub of the milk on the surface of the milk frother. - When finished frothing, tap the coffee quantity icon so that the coffee machine will automatically cool down to the coffee making temperature. During this process steam is being generated from the milk frother and seven icons on the control panel flash. When they stop flashing, the appliance is ready to use.
Note: During this process, coffee machine issues regular low sounds. This is normal and will stop as soon as the appliance cools down.
BREWING COFFEE FROM GROUND COFFEE
- Tap the Ground coffee icon on the control panel. The Espresso and Coffee icons light up. The appliance enters ground coffee mode.
- Remove the bean coffee container cover and then the ground coffee inlet cover. Add one teaspoon of ground coffee to the ground coffee inlet which is inside the bean container. Replace both covers.
-
Tap the icon of the desired beverage (espresso or coffee). After selecting the desired beverage, you can use the +/- icons on the control panel to adjust its quantity.
-
The icon of the selected beverage flashes while the coffee is being dispensed.
- You can stop the process any time by tapping the icon of the selected beverage.
Notes:
- The brew unit will return to the original position automatically after cleaning. Do not operate any step until the process is completed.
• Use only ground coffee. Do not use instant coffee or bean coffee.
• Fill in maximally 12 g of ground coffee to the inlet.
DISPENSING HOT WATER
- Tap the Hot water icon.
- Countdown starts on the display. Hot water will be dispensed from the milk frother for 60 seconds and then it will automatically stop.
- The Hot water icon flashes while water is being dispensed
- If you want to stop earlier, tap the Hot water icon.
AUTOMATIC CLEANING
- Tap the Clean icon on the control panel to start cleaning. The icon flashes.
- When the icon stops flashing, the cleaning process is finished.
COFFEE SETTINGS
- Coffee strength: Tap the coffee strength icon on the control panel. The display will show current coffee strength setting. Use the +/- to adjust. The range is 7 - 12 g. Tap the same icon again to confirm settings and return to the main screen.
- Coffee temperature: Tap the coffee temperature icon on the control panel. The display will show current temperature setting. Use the +/- to adjust. The range is 75 - 95°. Tap the same icon again to confirm settings and return to the main screen.
- Coffee quantity: Tap the coffee quantity icon on the control panel. Select desired beverage. The display will show current coffee quantity setting for that beverage. Use the +/- to adjust. The range is 30 - 250 ml. Tap the same icon again to confirm settings and return to the main screen.
- Grinding level: There is a knob inside the bean coffee container for grinding level adjustment:
- Turn it anticlockwise to get finer grind and consequently stronger coffee.
- Turn it clockwise to get coarser grind and consequently weaker coffee.
Notes:
- Adjust the grinding level only when the grinder is working.
- Changing the grinding level setting will take effect from the third cup.
32 33 Owner's manual Owner's manual
reesa
RESTORING FACTORY SETTINGS
- When the appliance is on, tap and hold the Ground coffee and Clean icon for about 5 seconds.
- The display and side icons flash for 2 seconds, then the appliance returns to the main screen. Factory settings have been restored and the appliance is ready to use.
AUTO SHUT OFF
- When the appliance is on, tap and hold the Hot water and Hot milk icon. The appliance will enter auto shut off menu.
- Tap the +/- icons to adjust. Available options are: OFF, 0,5 hour, 4 hours, 8 hours (set to 0,5 h by default).
- Tap the ON/OFF icon to confirm settings and return to the main screen.
POWER OFF
Tap and hold the ON/OFF Icon on the control panel for a second. The appliance will turn off and enter standby mode after a self-cleaning process.
DESCALING REMINDER
EN
The appliance has a function of descaling reminder. To set follow the below instructions:
- Tap and hold the Clean and Hot milk icon for more than 5 seconds. The appliance will enter descaling reminder menu.
- Tap the +/- icons to adjust. Available options are: OFF, 20 |, 50 |, 100 |, 200 | (set to 20 | by default).
- Tap the ON/OFF icon to confirm settings and return to the main screen.
When the set value is reached, all icons on the control panel flash. Tap any icon to start descaling (the process is described in the „Descaling” section below).
DESCALING (30 MINUTES)
Prior to descaling:
• make sure that the water tank is filled with water,
- put a vessel under the milk frother and coffee spout that is large enough to hold dispensed water (empty the vessel regularly during descaling).
- Add Teesa descaler* into the water tank.
- Tap and hold the Clean icon for about 5 seconds to start the process. CLE on the display and the ON/OFF icon start flashing.
-
The appliance will pump water: 30 ml from the brewer and 30 ml from the milk frother, then stop for approximately 2 minutes and finish 9 rounds. During this process, CLE on the display and the ON/OFF icon flash.
-
When warning icon appears on the screen, pour fresh water to the water tank then reassemble it.
- All icons on the screen flash. Tap the Espresso icon.
- The appliance will pump clean water: 200 ml from the brewer and 200 ml from the milk frother, then the descaling will finish automatically. The appliance returns to the main screen.
* Teesa descaler (TSA0010) is available for purchase online at www.teesa.pl or www.rebelelectro.com. You can also use another descaling agent for coffee machine descaling. Follow the instructions provided by the producer of the descaler on how to use it.
Note: You can exit the descaling process by tapping the ON/OFF icon.
BREW UNIT
How to take out:
- Open the side door. Take out the waste container and tray which is placed under the brew unit.
- Hold the handle of the brew unit and press down the lever above the handle with your thumb. Now it is possible to take out the brew unit.
How to replace:
- Hold the handle of the brew unit with the lever pressed down and slide the brew unit back into the appliance.
- Reinsert the waste container and tray. Close the side door.
How to reset brew unit position:
When the brew unit is blocked in the middle position, it cannot be disassembled from the appliance and the warning icon shows brew unit missing, keep tapping the icon for 3 seconds. The brew unit will automatically return to its original position.
CLEANING AND MAINTENANCE
Notes:
- Before cleaning make sure the appliance is switched off, disconnected from power outlet and that it has cooled down.
• Before reassembly make sure all parts are dry.
• Non of the parts is dishwasher safe. Clean by hand only.
Bean coffee container: It is recommended to clean the bean coffee container prior to each refilling. When the bean coffee container is empty, clean it with a soft and dry cloth.
Ground coffee inlet: Any coffee residues can be wiped off with a soft brush.
Coffee spout: Clean it with a soft and slightly damp cloth.
EN
34 35 Owner's manual Owner's manual
Milk frother: Remove the metal part and rinse it under running water. Wipe it dry and reassemble. Clean the milk frother after each use with a soft, slightly damp cloth.
Water tank: Rinse it under running water and refill with fresh water daily.
Waste container and tray (behind the side door): Dispose of used coffee when the warning icon appears on the control panel. Rinse the waste container and the tray under running water then wipe them dry with soft and dry cloth.
Drip tray: Empty the drip tray daily or when the red indicator pops up through the drip tray. Rinse it under running water then wipe it dry with soft and dry cloth.
Brew unit: Rinse it under running water every two weeks and let it air dry. Do not use any cloths to dry the brew unit to prevent fibers from collecting inside the brew unit.
Housing: Clean the housing of the coffee machine with a slightly damp and soft cloth. Do not use any abrasives or chemical agents.
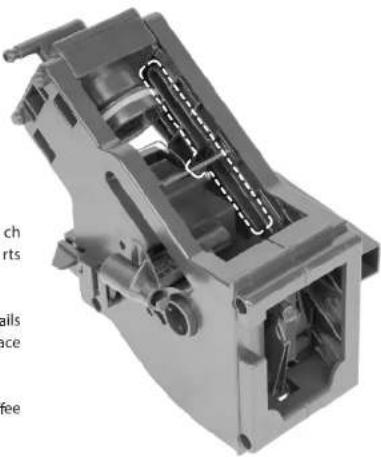
LUBRICATING THE BREW UNIT
EN
Lubricate the brew unit after each cleaning to ensure the moving parts continue to move smoothly.
Apply a thin layer of grease ^® to the rails on both sides in the designated place as shown on the picture.
* Use only dedicated grease for coffee machines.
natural_image
3D cutaway view of a mechanical device showing internal components and mounting holes (no text or symbols visible)reesa
DEGREASING THE BREW UNIT
Note: It is recommended to degrease the appliance once a month.
- Make sure the appliance is on and the water tank is full.
- Put a degreasing tablet ^4 into the ground coffee inlet.
- Tap and hold the Clean Icon for about 5 seconds to start the descaling process.
- Degreasing is similar to the descaling therefore to degrease the appliance, follow the instructions in the "Descaling" section (points 3-6).
* Use only coffee oil remover tablets for brew units available on the market (such as PHILIPS Saeco CA6704/10).
WARNING ICONS
| Icon | Problem | Solution |
| Water shortage | Add water to the water tank or reset the position of the water tank | |
| Water circuit is plugged | Make sure the water tank is full, then tap theto recheck or turn on the appliance again | |
| For the new coffee machine, restart the appliance with the ON/OFF switch 2 or 3 times | ||
| For the coffee machine that has been used for a period of time, it has to be descaled or checked in the authorized service point | ||
| Brew unit missing | Make sure the brew unit is in right position, slid maximally into the coffee machine | |
| Waste container is full | Empty the waste container | |
| Side door is open | Close the door |
EN
SPECIFICATION
Functions
LCD touch screen
Ground coffee function
Milk frother
Hot water function
Preparing two cups simultaneously
Cup warmer
Memory of last setting
Automatic cleaning
Descaling reminder
Removable water tank
Removable brewing unit
Auto shut off
Anti-slip feet
Technical data
Grinder type: stainless steel
Pump pressure: 19 bar
Water tank capacity: 1,8 l
Bean coffee container capacity: 200 g
Adjustable coffee spout height: 75 – 130 mm
Maximum power: 1450 W
Power supply: 220 - 240 V \~ 50 Hz
In set: ground coffee spoon, cleaning brush
Physical parameters
Weight: 9 kg
Dimensions: 460 x 240 x 340 mm
Cable length: 95 cm
Customization
Coffee volume control: 30 – 250 ml
Coffee strength adjustment: 7 - 12 g
Coffee temperature adjustment: 75 – 95°C
Grinding level adjustment

English
Correct Disposal of This Product
(Waste Electrical & Electronic Equipment)


(Applicable in the European Union and other European countries with separate collection systems) This marking shown on the product or its literature, indicates that it should not be disposed with other household wastes at the end of its working life. To prevent possible harm to the environment or human health from uncontrolled waste disposal, please separate this from other types of wastes and recycle it responsibly to promote the sustainable reuse of material resources. Household users should contact either the retailer where they purchased this product, or their local government office, for details of where and how they can take this item for environmentally safe recycling. Business users should contact their supplier and check the terms and conditions of the purchase contract. This product should not be mixed with other commercial wastes for disposal.
Made in China for Lechpol Electronics Leszek Sp.k., ul. Garwolińska 1, 08-400 Miętne.
flowchart
graph TD
    A["Ground COFFEE"] --> B["HOT WATER"]
    B --> C["COFFEE"]
    C --> D["DOUBLE ESPRESSO"]
    D --> E["EXPRESSO"]
    E --> F["DOUBLE ESPRESSO"]
    F --> G["DOUBLE COFFEE"]
    G --> H["HOT MILK"]
    H --> I["CLEAN"]
    I --> J["COFFEE"]
    J --> K["EXPRESSO"]
    K --> L["+ 800 mL °C -"]
natural_image
3D cutaway view of a mechanical device with internal components and no visible text or symbolsONTKALKINGSHERINNERING
NL
ONTKALKEN (30 MINUTEN)
natural_image
3D cutaway view of a mechanical device showing internal components and housing (no text or symbols visible)SMERING VAN DE ZETEENHEID
SPECIFICATIEWAARSCHUWINGSPICTOGRAN
Functions
LCD-touchscreen
natural_image
3D cutaway view of a mechanical device showing internal components and housing (no text or symbols visible)ODTŁUSZCZANIE JEDNOSTKI ZAPARZAJĄCEJ
flowchart
graph TD
    A["1: Raw Material Input"] --> B["2: Espresso"]
    B --> C["3: Double Espresso"]
    C --> D["4: Ground Coffee"]
    D --> E["5: Clean"]
    E --> F["6: Beverage"]
    F --> G["7: Beverage"]
    G --> H["8: Beverage"]
    H --> I["9: Power Supply"]
    I --> J["10: Beverage"]
    J --> K["11: Beverage"]
    K --> L["12: Beverage"]
    L --> M["13: Beverage"]
    M --> N["14: Beverage"]
    N --> O["15: Beverage"]
    O --> P["16: Beverage"]
    P --> Q["17: Beverage"]
    Q --> R["18: Beverage"]
    R --> S["19: Beverage"]
    S --> T["20: Beverage"]
natural_image
3D cutaway view of a mechanical device showing internal components and housing (no text or symbols visible)DEGRESAREA UNITĂȚII DE PREPARARE
natural_image
3D cutaway view of a mechanical device showing internal components and housing (no text or symbols visible)ODMASTENIE SPAROVACEJ JEDNOTKY

- Automatic coffee machine with grinder
- AROMA 750
- TSA4012
- SAFETY INSTRUCTIONS
- In order to reduce the risk of injuries or damages, follow basic safety precautions applied when using any electrical device, including the following:
- TOUCH SCREEN/CONTROL PANEL BEFORE FIRST USE
- I Locate the coffee machine:
- II Make sure the brew unit is locked, waste container and drip tray is in right position.
- III Fill the water tank:
- IV Fill the bean coffee container:
- CONNECTION
- BREWING COFFEE FROM BEAN COFFEE
- FROTHING MILK
- BREWING COFFEE FROM GROUND COFFEE
- Notes:
- DISPENSING HOT WATER
- AUTOMATIC CLEANING
- COFFEE SETTINGS
- 33 Owner's manual Owner's manual
- reesa
- RESTORING FACTORY SETTINGS
- AUTO SHUT OFF
- POWER OFF
- DESCALING REMINDER
- EN
- DESCALING (30 MINUTES)
- BREW UNIT
- CLEANING AND MAINTENANCE
- 35 Owner's manual Owner's manual
- DEGREASING THE BREW UNIT
- SPECIFICATION
- Functions
- Technical data
- Physical parameters
- Customization
- English
- ONTKALKINGSHERINNERING
- NL
- ONTKALKEN (30 MINUTEN)
- SMERING VAN DE ZETEENHEID
- SPECIFICATIEWAARSCHUWINGSPICTOGRAN
- ODTŁUSZCZANIE JEDNOSTKI ZAPARZAJĄCEJ
- DEGRESAREA UNITĂȚII DE PREPARARE
- ODMASTENIE SPAROVACEJ JEDNOTKY
Brand : Teesa
Model : Aroma 750 TSA4012
Category : Coffee machine