TO 9579 - Oven SEVERIN - Free user manual and instructions
Find the device manual for free TO 9579 SEVERIN in PDF.

User questions about TO 9579 SEVERIN
0 question about this device. Answer the ones you know or ask your own.
Ask a new question about this device
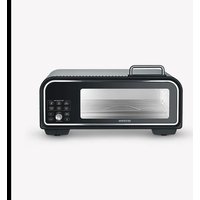
Download the instructions for your Oven in PDF format for free! Find your manual TO 9579 - SEVERIN and take your electronic device back in hand. On this page are published all the documents necessary for the use of your device. TO 9579 by SEVERIN.
USER MANUAL TO 9579 SEVERIN
natural_image
Line drawing of a microwave oven with control panel and side panels (no text or symbols)Art.-No. TO 2077
Instruction manual 21
Mode d'emploi 39
text_image
MANUAL www.severin.com3 Toastofen

text_image
D A B C D E F G H I Inatural_image
Simple line drawing of a woven basket with handles (no text or symbols)Frittierrost
natural_image
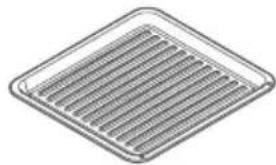
Simple line drawing of a rectangular tray with horizontal slats (no text or symbols)Backblech
natural_image
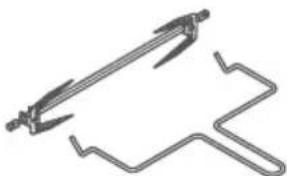
Pure mechanical tool diagram without any text, numbers, or symbolsSpieß mit Handgriff
natural_image
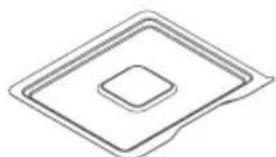
Simple line drawing of a square recess with concentric rings (no text or symbols)Krümelblech
text_image
n 888 °CMin 88:88 a Custom b A/R FRY OVEN defghijklmnatural_image
Diagram of a computer chassis showing internal components and a highlighted area with an arrow (no text or symbols present)Pre-set Zeit Temperatur
Pre-set Zeit Temperatur
text_image
Technical diagram showing mechanical assembly with labeled component '1' and directional arrow indicating motion
text_image
Technical diagram showing a mechanical assembly with labeled components and a checkmark indicating inspection or approval.1 About this manual 22
General information 22
Relevant documents....22
Warning notices 22
2 Scope of supply 23
3 Toaster oven....24
4 Accessory 25
5 Control panel....26
6 Before the first use....27
Unpacking 27
Cleaning....27
Installation....27
First use....28
7 Operation....29
8 Preset programmes....32
Air fry programmes 32
Oven programmes 32
9 Spit roasting.... 33
10 Toasting 34
11 Dry 35
12 Cleaning....36
13 Recommendations 36
14 FAQ....37
15 Disposal....38
16 Technical Data.... 38
1 About this manual
General information
These instructions are an integral part of the appliance.
Read them carefully before setting up, installing and using the appliance and keep them for future reference.
▶ Pass them on to any subsequent owner or user of the product.
The appliance must only be used by those familiar with the instructions below.
Relevant documents
- Quick start guide
- Safety manual (Safety)
- Warranty declaration (Warranty)
Warning notices

Signal word
Type, source and consequences of the hazard
▶ Measures to avoid the hazard.
Signal word Description
| Danger Imminently | hazardous situation which, if not avoided, will result in death or serious injury. |
| Warning Potentially | hazardous situation which, if not avoided, could result in death or serious injury. |
| Caution Potentially | hazardous situation which, if not avoided, could result in minor injury. |
| Note Potentially hazardous situation which, if not avoided, can result in property damage. | |
text_image
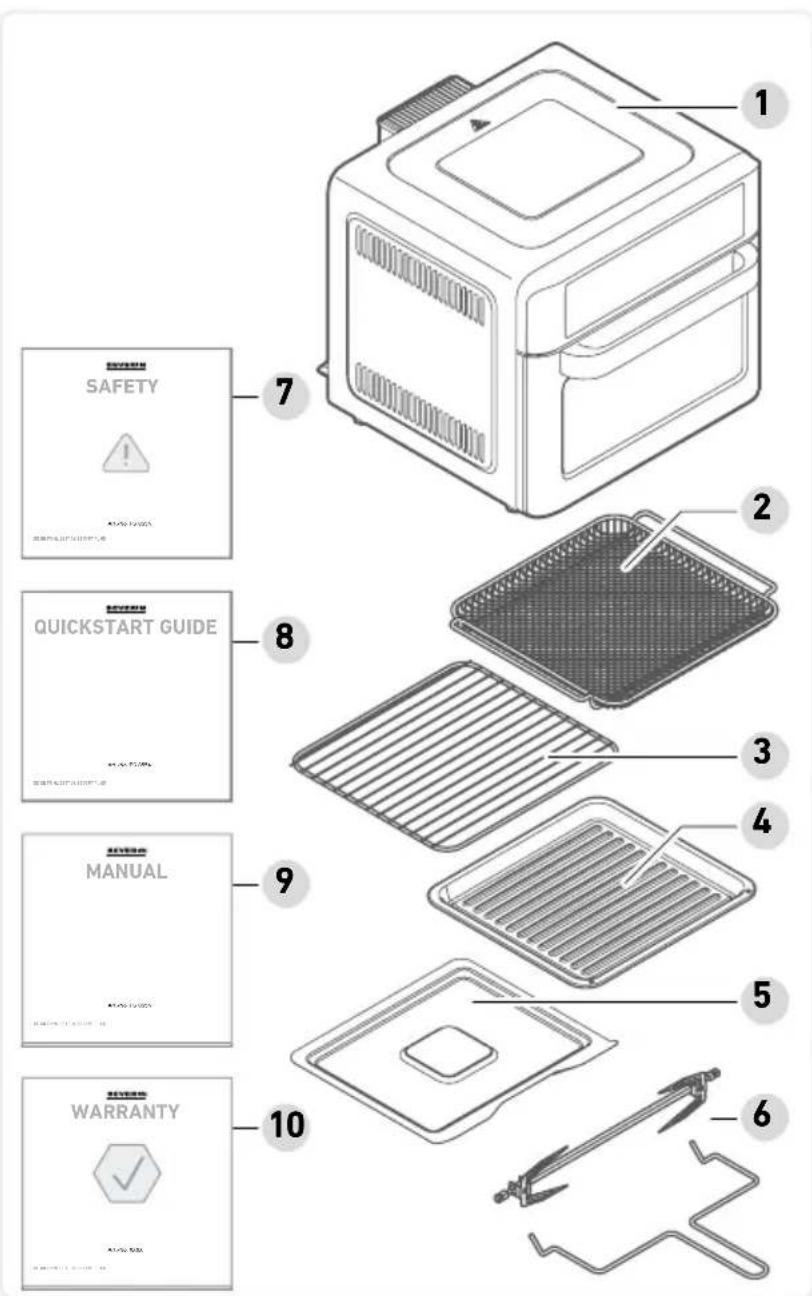
1 2 3 4 5 6 7 8 9 10 SAFETY QUICKSTART GUIDE MANUAL WARRANTY2 Scope of supply
1 Toaster oven
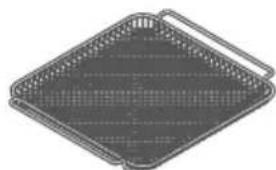
2 Frying rack
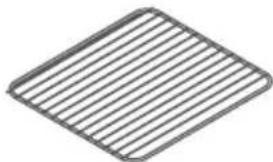
3 Grill rack
4 Baking tray
5 Crumb tray
6 Spit with grip
7 Safety instructions
8 Quick start guide
9 Instruction manual
10 Warranty declaration

text_image
MANUAL www.severin.com3 Toaster oven

text_image
D A B C D E F G H I IA Control panel with indicators and display
B Handle
C Viewing glass
D Vents
E Top rail
F Middle rail
G Bottom rail
H Heating rod
I Spit recesses
4 Accessory
natural_image
Simple line drawing of a woven basket with no text or symbolsFrying rack
It serves as a base for foods to be fried.
natural_image
Simple 3D wireframe diagram of a rectangular plate with horizontal lines, no text or symbols present.Grill rack
It is used for baking pizza or pastries and as a base for casserole or baking dishes.
natural_image
Isometric view of a square metal grate with uniform slats (no text or symbols)Baking tray
It serves as a base for foods to be baked or roasted.
natural_image
Pure mechanical tool diagram without any text, numbers, or symbolsSpit with grip
It is used for preparing large pieces of meat or a whole chicken, see page 33, Spit roasting.
natural_image
Simple line drawing of a square recess with concentric rings (no text or symbols)Crumb tray
It is used to catch crumbs or dripping fat and other liquids.
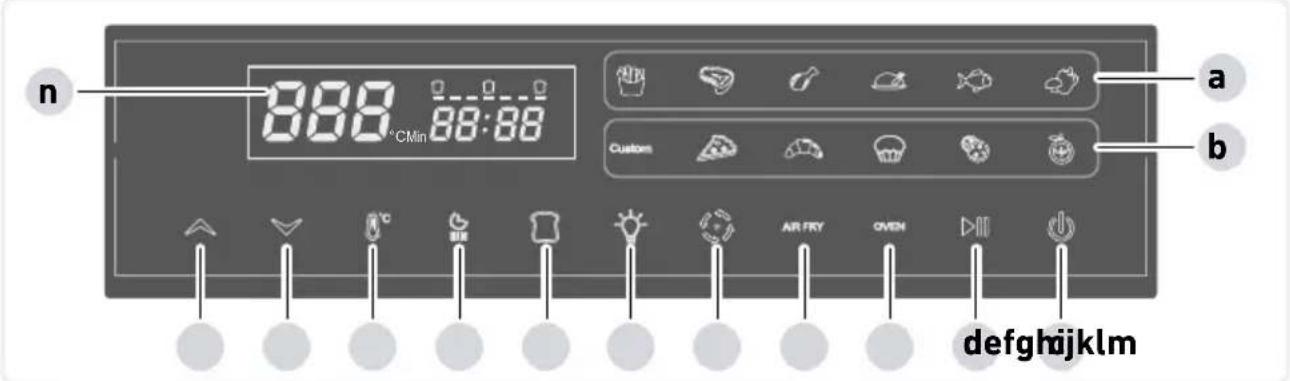
5 Control panel
text_image
n 888 °CMin 88:88 a Custom b °C AIR FRY OVEN defghijklma Display the preset air fry programmes
b Display the preset oven programmes
c Power button
d Start/Pause
e OVEN button (activate the oven programmes)
f AIR FRY button (activate the air fry programmes)
g Turn the rotating spit on and off
h Turn light on and off
i Activate the toast function
j Timer
k Setting the temperature
1 Decrease time and temperature
m Increase time and temperature
n Display
Each button press generates audible sounds.
To turn off the sounds, press and hold the ▼ and buttons for 3 seconds simultaneously.
To turn on the sounds, press the and buttons simultaneously.
Unpacking
- Remove all parts from the packaging.
- Remove all packaging material, protective film and stickers.
! Never remove the rating labels; they must remain on the appliance. - Check the scope of delivery for completeness and damage.
Cleaning
- Clean all accessories with warm soapy water and dry them.

Caution!
Risk of injury from electric shock and damage to the appliance.
▶ Do not immerse the appliance in water.
- Wipe the oven inside and outside with a damp cloth and dry it.
Installation
- Place the appliance on a flat, heat-resistant surface.
- Do not cover the appliance or place anything on it.
- The appliance must only be connected to a properly installed socket.
First use

Caution!
Risk of injury from slight build-up of smoke. Inhaling smoke can cause damage to your health.
▶ Open the windows or doors.
- Place the crumb tray in the oven.
- Plug the appliance into the socket.
- Switch on the appliance with the power button ⏻.
The chips programme is active, the corresponding symbol lights up. - Press the start button ▷II
- End the programme after about 10 minutes. To do this, press and hold the power button for 2 seconds.
- Allow the appliance to cool down.
7 Operation
▶ Set up the appliance in a suitable place, see page27tallation.

Caution!
Damage to the appliance due to soiling.
▶ Never use the appliance without the crumb tray in place.

natural_image
Diagram of a computer tower with an open panel and ventilation slots, showing internal components without any text or symbols.▶ Insert the crumb tray.
Plug the appliance into a suitable socket.
The power button ⏻ lights up, the rest of the control panel is dark.
If the start button ▷ is not pressed after selecting a programme, the appliance switches to standby mode after 1 minute.
Prepare the food and, if necessary, place it in the cooking chamber before switching the oven on.
▶ Switch on the appliance with the power button
The chips programme is active, the corresponding symbol lights up.
▶ Press the AIR FRY button AIR FRY
repeatedly until the desired programme lights up.

▶ Press the OVEN button to select oven programmes.

▶ Press the OVEN button until the desired programme lights up.
Overview, see page 32, Air fry programmes Overview, see page 32, Oven programmes

Caution!
Risk of injury from burns.
▶ Only use the handle to open and close the oven.
▶ Open the oven door.
Using suitable accessories (see page 25 Accessory), place the food into the top, middle or bottom rail.
▶ Close the oven door.
▶ Press the start button .
While the programme is running, you can press the pause button ▷ or turn on the light to check the cooking process.
Opening the door during cooking pauses the programme until you close the door.
The cooking process can be stopped at any time. Pressing and holding the power button ⏻ for 2 seconds ends the current programme.
After the programme has finished, a signal sounds and 00 flashes in the display. After a short while, the fan switches off, and the display goes out. All functions switch off, only the power button lights up.

Caution!
Risk of injury from burns.
▶ Only remove accessories and hot containers using oven mitts.
▶ Only hold the spit by the grip when removing it from the oven.
▶ Open the oven door and remove the food using oven mitts.
▶ Place the baking tray, other accessories or hot containers on a heat-resistant surface.
▶ Close the oven door.
▶ After you have finished preparing food, unplug the appliance.
▶ Allow the oven to cool down and clean it.
Custom function
Using the custom function, you can individually configure the temperature and cooking time.
▶ Prepare the food and place it in the cooking chamber using the appropriate accessories.
▶ Switch on the appliance using the power button.
Press the OVEN button. The Custom indicator lights up.
▶ Press the temperature button 8^ and use or to decrease or increase the temperature.
▶ Press the timer button ⚙ and use ▼ or ▲ to decrease or increase the time.
▶ Press the start button.
8 Preset programmes
Air fry programmes
By pressing the AIR FRY button, the following preset programmes can be selected:
Preset Time Temperature
 | Chips 20 min 220 °C |
 | Steak 10 min 220 °C |
 | Chicken (parts) 20 min 220 °C |
 | Chicken (whole) 40 min 220 °C |
 | Fish 18 min 180 °C |
 | Vegetables 17 min 160 °C |
Oven programmes
By pressing the OVEN button (e), the following preset programmes can be selected:
Preset Time Temperature
| Custom | Custom * | * see page 31, | Custom function | |
 | Pizza 15 min | 200 °C | ||
 | Bake 25 min | 180 °C | ||
 | Cake 23 min | 200 °C | ||
 | Cookies 12 min | 180 °C | ||
 | Dry | 4 hours | 65 °C | |
The actual cooking time and temperature may vary depending on the quantity or size of food.
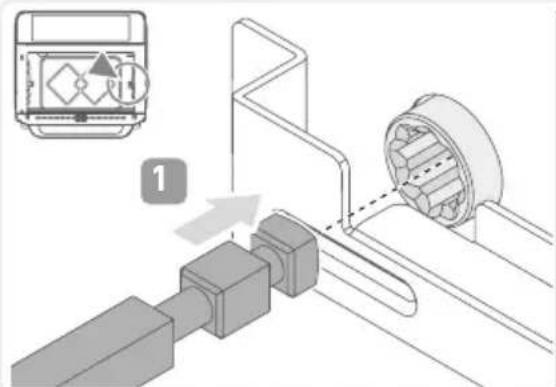
9 Spit roasting
Note Chapter 7 Operation.
Do not put too much food in the oven so that it can rotate freely.
▶ Spit the food and align it in the middle of the spit.
▶ Attach the forks to both sides of the spit to secure the food. Tighten the screws on the forks.
- Secure any protruding parts of the food with thread or toothpicks.
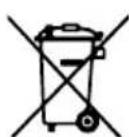
▶ Fit the spit into the dedicated recesses.
text_image
Technical diagram showing mechanical assembly with labeled component '1' and directional arrow indicating motion
text_image
Technical diagram showing a mechanical assembly with labeled components and a checkmark indicating inspection or validation.▶ Position the baking tray under the spit to catch any dripping fat.
▶ Close the oven door.
▶ Press the AIR FRY button AIR FRY repeatedly until the desired air fry programme is selected (see page 32, Oven programmes).
If the chicken programme is selected, the spit starts to rotate automatically. The symbol flashes. To switch off the rotation function, press the button.
▶ If necessary, adjust the temperature or cooking time manually (see page 31, Custom function).
▶ After the programme has finished, the spit stops rotating automatically.
▶ Open the oven door.
Remove the spit from the oven using the grip.
10 Toasting
Note Chapter 7 Operation.
Toast can be prepared both on the grill rack and the frying rack.
Place the toast on the rack.
Insert the rack in the bottom position and close the oven door.
▶ Activate the toast function by pressing the toast button
▶ Press the toast button ☐ repeatedly until the desired degree of browning is displayed.

text_image
200 °CMin 05:30▶ Press the start button .
▶ After the toast programme has finished, open the oven door and remove the rack with oven mitts.
Place the rack on a heat-resistant surface.
▶ Close the oven door.
11 Dry
Note Chapter 7 Operation.
▶ Cut fruit or vegetables into thin slices and place them on the frying rack.
Insert the frying rack into the middle rail.
▶ Switch on the appliance using the power button
▶ Press the OVEN button OVEN repeatedly until the button for the drying programme lights up.
▶ If necessary, adjust the temperature or cooking time manually (see page 31, Custom function).
▶ Press the start button.
▶ After the drying programme has finished, open the oven door and remove the rack with oven mitts.
Place the rack on a heat-resistant surface.
▶ Close the oven door.
12 Cleaning
The accessories are dishwasher safe, and all other parts of the appliance are not!
- Before each cleaning, unplug the appliance and let it cool down.
- Clean the appliance after each use.

Caution!
Risk of injury, damage to the appliance.
▶ Do not immerse the appliance in water.
- Remove the crumb tray for cleaning. Remove crumbs. Remove large amounts of fat with a paper towel. Clean with mild soapy water or in the dishwasher.
- Clean the accessories with mild soapy water or in the dishwasher. ! Do not use harsh or abrasive cleaning agents or oven spray.
- Clean the housing inside and outside with a slightly damp cloth.
- Dry all parts and store them in a clean, dry place.
13 Recommendations
- The time and temperature values of the preset programmes are only rough estimates. Adjust the time and temperature depending on the food or how browned you want it to be.
- When making chips from fresh potatoes, place the potato pieces in cold water for 30 minutes before cooking. The starch escapes, and chips become crispier.
- The drying function can be used when making yeast dough. Let 500 g yeast dough rise at 40 °C for about 20 minutes.

Warning!
Risk of injury from operating a faulty appliance. Operating a faulty appliance can lead to electric shock.
▶ Never use a faulty appliance.
▶ Do not attempt to repair the appliance yourself.
Contact our customer service in the event of a defect.
Before contacting our customer service, check the table below to see if you can rectify the problem yourself.
| Question / problem | Possible cause Solution | |
| Appliance will not switch on. | Appliance is not plugged in | Plug the appliance into the socket. |
| Food is not fully cooked. | Too much food in the cooking chamber | Fill in less food. |
| Cooking time is too short | Continue cooking food for a few minutes.If the preparation method is the same, increase the cooking time in the future. | |
| Temperature is too low | Continue cooking food for a few minutes.If the preparation method is the same, increase the temperature in the future. | |
| Food is not crispy. Food you are using is not suitable for the hot air fryer | Only use food that is suitable for the hot air fryer. | |
| Chips made from fresh potatoes are not crispy. | Not enough oil • Mix potato pieces with a tablespoon of oil before preparation. | |
| Potato pieces are too moist | • Pat potato pieces dry before preparation. | |
| Potato pieces are too big • Cut potatoes into smaller pieces. | ||
15 Disposal
Appliances marked with this symbol must be disposed of separately from household waste. These appliances contain valuable raw materials that can be recycled. Proper disposal of these items protects the environment and public health. Your local authority or retailer can provide detailed information on proper disposal.
16 Technical Data
| Article number TO 2077 | |
| Power 2,200 W | |
| Voltage/Frequency 220-240 V~/50-60 Hz | |
| Capacity 25 litres | |
| Temperature range 40 - 220 °C | |
| Timer 24 hours | |
| Net weight 10.3 kg |
Contenu
text_image
MANUAL www.severin.com3 Four de table

text_image
D A B C D E F G H I Inatural_image
Simple line drawing of a woven basket with no text or symbolsGrille de friture
natural_image
Simple 3D wireframe diagram of a rectangular plate with horizontal lines (no text or symbols)Grill
natural_image
Isometric view of a square metal grate with uniform slats (no text or symbols)Plaque de cuisson
natural_image
Pure mechanical tool diagram without any text, numbers, or symbolsBroche avec manche
natural_image
Simple line drawing of a square recess with concentric rings (no text or symbols)Plaque anti-miettes
natural_image
Diagram of a computer interior showing a tray with a highlighted area and an arrow indicating direction (no text or symbols present)text_image
Technical diagram showing mechanical assembly with labeled component '1' and directional arrow indicating motion
text_image
Diagram illustrating a mechanical assembly process with labeled components and a checkmark indicating inspection or approval.text_image
MANUAL www.severin.com3 Toastoven

text_image
D A B C D E F G H I Inatural_image
Simple line drawing of a woven basket with no text or symbolsFrituurrek
natural_image
Simple 3D wireframe diagram of a rectangular plate with horizontal lines, no text or symbols present.Grillrooster
natural_image
Simple line drawing of a rectangular tray with horizontal slats (no text or symbols)Bakplaat
natural_image
Pure mechanical tool diagram without any text, numbers, or symbolsSpies met handvat
natural_image
Simple line drawing of a square recess with concentric rings (no text or symbols)Kruimellade
text_image
n 888 °CMin 88:88 a Custom b A/R FRY OVEN defghijklmnatural_image
Diagram of a computer interior showing a tray with a highlighted component and an arrow indicating direction (no text or symbols present)text_image
Technical diagram illustrating mechanical assembly steps with labeled components and a checkmark indicator for inspection.text_image
MANUAL www.severin.com3 Horno tostador

text_image
D A B C D E F G H I Inatural_image
Simple line drawing of a woven basket with two handles (no text or symbols)Bandeja para freír
natural_image
Simple 3D wireframe diagram of a rectangular plate with horizontal lines (no text or symbols)Rejilla
natural_image
Simple line drawing of a square plate with horizontal grooves (no text or symbols)Bandeja para hornear
para colocar alimentos que se van a hornear o asar.

natural_image
Pure mechanical tool diagram without any text, numbers, or symbolsBrocheta con mango
natural_image
Simple line drawing of a square component with concentric rings (no text or symbols)Bandeja para migas
natural_image
Diagram of a computer oven with ventilation slots and an arrow indicating airflow direction (no text or symbols)text_image
Technical diagram showing mechanical assembly with labeled component '1' and directional arrow indicating motion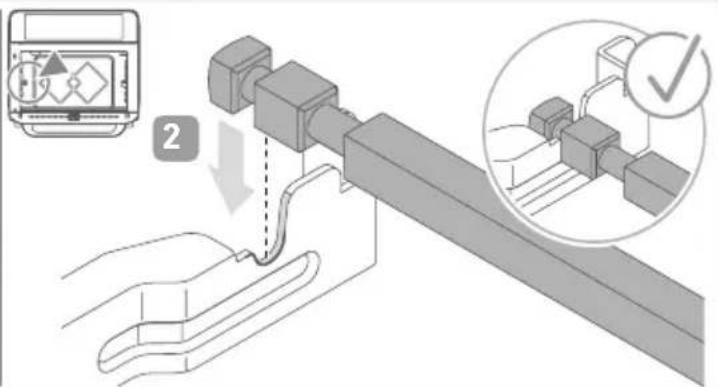
text_image
Diagram illustrating a mechanical assembly process with labeled components and a checkmark indicating inspection or approval.text_image
MANUAL www.severin.com3 Tostapane
text_image
D A B C D E F G H I Inatural_image
Simple line drawing of a woven basket with two handles (no text or symbols)Griglia da frittura
natural_image
Simple line drawing of a rectangular tray with horizontal slats (no text or symbols)Teglia
natural_image
Pure mechanical tool diagram without any text, numbers, or symbolsnatural_image
Simple line drawing of a square recess with concentric rings (no text or symbols)text_image
n 888 °CMin 88:88 a Custom b °C AIR FRY OVEN defghijklmnatural_image
Diagram of a computer oven with an open lid and ventilation slots, showing internal structure without any text or symbols.text_image
Technical diagram showing mechanical assembly with labeled component '1' and directional arrow indicating motion
text_image
Diagram illustrating a mechanical assembly process with labeled components and a checkmark indicating inspection or approval.www.severin.com/socials
SEVERIN
Model specifications are subject to change.