Ultimate 8000 AB81U1 - Vacuum Cleaner AEG - Free user manual and instructions
Find the device manual for free Ultimate 8000 AB81U1 AEG in PDF.

| Brand | AEG |
| Model | Ultimate 8000 AB81U1 |
| Product type | Canister vacuum |
| Category | Vacuum cleaner |
| Collection system | s-bag® dust bag (disposable) |
| Bag fill indicator | S-BAG indicator (green/yellow/red) |
| Exhaust filter | Washable (blue frame) or replacement (green frame) |
| Motor filter | Replace after 5 bag changes |
| Suction power | Electronic control with Auto mode |
| Standby consumption | 0.5 W |
| Power cord length | Automatic rewind (approx. 8 m) |
| Hose | AeroPro |
| Tube | Telescopic AeroPro |
| Main nozzle | AllFloor Auto LED with front lighting |
| Included accessories | Turbo brush, Mini Turbo brush, ParkettoPro brush, FlexProPlus brush, Furniture brush, 3-in-1 accessory |
| Remote control | On handle (CR1632 battery) |
| Nozzle lighting | LED, 2 AA batteries |
| Parking positions | Side, under, and rear (pause) |
| Operating modes | Auto, Low, High |
| Overheat protection | Automatic shutoff |
| Materials | Recyclable plastics |
| After-sales service | Authorized Electrolux centers |
| Warranty | Consult after-sales service |
Frequently Asked Questions - Ultimate 8000 AB81U1 AEG
User questions about Ultimate 8000 AB81U1 AEG
0 question about this device. Answer the ones you know or ask your own.
Ask a new question about this device
Download the instructions for your Vacuum Cleaner in PDF format for free! Find your manual Ultimate 8000 AB81U1 - AEG and take your electronic device back in hand. On this page are published all the documents necessary for the use of your device. Ultimate 8000 AB81U1 by AEG.
USER MANUAL Ultimate 8000 AB81U1 AEG
natural_image
Line drawing of a smartwatch with labeled buttons and textured grip (no text or symbols beyond basic labels)


[Non-Text]
[Non-Text]
[Non-Text]
[Non-Text]
[Non-Text]
[Non-Text]
[Non-Text]
[Non-Text]
[Non-Text]
[Non-Text]
[Non-Text]
[Non-Text]
[Non-Text]
[Non-Text]
[Non-Text]
[Non-Text]
[Non-Text]
[Non-Text]
[Non-Text]
[Non-Text]
[Non-Text]
[Non-Text]
[Non-Text]
[Non-Text]
[Non-Text]
[Non-Text]
[Non-Text]
[Non-Text]
[Non-Text]
[Non-Text]
[Non-Text]
[Non-Text]
[Non-Text]
[Non-Text]
[Non-Text]
[Non-Text]
[Non-Text]
[Non-Text]
[Non-Text]
[Non-Text]
[Non-Text]
[Non-Text]
[Non-Text]
[Non-Text]
[Non-Text]
[Non-Text]
[Non-Text]
[Non-Text]
[Non-Text]
[Non-Text]
[Non-Text]
[Non-Text]
[Non-Text]
[Non-Text]
[Non-Text]
[Non-Text]
[Non-Text]
[Non-Text]
[Non-Text]
[Non-Text]
[Non-Text]
[Non-Text]
[Non-Text]
[Non-Text]
[Non-Text]
[Non-Text]
广力云智慧零售收银系统
一
|
[Non-Text]
[Non-Text]
[Non-Text]
[Non-Text]
[Non-Text]
[Non-Text]
[Non-Text]
[Non-Text]
[Non-Text]
[Non-Text]
[Non-Text]
[Non-Text]
[Non-Text]
[Non-Text]
[Non-Text]
[Non-Text]
[Non-Text]
[Non-Text]
[Non-Text]
[Non-Text]
[Non-Text]
[Non-Text]
[Non-Text]
[Non-Text]
[Non-Text]
[Non-Text]
[Non-Text]
[Non-Text]
[Non-Text]
[Non-Text]
[Non-Text]
[Non-Text]
[Non-Text]
[Non-Text]
[Non-Text]
[Non-Text]
[Non-Text]
[Non-Text]
[Non-Text]
[Non-Text]
[Non-Text]
[Non-Text]
[Non-Text]
[Non-Text]
[Non-Text]
[Non-Text]
[Non-Text]
[Non-Text]
[Non-Text]
[Non-Text]
[Non-Text]
[Non-Text]
[Non-Text]
[Non-Text]
[Non-Text]
[Non-Text]
[Non-Text]
[Non-Text]
[Non-Text]
[Non-Text]
[Non-Text]
[Non-Text]
[Non-Text]
[Non-Text]
[Non-Text]
[Non-Text]
[Non-Text]
[Non-Text]
[Non-Text]
[Non-Text]
[Non-Text]
[Non-Text]
广力云智慧零售收银系统
一
|
[Non-Text]
ENGLISH
Thank you for choosing Electrolux 800 bagged vacuum cleaner. Always use original accessories and spare parts to get the best results. This product is designed with the environment in mind. All plastic parts are marked for recycling purposes.
Before starting
- Read this manual carefully.
- Check that all parts described are included.
- Pay special attention to the safety precautions!
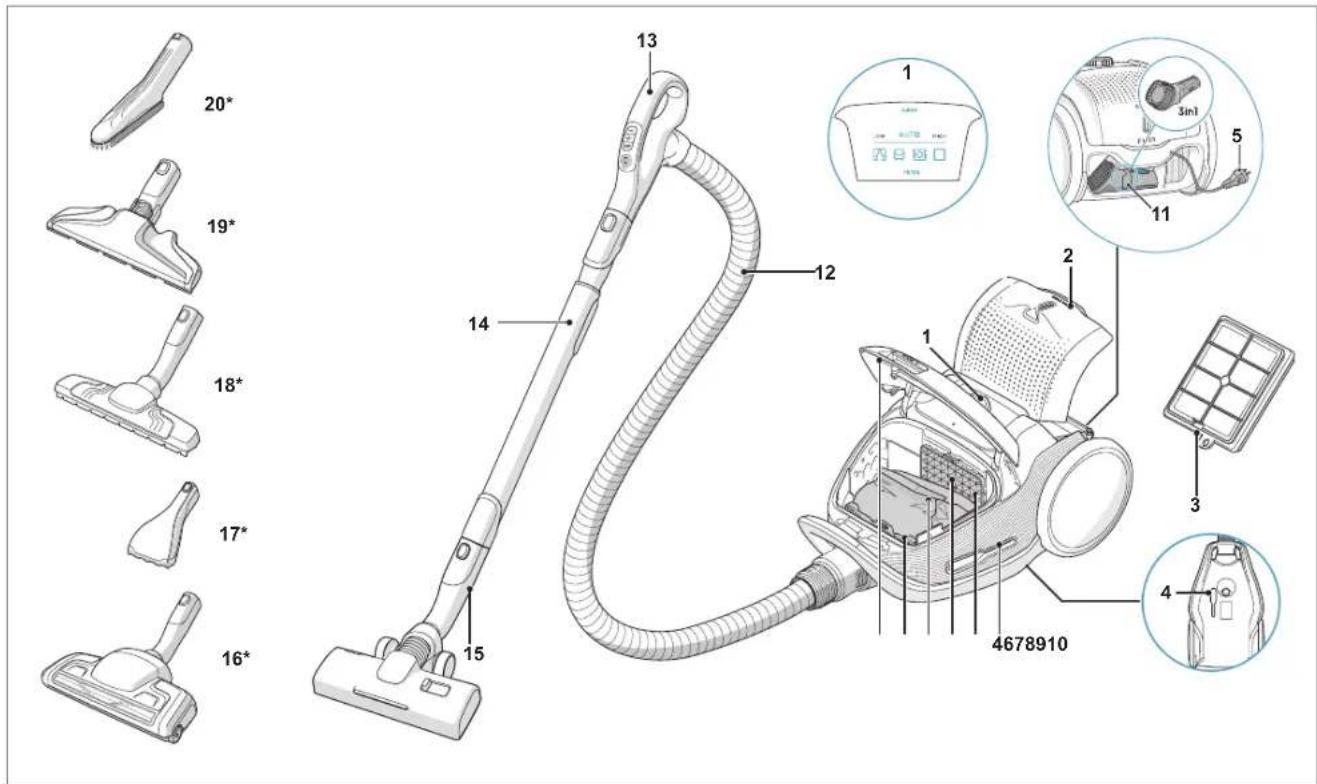
DESCRIPTION OF 800 VACUUM CLEANER
- Display
- Exhaust filter lid
- Exhaust filter
- Parking slots
- Power cord
- Motor filter
- Motor filter holder
- S-bag ^®
- S-bag ^® holder
- Dust compartment cover
- 3in1 tool
- AeroPro hose
- AeroPro handle
- AeroPro telescopic tube
- AllFloor Auto LED nozzle
- Turbo nozzle*
- Mini Turbo nozzle*
- ParkettoPro nozzle*
- FlexProPlus nozzle*
20.Furniture nozzle*
* Certain models only
Power consumption in standby: 0.5W
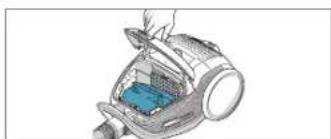
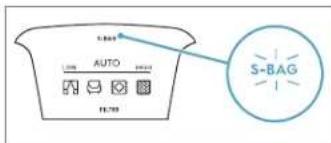
HOW TO USE THE VACUUM CLEANER
natural_image
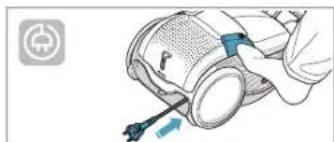
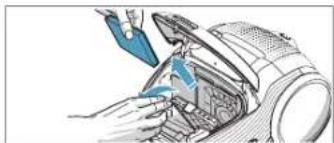
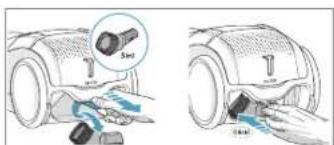
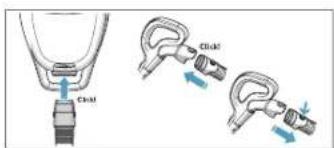
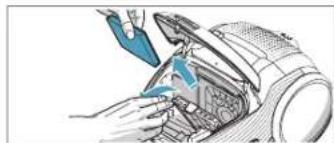
Illustration of a handheld vacuum cleaner with a blue internal component (no text or symbols visible)Open the dust compartment cover by pulling the S-BAG button. Check that the dust bag (s-bag) is in place.
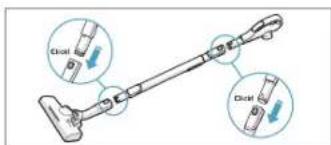
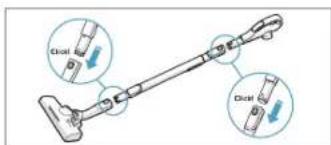
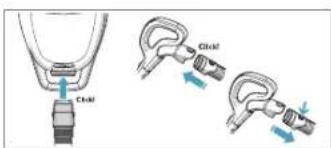
Attach the telescopic tube to the nozzle. Attach the telescopic tube to the hose handle (to remove it, press the lock button and pull).
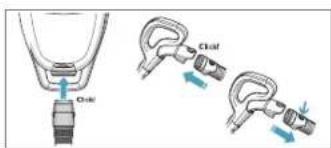
Insert the hose into the cleaner (to remove it, press the lock buttons and pull). Insert the hose into the hose handle until the lock button clicks (to release it, press the lock button and pull).
natural_image
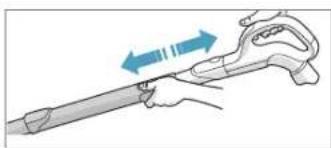
Illustration of a hand holding a tool with blue arrows indicating direction (no text or symbols)Adjust the telescopic tube by holding the lock with one hand and pulling the handle with the other hand.
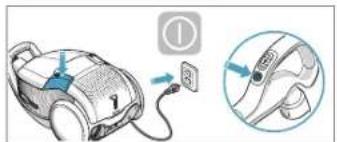
START/STOP THE VACUUM CLEANER AND ADJUST SUCTION POWER
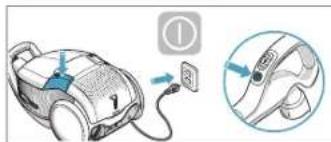
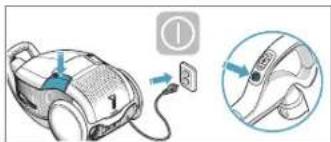
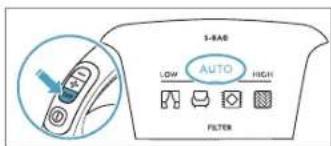
Pull out the power cord and plug it into the mains. Press the ON/OFF button to turn the cleaner on/off. Indicators light up, LOW/HIGH indicator lights up from left to right and back. Press the ON/OFF button on the remote control to turn the cleaner on/off.
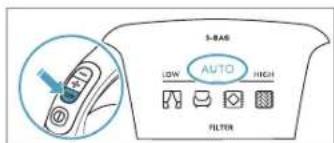
Adjust suction power: The cleaner starts in AUTO mode (automatic power regulation). AUTO indicator is illuminated on the display and LOW/HIGH indicator pulses. To regulate power manually press +/- button on handle. Press AUTO button to return to auto-function.
natural_image
Illustration of a hand using a tool to adjust or install a device component (no text or symbols visible)After cleaning, push the REWIND button to rewind the cable.
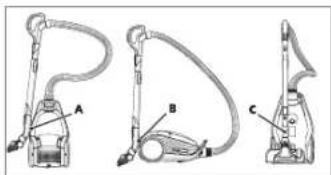
PARKING POSITIONS

Use parking position on the side (A) or underneath (C) to carry and store the cleaner. At the back (B) when you pause (save your back).
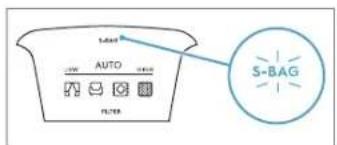
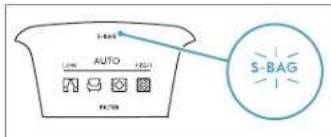
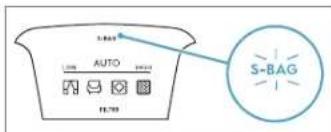
REPLACING THE DUSTBAG, S-BAG®

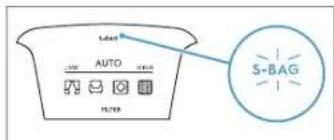
Replace the s-bag when S-BAG indicator lights up in red (green light: bag is OK, yellow light: soon time to replace bag).
NB: Always change the s-bag when S-BAG indicator is illuminated or has red light even if the s-bag is not full (it may be blocked) and after using carpet cleaning powder. For best possible performance, use the Ultra Long Performance bag which is especially developed for your cleaner. Other synthetic s-bags can also be used. Do not use paper dust bags! www.s-bag.com
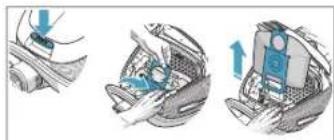
Open the dust compartment cover by pulling the S-BAG button. Pull the cardboard handle to close and remove the s-bag ^®
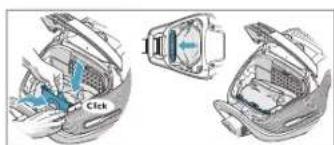
Insert a new s-bag ^® by pushing the cardboard straight down in its tracks. Close the lid. If the s-bag ^® is not properly placed or is missing, the lid will not close.
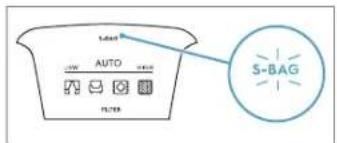
When you start the cleaner after s-bag replacement, it takes 10 seconds before the S-BAG indicator turns off or turns green.
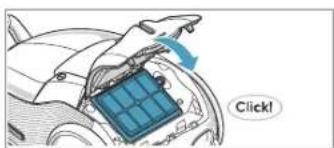
REPLACING THE FILTERS
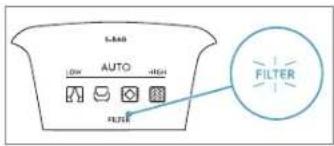
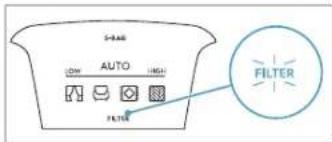
Replace/clean the filter when filter indicator lights up in red. Green light indicates that the filter is ok. It lights up briefly when you start the vacuum cleaner.
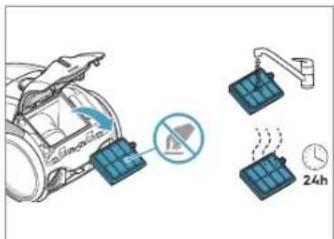
Pull the FILTER button to open the filter lid. Use original s-filters. Remove the filter and check the reference on the frame to define type. Replace with a new filter or clean it. Rinse the inside (dirty side) in lukewarm tap water. Tap the filter frame to remove the water. Repeat the process four times.
NB: Do not use cleaning agents. Avoid touching the filter surface. Let the filter dry completely (min. 24 h in room temperature) before putting back! Change the washable filter at least once a year or when it is very dirty or damaged. Do not remove the L-shaped foam under the filter.

natural_image
Diagram of a car interior with a blue solar panel and directional arrow, no readable text or symbolsAfter replacing the filter, close the filter lid until it is clicked back into place. If the filter lid comes off, position the hinges at the bottom and push the filter lid until it is clicked back into place.
NB: When you start the cleaner after filter replacement, it takes 10 seconds before the FILTER indicator turns green or turns off.
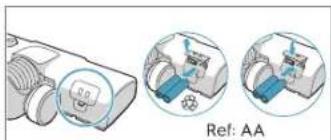
natural_image
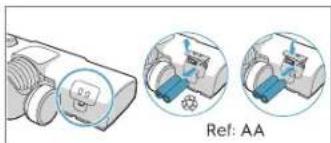
Illustration of hands using a tool to adjust or install a mechanical component (no text or symbols visible)Replace the motor filter when dirty or after every 5th s-bag. Push the filter holder down and pull it out. Exchange the filter and close the lid.
VACUUMING WITH THE UNIVERSAL NOZZLE

natural_image
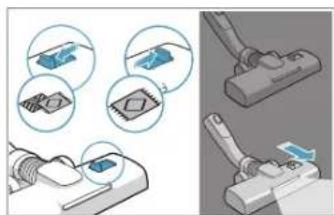
Illustration of a mechanical clamp device with close-up views of components (no text or symbols)For deep cleaning on carpet, change the nozzle setting with the slider to Carpet mode. Icon illustrates recommended floor type. Move the nozzle forward. The front light turns on automatically after a few seconds. When the nozzle is not used, the light turns off automatically after a few seconds.
CLEANING THE UNIVERSAL NOZZLE
natural_image
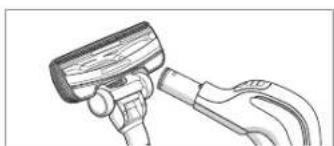
Illustration of a hand holding a tool with a handle and lever (no text or symbols)Disconnect the nozzle from the tube. Clean with the hose handle.
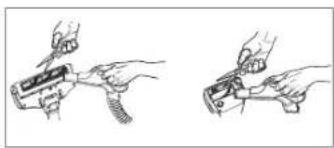
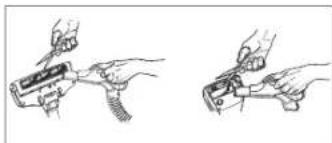
CLEANING THE TURBO NOZZLE
natural_image
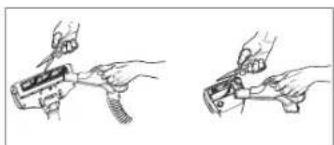
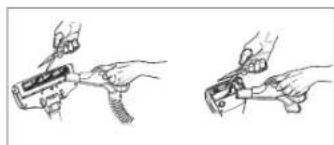
Two hand-drawn diagrams showing a tool being inserted into a device, no text or symbols presentDisconnect the nozzle from the tube and remove entangled threads etc by snipping them away with scissors. Use the hose handle to clean the nozzle.
3IN1 ACCESSORY TOOL
Pull the textile tab to take out 3in1 tool. The tool has 3 functions, see pictures on next page. After usage, put it back in its place.
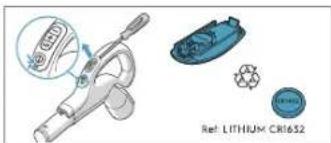
CHANGING THE BATTERIES
natural_image
Technical illustration of a mechanical device with two views showing internal components (no text or symbols)Change batteries when front lights start blinking fast. Use 2 AA batteries.
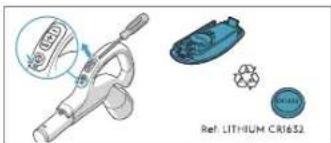
Change battery when light indicator turns red or is not responding when pressing any button. Use only batteries type LITHIUM CR1632
This appliance contains non-rechargeable batteries, these batteries are not to be recharged. Do not expose the appliance or battery to excessive temperatures. Be aware of the risk of terminals of the battery-operated appliance or battery being short-circuited by metal objects. Different types of batteries or new and used batteries are not to be mixed. Exhausted batteries are to be removed from the appliance and safely disposed of. If the appliance is to be stored unused for a long period, the batteries should be removed. Do not use modified or damaged batteries. Remove the batteries from the product before scrapping. Follow your country's rules for collection of batteries and electrical products.
TIPS ON HOW TO GET THE BEST RESULTS
| NOZZLE/ACCESSORY | USE FOR: | NOZZLE/ACCESSORY | USE FOR: |
3In1 accessory tool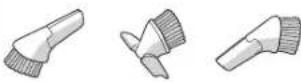 123 123 | 3 tools in 1:1. Dusting tool for hard surfaces (bookshelves, skirting boards etc).2. Upholstery tool for textiles (curtains, upholstery etc).3. Crevice tool for narrow spaces (behind radiators etc). | AllFloor Auto LED nozzle (with front lights)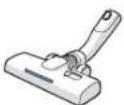 | Universal nozzle:- For all floor types, secures excellent dust pick up both on carpets and hard floors.- Recommended to use Allfloor mode, which enables going from hard floor to carpet without adjusting the setting.- For deep cleaning on carpet, change the nozzle setting with the slider to Carpet mode.- Front light helps to detect dust and dirt in dark spaces (under furniture etc). |
Turbo nozzle* Carpet nozzle: | - Brushes and vacuums at the same time (best pick up of hair, fibres etc).- Brush roller is driven by the airflow of the vacuum cleaner.- Not suitable for carpets with very deep piles and long fringes, anti-slip carpets like door mats or water resistant carpets. Use universal nozzle instead. | Mini Turbo nozzle* | Upholstery nozzle:- Brushes and vacuums at the same time (best pick up of hair, fibres etc).- For textile furniture, car seats, mattresses etc.- Brush roller is driven by the airflow of the vacuum cleaner.- Not suitable for carpets with very deep pile and long fringes as it can get stuck in the rotating brush roll. |
ParkettoPro nozzle* | Hard floor nozzle:- For gentle cleaning of hard floor (parquet, wooden floor, tiles etc).- Best dust pick up on hard floor with crevice. | FlexProPlus nozzle*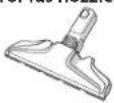 | Hardfloor nozzle:- For reach under/between furniture, corners and other obstacles.- Can easily turn 180 degrees for direct access to narrow spaces. |
| Furniture nozzle* Delicate Surfaces Tool: | - Removes fine particles and dust from delicate surfaces in your home | ||
With AUTO-function the cleaner automatically adjust the suction power in order to give an optimal cleaning performance and comfort on every surface. For manual regulation, follow graphics for optimal performance.
TROUBLESHOOTING
| PROBLEM SOLUTION | |
| The vacuum cleaner does not start | Check that the cable is connected to the mains.Check that the plug and cable are not damaged.Check for a blown fuse.Check if the battery indicator lamp in the remote control handle responds (certain models only). |
| The s-bag® indicator light is illuminated | Check if the s-bag* is full or blocked.If you have already changed the s-bag*, change the motor filter. |
| The filter indicator light is illuminated Change, or wash (if washable), the exhaust filter. | |
| The cleaner stops | The cleaner might be overheated: disconnect it from the mains; check if the nozzle, tube, hose or filters are blocked. Let the cleaner cool down for 30 minutes before plugging it in again.If the cleaner still does not work, contact an authorized Electrolux service centre. |
| Reduction of suction capacity versus normal | Check if the s-bag is full or blocked.Check if the motor filter is clogged and needs changing.Check if nozzle is blocked and needs to be cleared.Check if hose is blocked by squeezing it gently. However, be careful in case the obstruction has been caused by glass or needles caught inside the hose.Note: The warranty does not cover any damage to the hose caused by cleaning it. |
| Water has been sucked into the vacuum cleaner | It will be necessary to replace the motor at an authorized Electrolux service centre.Damage to the motor caused by the penetration of water is not covered by the warranty. |
| For any further problems, contact an authorized Electrolux service centre. | |
| PROBLEM SOLUTION | |
| The vacuum cleaner does not start | Check that the cable is connected to the mains.Check that the plug and cable are not damaged.Check for a blown fuse.Check if the battery indicator lamp in the remote control handle responds (certain models only). |
| The s-bag® indicator light is illuminated | Check if the s-bag® is full or blocked.If you have already changed the s-bag*, change the motor filter. |
| The filter indicator light is illuminated Change, or wash (if washable), the exhaust filter. | |
| The cleaner stops | The cleaner might be overheated: disconnect it from the mains; check if the nozzle, tube, hose or filters are blocked. Let the cleaner cool down for 30 minutes before plugging it in again.If the cleaner still does not work, contact an authorized Electrolux service centre. |
| Reduction of suction capacity versus normal | Check if the s-bag is full or blocked.Check if the motor filter is clogged and needs changing.Check if nozzle is blocked and needs to be cleared.Check if hose is blocked by squeezing it gently. However, be careful in case the obstruction has been caused by glass or needles caught inside the hose.Note: The warranty does not cover any damage to the hose caused by cleaning it. |
| Water has been sucked into the vacuum cleaner | It will be necessary to replace the motor at an authorized Electrolux service centre.Damage to the motor caused by the penetration of water is not covered by the warranty. |
| For any further problems, contact an authorized Electrolux service centre. | |
FRANCAIS
natural_image
Illustration of a vacuum cleaner inside a device, showing internal components and airflow path (no text or symbols)natural_image
Illustration of a hand holding a tool with directional arrows indicating movement (no text or symbols)natural_image
Illustration of a hand holding a device with a blue tool, no visible text or symbolsnatural_image
Three-step illustration of car seatbelt usage showing hand positioning, seatbelt opening, and seatbelt opening with blue buttons (no text or symbols)REMPLACEMENT DES FILTRES
natural_image
Diagram of a car interior with a blue solar panel and directional arrow, no text or symbols presentnatural_image
Illustration of a robotic arm interacting with a mechanical device (no text or symbols visible)natural_image
Illustration of a mechanical clamp tool interacting with a device, showing four circular diagrams and a close-up view of the clamp (no text or symbols present)natural_image
Line drawing of a hand holding a cap and lever (no text or symbols)natural_image
Two-step line drawing showing hands using a tool to adjust or install a mechanical component (no text or symbols present)natural_image
Illustration of a device with a close-up view showing internal components and a label 'Ref: AA' (no text or symbols on the diagram itself)natural_image
Illustration of a handheld vacuum cleaner with a blue internal component (no text or symbols visible)natural_image
Illustration of a hand holding a tool with directional arrows indicating movement (no text or symbols)natural_image
Illustration of a hand using a tool to adjust or install a device component (no text or symbols visible)natural_image
Three-step illustration of a car seatbelt mechanism showing hand positioning and valve placement (no text or symbols)natural_image
Diagram of a car interior with a blue grid on the roof and an airplane flying nearby, no text or symbols present.natural_image
Illustration of a hand using a tool to adjust or install a mechanical component (no text or symbols visible)natural_image
Illustration showing two different types of electrical connectors or tools, one with a plug and others with circuitry (no text or symbols present)natural_image
Line drawing of a hand holding a tool, possibly a valve or pump, with no visible text or symbols.natural_image
Two hand-drawn diagrams showing mechanical assembly steps (no text or symbols)natural_image
Illustration of a handheld vacuum cleaner with internal components (no text or symbols visible)natural_image
Illustration of a hand holding a tool with two blue arrows indicating direction (no text or symbols)natural_image
Illustration of a hand using a screwdriver to adjust a mechanical component (no text or symbols visible)natural_image
Three-step illustration of car seatbelt mechanism showing hand placement and lock mechanism (no text or symbols)natural_image
Illustration of a car interior with hands using a tool to adjust or install a component (no text or symbols visible)natural_image
Illustration of a mechanical clamp tool interacting with a component, showing close-up and disassembly views (no text or symbols)natural_image
Line drawing of a hand holding a tool or device with a handle and lever (no text or symbols)natural_image
Two hand-drawn diagrams showing a tool being inserted into a component, no text or symbols presentnatural_image
Diagram showing a device with a circular component and two views of a mechanical assembly (no text or symbols)natural_image
Illustration of a handheld vacuum cleaner with a blue internal component (no text or symbols visible)natural_image
Illustration of a hand holding a tool with directional arrows indicating movement (no text or symbols)natural_image
Illustration of a hand using a tool to adjust or install a device component (no text or symbols visible)AUSTAUSCHEN DES STAUBBEUTELS (S-BAG®)
natural_image
Technical illustration of a car interior showing three views with labeled components (no text or symbols present)natural_image
Diagram of a car interior with a blue solar panel and airplane, showing airflow direction (no text or symbols)natural_image
Illustration of a robotic arm with blue tool, showing mechanical components and motion (no text or symbols)natural_image
Illustration of a mechanical clamp tool with multiple close-up views of components (no text or symbols)natural_image
Line drawing of a hand holding a tool with a wooden handle (no text or symbols)natural_image
Two hand-drawn diagrams showing a tool being inserted into a mechanical component, no text or symbols present.natural_image
Diagram showing a device with a control panel and two circular insets illustrating mechanical components (no text or symbols)natural_image
Illustration of a vacuum cleaner inside a device, showing internal components and airflow path (no text or symbols)natural_image
Illustration of a hand holding a tool with two blue arrows indicating direction (no text or symbols)natural_image
Illustration of a hand using a tool to adjust or install a device component (no text or symbols visible)UDSKIFTNING AF POSEN, S-BAG®
natural_image
Three-step illustration of a car seatbelt mechanism, showing hand placement and blue adjustment arrows (no text or symbols)Äbn låget til
natural_image
Diagram of car interior compartments with directional arrows and a 'Click' label (no text or symbols beyond basic labels)natural_image
Illustration of a hand using a tool to clean or inspect the internal components of a vehicle (no text or symbols visible)natural_image
Illustration showing a mechanical assembly with clamping tools and a close-up of a device (no text or symbols present)natural_image
Line drawing of a hand holding a small object, possibly a tool or device (no text or symbols visible)natural_image
Two-step line drawings showing hands using pliers to adjust a mechanical component (no text or symbols present)natural_image
Diagram showing a device with a labeled component and two circular insets illustrating internal components (no text or symbols present)natural_image
Illustration of a handheld vacuum cleaner with a blue internal component (no text or symbols visible)Avage tolmukambri kate, tömmates S-BAG-i nuppu. Veenduge, et tolmukott (s-bag) on oma kohal.
Kinnitage teleskooptoru otsakule. Kinnitage teleskooptoru vooliku hoidikule (eemaldamiseks vajutage lukustusnuppu ja tömmake).

natural_image
Illustration of a hand holding a tool with directional arrows indicating movement (no text or symbols)natural_image
Illustration of a hand using a tool to adjust or install a device component (no text or symbols visible)natural_image
Three line drawings of a vacuum cleaner with labeled parts A, B, and C (no text or symbols beyond labels)natural_image
Diagram of a car interior with an airplane and a blue grid on the floor, showing airflow direction (no text or symbols)natural_image
Illustration of a hand using a tool to adjust or install a mechanical component (no text or symbols visible)natural_image
Illustration of mechanical clamping tools with magnified views of components (no text or symbols)natural_image
Line drawing of a hand holding a tool with a handle and lever (no text or symbols)natural_image
Illustration of two hands holding a tool, showing the process with no text or symbolsnatural_image
Diagram showing a device with a control panel and two circular insets illustrating mechanical components (no text or symbols)natural_image
Illustration of a vacuum cleaner internal component (no text or symbols visible)natural_image
Illustration of a hand holding a tool with two blue arrows indicating direction (no text or symbols)natural_image
Illustration of a hand using a tool to adjust or install a device component (no text or symbols visible)natural_image
Diagram of a car interior with a blue solar panel and directional arrow, no text or symbols presentnatural_image
Illustration of a car interior with hands installing or adjusting components (no text or symbols visible)natural_image
Illustration of a mechanical clamp tool and its application on a component, showing tool positioning and assembly (no text or symbols present)natural_image
Line drawing of a hand holding a tool or device with a handle and lever (no text or symbols)natural_image
Two hand-drawn diagrams showing a tool being inserted into a component, no text or symbols presentnatural_image
Diagram showing a device with a labeled component and two circular insets illustrating internal components (no text or symbols present)natural_image
Illustration of a handheld vacuum cleaner with a blue internal component (no text or symbols visible)natural_image
Illustration of a hand holding a tool with directional arrows indicating movement (no text or symbols)natural_image
Illustration of a hand using a tool to adjust or install a device component (no text or symbols visible)natural_image
Three-step illustration of a car seatbelt mechanism, showing hand positioning and blue adjustment arrows (no text or symbols)natural_image
Diagram of a car interior with a blue grid-patterned component and a circular arrow indicating rotation (no text or symbols)natural_image
Illustration of a hand using a tool to adjust or install a mechanical component (no text or symbols visible)natural_image
Line drawing of a mechanical device with a handle and lever (no text or symbols)natural_image
Illustration of two hands holding a tool, showing the process with no text or symbolsnatural_image
Technical illustration of a mechanical device with two circular insets showing internal components (no text or symbols)natural_image
Illustration of a vacuum cleaner with internal components (no text or symbols visible)natural_image
Illustration of a hand holding a tool with blue arrows indicating direction (no text or symbols)natural_image
Illustration of a hand using a tool to adjust or install a device (no text or symbols visible)natural_image
Three-step illustration of car seatbelt mechanism showing hand placement and lock mechanism (no text or symbols)natural_image
Diagram of a mechanical component with a blue internal structure and directional arrow, labeled 'Click!' (no readable text or symbols beyond the label)natural_image
Illustration of a car interior with hands and tools, no visible text or symbolsnatural_image
Illustration of a mechanical clamp or clamp tool with multiple views of the clamp (no text or symbols present)natural_image
Line drawing of a handheld device with a handle and lever (no text or symbols)natural_image
Two hand-drawn diagrams showing a tool being inserted into a device, no text or symbols presentnatural_image
Diagram showing a device with a circular component and two views of a mechanical assembly (no text or symbols)natural_image
Illustration of a handheld vacuum cleaner with a blue internal component (no text or symbols visible)Spojite teleskopsku cijev na nastavak. Umetnite teleskopsku cijev u dršku za cijev (za vađenje pritisnite gumb za blokiranje i povucite).

natural_image
Illustration of a hand holding a tool with directional arrows indicating movement (no text or symbols)Prilagodite teleskopsku cijev držeći bravu jednom rukom i povlačeći ručku drugom rukom.
POKRENITE/ZAUSTAVITE USISAVAČ I PRILAGODITE JAČINU USISAVANJA

natural_image
Illustration of a hand using a tool to adjust or install a device component (no text or symbols visible)Za prijenos i pohranu usisavača koristite parkirne položaje bočno (A) ili s donje strane (C). Straga (B) kad se zaustavljate (štedite leđa).
ZAMJENA VREĆICE ZA PRAŠINU, S-BAG®
Povucite gumb FILTAR za otvaranje poklopca za filtrar. Koristite originalne s-filtre. Izvadite filtrar i provjerite referencu na okviru kako biste utvrdili vrstu. Zamijenite ga novim filtrom i očistite ga. Isperite unutrašnjost (prljavu stranu) mlakom vodom iz slavine. Dodirnite okvir filtra kako biste uklonili vodu. Ponovite proces četiri puta.
Napomena: Ne koristite sredstva za čišćenje. Izbjegavojte dodirivanje površine filtra. Pustite filtar da se osuši (mln. 24 h na sobnoj temperaturi) prije vraćanja! Perivi filtar zamijenite barem jednom godišnje, odnosno kad je jako zaprijan ili oštećen. Nemojte uklanjati pjenu u obliku slova L ispod filtra.
Nakon zamjene filtra zatvorite poklopac filtra tako da klikne na svoje mjesto. Ako se poklopac filtra otpusti, postavite šarke na dnu i gurnite poklopac filtra natrag sve dok ne sjedne na mjesto
natural_image
Illustration of hands using a tool to clean or store electronic equipment (no text or symbols visible)natural_image
Illustration showing two different types of electrical connectors or tools, one with a plug and others with circuitry (no text or symbols present)natural_image
Illustration of a hand holding a tool with a handle and lever (no text or symbols)Iskopčajte nastavak iz cijevi. Očistite drškom za cijev.
ČIŠĆENJE TURBO NASTAVKA
natural_image
Illustration of two hands using a tool to adjust or install a mechanical component (no text or symbols present)Odvojite nastavak s cijevi i uklonite zapetljane niti i sl. tako da ih odrežete škarama. Pomoću ručke za cijev očislite nastavak.
3U1 NASTAVAK

Povucite tekstilnu karticu kako biste izvadili 3ul nastavak. Alat ima 3 funkcije, pogledajte slike na sljedećoj stranici. Nakon upotrebe vratite na mjesto.
IZMJENA BATERIJA
natural_image
Diagram showing a device with a control panel and two circular insets illustrating mechanical components (no text or symbols)natural_image
Illustration of a vacuum cleaner with a blue internal component, showing internal wiring and handle (no text or symbols)natural_image
Illustration of a hand holding a tool with directional arrows indicating movement (no text or symbols)natural_image
Illustration of a hand using a tool to adjust or install a device component (no text or symbols visible)natural_image
Three-step illustration of car seatbelt usage showing hand placement and seatbelt switch (no text or symbols)natural_image
Diagram of a car interior with a blue grid and directional arrow, no readable text or symbols presentnatural_image
Illustration of a car interior with hands cleaning the engine compartment (no text or symbols visible)natural_image
Illustration of mechanical clamping tools and components (no text or symbols)natural_image
Line drawing of a hand holding a showerhead and bulb (no text or symbols)natural_image
Two hand-drawn diagrams showing a tool being adjusted, with no visible text or symbols.natural_image
Diagram showing a device with a circular component and two views of a mechanical assembly (no text or symbols)natural_image
Illustration of a handheld vacuum cleaner with internal components (no text or symbols visible)natural_image
Illustration of a hand holding a tool with directional arrows indicating movement (no text or symbols)natural_image
Illustration of a hand using a tool to adjust or install a device component (no text or symbols visible)natural_image
Illustration of hands using a tool to adjust or install a mechanical component (no text or symbols visible)natural_image
Illustration of two different electrical clamp devices with close-up views of their components (no text or symbols)natural_image
Illustration of a hand holding a tool with a handle and lever (no text or symbols)natural_image
Two hand-drawn diagrams showing a tool being inserted into a component, no text or symbols presentnatural_image
Diagram showing a device with a control knob and two views of a mechanical component (no text or symbols)natural_image
Illustration of a vacuum cleaner inside a device, showing internal components and airflow path (no text or symbols)Pieslēdziet teleskopisko cauruli pie uzgaja. Pieslēdziet teleskopisko cauruli pie šlūtenes roktura (lai to noņemtu, piespiediet blokēšanas pogu un velciet).
natural_image
Illustration of a hand holding a tool with two blue arrows indicating direction (no text or symbols)Noregulëjiet teleskopisko cauruli, turot blokëtäju ar vienu roku un velkot rokturi ar otru roku.
PUTEKŁU SÜCËJA IEDARBINÄŠANA/APSTÄDINÄŠANA UN UZSÜKŠANAS JAUDAS REGULËŠANA
natural_image
Illustration of a hand using a tool to adjust or install a mechanical component (no text or symbols visible)natural_image
Three-step illustration showing hand positioning and valve assembly (no text or symbols)natural_image
Diagram of a car interior with a blue solar panel and directional arrow, no text or symbols presentnatural_image
Illustration of hands using a tool to adjust or install a mechanical component (no text or symbols visible)natural_image
Illustration of mechanical clamping tools with magnified views of components (no text or symbols)natural_image
Line drawing of a hand holding a tool, no text or symbols presentAtvienojiet uzgali no caurules. Notiriet ar šlūtenes rokturi.
TURBO UZGAŁA TİRİŞANA
natural_image
Two hand-drawn diagrams showing a tool being inserted into a component, no text or symbols presentnatural_image
Diagram showing a device with a close-up view of its internal components, labeled 'Ref: AA' (no text or symbols on the diagram itself)natural_image
Illustration of a handheld vacuum cleaner with a blue internal component (no text or symbols visible)natural_image
Illustration of a hand holding a tool with directional arrows indicating movement (no text or symbols)natural_image
Illustration of a hand using a handheld device to adjust a component (no text or symbols visible)natural_image
Three-step diagram showing car seatbelt insertion process with arrows indicating direction (no text or symbols)natural_image
Illustration of a hand using a tool to adjust or install a mechanical component (no text or symbols visible)natural_image
Illustration of a mechanical clamp tool with multiple clamps and a clamp, showing different components (no text or symbols present)natural_image
Line drawing of a hand holding a tool with a handle and lever (no text or symbols)natural_image
Illustration of two hands holding a tool, showing the process with no text or symbolsnatural_image
Technical illustration of a mechanical device with two views showing internal components (no text or symbols)VOOR U VAN START GAAT
natural_image
Illustration of a vacuum cleaner internal component (no text or symbols visible)natural_image
Illustration of a hand holding a tool with two blue arrows indicating direction (no text or symbols)natural_image
Illustration of a hand using a tool to adjust or install a device component (no text or symbols visible)Use parking position on the side (A) or underneath (C) to carry and store the cleaner. At the back (B) when you pause (save your back).
DE STOFZUIGERZAK, S-BAG®, VERVANGEN
natural_image
Three-step illustration showing car seatbelt insertion process with arrows indicating direction (no text or symbols)natural_image
Illustration of a hand using a tool to adjust or install a mechanical component (no text or symbols visible)natural_image
Illustration of mechanical clamping tools with magnified views of components (no text or symbols)natural_image
Line drawing of a hand holding a small object, possibly a tool or device, with no visible text or symbols.natural_image
Two hand-drawn diagrams showing a tool being adjusted, with no visible text or symbols.natural_image
Diagram showing a device with a magnified inset of its internal components, labeled 'Ref: AA' (no text or symbols on the diagram itself)natural_image
Illustration of a vacuum cleaner with internal components and a hand holding the lid (no text or symbols visible)natural_image
Illustration of a hand holding a tool with directional arrows indicating movement (no text or symbols)Juster teleskoprøret ved å holde låsen med en hånd og trekk i håndtaket med den andre hånden.
START/STOPP ST∅VSUGEREN OG JUSTER SUGEKRAFTEN BYTTE AV FILTER
natural_image
Illustration of a hand using a tool to adjust or install a device component (no text or symbols visible)Bruk holderen på siden (A) eller under (C) for bære eller lagre støvsugeren. Bak (B) når du tar en pause (spar ryggen).
BYTT ST∅VSUGERPOSE, S-BAG®
Bytt s-bag när S-BAG-indikatoren lyser rødt (grønt lys: posen er OK, gult lys: snart på tide å bytte pose).
natural_image
Illustration of a hand using a tool to adjust or install a mechanical component (no text or symbols visible)natural_image
Illustration showing two different types of electrical connectors or tools, one with a plug and others with circuitry (no text or symbols present)natural_image
Illustration of a hand holding a tool with a handle and lever (no text or symbols)natural_image
Illustration of two hands using pliers to adjust a mechanical component (no text or symbols present)natural_image
Technical illustration of a mechanical device with two views showing internal components (no text or symbols)natural_image
Illustration of a vacuum cleaner with internal components (no text or symbols visible)natural_image
Illustration of a hand holding a tool with two blue arrows indicating direction (no text or symbols)natural_image
Illustration of a hand using a screwdriver to adjust a mechanical component (no text or symbols visible)natural_image
Three-step illustration of car seatbelt mechanism showing hand placement and lock mechanism (no text or symbols)natural_image
Diagram of a car interior with a blue solar panel and directional arrow, no text or symbols presentnatural_image
Illustration of hands using a tool to adjust or install electronic components on a device (no text or symbols visible)natural_image
Illustration of mechanical clamping tools with magnified views of components (no text or symbols)natural_image
Line drawing of a hand tool with a handle and lever (no text or symbols)natural_image
Two hand-drawn diagrams showing a tool being inserted into a component, no text or symbols presentnatural_image
Diagram showing a device with a circular component and two views of a mechanical assembly (no text or symbols)natural_image
Illustration of a handheld vacuum cleaner with a blue internal component (no text or symbols visible)natural_image
Illustration of a hand holding a tool with directional arrows indicating movement (no text or symbols)natural_image
Illustration of a hand using a tool to adjust or install a device component (no text or symbols visible)natural_image
Three-step illustration of a car interior showing hand positioning and valve placement (no text or symbols)natural_image
Diagram of a car interior with a blue grid and directional arrow, no readable text or symbols presentnatural_image
Illustration of a hand using a tool to adjust or install a mechanical component (no text or symbols visible)natural_image
Illustration of a mechanical clamp tool and its application on a component, showing close-ups of clamps and parts (no text or symbols)natural_image
Line drawing of a hand holding a handheld device with a handle and lever (no text or symbols)natural_image
Illustration of two hands holding a tool, showing the process with no text or symbolsnatural_image
Diagram showing a device with a control panel and two circular insets illustrating mechanical components (no text or symbols)natural_image
Illustration of a vacuum cleaner with internal components and fan (no text or symbols)Deschideti capacul
natural_image
Illustration of a hand holding a tool with blue arrows indicating motion or force direction (no text or symbols)natural_image
Illustration of a hand using a tool to adjust or install a device component (no text or symbols visible)natural_image
Three-step illustration of a car seatbelt mechanism, showing hand positioning and mounting details (no text or symbols)natural_image
Diagram of a car interior with a blue solar panel and directional arrow, no text or symbols presentnatural_image
Illustration of a hand using a tool to adjust or install a mechanical component (no text or symbols visible)natural_image
Line drawing of a hand holding a device with a handle and lever (no text or symbols)natural_image
Two hand-drawn diagrams showing a tool being adjusted, with no visible text or symbols.natural_image
Diagram showing a device with a circular component and two views of a mechanical assembly (no text or symbols)natural_image
Illustration of a handheld device with a blue internal component and a hand adjusting its part (no text or symbols visible)natural_image
Illustration of a hand holding a tool with directional arrows indicating movement (no text or symbols)natural_image
Illustration of a hand using a tool to adjust or install a device component (no text or symbols visible)natural_image
Three-step illustration showing car seatbelt and seatbelt mechanism (no text or symbols)natural_image
Diagram of a car interior with a blue grid panel and directional arrow, no readable text or symbols presentnatural_image
Illustration of a car interior with hands using a tool to adjust or install a component (no text or symbols visible)natural_image
Illustration of a mechanical clamp tool interacting with a device, showing close-ups of components (no text or symbols present)natural_image
Line drawing of a handheld device with a handle and lever (no text or symbols)natural_image
Two hand-drawn diagrams showing a tool interacting with a device, no text or symbols present.natural_image
Technical illustration of a mechanical device with two views showing internal components (no text or symbols)natural_image
Illustration of a vacuum cleaner with internal components (no text or symbols)natural_image
Illustration of a hand holding a tool with directional arrows indicating movement (no text or symbols)natural_image
Illustration of a hand using a tool to adjust or install a device component (no text or symbols visible)natural_image
Three-step illustration showing hand positioning and valve assembly (no text or symbols)natural_image
Diagram of a car interior with a blue solar panel and directional arrow, no text or symbols presentnatural_image
Illustration of hands using a tool to adjust or install a mechanical component (no text or symbols visible)natural_image
Illustration of mechanical clamping tools and components (no text or symbols)natural_image
Line drawing of a hand holding a tool, no text or symbols presentnatural_image
Two hand-drawn diagrams showing a tool being adjusted, with no visible text or symbols.natural_image
Diagram showing a device with a circular component and two views of a mechanical assembly (no text or symbols)natural_image
Illustration of a handheld vacuum cleaner with a blue internal component (no text or symbols visible)Pripojte k hubici teleskopickú trubicu. Pripojte teleskopickú trubicu k rukováti hadice (vyberiete ju stlačením blokovacieho tlačidla a potiahnutím).

natural_image
Illustration of a hand holding a tool with directional arrows indicating movement (no text or symbols)natural_image
Illustration of a hand using a tool to adjust or install a device component (no text or symbols visible)natural_image
Diagram of a car interior with a blue solar panel and directional arrow, no readable text or symbols presentnatural_image
Illustration of hands using a tool to adjust or install a mechanical component (no text or symbols visible)natural_image
Illustration showing two different types of electrical connectors or tools, one with a plug and others with circuitry (no text or symbols present)natural_image
Line drawing of a hand holding a tool with a handle and lever (no text or symbols)natural_image
Two hand-drawn diagrams showing a tool being inserted into a device, no text or symbols presentnatural_image
Diagram showing a device with a sensor and two views of a mechanical assembly (no text or symbols)natural_image
Illustration of a vacuum cleaner inside a device, showing internal components and airflow path (no text or symbols)Pritrdite teleskopsko cev na nastavek. Pritrdite teleskopsko cev na ročaj gibljive cevi (da jo odstranite, pritisnete gumb za zaklepanje in povlecite).
Vstavite gibljivo cev v sesalnik (da jo odstranite, pritisnete gumbe za zaklepanje in povlecite). Vstavite gibljivo cev v ročaj za gibljivo cev, dokler se gumb za zaklepanje ne zaskoči (da se sprosti, pritisnite gumb za zaklepanje in povlecite).

natural_image
Illustration of a hand holding a tool with two blue arrows indicating direction (no text or symbols)Izvlecite napajalni kabel in ga priključite v električno omrežje. Pritisnite gumb za VKLOP/ IZKLOP, da vklopite/izklopite sesalnik. Kontrolne lučke posvetijo, kontrolna lučka LOW/ HIGH posveti od leve proti desni in nazaj. Na daljinskem upravljalniku pritisnite gumb za VKLOP/IZKLOP (ON/OFF), da vklopite/izklopite sesalnik.
natural_image
Illustration of a hand using a tool to adjust or install a device component (no text or symbols visible)Po sesanju pritisnite gumb za NAVIJANJE, da navijete kabel.
POLOŽAJI ZA SHRANJEVANJE
Za prenašanje in shranjevanje sesalnika uporabite položaj za shranjevanje na bočni strani (A) ali spodaj (C). Med premorom uporabite položaj na zadnji strani (B), da si odpočijete hrbet.
ZAMENJAVA VREČKE ZA PRAH, S-BAG®
natural_image
Three-step illustration of a car seatbelt mechanism, showing hand positioning and mounting bracket (no text or symbols)Povlecite gumb FILTER, da odprete pokrov filtra. Uporabite originalne s-filtre. Odstranite filter in preverite oznako na okvirju filtra, da določite tip. Zamenjajte z novim filtrom ali ga očistite. Sperite notranjost (umazano stran) v mlačni vodi. Narahlo potrkajte po okvirju filtra, da odstranite vodo. Ponovite postopek štirikrat.
natural_image
Diagram of a car interior with a blue solar panel and directional arrow, no text or symbols presentPo zamenjavi filtra zaprite pokrov filtra, dokler ta ne klikne nazaj na svoje mesto. Če se pokrov filtra začne premikati, namestite tečaje na dno in potisnite pokrov filtra, da se zaskoči na svoje mesto.
OPOMBA: Ko zaženele sesalnik po zamenjavi filtra, bo minilo 10 sekund, preden se kontrolna lučka za FILTER obarva zeleno ali se izklopi.
natural_image
Illustration of hands using a tool to adjust or install a mechanical component (no text or symbols visible)Zamenjajte motorni filter, ko je umazan ali po vsaki 5. zamenjavi vrečke s-bag. Držalo filtra potisnite navzdol in ga izvlecite. Zamenjajte filter in zaprite pokrov.
SESANJE Z UNIVERZALNIM NASTAVKOM
natural_image
Illustration of a mechanical clamp tool and its corresponding disassembly process (no text or symbols present)natural_image
Line drawing of a hand holding a mechanical device with a handle and lever (no text or symbols)Odklopite nastavek s cevi. Očistite z ročajem gibljive cevi.
ČIŠČENJE NASTAVKA TURBO
natural_image
Two hand-drawn diagrams showing a tool being inserted into a component, no text or symbols present.natural_image
Diagram showing a device with a circular component and two views of a mechanical assembly (no text or symbols)Zamenjajte bateriji, ko začnejo sprednje lučke hitro utripati. Uporabite 2 AA bateriji.