
iGO - Video camera Xblitz - Free user manual and instructions
Find the device manual for free iGO Xblitz in PDF.

| Brand | Xblitz |
| Model | iGO |
| Product type | Dashcam |
| Dimensions | 90 x 26 x 30 mm |
| Weight | 76 g |
| Power supply | 5V / 2A via cigarette lighter (USB-C) |
| Screen | IPS 1.47 inches |
| Processor | GK7202 |
| Sensor | GC2083 |
| Recording resolution | 2.5K (2560x1440p) / 30 fps |
| Codec | H.264 |
| Video format | TS |
| View angle | 140° (FOV), FNO=2.0 |
| Connectivity | Wi-Fi (2412-2472 MHz, 18.9 dBm), GPS module |
| Mobile app | RoadVideo (Android and iOS) |
| Main functions | Loop recording, G-sensor, WDR, parking mode, motion detection, emergency recording, mirror, rotation, GPS data |
| Storage | Micro SD card up to 256 GB (Class 10 or higher, FAT32/exFAT format) |
| Kit contents | Camera, GPS module, cigarette lighter charger, suction cup mount with strap, electrostatic film, micro SD card reader, user manual |
| Maintenance | Clean with a soft dry cloth, avoid detergents. Clean only when the device is unplugged. |
| Safety | Do not disassemble, use only original accessories, operating temperature 0-35°C, do not expose to high temperatures, keep out of reach of children. |
| Warranty | 24 months |
| Compliance | Directive 2014/53/EU |
Frequently Asked Questions - iGO Xblitz
User questions about iGO Xblitz
0 question about this device. Answer the ones you know or ask your own.
Ask a new question about this device
Download the instructions for your Video camera in PDF format for free! Find your manual iGO - Xblitz and take your electronic device back in hand. On this page are published all the documents necessary for the use of your device. iGO by Xblitz.
USER MANUAL iGO Xblitz
natural_image
Exterior view of a black XBlitz GO digital camera with dual rear screens (no visible text or symbols on main body)Table of contents
Spis treści
B
natural_image
Interior view of a car dashboard and steering wheel, showing steering wheel, dashboard, and steering wheel (no text or symbols)PL
INSTRUKCJA OBSŁUGI
WIDEOREJESTRATOR
Carefully read the enclosed operating instructions and safety notes before use to avoid accidental damage to the equipment or unintentional injury.
PURPOSE OF THE PRODUCT
The Xblitz iGO dash cam with GPS and Wi-Fi module allows you to monitor the route, position and speed of your vehicle and record any traffic incidents. The dash cam is created from the highest quality components.
01. CONTENTS OF THE KIT
- Dash cam
- GPS module
- Charger
- Handle with retaining strap
- Electrostatic film
- Micro SD memory card reader
- Operating instructions
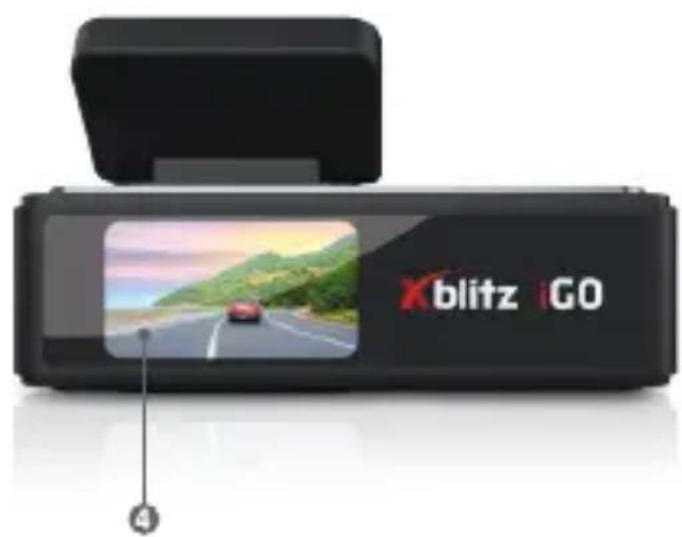
02. PRODUCT DESCRIPTION
SEE FIG. A
- Handle with retaining strap
- Micro SD memory card slot
- USB-C power port
- Display
- Function button (first short press starts Wi-Fi module/starts emergency recording (protected from overwriting); longer press 3s takes you
to Wi-Fi information and RoadVideo app QR code; next short press starts screen saver with time and basic icons; 5s press resets camera to factory settings)).
03. BEFORE USE
- It is recommended to use original micro SD cards of class 10 or higher.
- Before inserting the card into the recorder, it must be formatted on the computer in the FAT32 or exFAT file system (depending on the card) and then in the camera.
- The camera must be switched off when inserting the memory card, otherwise the card and the device may be damaged. The same applies when removing the card from the device.
- When the memory card fills up, the oldest unprotected recordings are overwritten.
- It is recommended that the G - SENSOR option is set to the minimum, in order to avoid securing unnecessary material caused, for example, by uneven road surfaces and thus losing space on the memory card.
- Sound: the device has a built-in condenser microphone that records all ambient sounds. Sounds may overlap causing distortion.
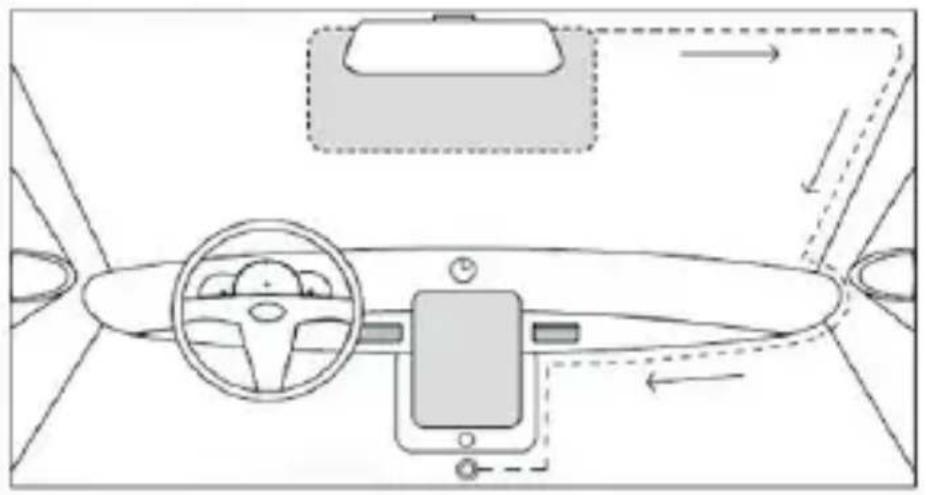
04. MONTAGE
SEE FIG. B
- Select and clean the camera mounting location.
- Mount the camera with or without pre-applied electrostatic film.
- Insert the memory card into the slot in the camera.
- Point the camera lens towards the roadway.
- Connect the GPS module to the video recorder and then connect the camera's power supply to the module. (It is possible to use the device without the GPS module connected).
- Route the cable of the power supply and GPS module so that it does not obstruct the view while driving.
- Plug the power supply plug into the car's cigarette lighter socket.
05. ACTION
- Start-up: The camera activates automatically when placed in the vehicle and connected to the power supply, and starts recording if the memory card is formatted (if the memory card is not installed or formatted the camera will issue a command to format the card).
- Charging: connect the device using the included USB-C charger. The recorder records automatically when voltage is present in the
cigarette lighter socket and when the car is started, and switches off when the car loses power after the engine is switched off. (It is also possible to connect and power up using the constant power kit directly from the battery).
-
Connecting to an app: the software (RoadVideo) is used to control the operation of the device. The app can be downloaded from the Play Store (Android), App Store (iOS) or by scanning the QR code on the box. Make sure the camera is switched on, launch the app, search for a Wi-Fi network on your phone, the device's Wi-Fi network name is: Xblitz iGO and the default password is 12345678 Once the device has successfully connected to the app, an icon will appear on the camera display to symbolise the connection. Please note that only one device can be connected to the network, and also when using the app, viewing on the display is not possible. All device settings are accessible from the RoadVideo application.
-
Recording: connect the video recorder to the application as per step 3. The recorder is in recording mode by default if there is voltage in the power socket and a formatted memory card has been inserted. The image is recorded if a flashing red recording dot appears on the camera display. The recording files are saved on the micro SD card.
-
Camera: once connected to the app, to take a photo press the button with the camera icon.
-
Reading out GPS data: when you insert the memory card with the video files into your computer, the card will contain an installation file with the "HIT GPS PLAYER" programme. Once it has been installed, the video files and the route can be viewed and analysed together with the GPS data. The data and route can also be tracked directly in the RoadVideo application by playing the recordings on your phone, where the parameters of the route will be displayed.
06. SETTING FUNCTIONS
Viewing and deleting files: maintain the connection between your device and mobile phone. If you want to view saved video or photo files, click on the 'Camera files' icon in the mobile app and manage your footage.
To manage your video recorder settings, go to the app's home screen and click on the "Camera Settings" icon in the bottom right corner. (The list of available functions or their description may vary slightly depending on the iOS/Android mobile phone operating system).
- Audio recording: on/off.
- Volume: mute/low/medium/high.
-
Start-up sound: on/off.
-
Video resolution: 2560x1440p.
- Loop recording options: 1min/3min/5min.
- Light source frequency: 50Hz/60Hz - recommended setting: 50Hz.
- Mirror - on/off mirroring.
- Rotate/Flip - enable/disable 180-degree rotation of the image.
- GPS data - enable/disable GPS speed and position data.
- G-sensor: set the sensitivity of the shock sensor: off/low/medium/high - recommended setting: low.
- Low voltage adjustment: 11.8/12.0/12.2V - recommended setting 12.0V.
- Wi-Fi name: allows the name of the camera's Wi-Fi network to be changed.
- Wi-Fi network password: allows you to change the Wi-Fi network password.
- Software version.
- Format SD card: select to format the memory card.
- Default settings: restores the default settings on the device.
07. PRECAUTIONS
- Do not disassemble the camera yourself or interfere with its construction. In the event of a malfunction, contact the service department.
- Use only original accessories.
- Only use the original charger supplied. The use of any other power supply may adversely affect the performance of the device or battery.
- The device may not be used in contravention of the laws of your country or region.
- Permissible operating temperature is 0-35 °C, storage temperature 5-45 °C
- Do not subject the device to damage or impacts.
- Take care of the cleanliness of the product, especially the lens. Do not use detergents or chemicals when cleaning.
- Clean the device when it is unplugged.
- Keep the device out of the reach of children.
- Do not expose the device to very high temperatures or fire.
- If you smell burnt plastic or electronics from the camera, unplug the device as soon as possible and contact service.
08. FAQ
1. Device does not switch on, screen flashes
Before starting up, charge the device's battery and check the connection in the cigarette lighter socket.
2. The device does not switch on/off automatically
The reason for this behaviour may be the constant power supply in the cigarette lighter socket.
3. The camera stops recording / does not overwrite recordings
Check: G-SENSOR - a function by which recordings with recorded overloads (e.g. uneven pavement, braking, driving off a kerb or over a speed bump, etc.) are protected from being overwritten. If you use this function, you must periodically format the memory card on your computer and then on the camera. Ultimately, each file on the data carrier will be protected from being overwritten and the device will not be able to record a further route - it will not record in a loop. We suggest setting the sensor according to your driving style and road conditions. You can also disable the option completely, in which case each oldest file will be overwritten and the card will not need to be formatted periodically. After adjusting the function, remember to format the memory card.
4. The camera turns on and off
Check: PARKING MODE/MONITOR and MOVEMENT DETECTION - function designed to operate while the vehicle is parked. Deactivate the functions, before setting off, as they can cause the camera to switch on and off and make random fragments of the route recordings. If the functions are deactivated, check if the fault occurs without a memory card inserted.
5. The camera records fragments of the route / random ongoing recordings
Check: MOVEMENT DETECTION - a function designed to operate while the vehicle is parked.
You need to deactivate the function before you set off, as it can cause the camera to switch on and off and make random fragments of route recordings. If the function is deactivated, check if the fault occurs without a memory card inserted.
The device shows the message “card full” or does not read the card Check the “G-sensor” and “parking mode” functions and set them to minimum. The card must be formatted in the computer in the FAT32 or exFAT file system (depending on the card) and then in the recorder. Also check: Is the selected card capacity and specification (micro SD, class 10 - U1, V10 additionally recommended) suitable for your device (we recommend using cards from reputable manufacturers, we recommend: Kingston, Samsung, Sandisk). If you encounter an error at any stage, replace the card with a new one from official distributors.
6. The device records noise, distorted, unclear sound
The device has a highly sensitive microphone that records any ambient
noises. The recorded sounds may overlap. Windscreen air vents can also distort the sound.
7. The device does not respond
Press the Reset button briefly or return the device to factory settings.
8. Transverse stripes are present in the footage
Incorrect setting of the frame rate value. Set the frequency value to "50Hz" or "60Hz" depending on local settings.
9. Handle detaches from windshield/does not stick
Degrease the surfaces well before mounting the holder on the glass.
Remember to avoid high temperatures, which can cause deformation of the holder, and damage to the recorder itself.
NOTES:
- G-SENSOR - a function thanks to which recordings with recorded overloads (e.g. uneven road surface, braking, driving off a kerb or over a speed bump, etc.) are protected from being overwritten. If you use this function, you must periodically format the memory card on your computer and then on the camera. Ultimately, each file on the data carrier will be protected from being overwritten and the device will not be able to record a further route - it will not record in a loop. We suggest setting the sensor according to your driving style and road conditions. The option can also be completely disabled, in which case each oldest file will be overwritten and the card will not need to be formatted periodically.
- PARKING MODE/MONITOR - a function designed to operate while the vehicle is parked, uses battery power* if the camera is fully charged - (*if it has a built-in battery). In this case, the camera starts recording a few seconds of video after detecting a shock - until the battery is discharged. When using this function, bear in mind the battery of the device, which needs to be charged after the function is activated (started). You should deactivate the function, before setting off on a journey, as it may cause the camera to switch on and off and make random fragments of recordings from the route.
The operation of the vehicle's constant power supply can cause this function to behave differently, e.g. leaving the camera on, which can drain the car's battery.
- MOVEMENT DETECTION - a function designed to operate while the vehicle is parked - requires constant power and the camera must remain switched on. The camera will start recording automatically when motion is detected, and will stop recording a few seconds after there is no movement in front of the camera lens. Please note that this function can drain the car battery.
You need to deactivate the function, before setting off, as it can cause the camera to switch on and off and make random fragments of route footage.
09. NOTE
- Due to continuous product improvement, the manufacturer reserves the right to make changes to the device/kit without prior notice. Some functions described in this manual may differ slightly from reality.
- Use only the original charger with a charging current of 5V/2A (do not plug directly into a 220/230V socket). Failure to follow the instructions may damage the camera or lead to dangerous situations.
- This recorder records in a loop, if you select: 1/3/5 minutes as the recording time, when the memory media is full, it will record from the beginning again and automatically delete the oldest footage in addition to the protected footage.
- The Wi-Fi module in the device is used to connect to a mobile phone using the dedicated RoadVideo software, so you can view live camera images, review recordings, and change camera settings using your mobile phone.
10. SPECIFICATION
■ Wi-Fi ■ GPS module ■ Dedicated app (Android & iOS) ■ 1.47" IPS display ■ Processor GK7202 ■ Sensor GC2083 ■ Lens FOV 140° / FNO=2.0 ■ Max. recording resolution: 2.5K (1440p) / 30fps ■ Codec: H.264 ■ Video format: TS
- Wide viewing angle - G-sensor - Loop recording - WDR - Support for micro SD memory cards up to 256GB (class 10 upwards) - Operating frequency range: 2412-2472MHz - Max frequency power in operating range: 18.9dBm - Built-in microphone and speaker - Dimensions: 90x26x30mm - Weight: 76g
11. WARRANTY/ COMPLAINTS CARD
The product comes with a 24-month warranty. Warranty terms and conditions can be found at: https://xblitz.pl/gwarancja/
Complaints must be made using the complaint form found at:
Details, contact and service address can be found at: www.xblitz.pl. Specifications and contents are subject to change without notice. We apologise for any inconvenience.
KGK Trend declares that the Xblitz iGO complies with the essential requirements of Directive 2014/53/EU. The text of the declaration can be found at the link:
02. PRODUKTA APRAKSTS
SKATIT A ATTELA
The crossed out trash can symbol indicates that unusable electrical or electronic devices, its accessories (such as power supplies, cords) or components (for example batteries, if included) cannot be disposed of alongside with household waste. In order to dispose of the devices or its components (for example, batteries) deliver the device to the collection where it will be accepted free of charge. Disposal is subject to cast version of the WEEE Directive (2012/19/ EU) and the use on batteries and accumulators (2006/66 / EC). Properal of the device prevents degradation of the natural nment. Information about the collection points of the es is issued by the competent local authorities. Incorrect al of waste is subject to penalties provided for by the law in the given area.
DE

KGK TREND Sp. z o.o.
Ujastek 5b, 31-752 Kraków, Polska.
Wyprodukowano w PRC
Producer:
KGK TREND Sp. z o. o.
Ujastek 5b, 31-752 Cracow, Poland.
Made in PRC


- Table of contents
- Spis treści
- B
- PL
- INSTRUKCJA OBSŁUGI
- WIDEOREJESTRATOR
- PURPOSE OF THE PRODUCT
- CONTENTS OF THE KIT
- PRODUCT DESCRIPTION
- SEE FIG. A
- BEFORE USE
- MONTAGE
- SEE FIG. B
- ACTION
- SETTING FUNCTIONS
- PRECAUTIONS
- FAQ
- Device does not switch on, screen flashes
- The device does not switch on/off automatically
- The camera stops recording / does not overwrite recordings
- The camera turns on and off
- The camera records fragments of the route / random ongoing recordings
- The device records noise, distorted, unclear sound
- The device does not respond
- Transverse stripes are present in the footage
- Handle detaches from windshield/does not stick
- NOTES:
- NOTE
- SPECIFICATION
- WARRANTY/ COMPLAINTS CARD
- PRODUKTA APRAKSTS
- SKATIT A ATTELA
- DE
- Producer:
Brand : Xblitz
Model : iGO
Category : Video camera