Z8 Night - Video camera Xblitz - Free user manual and instructions
Find the device manual for free Z8 Night Xblitz in PDF.

User questions about Z8 Night Xblitz
0 question about this device. Answer the ones you know or ask your own.
Ask a new question about this device
Download the instructions for your Video camera in PDF format for free! Find your manual Z8 Night - Xblitz and take your electronic device back in hand. On this page are published all the documents necessary for the use of your device. Z8 Night by Xblitz.
USER MANUAL Z8 Night Xblitz
User's manual in English language - EN
natural_image
Two black Z8 remote road rest camera units shown from different angles, one with a solar panel and the other with a landscape display (no text or symbols visible on main body)

natural_image
Abstract geometric shape with diagonal light and white background, no text or symbols presentXblitz®
INSTRUKCJA OBSŁUGI
[Z8 NIGHT]
![Xblitz Z8 Night - [Z8 NIGHT] - 1](/content/2026/06/1169907/images/3b40e71a42707ab896f45662ebf0095b1fbf168615be71350a3de3207c4c1803.jpg)
natural_image
Two black-and-white cameras with visible lens, one labeled 'Z8' and the other showing a landscape image (no text or symbols on main body)PL
Szanowny Kliencie,
KGK Trade Sp. z o.o. sp. K
ul. Ujastek 5B
31-752 Kraków
Polska
Xblitz®
USER'S MANUAL
[Z8 NIGHT]
![Xblitz Z8 Night - [Z8 NIGHT] - 1](/content/2026/06/1169907/images/0414539ec717a1ee3309e8615ebc94835c0a1617db83078dbc857f0026c38c89.jpg)
natural_image
Two black-and-white cameras with visible lens, one labeled 'Z8' and the other showing a landscape image (no text or symbols on main body)EN
Dear Customer,
Thank you for purchasing the Xblitz Z8 NIGHT. The product you purchased is a dashboard camera used to record vehicle movement when driving.
Please read the user manual and use the product as intended.
BEFORE USE
- It is recommended to use branded micro SD memory cards (8 to 32GB, class 10).
- Before putting the memory card in the camera, format the card according to the computer FAT32 system and in the device system as well.
- Insert the memory card in the camera only when it is turned off. When installed or taken out while the camera is turned on, can cause damage to the card and the camera.
- The camera has built-in capacitors and cannot operate without an external power supply.
- When the memory card is full, the oldest, unprotected data will be overwritten by new video files.
- Use the device as intended. Do not use the MOTION DETECTOR or PARKING MODE functions during driving – they can cause device malfunction when, for example, standing on the intersection.
- It is recommended to use the G-SENSOR function on the lowest settings to prevent protecting unnecessary recordings. The protected recordings will not be overwritten by new data when the memory card is full.
- The device is equipped with a condenser microphone which records background noises. The sounds can overlap and create distortions.
01. INCLUDED
- Dashboard camera Xblitz Z8 NIGHT
- Car charger
- Magnetic camera holder
- Micro SD card reader
- User manual
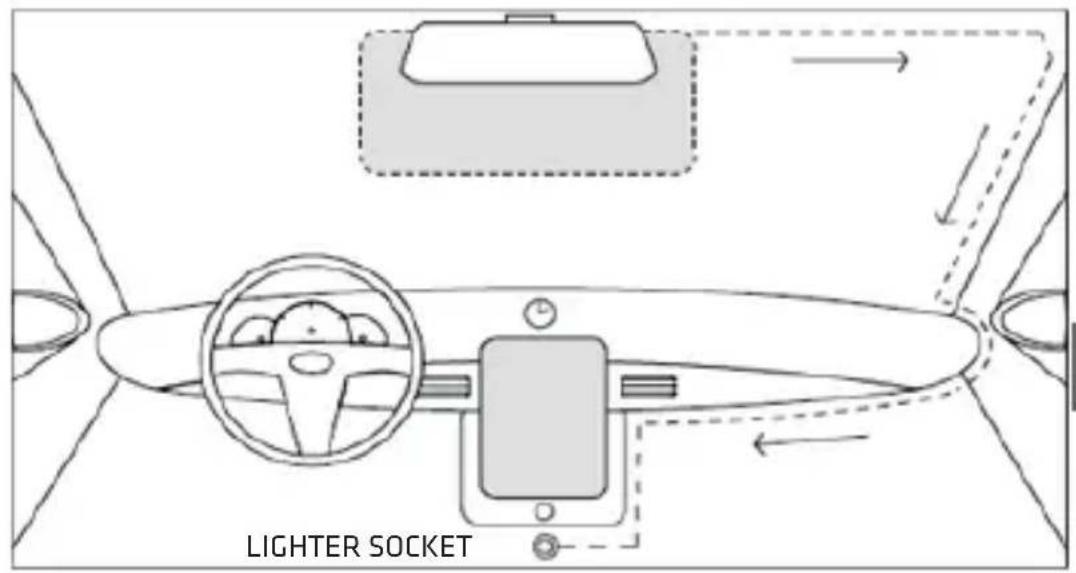
02. INSTALLING THE CAMERA
INSTALLING THE CAMERA
EN
- Choose the place of installation. Make sure that nothing is blocking the camera view.
- Thoroughly clean the chosen place before mounting the device.
- Adhere the camera handle to the windshield.
- Drag the cable according to the picture.
- Place the mini-USB plug in the port situated in the magnetic holder.
- Place the charger in the power input situated in the cigarette lighter socket.
- Put the memory card into the slot in the camera. Make sure that the device is turned off.
-
Mount the camera in the holder.
-
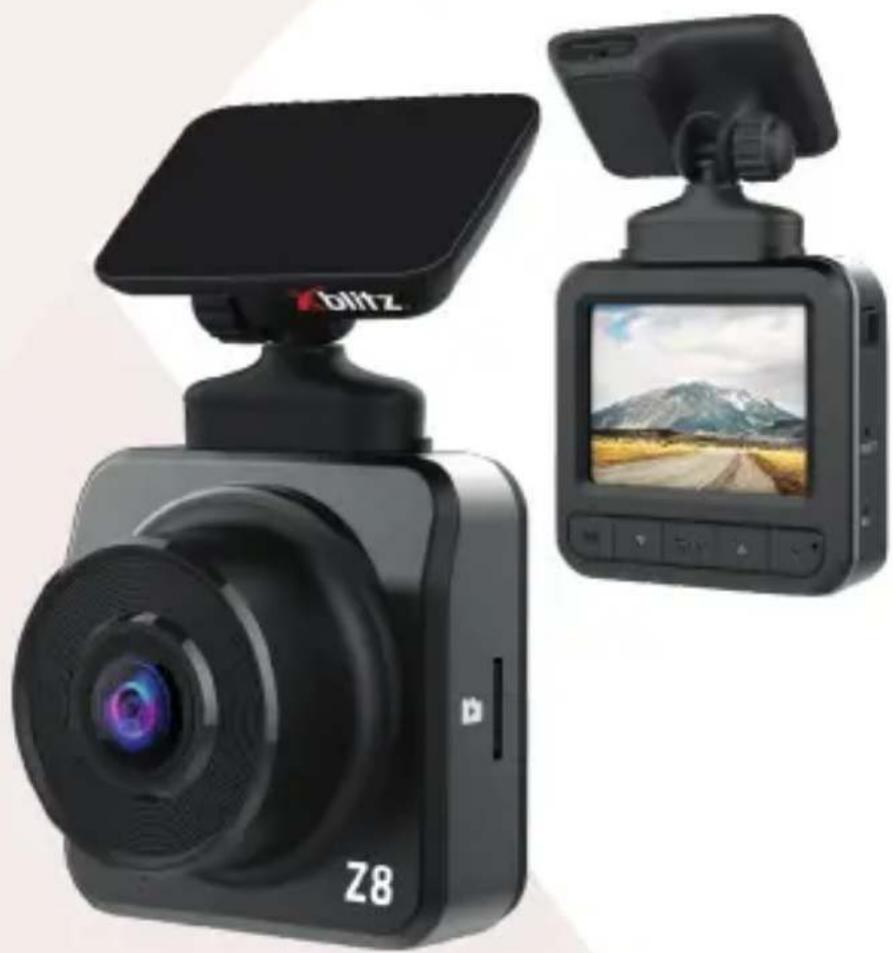
PRODUCT DESCRIPTION
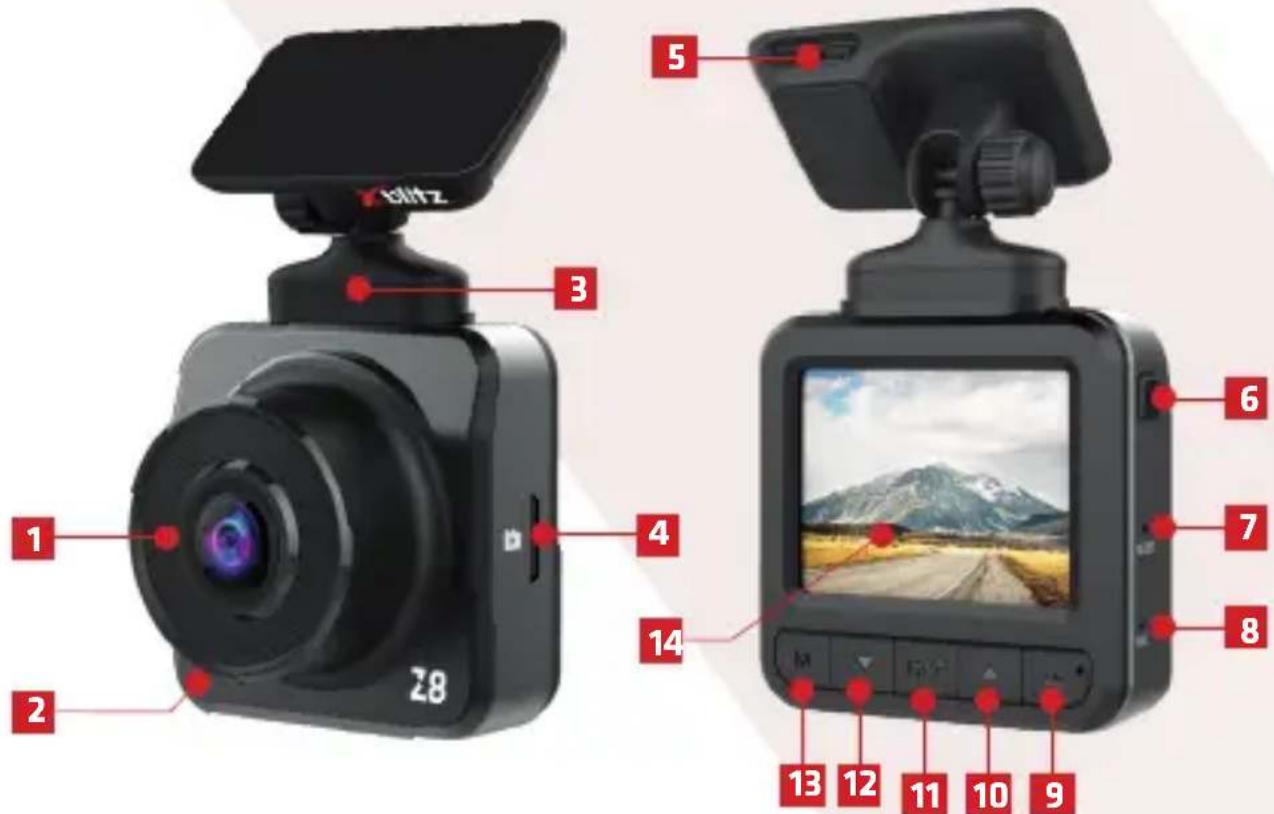
- Lens
- Speaker
- Mounting spot
- Micro SD card slot
- USB port
- POWER button
- RESET button
- Microphone
- "!" button
- UP button
- REC button
- DOWN button
- MODE button
- Screen
04. STARTING THE DEVICE
- Mount the camera in the holder and plug it in the socket (according to the instructions in the INSTALLING THE CAMERA section).
- Place the micro SD in the right camera port. Make sure that the card is formatted according to the FAT32 files.
ATTENTION: SD card can be put in or out of the device only when it is turned off.
3. Use the menu to set:
a. Date and time.
b. Loop recording (time of recording). If the loop recording function is turned off, the files will not be overwritten by new recordings.
c. Set the highest available resolution.
d. Set the G-SENSOR function for the highest possible value, so that the camera will not protect blurry recordings, for example from driving on uneven roads.
e. Turn on the HDR mode.
-
Make sure the motion detector and the parking mode are turned off. If the options will be turned off during driving, they will have a negative effect on the car. These modes should be turned on only when your car is parked.
-
The camera will automatically begin recording after starting the vehicle, only if the power socket does not provide continuous power supply.
-
Red LED light right next to the MENU button indicates that the device is plugged into the power supply.
EN
05. BUTTONS
1. POWER
To turn the display on/off press the POWER button shortly. To turn the device on/off press and hold the POWER button for 3 seconds.
2. MODE
To change the video/photo/file playback menus press the button shortly. To open the MENU press and hold the MODE button.
To switch between function menu and setting menu press the MENU button. When pressed during function change, the device goes back to the regular menu.
3. DOWN
In video mode, the DOWN button turns the sound recording on/off. In video mode, pressing and holding the DOWN button turns on the parking mode.
In file browsing mode, the DOWN button switches between files saved on the memory card.
When playing a video, the DOWN button forwards the recording.
When in menu, pressing the DOWN button changes the current position.
4. REC
In video mode, the REC button starts/stops recording a video.
In photo mode, the REC button is used to take a photo.
In browsing mode, the REC button starts/stops playing video recordings.
In menu mode, pressing the button confirms the selection.
5. UP
In browsing mode, the UP button switches between files saved on the memory card.
In menu mode, the UP button changes the currently chosen item.
When playing a video, the UP button rewinds the video.
6. !
When pressed during recording a video, protects the video from overwrite.
7. RESET
The RESET button resets the device to factory settings.
06. MENU
A. VIDEO MODE:
1. Resolution
Changes the resolution of the video files recorded by the camera. The higher the resolution, the better the recording quality and bigger the file saved on the memory card.
2. Loop recording
Allows to set the length of video recordings. If the function is turned off, new recordings will not overwrite the old recordings when the memory card is full.
3. Time-lapse recording
Turns on the time-lapse recording and allows to set the length of interval between the video frames. Turning on the option will turn off normal recording.
4. HDR
Allows the device to dynamically change the values of underexposed and overexposed areas and makes the underexposed elements more visible on recordings.
5. Exposure
Allows to adjust the amount of light which enters the camera sensor in the video mode.
6. Motion detection
Allows to turn on and off the motion detection mode. When turned on, the camera will automatically start recording the video file when it senses a moving object in front of the lens (for example, a person moving towards the car). The recordings are protected from overwriting by the device.
7. Sound
Allows to turn on/off sound recording by the device.
8. Date mark
Allows to turn on/off data and hour mark on the recording.
9. G-SENSOR
Gravity sensor allows the camera to automatically record videos after sensing a shock (caused by, for an example, a collision) and protects them from overwrite.
10. Parking mode function
Allows to turn on/off the parking mode. The function turns on automatically and starts recording after sensing a shock (caused by, for example, a collision on the parking lot). Recordings made during the parking mode are protected from overwrite.
11. License plate number visibility
Allows you to turn on/off displaying license plate numbers of your car on the videos. License plate numbers can be added manually after turning on the function.
EN
B. PHOTO MODE:
1. Self-timer
Allows you to set the time which passes between pressing the REC button and device taking a photo.
2. Resolution
Allows to change the resolution of the photos.
3. Continuous shooting
Pressing the REC button enables the camera to take a series of three photos at once.
4. Quality
Allows to change the quality of the photos taken by the camera. Higher quality photos are more readable but take up more space on the memory card as well.
5. Sharpness
Allows to change the sharpness of the photos taken by the camera. Photos with low sharpness are lighter and take up less space on the memory card.
6. White balance
Allows to adjust the sensitivity of the device sensor to the light conditions.
7. Color
Allows to change the color settings of the camera. Available options: color, black and white, sepia.
8. ISO
Allows you to adjust the light sensitivity of the camera sensor.
9. Exposure
Allows to adjust the amount of light which enters the camera sensor in photo mode.
10. Anti-shock protection
Turns on/off the digital photo stabilization, which protects the photo from blurring caused by shaking of the camera.
11. Date mark
Allows to turn on/off data and hour mark on the photo.
C. FILE PLAYBACK MODE:
1. Delete
Allows to delete a chosen file or all the files saved on the memory card.
2. Protection
Allows to turn on/off the protection from overwriting/ deleting currently chosen files or all the files saved on the memory card.
3. Slideshow
Allows to turn on the slideshow of the saved photos on the memory card. The user can also choose how long each photo will be displayed.
D. DEVICE SETTINGS
1. Screen saver
Shows how much time there is left until the device will automatically turn off the screen.
2. Automatic shutdown
Shows how much time is left until the device automatically shuts down.
3. Frequency
Allows to change the frequency in which the videos are recorded and played. There are two frequency settings, 50Hz and 60Hz.
4. Button sound
Allows to turn on/off device button sounds.
5. Language
Allows to change the language setting for the device menu.
6. Date/time
Allows to set the current date and hour in the device memory. The date will be displayed on the recordings and photos if the DATE MARK function is turned on in the photo/video.
7. Format
Formats the memory card put in the device.
ATTENTION: Formatting will delete all data and files saved on memory card.
8. Default settings
Switches the camera to factory settings.
9. Version
Displays the installed software version.
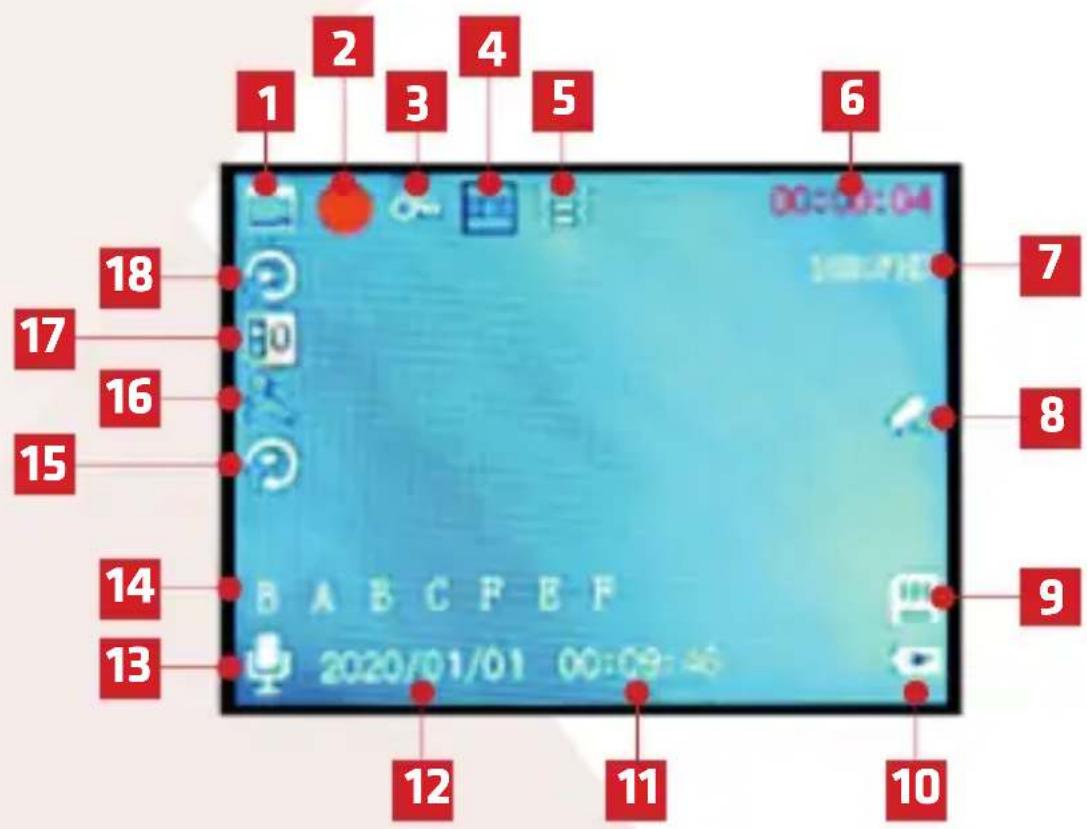
07. SCREEN AND ICONS
A. VIDEO MODE:
- Camera operation mode.
- Turned on video recording.
-
The recording is protected from overwriting.
-
HDR mode is turned on.
-
G-SENSOR function sensitivity.
-
Length of recording. If the camera is not recording, the screen displays the length of recordings which can fit on the memory card.
-
Recording resolution.
-
Parking mode.
-
Device recognizes the input/memory card.
-
Device is connected to the charger.
-
Hour.
-
Date.
-
Sound recording.
-
Vehicle registration numbers.
-
Time-lapse recording.
-
Motion detection.
-
Exposure value in video mode.
-
Length of recording in loop recording mode.
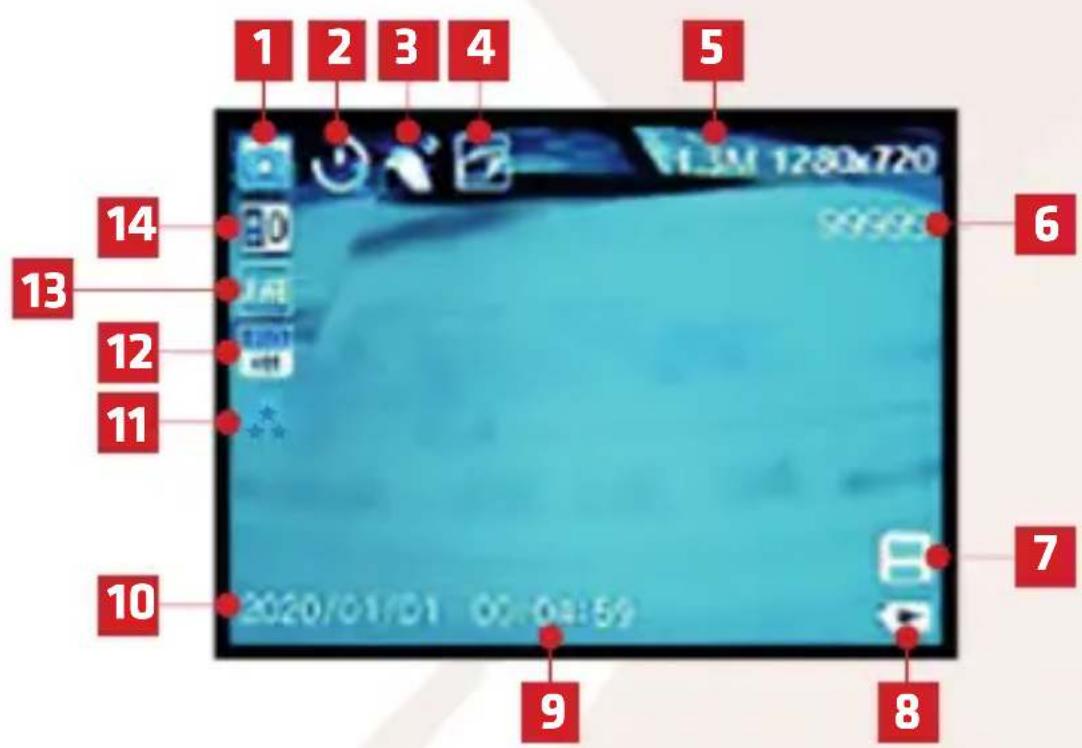
B. PHOTO MODE:
- Camera work mode.
- Display turned on and the count of seconds from pressing the REC button and taking a photo.
- Anti-shock function.
- Continuous shooting function.
- Photo resolution.
- Number of photos that the memory card can hold.
- The device is locating the inserted memory card.
- The device is plugged into the charging port.
- Hour.
- Date.
- Photo quality.
- ISO photo value.
- White balance.
- Exposure value in photo mode.
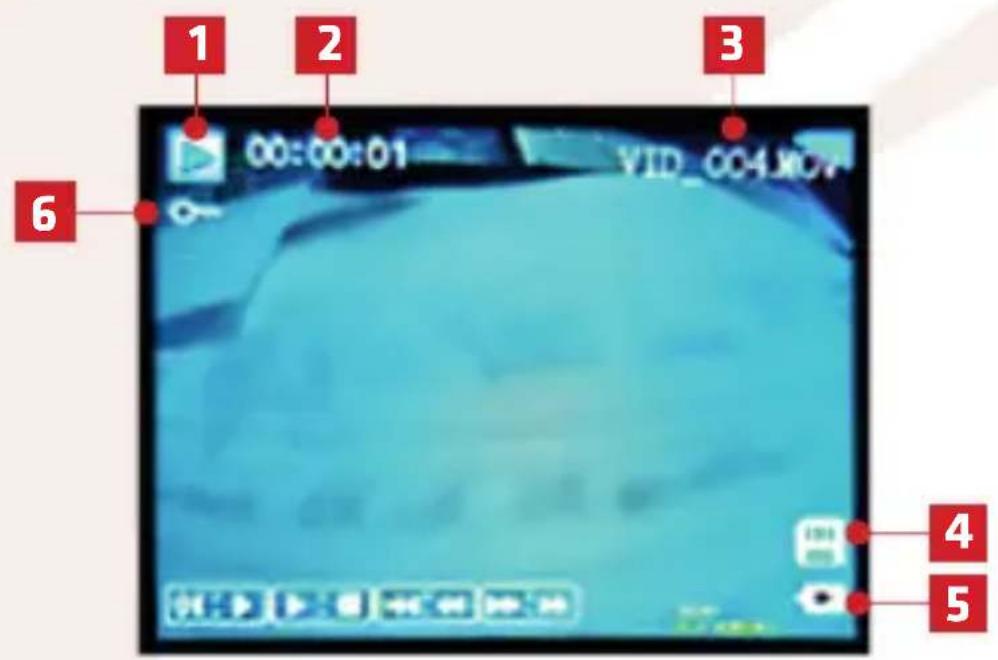
C. FILE PLAYBACK MODE:
- File type (recording/photo).
- Length of recording.
- File name.
- Device is detecting the memory card.
- Device is connected to the charger.
- File is protected from overwriting or deletion.
EN
08. FAQ
- The device does not turn on or turns off automatically.
This can happen due to continuous power in the lighter socket in your car.
- The device resets during driving.
Check, if the camera is plugged in correctly into the power socket. Check if the power cables or the lighter socket are not damaged.
- The device does not record videos in fixed length or starts recording at random times.
Check, if the MOTION DETECTION and PARKING MODE functions are turned off during the drive.
- The device display shows a message: "the memory card is full".
Check the G-SENSOR function and set its sensitivity to minimum, so that the camera will not protect useless files from overwriting.
- The device display shows a message: "please use a high-speed card".
Make sure that you are using a fast, class 10 memory card.
- The device records static or a distorted, inaudible sound.
The device is equipped with a sensitive condenser microphone, which records all ambient noise. Loud air-conditioning or even windscreen air vent can interfere with the recording and distort the recorded sound.
09. SAFETY
- Do not disassemble or modify the device yourself. In case of damage, please contact the customer service center.
- Use only original accessories.
- Use only the original charger included in the set. Using a different charger cord can have damaging effects on the camera.
- The device can not be used against the laws and regulations in your country or region.
- The device can operate in a temperature from 0 to 35°C and be stored in a temperature ranging from 5 to 45°C. Appropriate air humidity is 5-90% (without condensation).
- Do not drop the device on the ground and do not expose it to other physical damages.
- Keep the device clean, especially the camera lens. Do not use detergents or any other chemical substances to clean the camera.
- Clean the device only when it is unplugged from the power source.
- Keep the camera out of reach of children.
- Do not expose the device to high temperatures or fire.
10. SPECIFICATION
Processor: JI5601
Video resolution: Max. 1920x1080
Sensor: 2Mpx
Memory: Micro SD, up to 32 GB storage, class 10
USB: Mini USB
Microphone/Speaker: Built-in
Capacitors: Built-in
Dimensions (without the handle): 40x60x57 mm
Weight (without the handle): 60 g

ATTENTION: The camera does not have a built-in mass storage. To open files on the computer, you need to take out the memory card and connect it with the computer using a card reader.

ATTENTION: Use only chargers with a charging power of 5V/1A. Do not plug the device directly into a 220/230V power outlet. Failure to comply with the recommendations can damage the camera, or, in severe cases, cause ignition.
11. WARRANTY/ COMPLAINTS
The product is covered by a 24-month warranty. The terms of the guarantee can be found at: https://xblitz.pl/warranty/
Complaints should be reported using the complaint form located at: http://reklamacje.kgktrade.pl/
Details, contact and website address can be found at: www.xblitz.pl
Specifications and contents of the kit are subject to change without notice. We apologise for any inconvenience.

The crossed out trash can symbol indicates that unusable electrical or electronic devices, its accessories (such as power supplies, cords) or components (for example batteries, if included) cannot be disposed of alongside with household waste. In order to dispose of the devices or its components (for example, batteries) deliver the device to the collection point, where it will be accepted free of charge. Disposal is subject to the recast version of the WEEE Directive (2012/19/EU) and the Directive on batteries and accumulators (2006/66/EC). Proper disposal of the device prevents degradation of the natural environment. Information about the collection points of the facilities is issued by the competent local authorities. Incorrect disposal of waste is subject to penalties provided for by the law in force in the given area.

Manufacturer:
KGK Trade sp. z o.o. sp. k.
Ujastek 5B
31-752 Cracow
Poland

natural_image
Abstract geometric shape with diagonal light pink and white gradient, no text or symbols presentXblitz®
EXPLORE THE FUTURE...