Gysflash 8.48 Pl-E - Welding machine GYS - Free user manual and instructions
Find the device manual for free Gysflash 8.48 Pl-E GYS in PDF.


User questions about Gysflash 8.48 Pl-E GYS
0 question about this device. Answer the ones you know or ask your own.
Ask a new question about this device
Download the instructions for your Welding machine in PDF format for free! Find your manual Gysflash 8.48 Pl-E - GYS and take your electronic device back in hand. On this page are published all the documents necessary for the use of your device. Gysflash 8.48 Pl-E by GYS.
USER MANUAL Gysflash 8.48 Pl-E GYS
natural_image
Line drawing of a rectangular electronic enclosure with ventilation slots and mounting tabs (no text or symbols)
| FR | 02-06 / 37-44 |
| EN | 07-11 / 37-44 |
| DE | 12-16 / 37-44 |
| ES | 17-21 / 37-44 |
| RU | 22-26 / 37-44 |
| NL | 27-31 / 37-44 |
| IT | 32-36 / 37-44 |
GYSFLASH 8.48 PL-E
DESCRIPTION GÉNÉRALE
| Liquide/Gel | AGM | Liquide/Gel-Traction AGM-Traction | |
| 57.2 V | 58.8 V | 57.6 V | 58.8 V |
| Liquide/Gel | AGM | Liquide/Gel-Traction AGM-Traction |
| 57.2 V | 58.8 V 57.6 V | 58.8 V |
line
| Phase | U (V) | I (V) | |-------|-------|-------| | Analyse Charge Complément | 0 | 0 | | Max 30 min < 1s | 1 | 1 | | Max 2h | 1 | 0 | | Max 1h No limit | 1 | 0 | | Mode Floating Absorption | 0 | 1 |Étape 1 : Analyse
ANOMALIES, CAUSES, REMÈDES
CONDITIONS DE GARANTIE
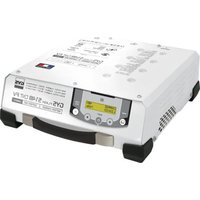
The Gysflash 8.48 PL-E is an on-board charger for recharging the traction batteries found on scrubber-driers or forklift-trucks, service batteries found in marine, heavy goods vehicles or buses, and for batteries used in electromobility-related transport equipment (bicycles, scooters, golf carts, etc.). It is suitable for charging most lead-acid batteries (liquid/gel, AGM) and lithium batteries (LiFePO4, lithium-ion, etc.).
This charger is ideal for charging and maintenance of:
- 48 V (24 cells in series) lead batteries (Liquid/Gel, AGM) ranging from 15 Ah to 160 Ah.
• 48 V LFP batteries (15 cells in series) ranging from 8 Ah to 160 Ah. - 48 V LFP batteries (16 cells in series) ranging from 8 Ah to 160 Ah.
• 48 V «standard» lithium-ion batteries (13 cells in series)
• 48 V «standard» Lithium-ion batteries (14 cells in series)
CONNECTIONS AND WIRING
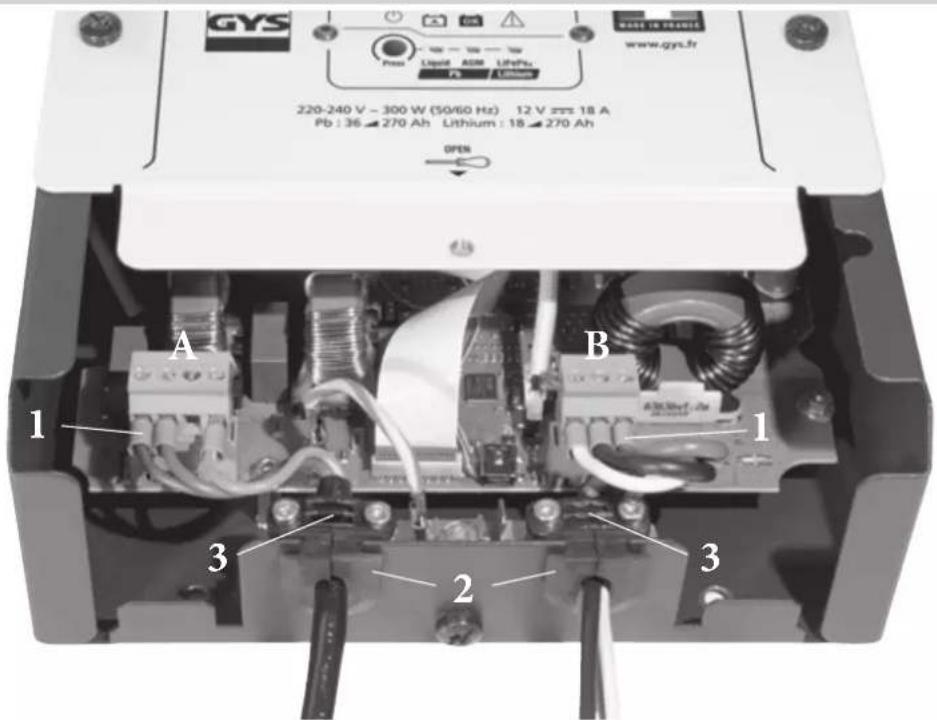
text_image
GYS Press Liquid ADR LiFePb Pb Lithium 220-240 V - 300 W (50/60 Hz) 12 V ≈ 18 A Pb : 36 ▲ 270 Ah Lithium : 18 ▲ 270 Ah OPEN A B 1 1 3 2 3| Connectivity | Wire | |||
| Type Section | ||||
| A | 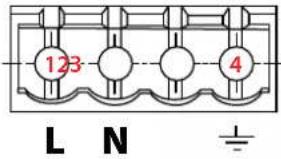 | POWER SUPPLY 230~1. PHASE2. NEUTRAL3. N.C.4. EARTHWürth Electronik connector reference number691344510004 | H05RN-For equivalent | min:3G0.75 mm2max:3G2.5 mm2 |
| B | 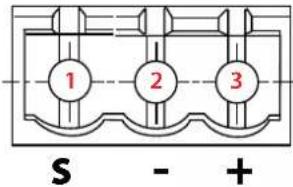 | 48 V BATTERY CONNECTION1. SIGNAL power present (+48/2mA ) SIGNAL présence secteur(+48/2mA )————2. NEGATIVE CONNECTION - 48 V————3. POSITIVE CONNECTION + 48 V————Würth Electronik connector reference number691344510003 | H01V-Kor equivalent | Battery (2/3)2.5 mm2orAWG14 |
| Signal (1)max 2.5 mm2 | ||||
- Fit the appropriate cable crimps 1 for the cross-section of each cable.
-
Screw the crimps into the connector as shown in the above connection diagrams for connectors A and B.
-
Clip the connectors into their sockets on the board.
- Pass the cables through the rubber grommets 2 and secure them in the metal plate.
- Fix the clamps 3 in such a way that the wired sections inside the casing are not under tension (M3x20 - TORX 10 screws).
CALIBRATION CABLE FUNCTION
This procedure is used to calibrate the charging cables on the unit, so that the charger can compensate for the voltage drop caused by the cables as effectively as possible. It is strongly recommended that this procedure is carried out when the charger is first installed and whenever the cables are modified or changed.
- Enter one of the lead charging modes.
- Short-circuit the 2 clamps of the cable (do not short-circuit a battery).
- Unplug the product from the mains and wait until the charger switches off.
- Press and hold the Ⓞ button while plugging in the mains plug until the 📊 indicator light comes on.
- OK on: the calibration was carried out successfully.
- ⚠ on: If the calibration fails, remove the mains plug and repeat the process.
- Unplug from the mains until the charger switches off.
CHARGE MODES
To modify the charging mode settings, you must:
-
Unlock the charger by pressing the ⬤ button for 3 seconds.
-
Select the mode by pressing the ● button again.
-
Lock the mode by pressing the 📄 button again for 3 seconds (or wait 10 seconds without pressing the button).
Pb
Lead-acid/gel charging mode (57.2 V/8 A):
Mode for charging 48 V lead/liquid batteries from 15 Ah to 160 Ah. 7-step automatic charging cycle.
Pb
Lead Liquid/Gel-Traction charging mode (57.6 V/8 A):
Mode for charging 48 V lead/liquid batteries from 15 Ah to 160 Ah. 7-step automatic charging cycle.
Pb
Lead-acid AGM charging mode (58.8 V/8 A):
Mode for charging 48 V lead/AGM batteries from 15 Ah to 160 Ah. 7-step automatic charging cycle.
Pb
Lead AGM-traction charging mode (58.8 V/8 A):
Mode for charging 48 V lead/AGM batteries from 15 Ah to 160 Ah. 7-step automatic charging cycle.
LiFePO4
Lithium Iron Phosphate charging mode 54.0V/15 cells (54.0 V/8 A):
Mode for charging 48 V LiFePO4 lithium batteries from 8 Ah to 160 Ah. 6-step automatic charging cycle.
LiFePO4
Lithium Iron Phosphate charge mode 58.0V/16 cells (57.6 V/8 A):
Mode for charging 48 V LiFePO4 lithium batteries from 8 Ah to 160 Ah. 6-step automatic charging cycle.
Li-ion
Lithium-ion charging mode 54.0V/13 cells (54.0 V/8 A):
Mode for charging 48 V lithium-ion batteries from 8 Ah to 160 Ah. 6-step automatic charging cycle.
Li-ion
Lithium-ion charge mode 58.0V/14 cells (58.1 V/8 A):
Mode for charging 48 V lithium-ion batteries from 8 Ah to 160 Ah. 6-step automatic charging cycle.
UVP wake-up function

Some Lithium batteries incorporate a UVP protection (Under Voltage Protection) which disconnects the battery in case of deep discharge. This protection prevents the charger from detecting the battery. To enable the Gysflash 8.48 PL-E to charge the battery, the UVP protection must be deactivated. To do this, activate the UVP Wake-up function on the charger. Once activated, this function will run a battery wake-up procedure every 5 minutes.
Procedure for activating or deactivating the UVP wake-up function:
- Enter one of the Lithium charging modes.
- Unplug the product from the mains and wait until the charger switches off.
- Keep the ⬤ button pressed while connecting the mains plug.
- If the Li-ion, LiFePO4 and OK LEDs are lit, the UVP wake-up function is active.
- If the Li-ion, LiFePO4 and LEDs are lit, the UVP wake-up function is deactivated.
- Unplug the mains plug until the charger switches off. The settings will be saved.
Tip for checking whether the UVP wake-up function is active:
- Restart the product.
- If all the LEDs light up at the same time for one second, the UVP wake-up function has been activated.
- If the LEDs illuminate one after the other, the UVP wake-up function is deactivated.

In the case of UVP protection on a lithium battery, it is recommended that all the consumers on the battery are removed so that the UVP wake-up function works correctly.
- Lead-acid charge curve:
The Gysflash 8.48 PL-E features an advanced 6 (or 7) stage charging curve that optimizes battery performance. This automatic charge curve is adapted to all types of lead-acid batteries (liquid/GEL and AGM) to ensure the optimal charge level for the battery. This curve is fully compatible even when there are consumers present on the battery.
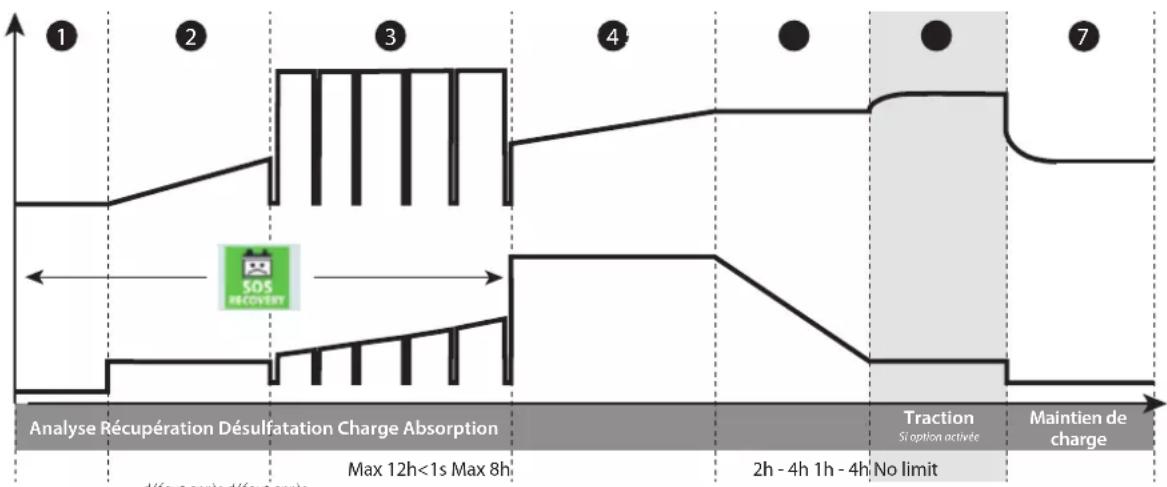
flowchart
graph LR
    A["1: Analyse Récupération Désulfatation Charge Absorption"] --> B["2: Max 12h<1s Max 8h"]
    B --> C["3: Solute Plateau"]
    C --> D["4: Traction Si option activée"]
    D --> E["5: 2h - 4h 1h - 4h No limit"]
    E --> F["6: Maintien de charge"]
    F --> G["7: Final state"]
Step 1: Analysis
Analysis of the battery status (level of charge, reverse polarity, incorrect battery connected...)
Step 2: Recovery (3 A)
Recovering damaged elements following a prolonged deep discharge.
Step 3 : Desulphation (62 V)
Battery desulphation process.
Step 4 : Charge (8 A)
Fast charge at maximum current to reach 80% charge level.
| Liquid/Gel AGM | Liquid/Gel-Traction | AGM-Traction |
| 57.2 V | 58.8 V 57.6 V | 58.8 V |
Step 5 : Absorption
Constant voltage charging to bring the charge level up to 100%.
| Liquid/Gel AGM | Liquid/Gel-Traction | AGM-Traction |
| 57.2 V | 58.8 V 57.6 V | 58.8 V |
Step 6 : Traction (62 V)
If the traction option has been selected, the charger will apply an additional current to create gas, which will mix the electrolyte and recondition the battery cells. During this phase, the battery may lose some water.
Step 7: Maintenance charge (54 V)
Battery charge level maintained at maximum.
• Lithium charging curve:
The Gysflash 8.48 PL-E uses an advanced 6-stage lithium charging curve to ensure optimum performance from the battery. This automatic charge curve is adapted to all types of Lithium batteries to provide the optimal level of charge for your battery. This curve is fully compatible even when there are consumers present on the battery.
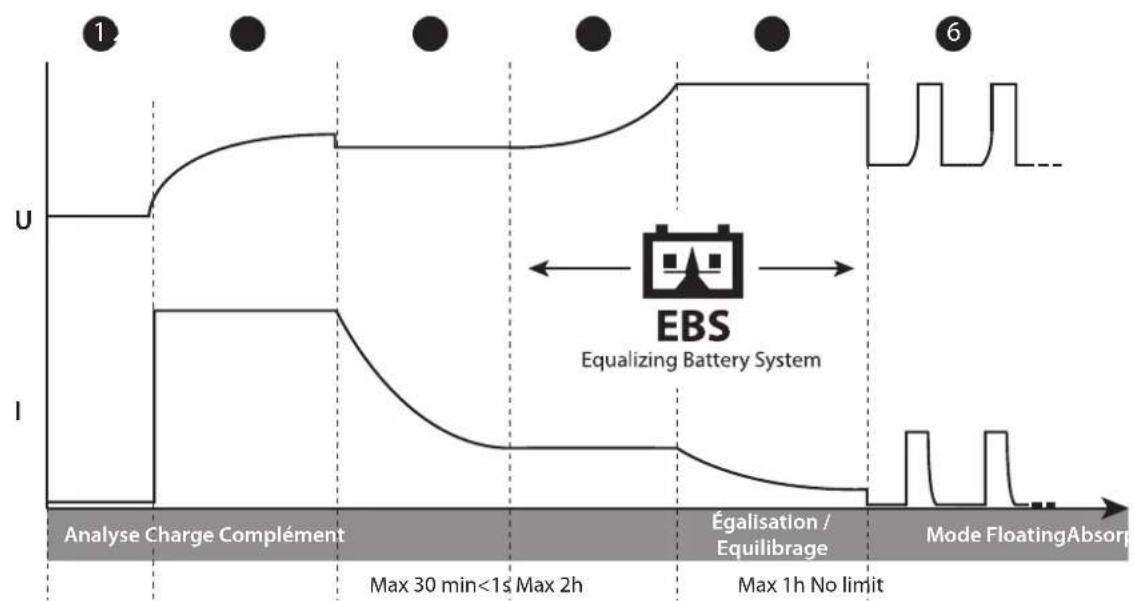
line
| Phase | Voltage (U) | Current (I) | |-------|-------------|-------------| | Analyse Charge Complément | High | Low | | Max 30 min < 1s | High | Low | | Max 2h | High | Low | | Égalisation / Equilibrage | Low | Low | | Max 1h No limit | Low | Low | | Mode Floating Absorption | Low | Low |Step 1: Analysis
Battery status analysis (level of charge, inversion of polarity, incorrect battery connected, etc).
Step 2 : Charge (8 A)
Fast charging at maximum current up to U1
| LiFePO4 54.0 V Li | FePO4 58.0 V Li-ion | 54.0 V Li-ion 58.0 V | |
| 51.8 V | 55.2 V | 53.3 V | 57.4 V |
Step 3 : Absorption
Charging at a constant voltage U1 to bring the charge level to 98%.
Step 4 : Completion
Gradual increase in voltage at U2 at reduced current to reach 100% charge level.
| LiFePO4 54.0 V LiFePO4 58.0 V Li-ion 54.0 V Li-ion 58.0 V | |||
| 54.0 V | 57.6 V | 54.0 V | 58.1 V |
Balancing the battery cells.
Step 6 : Floating
Maintains the battery charge level at maximum with a maintenance charge every 2 months.
- Protections:

The GYSFLASH 8.48 PL-E has a set of devices protecting it against short-circuits and polarity reversals. It has an anti-spark feature which prevents sparks whilst connecting the device to the battery. This charger has double insulation and is safe to use while the battery is connected to in-vehicle electronics.
The GYSFLASH 8.48 PL-E has a built-in temperature sensor that automatically adapts the charging current to suit the ambient temperature, so as to prevent the internal electronics from overheating.
DEFECTS, CAUSES, AND SOLUTIONS
| Troubleshooting | Causes | Solutions | |
| 1 | The⚠ indicator flashes. | Polarity reversalBattery voltage too highBattery in short-circuit | Check that the charging cables are properly connectedCheck that it is a 48V battery. |
| 2 | The⚠ indicator is on. | Charging failure, battery not recoverable | Change the battery and press the select buttonto restart charging |
| 3 | The⚠ LED remains lit even after the selection button 🔑 is pressed. | Thermal protection | Ambient temperature is too high (>50°C), cool the room and let the charger cool down. |
WARRANTY CONDITIONS
The warranty covers any defects or manufacturing faults for two years from the date of purchase (parts and labour).
The warranty does not cover:
- Any other damage caused during transport.
- The general wear and tear of parts (i.e. : cables, clamps, etc.).
- Incidents caused by misuse (incorrect power supply, dropping or dismantling).
- Environment-related faults (such as pollution, rust and dust).
In the event of a breakdown, please return the item to your distributor, along with:
- a dated proof of purchase (receipt or invoice etc.).
- a note explaining the malfunction.
Lademodus Lithium-Ion-Batterie 54,0 V/13 Zellen (54,0 V/8 A):
| LiFePO4 54,0 V Li | LiFePO4 58,0 V Li-Ion | 54,0 V Li-Ion 58,0 V |
| 54,0 V 57,6 V | 54,0 V 58,1 V |
line
| Phase | U (V) | I (V) | |-------|-------|-------| | Analyse Charge Complément | High | Low | | Max 30 min < 1s | High | Low | | Max 2h | High | Low | | Max 1h No limit | Low | Low | | Mode Floating Absorption | Low | Low |Etapa 1: Análisis
| LiFePO4 54,0 V Li | FePO4 58,0 V Li-ion | 54,0 V Li-ion 58,0 V |
| 51,8 V 55,2 V | 53,3 V 57,4 V |
Paso ③: Absorción
| LiFePO4 54,0 V Li | LiFePO4 58,0 V Li-ion | 54,0 V Li-ion 58,0 V |
| 54,0 V 57,6 V | 54,0 V 58.1 V1 V |
| LiFePO4 54.0 V | LiFePO4 58.0 V | Li-ion 54.0 V | Li-ion 58.0 V |
| 51.8 V | 55.2 V | 53.3 V | 57.4 V |
Этап 3 : Поглощение
line
| Phase | Voltage (U) | Current (I) | | ------------------------- | ----------- | ----------- | | Analyse Charge Complément | High | Low | | Max 30 min < 1s | Medium | Low | | Max 2h | Medium | Low | | Max 1h No limit | Low | Low | | Mode Floating Absorption | Low | Low |Stap 1 : Analyse
natural_image
Technical line drawing of a rectangular enclosure with a 80 mm height dimension label (no other text or symbols)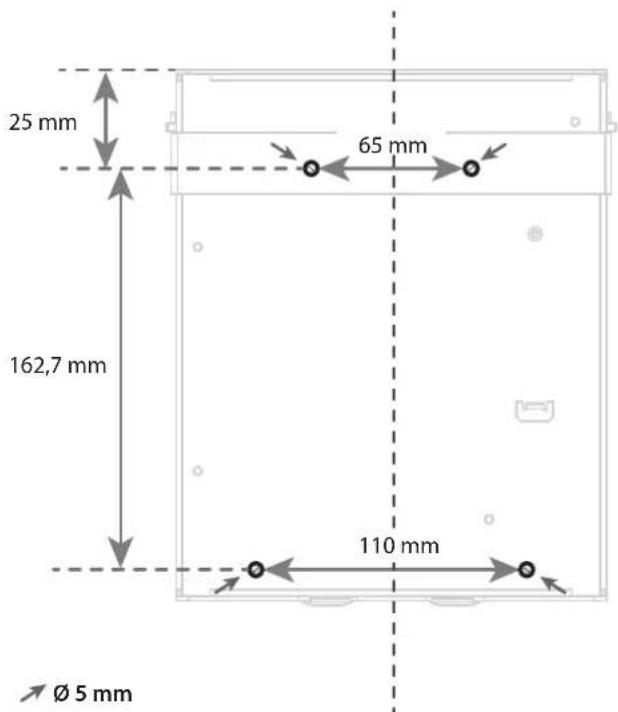
text_image
25 mm 65 mm 162,7 mm 110 mm Ø 5 mmMOUNTING / WANDBEFESTIGUNG / MONTAJE / СБОРКА / MONTAGE / MONTAGGIO
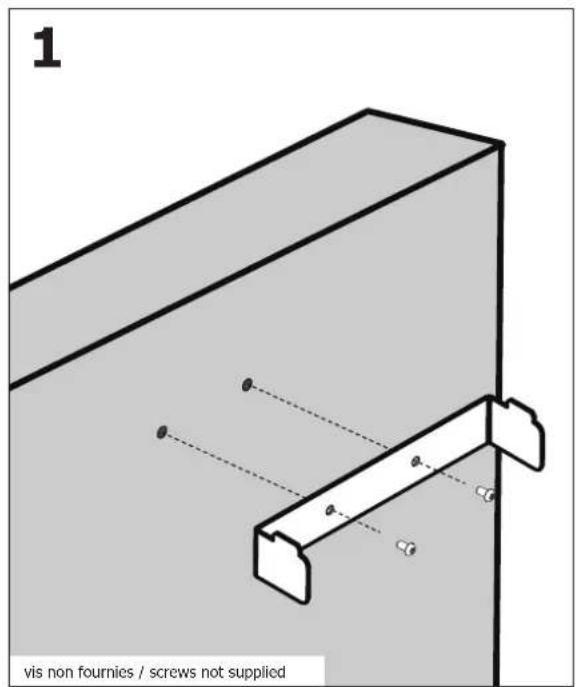
text_image
1 vis non fournies / screws not supplied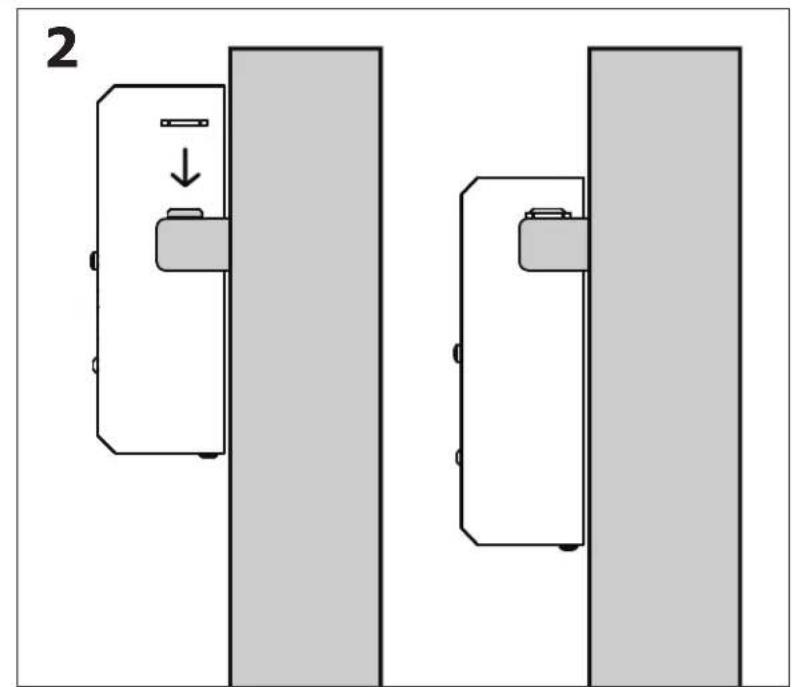
natural_image
Diagram showing two mechanical components with a downward arrow indicating motion, no text or symbols present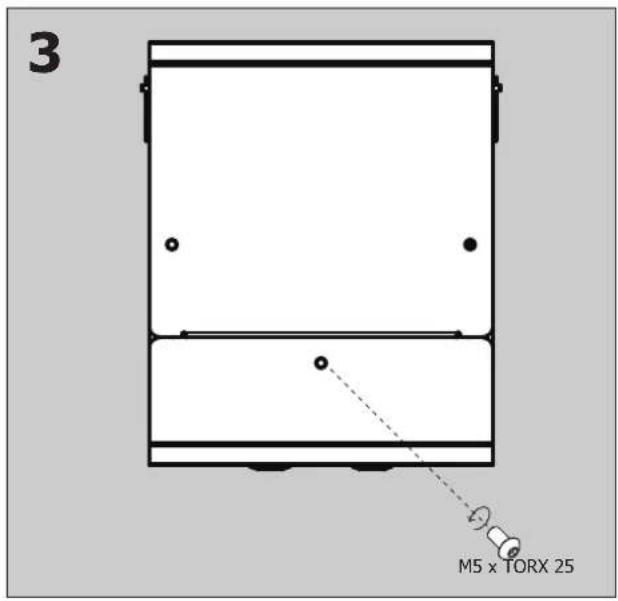
text_image
3 M5 x TORX 25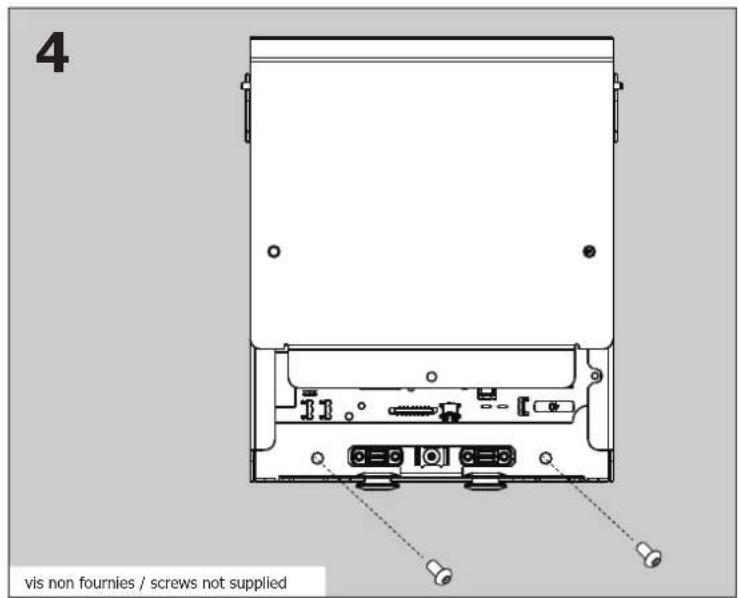
text_image
4 vis non fournies / screws not supplied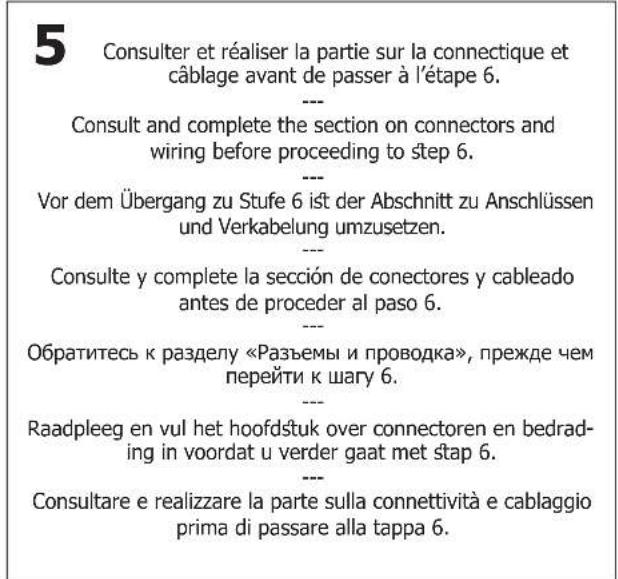
text_image
5 Consulter et réaliser la partie sur la connectique et câblage avant de passer à l'étape 6. --- Consult and complete the section on connectors and wiring before proceeding to step 6. --- Vor dem Übergang zu Stufe 6 ist der Abschnitt zu Anschlüssen und Verkabelung umzusetzen. --- Consulte y complete la sección de conectores y cableado antes de proceder al paso 6. --- Обратитесь к разделу «Разъемы и проводка», прежде чем перейти к шагу 6. --- Raadpleeg en vul het hoofdstuk over connectoren en bedrading in voordat u verder gaat met stap 6. --- Consultare e realizzare la parte sulla connettività e cablaggio prima di passare alla tappa 6.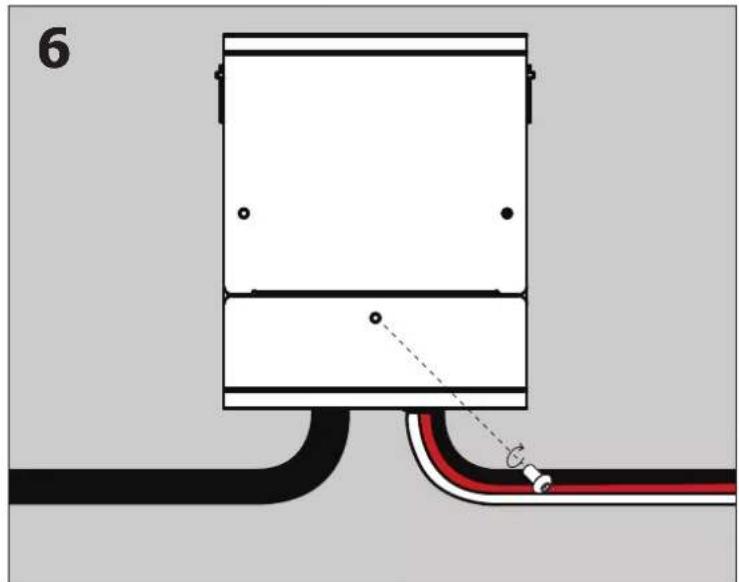
natural_image
Pure diagram of a mechanical or electrical component with no text, numbers, or symbols9
10
8
11
1
7
5
6
2
3
4
FR EN DE ES RU NL IT
| 1 | Bouton de sélection | Selection button Auswahltaste | Botón de selección | Кнопка выбора Keuzeknop Tasto di selezione | |||
| 2 | Type Pb-Liquide/ GEL | Pb/GEL type | Typ μ Blei-Säure/nass | Tipo Pb/GEL | Tin Pb/GEL Type Lood/GEL | Tipo Pb/Liquido | |
| 3 | Type Pb/AGM Pb/AGM type | Typ Blei-Säure/AGM | Tipo Pb/AGM | Tin Pb/AGM Type Lood/AGM | Tipo Pb/AGM | ||
| 4 | Option Traction Type Pb | Pb Traction Type | Typ Pb Traktion | Tipo Pb Tracción | Tin Pb Traction | Type Lood Tractie | Tipo Pb Trazione |
| 5 | Option 54.0 V ou 58.0 V - Type Lithium | Option 54.0 V or 58.0 V - Lithium type | Option 54,0 V oder 58,0 V - Typ Lithium | Opción 54,0 V o 58.0 V - Tipo Litio | 54,0 Выбор или 58,0 B - Tin Lithium | Optie 54,0 V of 58,0 V - Type Lithium | Opzione 54,0 V o 58,0 V - Tipo Litio |
| 6 | Type Lithium Li-Ion | Lead Traction type | Typ Lithium Li-Ionen | Tipo Litio-Ion | Tin Lithium Li-Ion | Type Lithium Li-Ion | Tipo Litio Li-Ion |
| 7 | Type Lithium LiFePO4 | Lithium LiFeO4 type | Typ Lithium LiFePO4 | Tipo Litio LiFeO4 | Tin Lithium LiFeO4 | Type Lithium LiFeO4 | Tipo Litio LiFePO4 |
| 8 | Voyant veille | Standby light | Kontrollleuchte Stand-by-Modus | Indicador de Standby | Индикатор режима ожидания | Standby lampje | Spia stand-by |
| 9 | Voyant charge en cours | Charge in progress indicator | Kontrollleuchte Ladevorgang | Indicador carga en curso | Индикатор заряда в процессе | Lampje | Spia carica in corso |
| 10 | Voyant Charge OK | LED Indicator Charge OK | Kontrollleuchte Ladung OK | Testigo Carga OK | Индикатор Зарядка OK | Laden OK | Spia Carica OK |
| 11 | Voyant défaut | Fault indicator | Kontrollleuchte Fehler | Testigo de fallo | Индикатор неисправности | Lampje storing Spia difetto | |
GYS France
Siège social / Headquarter