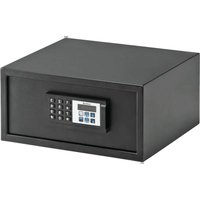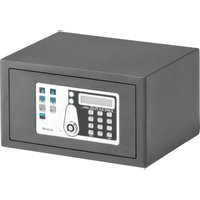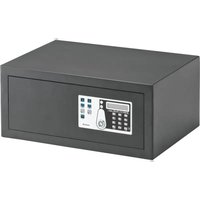
SAFE 35 SMART PLUS - Safe Indel B - Free user manual and instructions
Find the device manual for free SAFE 35 SMART PLUS Indel B in PDF.


User questions about SAFE 35 SMART PLUS Indel B
0 question about this device. Answer the ones you know or ask your own.
Ask a new question about this device
Download the instructions for your Safe in PDF format for free! Find your manual SAFE 35 SMART PLUS - Indel B and take your electronic device back in hand. On this page are published all the documents necessary for the use of your device. SAFE 35 SMART PLUS by Indel B.
USER MANUAL SAFE 35 SMART PLUS Indel B
SAFE 10 SMART SAFE 30 SMART SAFE 35 SMART PLUS
indelB
instructions for use
mode d'emploi
SCHEMI DI FORATURA
SAFE 10 SMART
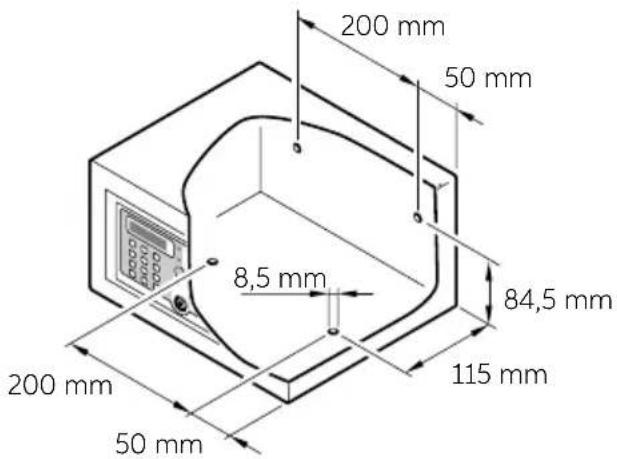
text_image
200 mm 50 mm 8,5 mm 84,5 mm 115 mm 200 mm 50 mmSAFE 30 SMART
text_image
300 mm 65 mm 50 mm 120 mm 8,5 mm 240 mm 240 mm 95 mm 55 mmSAFE 35 SMART PLUS
text_image
365 mm 65 mm 50 mm 120 mm 8,5 mm 305 mm 240 mm 95 mm 55 mmSAFE 10/30 SMART - 35 SMART PLUS
SETTAGGI PRELIMINARI
INIZIALIZZAZIONE / RESET
flowchart
graph LR
    A["Appoggiary Owner Key\n1 Beep"] --> B["Appoggiary Owner Key\n1 Beep"]
    B --> C["Appoggiary IB Key\n1 Beep"]
    C --> D["Master Key"]
natural_image
Technical diagram showing a mechanical assembly with a close-up view of a component being inserted (no text or symbols present)natural_image
Technical diagram showing a mechanical assembly with a close-up of a component labeled '按钮' (button) and an arrow indicating direction (no text or symbols present)IMPOSTAZIONE CODICE PERMANENTE
natural_image
Line drawing of a hand using a screwdriver to install or install an electrical outlet panel (no text or symbols present)SAFE 10/30 SMART - 35 SMART PLUS
text_image
InstallShield Wizard Welcome to the InstallShield Wizard for Smart Box V2014.10 The InstallShield® Wizard will install Smart Box V2014.10 on your computer. To continue click Web Get Next 1 Canceltext_image
InstallShield Wizard Customer Information Please enter your information. Please enter your name and the name of the company for whom you want. Users Name: Company Name: < Back Print Canceltext_image
InstallShield Wizard Choose Destination Locations Select folder where setup will install files Setup will install SmartBox V2014.10 in the following folder: To install to this folder, click Next. To install to a different folder, click browse and select another folder. Destination folder C:\VPhages Files\td(B)\ndelB Browse... < Back Next > Canceltext_image
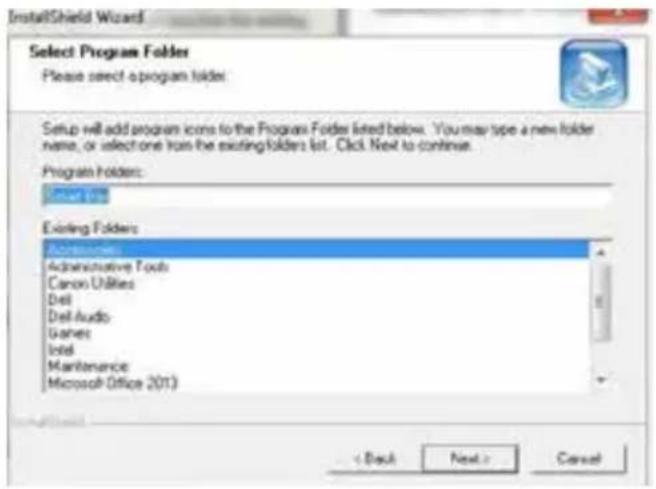
InstallShield Wizard Select Program Folders Please select a program folder Setup will add program icons to the Program Folder listed below. You may type a new folder name, or select one from the existing folders list. Click Next to continue. Program Folders: Existing Folders Administrative Tools Canon Utilities Dell Shell Audio Senses Intel Maintenance Microsoft Office 2013 < Back Next > Canceltext_image
InstallShield Wizard Setup Type Select the Setup Type to Install Click the type of Setup you prefer, then click Next. Typical Program will be installed with the most common options. Recommended for next users. Compact Program will be installed with minimum required options. Customs You may choose the options you want to install. Recommended for advanced users. + Back Next > Canceltext_image
InstallShield Wizard InstallShield Wizard Complete Setup has finished installing Smart Box V2014.70 on your computer.text_image
Confirm Issuing time card ? Yes Notext_image
Information i Issue time card ok! OKtext_image
Confirm Reading entry records or time card ? Yes Notext_image
Information Read card ok! OKtext_image
NUMERO PROGRESSIVO DI APERTURE DATA E ORA DI APERTURA TIPO DI CHIAVE UTILIZZATA O COMBINAZIONE IMPOSTATA DALL'UTILI ZZATORE Menu Language English Encoder DSB4001 Port No. COM Tools Insider (S) Audit Trust (S) Click Adjustment (S) Excel Print (P) Help Close (C) Evento Owner Key: 0183319910000012 Index CodeKey ID Date/Time Owner Key: 2016-07-28 11:51:32 Owner Key: 2016-07-28 11:51:44 Temp Code: 2016-07-28 11:51:51 Temp Code: 2016-07-28 11:51:59 Temp Code: 2016-07-28 11:52:04 Owner Key: 2016-07-28 11:52:17 Owner Key: 2016-07-28 11:52:37 Temp Code: 2016-07-28 11:52:43 Temp Code: 2016-07-28 11:52:46 Temp Code: 2016-07-28 11:52:54 Temp Code: 2016-07-28 11:52:57 Owner Key: 2016-07-28 11:57:12 Owner Key: 2016-07-28 11:57:25 Temp Code: 2016-07-28 11:57:31 Temp Code: 2016-07-28 11:57:37 Temp Code: 2016-07-28 11:57:43 Temp Code: 2016-07-28 11:57:54 Owner Key: 2016-07-28 11:58:05 Temp Code: 2016-07-28 11:58:11 Temp Code: 2016-07-28 11:58:19 Temp Code: 2016-07-28 11:58:27 Temp Code: 2016-07-28 11:58:33 Temp Code: 2016-07-28 11:58:39 Temp Code: 2016-07-28 11:58:46 Temp Code: 2016-07-28 11:58:55 Owner Key: 2016-07-28 12:00:32 Temp Code: 2016-07-28 12:00:39 Temp Code:
AVVERTENZA
This device is not designed for use by people (children included) with reduced physical, sensory or mental capacities, or with lack of experience or knowledge, unless they could have benefited, thanks to the intermediation of someone in charge for their safety, from a surveillance or instructions for the device use. Children must be under surveillance, to make sure that they don't play with the device.
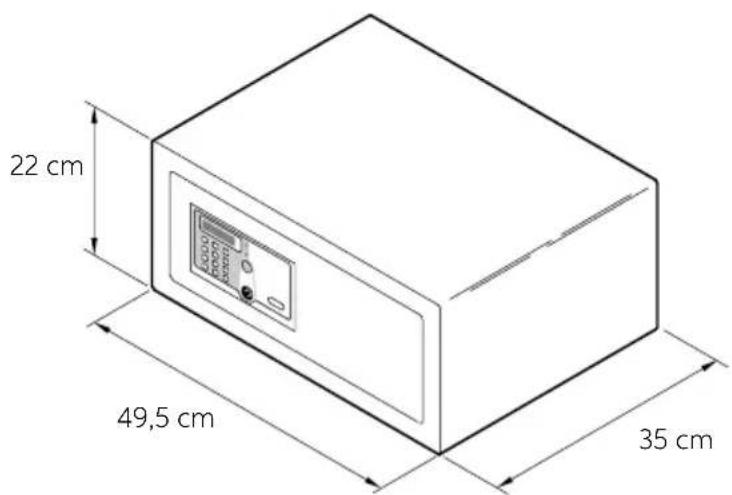
OVERALL DIMENSIONS
SAFE 10 SMART
text_image
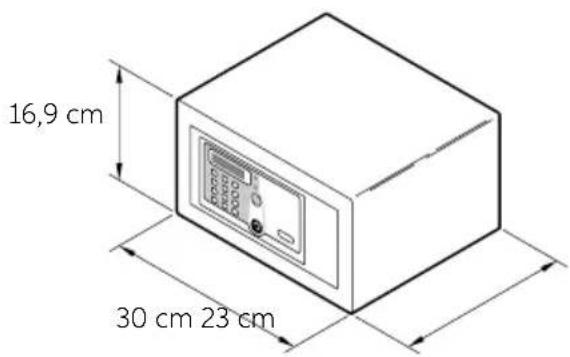
16,9 cm 30 cm 23 cmSAFE 30 SMART
text_image
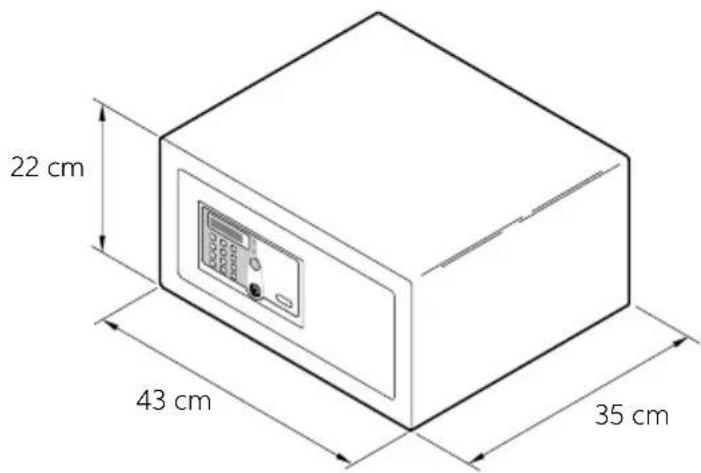
22 cm 43 cm 35 cmSAFE 35 SMART PLUS
text_image
22 cm 49,5 cm 35 cmSAFE_10_30_35_SMART_IM_20190517
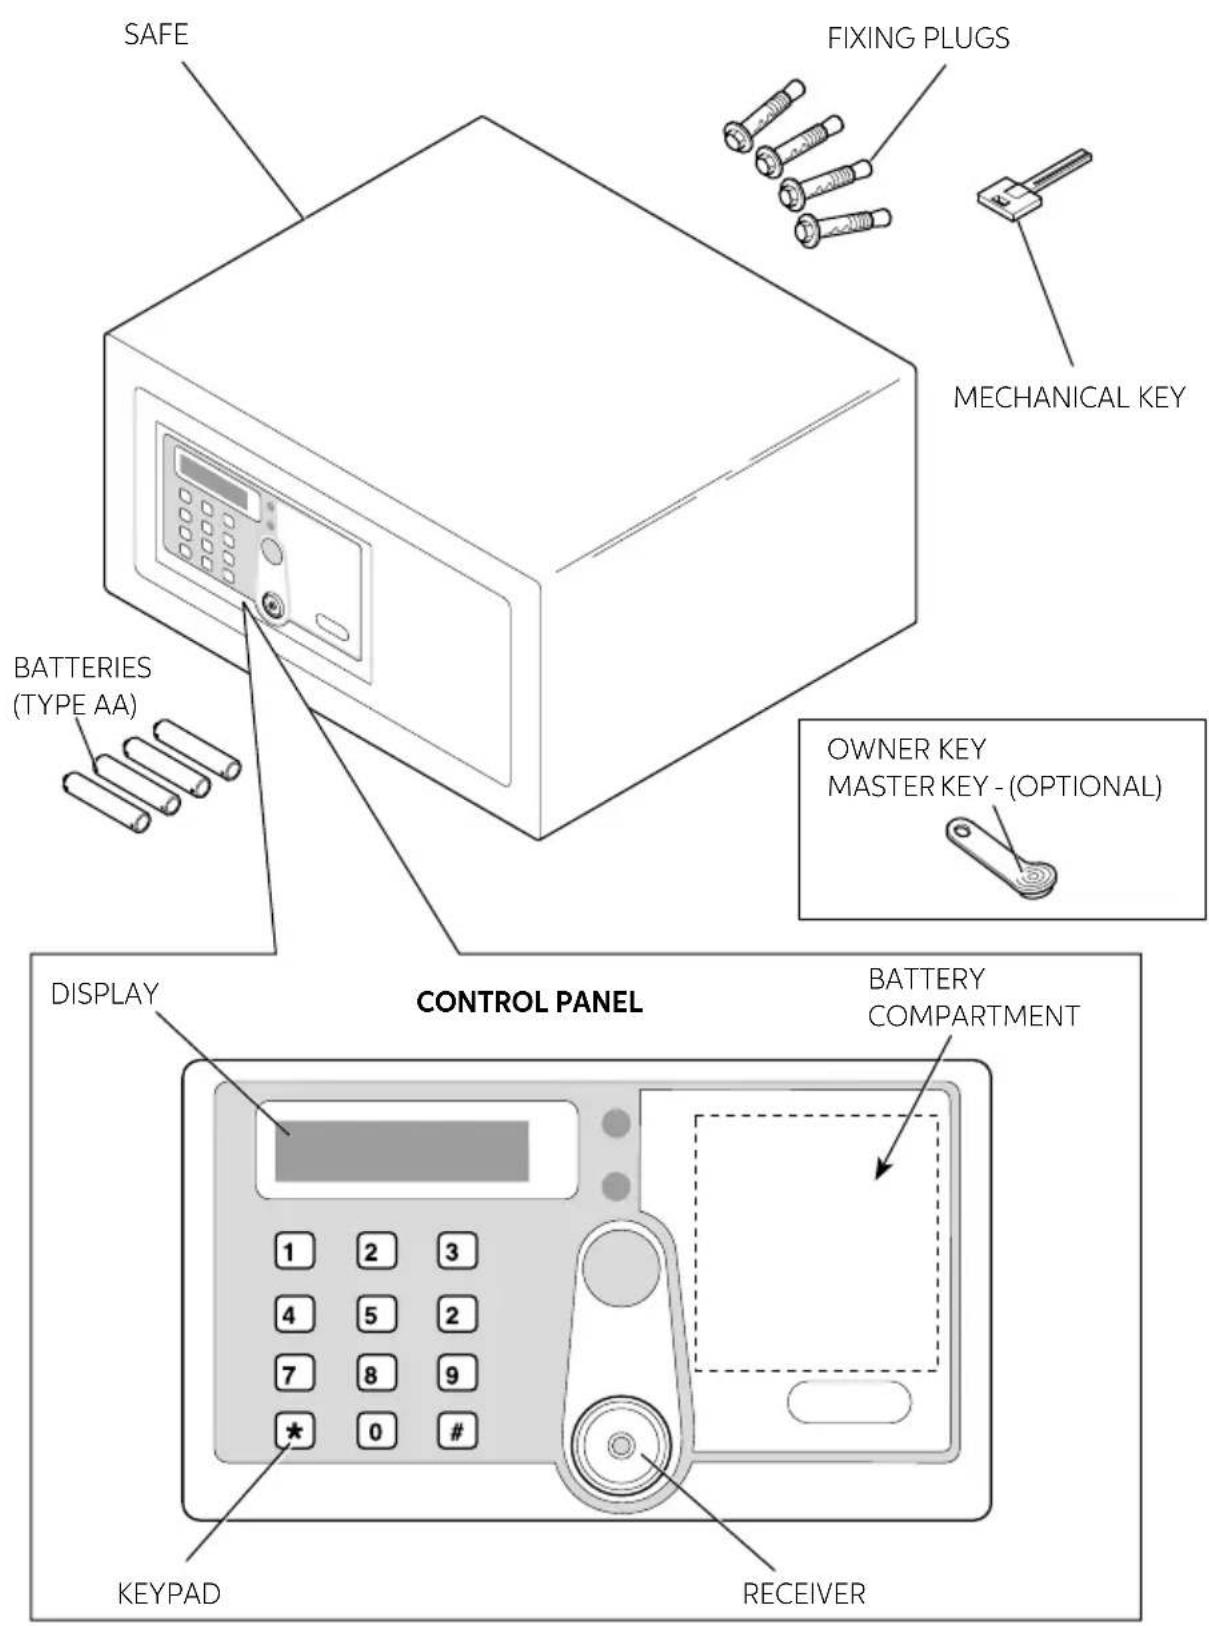
PACKING CONTENT
text_image
SAFE FIXING PLUGS MECHANICAL KEY BATTERIES (TYPE AA) OWNER KEY MASTER KEY - (OPTIONAL) DISPLAY CONTROL PANEL BATTERY COMPARTMENT 1 2 3 4 5 2 7 8 9 * 0 # KEYPAD RECEIVERSAFE 10/30 SMART - 35 SMART PLUS
INSTALLATION
On receipt of the Safe it is necessary to install it, with some simple operations, to make its use possible.
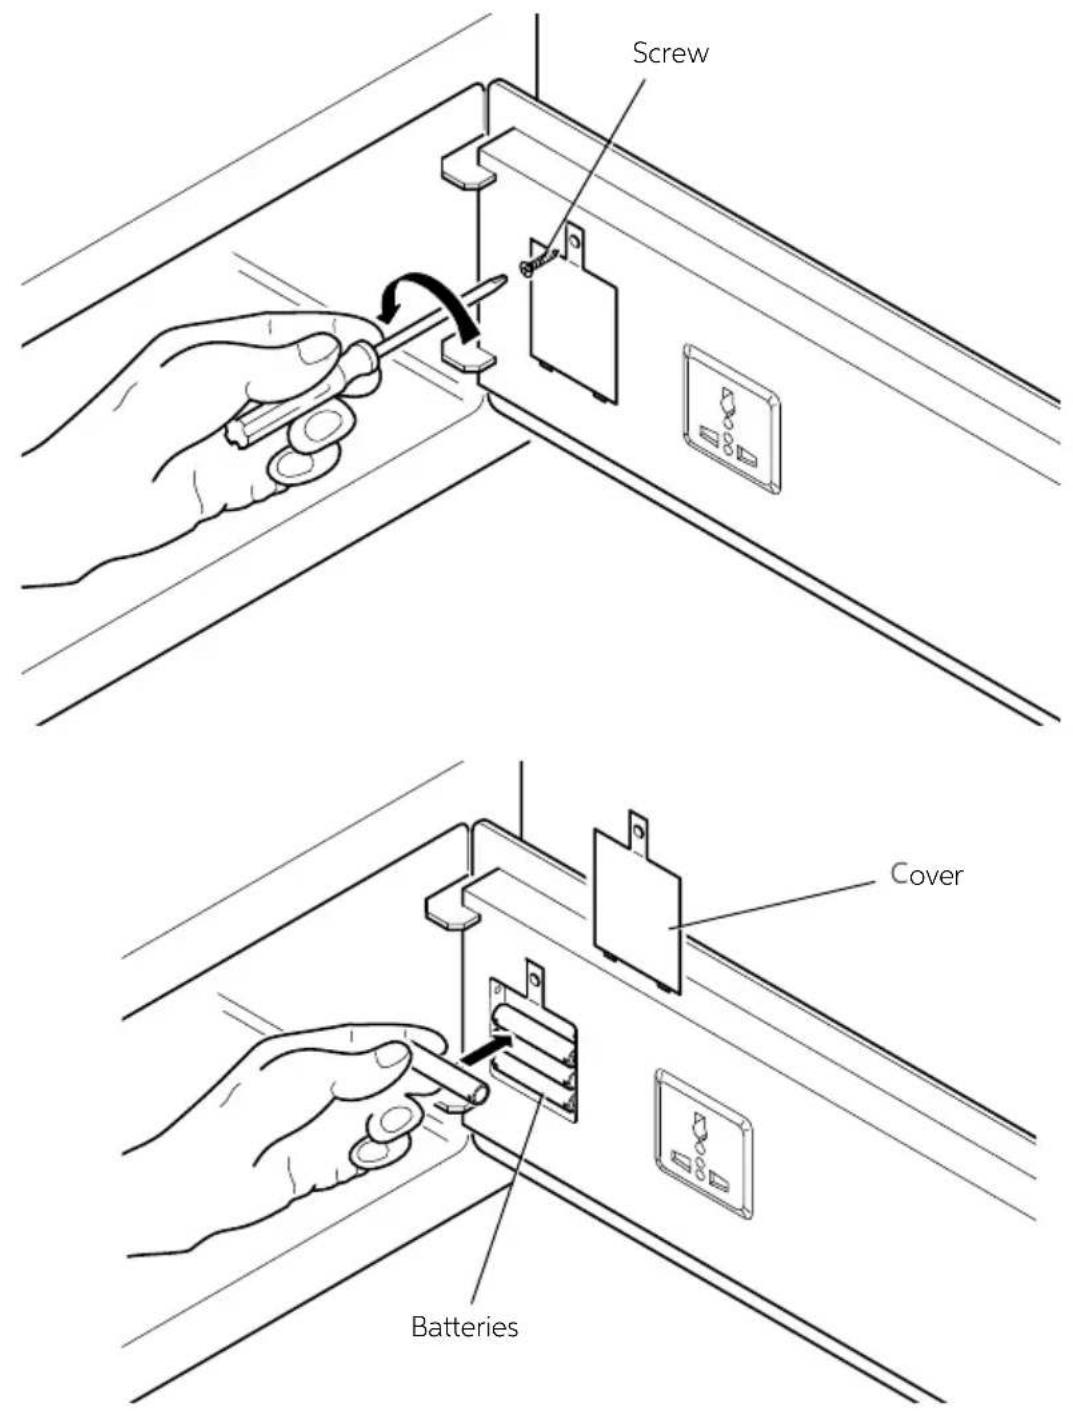
BATTERY INSERTION
Remove the protection cover unscrewing the screw and insert batteries in their proper locations.
text_image
Screw Cover BatteriesSAFE_10_30_35_SMART_IM_20190517
PLACEMENT
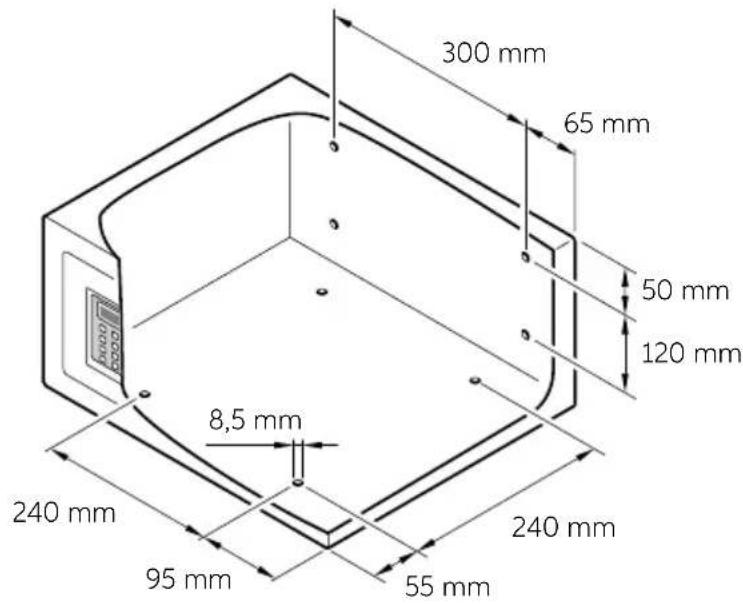
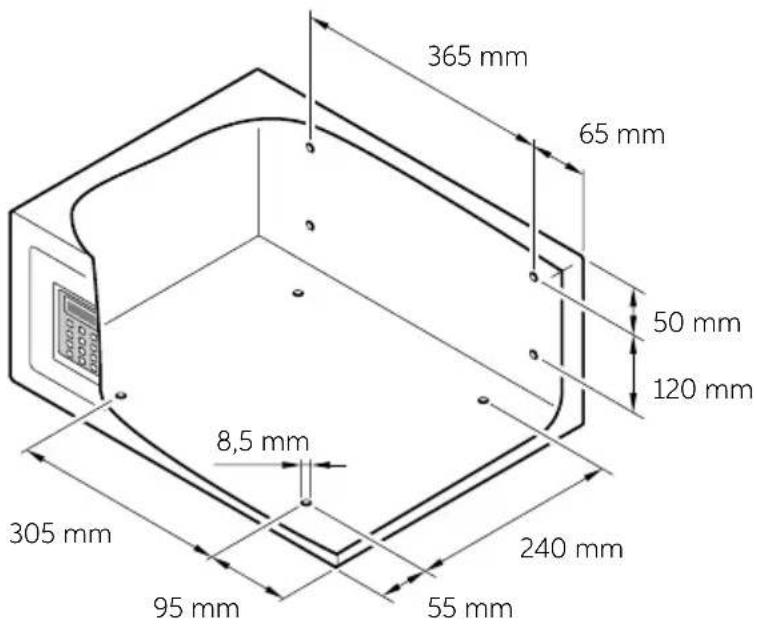
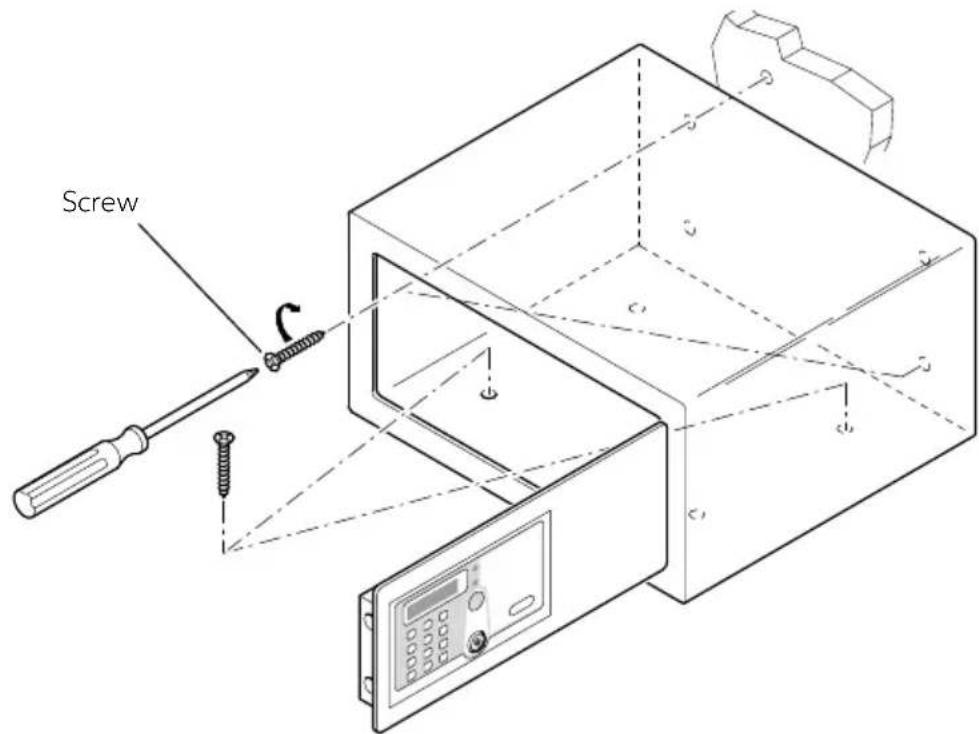
Now it is possible to place the Safe over a piece of furniture or inside a wardrobe, locking it with 2 fixing screws supplied in packing.
The Safe has 8 through holes for fixing, 4 on the rear wall and 4 on the horizontal face, to be used at the installer's discretion, according to the place where the Safe will be placed.
Note: Lock the Safe in 2 corresponding holes on the diagonal in the same flat.
text_image
ScrewSAFE 10/30 SMART - 35 SMART PLUS
DRILLING DIAGRAMS
SAFE 10 SMART
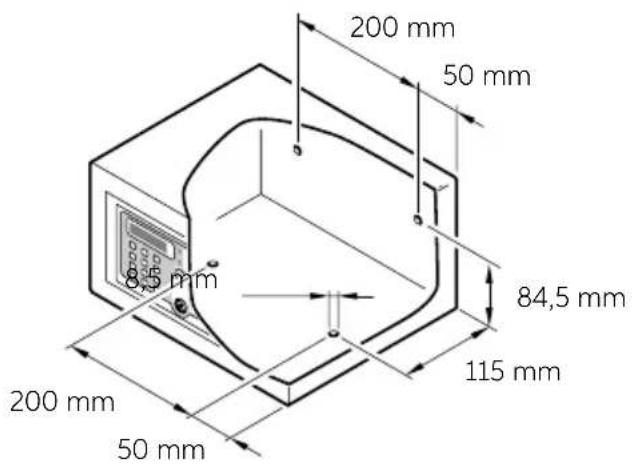
text_image
200 mm 50 mm 84,5 mm 115 mm 200 mm 50 mmSAFE 30 SMART
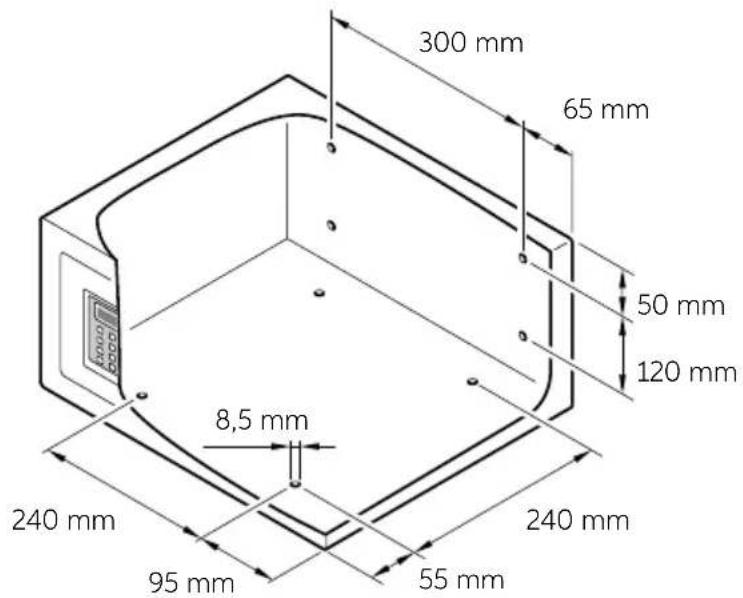
text_image
300 mm 65 mm 50 mm 120 mm 8,5 mm 240 mm 240 mm 95 mm 55 mmSAFE 35 SMART PLUS
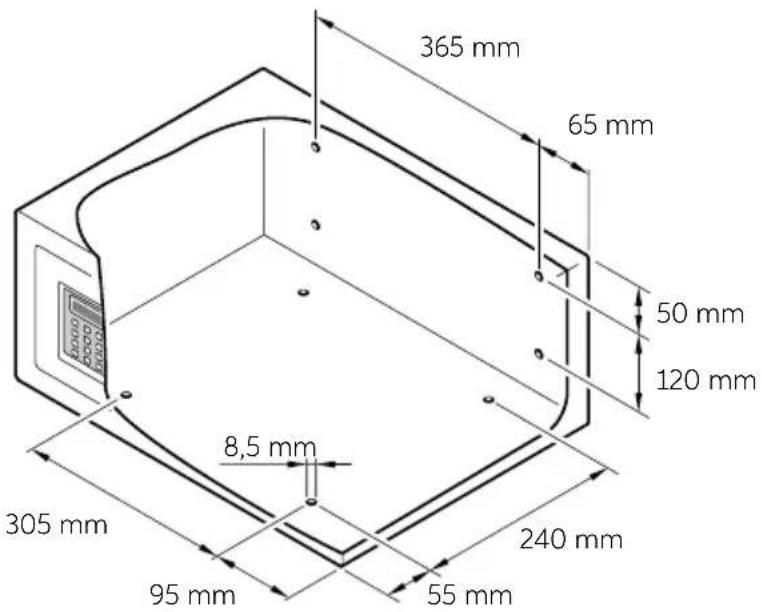
text_image
365 mm 65 mm 50 mm 120 mm 8,5 mm 305 mm 240 mm 95 mm 55 mmSAFE_10_30_35_SMART_IM_20190517
PRELIMINARY SETTINGS
This operation is required only for Safe already used and initialized. It is not necessary with new Safe, just purchased and installed.
To reset memory, press the RESET button (see Instructions for Use chapter); after three acoustic signals ("beep") the Safe initialization has been completed and the keys and codes memorised have been cancelled.
OWNER KEY
The Owner Key is the "mother" key necessary for the configuration of the Safe and its opening in case of emergency.
OWNER KEY (RED OR BLUE) ACTIVATION
Once the initialization has been done, put the first IB key (red or blue) on the receiver. After three acoustic signals ("beeps") the Safe opens and the IB key becomes the Owner Key. The first electronic key resting on the safe becomes the Owner Key (red or blue). For each Safe only one Owner Key will be set.
SAFE OPENING WITH THE OWNER KEY
Place the Owner Key on the receiver, after one acoustic signal ("beep") the Safe will open.
OWNER KEY ERASURE
Press the RESET button (see Instruction for Use chapter), after three beeps the Owner Key will be erased.
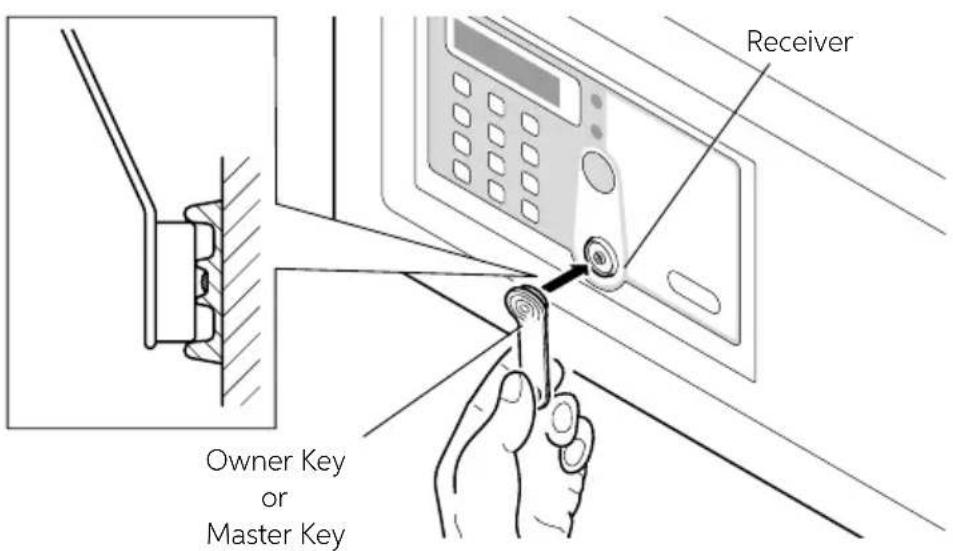
text_image
Owner Key or Master Key ReceiverSAFE 10/30 SMART - 35 SMART PLUS
MASTER KEY
The Master Keys are the "secondary" keys; they are necessary for Safe opening in case of emergency.
MASTER KEY (RED OR BLUE) ACTIVATION
Place the Owner Key on the receiver, after one beep place it again, after another beep place an IB Key on the receiver, after one beep the IB Key becomes the Master Key. It is possible to activate up to a maximum of five Master Keys for each Safe.

flowchart
graph LR
    A["Place the Owner Key\n1 Beep"] --> B["Place the Owner Key\n1 Beep"]
    B --> C["Place the IB Key\n1 Beep"]
    C --> D["Master Key"]
To set an IB Key as Master Key, place it on the receiver within 4 seconds after the last typing. The Safe will emit four beeps to show that the Master Key has been activated.
OPENING THE Safe WITH THE MASTER KEY
Place the Master Key on the receiver, after one beep the Safe opens.
ERASURE OF A MASTER KEY
Place the Owner Key on the receiver, after one beep place it again, after another beep place the Master Key on the receiver, after 2 beeps the Master Key will be erased.

flowchart
graph LR
    A["Place the Owner Key\n1 Beep"] --> B["Place the Owner Key\n1 Beep"]
    B --> C["Place the Master Key\n2 Beep"]
    C --> D["Master Key Erased"]
You can keep erasing the Master Keys within 4 seconds after the last typing.
ERASURE OF ALL THE MASTER KEY
Place the Owner Key on the receiver, after one beep, place it again, after another beep place it again, after three beeps all the Master Keys will be erased.

flowchart
graph LR
    A["Place the Owner Key\n1 Beep"] --> B["Place the Owner Key\n1 Beep"]
    B --> C["Place the Owner Key\n3 Beep"]
    C --> D["Master Keys Erased"]

WARNING
At this point the Master Key cannot open the Safe anymore; to reactivate them follow again the above-described procedures.
SAFE_10_30_35_SMART_IM_20190517
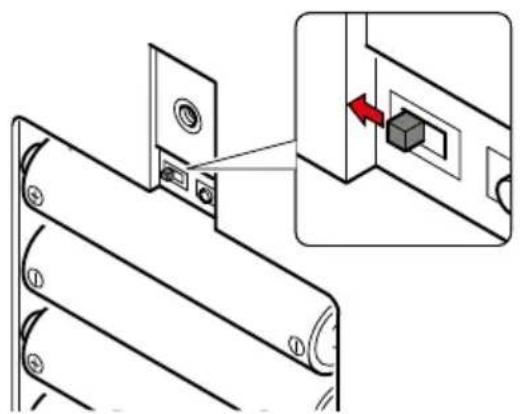
TEMPORARY CODE - PLACE THE SLIDING SWITCH TO THE LEFT (DOOR HINGE SIDE) - (BATTERY COMPARTMENT)
natural_image
Technical diagram showing a mechanical assembly with a close-up of a component being inserted, no text or symbols present.TEMPORARY CODE SETTING
While the Safe is open, insert a code with 4 to 9 digits, followed by #. After two beeps the Safe closes and the inserted code will become the Temporary Code. It is possible to set a temporary code for each Safe until it will be substituted by the new permanent code.

flowchart
graph LR
    A["Opened Safe"] --> B["Code + # 2 Beep"]
    B --> C["Temporary code"]
SAFE CLOSURE
Insert the Temporary Code with 4 to 9 digits followed by #, the Safe emits a beep and closes.
SAFE OPENING
Insert the Temporary Code, the Safe opens.
In case you forget the Temporary Code, rest the Owner Key or the Master Key: the Safe opens.
SAFE 10/30 SMART - 35 SMART PLUS
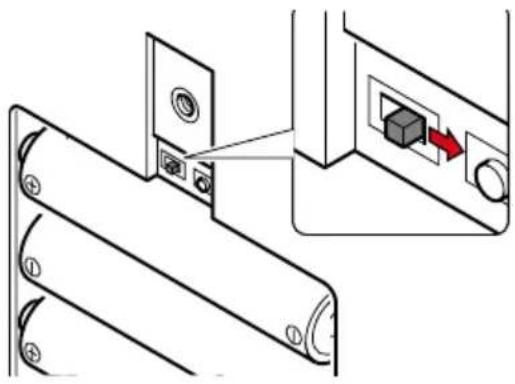
PERMANENT CODE - PLACE THE SLIDING SWITCH TO THE RIGHT (DOOR LOCK SIDE) - (BATTERY COMPARTMENT)
natural_image
Technical diagram showing a mechanical assembly with a close-up of a component being inserted into a housing (no text or symbols visible)PERMANENT CODE SETTING
Press the ✕ button, place the Owner Key on the receiver, after one beep, insert a code with 4 to 9 digits, followed by #. After two beeps the Safe will pop up on display "CLOSE" and the inserted code will become the Permanent Code. For each Safe only one Permanent Code will be assigned.

flowchart
graph LR
    A["1 Beep"] --> B["1 Beep"]
    B --> C["Permanent code"]
    C --> D["Opening"]
SAFE OPENING
Press the ✕ button, press the ✕ button again, insert the Permanent Code followed by #, place the Owner Key or the Master Key on the receiver and the Safe will open.
SAFE CLOSURE
Press the # button, after two beeps the Safe will close.
SAFE_10_30_35_SMART_IM_20190517
INSTRUCTIONS FOR USE
The Safe appears to the user with its door open and ready for use.
SAFE OPENING AND CLOSURE
To close the Safe the user must keep the door pressed and type on the keypad the code followed by the # key. This code can be composed by four to nine digits, at user's discretion.
To open the Safe you just need to type the same code, again followed by the # key. While the code is set, if a wrong digit is typed, press the * key to cancel it and insert the right digit.
It is possible to change the secret code every time the Safe is opened and closed

WARNING
If the user forgets the code and the Safe is closed, or if the user leaves the room and the Safe is closed, it is possible to open the Safe using the Owner Key, the Master Key or the mechanical key.
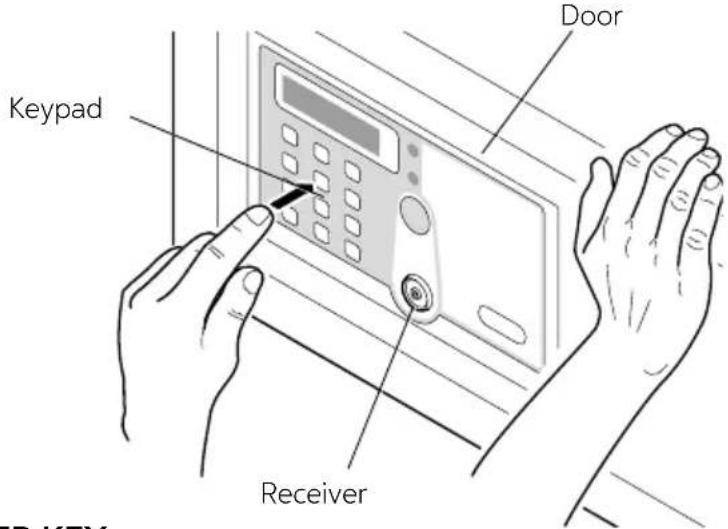
text_image
Keypad Door ReceiverOWNER KEY - MASTER KEY
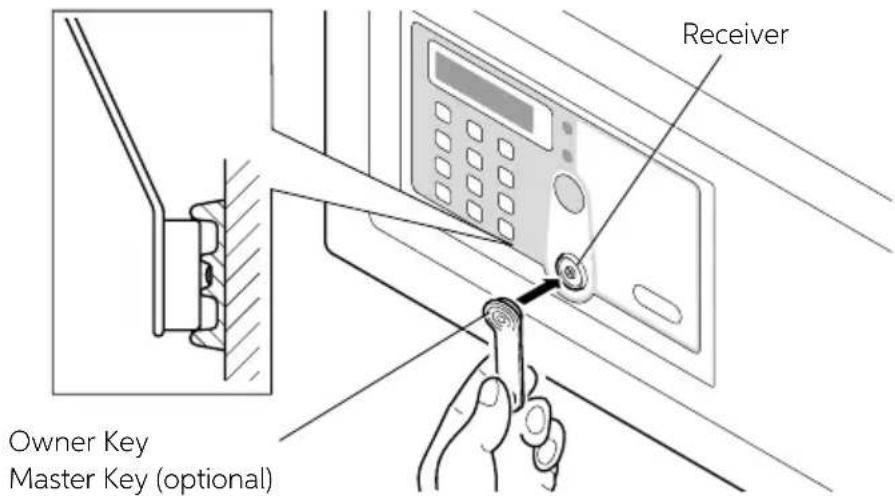
In case the user forgets the code typed and the Safe is closed, it is possible to open it using the Owner Key or the Master Key, by proceeding as follows.
Place on the receiver the Owner Key or the Master Key; an acoustic signal ("beep") confirms the Safe opening.
text_image
Owner Key Master Key (optional) ReceiverSAFE 10/30 SMART - 35 SMART PLUS
MECHANICAL KEY USE
In case you lose accidentally the Owner Key, the Master Key, or malfunction of the electronic card, it is possible to open the Safe with the mechanical key, proceeding as follows. Remove the front sticker from the door and insert the mechanical key, supplied with the device, in the apposite lock. Now the door can be opened manually.
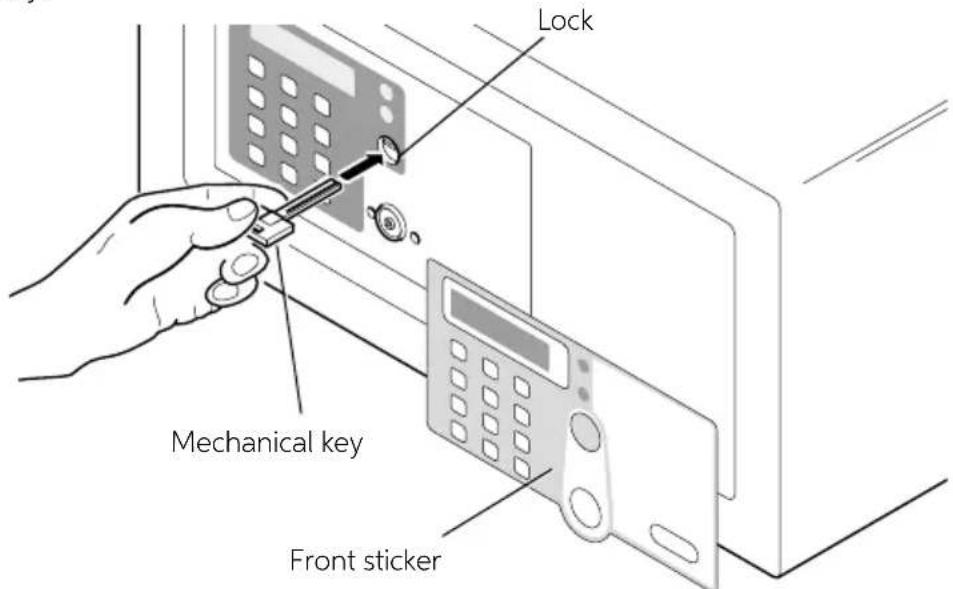
text_image
Lock Mechanical key Front sticker
WARNING
Never leave the mechanical key and the Owner and Master Keys inside the Safe.
ALARM FUNCTION
When you try to type a wrong code, after the third time, the Safe emits an acoustic signal for sixty seconds and it gets blocked.
After these sixty seconds the Safe can be used once again.
RESET BUTTON
The RESET button, placed on top of the batteries location, deletes all the stored data concerning the related Keys.
Pressing the RESET key with the tip of a small screwdriver, as shown in the picture, all the Keys are not associated to the Safe anymore, and therefore it is possible to set new ones. For example it is advisable to use the RESET function, pressing the related button, in case at least one of the Keys gets lost.
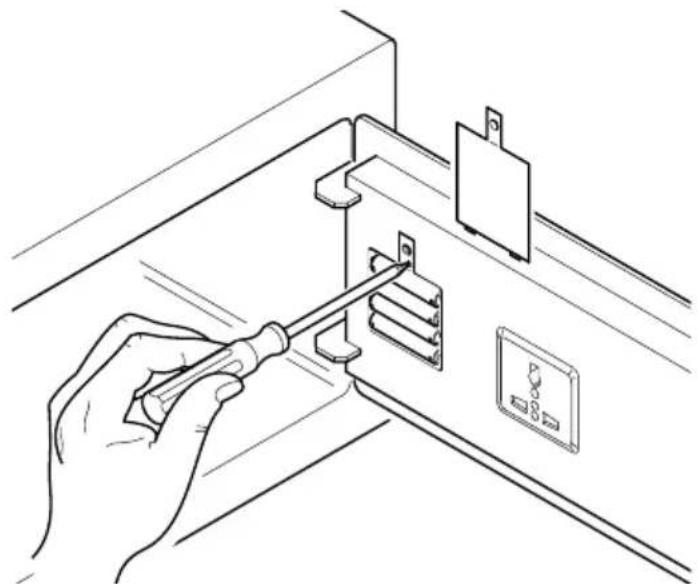
natural_image
Line drawing of a hand using a screwdriver to adjust or install electronic components on a wall (no text or symbols)SAFE_10_30_35_SMART_IM_20190517
BATTERY REPLACEMENT
If a warning tone (beep) is sent from the safe after each opening and closing, the batteries need to be replaced.
To do this remove the protection cover by unscrewing the screw and replace the exhausted batteries with new ones.

WARNING
Make sure that the batteries in question are alkaline 1.5 Volt. Risk of explosion if battery is replaced by an incorrect type. Dispose of used batteries according to the instructions.

WARNING
Batteries are delivered free of charge for the operating test and must be replaced in a short time.
EMERGENCY POWER SUPPLY
If batteries are not replaced before they are completely exhausted, it is possible to place a 9V battery in the two contacts on the right of the display, to supply temporarily the Safe with power and therefore be able to open it.
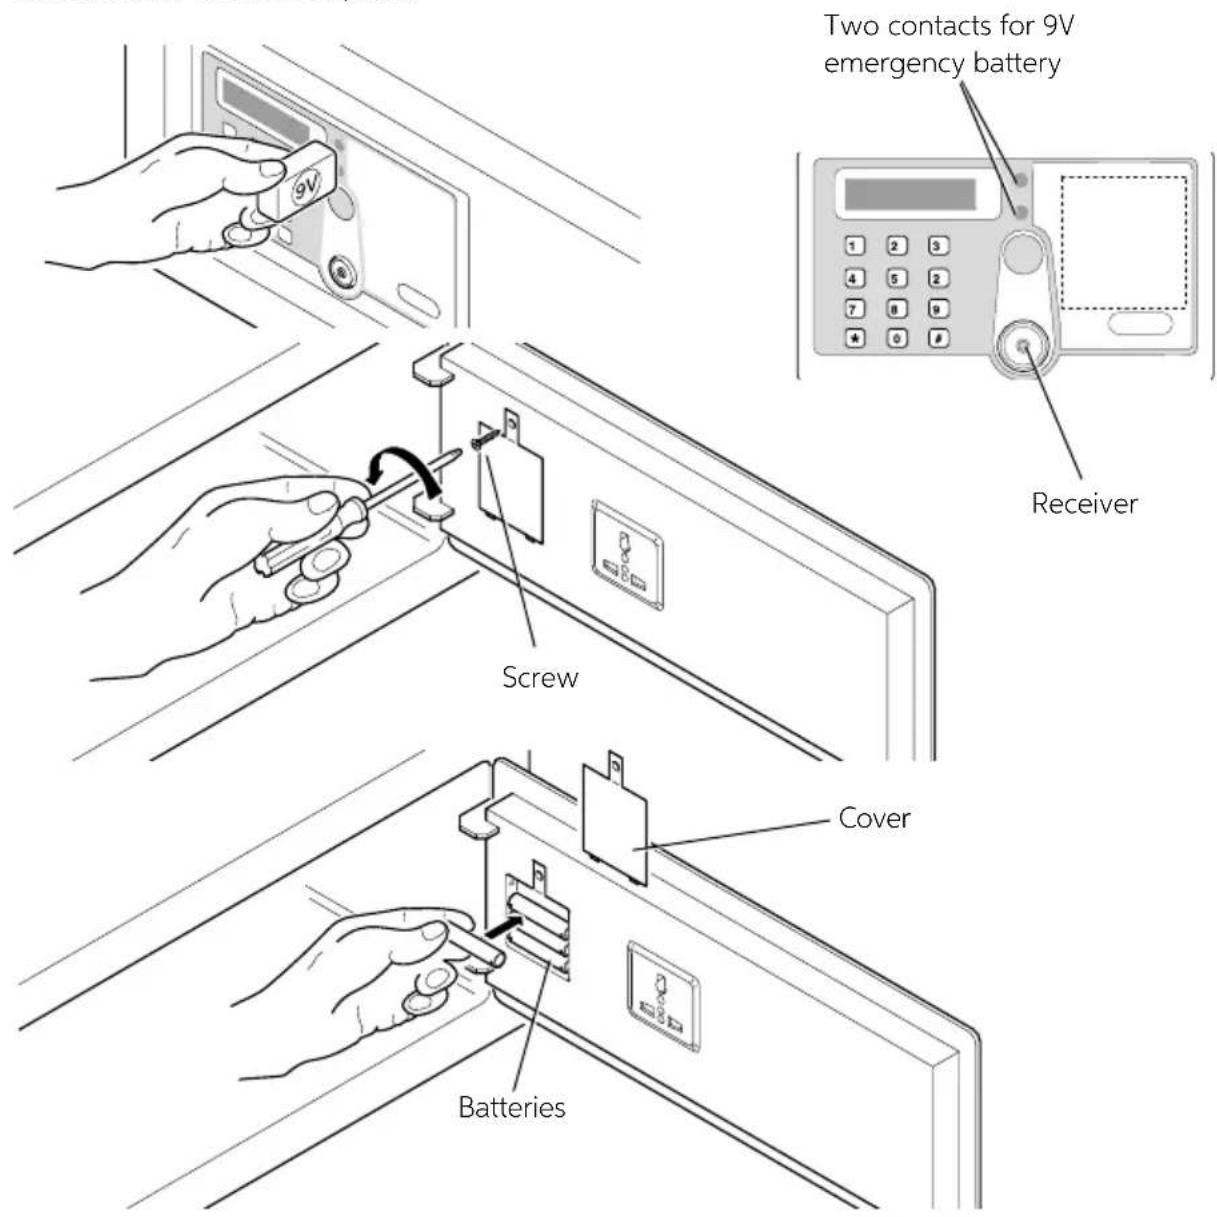
text_image
Two contacts for 9V emergency battery Receiver Screw Cover BatteriesSAFE 10/30 SMART - 35 SMART PLUS
UNIVERSAL SOCKET (ONLY FOR SAFE 30/35)
An universal power socket is available; it is placed inside the Safe door, to connect to electric systems of several devices such as a PC or a battery charger for mobile phones. The power cable of this socket comes out of the back of the Safe and ends with the three cables (phase, neutral and ground) that are directly connectable to the terminals of the electrical installation or to a normal socket
In case of a direct connection to the electrical installation, this one must have a complete sectioning device of the line (omnipolar disconnection), the minimal opening distance of the contacts being 3.5 mm.
If the power cable is connected to a normal socket, this one must be kept fully reachable.

WARNING
If for whatever reason the power cable should be damaged, disconnect it from the electrical power system (or take off the plug from the socket) and contact the Technical Assistance Service.
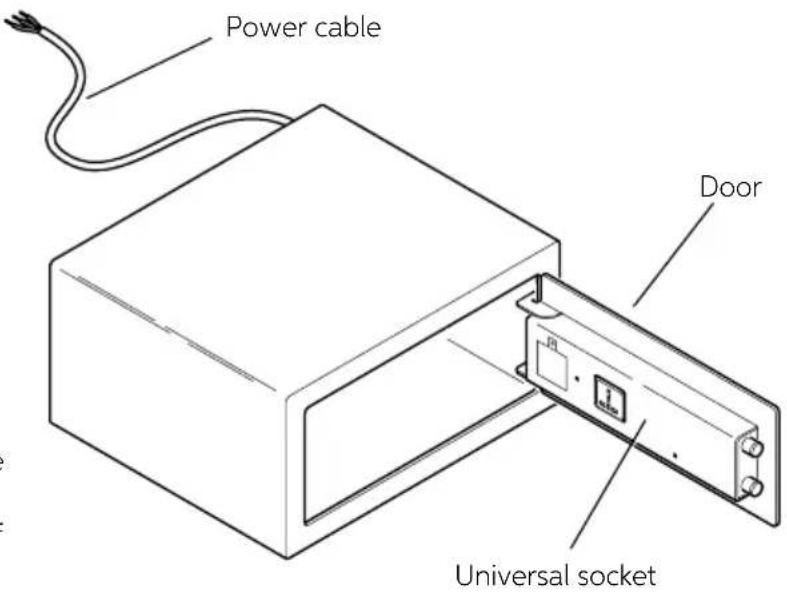
text_image
Power cable Door Universal socketINDEL B SMART BOX
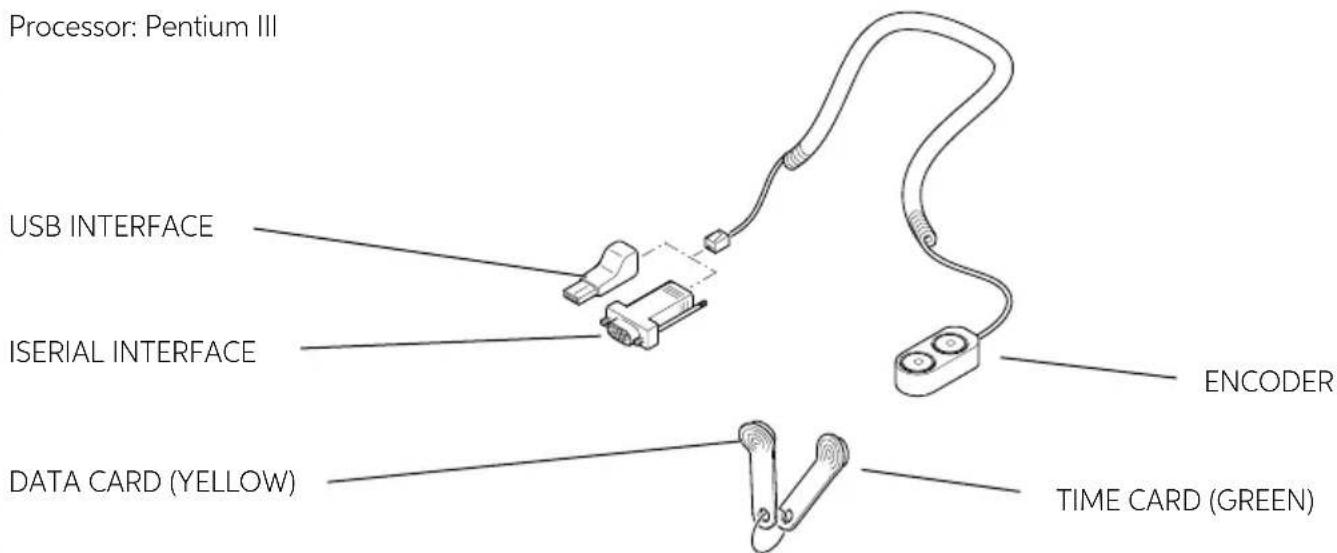
It is possible to use a program called Indel B Smart Box, which stores the openings of the Safe in a data file. This program manages the file according to the customer code used and/or the kind of key used (Owner Key, Master Key or Mechanical Key), showing date and time of the Safe opening.

WARNING
To install the program some minimal system requirements are necessary. These requirements are:
Operating System: Windows Xp, Windows 2000, Windows 98
RAM: 64 MB
Processor: Pentium III
text_image
Processor: Pentium III USB INTERFACE ISERIAL INTERFACE ENCODER DATA CARD (YELLOW) TIME CARD (GREEN)SAFE_10_30_35_SMART_IM_20190517
ACCESSORIES SUPPLIED WITH KIT SOFTWARE INSTALLATION
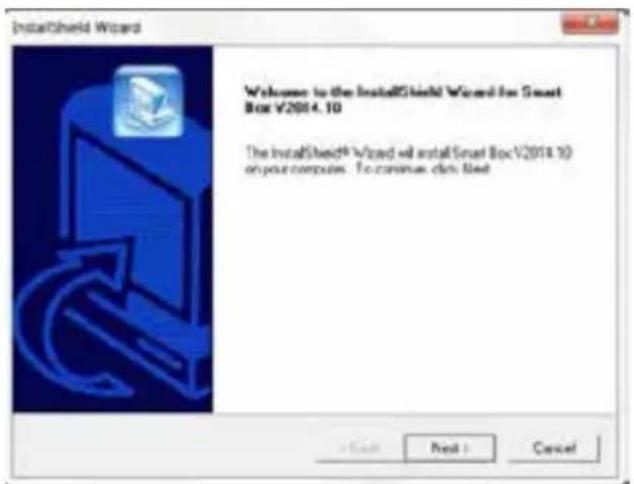
The first step is to download the installation software from the following link: www.indelb.it/smartboxsoftware.
Once the download is complete, run the file named IndelBSmartBoxV2014.10.
Once done, a series of installation windows will open in succession, driving the user step by step through software installation.
text_image
InstallShield Wizard Welcome to the InstallShield Wizard for Smart Box V2014.10 The InstallShield® Wizard will install Smart Box V2014.10 on your computer. To continue click next +/- Next > CancelThis window shows the general features of the software to be installed.
Click on the "Next" button to continue the installation.
Click on the "Cancel" button to exit the installation
text_image
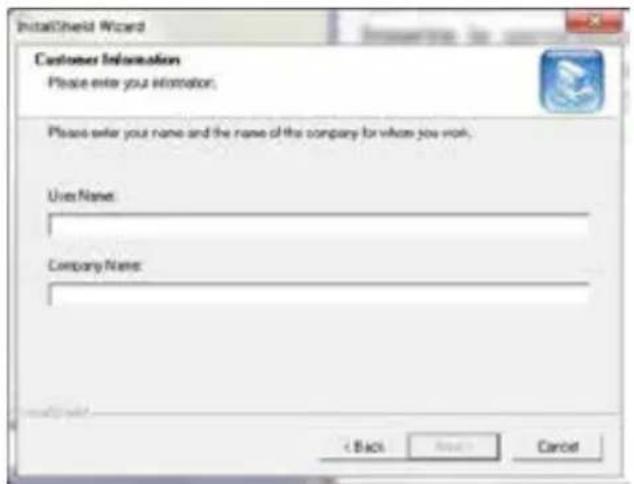
InitialShield Wizard Customer Information Please enter your information. Please enter your name and the name of the company for whom you want. Uses Name: Company Name: < Back Next > CancelIn this window it is necessary to give personal details of the user and the manufacturer.
Type the personal details of the user in the field named "Name" and the name of the manufacturer in field named "Company".
Click on the "Back" button to go back to the previous window.
SAFE 10/30 SMART - 35 SMART PLUS
text_image
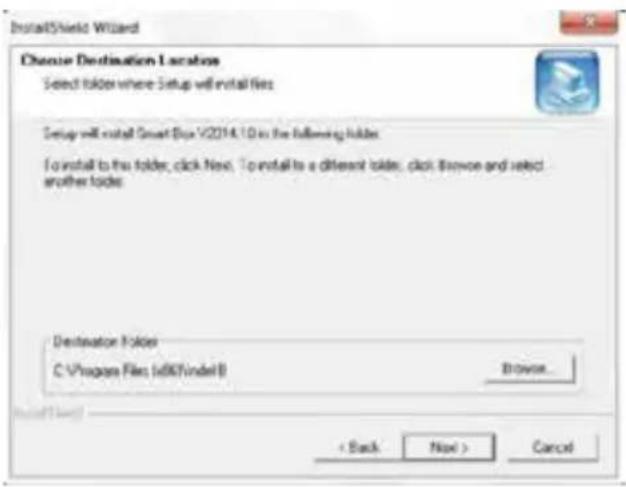
InstallShield Wizard Choose Destination Locations Select folder where Setup will install files Setup will install SmartBox V2014.10 in the following folder: To install to this folder, click Next. To install to a different folder, click Browse and select another folder. Destination folder C:\Phages Files\168\Indel B Browse... < Back Next > CancelThis window asks to choose the destination path of the software.
Click on the "Browse" button to choose another destination.
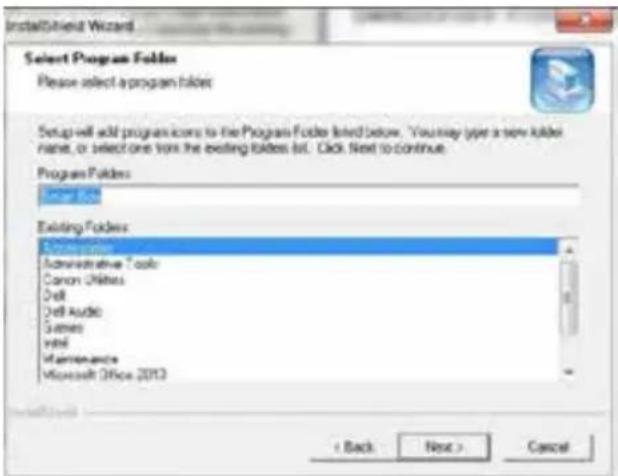
text_image
InstallShield Wizard Select Program Folders Please select a program folder. Setup will add program icons to the Program Folder listed below. You may type a new folder name, or select one from the existing folders list. Click Next to continue. Program Folders: Current file Existing Folders: Administrative Tools Canon Utilities Dell Dell Audio Games Intel Maintenance Microsoft Office 2013 + Back Next > CancelThis window shows the name of the folder. Click "Next" to continue the installation.
SAFE_10_30_35_SMART_IM_20190517
ENCODER INSTALLATION
Once the software installation is finished, it is necessary to connect the encoder to the computer through a serial interface or a USB interface. Once decided the connection to be performed, a series of installation windows of the encoder driver will open in succession, driving the user step by step through installation.
text_image
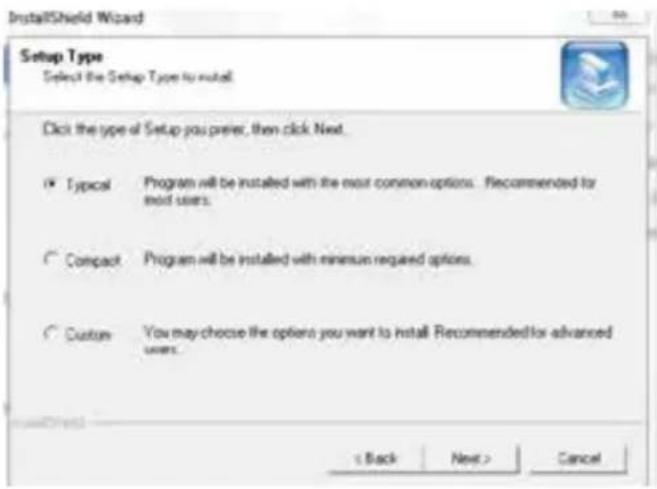
InstallShield Wizard Setup Type Select the Setup Type to install. Click the type of Setup you prefer, then click Next. Typical Program will be installed with the most common options. Recommended for mod users. Compact Program will be installed with minimum required options. Custom You may choose the options you want to install. Recommended for advanced users. < Back Next > CancelThis window asks to choose the type of installation to be performed.
Select in the first window "No, Not this time" option, then click on "Next". Select "Install the software automatically (Recommended)" in the second window and then click "Next".
Click on the "Next" button to continue the installation.
Click on the "Cancel" button to stop the installation.
text_image
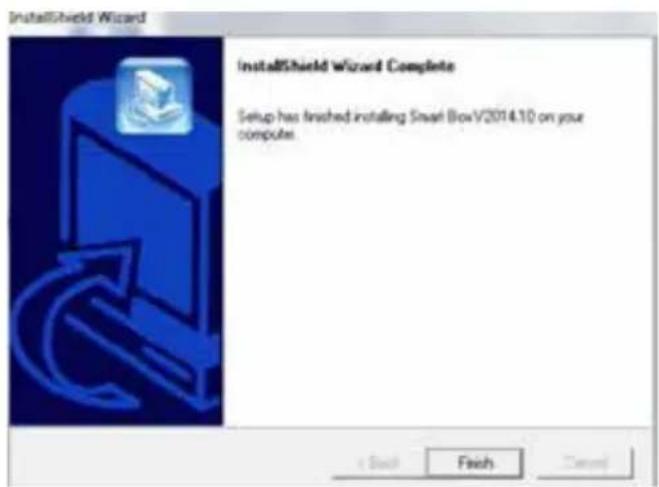
InstallShield Wizard Complete Setup has finished installing Smart BowlV2014.10 on your computer.At this point the driver installation is complete. Click on "Finish" to end installation.

WARNING
At this point the Indel B Smart Box program is ready to be used and is launched automatically by the computer at the end of the installation. If this does not happen, look for it in the programs menu and launch it manually.
SAFE 10/30 SMART - 35 SMART PLUS
IOPERATOR INTERFACE

text_image
OPERATOR PANEL DS9490R is the default setting Mono Language English Encoder DISHROOM Port No. COMF Tools Holders (E) Audit Trail (B) Clear Adjustment (C) Exon Print (P) Help Close (C) Events Order Key: Master Key: Index CodeKey ID DataTime Opened By Hidder Name Ha la funzione di riconminare la chives elettronica Leggere informazioni Importane la data e ForaINITIAL SETTINGS
After launching the program, select in the operator panel the type of interface used.
The keys called Holders, Audit Trail, Clock Adjustment, Excel, Print, Close, serve respectively to rename the electronic key (Holders), read information (audit trail), set date and time (Clock Adjustment), save data downloaded in Excel format (Excel), to print the stored data (Print), and close the program (Close).
SAFE DATE AND TIME SETTING
Before using the program, it is necessary to set correct date and time in the Safe. The date that will be stored by the time card is the date and time set in the computer. For this operation it is necessary to proceed as follows.

WARNING
The non-synchronisation between the date set on the Safe and the date set on the computer is due to the time elapsed between the storage of the date in the time card and the storage of the date in the Safe.
text_image
Time card (green) EncoderSAFE_10_30_35_SMART_IM_20190517
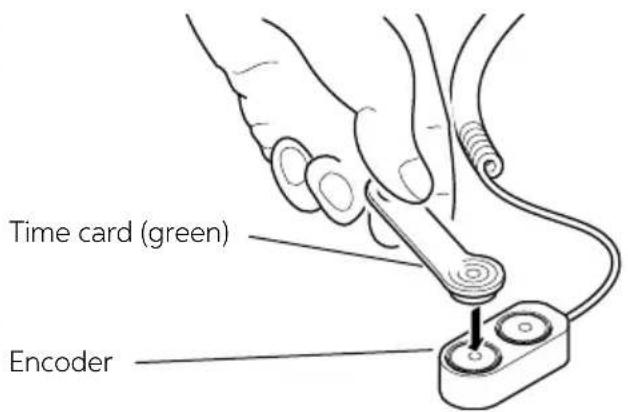
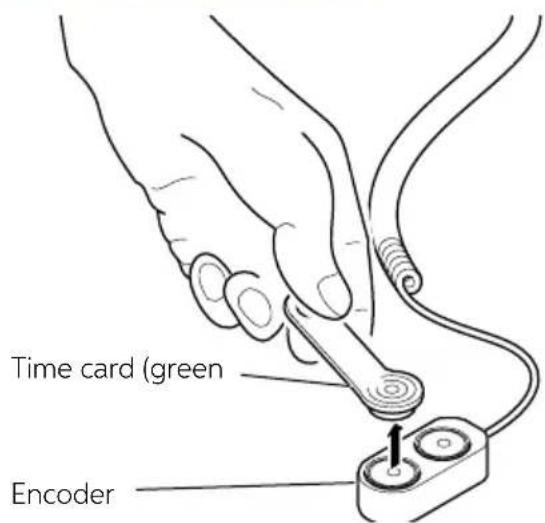
Connect the time card (green) to one of the two encoder ports and click on the Write button in the operator panel.
text_image
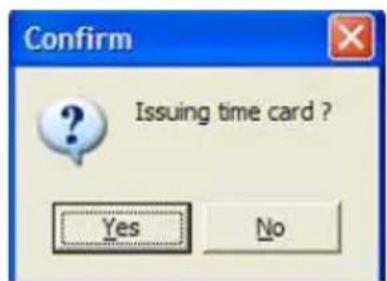
Confirm Issuing time card ? Yes NoAt this point a window will open, asking to confirm your choice. Click on the Yes button.
text_image
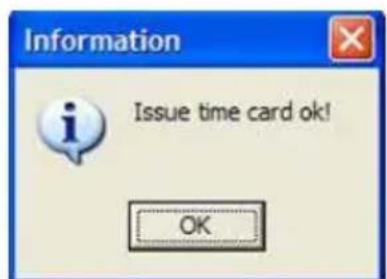
Information Issue time card ok! OKAnother confirmation window opens. Click on the OK button.
text_image
Time card (green) EncoderRemove the time card (green) from the encoder port.
text_image
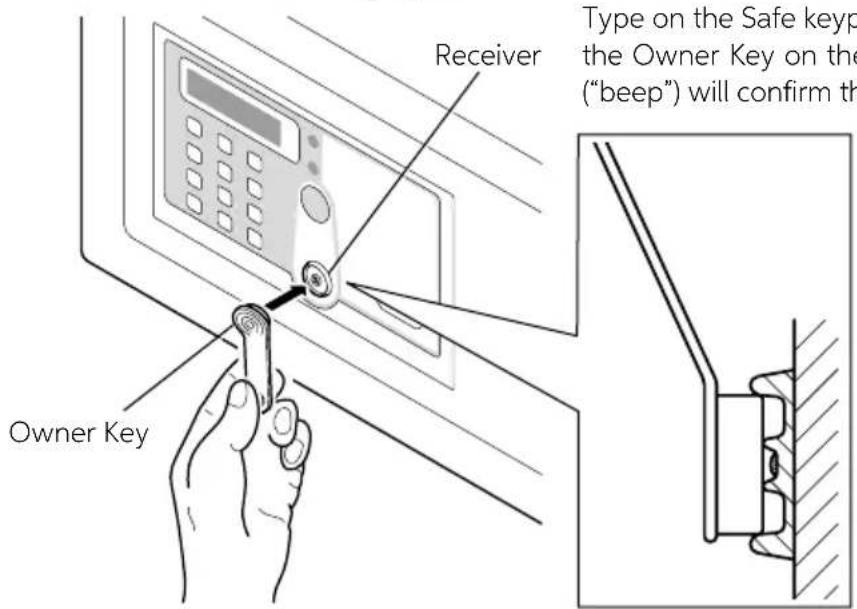
Receiver Type on the Safe keys the Owner Key on the ("beep") will confirm th Owner KeyType on the Safe keypad the * character and place the Owner Key on the receiver. An acoustic signal ("beep") will confirm that it has been recognised.
SAFE 10/30 SMART - 35 SMART PLUS
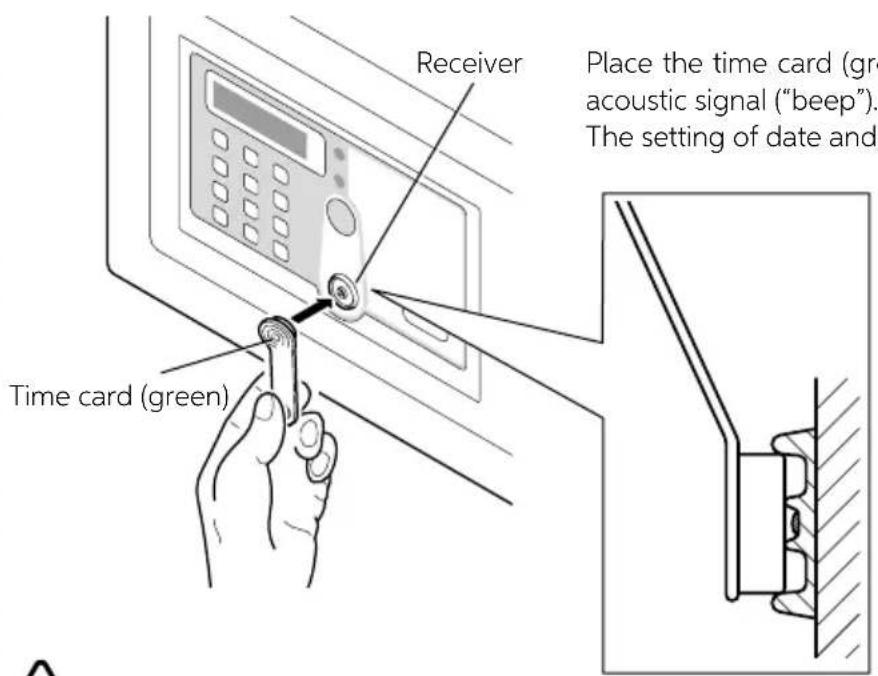
text_image
Receiver Place the time card (green acoustic signal ("beep"). The setting of date and Time card (green)
WARNING
Place the time card (green) on the receiver. If this doesn't happen it is necessary to press again the * button, place the Owner Key (red) on the receiver and then place the time card (green).
DATA FILING
To file data on the computer it is necessary to transfer them from the Safe, with the data card (yellow). This file can contain a maximum of three hundred openings.
For the transfer procedure proceed as follows.
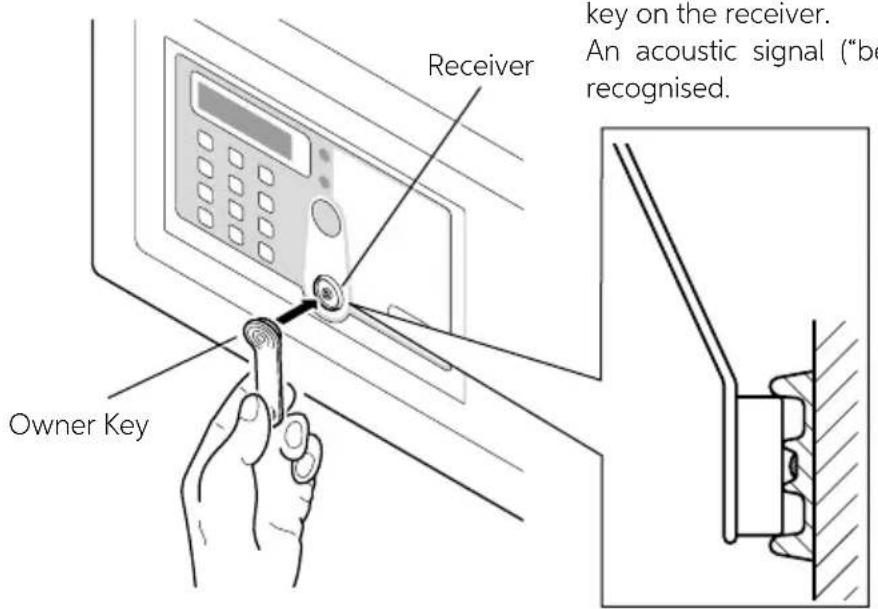
text_image
Receiver Key on the receiver. An acoustic signal ("be recognised. Owner KeySAFE_10_30_35_SMART_IM_20190517
Type on the Safe keypad the * button and place the Owner key on the receiver.
An acoustic signal ("beep") will confirm that it has been recognised.
indelB
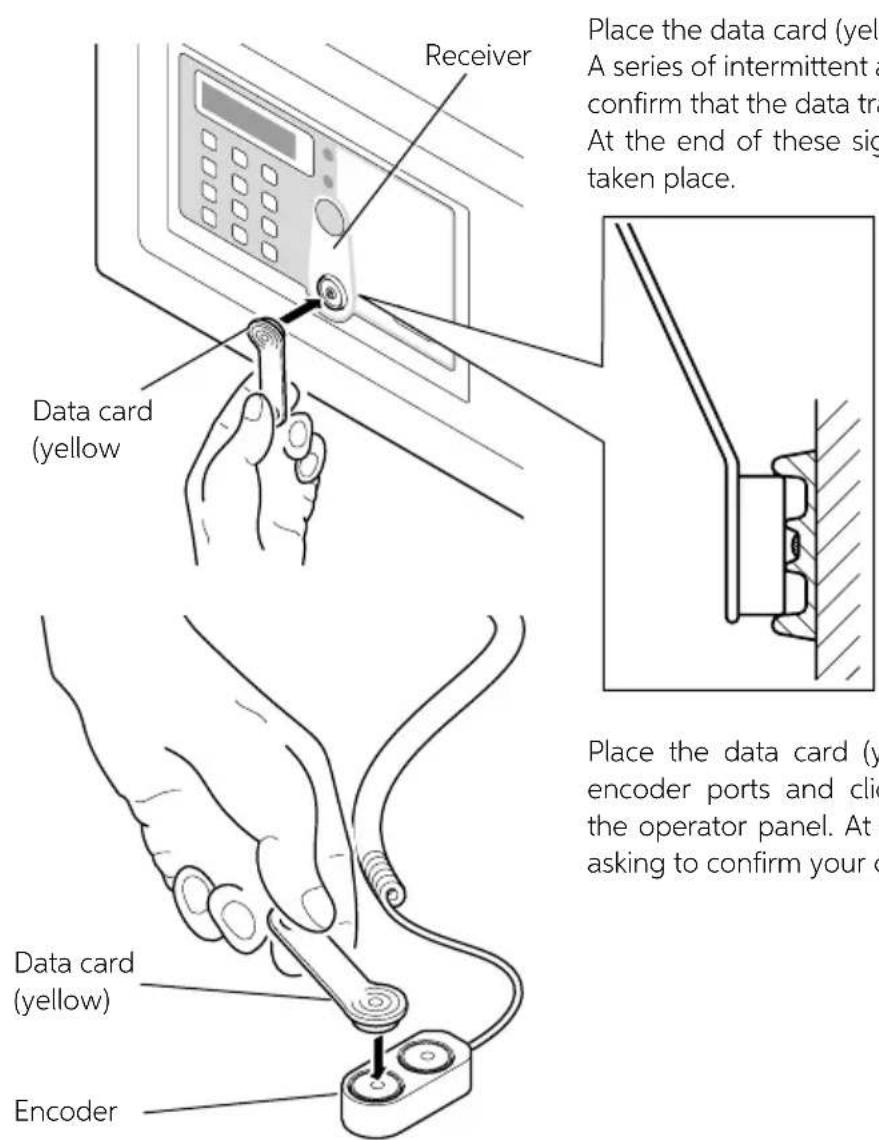
text_image
Receiver Place the data card (yellow) A series of intermittent a confirm that the data tr At the end of these sig taken place. Data card (yellow) Place the data card (y encoder ports and clic the operator panel. At asking to confirm your c Data card (yellow) EncoderPlace the data card (yellow) on the receiver.
A series of intermittent acoustic signals ("beep") will confirm that the data transfer is in progress.
At the end of these signals the transfer will have taken place.
natural_image
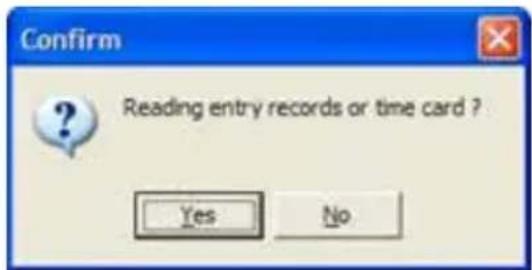
Technical line drawing of a mechanical assembly with a lever and base (no text or symbols)Place the data card (yellow) on one of the two encoder ports and click on the Read button in the operator panel. At this point a window opens asking to confirm your choice
text_image
Confirm Reading entry records or time card ? Yes NoClick on the Yes button.
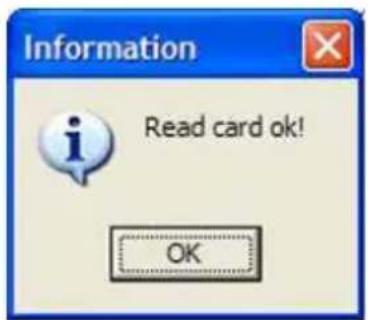
The data transfer from the data card (yellow) to the computer will then begin; this will take some minutes. Once the data transfer has taken place, a confirmation window will appear.
text_image
Information Read card ok! OKClick on the OK button.
SAFE 10/30 SMART - 35 SMART PLUS
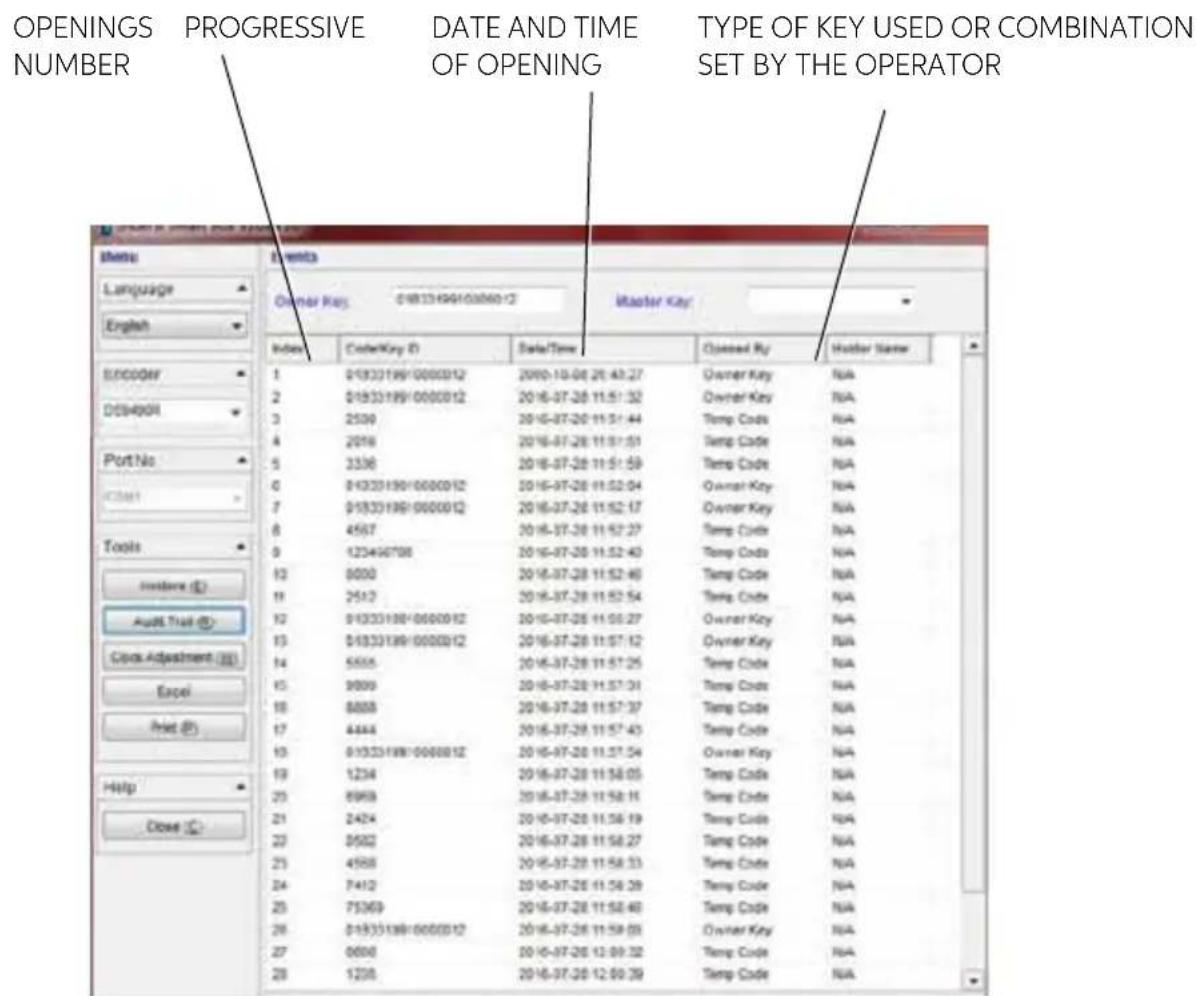
Now it is possible to display and print, if necessary, the filing of the data concerning all the openings done.
text_image
OPENINGS PROGRESSIVE DATE AND TIME TYPE OF KEY USED OR COMBINATION NUMBER OF OPENING SET BY THE OPERATOR Language English Encoder DS94001 Port No C3611 Tools Restore (E) Audit Trust (B) Cost Adjustment (S) Excel Print (P) Help Close (C) Events Owner Key: 0181349410306012 Master Key: Index CodeKey (I) Date/Time Closed By Hatcher Name 1 01833199/0000012 2000-10-06 20:43:27 Owner Key N/A 2 01833199/0000012 2016-07-28 11:51:32 Owner Key N/A 3 2530 2016-07-28 11:51:44 Temp. Code N/A 4 2016 2016-07-28 11:51:51 Temp. Code N/A 5 3336 2016-07-28 11:51:59 Temp. Code N/A 6 01833199/0000012 2016-07-28 11:52:04 Owner Key N/A 7 01833199/0000012 2016-07-28 11:52:17 Owner Key N/A 8 4567 2016-07-28 11:52:27 Temp. Code N/A 9 123496798 2016-07-28 11:52:43 Temp. Code N/A 10 8000 2016-07-28 11:52:46 Temp. Code N/A 11 2512 2016-07-28 11:52:54 Temp. Code N/A 12 91833199/0000012 2016-07-28 11:53:27 Owner Key N/A 13 51833199/0000012 2016-07-28 11:57:12 Owner Key N/A 14 5555 2016-07-28 11:57:25 Temp. Code N/A 15 9899 2016-07-28 11:57:34 Temp. Code N/A 16 8888 2016-07-28 11:57:37 Temp. Code N/A 17 4444 2016-07-28 11:57:43 Temp. Code N/A 18 91833199/0000012 2016-07-28 11:57:54 Owner Key N/A 19 1234 2016-07-28 11:58:05 Temp. Code N/A 20 8969 2016-07-28 11:58:15 Temp. Code N/A 21 2424 2016-07-28 11:58:19 Temp. Code N/A 22 9582 2016-07-28 11:58:27 Temp. Code N/A 23 4568 2016-07-28 11:58:33 Temp. Code N/A 24 7412 2016-07-28 11:58:39 Temp. Code N/A 25 75369 2016-07-28 11:58:46 Temp. Code N/A 26 01833199/0000012 2016-07-28 11:59:03 Owner Key N/A 27 6666 2016-07-28 12:09:32 Temp. Code N/A 28 1236 2016-07-28 12:09:39 Temp. Code N/A
WARNING
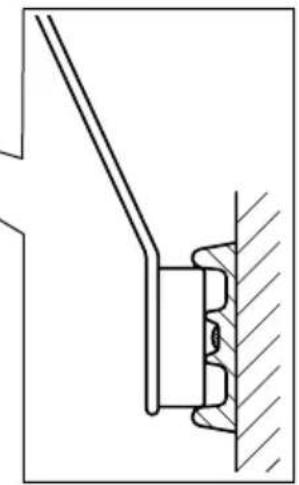
Keep the data card (yellow), the Owner Key and the Master Key slightly tilted when you place them on the receiver, taking care that the cards touch the center of the receiver, as shown in figure 1.

WARNING
Place the data card (yellow) on the receiver. If this does not happen, it will be necessary to repeat the procedure from the beginning.

WARNING
During data transfer the * key is pressed on the Safe keypad, before placing the Owner Key or the Master Key on the receiver, otherwise the Safe would open without allowing the operation.
SAFE_10_30_35_SMART_IM_20190517

AVERTISSEMENT
OUVERTURE DU COFFRE-FORT AVEC LA CLE MAITRESSE
EFFACEMENT D'UNE CLE MAITRESSE
natural_image
Technical diagram showing a mechanical assembly with a close-up inset of a component (no text or symbols visible)RÉGLAGE DU CODE TEMPORAIRE
natural_image
Technical diagram showing a mechanical assembly with a close-up of a component being inserted, no text or symbols present.RÉGLAGE DU CODE PERMANENT
natural_image
Line drawing of a hand using a screwdriver to adjust or install a wall-mounted component (no text or symbols present)SAFE 10/30 SMART - 35 SMART PLUS
REEMPLACEMENT DE LA PILE
ACCESSOIRES FOURNIS AVEC LE KIT
INSTALLATION DU LOGICIEL
text_image
InstallShield Wizard Welcome to the InstallShield Wizard for Smart Box V2014.10 The InstallShield® Wizard will install Smart Box V2014.10 on your computer. To continue click Web < Back Next > Canceltext_image
InstallShield Wizard Customer Information Please enter your information. Please enter your name and the name of the company for whom you want. Use Name: Company Name: < Back Save Canceltext_image
InstallShield Wizard Choose Destination Locations Select folder where setup will install files Setup will install SmartBox V2014.10 in the following folder: To install to this folder, click Next. To install to a different folder, click browse and select another folder. Destination folder C:\VPhages Files\td(B)\ndelB Browse... < Back Next > Canceltext_image
InstallShield Wizard Select Program Folders Please select a program folder Setup will add program icons to the Program Folder listed below. You may type a new folder name, or select one from the existing folders list. Click Next to continue. Program Folders: Existing Folders Administrative Tools Canon Utilities Dell Shell Audio Senses Intel Maintenance Microsoft Office 2013 < Back Next > Canceltext_image
InstallShield Wizard Setup Type Select the Setup Type to Install Click the type of Setup you prefer, then click Next. Typical Program will be installed with the most common options. Recommended for next users. Compact Program will be installed with minimum required options Custom You may choose the options you want to install. Recommended for advanced users. + Back Next > Canceltext_image
InstallShield Wizard InstallShield Wizard Complete Setup has finished installing SmartBox V2014.70 on your computertext_image
Confirm Issuing time card ? Yes Notext_image
Information Issue time card ok! OKtext_image
Confirm Reading entry records or time card ? Yes Notext_image
Information Read card ok! OKflowchart
graph LR
    A["Inhaberschlüssel ansetzen\n1 Signalton"] --> B["Inhaberschlüssel ansetzen\n1 Signalton"]
    B --> C["IB-Schlüssel ansetzen (blau)\n1 Signalton"]
    C --> D["Masterschlüssel"]
natural_image
Technical diagram showing a mechanical assembly with a close-up of a component being inserted, no text or symbols present.natural_image
Technical diagram showing a mechanical assembly with a close-up of a component being inserted into a housing (no text or symbols visible)natural_image
Line drawing of a hand using a screwdriver to adjust or install a wall-mounted device (no text or symbols visible)SAFE_10_30_35_SMART_IM_20190517
BATTERIEN AUSTAUSCHEN
text_image
InstallShield Wizard Welcome to the InstallShield Wizard for Smart Box V2014.10 The InstallShield® Wizard will install Smart Box V2014.10 on your computer. To continue this next. Next > Canceltext_image
InstallShield Wizard Customer Information Please enter your information. Please enter your name and the name of the company for whom you want. Uses Name: Company Name: < Back Canceltext_image
InstallShield Wizard Choose Destination Locations Select folder where Setup will install files Setup will install SmartBox V2014.10 in the following folder: To install to this folder, click Next. To install to a different folder, click Browse and select another folder: Destination folder C:\Phages Files\168\Indel B Browse... < Back Next > Canceltext_image
InstallShield Wizard Select Program Folders Please select a program folder. Setup will add program icons to the Program Folder listed below. You may type a new folder name, or select one from the existing folders list. Click Next to continue. Program Folders: Current file Existing Folders: Administrative Tools Canon Utilities Dell Dell Audio Games Intel Maintenance Microsoft Office 2013 + Back Next > Canceltext_image
InstallShield Wizard Setup Type Select the Setup Type to install Click the type of Setup you pretes, then click Next. ✓ Tuncel Program will be installed with the most common options. Recommended for next users. ✓ Compact Program will be installed with minimum required options. ✓ Customs You may choose the options you want to install. Recommended for advanced users. + Back Next > Canceltext_image
InstallShield Wizard InstallShield Wizard Complete Setup has finished installing SmartBox V2014.10 on your computertext_image
Confirm Issuing time card ? Yes Notext_image
Information Issue time card ok! OKtext_image
Confirm Reading entry records or time card ? Yes Notext_image
Information Read card ok! OKnatural_image
Technical diagram showing a mechanical assembly with a close-up view of a component being inserted (no text or symbols present)natural_image
Technical diagram showing a mechanical assembly with a close-up of a component labeled '按钮' (button) and an arrow indicating direction, no readable text or symbols present.natural_image
Line drawing of a hand using a screwdriver to adjust or install a wall-mounted component (no text or symbols present)SAFE 10/30 SMART - 35 SMART PLUS
text_image
InstallShield Wizard Welcome to the InstallShield Wizard for Smart Box V2004.10 The InstallShield® Wizard will install Smart Box V2004.10 on your computer. To continue click Next Next Canceltext_image
InstallShield Wizard Customer Information Please enter your information. Please enter your name and the name of the company for whom you want. User Name: Company Name: < Back Save Canceltext_image
InstallShield Wizard Choose Destination Location Select folder where Setup will install files. Setup will install SmartBox V2C14 18 in the following folder. To install to this folder, click Next. To install to a different folder, click Browse and select another folder. Destination Folder C:\Program Files (eB6)\model 8 Browse... < Back Next > Cancel