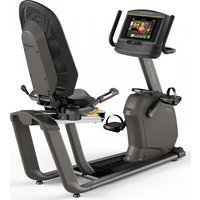
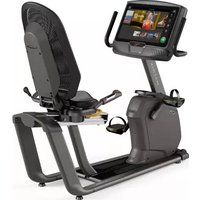
CXC - Indoor bike trainer MATRIX - Free user manual and instructions
Find the device manual for free CXC MATRIX in PDF.

User questions about CXC MATRIX
0 question about this device. Answer the ones you know or ask your own.
Ask a new question about this device
Download the instructions for your Indoor bike trainer in PDF format for free! Find your manual CXC - MATRIX and take your electronic device back in hand. On this page are published all the documents necessary for the use of your device. CXC by MATRIX.
USER MANUAL CXC MATRIX
natural_image
Exterior view of a black rectangular exercise bike (no signage or text visible on body)3 ENGLISH
15 DEUTSCH
27 NEDERLANDS
39 DANSK
51 FRANÇAIS
63 ESPAÑOL
75 ITALIANO
87 EΛΛΗΝΙΚΑ
99 POLSKI
111 PORTUGUÊS
123 РУССКИЙ
ENGLISH

IMPORTANT PRECAUTIONS
SAVE THESE INSTRUCTIONS
When using Matrix exercise equipment, basic precautions should always be followed, including the following: Read all instructions before using this equipment. It is the responsibility of the owner to ensure that all users of this equipment are adequately informed of all warnings and precautions.
This equipment is for indoor use only. This training equipment is a Class S product designed for use in a commercial environment such as a fitness facility.
This equipment is for use only in a climate-controlled room. If your exercise equipment has been exposed to colder temperatures or high moisture climates, it is strongly recommended that this equipment is warmed up to room temperature prior to use.
DANGER!
TO REDUCE THE RISK OF ELECTRICAL SHOCK:
Always unplug the equipment from the electrical outlet before cleaning, performing maintenance and putting on or taking off parts.
WARNING!
TO REDUCE THE RISK OF BURNS, FIRE, ELECTRICAL SHOCK OR INJURY TO PERSONS:
- Use this equipment only for its intended use as described the equipment's Owner's Manual.
- At NO time should children under the age of 14 use the equipment.
- At NO time should pets or children under the age of 14 be closer to the equipment than 10 feet / 3 meters.
- This equipment is not intended for use by persons with reduced physical, sensory or mental capabilities, or lack of experience and knowledge, unless they are supervised or have been given instruction concerning use of the equipment by a person responsible for their safety.
- Always wear athletic shoes while using this equipment. NEVER operate the exercise equipment with bare feet.
- Do not wear any clothing that might catch on any moving parts of this equipment.
• Heart rate monitoring systems may be inaccurate. Over exercising may result in serious injury or death.
• Incorrect or excessive exercise may result in serious injury or death. If you experience any kind of pain, including but not limited to chest pains, nausea, dizziness, or shortness of breath, stop exercising immediately and consult your physician before continuing.
- Do not jump on the equipment.
- At no time should more than one person be on the equipment.
- Set up and operate this equipment on a solid level surface.
- Never operate the equipment if it is not working properly or if it has been damaged.
- Use handlebars to maintain balance when mounting and dismounting, and for additional stability while exercising.
• To avoid injury, do not expose any body parts (for example, fingers, hands, arms or feet) to the drive mechanism or other potentially moving parts of the equipment.
- Connect this exercise product to a properly grounded outlet only.
- This equipment should never be left unattended when plugged in. When not in use, and prior to servicing, cleaning, or moving equipment, turn off power, then unplug from outlet.
- Do not use any equipment that is damaged or has worn or broken parts. Use only
replacement parts supplied by Customer Technical Support or an authorized dealer.
- Never operate this equipment if it has been dropped, damaged, or is not working properly, has a damaged cord or plug, is located in a damp or wet environment, or has been immersed in water.
- Keep power cord away from heated surfaces. Do not pull on this power cord or apply any mechanical loads to this cord.
- Do not remove any protective covers unless instructed by Customer Technical Support. Service should only be done by an authorized service technician.
- To prevent electrical shock, never drop or insert any object into any opening.
- Do not operate where aerosol (spray) products are being used or when oxygen is being administered.
- This equipment should not be used by persons weighing more than the specified maximum weight capacity as listed in the equipment Owner's Manual. Failure to comply will void the warranty.
- This equipment must be used in an environment that is both temperature and humidity controlled. Do not use this equipment in locations such as, but not limited to: outdoors, garages, car ports, porches, bathrooms, or located near a swimming pool, hot tub, or steam room. Failure to comply will void the warranty.
- Contact Customer Technical Support or an authorized dealer for examination, repair and/or service.
- Never operate this exercise equipment with the air opening blocked. Keep the air opening and internal components clean, free of lint, hair, and the like.
- Do not modify this exercise device or use unapproved attachments or accessories. Modifications to this equipment or use of unapproved attachments or accessories will void your warranty and may cause injury.
- To clean, wipe surfaces down with soap and slightly damp cloth only; never use solvents. (See MAINTENANCE)
- Use the stationary training equipment in a supervised environment.
- Individual human power to perform exercise may be different than the mechanical power displayed.
- When exercising, always maintain a comfortable and controlled pace.
- Ensure that adjustment levers (seat and handlebar fore-and-aft) are properly secured and do not interfere with range of motion during exercise.
- Do not attempt to ride the exercise bike in a standing position at high RPMs until you have practiced at slower speeds.
- When adjusting the seat height position, lift the saddle height adjustment lever and gently lower seat to a lower height, or raise the seat to the desired height. Push down on saddle height adjustment lever to clamp, and ensure clamp is fully engaged prior to use.
- Make sure handlebars are secure before each use.
- Never rotate the foot pedals by hand.
- Never dismount the equipment until the pedals come to a complete STOP.
- This unit is not equipped with a free wheel. Pedal speed should be reduced in a controlled manner.
- Care should be taken when mounting or dismounting the equipment. Before mounting or dismounting, move the foot pedal on the mounting or dismounting side to its lowest position.
ENGLISH

ASSEMBLY
UNPACKING
Unpack the equipment where you will be using it. Place the carton on a level flat surface. It is recommended that you place a protective covering on your floor. Never open box when it is on its side.
IMPORTANT NOTES
During each assembly step, ensure that ALL nuts and bolts are in place and partially threaded.
Several parts have been pre-lubricated to aid in assembly and usage. Please do not wipe this off. If you have difficulty, a light application of lithium grease is recommended.
WARNING!
There are several areas during the assembly process that special attention must be paid. It is very important to follow the assembly instructions correctly and to make sure all parts are firmly tightened. If the assembly instructions are not followed correctly, the equipment could have parts that are not tightened and will seem loose and may cause irritating noises. To prevent damage to the equipment, the assembly instructions must be reviewed and corrective actions should be taken.
NEED HELP?
If you have questions or if there are any missing parts, contact Customer Tech Support.
TOOLS REQUIRED:
□ 3 mm Allen Wrench
□ 5 mm Allen Wrench
□ 10 mm Allen Wrench
□ Flat Wrench (15mm/17mm 325L)
□ Phillips Screwdriver
PARTS INCLUDED:
□ 1 Main Frame
□ 1 Front Stabilizer Tube
□ 1 Rear Stabilizer Tube
1 Handlebar Set
□ 1 Transport Handle
□ 1 Bicycle Saddle
□ 2 Pedals
□ 1 Console (CXM only)
□ 1 Hardware Kit
text_image
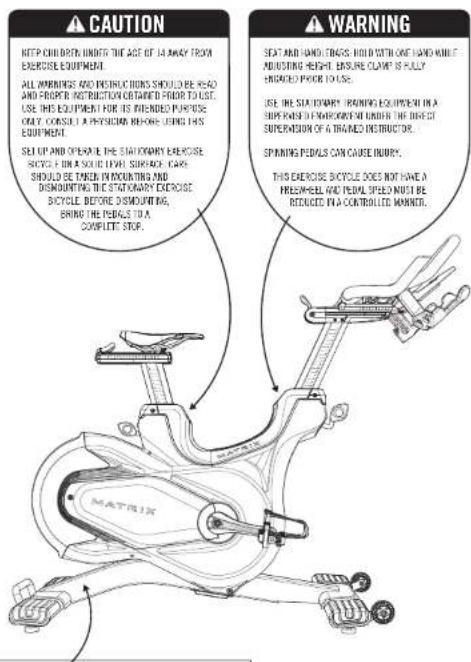
CAUTION KEEP CHILD OPEN THE ACT OF 14 AWAY TRYN EXERCISE EQUIPMENT. ALL WARNINGS AND INSTRUCTIONS SHOULD BE READ AND PROPER INSTRUCTION OR TADED POUR TO USE. USE THIS EQUIPMENT FOR ITS INTERNEED PURPOSE ONLY. CONSULT A PHYSICIAN BEFORE USING THIS EQUIPMENT. SELL UP AND OPEN OUT THE STATOMARY EXERCISE SUPPORT ON A SOLICE LEVEL SURFACE CARE SHOULD BE TAGEN IN COUNTING AND DISCOUNTING THE STATOMARY EXERCISE BICYCLE BEFORE DISCOUNTING, BRING THE PEAPLS TO A COMPLETE STOP. WARNING SEAT AND HAND TRABS. HOLD WITH ONE HAND WHILE INDUSTRY HEIGHT. ENSEMBLE CLIMATE IS FULLY ENGAGED POUR TO USE. USE THE STATOMARY BRANDING EQUIPMENT IN A SIDE ROADS IN ENVIRONMENT UNDER THE DIRECT SUPERVISION OF A BRIARDED INSTRUCTOR. SPINNING PEAPLS CAN CAUSE INJURY. THIS EXERCISE BICYCLE DOES NOT HAVE A FREEWHEEL AND PEAPL SPEED MUST BE REDUCED IN A CONTROLLED MARKER.SERIAL NUMBER
MODEL
□ CXC MATRIX TARGET TRAINING CYCLE
□ CXM MATRIX TARGET TRAINING CYCLE
ENGLISH

ASSEMBLY
text_image
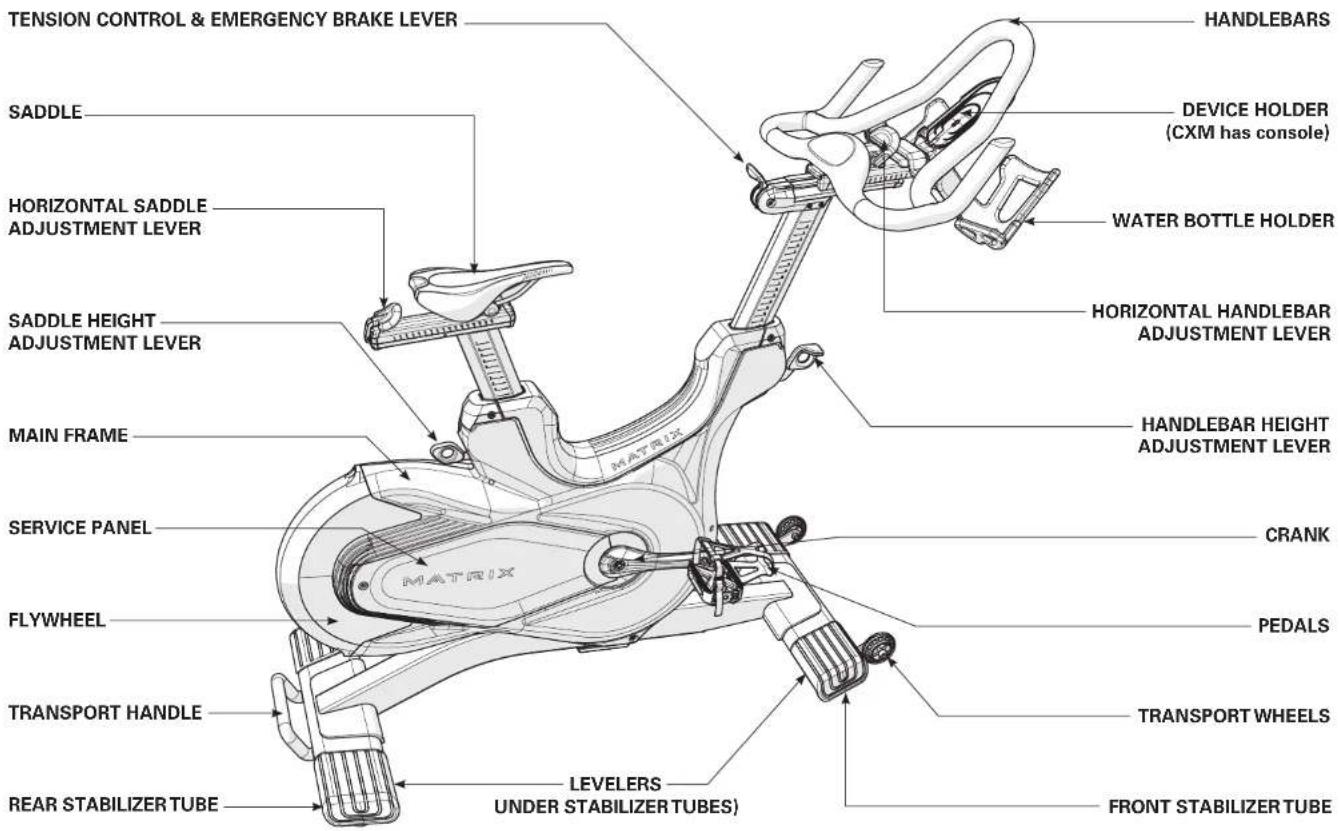
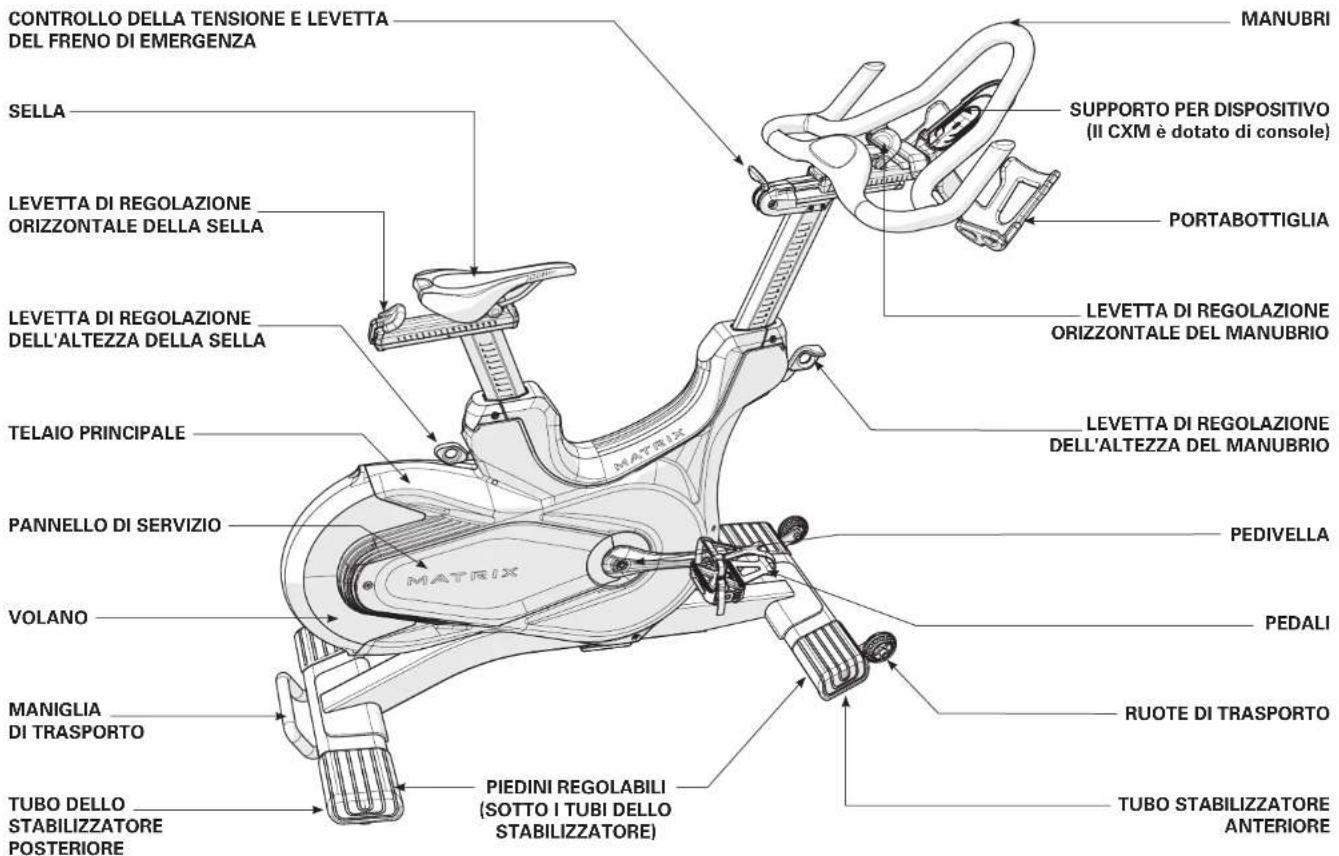
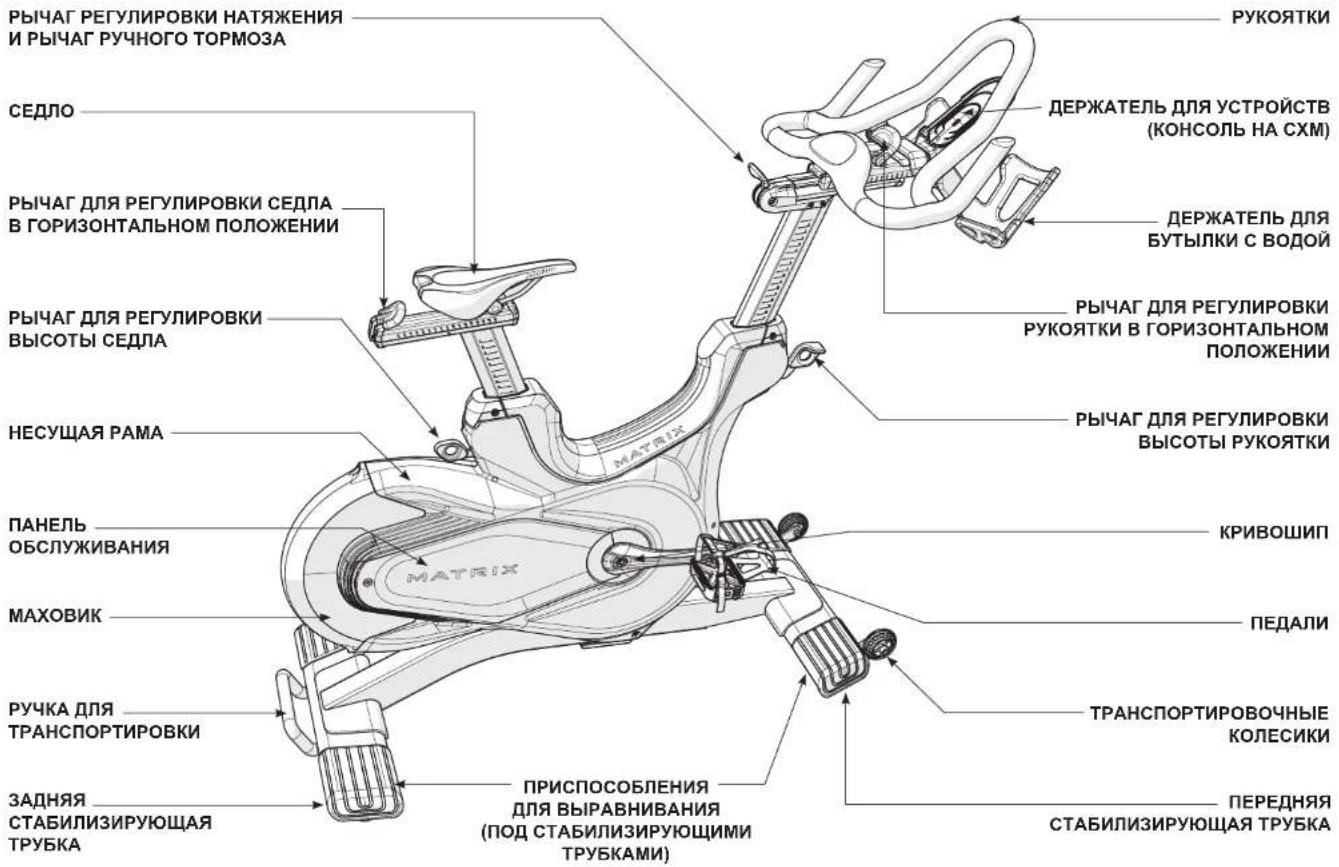
TENSION CONTROL & EMERGENCY BRAKE LEVER SADDLE HORIZONTAL SADDLE ADJUSTMENT LEVER SADDLE HEIGHT ADJUSTMENT LEVER MAIN FRAME SERVICE PANEL FLYWHEEL TRANSPORT HANDLE REAR STABILIZER TUBE LEVELERS UNDER STABILIZER TUBES) HANDLEBARS DEVICE HOLDER (CXM has console) WATER BOTTLE HOLDER HORIZONTAL HANDLEBAR ADJUSTMENT LEVER HANDLEBAR HEIGHT ADJUSTMENT LEVER CRANK PEDALS TRANSPORT WHEELS FRONT STABILIZER TUBEENGLISH

ASSEMBLY

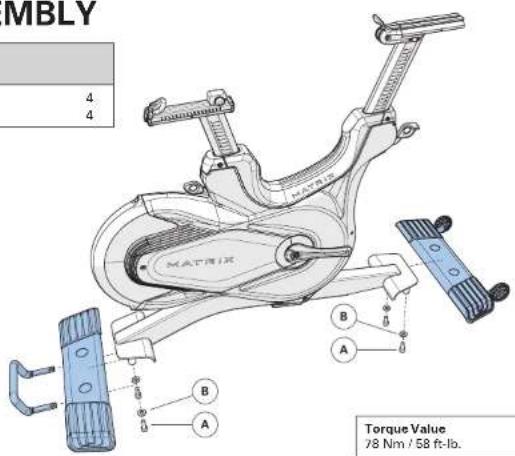
Hardware Qty

Bolt (M12x25L)
Flat Washer
text_image
MBLY 4 4 B A B A Torque Value 78 Nm / 58 ft-lb.
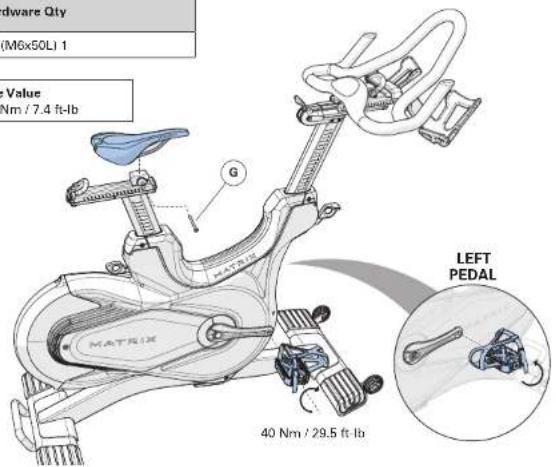
Hardware Qty
G Screw (M6x50L) 1
Torque Value
G - 10 Nm / 7.4 ft-lb
text_image
Hardware Qty (M6x50L) 1 Value Nm / 7.4 ft-lb G MATRIX LEFT PEDAL 40 Nm / 29.5 ft-lb
Hardware Qty

Stopper

Screw (M8x20L)
Screw (M4x6L)
text_image
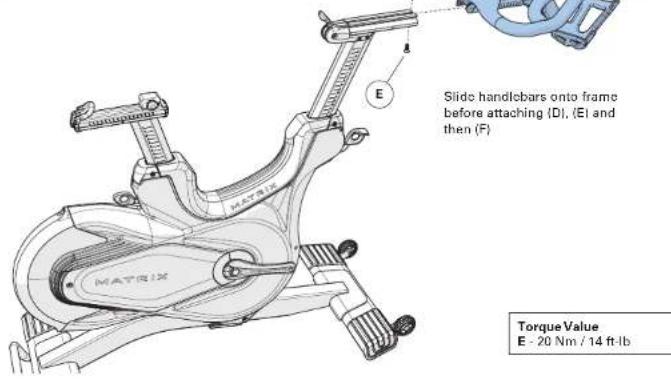
Slide handlebars onto frame before attaching (D), (E) and then (F) Torque Value E - 20 Nm / 14 ft·lb
Hardware Qty
H Screw (M4x10L) 3

text_image
Diagram showing three steps of a bicycle steering wheel with labeled components and hand positioning indicatorsASSEMBLY COMPLETE

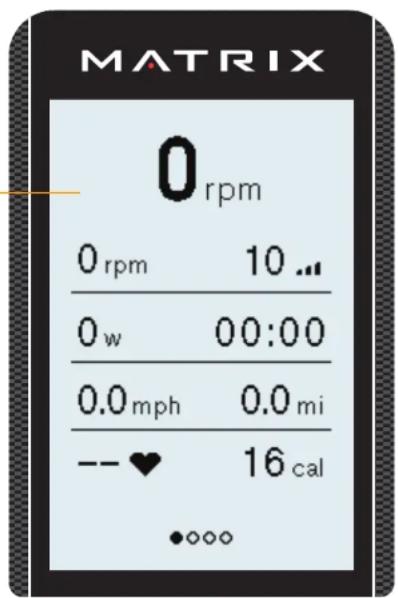
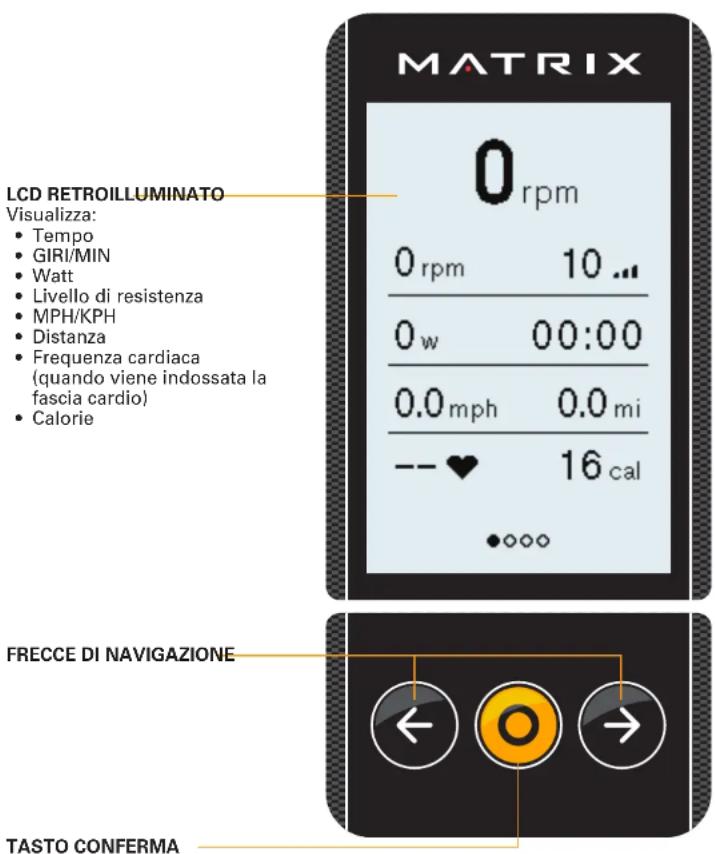
CONSOLE OPERATION
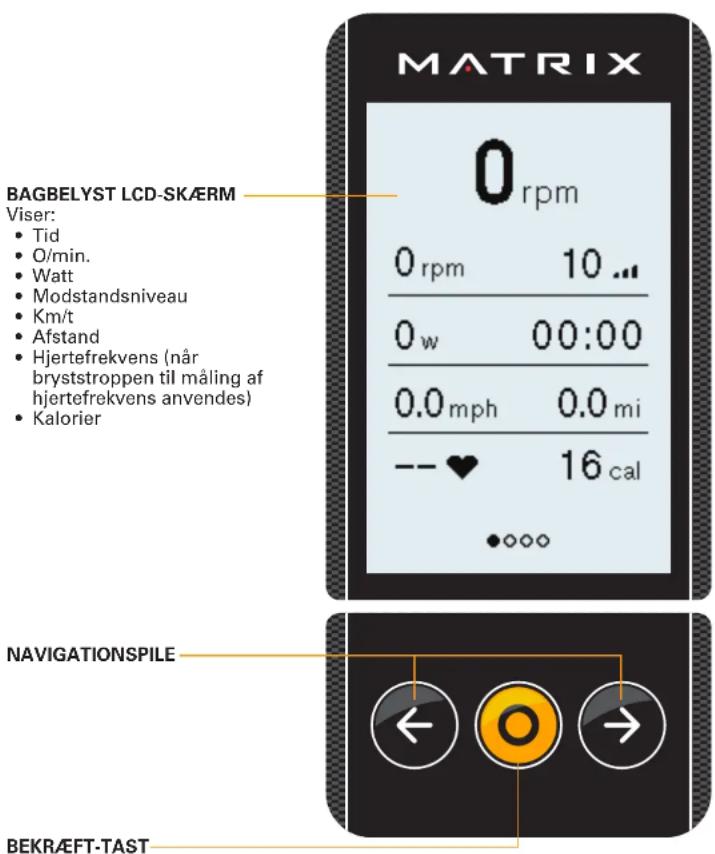
BACK-LIT LCD
Displays:
• Time
- RPM
- Watts
- Resistance Level
- MPH/KPH
- Distance
• Heart Rate (when heart rate strap is worn)
- Calories
text_image
MATRIX 0 rpm 0 rpm 10 ... 0 w 00:00 0.0 mph 0.0 mi -- ♥ 16 cal •••••NAVIGATION ARROWS
CONFIRMATION KEY
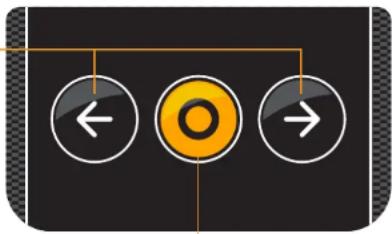
flowchart
graph TD
    A["←"] --> B["O"]
    B --> C["→"]
CXM CONSOLE INFORMATION
Console turns on when pedals are moved.
Press ← → to change the large metric at the top from RPMs to Watts, to HR, to a lap feature.
LAP/INTERVAL - when on the lap screen, press to start the first interval. Lap number, time and distance covered will be displayed. Press to stop the interval. To start the next lap, press again, etc. At the end of the workout, lap times/distances will be displayed.
SUMMARY SCREENS – after the workout is complete, an average summary of RPM, Watts, MPH, HR, etc. will be displayed. Press → to advance to the max summary screen for RPM, Watts MPH, HR, etc. Press → again to advance to the Lap summary screen.
MANAGER MODE
To enter manager mode, press ← → simultaneously for 3-5 seconds, to exit manager mode, press and hold for 3-5 seconds.
- WORKOUT – set desired pause time and inactivity time
- USER – select weight
- UNIT – set console to display metric or imperial units
- SOFTWARE – version and updates
• FRAME LIFE – Accumulated distance and time - MACHINE – Type, Serial Number, out of order
- LCD – adjust backlight brightness and contrast settings
- SHUTDOWN TIME – When in the workout summary, if there is no RPM, this is the amount of time before the console shuts off
- PAIR HR – Disable / enable for ANT+/BLE HR pairing screen
- ANT+ - enable or disable the broadcast function and set broadcast ID

CONSOLE OPERATION
POWER ACCURACY
This bike displays power on the console. The power accuracy of this model has been tested using the test method of ISO 20957-10:2017 to ensure a power accuracy within a tolerance of ± 10% for input power ≥ 50W , and within a tolerance of ± 5W for input power < 50W . The power accuracy was verified using the following conditions:
Nominal Power Rotations per minute measured at crank
- 50 W 50 RPM
• 100 W 50 RPM - 150 W 60 RPM
- 200 W 60 RPM
• 300 W 70 RPM
• 400 W 70 RPM
In addition to the above testing conditions, the manufacturer tested the power accuracy at one additional point, using a crank rotation speed of approximately 80 RPM (or higher) and comparing the displayed power to the input (measured) power.
USING THE HEART RATE FUNCTION
The heart rate function on this product is not a medical device. The heart rate reading is intended only as an exercise aid in determining heart rate trends in general. Please consult your physician.
When used in conjunction with a wireless chest transmitter (sold separately), your heart rate can be transmitted wirelessly to the unit and displayed on the console. Compatible with Bluetooth, ANT+ and Polar 5kHz heart rate devices.
NOTE: The chest strap must be tight and properly placed to receive an accurate and consistent readout. If the chest strap is too loose, or positioned improperly, you may receive an erratic or inconsistent heart rate readout.
WARNING!
Heart rate monitoring systems may be inaccurate. Over exercising may result in serious injury or death. If you feel faint, stop exercising immediately.
BATTERY
When the battery is low, a low battery icon will be displayed in the upper right hand corner of the screen.
The user will be prompted to pedal to charge (minimum of 67 RPMs). The battery icon will disappear when sufficiently charged.
If the battery needs to be replaced, the console will display this message when necessary.
ENGLISH

BEFORE YOU BEGIN
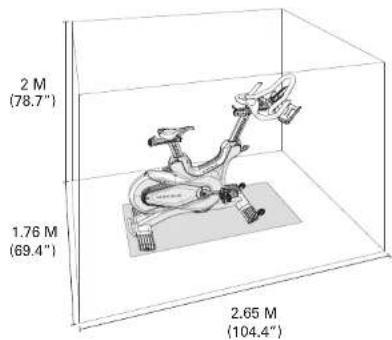
Place the equipment on a level and stable surface away from direct sunlight. The intense UV light can cause discoloration on the plastics. Locate your equipment in an area with cool temperatures and low humidity. Please leave a clear zone on all sides of the equipment that is at least 60 cm (23.6"). This zone must be clear of any obstruction and provide the user a clear exit path from the machine. Do not place the equipment in any area that will block any vent or air openings. The equipment should not be located in a garage, covered patio, near water or outdoors.
WARNING!
Our equipment is heavy, use care and additional help if necessary when moving. Failure to follow these instructions could result in injury.
TRAINING AREA
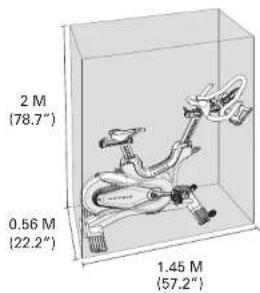
text_image
2 M (78.7°) 0.56 M (22.2°) 1.45 M (57.2°)FREE AREA
text_image
2 M (78.7") 1.76 M (69.4") 2.65 M (104.4)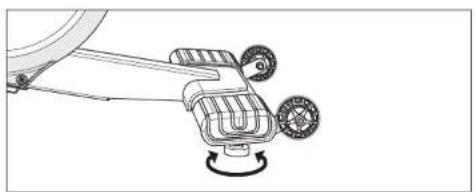
natural_image
Technical line drawing of a mechanical device with two wheels and a rotating knob (no text or symbols)LEVELING THE EQUIPMENT
It is extremely important that the levelers are correctly adjusted for proper operation. Turn leveling foot clockwise to lower and counter-clockwise to raise unit. Adjust each side as needed until the equipment is level. An unbalanced unit may cause belt misalignment or other issues. Use of a level is recommended.
natural_image
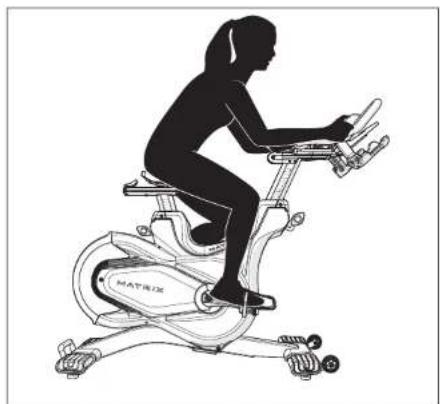
Silhouette of a person riding an exercise bike with legs and arms extended (no text or symbols visible)PROPER USAGE
- Sit on the cycle facing the handlebars. Both feet should be on the floor one on each side of the frame.
- To determine proper seat position, sit on the seat and position both feet on the pedals. Your knee should bend slightly at the furthest pedal position. You should be able to pedal without locking your knees or shifting your weight from side to side.
- Adjust pedal straps to desired tightness.
- To get off of the cycle, follow the proper usage steps in reverse.
ENGLISH

BEFORE YOU BEGIN
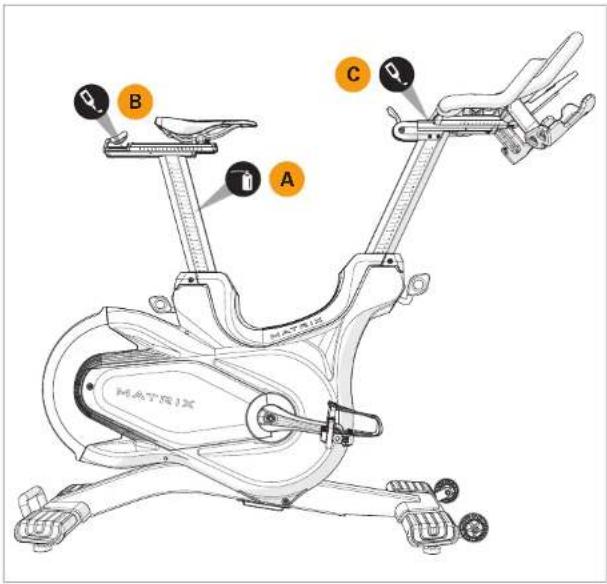
text_image
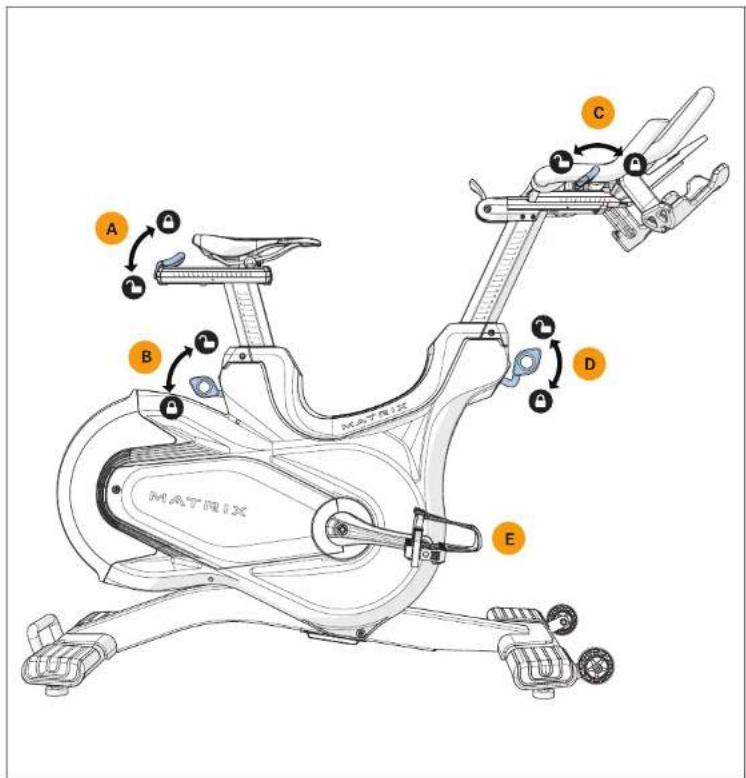
A B C D E MATRIXHOW TO ADJUST THE INDOOR CYCLE
The indoor cycle can be adjusted for maximum comfort and exercise effectiveness. The instructions below describe one approach to adjusting the indoor cycle to ensure optimal user comfort and ideal body positioning; you may choose to adjust the indoor cycle differently.
SADDLE ADJUSTMENT
Proper saddle height helps ensure maximum exercise efficiency and comfort, while reducing the risk of injury. Adjust the saddle height to make sure it's in proper position, one that keeps a slight bend in your knee while your legs are in the extended position
HANDLEBAR ADJUSTMENT
Proper position for the handlebar is based primarily on comfort. Typically, the handlebar should be positioned slightly higher than the saddle for beginning cyclists. Advanced cyclists could try different heights to get the arrangement most suitable for them.
A) SADDLE HORIZONTAL POSITION
Pull the adjustment lever down to slide the saddle forward or backward as desired. Push the lever up to lock saddle position. Test the saddle slide for proper operation.
B) SADDLE HEIGHT
Lift the adjustment lever up while sliding the saddle up and down with the other hand. Push the lever down to lock saddle position.
C) HANDLEBAR HORIZONTAL POSITION
Pull the adjustment lever towards the rear of the cycle to slide the handlebars forward or backward as desired. Push the lever forward to lock handlebar position.
D) HANDLEBAR HEIGHT
Pull the adjustment lever up while raising or lowering the handlebar with the other hand. Push the lever down to lock handlebar position.
E) PEDAL STRAPS
Place the ball of the foot into the toe cage until the ball of the foot is centered over the pedal, reach down and pull the pedal strap up to tighten prior to use. To remove your foot from the toe cage, loosen the strap and pull out.
ENGLISH

BEFORE YOU BEGIN
text_image
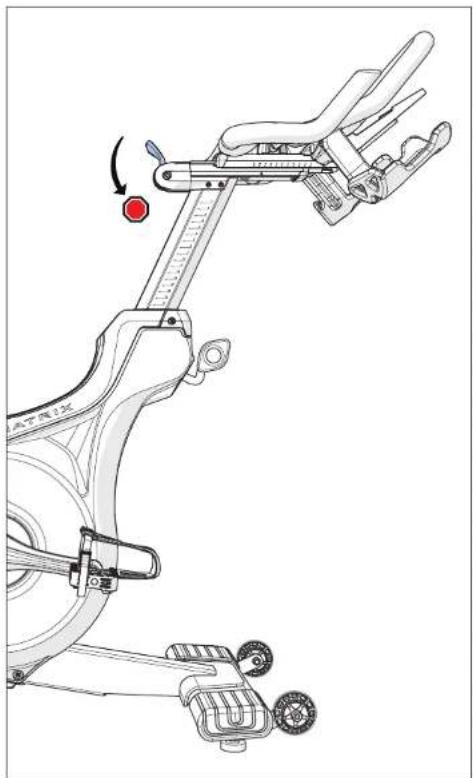
Technical diagram of a stationary exercise bike with labeled components and motion indicatorThe preferred level of difficulty in pedaling (resistance) can be regulated in fine increments by use of the tension control lever. To increase the resistance, push the tension control lever towards the ground. To decrease the resistance, pull up the lever upwards.
IMPORTANT:
• To stop the flywheel while pedaling, push down hard on the lever.
- The flywheel should quickly come to a complete stop.
• Make sure your shoes are fixed into the toe clip.
- Apply full resistance load when the bike is not in use to prevent injuries due to moving drive gear components.

WARNING
The indoor cycle does not have a free moving flywheel; the pedals will continue to move together with the flywheel until the flywheel stops. Reducing speed in a controlled manner is required. To stop the flywheel immediately, push down the red emergency brake lever. Always pedal in a controlled manner and adjust your desired cadence according to your own abilities. Push the red lever down = emergency stop.
The indoor cycle uses a fixed flywheel that builds momentum and will keep the pedals turning even after the user stops pedaling or if the user's feet slip off. DO NOT ATTEMPT TO REMOVE YOUR FEET FROM THE PEDALS OR DISMOUNT THE MACHINE UNTIL BOTH THE PEDALS AND THE FLYWHEEL HAVE COMPLETELY STOPPED. Failure to follow these instructions may lead to loss of control and the potential for serious injury.
ENGLISH

MAINTENANCE
- Any and all part removal or replacement must be performed by a qualified service technician.
- DO NOT use any equipment that is damaged and or has worn or broken parts. Use only replacement parts supplied by your country's local MATRIX dealer.
- MAINTAIN LABELS AND NAMEPLATES: Do not remove labels for any reason. They contain important information. If unreadable or missing, contact your MATRIX dealer for a replacement.
- MAINTAIN ALL EQUIPMENT: Preventative maintenance is the key to smooth operating equipment as well as keeping your liability to a minimum. Equipment needs to be inspected at regular intervals.
- Ensure that any person(s) making adjustments or performing maintenance or repair of any kind is qualified to do so. MATRIX dealers will provide service and maintenance training at our corporate facility upon request.

text_image
A B C Q HEAT 1983X| MAINTENANCE SCHEDULE | |
| ACTION FREQUENCY | |
| Clean the indoor cycle using soft cloths or paper towels or other Matrix approved solution (cleaning agents should be alcohol and ammonia free). Disinfect the saddle and handlebars and wipe off all bodily residues. | AFTER EACH USE |
| Make sure that the indoor cycle is level and does not rock. DAILY | |
| Clean entire machine using water and a mild soap or other Matrix approved solution (cleaning agents should be alcohol and ammonia free). Clean all exterior parts, the steel frame, front and rear stabilizers, seat and handlebars. | WEEKLY |
| Test the emergency brake to make sure it is functioning properly. To do this, press down the red emergency brake lever while pedaling. When functioning properly, it should immediately slow down the flywheel until it comes to a complete stop. | BI-WEEKLY |
| Lubricate the saddle post (A). To do this, raise the saddle post to the MAX position, spray with maintenance spray and rub down the entire exterior surfaces with a soft cloth. Clean the saddle slide (B) with a soft cloth and if necessary apply a small amount of lithium/silicone grease. | BI-WEEKLY |
| Clean the handlebar slide (C) with a soft cloth and if necessary apply a small amount of lithium/silicone grease. | BI-WEEKLY |
| Inspect all assembly bolts and pedals on the machine for proper tightness. | MONTHLY |
 | MONTHLY |
ENGLISH

PRODUCT INFORMATION
| CXM Indoor Cycle CXC Indoor Cycle | ||
| Console Back-lit LCD NA | ||
| Max User Weight 159 kg / 350 lbs | ||
| User Height Range 147 – 200.7 cm / 4'11" – 6'7" | ||
| Max Saddle and Handlebar Height 130.3 cm / 51.3" | ||
| Max Length 145.2 cm / 57.2" | ||
| Product Weight 56.5 kg / 124.6 lbs 55.2 kg / 121.7 lbs | ||
| Shipping Weight 62.4 kg / 137.6 lbs 61.1 kg / 134.7 lbs | ||
| Required Footprint (L x WI)* 125.4 x 56.3 cm / 49.4 x 22.2" | ||
| Dimensions(max saddle & handlebar height) | 145.2 x 56.4 x 130.2 cm /57.2 x 22.2 x 51.3" | 145.2 x 56.4 x 130.2 cm /57.2 x 22.2 x 51.3" |
| Overall Dimensions(L x W x HIx | 125.4 x 56.4 x 102.8 cm /49.4 x 22.2 x 40.5" | 125.4 x 56.4 x 102.8 cm /49.4 x 22.2 x 40.5" |
* Ensure a minimum clearance width of 0.6 meters (24") for access to and passage around MATRIX equipment. Please note, 0.91 meters (36") is the ADA recommended clearance width for individuals in wheelchairs.
For most current owner's manual and information, check matrixfitness.com

MANAGER-MODUS (MANAGER-MODE)
natural_image
Technical line drawing of a mechanical device with two wheels and a rotating knob (no text or symbols)natural_image
Silhouette of a person riding an exercise bike (no text or symbols visible)text_image
A B C D E M A T P R 0.2text_image
Technical diagram of a stationary exercise bike with labeled components and motion indicatorWIDERSTANDSKONTROLLE / NOTBREMSE
flowchart
graph TD
    A["←"] --> B["O"]
    B --> C["→"]
INFORMATIE CONSOLE CXM
natural_image
Technical line drawing of a mechanical device with two wheels and a rotating knob (no text or symbols)HET APPARAAT WATERPAS ZETTEN
natural_image
Silhouette of a person riding an exercise bike (no text or symbols visible)CORRECT GEBRUIK
text_image
A B C D E M A T P R 0.2text_image
Technical diagram of a stationary exercise bike with labeled components and motion indicatorINSTELLEN WEERSTAND/NOODREM
natural_image
Mechanical assembly diagram showing a blue car component with mounting bracket and force indicator (no text or labels)text_image
Technical diagram of a stationary exercise machine with labeled parts and component annotationstext_image
Diagram showing three steps of a bicycle scooter charging device with labeled components and hand gesturesSAMLING FULDF∅RT
DANSK

KONSOLBETJENING
text_image
MATRIX 0 rpm BAGBELYST LCD-SKÆRM Viser: • Tid • O/min. • Watt • Modstandsniveau • Km/t • Afstand • Hjertefrekvens (når bryststroppen til måling af hjertefrekvens anvendes) • Kalorier 0 rpm 10 ... 0 w 00:00 0.0 mph 0.0 mi -- ♥ 16 cal • ◦ ◦ ◦ ◦ NAVIGATIONSPILE BEKRÆFT-TASTCXM-KONSOLOPLYSNINGER
natural_image
Technical line drawing of a mechanical device with two wheels and a rotating knob (no text or symbols)NIVELLERING AF UDSTYRET
natural_image
Silhouette of a person riding an exercise bike (no text or symbols visible)KORREKT BRUG
text_image
Technical diagram of a bicycle leg mechanism with Chinese annotations indicating motion and component placementMODSTANDSKONTROL/N∅DBREMSE
natural_image
Technical line drawing of a mechanical device with two wheels and a rotating knob (no text or symbols)MISE DE NIVEAU DE L'ÉQUIPEMENT
natural_image
Silhouette of a person riding an exercise bike (no text or symbols visible)UTILISATION APPROPRIÉE
text_image
A B C D E M A T P R 0.2COMMENT RÉGLER LE VÉLO D'APPARTEMENT
text_image
Technical diagram of a stationary exercise bike with labeled components and motion indicatorCOMMANDE DU NIVEAU DE RÉSISTANCE/FREIN D'URGENCE
CARACTÉRISTIQUES DU PRODUIT
text_image
Diagram showing three steps of a bicycle steering wheel with labeled parts and hand positionsMONTAJE FINALIZADO
ESPAÑOL

text_image
2 m (78,7") 1,76 m (69,4") 2,65 m (104,4")
natural_image
Technical line drawing of a mechanical device with two wheels and a rotating knob (no text or symbols)natural_image
Silhouette of a person riding an exercise bike with legs and arms extended (no text or symbols visible)USO CORRECTO
text_image
A B C D E M A T P R 0 XCÓMO AJUSTAR LA BICICLETA DE SPINNING
text_image
Technical diagram of a stationary exercise bike with labeled components and motion indicatortext_image
Technical diagram of a stationary exercise machine with labeled components and motion arrowsNUMERO DI SERIE
MODELLO
□ CXC MATRIX BIKE
□ CXM MATRIX BIKE
ITALIANO

ASSEMBLAGGIO
text_image
CONTROLLO DELLA TENSIONE E LEVETTA DEL FRENO DI EMERGENZA SELLA LEVETTA DI REGOLAZIONE ORIZZONTALE DELLA SELLA LEVETTA DI REGOLAZIONE DELL'ALTEZZA DELLA SELLA TELAIO PRINCIPALE PANNELLO DI SERVIZIO VOLANO MANIGLIA DI TRASPORTO TUBO DELLO STABILIZZATORE POSTERIORE MATRIX PADIRI PEDIVELLA PEDALI PUOTE DI TRASPORTO TUBO STABILIZZATORE ANTERIORE SUPPORTO PER DISPOSITIVO (II CXM è dotato di console) PORTABOTTIGLIA LEVETTA DI REGOLAZIONE ORIZZONTALE DEL MANUBRIO LEVETTA DI REGOLAZIONE DELL'ALTEZZA DEL MANUBRIO MATRIX PIEDINI REGOLABILI (SOTTO I TUBI DELLO STABILIZZATORE)ITALIANO

ASSEMBLAGGIO

Materiali Qta


natural_image
Mechanical assembly diagram showing a blue car component with attached bracket and mounting bracket (no text or labels)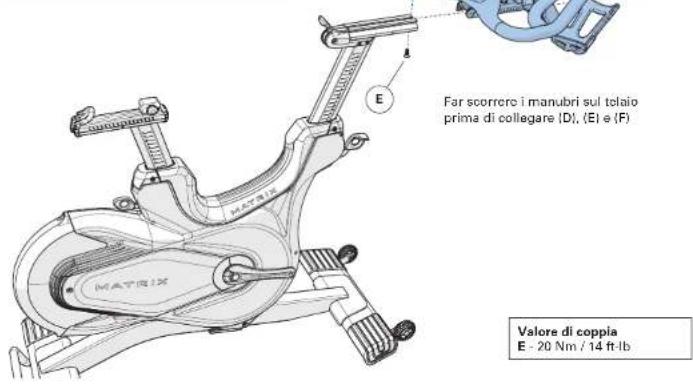
text_image
Diagram showing three steps of a bicycle scooter charging device with labeled components and hand gesturesASSEMBLAGGIO COMPLETATO

UTILIZZO DELLA CONSOLE
text_image
MATRIX 0 rpm LCD RETROILLUMINATO Visualizza: • Tempo • GIRI/MIN • Watt • Livello di resistenza • MPH/KPH • Distanza • Frequenza cardiaca (quando viene indossata la fascia cardio) • Calorie 0 rpm 10 ... 0 w 00:00 0.0 mph 0.0 mi -- ♥ 16 cal • ◦ ◦ ◦ ◦ FRECCE DI NAVIGAZIONE ← ○ → TASTO CONFERMAtext_image
2 M (78,7°) 1,76 M (69,4°) 2,65 M (104,4°)
natural_image
Technical line drawing of a mechanical device with two wheels and a rotating knob (no text or symbols)natural_image
Silhouette of a person riding an exercise bike with legs and arms extended (no text or symbols visible)UTILIZZO CORRETTO
text_image
A B C D E M A T P R 0 XCOME REGOLARE LA BIKE
text_image
Technical diagram of a stationary exercise bike with labeled components and motion indicatorCONTROLLO DELLA RESISTENZA/FRENO DI EMERGENZA
flowchart
graph TD
    A["←"] --> B["O"]
    C["→"] --> B["O"]
natural_image
Technical line drawing of a mechanical device with two wheels and a rotating knob (no text or symbols)natural_image
Silhouette of a person riding an exercise bike with legs elevated (no text or symbols visible)ΟΡΘΗ ΧΡΗΣΗ
text_image
A B C D E M A T P R 0 Xtext_image
Technical diagram of a stationary exercise bike with labeled components and motion indicatornatural_image
Mechanical assembly diagram showing a blue car component with mounting bracket and force indicator (no text or labels)
text_image
E MATRIXtext_image
Diagram showing three steps of a device with labeled components and connection points, likely illustrating a mechanical or electronic assembly.MONTAŻ ZAKOŃCZONY
POLSKI

OBSŁUGA KONSOLI
PODŚWIETLANY EKRAN LCD
Wyświetlane:
flowchart
graph TD
    A["←"] --> B["O"]
    C["→"] --> B["O"]
INFORMACJE DOTYCZACE KONSOLI CXM
natural_image
Technical line drawing of a mechanical device with two wheels and a rotating knob (no text or symbols)POZIOMOWANIE SPRZĘTU
natural_image
Silhouette of a person riding an exercise bike (no text or symbols visible)PRAWIDŁOWE ZASTOSOWANIE
text_image
A B C D E M A T M B XREGULACJA ROWERU TRENINGOWEGO
text_image
Technical diagram of a stationary exercise bike with labeled components and motion indicatorSTEROWANIE OPOREM / HAMULEC AWARYJNY
text_image
Technical diagram of a stationary bike with labeled components and motion arrows indicating movement paths.NÚMERO DE SÉRIE
MODELO
□ CXC MATRIX BIKE INDOOR
□ CXM MATRIX BIKE INDOOR
natural_image
Mechanical assembly diagram showing a blue car component with attached bracket and mounting bracket (no text or labels)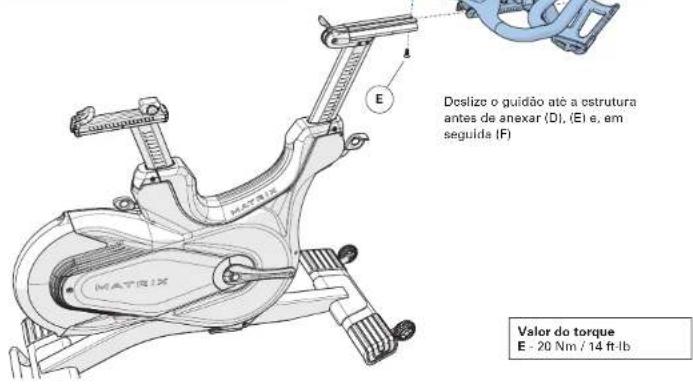
text_image
Diagram showing three steps of a bicycle scooter charging system with labeled components and connection pointsMONTAGEM CONCLUÍDA

OPERAÇÃO DO CONSOLE
LCD COM
RETROILUMINAÇÃO
Exibe:
flowchart
graph TD
    A["←"] --> B["O"]
    C["→"] --> B["O"]
natural_image
Technical line drawing of a mechanical device with two wheels and a rotating knob (no text or symbols)natural_image
Silhouette of a person riding an exercise bike (no text or symbols visible)USO ADEQUADO
text_image
A B C D E M A T P R 0 XCOMO AJUSTAR A BIKE INDOOR
text_image
Technical diagram of a stationary exercise bike with labeled components and motion indicatorCONTROLE DE RESISTÊNCIA/FREIO DE EMERGÊNCIA
text_image
A B C Q M H E T XDISMOUNTING THE STATIONARY EXERCISE BICYCLE BEFORE DISMOUNTING, BRING THE PEDALS TO A COMPLETE STOCK

text_image
SAMPLI-STOP MILK T 08.13XМОДЕЛЬ
□ СХС MATRIX ВЕЛОТРЕНАЖЕР ДЛЯ ПОМЕЩЕНИЙ
□ СХМ MATRIX ВЕЛОТРЕНАЖЕР ДЛЯ ПОМЕЩЕНИЙ
РУССКИЙ

СБОРКА
flowchart
graph TD
    A["←"] --> B["O"]
    C["→"] --> B["O"]
natural_image
Line drawing of a stationary exercise bike inside a transparent enclosure, no text or symbols present
natural_image
Technical line drawing of a mechanical device with two wheels and a rotating knob (no text or symbols)natural_image
Silhouette of a person riding an exercise bike with legs and arms extended (no text or symbols visible)natural_image
Technical line drawing of a bicycle frame with adjustment mechanism (no text or symbols)- Any and all part removal or replacement must be performed by a qualified service technician.
- DO NOT use any equipment that is damaged and or has worn or broken parts. Use only replacement parts supplied by your country's local MATRIX dealer.
- MAINTAIN LABELS AND NAMEPLATES: Do not remove labels for any reason. They contain important information. If unreadable or missing, contact your MATRIX dealer for a replacement.
- MAINTAIN ALL EQUIPMENT: Preventative maintenance is the key to smooth operating equipment as well as keeping your liability to a minimum. Equipment needs to be inspected at regular intervals.
- Ensure that any person(s) making adjustments or performing maintenance or repair of any kind is qualified to do so. MATRIX dealers will provide service and maintenance training at our corporate facility upon request.
text_image
A B C Q HEAT 1983X| MAINTENANCE SCHEDULE | |
| ACTION FREQUENCY | |
| Clean the indoor cycle using soft cloths or paper towels or other Matrix approved solution (cleaning agents should be alcohol and ammonia free). Disinfect the saddle and handlebars and wipe off all bodily residues. | AFTER EACH USE |
| Make sure that the indoor cycle is level and does not rock. DAILY | |
| Clean entire machine using water and a mild soap or other Matrix approved solution (cleaning agents should be alcohol and ammonia free). Clean all exterior parts, the steel frame, front and rear stabilizers, seat and handlebars. | WEEKLY |
| Test the emergency brake to make sure it is functioning properly. To do this, press down the red emergency brake lever while pedaling. When functioning properly, it should immediately slow down the flywheel until it comes to a complete stop. | BI-WEEKLY |
| Lubricate the saddle post (A). To do this, raise the saddle post to the MAX position, spray with maintenance spray and rub down the entire exterior surfaces with a soft cloth. Clean the saddle slide (B) with a soft cloth and if necessary apply a small amount of lithium/silicone grease. | BI-WEEKLY |
| Clean the handlebar slide (C) with a soft cloth and if necessary apply a small amount of lithium/silicone grease. | BI-WEEKLY |
| Inspect all assembly bolts and pedals on the machine for proper tightness. | MONTHLY |
| MONTHLY |
РУССКИЙ

© 2021 Johnson Health Tech
Rev 2.2 B