SS-12360 - Toothbrush Sogo - Free user manual and instructions
Find the device manual for free SS-12360 Sogo in PDF.

| Product type | Oral irrigator (dental water jet) |
| Brand | Sogo |
| Model | SS-12360 |
| Power | 18 W |
| Supply voltage | 100-240 V ~ 50/60 Hz |
| Rotation speed | 1250-1700 rpm |
| Pressure levels | 10 levels (20-120 psi) |
| Noise level | <75 dB |
| Water flow | ≥290 ml/min |
| Tank capacity | 600 ml |
| Number and types of tips | 8 tips: 3 standard high-pressure, 1 for periodontal pockets, 1 orthodontic, 1 for dental plates, 1 tongue scraper, 1 toothbrush with water jet |
| Tip rotation | 360° |
| Pause function | Yes, via dedicated button |
| Non-slip feet | Yes |
| Power supply | Mains (power cable) |
| Recommended use | Domestic, indoor |
| Maintenance | Clean after each use; rinse tank with warm water; wipe with damp cloth; do not immerse |
| Spare parts / repairability | Replacement tips available via SOGO SAT (www.sogosat.com) |
| Compliance | Directives 2014/35/EU, 2014/30/EU, 2015/863/EU, 2009/125/EC |
| Made in | P.R. China (PRC) |
Frequently Asked Questions - SS-12360 Sogo
User questions about SS-12360 Sogo
0 question about this device. Answer the ones you know or ask your own.
Ask a new question about this device
Download the instructions for your Toothbrush in PDF format for free! Find your manual SS-12360 - Sogo and take your electronic device back in hand. On this page are published all the documents necessary for the use of your device. SS-12360 by Sogo.
USER MANUAL SS-12360 Sogo
natural_image
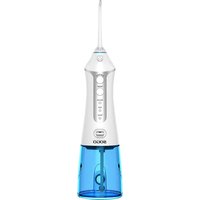
White and blue Oxy 800 oral oil lamp with white body, no visible text or symbols on device body
IRRIGADOR BUCAL WATER FLOSSER IRRIGATEUR DE BOUCHE IRRIGADOR DE BOCA WASSERFLOSSER IRRIGATORE A BOCCA
Caution: please read and preserve these important instructions
IMPORTANTE:
natural_image
Illustration showing three dental care scenes: a tooth with magnifying glass, a tooth with teeth, and a smiling tooth (no text or symbols)natural_image
Six line drawings of dental or mechanical instruments, no text or symbols presentnatural_image
Technical line drawing of a kitchen appliance with handle, wheels, and a rotary knob (no text or symbols)natural_image
Line drawing of a hairdryer with control panel and manual hand gesture (no text or symbols)natural_image
Line drawing of two dental prosthetic teeth with no text or symbolsnatural_image
Simple line drawing of a hand holding a small object, no text or symbols presentBoquilla estándar
natural_image
Simple line drawing of a dental arch with teeth and jaw (no text or symbols)natural_image
Simple line drawing of a dental arch with teeth and a small object attached (no text or symbols)Boquilla ortodóntica
natural_image
Line drawing of dental braces with a hand adjusting the teeth (no text or symbols)Cepillo de dientes hidráulico giratorio
• Always read the instruction book carefully before using.
- This manual can be downloaded from our web page www.sogo.es
- Keep these instructions for future reference.
SAFETY INSTRUCTIONS FOR THE USER – GENERAL:
- This product is intended for indoor, non-industrial, non-commercial and only for household use. Do not use the item outdoors or for any other purpose. Misuse or improper handling may cause problems in the appliance and cause injury to the user.
- The unit must be used only for the intended purposes. No liability is accepted for damages arising from improper use or wrong handling.
- Ensure that the voltage indicated on the nameplate matches the mains voltage before plugging in the appliance.
- Do not use or store the appliance outdoors.
- Always remove the plug from the power socket when the appliance is not in use. Do not leave the appliance unattended when switched on.
- Close supervision is necessary when any appliance is being used by or near children.
- Before cleaning or storing your appliance,
always unplug the appliance from the power supply and let it cool down.
- Do not place or operate this appliance near water sources.
- Never immerse the appliance or the plug-in water or any other liquid. In the event of the appliance falling in water, disconnect immediately from the mains supply and take it to an authorized service agent for repair before reusing.
- Do not place or operate the appliance and its power cord on or near hot surfaces (e.g., stove plates) or open flames.
- Do not leave the power cord hanging from sharp edges and keep away from hot objects and flames. Do not wind the cord around the appliance and do not bend it.
- Do not use the appliance if it has fallen on the floor, if there are visible signs of damage or if it has a leak.
- Do not use the appliance if the cable or plug is damaged. In case of the cord be damaged, it must be replaced only by the manufacturer, its service agent or similarly qualified persons in order to avoid Hazard.
- In case of appliance malfunction, or if it has been damaged in any manner, return the appliance to the nearest authorized service facility for examination, repair or adjustment.
- Never use accessories that are not recommended by the manufacturer.
- The use of accessories not recommended
or sold by the appliance manufacturer may result in fire, electric shock or injury to persons.
• 'Always place the appliance on to the flat and even surface.
- Do not use the appliance for any other purpose than described in this manual.
- Do not let the appliance operate unattended.
- When you want to remove the plug from the wall contact, please do this at the plug itself and not by pulling on the cable or the appliance itself.
- Make sure your hands are dry before plug or unplugging.
- Do not use the appliance with wet hands, on moist floor or when the ambience is humid.
- Do not let the motor unit, cord or plug get wet to protect against risk of electric shock.
• Children should be supervised to ensure that they do not play with the appliance.
- This appliance can be used by children aged from 8 years and above and persons with reduced physical, sensory or mental capabilities or lack of experience and knowledge if they have been given supervision or instruction concerning use of the appliance in a safe way and understand the hazards involved.
• Children should be supervised to ensure that they do not play with the appliance.
- Cleaning and user maintenance shall not be
made by children unless they are older than 8 and supervised.
SAFETY INSTRUCTIONS FOR THE USER - FOR THIS APPLIANCE:
- Do not splash the water directly under the tongue, into the ear, nose, eyes or other sensitive body areas. This product is capable of generating pressure that might cause serious health issues, make sure to reads the instruction manual thoroughly for its correct use.
- Use this product only and as indicated in the instruction manual and as recommended by your dental professional.
- It is normal to have gum bleeding while using water flosser during first time use as it all depends on the gum's ability to bear high water pressure.
- Fill reservoir only with water or in case need to fill with dental cleaning solutions, must always do it with the recommendation of your dental professional.
- Keep small and foreign object away from the opening of the water reservoir in order to avoid getting stuck of the unit or swallowing it accidentally with the flossing water.
-
Never operate the unit where oxygen or aerosol sprays are being used.
-
Do not use the mouthwashes/rinses which contain iodine, bleach or any other chemical substance.
- Do not use the oral flosser while having piercing or oral jewellery, always remove them prior to use.
- Do not use the water flosser if you are having mouth or tongue ulcers.
- In case of severe dental issues and medication condition always consult with the dental professional before using the water flosser.
- Do not remove the Tooth Pocket flexible tip from the clear shaft. If it gets separate for any reason, discard both the tip and shaft and replace with a new Tooth Pocket tip.
- Do not use this product for more than 5 minutes at a time, and in case need to use again make sure to keep the time difference of at least 2 hrs.
- If your physician or cardiologist has advised you to take antibiotic premedication before dental procedures, you should consult your dentist before using this appliance or any other oral hygiene aid.
- These oral irrigators can be used only with normal or lukewarm water, if need to use any specific solutions, make sure to consult with your dental specialist.
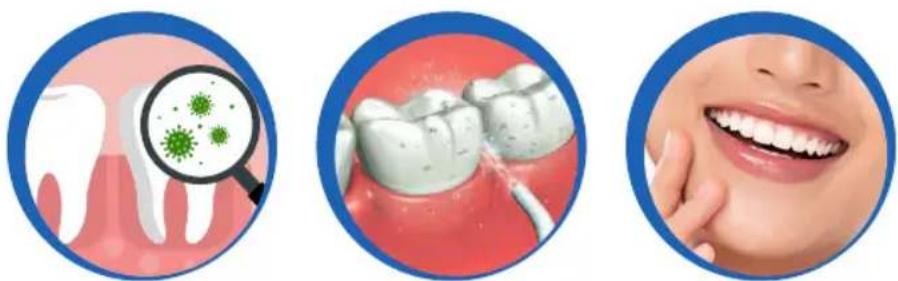
Advantage of using the water flosser
The flossing has limited access below the gumline, using water flosser is the better way to remove plaques and gives much more effective results than flossing.
Removes debris and bacteria from teeth and under the gums, as traditional cleaning with tooth brush can't remove hidden food debris and harmful bacteria.
High frequency water floss helps to keep clean below gumline and teeth.
Healthy teeth and shining smile gives the full world confidence to start the day and this can be achieved easily with the help of water flosser.
An essential appliance for easy and complete dental care with or without dental diseases
natural_image
Illustration showing three dental care scenes: a magnifying glass over teeth, a tooth with teeth and gums, and a smiling tooth (no text or symbols)Technical specification:
| Power Voltage | Frequency | Rotation | Pressure Grades | Noise level | Flow Rate | |
| 18W | 100-240V | 50-60Hz | 1250-1700rpm | 10 (20-120 Psi) | <75 db | ≥ 290ml/min |
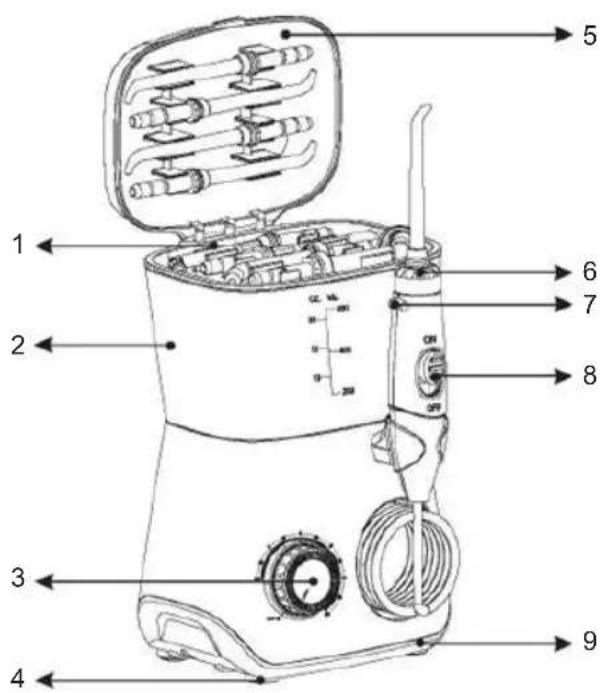
Parts of Water flosser
- 8 various kinds of tips
Types of tips

natural_image
Six line drawings of dental or mechanical instruments, no text or symbols present3 x Ordinary high-pressure tips
1 x Periodontic tip
1 x Orthodontal tip
1 x Dental Plaque tip
1 x Tongue Cleaner
1 X Hydraulic Toothbrush
Tip Functions
| No. Type | Quantity Used for Uses and Advantages | |||
| 1. Ordinary high pressure tips | 3 General use This unit is provided with 8 different types of tips among them there are 3 different coloured ring standard tips, which can be used individually by the family members. These tips are used for complete dental hygiene and much more effective than string floss for healthier gums. | |||
| 2. Periodontic 1 For cleaning of gumline | To massage gums, relieve from periodontitis, gingivitis, clean below gumline. | |||
| 3. Orthodontal tip | 1 For Braces 3 times more effective than regular string floss for removing plaque around Orthodontic applications. | |||
| 4. Dental Plaque | 1 For dental implants, dental bridge and false tooth crowns | Specially designed for dental implants, dental bridge and false tooth crowns. | ||
| 5. Tongue cleaner | 1 Fresh breath Removes bacterias from tongue to freshen Breath. | |||
| 6. Hydraulic rotative toothbrush | 1 For correct dental cleaning | Works like electric toothbrush. | ||
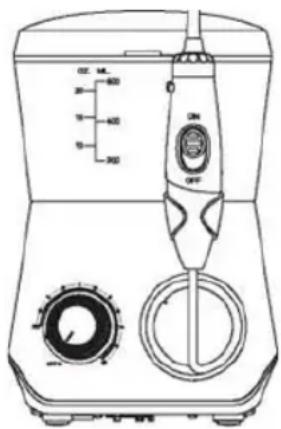
- Reservoir: This unit is accompanied with the water tank of 600ml capacity. The water can be filled directly removing the water tank from the water flos-ser from the tap or removing the water tank lid with the help of glass.
Note: Do not the use the water flosser without water in it, always make sure to fill it before using. Using it without water can cause damage to the unit. - OFF / ON and pressure grade switch: There is one on / off and pressure grades knob located in front part of the water flosser to turn on and turn off the unit, with the help of this knob you can turn on the unit and select the pressure grade as per requirement and choice. To switch on the unit, turn the knob clockwise and water flosser will start working, you can choose the pressure grade from 10 different pressure grades available by turning it to extreme point of knob, to switch off the unit turn the knob anticlockwise to the extreme point and with a click sound it will switch off.
- Anti-slip feet: it is necessary that water flosser must not move or shake while in use, so for that anti slip feet has been provided, which gives the firmness and stability while it works.
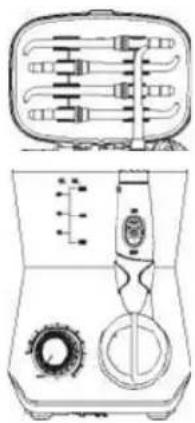
- Reservoir lid: Reservoir lid is to protect the water flosser reservoir entry, so that any foreign object should not enter into the reservoir, also in the reservoir lid there is the space to store and keep safe all kinds of tips.
- 360° rotating tip knob: 360° rotating tip knob help tips to move in 360°, so that water can be streamed in all the directions to do the full cleaning and care.
- Jet tip disassembly button: With the help of jet tip assembly button, you can change the jet tips very easily. To remove the jet tip just press the jet tip assembly button, pull out the jet tip upward side and to replace it with another jet tip, press it downward. Just when you hear a click sound it means jet tip has been mounted.
- Pause button: This button is to prevent the sudden splashing of water while starting water flosser, also this button helps you to take a pause while using water flosser, with the help of this button you can turn it off for few moments and turn on at any time to use it again. To use this button, push the button upwards side, to start the unit and to stop it push the button downwards side.
Note: It is recommended to always keep this button on off position.
Before first use
Remove all the packaging materials and make sure to clean it before first use. Plug in the appliance on the wall outlet, make sure the wall outlet voltage rating is as same as rated voltage of the appliance. Remove the water reservoir and fill it with the water and place it again properly. Turn it on and start flossing in the sink until water reservoir empty. This process helps to clean the unit and water flossing tube internal part.
Filling the water into the reservoir
Remove the lid and reservoir from the base fill the reservoir with lukewarm water. Place the reservoir again on to its position and press it down firmly and put on the lid.
Note: It is recommended to use only lukewarm water, without any cleaning solution. If you need to use any other cleaning solution, use it with the advice of your dental specialist.
Note: Make sure that the unit is switched off while filling the water into the water tank.
natural_image
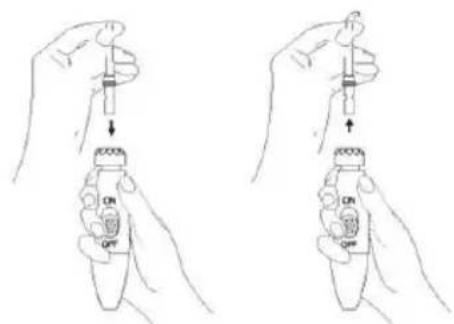
Technical line drawing of a toaster oven with handle, wheels, and control panel (no text or labels)Installation and disassembly of jet tip:
To mount the jet tip on the unit, insert the jet tip on the spray head hole, press it downwards until you hear a click sound, which means the jet tip has been mounted correctly.
In order to remove or changing the jet tip, press the disassembly button located on to the jet tip handle and pull out in upward direction.
Selection of pressure settings
This unit is provided with 10 pressure grades, these pressure grades help you to select as per the need of your actual dental health condition and requirement. To select the pressure grade, switch on the unit and rotate the ON/OFF knob in the clockwise direction, when you hear a click sound it means the unit has been turned on. In order to select the pressure setting, keep rotating until you get your desired pressure grade which has been marked on to the unit.
Note: It is always recommended to start cleaning with the lower pressure grades, while using for the first time and once you get used to it, the pressure grades can be increased to a higher level.
Use of water flosser
Lean low over the sink to prevent the water splash our outside, aim the tip towards the teeth and turn it on, select the pressure grade and change the direction of the stream with the help of 360^ rotating tip knob, located at the bottom of the tip mounting.

natural_image
Line drawing of a watercolor washing machine with hand operating controls (no text or symbols)Instruction for use:
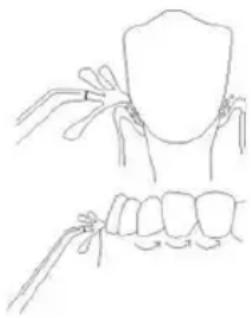
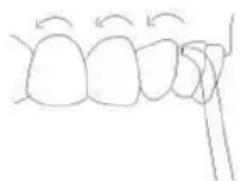
Before turning on the device hold it slanting down little bit at the angle of 45^ approx. and position the jet tip in the mouth, so that while flossing the water, it goes directly towards the teeth.
When the gums are at the 90^ angle with the water flows, slightly close your mouth in order to stop the water splashing out and turn on the unit.
To achieve the best results, make sure to clean first rear teeth (molar areas) and begin to apply on incisors, keep sliding the water flow along the gum line to clean it through the whole gum line. Make sure to keep pausing until the area around the gum line and spaces between the teeth are fully cleaned.
natural_image
Line drawing of two dental prosthetic teeth with no text or symbolsNote: You can pause the cleaning process at any time with the help of pause button as mentioned above. It is always recommended to do the flossing with having some pauses, as it helps to remove the debris completely and remove the bacteria without damaging the gumline.
After cleaning:
When you have finished the water flossing turn off the unit and unplug it from the wall outlet. Throw the remaining water and let it dry before storing.
Introduction of the jet tips
Periodontal tip:
This tip must be used with the advice of your dental specialist, this kind of tip can direct the water or liquid oral medicine prescribed for your oral care. This tip mostly used in the specific locations below gum lining.

natural_image
Simple line drawing of a hand holding a small object, no text or symbols presentStandard tip
This tip can be used in generally for complete dental cleaning. This type of tip streams in the deep location, within the oral cavity in 360^ direction, this tip is used to clean the places, where the normal toothbrush cleaning can't reach, this tip is used to remove the food debris and destroy the harmful bacteria and gives you a pleasant cleaning experience.
natural_image
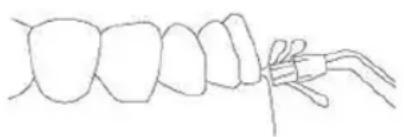
Simple line drawing of a tooth with teeth and a finger (no text or symbols)Tongue cleaner tip
Tongue cleaner tip is used to clean the tongue surface and gives you the complete mouth cleaning. Mount the tongue cleaning tip on to the water flosser and place it on to the centre part of the tongue surface. Turn it on and pull it in forward direction and then do the same process to clean the lateral part of tongue.
Dental plaque tip
Dental plaques are group of bacteria which stick on to the teeth surface but yet not has been mineralized, this type of jet is very effective at preventing dental plaque. Also, this tip can be used to clean the areas, where is difficult to reach while using braces and other dental devices.
natural_image
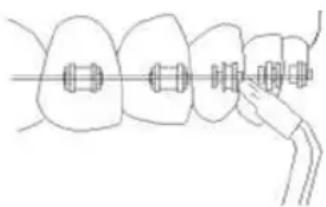
Simple line drawing of a tooth with a small object attached (no text or symbols)Orthodontic tip
This tip is specially used to brush and rinse to hard reaching areas around braces and other dental applications. To use this tip lean low over the sink and use the brush bristles to clean around the dental braces and use the orthodontic tip to remove any debris which has been left out below braces while cleaning with the normal brush cleaning.
natural_image
Line drawing of dental braces with a finger pointing to a specific tooth (no text or symbols present)Hydraulic rotating toothbrush
This brush head is designed according to dental scaling tool, which is different from the traditional toothbrush which just covers the whole teeth. This toothbrush gives you thorough cleaning of the surface of each tooth, removes the hidden plaques from teeth and gingival crevice without hurting gums.
Cleaning
It is always recommended to clean the flosser after every single use. In case you use any medicine or water solution for cleaning make sure to rinse every time.
To rinse the water flosser, partially fill the reservoir with the warm clean water, aiming the water tip towards the sink to prevent the splashing of water outside. Turn on the unit and let it function until the water reservoir is empty. This process helps to keep the tips and tube from clogging.
Note: Clean the product after every single use.
Cleaning of the unit must be done with the help of a clean and damp cloth and non-abrasive cleaner. Make sure to unplug the unit before cleaning the unit.
Before exposing the dental jet tip to the cold temperatures, remove the reservoir and run until completely empty.
Storage and maintenance
After cleaning, place the reservoir upside down on a flat and clean surface and wait until completely dry.
Place the whole unit into the cool and dry place.
Make sure to keep it away from the sunlight and wet environment.
Do not store it in outdoor areas.
Keep it in the box or similar storage when not in use for the long time.
Common Problems and their solutions
| Problem Cause Solution | ||
| Jet Tips and Tongue Cleaner Leaks Between the top and handle knob | Tip is not fully engaged Remove tip and reinstall | |
| Periodontal Tip Tear in soft tip | Tip has been damaged Replace with the new tip | |
| Oral Irrigator base hose to the handle leaks | Hose has been damaged Can be replaced by the seller for a self-service repair kit | |
| Reservoir leaks Missing water | tank valve or water tank valve is upside down | Replace Reservoir valve (contact the seller); Turn the valve right side up |
| Inadequate pressure Reservoir | not positioned properly | Remove and reinstall the reservoir and place it firmly.Take it to the authorized service centre and get it done repairing |
| Unit without water flow out | Lack of water in reservoir | Fill out reservoir |
IMPORTANT:
natural_image
Illustration showing three dental care scenes: a tooth with magnifying glass, teeth with red gum, and a smiling tooth (no text or symbols)natural_image
Six line drawings of dental or mechanical instruments, no text or symbols presentnatural_image
Line drawing of a toaster oven with handle, wheels, and control panel (no text or symbols)natural_image
Line drawing of a hairdryer with control panel and manual hand gesture (no text or symbols)Mode d'emploi:
natural_image
Line drawing of two dental prosthetics: upper view shows tooth and jaw with teeth, lower view shows teeth with jaw and jaw (no text or symbols)natural_image
Simple line drawing of a person's head with a hand pointing to the lower face (no text or symbols)natural_image
Simple line drawing of a dental arch with teeth and jaw (no text or symbols)Canule gratte-langue
natural_image
Simple line drawing of a dental tool interacting with teeth (no text or symbols)natural_image
Line drawing of dental arches with orthodontic brackets and a connecting rod (no text or symbols)natural_image
Illustration showing three dental care scenes: a tooth with magnifying glass, a tooth with teeth, and a smiling tooth (no text or symbols)natural_image
Six line drawings of dental or mechanical instruments, no text or symbols presentnatural_image
Line drawing of a portable stove with wheels and a digital camera (no text or symbols)natural_image
Line drawing of a hair dryer with control panel and hand gesture (no text or symbols)natural_image
Line drawing of two dental prosthetic teeth with no text or symbolsnatural_image
Simple line drawing of a hand holding a small object, no text or symbols presentnatural_image
Simple line drawing of a tooth with teeth and a finger (no text or symbols)natural_image
Simple line drawing of a tooth with a finger inserted (no text or symbols)natural_image
Line drawing of dental braces with a hand adjusting the teeth (no text or symbols)natural_image
Illustration of a tooth with magnifying glass highlighting green virus particles (no text or symbols)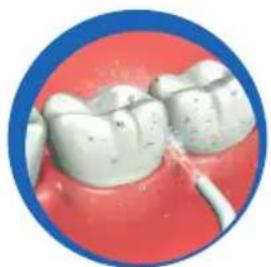
natural_image
Close-up of human teeth with a dental tool inserted, enclosed in a blue circular border (no text or symbols visible)
natural_image
Close-up of a smiling child's face with teeth, partially obscured by a blue circular frame (no text or symbols visible)Technische Daten:
natural_image
Six line drawings of dental or mechanical instruments, no text or symbols presentnatural_image
Line drawing of a portable stove interior with wheels and a digital device (no text or symbols)Druckeinstellungen
natural_image
Line drawing of a hairdryer with a hand operating the brush (no text or symbols present)natural_image
Line drawing of dental tools and teeth (no text or symbols)natural_image
Simple line drawing of a person's head and shoulders with a curved line above, no text or symbols present.Normaler Aufsatz
natural_image
Simple line drawing of a dental arch with teeth and jaw (no text or symbols)Zungenreiniger
natural_image
Simple line drawing of a tooth with a finger inserted (no text or symbols)natural_image
Line drawing of dental braces with a finger pointing to a specific tooth (no text or symbols present)natural_image
Illustration showing three dental care scenes: a tooth with magnifying glass, a tooth with teeth, and a smiling tooth (no text or symbols)natural_image
Six line drawings of dental or mechanical instruments, no text or symbols presentnatural_image
Technical line drawing of a washing machine with handle, gasket, and top view (no text or labels)natural_image
Line drawing of a hairdryer with control panel and hand gesture (no text or symbols)natural_image
Line drawing of two dental prosthetic teeth with no text or symbolsnatural_image
Simple line drawing of a hand holding a small object, no text or symbols presentUgello standard
natural_image
Simple line drawing of a tooth with teeth and a finger (no text or symbols)natural_image
Simple line drawing of a tooth with a finger inserted (no text or symbols)Ugello ortodontico
natural_image
Line drawing of dental braces with a hand adjusting the teeth (no text or symbols)DECLARATION OF CONFORMITY
This device complies with Low Voltage Directive 2014/35/EU, Electromagnetic Compatibility Directive 2014/30/EU, Directive 2015/863/EU on the restriction of the use of certain hazardous substances in electrical and electronic equipment and Directive 2009/125/EC on the eco-design requirements applicable to energy-related products.
DÉCLARATION DE CONFORMITÉ
This symbol means that in case you wish to dispose of the product once its working life has ended, take it to an authorised waste agent for the selective collection of waste electrical and electronic equipment (WEEE).

Imported by:
Sanysan Appliances S.L, NIF: B98753056, C/ Barcas 2, 2 46002 Valencia, Spain Product made in P.R.C. – Designed by SOGO based on the European Quality Standards Customer Service: www.sogosat.com / sogosat@sogosat.com / 0034 902 222 161