
SS-12355 - Toothbrush Sogo - Free user manual and instructions
Find the device manual for free SS-12355 Sogo in PDF.

User questions about SS-12355 Sogo
0 question about this device. Answer the ones you know or ask your own.
Ask a new question about this device
Download the instructions for your Toothbrush in PDF format for free! Find your manual SS-12355 - Sogo and take your electronic device back in hand. On this page are published all the documents necessary for the use of your device. SS-12355 by Sogo.
USER MANUAL SS-12355 Sogo
natural_image
White and blue OTC water dispenser with digital ports and a triangular tip (no visible text or symbols)
IRRIGADOR DENTAL PORTABLE RECARGABLE RECHARGEABLE PORTABLE DENTAL FLOSSER IRRIGATEUR DENTAIRE PORTABLE RECHARGEABLE IRRIGADOR DENTÁRIO PORTÁTIL RECARREGÁVEL WIEDERAUFLADBARE, TRAGBARE ZAHNSEIDE IRRIGATORE DENTALE PORTATILE RICARICABILE
natural_image
Line drawings of three different electronic components: a multi-pin connector, a multi-pin connector with pins, and a connected cable (no text or symbols)natural_image
Line drawing of a dental oil lamp with a power cord and earplifier (no text or symbols)natural_image
Line drawing of a mechanical device pouring liquid into a container (no text or symbols)natural_image
Illustration of two identical electric shock absorbers with downward and upward arrows indicating force application (no text or symbols)natural_image
Line drawing of a dental procedure showing tooth being extracted from a tool (no text or symbols present)Importante:
natural_image
Line drawing of a dental tool with toothed tip and toothed base (no text or symbols)natural_image
Line drawing of two hand-drawn electrical devices, one holding a bulb and the other with a door (no text or symbols)• Always read the instruction book carefully before using.
• This manual can be downloaded from our web page www.sogo.es
- Keep these instructions for future reference.
SAFETY INSTRUCTIONS FOR THE USER
- This product is intended for indoor, non-industrial, non-commercial and only for household use. Do not use the item outdoors or for any other purpose. Misuse or improper handling may cause problems in the appliance and cause injury to the user.
- The unit must be used only for the intended purposes. No liability is accepted for damages arising from improper use or wrong handling.
- Do not place or operate this appliance near water sources.
- Never immerse the appliance or the plug-in water or any other liquid. In the event of the appliance falling in water, disconnect immediately from the mains supply and take it to an authorized service agent for repair before reusing.
- Do not place or operate the appliance and its power cord on
or near hot surfaces (e.g., stove plates) or open flames.
- Do not use the appliance if it has fallen on the floor, if there are visible signs of damage or if it has a leak.
- Do not use the appliance if the cable or plug is damaged. In case of the charging cable cord be damaged, it must be replaced only sold by the manufacturer or their service agent.
- In case of appliance malfunction, or if it has been damaged in any manner, return the appliance to the nearest authorized service facility for examination, repair or adjustment.
- In case of hardware problems, do not attempt to repair the product yourself. Repairs should only be carried out by qualified technicians.
- Never use accessories that are not recommended by the manufacturer.
- The use of accessories not recommended or sold by the appliance manufacturer may result in fire, electric shock or injury to persons.
• Make sure your hands are dry before plug or unplugging.
• Make sure to plug in the device in to the electric system, which is same as mentioned on the product. - Do not splash the water directly
under the tongue, into the ear, nose, eyes or other sensitive body areas. This product is capable of generating pressure that might cause serious health issues, make sure to reads the instruction manual thoroughly for its correct use.
- Use this product only and as indicated in the instruction manual and as recommended by your dental professional.
- It is normal of having gum bleeding while using water flosser first time as it all depends on the gum bearing ability.
- Fill reservoir only with water or in case need to fill with dental cleaning solutions, always with the recommendation of your dental professional.
- Keep small and foreign object away from the opening of the water reservoir in order to avoid getting stuck of the unit or swallowing it accidentally with the flossing water.
- Never operate the unit where oxygen or aerosol sprays are being used.
- Do not use the mouthwashes/rinses which contain iodine, bleach or any other chemical substance.
- Do not use the oral flosser while having piercing or oral jewelry, always remove them prior to use.
- Do not use the water flosser if
you are having mouth or tongue ulcers.
- In case of severe dental issues and medication condition always consult with the dental professional before using the water flosser.
- The appliance is not to be used by persons (including children) with reduced physical, sensory or mental capabilities, or lack of experience and knowledge, unless they have been given supervision or instruction.
• Children should be supervised to ensure that they do not play with the appliance.
• Cleaning and user maintenance shall not be made by children without supervision.
TECHNICAL SPECIFICATIONS
| Power | Battery Power | Charging Time | RPM |
| 5W | 1400mAh 3.7V | 4 Hrs 1200-1650 |
| Noise | Pressure grades (25 - 115 Psi) | Flow Rate |
| <75dB 3 ≥200ml/min | ||
Product description
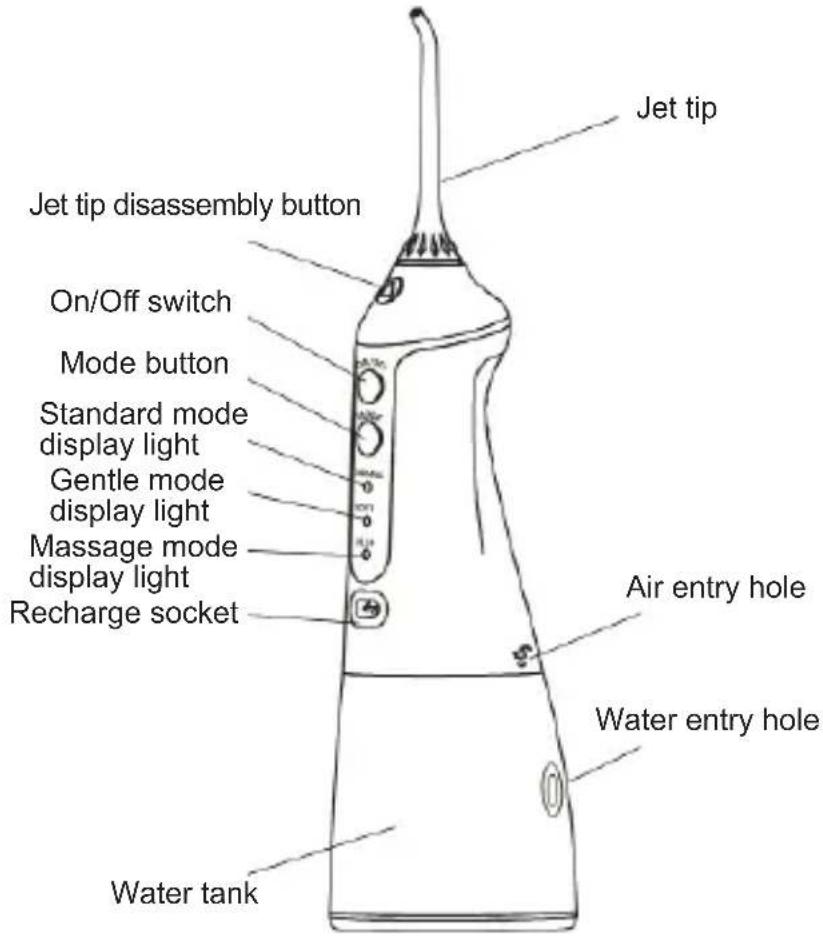
Jet tip assembly button: With the help of jet tip assembly button, you can change the jet tips very easily. To remove the jet tip just press the jet tip assembly button, pull out the jet tip upward side and to replace it with another jet tip, press it downward. Just when you hear a click sound it means jet tip has been mounted.
ON / OFF button: There is one single on / off button to turn on and turn off the unit. To turn on, press the button once and the flosser will start working and while pressing it again you can turn it off.
Mode: This flosser works with 3 different working modes; you can change to any mode with the help of mode button. To change the mode press the mode button and the unit automatically enters into the mode you were using prior and the LED light of that mode illuminates. To change it press the mode button again and it keeps changing between the available modes with illuminating LED light.
Note: This unit has mode memory, so when you turn on the unit it will start working in the mode which you were using previously.
-
Normal: As per the name this cleaning mode is for general and regular cleaning. Which can be use by any one, in this mode the water flosses at the normal speed and pressure.
-
Soft: As the name suggest this cleaning mode is for gentle cleaning mode, which means the persons with the sensitive gumline can use this mode. In this mode the water flosses at the lesser speed and pressure than the normal mode.
-
Pulse: Basically, this mode is for the cleaning the gum line with soft massage feeling. In this mode the water flosses with the intermittent jets.
Recharge Socket: Normally it is covered with the silicone cover, this socket is use to recharge the water flosser. When you find the unit is not working properly and need to recharge the water flosser, remove the silicone cap, insert the charging cable and connect it to the wall electric outlet with the help of USB adaptor. (charger cable is provided, USB adaptor is not provided).
Note: You can use any USB adaptor of 5V DC output, including any of your mobile charging cable adaptor.
Water Tank: This unit is accompanied with the water tank of 300ml capacity. The water can be filled directly removing the water tank from the water flosser and also with the help of water entry hole, which is located on the back part of water tank.
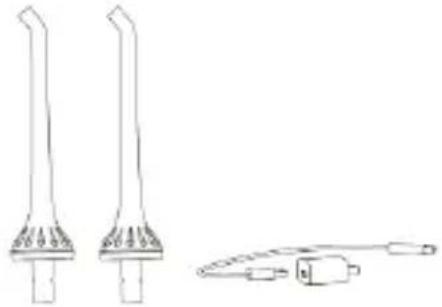
Accessories:
This appliance comes with 2 standard jet tips and 1 power charging cable.
natural_image
Line drawings of three different electronic components: a multi-pin connector, a multi-pin connector with a cable, and a separate cylindrical device (no text or symbols present)Standard jet tips x2 Power recharger
In case of damage of the jet tip or you require more tips you can buy it from the store where you have acquired this product or any of your nearby electronic store where SOGO product is usually being sold. Also, you can buy them through the website of SOGO www.sogostore.es.
Before first use:
It is recommended to charge fully the unit before using the product for the first time. To charge it, insert the charging cable to the charging socket and other side of charging cable to the wall electric outlet through the USB charging adaptor. Note: Make sure not to use the product during charging, as the use of the flosser during charging time can damage the product and cause the potential harm to the user.
natural_image
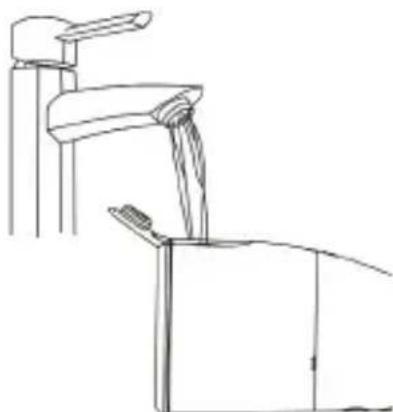
Line drawing of a water-oxygen oral oil lamp with a separate terminal device (no text or symbols)Filling of water tank:
Remove the water tank from the unit and fill the water or you can fill it through water tank hole as well. To fill it through the water tank hole remove the lid and place the water tank underneath water tap in the position as shown in the diagram below.
natural_image
Line drawing of a mechanical device pouring liquid into a container (no text or symbols)Note: make sure that the unit is switched off while filling the water into the water tank.
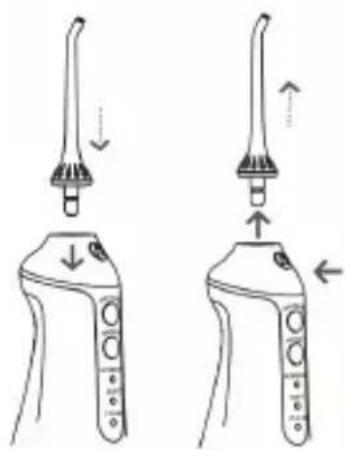
Installation and disassembly of jet tip:
To mount the jet tip on the unit, insert the jet tip on the spray head hole, press it downwards until you hear a click sound, which means the jet tip has been mounted correctly.
In order to remove or changing the jet tip, press the disassembly button located on to the jet tip handle and pull out in upward direction.
natural_image
Illustration of two identical electric shock absorbers with downward and upward arrows indicating force application (no text or symbols)Instruction for use:
Before turning on the device hold it slanting down little bit at the angle of 45^ approx. and position the jet tip in the mouth, so that while flossing the water, it goes directly towards the teeth.
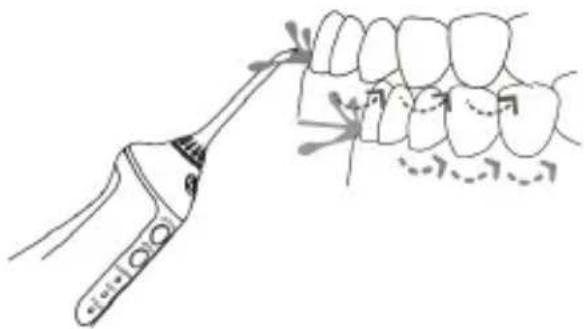
natural_image
Illustration of a dental tool interacting with teeth, showing tooth positioning and application (no text or symbols)When the gums are at the 90^ angle with the water flows, slightly close your mouth in order to stop the water splashing out and turn on the unit.
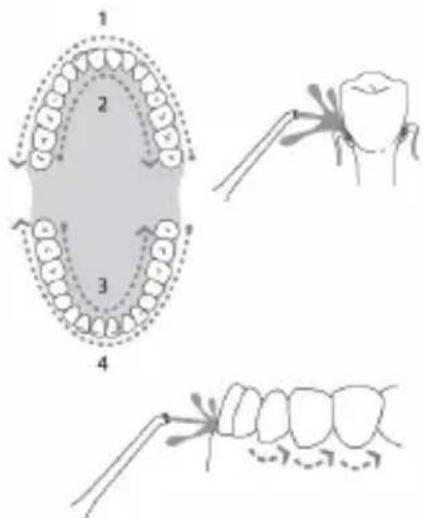
To achieve the best results, make sure to clean first rear teeth and began to apply incisors, keep sliding the water flow along the gum line to clean it through the whole gum line. Make sure to keep pausing until the area around the gum line and spaces between the teeth are fully cleaned.
Important:
- This product has auto memory function, once you turn off the unit and turn it on again the unit
starts with the same water pressure mode on which it was working previously. - The modes can be change accordingly whether the unit is turned on or off, with the help of this function, you can change the mode before turning on the device.
- Irrespective of the mode, after continuous operation of 120 seconds the product will automatically switch off (Can be called as auto timer system).
- During recharge, the three display lights of modes function start flashing in an intermittent way. When you see all three display lights are constantly on, this indicates that the unit has been charged completely.
- While in use, if all three display lights start flashing, it means that the unit power is insufficient, and need to recharge.
- During recharge this product cannot be used.
- You can rotate the jet tip dial in order to adjust the direction of the water flow.
Note:
- While using first time the gum bleeding can occur, so in order to avoid this common phenomenon, please select "Soft mode." After continuous usage of two weeks or more when you have been getting use of it can change the mode as per your requirements and choice. On the contrary, If bleeding continues after two weeks or if bleeding is excessive, it might because of chronic gum inflammation. Stop
using the air flosser immediately and contact your dental professional to get an adequate treatment.
- This product is not recommended to be used by children, or people with dental implants, oral ulcers or open oral sores.
After use:
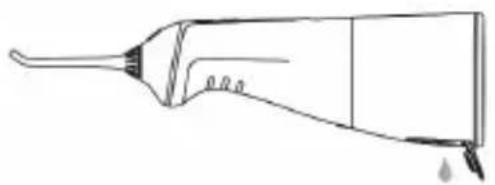
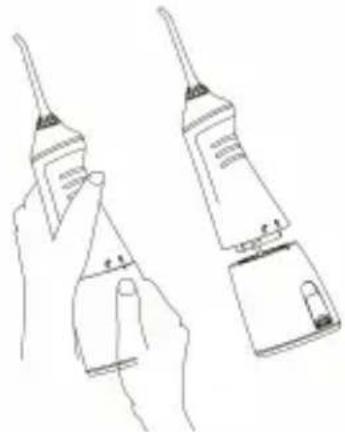
Turn off the unit with the help of on/off button and empty the water tank, as shown in the picture below.
natural_image
Line drawing of a toothbrush with no text or symbolsIn order to remove the water tank, hold the upper body part with one hand and with the other hand hold the water tank as shown in the picture below, turn the water tank in the anticlockwise direction and pull it downwards to detach it completely.
natural_image
Line drawing of two hand-drawn electrical devices with no visible text or symbolsBattery maintenance and handling:
- Prior to initial use the devise must be fully charged, so make sure to charge it at least for 4 hours.
- Always keep full charge, before storing it for long period of time.
- In order to maximize the battery life, keep charging the battery without wait of complete running out of the power.
Common problems and solutions:
| Causes Reasons Solutions | ||
| Leakage of water between jet tip and top cover | The seal ring on the fixed socket for the jet tip is damaged, and the jet tip cannot be installed properly | Contact the authorized service center of qualified technician, to fix the issue |
| Water leaks from the water tank | Seal ring is loose | Re-install correctly |
| Inadequate pressure | Low voltage issue / battery has not enough power | Recharge before using |
| Device does not switch on | Low voltage issue / battery has not enough power | Recharge before using |
| Product is not discharging water | Filtration net is clogged | Clean the filtration net |
| Water is leaking from the water tank sides | Air entry hole is producing water | Standard phenomenon – high air pressure principle. |
If with the help of above solutions you cannot resolve these problems, please contact with manufacturer or their authorized service center for repair and maintenance purpose.
Disposal of battery-operated units
This device contains a in built lithium battery, which cannot be changed. So at the end of battery life do not dispose them as normal rubbish, Always these should be recycled in a proper manner and according to the local municipal laws. You can recycle them by taking them to government authorized disposal centres or specialized bins which you can find in any nearby big super markets, electronics or electro domestics products stores or malls who have these types of facilities available.
IMPORTANT:
natural_image
Line drawing of a watercolor electric toothbrush and its earplifier (no text or symbols)natural_image
Line drawing of a mechanical device pouring liquid into a container (no text or symbols)natural_image
Diagram showing two identical hand tools with downward and upward arrows indicating movement or change (no text or symbols present)natural_image
Illustration of a dental tool interacting with teeth, showing tooth positioning and application (no text or symbols)Important:
natural_image
Line drawing of a medical or laboratory instrument with no visible text or symbolsnatural_image
Line drawing of two hand-drawn illustrations of a handheld device, one holding a pen and the other with a clip (no text or symbols)natural_image
Line drawings of three different medical or laboratory instruments: a long, pointed tool with flutes, a short, multi-pin device, and a separate cylindrical device (no text or symbols present)natural_image
Line drawing of a water-oxygen dorthogonal ear with a small connected device (no text or symbols)natural_image
Line drawing of a mechanical device pouring liquid into a container (no text or symbols)natural_image
Illustration of two identical electric shock absorbers with downward and upward arrows indicating force application (no text or symbols)natural_image
Illustration of a dental procedure showing tooth removal using a tool (no text or symbols present)Importante:
natural_image
Line drawing of a medical or laboratory instrument with no visible text or symbolsnatural_image
Line drawing of two hand-drawn models of a handheld device, one holding a small device and the other with a closed lid (no text or symbols)natural_image
Line drawings of three different electronic components: a multi-pin connector, a multi-pin connector with pins, and a connected cable (no text or symbols)natural_image
Line drawing of a watercolor electric toothbrush and its connected ear device (no text or symbols)natural_image
Line drawing of a medical procedure with fluid flowing from a device (no text or symbols)natural_image
Diagram of two identical electric shock absorbers with adjustment arrows indicating force application (no text or symbols)natural_image
Illustration of a dental tool interacting with teeth, showing tooth positioning and alignment (no text or symbols)natural_image
Line drawing of a mechanical tool or device with no visible text or symbolsnatural_image
Line drawing of two hand-drawn illustrations of a handheld device, one holding a small object and the other with a handle (no text or symbols)natural_image
Line drawings of three different mechanical or electrical components (no text or symbols)Ugelli standard x 2 Caricabatteria
natural_image
Line drawing of a water-oxygen drier with a small connected device (no text or symbols)natural_image
Line drawing of a faucet pouring liquid into a container (no text or symbols)natural_image
Diagram showing two identical hand positions of a medical or dental device with arrows indicating movement or change (no text or symbols present)natural_image
Illustration of a dental procedure showing tooth removal using a tool (no text or symbols present)Importante:
natural_image
Line drawing of a medical or laboratory instrument with no visible text or symbolsnatural_image
Line drawing of two hand-drawn illustrations of a handheld device, one holding a small device and the other with a close-up view (no text or symbols)DECLARATION OF CONFORMITY
This device complies with Electromagnetic Compatibility Directive 2014/30/EU, Directive 2015/863/UE on the restriction of the use of certain hazardous substances in electrical and electronic equipment and Directive 2009/125/EC on the eco-design requirements applicable to energy-related products.
DÉCLARATION DE CONFORMITÉ
This symbol means that in case you wish to dispose of the product once its working life has ended, take it to an authorised waste agent for the selective collection of waste electrical and electronic equipment (WEEE).
Imported by:
Sanysan Appliances S.L, NIF: B98753056,C/Barcas 2,2 46002 Valencia, Spain Product made in P.R.C. – Designed by SOGO based on the European Quality Standards Customer Service: www.sogosat.com / sogosat@sogosat.com / 0034 902 222 161


- Importante:
- SAFETY INSTRUCTIONS FOR THE USER
- Accessories:
- Before first use:
- Filling of water tank:
- Installation and disassembly of jet tip:
- Instruction for use:
- Important:
- Note:
- After use:
- Battery maintenance and handling:
- Disposal of battery-operated units
- DECLARATION OF CONFORMITY
- DÉCLARATION DE CONFORMITÉ
- Imported by:
Brand : Sogo
Model : SS-12355
Category : Toothbrush