SS-10790 - Saucepan Sogo - Free user manual and instructions
Find the device manual for free SS-10790 Sogo in PDF.

User questions about SS-10790 Sogo
0 question about this device. Answer the ones you know or ask your own.
Ask a new question about this device
Download the instructions for your Saucepan in PDF format for free! Find your manual SS-10790 - Sogo and take your electronic device back in hand. On this page are published all the documents necessary for the use of your device. SS-10790 by Sogo.
USER MANUAL SS-10790 Sogo

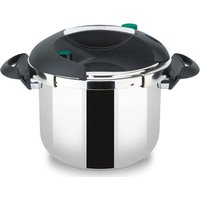
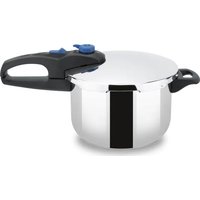
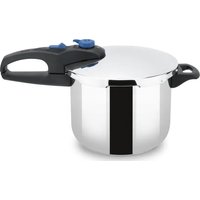
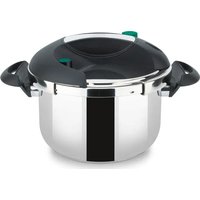
ROBOT MULTIFUNCIÓN AUTOMÁTICO MULTIFUNCTION PRESSURE COOKER AUTOCUISEUR MULTIFONCTION PANELA DE PRESSÃO MULTIFUNCIONAL MULTIFUNKTIONS-SCHNELLKOCHTOPF PENTOLA A PRESSIONE MULTIFUNZIONE
natural_image
Illustration of a hand holding a cooking pot with a directional arrow indicating rotation (no text or symbols)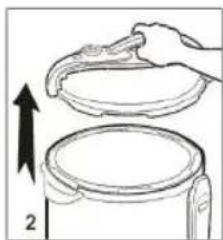
natural_image
Illustration of a hand holding a lid above a container with an upward arrow, no text or symbols present.natural_image
Line drawing of hands holding a rice cooker with a digital controller, no text or symbols present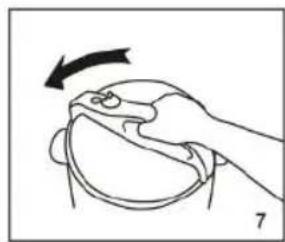
natural_image
Line drawing of a hand holding a curved object with an arrow indicating rotation (no text or symbols)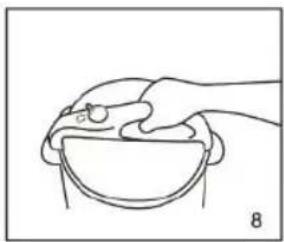
natural_image
Simple line drawing of a hand holding a bowl with a handle, no text or symbols presentnatural_image
Close-up of a mechanical component with a red arrow pointing to a circular feature (no visible text or symbols)natural_image
Simple diagram with a gray circle and a red upward arrow inside, no text or symbols present.Anillo de Silicona

natural_image
Top-down view of a circular mechanical component with a red arrow pointing to a feature (no text or symbols visible)Bobina de acero
natural_image
Top-down view of a circular mechanical component with a red arrow pointing upward (no text or symbols visible)natural_image
Close-up of a metallic mechanical component with a white cylindrical object and red arrow indicating direction (no text or symbols visible)natural_image
Close-up of a black camera lens with a red button and circular lens (no text or symbols visible)RELEASE
natural_image
Close-up of a black electronic device with a circular button and a red indicator light (no visible text or symbols)POSICIÓN SEAL
• Always read the instruction book carefully before using.
- This manual can be downloaded from our web page www.sogo.es
- Keep these instructions for future reference.
SAFETY INSTRUCTIONS FOR THE USER
- This product is intended for indoor, non-industrial, non-commercial and only for household use. Do not use the item outdoors or for any other purpose. Misuse or improper handling may cause problems in the appliance and cause injury to the user.
- The unit must be used only for the intended purposes. No liability is accepted for damages arising from improper use or wrong handling.
- Ensure that the voltage indicated on the nameplate matches the mains voltage before plugging in the appliance.
- Do not use or store the appliance outdoors.
• Always remove the plug from the power socket when the appliance is not in use. Do not leave the appliance unattended when switched on. - Close supervision is necessary when any appliance is being used by or near children.
- Before cleaning or storing your appliance, always unplug the appliance from the power supply and let it cool down.
- The appliances are not intended to be operated by means of an external timer or separate remote-control system.
- Do not place or operate this appliance near
water sources.
- Never immerse the appliance or the plug-in water or any other liquid. In the event of the appliance falling in water, disconnect immediately from the mains supply and take it to an authorized service agent for repair before reusing.
- Do not place or operate the appliance and its power cord on or near hot surfaces (e.g., stove plates) or open flames.
- Do not leave the power cord hanging from sharp edges and keep away from hot objects and flames. Do not wind the cord around the appliance and do not bend it.
- Do not use the appliance if the cable or plug is damaged. In case of the cord be damaged, it must be replaced only by the manufacturer, its service agent or similarly qualified persons in order to avoid Hazard.
- In case of appliance malfunction, or if it has been damaged in any manner, return the appliance to the nearest authorized service facility for examination, repair or adjustment.
- In case of hardware problems, do not attempt to repair the product yourself. Repairs should only be carried out by qualified technicians.
- Never use accessories that are not recommended by the manufacturer.
- The use of accessories not recommended or sold by the appliance manufacturer may result in fire, electric shock or injury to persons.
• Always place the appliance on to the flat and even surface. -
Do not use the appliance for any other purpose than described in this manual.
-
Do not let the appliance operate unattended.
- When you want to remove the plug from the wall contact, please do this at the plug itself and not by pulling on the cable or the appliance itself.
• Make sure your hands are dry before plug or unplugging. - Do not use the appliance with wet hands, on moist floor or when the ambience is humid.
- The device is not completely disconnected from the power source, even after it has been turned off. To disconnect it completely, disconnect it from the mains plug.
- While using the appliance, make sure that the power cord must not be caught or crushed.
- Do not let the motor unit, cord or plug get wet to protect against risk of electric shock.
- the appliance is not to be used by persons (including children) with reduced physical, sensory or mental capabilities, or lack of experience and knowledge, unless they have been given supervision or instruction.
- Children should be supervised to ensure that they do not play with the appliance.
- Cleaning and user maintenance shall not be made by children without supervision.
- Keep the appliance and its cord out of the reach of the children.
- Appliances can be used by persons with reduced physical, sensory or mental capabilities or lack of experience and knowledge if they have been given supervision or instructions concerning use of the appliance in a safe way and understand the hazards.
-
Children shall not play with the appliance.
-
This appliance can be used by children aged from 8 years and above and persons with reduced physical, sensory or mental capabilities or lack of experience and knowledge if they have been given supervision or instruction concerning use of the appliance in a safe way and understand the hazards involved.
• Children should be supervised to ensure that they do not play with the appliance. - Cleaning and user maintenance shall not be made by children unless they are older than 8 and supervised.
- Keep the appliance and its cord out of reach of children less than 8 years.
- This appliance is intended to be used in household and similar applications such as
- Staff kitchen areas in shops, offices and other working environments;
- Farm houses and by clients in hotels, motels and other residential type environments;
- Bed and breakfast type environments;
- Catering and similar non-retail applications.
THINGS TO REMEMBER WHILE USING PRESSURE COOKER
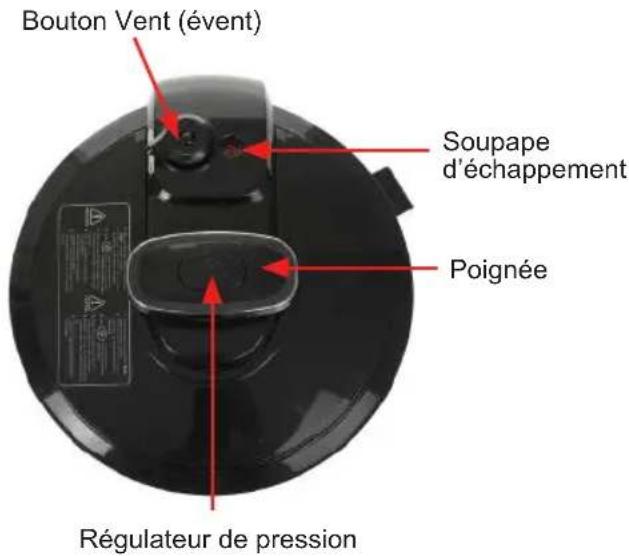
- Keep hands and face away from the VENT knob when releasing the pressure. Always use in a well-ventilated area. DO NOT cover the pressure valve with anything.
- While the pressure cooker is in operation, never remove the lid. Extreme caution must be taken after cooking while removing the lid as serious burns can occur from the releasing
steam. Always make sure the steam has been completely released. Let the appliance cool down and always use oven mitts while disassembling or removing accessories.
- DO NOT use this pressure cooker without the removable cooking pot in place.
- Do not attempt to dislodge food while the pressure cooker is plugged in.
- Do not fill the pressure cooker more than 1/2 full with food or 2/3 full with liquid. Do not fill more than 1/2 full, while cooking foods that expand during cooking.
- When cooking foods under pressure at least 1 cup (8 oz /230 ml) of liquid / water must be used.
- Foods such as apple sauce, cranberries, pearl barley, oatmeal or other cereals, split peas, noodles or pasta, or rhubarb should not be cooked under pressure. They can foam, froth or sputter and may block the floating valve. Use different cooking function for these items.
- If smoke is observed, turn the pressure cooker off immediately and unplug it from the power outlet.
- DO NOT use this unit for canning purposes.
• The pressure cooker must be unplugged:
A. After each use.
B. If it appears to be faulty.
C. Before cleaning or maintenance.
Things to remember while using the electrical appliances
- Do not touch the outer surface of the appliance as it can get very hot during operation. Instead, use the handle or mitts.
• To avoid a circuit overload when using this
product, do not operate another high-wattage product on the same electrical circuit.
- A short power supply cord is provided with this product. An extension cord is not recommended for use with this product, but if one must be used:
- The marked electrical rating of the cord must be at least as great as that of the product.
- Arrange the extension cord so that it does not hang where it can be tripped over or pulled unintentionally.
- Be careful, while handling electrical appliances, as the surface of the heating element is subject to residual heat after use. Any misuse may cause potential injury to the user and may damage the appliance.
- Avoid spillage on the connector
WARNING!
Read and understand all instructions. Failure to follow all instructions listed below may result in electric shock, fire or serious personal injury. The warnings, cautions, and instruction discussed in this instruction manual cannot cover all possible conditions and situations that may occur. The user should understand that common sense and caution are a factor which cannot be built into the product, but must be supplied by the user.
CLEANING AND MAINTENANCE
Kindly refer to the cleaning and maintenance section for details on how to clean surfaces which comes in the contact of food.
THIS PRODUCT IS INTENDED FOR HOUSEHOLD USE ONLY. SAVE THESE INSTRUCTIONS!
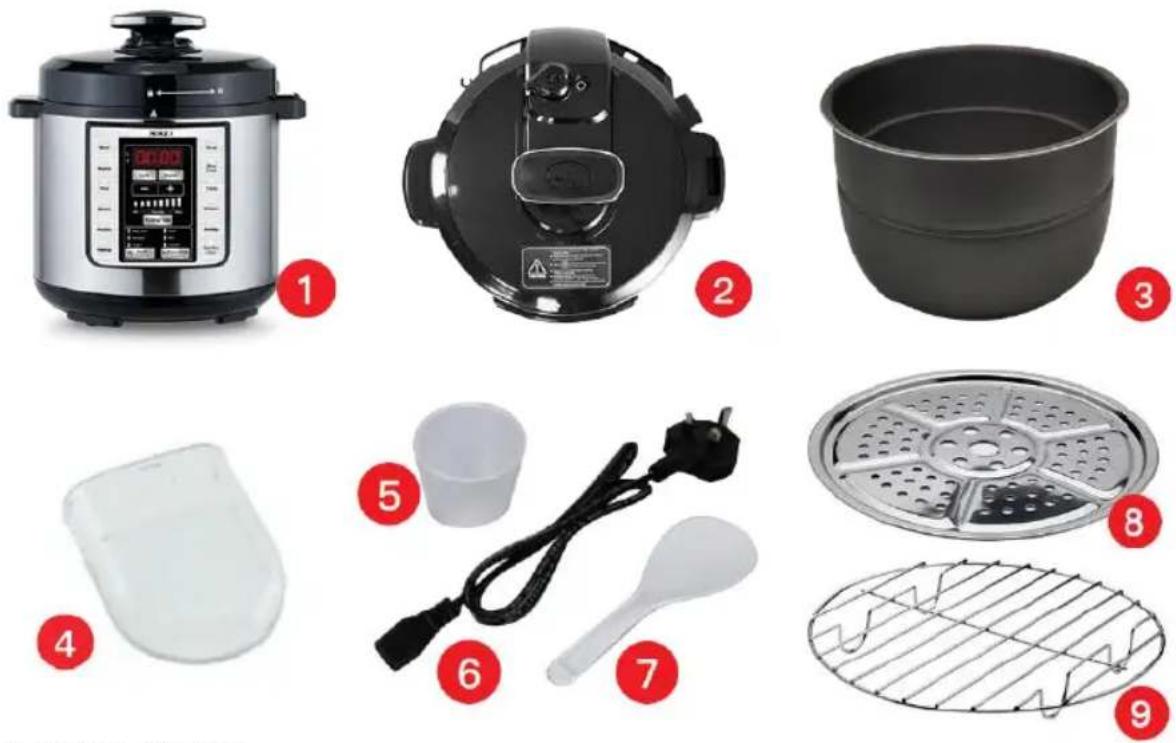
LIST OF MAIN PARTS
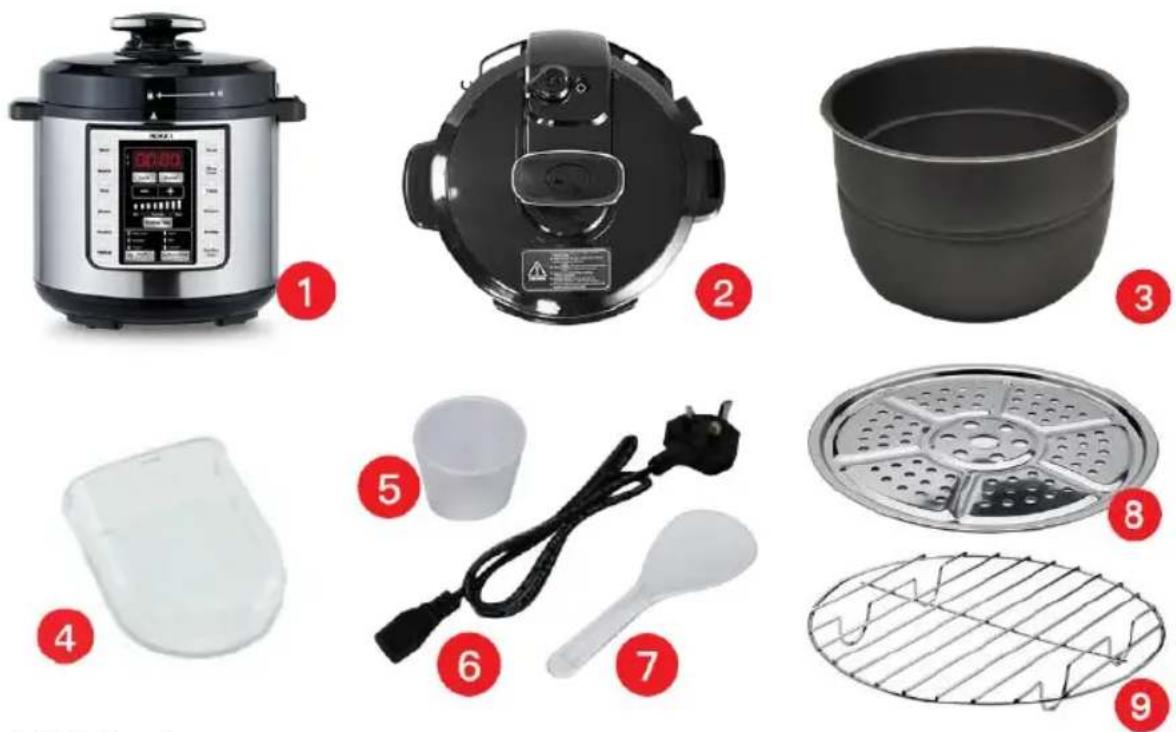
- Main Housing
- Lid Assembly (with handle, safety valves & rubber gasket)
- Aluminium removable cooking pot with non-stick coating
- Condensation cup
- Measuring cup
- Power supply cord
- Plastic spoon
- Stainless Steel Steam Plate (22cm)
- Chromed Metal Steam Rack
| Model No | Voltage | Power Capacity | Working pressure | ||
| SS-10790 | 2 | 20-240V-50/60Hz 1000 | W 6 L 0-70Kpa |
BEFORE THE FIRST USE
- Unpack the pressure cooker from the box.
- Remove all the packaging materials such as cardboard, plastics or Styrofoam.
- Read the manual thoroughly before use and keep safe the manual, warranty card, and receipt for future reference.
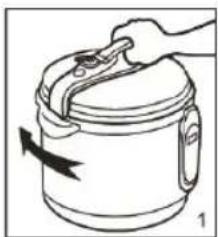
- Open the lid: to open the lid, hold it from the handle and turn it clockwise and pull it up as given in the picture below. (See Figure 1, 2)
natural_image
Illustration of a hand holding a lid with a handle, showing a curved arrow indicating rotation (no text or symbols)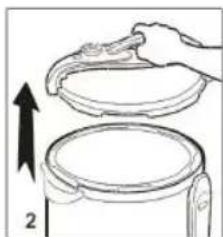
natural_image
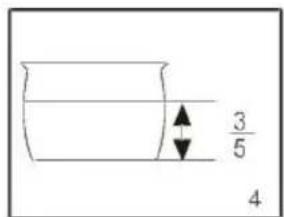
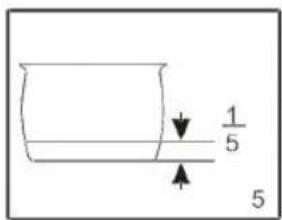
Illustration of a hand holding a lid above a container with an upward arrow, no text or symbols present.- Take out the inner pot and fill in with food and water. Food and water quantity should not be exceeded than 4/5 (figure 3) and less than 1/5 (figure 5) of the height of inner tank. And for the food which increases its volume during cooking, should not exceed than 3/5 (figure 4). (See Figure 3, 4 and 5).

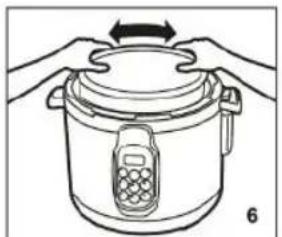
- Make sure there should not be any dirt or smear on the heating plate and outer side of the pot. Once you have filled the pot with the food, put it back in to the unit (See Figure 6). Make sure the sealant had fit on the aluminium cover plate border, then fix it on the shaft on the middle of the lid. Close the lid by turning it anti-clockwise until it gears with a clamping sound. (See Figure 7, 8)
natural_image
Line drawing of hands holding a rice cooker with a digital keypad, no text or symbols present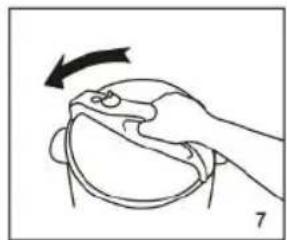
natural_image
Line drawing of a hand holding a curved object with an arrow indicating rotation (no text or symbols)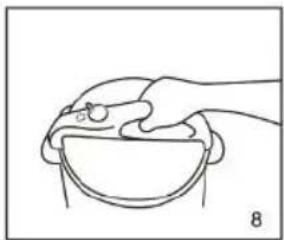
natural_image
Simple line drawing of a hand holding a bowl with a small object above it, labeled '8' at the bottom (no text or symbols on the diagram itself)NOTE: DO NOT USE ANY ABRASIVE MATERIALS TO CLEAN THE SURFACE DO NOT IMMERSE THE PRESSURE COOKER HOUSING OR LID
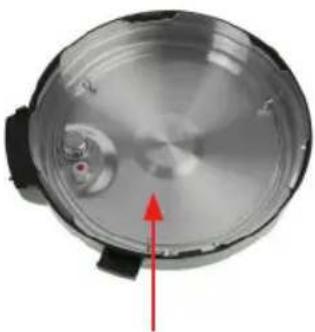
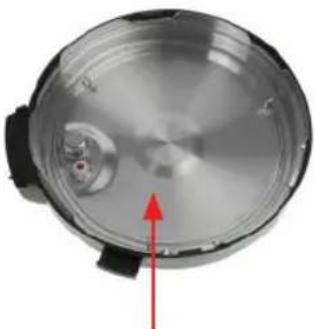
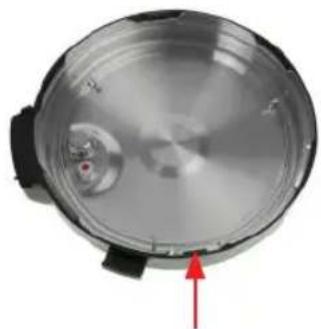
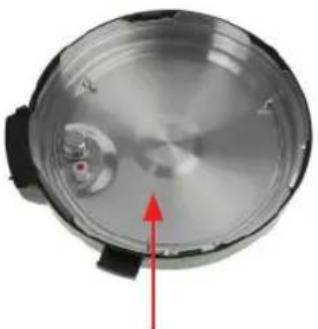
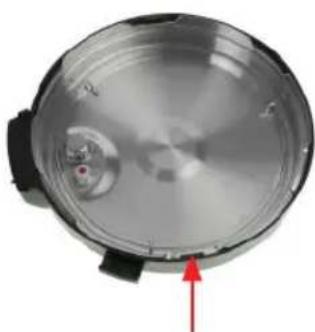
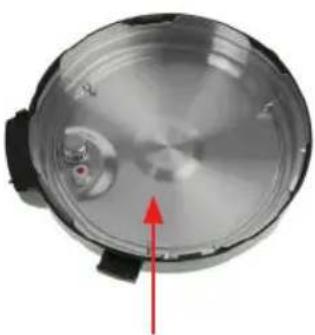
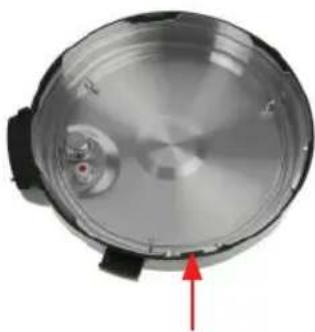
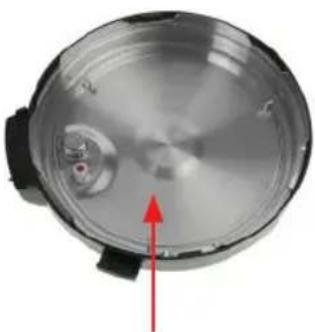
- Make sure the anti-blocking cover is fixed properly. Make sure the silicone ring is covered properly inside the steel coil of the lid. The silicone ring creates an air tight seal that ensures the pressure cooker operates correctly. See below
natural_image
Close-up of a metallic mechanical component with a red indicator light and arrow pointing to a circular feature (no text or symbols visible)Anti blocking cover

natural_image
Simple diagram with a gray circle and a red upward arrow inside, no text or symbols present.Silicone ring

natural_image
Close-up of a circular mechanical component with a red arrow pointing to a small feature (no text or symbols visible)Steel coil
natural_image
Close-up of a circular mechanical component with a red arrow pointing to a small feature (no text or symbols visible)Interior View of Lid
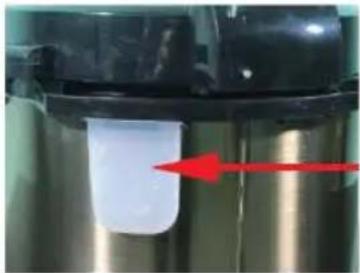
- Attach the condensation container on to the rear of the housing as per shown in the picture below.
natural_image
Close-up of a white plastic bag attached to a metallic container with a red arrow pointing to it (no text or symbols visible)Condensation container
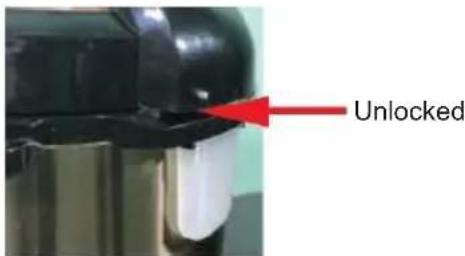
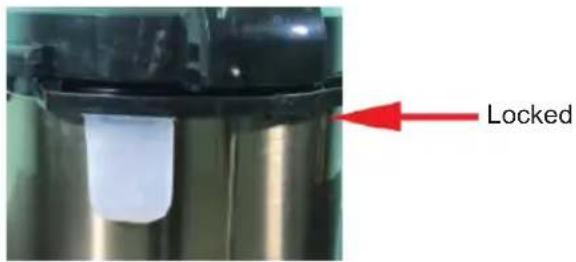
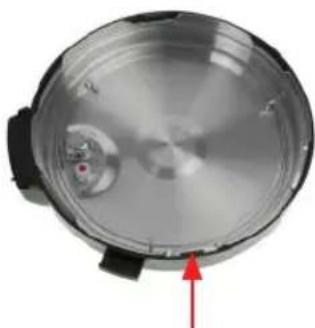
- To ensure the correct fitting of the silicone ring, fill the removable cooking pot with approximately 11 cups of water. Place the lid on the unit and turn it anti-clockwise until it closed firmly in the locked position (see photos below picture)
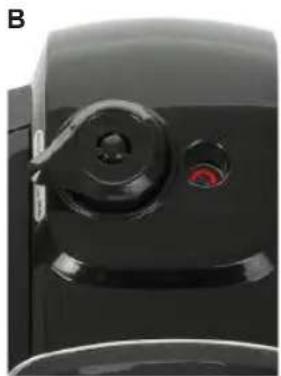
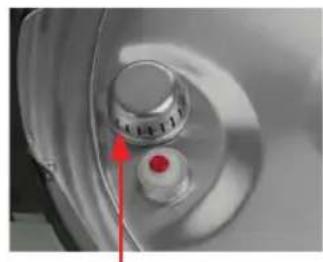
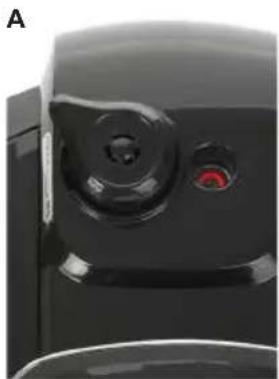
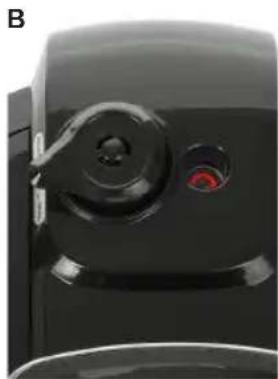
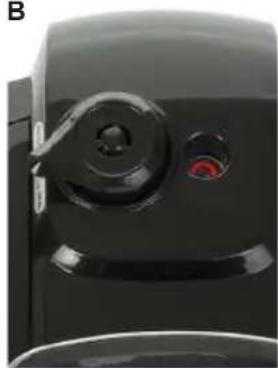
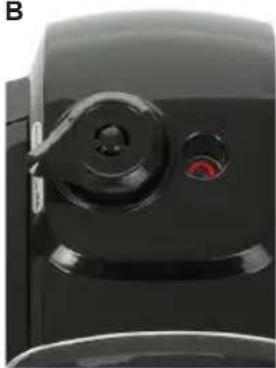
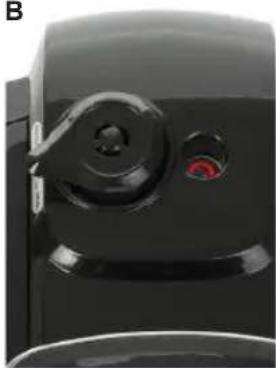
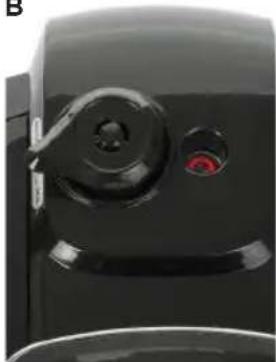
- Make sure the VENT knob is in the SEAL position (see photo B).
natural_image
Close-up of a black camera lens with a red button, labeled 'A' in the corner (no other text or symbols visible)RELEASE
natural_image
Close-up of a black electronic device with a circular button and a red indicator light (no visible text or symbols)SEAL position
- Before using the pressure cooker, make sure to check the rubber gasket, floating valve, and vent knob are clean and positioned properly.
FEATURES
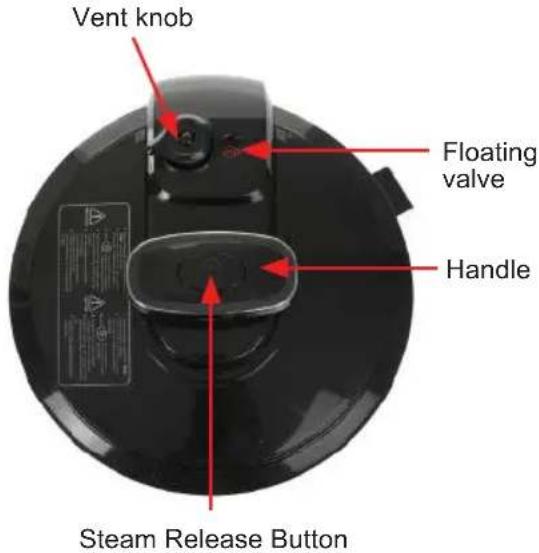
Steam Release button: Located on to the lid handle, can be use to take out the steam through short bursts.
NOTE: THIS APPLIANCE CAN GET HOT DURING USE. PLEASE USE CAREFULLY AND DO NOT TOUCH THE OUTER SURFACE, KINDLY USE MITTS OR GLOVES WHILE USING. COMO SE USA LA OLLA A PRESIÓN
HOW TO USE THE PRESSURE COOKER:
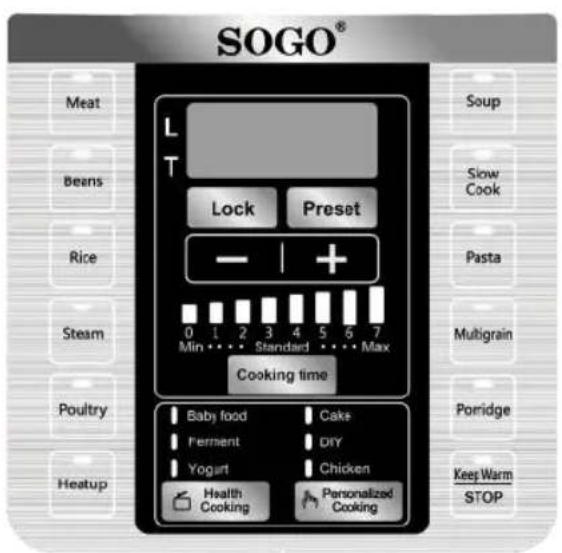
PANEL FUNCTIONS:
There are 12 pre-set menu functions, 3 healthy cooking function and 3 personalized cooking functions. With the help of these functions, you can cook all type of foods without too much effort.
NOTE: The time can be changed as per cooking function requirement.
"LOCK FUNCTION"
"LOCK" button can be used to lock any menu function when you start cooking, this function helps you to prevent your child from using the product and also manipulating your already set cooking program. This function is shown by the L on the LED screen panel. While unit is in "LOCK" mode L illuminates and keep illuminated until you remove the lock function.
In order to use the "LOCK" function choose any menu function from the panel and once selected press the "LOCK" button immediately, the unit will enter into the "LOCK" mode and L will illuminate. When need to remove it press the same "LOCK" button for little longer time (Long press) and the function will be unlocked and L will un illuminate.
Note: Any menu functions can't be cancelled, while the unit is in "LOCK" mode.
PRESET (PRESET TIMER FUNCTION):
This function can be used to delay the cooking program as per need and requirement. You can delay cooking time from 30 minutes to maximum 24 hours with the help of "PRESET" timer button (the time changes with the interval of 30 minutes). In order to use delay cooking time function as per need firstly select any cooking menu from the screen panel followed by "PRESET" button, then press
“+” button and keep pressing until you get the desired time. Once you have reached your desired delaying time, leave the unit for few seconds and automatically it enters into the timer mode. The timer clock will start reverse counting and when reached 00, starts cooking.
NOTE: This function is represented by the T symbol, once select the "PRESET" button T will illuminate and the same will un illuminate once it starts cooking
Example: If you wish to program the pressure cooker to automatically turn on in 3 hours, select any menu function, example "RICE" function followed by "PRESET" button then press the "+" button 6 times and screen shows 3:00 hrs.
Once the menu button and desired delay time are selected, the menu button and delay timer will illuminate and the unit will begin counting reverse. Once reached by the 00 the unit starts cooking.
NOTE:
Perishable foods such as meat, poultry, fish, cheese and dairy products should not be left at room temperature for more than 2 hours and no longer than 1 hour if the temperature is 32^ C or above.
"COOKING TIME"
This button can be used to choose the default or prefixed cooking times. For every function three default times have been provided and you can choose accordingly. The factory default cooking time has been set by the "STANDARD" cooking time, if you need more time to cook the food, you can choose the "MAX" default time and in case need less cooking time you can select "MIN" cooking time. The default cooking time shown by the illuminating vertical bars on the screen panel and minutes shows on the screen. In order to choose the default cooking time switch on the appliance and select any menu function the factory default "COOKING TIME" setting illuminates and screen shows default "STANDARD" time, if you want to change it with "MIN" or "MAX" default cooking time press the "COOKING TIME" button and choose the desired cooking time and screen shows the same time.
“+” / “-” button
These buttons help you to change the cooking time as per need and requirements, without using "COOKING TIME". These button helps you to cook with personalized menus and cooking any type of food with personalized time requirement.
In order to change the time with the help of these buttons, select any menu function and screen shows the factory default time setting, to change the time as per requirement, press "+" or "-" button and keep pressing until you get your desired time. The time will appear on the screen.
NOTE: With the help of these buttons, you can change the time from 1 minute to 59 minutes for all the menu functions with the interval of 1 minute, except REHEAT (1 to 99 minutes, with the interval of 1 minute), SLOW COOK (2Hrs to 10 Hrs, with the interval of 10 minutes); FERMENT (from 2 Hrs to 6 hrs, with the interval of 10 minutes) AND YOGURT (6Hrs to 12 Hrs, with the intervals of 30 minutes each).
NOTE: To change the time, we must do it immediately after selecting the menu function; otherwise, in a few seconds, the menu functions will be locked and start cooking with the factory default time. Once the cooking process starts and in case need to change the cooking time, then we must start the function selection process again by canceling the current function, and selecting again any menu function followed by time setting.
| MENU FUNCTIONS | With pressure/ Without Pressure | Default cooking time (min) | Min. time (min) | Max time (min) | LOW (min) | STAN-DARD (min) | MAX (Min) | TIME INTER-VAL (Min) | PRES-SURE (Kpa) | Temp. °C |
| MEAT Yes / - | 30 1 5 | 9 25 30 | 35 1 50-60 | 165 | ||||||
| BEANS | Yes / - 4 | 5 1 59 35 | 45 55 1 | 50-60 165 | ||||||
| RICE | Yes / - 1 | 2 1 59 8 1 | 2 14 1 5 | 0-60 165 | ||||||
| STEAM | Yes / - 1 | 0 1 59 5 1 | 0 15 1 5 | 0-60 165 | ||||||
| POULTRY | Yes / - 1 | 3 1 59 10 | 13 16 1 | 50-60 165 | ||||||
| HEATUP | Yes / - 0 | 0 1 99 0 0 | 0 1 50-6 | 0 165 | ||||||
| SOUP | Yes / - 2 | 5 1 59 20 | 25 30 1 | 50-60 165 | ||||||
| SLOW COOK | - / Yes | 4:00 Hrs | 2:00 Hrs | 10:00 Hrs | 2:00 Hrs | 4:00 Hrs | 6:00 Hrs | - | - 90 | |
| PASTA | Yes / Yes | 5 | 1 | 59 3 5 | 8 1 50 | -60 165 | ||||
| MULTI-GRAIN | Yes / - 5 | 0 1 59 40 | 50 59 1 | 50-60 165 | ||||||
| PORRIDGE | Yes / Yes | 25 | 1 | 59 | 15 | 25 | 35 | 1 | 50-60 | 165 |
| BABY FOOD | Yes / - 2 | 0 1 59 15 | 20 25 1 | 50-60 165 | ||||||
| FERMENT | - / Yes | 4Hrs | 2Hrs | 6Hrs | - | - | - | 10 | - | 40 |
| YOGURT | - / Yes | 10Hrs | 06 hrs | 12 Hrs | - | -- 30 | - 40 | |||
| CAKE | - / Yes | 48 | 1 | 59 | - | - | - | 1 | - | 120 |
| DIY | - / Yes | 18 | 1 | 59 | - | - | - | 1 | - | 130 |
| CHICKEN | Yes / - 1 | 3 1 59 - | -- | 1 50-60 160 | ||||||
| KEEP WARM | - / Yes - | - | - | - | -- | 24Hrs | - | 70 |
Note: 165°C is default temperature in cooking with pressure as the lid is closed.
Note: With Pressure: when the cooking is with pressure it is with close lid. But when without pressure it is without lid or lid placed but without sealing.
Note: Turn the Vent knob on to the "SEAL" position before cooking with pressure.
Avoid touching the steam release valve during cooking and steam releasing.
Indicator valve up - Do not open the lid.
Indicator valve down - Safe to open the lid.
When moving the pressure cooker, use the 2 side handles and not the lid handle.
KEEP WARM / CANCEL
KEEP WARM
Food can be prepared with the help of any MENU function and at the end of the cooking process, the KEEP WARM function starts working by default. The Menu button gets off and the KEEP WARM function indicator light comes on.,
In order to use the" KEEP WARM" function independently press" KEEP WARM" button," KEEP WARM" icon light will switch on and "bb" sign appears on the LED display, The LED display will show time period of the keep warm program. You can change the time with the help of PRESET button.
Note: It is recommended to turn the vent knob to "RELEASE", to stop Keep Warm function, and simply press the CANCEL/ button until indicator light is off.
Note: Food should not be kept warm for more than 24 hours. More than that may cause change in flavour, appearance and spoil the food.
CANCEL: You can use this button to cancel any selected menu function, also with the help of this button you can cancel the cooking process at any time, while cooking.
MENU FUNCTIONS:
MEAT
You can use this button to cook the “MEAT”, the default cooking time for this function is 30 minutes. The factory default cooking time setting always is the standard time, but you can choose the cooking time as per your requirements with the help of “COOKING TIME” button to choose the Min or Max time or also you can set personalized cooking time with the help of “+” / “-” button (as mentioned in the table).
Note: This function is to cook with closed lid and pressure cooking.
BEANS
You can use this button to cook the "BEANS", the default cooking time for this function is 45 minutes. The factory default cooking time setting always is the standard time, but you can choose the cooking time as per your requirements with the help of "COOKING TIME" button to choose the Min or Max time or also you can set personalized cooking time with the help of "+" / "-" button (as mentioned in the table).
Note: This function is to cook with closed lid and pressure cooking.
RICE
You can use this button to cook the "RICE", the default cooking time for this function is 12 minutes. The factory default cooking time setting always is the standard time, but you can choose the cooking time as per your requirements with the help of "COOKING TIME" button to choose the Min or Max time or also you can set personalized cooking time with the help of "+" / "-" button (as mentioned in the table).
Note: This function is to cook with closed lid and pressure cooking.
STEAM
You can use this button to do "STEAM" cooking, the default cooking time for this function is 10 minutes. The factory default cooking time setting always is the standard time, but you can choose the cooking time as per your requirements with the help of "COOKING TIME" button to choose the Min or Max time or also you can set personalized cooking time with the help of "+" / "-" button (as mentioned in the table).
Note: This function is to cook with closed lid and pressure cooking.
POULTRY
You can use this button to cook the "POULTRY" products, the default cooking time for this function is
13 minutes. The factory default cooking time setting always is the standard time, but you can choose the cooking time as per your requirements with the help of "COOKING TIME" button to choose the Min or Max time or also you can set personalized cooking time with the help of "+" / "-" button (as mentioned in the table).
Note: This function is to cook with closed lid and pressure cooking.
HEAT UP
You can use this button to cook the food again if you feel food is under cooked or also this function can be used for personalized cooking, the factory default cooking time for this function is 00 minutes. Also in this function there is not any factory set multiple "COOKING TIME" function, but you can set personalized cooking time with the help of "+" / "-" button up to 99 min (as mentioned in the table). Note: This function is to cook with closed lid and pressure cooking.
SOUP
You can use this button to prepare "SOUP", the default cooking time for this function is 25 minutes. The factory default cooking time setting always is the standard time, but you can choose the cooking time as per your requirements with the help of "COOKING TIME" button to choose the Min or Max time or also you can set personalized cooking time with the help of "+" / "-" button (as mentioned in the table).
Note: This function is to cook with closed lid and pressure cooking.
SLOW COOK
You can use this button to cook any food with the method of "SLOW COOKING", the default cooking time for this function is 4 Hrs. The factory default cooking time setting always is the standard time, but you can choose the cooking time as per your requirements with the help of "COOKING TIME" button to choose the Min or Max time or also you can set personalized cooking time with the help of "+" / "-" button (as mentioned in the table). It slow cooks foods at a much lower temperature of 90^ over a much longer time without burning the food.
Note: This function is to cook with open lid or you can cover with the lid but without sealing or pressure.
PASTA
You can use this button to cook various types of "PASTAS", the default cooking time for this function is 5 minutes. The factory default cooking time setting always is the standard time, but you can choose the cooking time as per your requirements with the help of "COOKING TIME" button to choose the Min or Max time or also you can set personalized cooking time with the help of "+" / "-" button (as mentioned in the table).
Note: This function helps you to cook in both ways with lid (Pressure cooking) or without lid (without pressure cooking) as well.
MULTI GRAIN (MULTI CEREALES)
You can use this button to cook "MÚLTIGRAINS", like brown rice, wheat, barley, flax seeds, millet, oats, quinoa, pumpkin seeds, sunflower seeds etc. The default cooking time for this function is 50 minutes. The factory default cooking time setting always is the standard time, but you can choose the cooking time as per your requirements with the help of "COOKING TIME" button to choose the Min or Max time or also you can set personalized cooking time with the help of "+" / "-" button (as mentioned in the table).
Note: This function is to cook with closed lid and pressure cooking.
PORRIDGE
You can use this button to cook the "PORRIDGE", the default cooking time for this function is 25 minutes. The factory default cooking time setting always is the standard time, but you can choose the cooking time as per your requirements with the help of "COOKING TIME" button to choose the Min or Max time or also you can set personalized cooking time with the help of "+" / "-" button (as mentioned in the table).
Note: This function helps you to cook in both ways with lid (Pressure cooking) or without lid (without pressure cooking) as well.
HEALTH COOKING
There are 3 menu functions under health cooking function.
The health cooking menu functions are:
BABY FOOD
Add the BABY FOOD you want to cook in to the removable cooking pot and place the pot in the
pressure cooker. Place the lid on the pressure cooker and turn it counter clockwise to lock it into position.
Now press the HEALTH COOKING button, and BABY FOOD indicator light start flashing, default cooking time (20 min) will appear on the LED display. You can adjust the time with the help of “+” /”- “button, you can select the time from the range of 15 minutes to 25 minutes. The time changes with the interval of 1 minute. Once you have selected the time wait for few seconds, and unit will start automatically. The display will scroll until the unit reach to its correct pressure and then timer will start counting down.
Note: This function is to cook with closed lid and pressure cooking.
FERMENT
Add the food you want to ferment in to the removable cooking pot and place the pot in the pressure cooker. Place the lid on the pressure cooker and turn it counter clockwise to lock it into position. Now press the HEALTH COOKING button, and keep pressing until the FERMENT indicator light start flashing, default ferment time (4Hrs) will appear on the LED display. You can adjust the time with the help of "+" / "-" button, you can select the time from the range of 2hrs to 6Hrs. The time changes with the interval of 10 minutes. Once you have selected the time wait for few seconds, and unit will start automatically and timer will start counting down.
Note: This function is to cook with open lid or you can cover with the lid but without sealing (no pressure cooking).
YOGURT
Add the YOGURT mixture to prepare the yogurt in to the removable cooking pot and place the pot in the pressure cooker. Place the lid on the pressure cooker and turn it counter clockwise to lock it into position.
Now press the HEALTH COOKING button, and keep pressing until the YOGURT indicator light start flashing, default yogurt time (10Hrs) will appear on the LED display. You can adjust the time with the help of "+" / "-" button, you can select the time from the range of 6hrs to 12hrs. The time changes with the interval of 30 minutes. Once you have selected the time wait for few seconds, and unit will start automatically and timer will start counting down.
Note: This function is to cook with open lid or you can cover with the lid but without sealing (No pressure cooking).
PERSONALIZED COOKING
In this pressure cooker there are 3 cooking functions as personalized cooking, you can cook any food with the help of these functions.
Personalized cooking functions are
CAKE
Add the prepared batter into the aluminium mould or you can pour directly into the cooking pot as well and place the pot in the pressure cooker. Place the lid on the pressure cooker and turn it counter clockwise to lock it into position.
Note: To safeguard the non-stick coating inside the cooking pot, we recommend you to use baking paper at the base of the pot and then pour in your batter to make your cake. A very good alternative would be to use silicon oven moulds to fill in the cake batter and then place it inside the cooking pot. Now press the PERSONALIZED COOKING button, and CAKE indicator light start flashing, default CAKE BAKING time (48 min.) will appear on the LED display. You can adjust the time with the help of “+” / ”-” button, you can select the time from the range of 1min to 59 min. The time changes with the interval of 1 minute. Once you have selected the time wait for few seconds, and unit will start automatically and timer will start counting down.
Note: This function is to cook with open lid or you can cover with the lid but without sealing (No pressure cooking).
DIY
DO IT YOUR SELF: With the help of this function, you can cook any food or personalized menu: Add desired food to the removable cooking pot and place the pot in the pressure cooker. Place the lid on the pressure cooker and turn it counter clockwise to lock it into position.
Now press the PERSONALIZED COOKING button, and keep pressing until DIY indicator light start flashing, default DIY time (18min) will appear on the LED display. You can adjust the time with the help of "+" / "-" button, you can select the time from the range of 1min to 59 min. The time changes with the interval of 1 minute. Once you have selected the time wait for few seconds, and unit will start automatically and timer will start counting down.
Note: This function helps you to cook in both ways with lid (Pressure cooking) or without lid (without pressure cooking) as well.
CHICKEN
Put the chicken into the cooking pot and place the pot in the pressure cooker. Place the lid on the pressure cooker and turn it counter clockwise to lock it into position. Now press the HEALTH COOKING button, and keep pressing until CHICKEN indicator light start flashing, default chicken cooking time (13 min.) will appear on the LED display. You can adjust the time with the help of “+” / ”-” button, you can select the time from the range of 1min to 59 min. The time changes with the interval of 1 minute. Once you have selected the time wait for few seconds, and unit will start automatically. The display will scroll until the unit reach to its correct pressure and then timer will start counting down.
NOTE: This function is to cook with closed lid and pressure cooking.
NOTE: To select and cook with the help any of the menu functions given above, refer to the section HOW TO COOK WITH SELECTED MENU.
HOW TO COOK WITH ANY SELECTED MENU COOKING FUNCTION:
For example, if we take "RICE" function to cook: Firstly, switch on the appliance and LED screen will show 0000 on the display screen, press the "RICE" button to select the RICE cooking function and RICE indicator light start flashing. Turn the vent knob on to the seal position and wait for few seconds and the appliance starts working automatically. The display starts scrolling until it reaches to correct pressure and temperature and then it will start counting down.
NOTE: User can change the time as per requirement following the COOKING TIME settings or “+” / “-” button time changing setting as detailed above.
NOTE: If need to change the time, change it immediately after selecting menu function, other wise in few seconds the menu functions will get locked with factory default time and appliance will start cooking, and to change it again need to cancel the menu function and select again.
Opening the lid with regular pressure release method: In this method pressure releases on its own. Once the cooking finishes, the unit will have "beep, beep" sound indicating the cooking process is completed and automatically enter into the keep warm function. To open the lid, press the CANCEL button and remove the plug out of the mains socket to avoid any short circuit, turn VENT knob from SEAL to RELEASE to release the steam and leave the appliance for 10 minutes or more before opening the lid. Use oven mitts or gloves, as while turning the vent knob hot steam and liquid might release. When the steam releases completely and floating valve drops, let the pressure cooker cool down to room temperature before emptying and cleaning. You can open the lid by turning it in clockwise direction and remove the cooking pot.
Note : This pressure release method can be used while cooking "Rice" or any menu function, which does not leave any water or liquid in the cooking basket.
Note: This pressure release method can be used in without pressure cooking as well.
Opening the lid with quick pressure release method: In this method you can use steam releasing button to release the pressure with short burst. Once the cooking finishes, the unit will have "beep, beep" sound indicating the cooking process is completed and automatically enter in to the keep warm function. To open the lid, press the CANCEL button and make sure the plug is taken out of the mains socket to avoid any short circuit, as in this method the water or liquid might be released. Release the steam and pressure by pushing down once the steam releasing button situated at the center of the lid. Make sure to use mitts and keep your face away from the appliance to avoid steam burns. Once the steam releases completely, let the pressure cooker cool down to room temperature and check if the and the floating valve has dropped, before opening the lid. You can open the lid by turning it in clockwise direction and remove the cooking pot.
Note: this pressure release methods can be used when there is water or liquid remaining in the pressure cooker.
PRECAUTIONS
- Use oven mitts or gloves, while turning the vent knob as hot steam and liquid might release.
- Let the pressure cooker cool to room temperature before emptying and cleaning.
- DO NOT hold the VENT knob open.
- Using the quick release method will release extremely hot steam and liquid that can cause burn. Please use oven mitts or other items to protect your hands and arms. Keep face away from the steam vent.
- Please use oven mitts to hold or removing the cooking pot as the pressure cooker and cooking pot will be hot.
- NEVER FORCE THE LID OPENING. The lid will only open when the pressure is fully released.
- Once the cooking finishes unit will automatically enter in to KEEP WARM mode.
Note: Causes of unit overheating are:
- High mains voltage
- Operation of the unit with the pot empty
- Cooked dry for a long time.
TIPS AND RECOMENDATIONS
- NEVER deep fry or pressure fry in the pressure cooker.
- DO NOT set the pre-set timer for more than 1-2 hours while cooking perishable foods. If the room temperature is 32^ or above do not set the pre-set timer for more than 1 hour.
- The rubber gasket creates an air tight seal that is needed for the pressure cooker to operate properly. Check that it is in good condition and seated properly before each use.
- DO NOT hold the VENT knob when releasing pressure as it releases hot steam and liquid into the air. Keep face away from the appliance while using short bursts to release the steam.
- Letting the pressure cooker cool until the pressure is released on its own is another option for the pressure cooker.
- If you are unsure of the exact time when cooking under pressure, it is always better to under cook and use the short bursts of steam to release the pressure so you can check the cooking status. If it has not cooked as per your requirement you can cook for few minutes more.
- Never fill the pressure cooker more than 1 / 2 with food ingredients or 2/3 with liquid.
- The pressure cooker must have some liquid (can be water) to create the steam and pressure needed while cooking with pressure.
- While cooking fresh fruits, low pressure must be used.
- If cooking beans (legumes) you might add a tbsp. of oil to the water to reduce the amount of foam that the beans can create.
- Less expensive cuts of meat are ideal for cooking in the pressure cooker as the fibers are broken down during cooking.
- NEVER try to remove the lid until the pressure has been completely released.
- NEVER cover the top of the lid or the valve opening with a cloth or any other object.
- PLEASE NOTE: If smoke is observed, press the CANCEL button immediately and unplug the power cord. Let the pressure cooker cool completely and try again. If the smoke is observed again, cancel the cooking function and take it to the nearest authorized service centre or qualified technician.
• Always inspect your pressure cooker before each use. Do not use this unit if it has been damaged, dropped, left outdoors or dropped in water. - When the LED display "E" it means there is a serious failure in the unit. Press the CANCEL button and unplug the power cord immediately. Once the unit has completely cooled down you can restart the pressure cooker. If the digital display again shows "E", and take it to the nearest authorized service centre or qualified technician.
- DO NOT use metal utensils with the cooking pot as it may scratch the non—stick surface. Use silicon or nylon utensils instead.
- DO NOT use this pressure cooker for the purpose of canning foods.
6. CLEANING AND MAINTENANCE
-
Clean the cooking pot and steamer with warm and soapy water using a sponge or damp cloth, then rinse. Then wipe dry with cloth. Don't clean with abrasive brushes to avoid damaging the non-stick coating.
-
Remove the dew collector and throw the water. Wash it with water and place it back to the rice cooker.
-
Rice grains or other residues may stick on the heating plate. To ensure a proper contact with the cooking pot, rub the grains/residues away from the heating plate with fine sandpaper (NO.320), then wipe it with cloth again.
-
NEVER immerse power cord, plug or pressure cooker housing in water or any other liquid. Clean the lid and housing parts with damp cloth first and dry cloth immediately afterwards and keep them dry.
TROUBLE SHOOTING
| Problem Description | Cause Solution | ||
| Indication light does not go on | Heating plate does not work. | 1. The power cord is not well connected.2. PCB is defective. | 1. Check power cord connection.2. Take the appliance to your dealer or an authorized service centre. |
| Heating plate works. | PCB is defective. Take the appliance to your dealer or an authorized service centre. | ||
| Indication light goes on | Heating plate does not work. | 1. Electronic parts or the temperature sensor malfunction.2. Fuse is broken.3. PCB is disconnected. | Take the appliance to your dealer or an authorized service centre. |
| Rice gets burned or the appliance fails to switch to keep-warm process automatically. | 1. PCB is defective.2. Electronic parts or the temperature sensor malfunction. | Take the appliance to your dealer or an authorized service centre. | |
| There is overflow during cooking process. | 1. PCB is defective.2. Electronic parts or the temperature sensor malfunction. | Take the appliance to your dealer or an authorized service centre. | |
| The rice is not cooked. | 1. Not enough water has been added.2. PCB is defective.3. Electronic parts or the temperature sensor malfunction. | 1. Add water according to the scale on the inside of the inner pot.2. Take the appliance to your dealer or an authorized service centre. | |
| Error code Reason Solution | ||
| E1 Broken sensor | circuit Unplug it, let it cool down and take it to the nearest authorized service centre for repairing. | |
| E2 Short circuit in the sensor | the sensor | Unplug it, let it cool down and take it to the nearest authorized service centre for repairing. |
| E3 Over heating | Unplug and let it cool down completely before using again. | |
| E4 Pressure switch | mal-function | Unplug it, let it cool down and take it to the nearest authorized service centre for repairing. |
IMPORTANT
natural_image
Illustration of a hand holding a lid with a handle, moving a curved arrow inside a container (no text or symbols)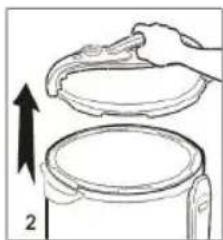
natural_image
Illustration of a hand holding a lid above a container with an upward arrow, no text or symbols present.natural_image
Illustration of hands holding a rice cooker with a digital controller, no text or symbols present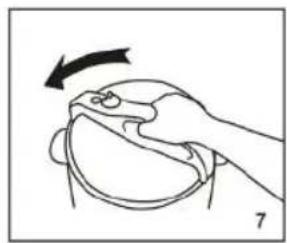
natural_image
Illustration of a hand holding a curved object with an arrow indicating rotation (no text or symbols)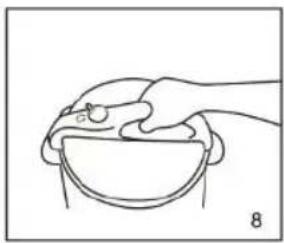
natural_image
Line drawing of a hand holding a bowl with a small object above it, labeled '8' (no text or symbols on the diagram itself)NE PAS UTILISER DE MATÉRIAUX ABRASIFS POUR NETTOYER LA SURFACE NE PAS IMMERGER LE CORPS OU LE COUVERCLE DE L'AUTOCUISEUR DANS L'EAU
natural_image
Close-up of a mechanical component with a red indicator light and a circular dial (no visible text or symbols)Verrou du couvercle

natural_image
Simple diagram with a gray circle and a red upward arrow inside, no text or symbols present.Anneau en silicone
natural_image
Top-down view of a circular mechanical component with a red arrow pointing to a small feature (no text or symbols visible)Couvercle en acier
natural_image
Top-down view of a circular mechanical component with a red arrow pointing to a small internal feature (no text or symbols visible)natural_image
Close-up of a white plastic bag attached to a metallic container with a red arrow indicating direction (no text or symbols visible)natural_image
Close-up of a black camera lens with a red circular button on the right side (no visible text or symbols)RELEASE
B
natural_image
Close-up of a black electronic device with a circular button and red indicator light (no visible text or symbols)POSITION SEAL
HEALTHY COOKING (CUISINE SANTÉ)
ESTE PRODUTO É DESTINADO APENAS PARA USO DOMÉSTICO. GUARDE ESTAS INSTRUÇÕES!
LISTA DAS PEÇAS PRINCIPAIS
natural_image
Illustration of a hand holding a cooking pot with a handle, showing a black arrow indicating rotation (no text or symbols)
natural_image
Illustration of a hand holding a lid above a cylindrical container with an upward arrow (no text or symbols)natural_image
Line drawing of hands holding a rice cooker with a digital keypad, no text or symbols present
natural_image
Line drawing of a hand holding a curved object with an arrow indicating rotation (no text or symbols)
natural_image
Simple line drawing of a hand holding a bowl with a small object above it, labeled '8' (no text or symbols on the diagram itself)natural_image
Close-up of a mechanical component with a red arrow pointing to a circular feature (no visible text or symbols)Tampa anti bloco

natural_image
Simple diagram with a gray circle and a red upward arrow inside, no text or symbols present.Anel de silicone
natural_image
Close-up of a circular mechanical component with a red arrow pointing to a feature, no visible text or symbols.Bobina de aço
natural_image
Close-up of a circular mechanical component with a red arrow pointing upward, no visible text or symbolsParte interna da tampa
natural_image
Close-up of a white plastic bag attached to a metallic cylindrical component, with a red arrow pointing to it (no text or symbols visible)natural_image
Close-up of a black camera lens with a red button and circular lens (no visible text or symbols)RELEASE
B
natural_image
Close-up of a black electronic device with a circular button and red indicator light (no visible text or symbols)POSIÇÃO SEAL

KEEP WARM (MANTER QUENTE)
natural_image
Line drawing of hands holding a rice cooker with a digital controller, no text or symbols present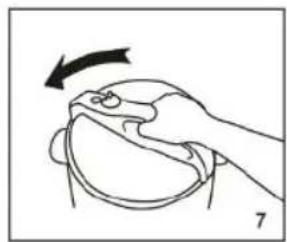
natural_image
Illustration of a hand holding a curved object with an arrow indicating rotation (no text or symbols)
natural_image
Line drawing of a hand holding a bowl with a spoon, no text or symbols presentnatural_image
Close-up of a mechanical component with a red dot and arrow pointing to a circular feature (no visible text or symbols)Anti-Block-Abdeckung

natural_image
Simple diagram with a gray circle and a red upward arrow (no text or symbols)Silikonring
natural_image
Top-down view of a circular mechanical component with a red arrow pointing to a feature (no text or symbols visible)Stahlspule Innere Kappe
natural_image
Top-down view of a circular mechanical component with a red arrow pointing to a central feature (no text or symbols visible)natural_image
Close-up of a white plastic bag attached to a metallic cylindrical device, with a red arrow pointing to it (no text or symbols visible)Auffangbehälter
natural_image
Close-up of a black camera lens with a red circular button on the right side (no visible text or symbols)RELEASE
B
natural_image
Close-up of a black mechanical device with a circular button and red indicator light (no visible text or symbols)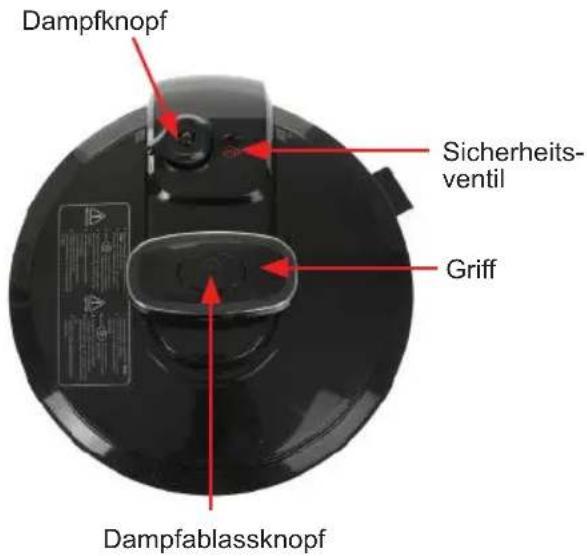
natural_image
Illustration of a hand holding a lid with a curved arrow indicating rotation (no text or symbols)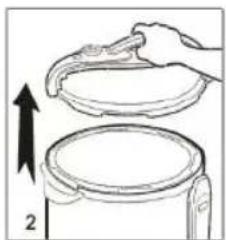
natural_image
Illustration of a hand holding a lid above a cylindrical container with an upward arrow (no text or symbols)natural_image
Line drawing of hands holding a rice cooker with a digital keypad, no text or symbols present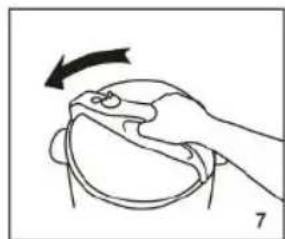
natural_image
Illustration of a hand holding a curved object with an arrow indicating rotation (no text or symbols)
natural_image
Line drawing of a hand holding a bowl with a small object above, labeled '8' (no text or symbols on the diagram itself)NON PULIRE LE SUPERFICI UTILIZZANDO MATERIALI ABRASIVI NON IMMERGERE IN ACQUA L'ALLOGGIAMENTO O IL COPERCHIO DELLA PENTOLA A PRESSIONE.
natural_image
Close-up of a mechanical component with a red dot and a red arrow pointing to it (no visible text or symbols)natural_image
Simple diagram with a gray circle and a red upward arrow inside, no text or symbols present.Anello in silicone
natural_image
Circular mechanical component with transparent glass and red arrow indicator (no text or symbols)Bobina d'acciaio

natural_image
Top-down view of a circular mechanical component with a red arrow pointing to a small feature (no text or symbols visible)natural_image
Close-up of a white plastic container being placed on a metallic cylindrical device, with a red arrow pointing to it (no text or symbols visible)natural_image
Close-up of a black camera lens with a red circular button (no visible text or symbols)RELEASE
B
natural_image
Close-up of a black automotive camera with a red button and circular lens (no visible text or symbols)POSIZIONE DI TENUTA
DECLARATION OF CONFORMITY
This device complies with Low Voltage Directive 2014/35/EC, Electromagnetic Compatibility Directive 2014/30/EU, Directive 2015/863/EU on the restriction of the use of certain hazardous substances in electrical and electronic equipment and Directive 2009/125/EC on the eco-design requirements applicable to energy-related products.


DÉCLARATION DE CONFORMITÉ
This symbol means that in case you wish to dispose of the product once its working life has ended, take it to an authorised waste agent for the selective collection of waste electrical and electronic equipment (WEEE).

Imported by:
Sanysan Appliances S.L, NIF: B98753056, C/ Barcas 2, 2 46002 Valencia, Spain Product made in P.R.C. – Designed by SOGO based on the European Quality Standards Customer Service: www.sogosat.com / sogosat@sogosat.com / 0034 902 222 161