SS-16935 - Steam cleaner Sogo - Free user manual and instructions
Find the device manual for free SS-16935 Sogo in PDF.

| Product Type | Steam Cleaner |
| Brand | Sogo |
| Model | SS-16935 |
| Category | Steam Cleaner |
| Rated Voltage | 220-240 V ~ 50-60 Hz |
| Rated Power | 900 W |
| Steam Pressure | 0.2 - 3.5 bars |
| Steam Temperature | 130 °C |
| Steam Flow | 28 g/min |
| Tank Capacity (max.) | 450 ml |
| Recommended Water Capacity | 150 - 270 ml |
| Net Weight | 2.4 kg |
| Package Dimensions | 29.5 x 19 x 24.5 cm |
| Heating Time | Approximately 5 minutes |
| Boiler Material | Aluminium |
| Exterior Material | Polypropylene |
| Main Functions | Sterilization, cleaning of clothes, windows, floors |
| Included Accessories | Round brush, flat brush, long nozzle, angled nozzle, towel holder, measuring cup, funnel, microfiber cloth |
| Safety | Overheat protection (172°C), automatic pressure release, safety switch, double-insulated cord |
| Certifications | Low Voltage Directive 2014/35/EC, EMC 2014/30/EU, RoHS 2015/863/EU, ErP 2009/125/EC |
| Cleaning and Maintenance | Clean the tank every 3 months with clean water; external surface with a soft damp cloth |
| Power Cord Type | Short, with grounded plug |
| Warranty and After-Sales Service | After-sales service: www.sogosat.com / 0034 902 222 161 |
Frequently Asked Questions - SS-16935 Sogo
User questions about SS-16935 Sogo
0 question about this device. Answer the ones you know or ask your own.
Ask a new question about this device
Download the instructions for your Steam cleaner in PDF format for free! Find your manual SS-16935 - Sogo and take your electronic device back in hand. On this page are published all the documents necessary for the use of your device. SS-16935 by Sogo.
USER MANUAL SS-16935 Sogo
natural_image
Black and white SOGO Gas washing machine with handle and spout (no visible text or symbols on body)
2 EN 1 LIMPIADOR A VAPOR 2 IN 1 STEAM CLEANER 2 EN 1 NETTOYEUR À VAPEUR 2 EM 1 LIMPADOR A VAPOR 2 IN 1 DAMPFREINIGER PULITORE A VAPORE 2 IN 1
Caution: please read and preserve these important instructions
ÍNDICE
-
Important Note P. 18
-
Symbol definitions P. 18
-
Safety instructions for the user P. 18
I. General precautions during the use of electrical equipment P. 18
II. Restrictions on use to avoid personal injury P. 19
III. Product use restrictions due to poor condition or breakdown P. 20
IV. Restrictions on use when used with children and elders P. 21
V. IMPORTANT WARNING P. 21
VI. Instructions to follow while using the device P. 22
- Technical specifications P. 24
- Parts description P. 24
- Instructions for use P. 24
- Cleaning and maintenance P. 26
- Declaration of conformity P. 68
- Responsibility of disposal, details of the manufacturer and after-sales service P. 69
ÍNDICE
ES Eco friendly and energy-efficient
ES Aluminium boiler with heat-up time: approx. 5 minutes
SOPHISTICATED TECHNOLOGY
- The steam cleaner has a special patent for hot and high-pressure steam, used for cleaning floors window and clothes. It can kill the bacteria and remove dust. It has an automatic heating control system to continue producing steam for cleaning. The steam cleaner uses high-pressure pure water without using any chemical product, therefore it is ecological and not polluting.
SAFETY
- This steam cleaner has an automatic safety cut –out for protection against overheating. It operates if the tank is switched on when there is no enough water. It has a central system to keep steam temperature constantly at 130° C, killing all bacteria at the same time. It is foreseen with an automatic pressure release function.
- When the pressure of the tank is too high, it automatically released. It has also a longer double layer insulated cable, which can prevent the product from water and dust.
DURABLE USAGE
- The steam cleaner is made of aluminium metal, with extreme sick inside pipe. This feature makes the steam cleaner safer. The external part is made of high-quality PP material and this makes the product to be resistant and to have a long endurance.
SAVING
- The steam cleaner has a special designed heating pipe and provides a balanced, efficient and economic heating energy. The double-layered construction of this product can prevent heating releasing to save energy.
CONVENIENCE
- The steam cleaner is easy to use. Once the plug is switched on, the heating system starts working, and it will reach the right temperature to produce hot steam. The steam cleaner has different accessories for the different use. All the accessories can be connected and removed easily.
Français
TECHNOLOGIE DE POINTE
6. INSTRUCCIONES DE USO
natural_image
Close-up of a mechanical component with a hand holding a cylindrical part, showing internal ridges and a downward arrow (no text or symbols visible)Fig. 1
natural_image
Close-up of a hand using a spray gun to press a white spray bottle (no text or symbols visible)Fig. 2
MONTAJE DE LOS ACCESORIOS
natural_image
Line drawing of a bell with a mounted microphone and base (no text or symbols)Fig. 5
natural_image
Two technical diagrams showing a device with a handle and a lever mechanism, labeled Fig. 6 and Fig. 7 (no text or symbols on the devices themselves)• Always read the instruction book carefully before using.
- This manual can be downloaded from our web page www.sogo.es
- Keep these instructions for future reference.
2. Symbol definitions
1


GENERAL PRECAUTIONS
1- Important information and useful hinds on use
2- Warning against dangerous situations in terms of life and property
4- Warning against hot surfaces
5- Cautions while using electrical and electronic equipment.
3. Safety instructions for the user
1.
GENERAL PRECAUTIONS
General precautions during the use of electrical equipment
- Do not use the appliance for any other purpose than described in this manual.
- Do not use or store the appliance outdoors.
• Always place the appliance on to the flat and even surface. - This product is intended for indoor, non-industrial, non-commercial and only for household use. Do not use the item outdoors or for any other purpose. Misuse or improper
handling may cause problems in the appliance and cause injury to the user.
- The unit must be used only for the intended purposes. No liability is accepted for damages arising from improper use or wrong handling.
- Ensure that the voltage indicated on the nameplate matches the mains voltage before plugging in the appliance.
• Always remove the plug from the power socket when the appliance is not in use. Do not leave the appliance unattended when switched on. - Close supervision is necessary when any appliance is being used by or near children.
- Before cleaning or storing your appliance, always unplug the appliance from the power supply and let it cool down.
- The device is not completely disconnected from the power source, even after it has been turned off. To disconnect it completely, disconnect it from the mains plug.
- The appliances are not intended to be operated by means of an external timer or separate remote-control system.
II.
Restrictions on use to avoid personal injury
- Do not let the appliance operate unattended.
- Do not place or operate this appliance near water sources.
- Do not place or operate the appliance and its power cord on or near hot surfaces (e.g., stove plates) or open flames.
- Do not leave the power cord hanging from sharp edges and keep away from hot objects
and flames. Do not wind the cord around the appliance and do not bend it.
- Never use accessories that are not recommended by the manufacturer.
- The use of accessories not recommended or sold by the appliance manufacturer may result in fire, electric shock or injury to persons.
- When you want to remove the plug from the wall contact, please do this at the plug itself and not by pulling on the cable or the appliance itself.
- To avoid electric shock, make sure your hands are dry before plugging or unplugging.
- Do not use the device with wet hands, on damp floors or when the atmosphere is humid, there is a risk of electric shock.
- While using the appliance, make sure that the power cord must not be caught or crushed.
- Do not let the motor unit, cord or plug get wet to protect against risk of electric shock.
- Do not touch the outer surface of the appliance as it can get very hot during operation. Instead, use the handle or mitts.
III.
Product use restrictions due to poor condition or breakdown
- Never immerse the appliance or the plug-in water or any other liquid. In the event of the appliance falling in water, disconnect immediately from the mains supply and take it to an authorized service agent for repair before reusing.
- Do not use the appliance if it has fallen on the floor, if there are visible signs of damage or if it has a leak.
- Do not use the appliance if the cable or plug is damaged. In case of the cord be damaged, it
must be replaced only by the manufacturer, its service agent or similarly qualified persons in order to avoid Hazard.
- In case of appliance malfunction, or if it has been damaged in any manner, return the appliance to the nearest authorized service facility for examination, repair or adjustment.
- In case of hardware problems, do not attempt to repair the product yourself. Repairs should only be carried out by qualified technicians.
IV. ⚠️! Restrictions on use when used with children and elders
• Children should be supervised to ensure that they do not play with the appliance.
- Cleaning and user maintenance shall not be made by children without supervision.
- Children shall not play with the appliance.
- This appliance can be used by children aged from 8 years and above and persons with reduced physical, sensory or mental capabilities or lack of experience and knowledge if they have been given supervision or instruction concerning use of the appliance in a safe way and understand.
- Cleaning and user maintenance shall not be made by children unless they are older than 8 and supervised.
- Keep the appliance and its cord out of reach of children less than 8 years.
V. ⚠️ IMPORTANT WARNING
- To avoid a circuit overload when using this product, do not operate another high-wattage product on the same electrical circuit.
- A short power supply cord is provided with this product. An extension cord is not recommended for use with this product, but if one must be used:
- The marked electrical rating of the cord must be at least as great as that of the product.
- Arrange the extension cord so that it does not hang where it can be tripped over or pulled unintentionally
VI. ⚠️! Instructions to follow while using the device
- Not for exterior use only for interior.
- The appliance has to be unplugged after using and before cleaning or making any maintenance operation.
- The filling cap must not be opened during use.
- Do not allow children to use it. Pay attention when it is used near children, pets and plants.
- Never spray in the direction of people, animal or equipment containing electrical components, such as the interior part of ovens.
- Do not put any object into openings and do not use it in case of any plugged openings or nozzles.
- Keep Your work area well lighted
- Keep the appliance always in horizontal position while working and never turn it more than 45 degrees respect to the vertical axis. Never direct steam towards people, animals, plants and equipment with electrical components.
- Do not dip the steam cleaner into water or other liquid. Always unplug the power cord from the electrical socket when the tank.
- Never put descaling, aromatic or detergent
products into the tank, as this may damage it or make it unsafe for use.
- Metal tips and nozzles will get hot during use. Do not touch their surfaces. Allow them to cool down before replacing them.
- The cover must be tightened while using the appliance.
- Do not use it in swimming pools containing water.
-
Before filling proceed as follows:
-
Unplug the power supply
- Release pressure by pressing on the pressure button
- Allow steamer to cool down for about 3 minutes.
- Relieve any residual pressure by acting again on the pressure button
- Unscrew slowly the safety cap and wait for 5 seconds before removing it.
• CAUTION:
Do not overfill the tank. It can create unnecessary steam pressure and steam production.
• DANGER OF SCALDING!
- When the tank is under pressure, push the steam button to release pressure before opening.
CLEANING AND MAINTENANCE
Kindly refer to the cleaning and maintenance section for details on how to clean this appliance.
4. TECHNICAL SPECIFICATIONS
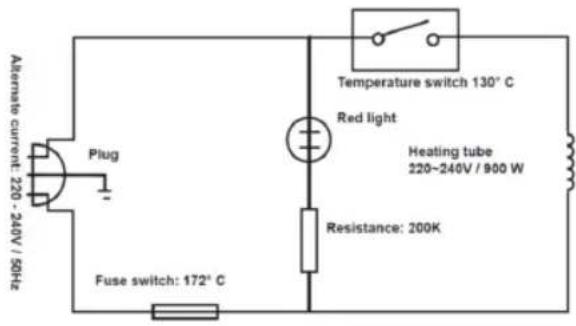
Rated voltage/Frequency: 220 - 240V \~ 50-60Hz
Alternate current with cable connected with ground.
Rated electric current more than 10A
Tank capacity: 450 ml (max)
Rated water capacity: 150-270 ml
Rated power: 900W
Steam pressure: 0.2-3.5 bar
Steam flow: 28g/min
Temperature: 130°C
Fuse switch: 172°C
Net weight: 2,4 Kg
Package dimension: 29.5 x 19 x 24.5 cm
WIRING DIAGRAM:
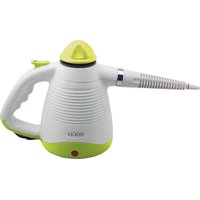
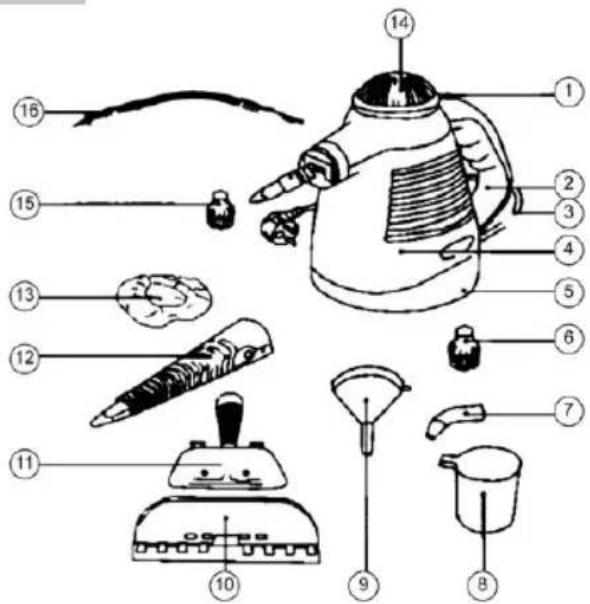
5. PARTS DESCRIPTION AND ACCESSORIES
- Steam Button
- Handle
- Cable/plug
- Tank
- Electricity indicator light
- Round brush nozzle
- Bend nozzle
- Measuring cup
- Funnel
- Flat sprayer
- Brush sprayer
- Long nozzle
- Cotton towel
- Safety cover
- Round copper brush sprayer
- Flexible long hose
6. INSTRUCTIONS FOR USE
SETTING
- Open the packaging
- Read carefully the instructions manual
- Check all components of the machine
FUNCTIONS
STERILIZATION AND ANTI BACTERIA FUNCTION
- Insert the long sprayer and aim it at the area to be cleaned; push the steam button to remove bacteria.
CLOTHES CLEANING FUNCTION
- Insert the brush sprayer, fix the towel, aim it at the clothes; push on the steam button and move the steam cleaner to remove dust from clothes.
Window cleaning function
- Insert the brush and the flat sprayer, aim at the window, press the steam button, move the cleaner to clean the window.
Floor cleaning function
- Insert the long brush sprayer and the bent or round brush sprayer, aim at the floor, press the steam button to remove dirty on the floor
WORKING OPERATIONS
- Open the package, check all parts and make sure no component is missing in the package.
- Please, read the manual carefully before using the appliance. This item is only for inside use.
- Put the steam cleaner on the table. Push down the safety cap (fig.1) and turn it counter-clockwise (fig.2) in order to take it off. Insert the funnel.
- Use the measuring cup to fill the tank (150ml-270ml = about one and a half cup), put back the safety cover and screw it firmly.
- Check the electricity and the plug and make sure they match the requirements as described in the manual, then insert the plug.
- Wait for the water to heat up for about 4 minutes. Press the steam button slightly to see if the steam start to release.
- Release the button, insert the accessories according to the different use.
- Press the steam button again and start cleaning.
push

natural_image
Close-up of a hand holding a cylindrical mechanical component with a tool, no visible text or symbolsFig. 1
turn it
counter clockwise
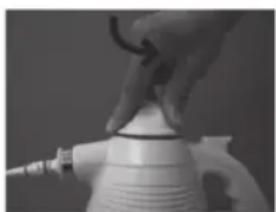
natural_image
Close-up of a hand using a spray gun to press a white ceramic object (no visible text or symbols)Fig. 2
ACCESSORIES CONNECTION
Brush sprayer connection
- Insert the brush sprayer to the body, follow the arrow to screw the sprayer in a clockwise way. To remove the sprayer act on the opposite way.
Proceed as indicated in Fig. 3 and Fig. 4 in order to assemble the extension (12) to all available accessories
Fig. 3
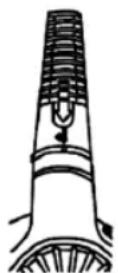
Fig. 4
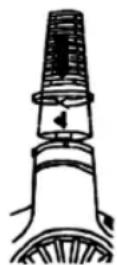
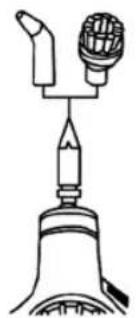
Round or bent sprayer connection
Insert the round or bent sprayer to the short sprayer directly. Follow the instructions as showed in Fig. 5 Adjust the direction of the sprayer.
natural_image
Diagram of a bell with a metal object inserted into the neck (no text or symbols)Fig. 5
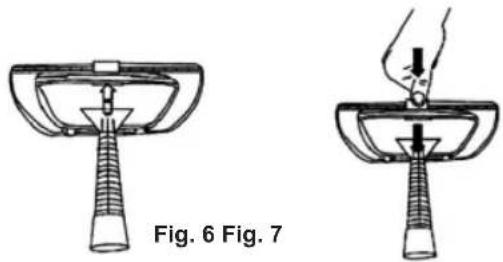
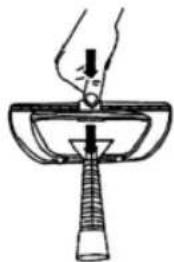
FLAT SPRAYER CONNECTION
Insert the brush sprayer to the short sprayer. Follow the instructions as showed in fig. 6 and fig. 7 about the brush sprayer
natural_image
Two diagrams showing a mechanical device with a handle and base, labeled Fig. 6 and Fig. 7 (no text or symbols on the devices themselves)Same pattern can be followed to attach rest of the accessories.
WATER ADDING
- Remove the plug; cut off electricity
- Press the steam button to release the pressure until no steam comes out
- Open slightly the safety cover, release the remaining steam, place the steamer in a cool place for 5 minutes, open the safety cap completely.
- Use the funnel and measuring cup to add some cool or warm water.
- Put back the safety cover and screw it tight.
AFTER USE
- Remove the plug, cut off the electricity
- Press the steam button to release the remaining steam.
- Open slightly the safety cover, release the remaining steam, place the steamer in a cool place for 5 minutes, open the safety cap completely.
- Empty the tank from the remaining water, clean the surface of the steam cleaner.
- Put back the safety cover and screw it tight.
NOTE
- The switch light will be ON when the power is ON.
- Please, screw the safety cap firmly
7. CLEANING AND MAINTENANCE
SURFACE CLEANING
Switch off the electricity and unplug from the outlet before cleaning.
Wipe the cleaner with a soft, damp cloth with mild detergent, then clean it with a dry cloth.
Do not use other chemical products and keep the surface dry
TANK CLEANING
Switch off the electricity and unplug from the outlet before cleaning. Clean the tank every 3 months. Remove the safety cover. Fill the tank up to the maximum level with clear water; risen the inside of the tank and pour the water out. Repeat this operation 2-3 times. The tank will be cleaned.
NOTE
Do not add any other chemical liquid to the water forcleaning.
PARTS CLEANING
Wash all parts after using, put them into the box and keep it cool and dry.
1. IMPORTANT:
6. MODE D'EMPLOI
OPÉRATIONS PRÉLIMINAIRES
natural_image
Close-up of a hand holding a cylindrical object with a downward arrow indicating motion (no visible text or symbols)Fig. 1
natural_image
Close-up of a hand holding a white spray bottle with a coiled tube (no visible text or symbols)Fig. 2
MONTAGE DE LA GRANDE BROSSE
natural_image
Diagram of a bell with a textured object attached to the top, no text or symbols presentFig. 5
MONTAGE DE LA BUSE PLATE
natural_image
Two diagrams showing a mechanical device with a handle and base, labeled Fig. 6 and Fig. 7 (no text or symbols on the devices themselves)6. INSTRUÇÕES DE USO
OPERAÇÕES PRELIMINARES DE USAR
natural_image
Close-up of a hand holding a cylindrical mechanical component with concentric ridges and a pointed tip (no visible text or symbols)Fig. 1
natural_image
Close-up of a hand using a spray gun to press a white spray bottle (no text or symbols visible)Fig. 2
MONTAGEM DOS ACESSÓRIOS
CHUVEIRO ESCOVA DE MONTAGEM
natural_image
Diagram of a bell with a textured object above it, no text or symbols presentFig. 5
natural_image
Two diagrams showing a mechanical device with a handle and base, labeled Fig. 6 and Fig. 7 (no text or symbols on the devices themselves)natural_image
Close-up of a hand holding a cylindrical mechanical component with a tool, no visible text or symbolsFig. 1
natural_image
Close-up of a hand holding a white kettle with a hose, no visible text or symbolsFig. 2
ZUBEHÖR ANSCHLUSS
natural_image
Diagram of a bell with a textured object above it, no text or symbols presentFig. 5
natural_image
Two technical diagrams showing a mechanical device with a handle and base, labeled Fig. 6 and Fig. 7 (no text or symbols on the devices themselves)6. ISTRUZIONI PER L'USO
IMPOSTAZIONE
natural_image
Close-up of a hand holding a cylindrical mechanical component with a downward arrow indicating motion (no visible text or symbols)Fig. 1
natural_image
Close-up of a hand using a spray gun to press down a white spray bottle (no text or symbols visible)Fig. 2
natural_image
Line drawing of a bell with a textured object above it (no text or symbols)Fig. 5
natural_image
Technical line drawing of a mechanical device with a handle and central component (no text or symbols)Fig. 6 Fig. 7
natural_image
Line drawing of a hand using a tool to lift a cup (no text or symbols)DECLARATION OF CONFORMITY
This device complies with EU Low Voltage Directive 2014/35/EC.
Electromagnetic Compatibility Directive 2014/30/EU. Directive 2015/863/EU on the restriction of the use of certain hazardous substances in electrical.
Directive 2009/125/EC on the eco-design requirements applicable to energy-related products.


This symbol on the product or on the packaging indicates that this product can't be disposed as normal rubbish or household waste. All the electrical, electronic equipment's and battery-operated units must recycle in proper manner and according to the local municipal laws. You can recycle them by taking them to government authorized disposal centres or specialized bins which you can find in any nearby big super markets, electronics or electro domestics products stores or malls who have these types of facilities available.
Designed by: SOGO based on European quality standards
Imported by: Sanysan Appliances S.L, NIF: B98753056, C/ Barcas 2, 2, 46002 Valencia, Spain
Product manufactured in CHINA. After-sales service: www.sogosat.com sogosat@sogosat.com / 0034 902 222 161