
Conga Windroid 1490 TwerkingSpray Connected - Windshield wiper CECOTEC - Free user manual and instructions
Find the device manual for free Conga Windroid 1490 TwerkingSpray Connected CECOTEC in PDF.

User questions about Conga Windroid 1490 TwerkingSpray Connected CECOTEC
0 question about this device. Answer the ones you know or ask your own.
Ask a new question about this device
Download the instructions for your Windshield wiper in PDF format for free! Find your manual Conga Windroid 1490 TwerkingSpray Connected - CECOTEC and take your electronic device back in hand. On this page are published all the documents necessary for the use of your device. Conga Windroid 1490 TwerkingSpray Connected by CECOTEC.
USER MANUAL Conga Windroid 1490 TwerkingSpray Connected CECOTEC
Window cleaning robot with dual spraying and twerking function
natural_image
Exterior view of a black and white electronic device with visible branding (no text or symbols on the device itself)cecòtec
Safety instructions 9
-
Parts and components 53
-
Before use 54
-
Operation 54
-
Mobile App 56
-
Cleaning instructions 57
-
Cleaning and maintenance 57
-
Troubleshooting 58
-
Technical specifications 59
-
Disposal of old electrical
and electronic appliances 59
-
Technical support and warranty 59
-
Copyright 60
-
Simplified Declaration of Conformity 60
SOMMAIRE
Read these instructions thoroughly before using the appliance. Keep this instruction manual for future reference or new users.
- All safety instructions must be closely followed when using the appliance.
- This appliance can be used by people with reduced physical, sensory, or mental capabilities or lack of experience and knowledge if they have been given supervision or instruction concerning the use of the appliance in a safe way and understand the hazards involved. Children must not play with the appliance.
- Supervise children to make sure they do not play with the appliance. Close supervision is necessary if the appliance is used near children.
- Take care that liquid is not directed towards equipment containing electrical components.
- The appliance must be unplugged from the mains after use and before any user maintenance is carried out on it.
- The appliance should not be left unattended while connected to a power supply.
- The filling opening must stay close during use.
- The appliance should not be used if it has fallen, if there are any visible signs of damage, or if it leaks.
- Keep the appliance out of the reach of children when live.
- Make sure that the mains voltage matches the voltage stated on the appliance marking and that the wall outlet is earthed.
- This appliance is designed for domestic use only and is not intended for bars, restaurants, farmhouses, hotels, motels, and offices.
- Check the power cable regularly for visible damage. If the cable is damaged, it must be repaired by the official Cecotec
Technical Support Service to avoid any type of danger.
- The appliance can only be assembled, disassembled, and repaired by qualified personnel.
- Do not touch the cord, power supply, or charger with wet hands.
- Keep the appliance away from clothing, curtains, and similar materials. Keep hair, fingers, and other body parts away from the appliance openings.
- Do not sit on or place sharp or heavy objects on top of the appliance or its cord.
- Do not use the appliance near heat sources, flammable substances, wet surfaces on which it may fall or where water may be spilled or allow it to come into contact with water or other liquids.
- The appliance can only be used with the battery and charger provided. The use of other components or accessories could cause risk of fire, electric shock, or product damage.
- Do not expose the appliance to excessive moisture or rain and keep it away from liquids.
- Do not expose the appliance to direct sunlight, strong light, or strong magnetic fields.
- Ensure enough ventilation around the adapter when using the appliance. Do not cover the power adapter with objects that could reduce cooling.
- To avoid risks, do not disassemble, short contact, incinerate, or heat the battery above 60 °C.
- Make sure the appliance is unplugged from the mains and switched off after use and before cleaning or maintenance. To disconnect it, do not pull from the power cord. Instead, pull on the adapter.
-
Do not twist, bend, pull, or damage the power cable. Do not place any heavy or sharpened objects on the cord, this could cause a fire or electrical shock.
-
The appliance should not be left unattended while plugged to a power supply.
- Do not use the product on cracked glass. The reflective glass or coating may get slightly scratched due to soiling of the glass when using the appliance.
- It is not suggested to use it on glasses thicker than 3 mm.
- PLEASE NOTE: do not operate the appliance without securing it to a sturdy, solid surface in your home with the safety rope. After and before every use, you must check the safety rope is not damaged. Make sure that it is securely fastened and at a suitable height to break the fall of the appliance if needed.
Instructions on cells and batteries
- WARNING: to recharge the battery, only use the power supply unit provided with the appliance, reference BZ065-240300-E2
- The appliance has batteries that cannot be replaced.
- Non-rechargeable batteries must not be recharged.
- Do not disassemble, open, or break the secondary battery.
- Do not expose the battery to heat or fire. Avoid storage in direct sunlight.
- Do not subject the battery to mechanical shock.
- Both batteries and cells can leak under extreme conditions. In the event of a battery leak, keep your skin and eyes away from the liquid. If the liquid gets into contact with skin, wash immediately with soap and water. If the liquid gets into the eyes, wash them immediately with clean water for a minimum of 10 minutes and seek medical attention. Wear gloves to handle the battery and dispose of it immediately in accordance with local regulations.
-
Do not use any charger other than the one supplied specifically for this appliance.
-
In case of battery ingestion, please seek medical attention immediately.
- Secondary cells and batteries must be charged before use. Always use the correct charger and refer to the manufacturer's instructions or equipment manual for proper charging instructions.
- Do not leave the battery on prolonged charge when not in use.
- After long periods of storage, it may be necessary to charge and discharge the battery several times to obtain maximum performance.
- Keep the original instruction manual for future reference.
- Use the battery only for its intended purpose.
INSTRUCTIONS DE SÉCURITÉ
https://cecotec.es/es/information/declaration-of-conformity
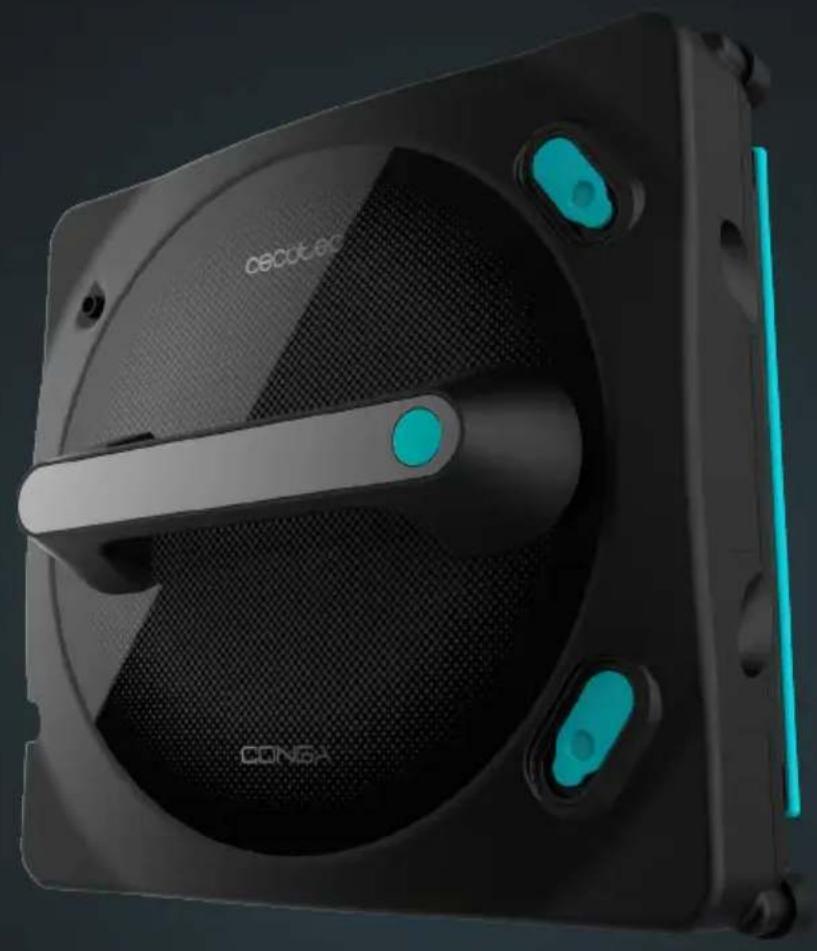
1. PARTS AND COMPONENTS
Fig. 1
- Water tank
- Water tank
- Mop
- Wheels
- Detection sensors
- Vacuuming motor
Remote control
| Button Function | |
| Manual spraying button. Each time you press it, the robot will spray water. | |
| Automatic spraying mode activation button. | |
| Automatic spraying mode cleactivation button. | |
| Cleaning button in upward direction. Press to make the robot move up to the top of the window. When it reaches the highest point, it will stop. | |
| Cleaning button in downward direction. Press to make the robot move down to the bottom of the window. When it reaches the lowest point. It will stop. | |
| Cleaning button towards the left side. Press to make the robot move to the left side of the window. When it reaches the end of that part, it will stop. | |
| Cleaning button towards the right side. Press to make the robot move to the right side of the window. When it reaches the end of that part, it will stop. | |
| Start/pause button. By default, the robot starts in Z+N mode. | |
| Z cleaning mode. If you press this button, the robot will move in a Z-shape. | |
| N cleaning mode. If you press this button, the robot will move in a N-shape. | |
ENGLISHENGLISH
| Z/N cleaning mode. If you press this button, the robot will first move from top to bottom drawing a Z, and then move from left to right drawing an N. | |
| Wheels cleaning button. Before pressing this button, turn off the robot and place it facing up in a horizontal position. When pressed, the wheels will start to rotate. If you press it again, the wheels will stop. |
NOTE:
The graphics in this manual are schematic representations and may not exactly match the device.
2. BEFORE USE
- This appliance is packaged in a way as to protect it during transport. Take the appliance out of its box and remove all packaging materials. You can keep the original box and other packaging elements in a safe place to prevent damage to the device if you need to transport it in the future. In case the original packaging is disposed of, make sure all packaging materials are recycled accordingly.
- Make sure all parts and components are included and in good conditions. If there is any piece missing or in bad conditions, contact the official Cecotec Technical Support Service immediately.
Box content
- Robot
- Adapter
- Power cable
- Extension lead
- Remote control
- Filling bottle
- Microfibre mop
- Safety rope
- Instruction manual
3. OPERATION
The window cleaning robot must be connected to a mains socket at all times when in operation, otherwise it will activate the safety mode and start beeping, indicating that the power cable is not properly connected.
Connection
Connect the power cable to the adapter and the power cable to the mains.
Positioning the rope
- Make sure the safety rope's knot is not loose.
- Secure the safety rope before using the window cleaning robot, ensuring it is tight. Secure the other end of the rope to fix and stable objects at home to prevent risks. Make sure the rope height is appropriate to prevent risks in case of accidental dropping.
Positioning the mop
- Position the mop correctly on the window cleaning robot's bottom part's Velcro.
- Make sure the mop is correctly positioned, without it covering the detection sensors and wheels.
Filling up the water tanks
- Lift the tanks' silicone tabs located on the top of the window cleaning robot.
- Fill the water tanks with water using the filling bottle. Please do not use any other liquid, as it may affect the correct operation of the robot.
On/Off
- Press and hold the power button to turn the window cleaning robot on and off.
- While in operation, press the power button to pause or start cleaning. The window cleaning robot will clean in Z+N mode by default.
Charging the battery
The WinDroid battery has a safety system which, in the event of a power failure, has a backup time of up to 30 minutes. The backup time will depend on the current charge when the window cleaning robot stops receiving electrical power or on the previous work.
Placing the Conga WinDroid robot on the glass/window
- Hold down the power button for a few seconds and make sure the inner fan is on.
- Place the window cleaning robot on the glass or window.
- Make sure the window cleaning robot remains firmly attached to the glass before releasing it.
How to remove the Conga WinDroid robot from the glass/window
When cleaning is finished, hold the robot with one hand and press the power button with the other to switch off the window cleaning robot. Once switched off, detach it from the glass.
UPS (Uninterrupted Power System) function
This safety system will be effective when the electric circuit fails. It provides a runtime up
ENGLISHENGLISH
to 30 min depending on the charge level.
- The window-cleaning robot will simultaneously stop and beep as the red light indicator flashes.
- Remove the window cleaning robot from the glass as soon as possible. You can pull carefully from the safety rope to detach it from the glass in case you can't reach it with your hand.
Start cleaning
- Press the power button on the window-cleaning robot or the "Start cleaning" option on the remote control or app. The window cleaning robot automatically chooses cleaning path "Z+N" with the water spray activated.
- You can choose between 'N', "Z", or 'Z+N' modes on the remote control or in the app.
Dry mode
- The window cleaning robot can operate in every mode without activating the spray.
- Note: The water spray will be activated by default.
Spraying mode
- The water spray will be activated by default. If you deactivate it and want to activate it again, press the Automatic spraying mode activation button on the remote control or app. The window cleaning robot will automatically spray in the direction it's facing; if it moves to the right, it will spray to the right; if it moves to the left, it will spray to the left.
- If you wish to deactivate the water spray option, press the Automatic spraying mode deactivation button.
- If you set the window cleaning robot to Manual movement, the spraying process will be the same.
- If you wish to spray manually, press the Manual spraying button.
Manual mode operation
- To manually direct the window cleaning robot, press and hold the arrow pointing the direction you want the window cleaning robot to take, either from the remote control or the app.
4. MOBILE APP
By scanning the following QR code you will be able to access the app download option and an instruction manual explaining how to pair your appliance:
NOTE:
Please note that the window cleaning robot can only be paired to one

device. Press the start/pause button three times quickly to unpair it to the previous device if you wish to pair it to another device.
5. CLEANING INSTRUCTIONS
Step 1. Dry cleaning
- It is recommended to use the Dry mode for the first use. To do so, deactivate the spraying. If the surface to be cleaned has too much sand, remove the sand previously.
- If you use the appliance in sunny days or with low humidity, the dry mode will get better results.
Step 2. Spraying mode
- Select the desired cleaning mode on the remote control or app. Water spraying is activated by default.
- For best results, it is recommended that you first wet the mop with water or window cleaning products and make several passes over the glass or use the Z+N mode. Once the mop has been dampened, clean the sensors, the wheels, and the air outlet with a soft dry cloth to ensure perfect operation of the window cleaning robot.
- Note: Please note that if the mop of your window cleaning robot is too wet, the result will not be as desired. It is recommended to moisten the mop slightly.
- If the surface to be cleaned has a lot of sand, it could form mud when spraying. Optimal cleaning results would not be obtained—prior dry cleaning is therefore recommended.
6. CLEANING AND MAINTENANCE
- Use a soft, dry cloth to clean the outer surface of the appliance, as well as the sensors, wheels, and air outlet.
- The cleaning mops are washable and reusable.
- For wheel cleaning, press the Wheels cleaning button. The wheels will start to rotate to facilitate cleaning with a soft dry cloth, be careful when cleaning as this is a moving part.
- Do not immerse the appliance in water or place it under the tap. Use the filling bottle provided with the window cleaning robot.
- Do not expose the window cleaning robot to direct sunlight or high temperatures.
Note: if the robot is stuck to the window and slips, it means that the wheels have accumulated too much dust. To solve this problem, follow the instructions in the "Cleaning and maintenance" section.
ENGLISHENGLISH
- TROUBLESHOOTING
| Problem Possible cause and solution | |
| The window cleaning robot slips The mop is too wet, or the wheels are damp. Replace the mop and dry the wheels with a soft, dry cloth. | |
| After cleaning, the window cleaning robot leaves marks on the surface of the glass | The mop is too dirty or too wet, replace it. |
| When the window cleaning robot is operating and approaches the edge of the frameless surface, it beeps twice | The sensor of the window cleaning robot detects the edge of frameless surfaces. |
| The window cleaning robot has stopped working due to a power failure and is now out of arm's reach | Carefully pull the safety cord and hold the window cleaning robot by hand. |
| The window cleaning robot emits a strange noise while on glass | The surface is too dry. Activate the water spraying to wet the surface and wipe the sensors and wheels with a clean dry cloth. |
| The red indicator light flashes and the window cleaning robot beeps 1 time per second | Power adapter error. Make sure the device is properly connected. |
| The window-cleaning robot does not spray water or glass cleaner | Check that the Water spraying function is activated and that the tanks are full. Clean the spray nozzles with a soft, clean cloth. |
| Indicator light status | |
| Fixed green indicator light | The robot is switched on and awaiting instructions. |
| Indicator light is off | The robot is in normal operation. |
| Red indicator light flashes There has been a power cut in the supply of power to the robot (short beeps).The robot has detached from the glass (long beeps). | |
| Red indicator light flashes No beeping, mechanical failure. Contact the official Cecotec Technical Support Service. | |
| Purple indicator light flashes The robot has problems moving around.Check that the sensors are clean.Make sure the glass is not too wet or dirty. | |
8. TECHNICAL SPECIFICATIONS
Product: Conga Windroid 1490 TwerkingSpray Connected
Product reference: 08060
72 W, 100–240 V\~, 50/60 Hz
Li-Ion battery: 14.8 V DC, 500 mAh
Charger:
Model: BZ065-240300-E2
Input: 100-240 V\~, 50/60 Hz
Output: 24 V DC 3 A
Charging time: approximately 2 hours.
Autonomy up to 30 minutes (for mains failure)
Operating temperature: 0 °C\~75 °C
Remote control operation with 2 AAA batteries.
Operation frequency: 2402 MHz - 2480 MHz
Maximum Transmission Power: 17.5 dBm
Technical specifications may change without prior notification to improve product quality. Made in China | Designed in Spain
9. DISPOSAL OF OLD ELECTRICAL AND ELECTRONIC APPLIANCES

This symbol indicates that, according to the applicable regulations, the product and/or batteries must be disposed of separately from household waste. When this product reaches the end of its shelf life, you should dispose of the cells/batteries/accumulators and take them to a collection point designated by the local authorities.

Consumers must contact their local authorities or retailer for information concerning the correct disposal of old appliances and/or their batteries.
Compliance with the above guidelines will help protecting the environment.
10. TECHNICAL SUPPORT AND WARRANTY
Cecotec shall be liable to the end user or consumer for any lack of conformity that exists at the time of delivery of the product under the terms, conditions, and deadlines established by the applicable regulations.
It is recommended that repairs be carried out by qualified personnel.
If at any moment you detect any problem with your product or have any doubt, do not hesitate to contact the official Cecotec Technical Support Service at +34 963 210 728.
11. COPYRIGHT
The intellectual property rights over the texts in this manual belong to CECOTEC INNOVACIONES, S.L. All rights reserved. The contents of this publication may not, in whole or in part, be reproduced, stored in a retrieval system, transmitted, or distributed by any means (electronic, mechanical, photocopying, recording or similar) without the prior authorization of CECOTEC INNOVACIONES, S.L.
12. SIMPLIFIED DECLARATION OF CONFORMITY
Cecotec Innovaciones hereby declares this window cleaning robot, model 08060 Congo Windroid 1490 TwerkingSpray Connected, complies with the Directive 2014/53/EU on radio equipment.
The full text of the EU Declaration of Conformity can be found on the following website: https://cecotec.es/es/information/declaration-of-conformity
1. PIÈCES ET COMPOSANTS
Img. 1
https://cecotec.es/es/information/declaration-of-conformity
DEUTSCHDEUTSCH
1. TEILE UND KOMPONENTEN
Abb. 1
https://recotec.es/es/information/declaration-of-conformity
1. ONDERDELEN EN COMPONENTEN
Fig. 1
4. MOBIELE APPLICATIE
Fig./Img./Abb./Afb./Rys./Obr.1
www.cecotec.es

- SOMMAIRE
- Instructions on cells and batteries
- INSTRUCTIONS DE SÉCURITÉ
- PARTS AND COMPONENTS
- NOTE:
- BEFORE USE
- Box content
- OPERATION
- Connection
- Positioning the rope
- Positioning the mop
- Filling up the water tanks
- On/Off
- Charging the battery
- Placing the Conga WinDroid robot on the glass/window
- How to remove the Conga WinDroid robot from the glass/window
- UPS (Uninterrupted Power System) function
- ENGLISHENGLISH
- Start cleaning
- Dry mode
- Spraying mode
- Manual mode operation
- MOBILE APP
- CLEANING INSTRUCTIONS
- Step 1. Dry cleaning
- Step 2. Spraying mode
- CLEANING AND MAINTENANCE
- TECHNICAL SPECIFICATIONS
- DISPOSAL OF OLD ELECTRICAL AND ELECTRONIC APPLIANCES
- TECHNICAL SUPPORT AND WARRANTY
- COPYRIGHT
- SIMPLIFIED DECLARATION OF CONFORMITY
- PIÈCES ET COMPOSANTS
- DEUTSCHDEUTSCH
- TEILE UND KOMPONENTEN
- ONDERDELEN EN COMPONENTEN
- MOBIELE APPLICATIE
Brand : CECOTEC
Model : Conga Windroid 1490 TwerkingSpray Connected
Category : Windshield wiper