RIVER lahn - Audio Interface Palmer - Free user manual and instructions
Find the device manual for free RIVER lahn Palmer in PDF.


User questions about RIVER lahn Palmer
0 question about this device. Answer the ones you know or ask your own.
Ask a new question about this device
Download the instructions for your Audio Interface in PDF format for free! Find your manual RIVER lahn - Palmer and take your electronic device back in hand. On this page are published all the documents necessary for the use of your device. RIVER lahn by Palmer.
USER MANUAL RIVER lahn Palmer
be true to your sound
text_image
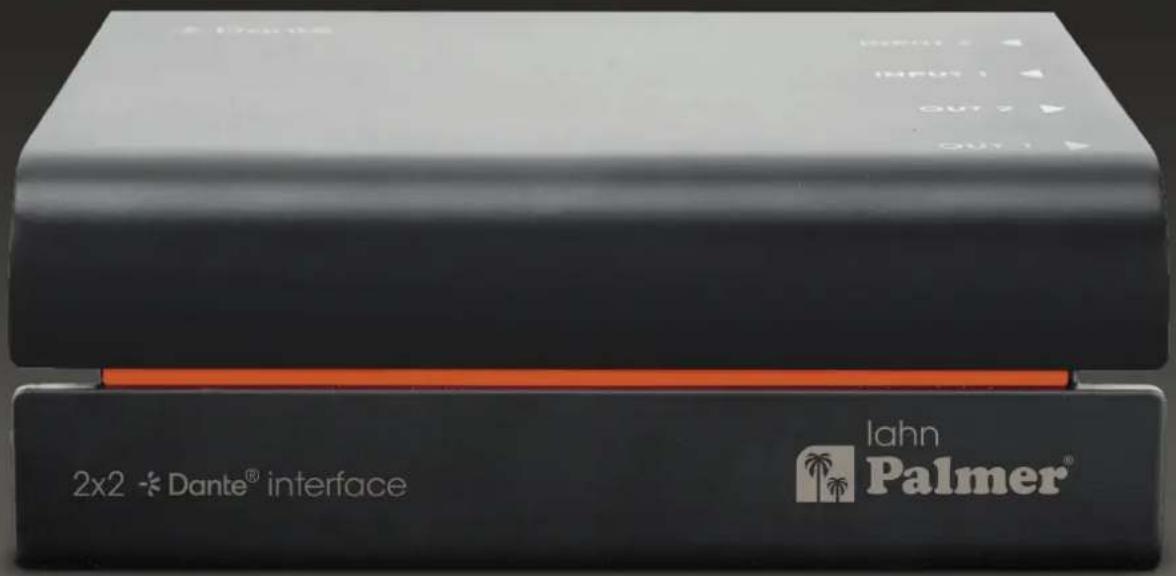
2x2 * Dante® interface Iahn Palmer®5
years
guarantee
2 × 2 I/O Dante® interface
lahn
| EN USER MANUAL | 3 |
| INFORMATION ON THIS USER MANUAL | 4 |
| INTENDED USE | 4 |
| EXPLANATIONS OF TERMS AND SYMBOLS | 4 |
| SAFETY INSTRUCTIONS | 5 |
| PACKAGING CONTENT | 8 |
| INTRODUCTION | 8 |
| CONNECTIONS AND OPERATING/DISPLAY ELEMENTS | 9 |
| CONNECTION EXAMPLES | 13 |
| DANTE® CONTROLLER 15 | |
| CARE, MAINTENANCE AND REPAIR | 16 |
| TECHNICAL DATA | 17 |
| DISPOSAL | 19 |
| MANUFACTURER'S DECLARATIONS | 19 |
Let your signals flow, naturally and powerfully like a river! The River Series embodies this aspiration down to the last detail - with high-precision circuitry designed by our award-winning engineers to ensure that your sound reaches its destination unadulterated: the heart of your listeners.
That's exactly what Palmer® stands for. We have been manufacturing audio tools for professional use on stage, in broadcasting and in the studio since 1980. Musicians and sound engineers around the world value our solutions developed in Germany for their unhindered signal flow and pure sound – as crystal clear and vibrant as water! So, what is more logical than naming the River Series models after German rivers?
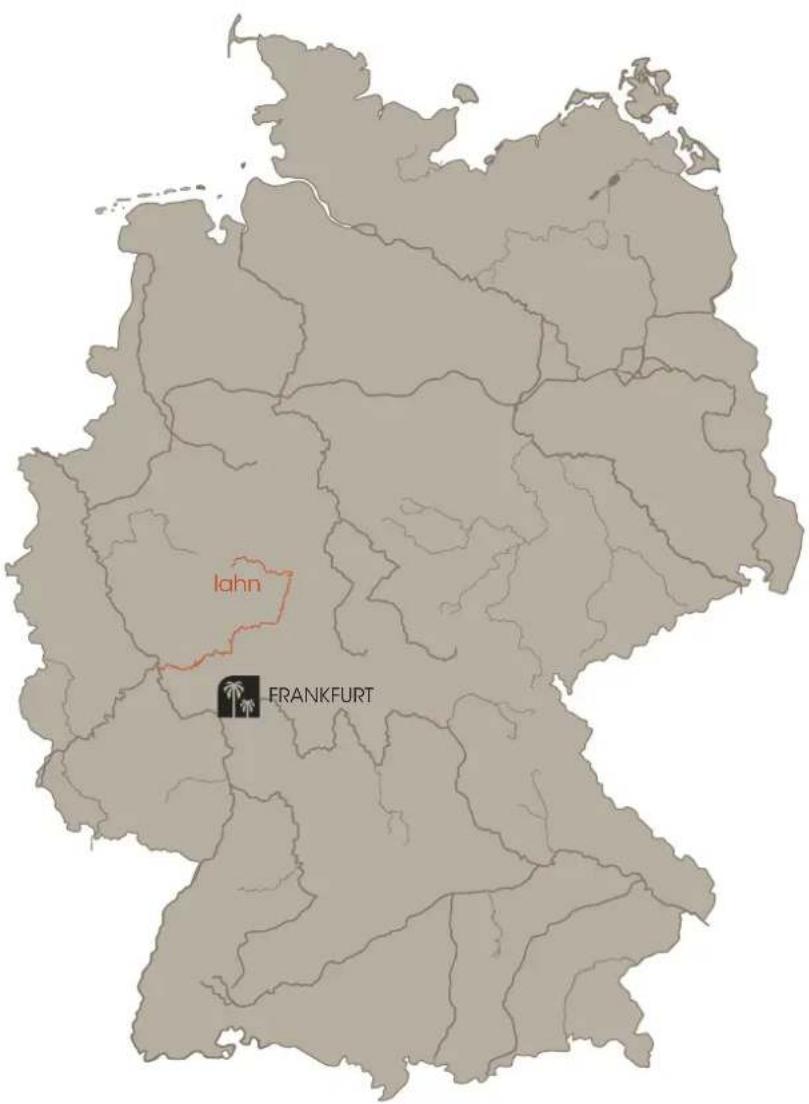
On the map of Germany you can see that the Lahn flows for 246 kilometres through North Rhine-Westphalia, Hesse and Rhineland-Palatinate.
Thank you for purchasing the lahn! We hope you enjoy this piece of German engineering. Be true to your sound!
Yours, the Palmer Team
lahn
2 × 2 I/O Dante® interface
INFORMATION ON THIS USER MANUAL
Carefully read the safety instructions and the entire manual before operating the device.
▶Observe the warnings on the device and in the user manual.
▶Always keep the user manual within reach.
If you sell or pass on the device, it is important that you also include this user manual, as it is an integral part of the product.
INTENDED USE
This product is a device for event technology, as well as for the studio, TV, and broadcasting!
The product has been developed for professional use in event technology, as well as in the studio, TV, and broadcasting.
Furthermore, this product is only intended for qualified users with specialist knowledge of event technology, as well as studio, TV, and broadcasting!
▶ Use of the product outside the specified technical data and operating conditions is considered improper use!
▶ Liability for damage and third-party damage to persons and property due to inappropriate use is excluded!
▶The product is not suitable for:
▶ Use by persons (including children) with limited physical, sensory, or mental abilities or lack of experience and knowledge.
Children (children must be instructed not to play with the device).
DEFINITIONS AND SYMBOL EXPLANATIONS
- DANGER: The word DANGER, possibly in combination with a symbol, indicates immediately hazardous situations or conditions risking life and limb.
- WARNING: The word WARNING, possibly in combination with a symbol, indicates potentially hazardous situations or conditions risking life and limb.
- CAUTION: The word CAUTION, possibly in combination with a symbol, indicates situations or conditions that may lead to injury.
- ATTENTION: The word ATTENTION, possibly in combination with a symbol, indicates situations or conditions that can lead to damage to property and/or the environment.

This symbol indicates hazards that can cause electric shock.

This symbol identifies hazardous areas or hazardous situations.

This symbol indicates hazards caused by hot surfaces.

This symbol indicates hazards due to high volume levels.

This symbol denotes a device that does not contain any user-serviceable parts.

This symbol indicates additional information on the operation of the product.

This symbol indicates a device that may only be used in dry rooms.
SAFETY INSTRUCTIONS

DANGER:
- Do not open the device, and do not make any modifications to it.
- If your device no longer functions properly, if liquids or objects get inside it, or if it has been damaged in any other way, switch it off immediately and disconnect it from the power supply. The device may be repaired only by authorised repair technicians.
- For devices of protection class 1, the protective conductor must be connected correctly. Never disconnect the protective conductor. Devices of protection class 2 do not have a protective conductor.
- Ensure that live cables are not kinked or otherwise mechanically damaged.
- Never bypass the device fuse.

WARNING:
- The device may not be operated if it shows obvious signs of damage.
- The device may only be installed in a voltage-free state.
- If the device's mains cable is damaged, the device may not be operated.
- Permanently attached mains cables may only be replaced by a qualified person.

ATTENTION:
- Do not operate the device if it has been exposed to large temperature fluctuations (for example, after transport). Moisture and condensation can damage the device. Switch on the device only when it has reached ambient temperature.
- Make sure that the voltage and frequency of the mains correspond to the values specified on the device. If the device has a voltage selector switch, do not turn the device on until it has been set correctly. Use only suitable mains cables.
- To disconnect the device completely from the power supply, unplug the mains cable or the mains adapter from the socket. It is not sufficient to press the on/off switch on the device. In addition, a connected amplifier must also be disconnected from the device!
- Make sure that the fuse used corresponds to the type printed on the device.
-
Make sure that appropriate measures have been taken against power surges (for example, lightning strike).
-
Observe the specified maximum output current on devices with a Power Out connection. Ensure that the total current consumption of all connected devices does not exceed the specified value.
- Replace plug-in mains cables with original cables only.

DANGER:
- Danger of suffocation/choking! Plastic bags and small parts must be kept out of reach of persons (including children) with reduced physical, sensory, or mental capabilities.
- Danger caused by falling device! Make sure that the device is securely installed and cannot fall down. Only use suitable stands or mounts (particularly for fixed installations). Ensure that accessories are properly installed and secured. Ensure that all applicable safety regulations are observed.

WARNING:
- Use the device in the prescribed manner only.
- Operate the device only with the accessories recommended and intended by the manufacturer.
- During installation, observe the safety regulations applicable in your country.
- After connecting the device, check all cable routes to avoid damage or accidents, for example, due to tripping hazards.
- Always observe the specified minimum distance to normally flammable materials! Unless explicitly stated, the minimum distance is 0.3 m.

CAUTION:
Moving components such as mounting brackets or other movable components may become jammed.

ATTENTION:
- Do not install or use the device in the vicinity of radiators, heat accumulators, furnaces, or other heat sources. Ensure that the device is always installed in such a way that it is sufficiently cooled and cannot overheat.
- Do not place any ignition sources such as burning candles near the device.
- Use the original packaging or packaging provided by the manufacturer for transport.
- Avoid shock or impact to the device.
- Observe the IP protection class as well as the ambient conditions such as temperature and humidity according to the specifications.
- Devices can be continuously further developed. In the event of deviating information on operating conditions, performance, or other device properties between the user manual and the device labelling, the information provided on the device always has priority.
- The device is not suitable for tropical climates and for operation at heights of 2,000 m above sea level.
- Unless explicitly stated, the device is not suitable for operation under marine conditions.

NOTE: For conversion or retrofit kits supplied by the manufacturer, the enclosed installation instructions must be observed.

CAUTION: HIGH-VOLUME AUDIO PRODUCTS!
This device is designed for professional use. The commercial operation of this device is subject to the applicable national regulations and guidelines for accident prevention.
Hearing damage due to high volume and continuous exposure: use of this product may generate high sound pressure levels (SPLs) that may cause hearing damage. Avoid exposure to high volumes.

ATTENTION: Connecting signal cables and operating switches (for example, switching phantom power on and off) can cause significant interference noise. Make sure that input channels (mixer, audio interface, effects device, and similar) are muted while making connections and operating switches. Otherwise, noise levels may cause damage.

WARNING: Unplug the mains adapter from the socket AND disconnect any amplifier that might be connected to the device to put the device in a completely voltage-free state.

ATTENTION: Make sure that the device is not covered while in operation and that the air can freely circulate, especially for the rack mounting!

NOTE: Strong magnetic fields can cause humming. For this reason, do not position the device near strong magnetic fields (for example, mains transformer).
PACKAGING CONTENT
Remove the product from the packaging and remove all packaging material.
Please check the completeness and integrity of the delivery and notify your distribution partner immediately after purchase if the delivery is not complete or if it is damaged.
The packaging content for the product includes:
▶1× lahn 2 × 2 I/O Dante® Interface
▶1× mains adapter
▶1x tour label
▶ 1x set of rubber feet
INTRODUCTION
The Palmer® RIVER lahn lets you integrate analogue audio devices into a Dante® network: the lahn is an end-of-network interface that can be used to feed two analogue microphone or line signals into a Dante® network. Thanks to the bidirectional functionality, Dante® signals can also be converted into high-quality analogue audio signals to feed them into mixers, amplifiers, or speakers.
With four-stage gain control and 48 V phantom power per channel, the RIVER Iahn offers precise control and flexibility for various application scenarios. The lockable XLR audio connectors and the Neutrik® etherCON® network socket ensure secure connections, while the simple configuration on the front and the user lock on the control panel ensure user-friendly handling.
Each channel is equipped with a signal display that shows you the status of your audio transmission at all times. In addition to the mains adapter included in the packaging content, PoE (Power over Ethernet) can also be used for the power supply, which offers additional flexibility with regard to installation. Developed in Germany, the RIVER lahn is compatible with Dante® Domain Manager and AES 67. The solid aluminium and steel housing guarantees durability and robustness, making it ideal for use in demanding environments.
Experience the seamless integration of analogue and digital audio technology with the Palmer® RIVER Iahn and benefit from first-class audio quality and ease of use.
FEATURES
▶Dante® interface with two inputs and two outputs
Feeding of two analogue microphone or line signals into Dante® networks
▶ Conversion of Dante® signals for mixers, amplifiers, speakers, and similar
▶Four-stage gain control and 48 V phantom power per channel
Lockable XLR audio connectors and etherCON® network socket from Neutrik®
▶Simple configuration on the front and user lock
▶Signal display for each channel
▶Compatible with Dante® Domain Manager and AES 67
▶Solid aluminium and steel housing
▶Engineered in Germany
text_image
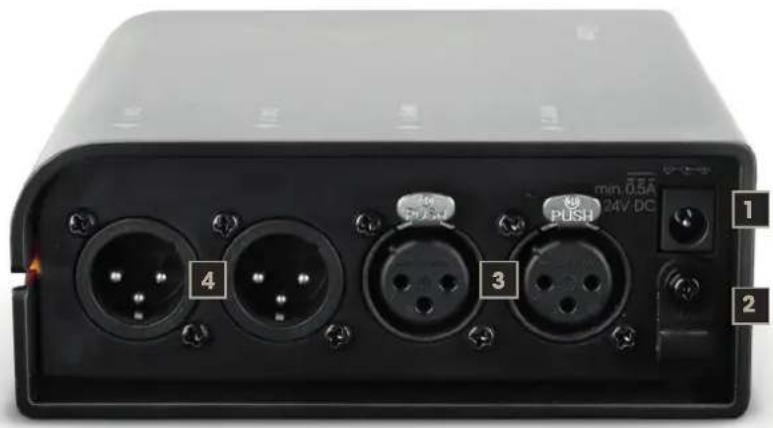
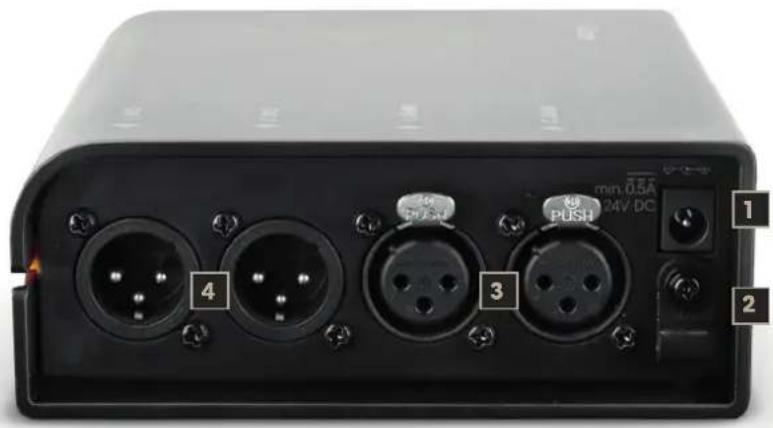
min 0.5A 4 3 PUSH PUSH 1 2CONNECTIONS AND OPERATING/DISPLAY ELEMENTS - FRONT
1. MAINS ADAPTER SOCKET
Connection to supply the device with power. To avoid damage to the device, only use the original mains adapter (mains adapter included in packaging content).
Alternative power supply via Ethernet connection: Ethernet switch with PoE (Power over Ethernet) or PoE injector (minimum requirement PoE+ IEEE 802.3at).
2. CABLE CLAMP
Secure the mains adapter cable to the cable clamp using a standard cable tie to protect the device socket from damage and to prevent the mains adapter plug from being pulled out unintentionally.
3. INPUT 1 + 2
Balanced audio inputs with female three-pin XLR connectors, suitable for both line and microphone levels. 48 V phantom power is selectable.
4. OUTPUT 1 + 2
Balanced audio output with male three-pin XLR connectors. If no audio signal is present at the OUTPUT 1 and 2 line outputs, these are automatically muted. If an audio signal is detected, the mute function is automatically deactivated.
text_image
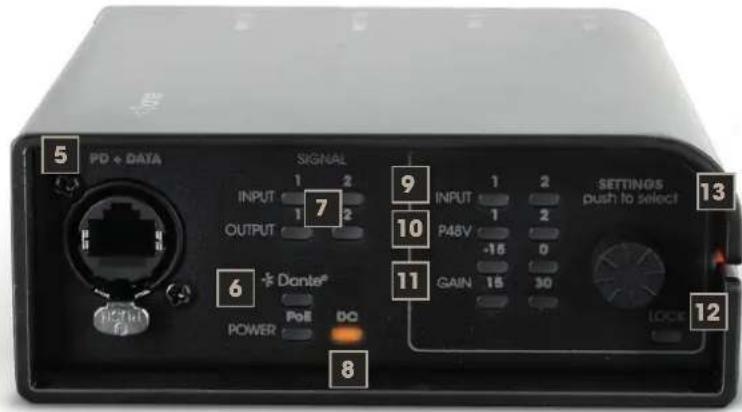
PD + DATA SIGNAL INPUT 1 2 OUTPUT 1 2 Dante® POWER PoE Do 9 INPUT 1 2 P48V -16 0 GAIN 15 30 SETTINGS push to select 13 12 11 8CONNECTIONS AND OPERATING/DISPLAY ELEMENTS - BACK
5. PD + DATA (Powered Device)
Dante® interface with etherCON socket for connecting the interface to a Dante® network (bidirectional 2 × 2). As an alternative to the power supply via an external mains adapter, the interface can be supplied with power via PoE (Power over Ethernet) (minimum requirement PoE+ IEEE 802.3at).
6. DANTE®
The orange-coloured Dante® LED indicator flashes during the search for a Dante® connection. After the connection has been established, the LED lights up permanently.
7. SIGNAL INPUT 1 + 2 / OUTPUT 1 + 2
Channel 1 and 2 LEDs for signal detection and clip display.
INPUT: Tricolour LEDs: as soon as an audio signal with a sufficient level is present at an input channel, the corresponding LED lights up green (-39 dB below clip). If the input level is higher, the corresponding LED lights up orange (-18 dB below clip). As soon as one of the LEDs lights up red, the corresponding input level operates at the distortion limit (-3 dB below clip). In this case, reduce the GAIN channel pre-amplification or reduce the level on the playback device to stop the LED from lighting up red.
OUTPUT: Bicolour LEDs: as soon as an audio signal with a sufficient level is present at an input channel, the corresponding LED lights up green (-48 dBFS signal). As soon as one of the LEDs lights up red, the corresponding input level operates at the distortion limit (-1 dBFS clip). Reduce the level on the playback device to stop the LED from lighting up red.
8. POWER POE / DC
The interface can be supplied with power either via PoE (Power over Ethernet) or via an external mains adapter (included in the packaging content). If both power sources are available, the power supply via the external mains adapter is prioritised.
As soon as the interface is supplied with power, the start-up process begins. During the start-up process, the corresponding LED indicator (PoE or DC) flashes, and the line outputs OUTPUT 1 and 2 are muted. After the start-up process is completed in a few seconds, the corresponding LED lights up permanently and the device is ready for operation.
9. INPUT 1 + 2
Orange-coloured LED indicators for the input channels INPUT 1 and 2. One of the LEDs 1 and 2 lights up when the corresponding channel is selected during the status request and flashes in edit mode.
10. P48V
The red LED for the status of the 48 V phantom power of the corresponding channel lights up when the status is requested when phantom power is switched on and flashes in edit mode (LED flashes in sync with the channel LED = phantom power on; LED flashes quickly = phantom power off).
11. GAIN -15 / 0 / 15 / 30
Orange-coloured LEDs for the status request and for editing the channel pre-amplification. One of the LEDs -15 to 30 lights up when the status is requested and flashes in edit mode. The values -15 and 0 are provided for the line level and the values 15 and 30 for microphone level.
12. LOCK
The edit mode can be locked to prevent unauthorised editing. Press the encoder for approximately 10 seconds to activate the lock. Ignore the fact that edit mode is activated after approximately 3 seconds. The LOCK LED now lights up permanently. The status of the input channels can now only be requested. To deactivate the lock, press the encoder again for approximately 10 seconds.
13. ROTARY- PUSH ENCODER SETTINGS (push to select)
The rotary-push encoder is used to carry out the status request and editing of the input channel settings.
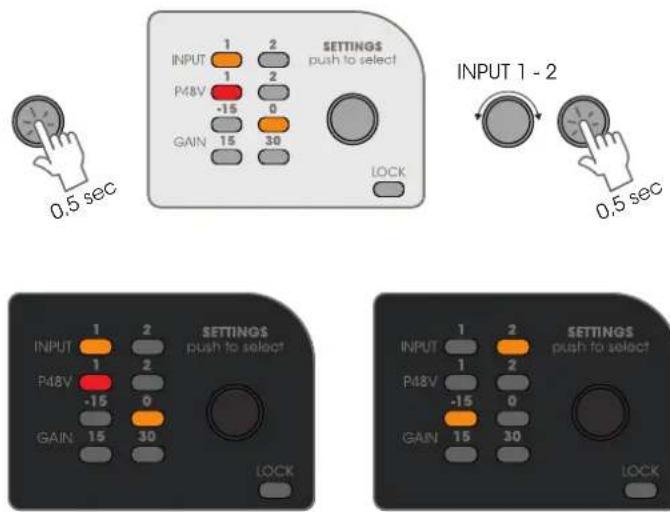
Status request: To access status information for each input channel, briefly press the encoder and turn the encoder to successively go through the channels. The LED for the selected channel INPUT 1 or 2 will light up in the process. The status of the phantom power P48V (LED lights up red = on/LED does not light up = off) and the value of the input gain GAIN (-15, 0, 15, 30, selected value lights up orange) are displayed.
text_image
INPUT 1 2 P48V 1 2 -15 0 GAIN 15 30 SETTINGS push to select INPUT 1 - 2 0,5 sec LOCK INPUT 1 2 P48V 1 2 -15 0 GAIN 15 30 SETTINGS push to select INPUT 1 2 P48V 1 2 -15 0 GAIN 15 30 SETTINGS push to select INPUT 1 2 P48V 1 2 -15 0 GAIN 15 30Example:
Channel 1 Phantom power activated, gain at 0 dB Channel 2 Phantom power deactivated, gain at -15 dB

NOTE
The LEDs are automatically deactivated if no input is made within approximately 40 seconds.
text_image
INPUT 1: P48V On INPUT 1: GAIN -15 - 30 INPUT 1: P48V Off OUTPUT 1: P48V Off OUTPUT 1: P48V On OUTPUT 1: GAIN -15 - 30 OUTPUT 1: P48V Off OUTPUT 1: GAIN -15 - 30 OUTPUT 1: P48V Off OUTPUT 1: GAIN -15 - 30 OUTPUT 1: P48V Off OUTPUT 1: GAIN -15 - 30 OUTPUT 1: P48V Off OUTPUT 1: GAIN -15 - 30 OUTPUT 1: P48V Off OUTPUT 3 sec OUTPUT 0.5 sec OUTPUT 0.5 sec OUTPUT 3 secEDIT MODE:
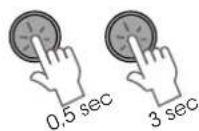
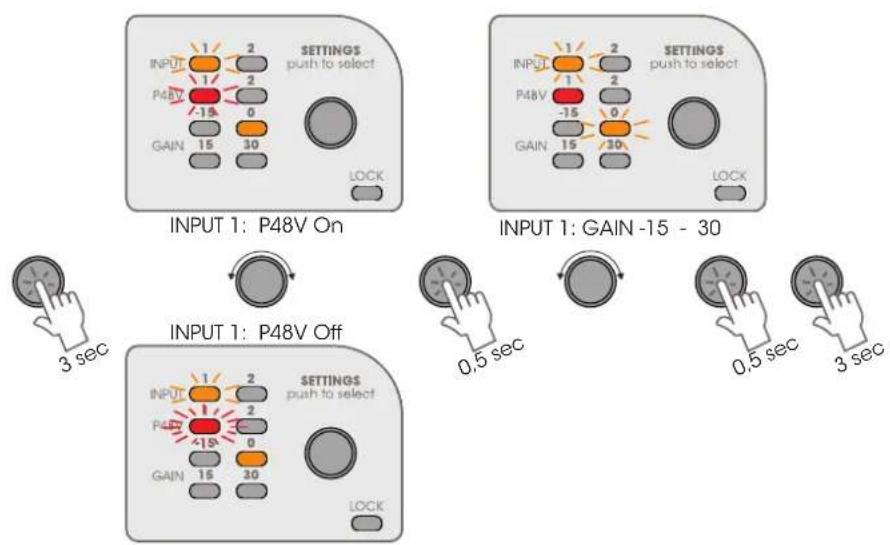
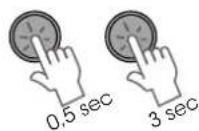
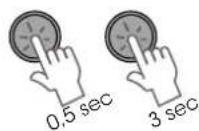
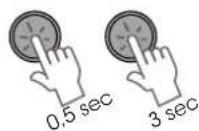
Briefly press the encoder and then turn the encoder to select the desired channel. Now press the encoder for approximately 3 seconds to switch to edit mode. The channel LED and the LED for the status of phantom power P48V start flashing. Now turn the encoder to switch the phantom power for this channel on or off (LED flashes in sync with the channel LED = phantom power on; LED flashes quickly = phantom power off). Briefly press the encoder to confirm your selection. The LED for the currently set value for GAIN starts flashing at the same time. If desired, you can turn the encoder to change this value. Briefly press the encoder to confirm your selection. The LED for the next channel will then flash. You can press the encoder again for approximately 3 seconds to set the status and value as required or exit edit mode. The settings are only accepted if you confirm them by pressing for 3 seconds. If you wait 40 seconds, the device switches to the last settings.
CONNECTION EXAMPLES
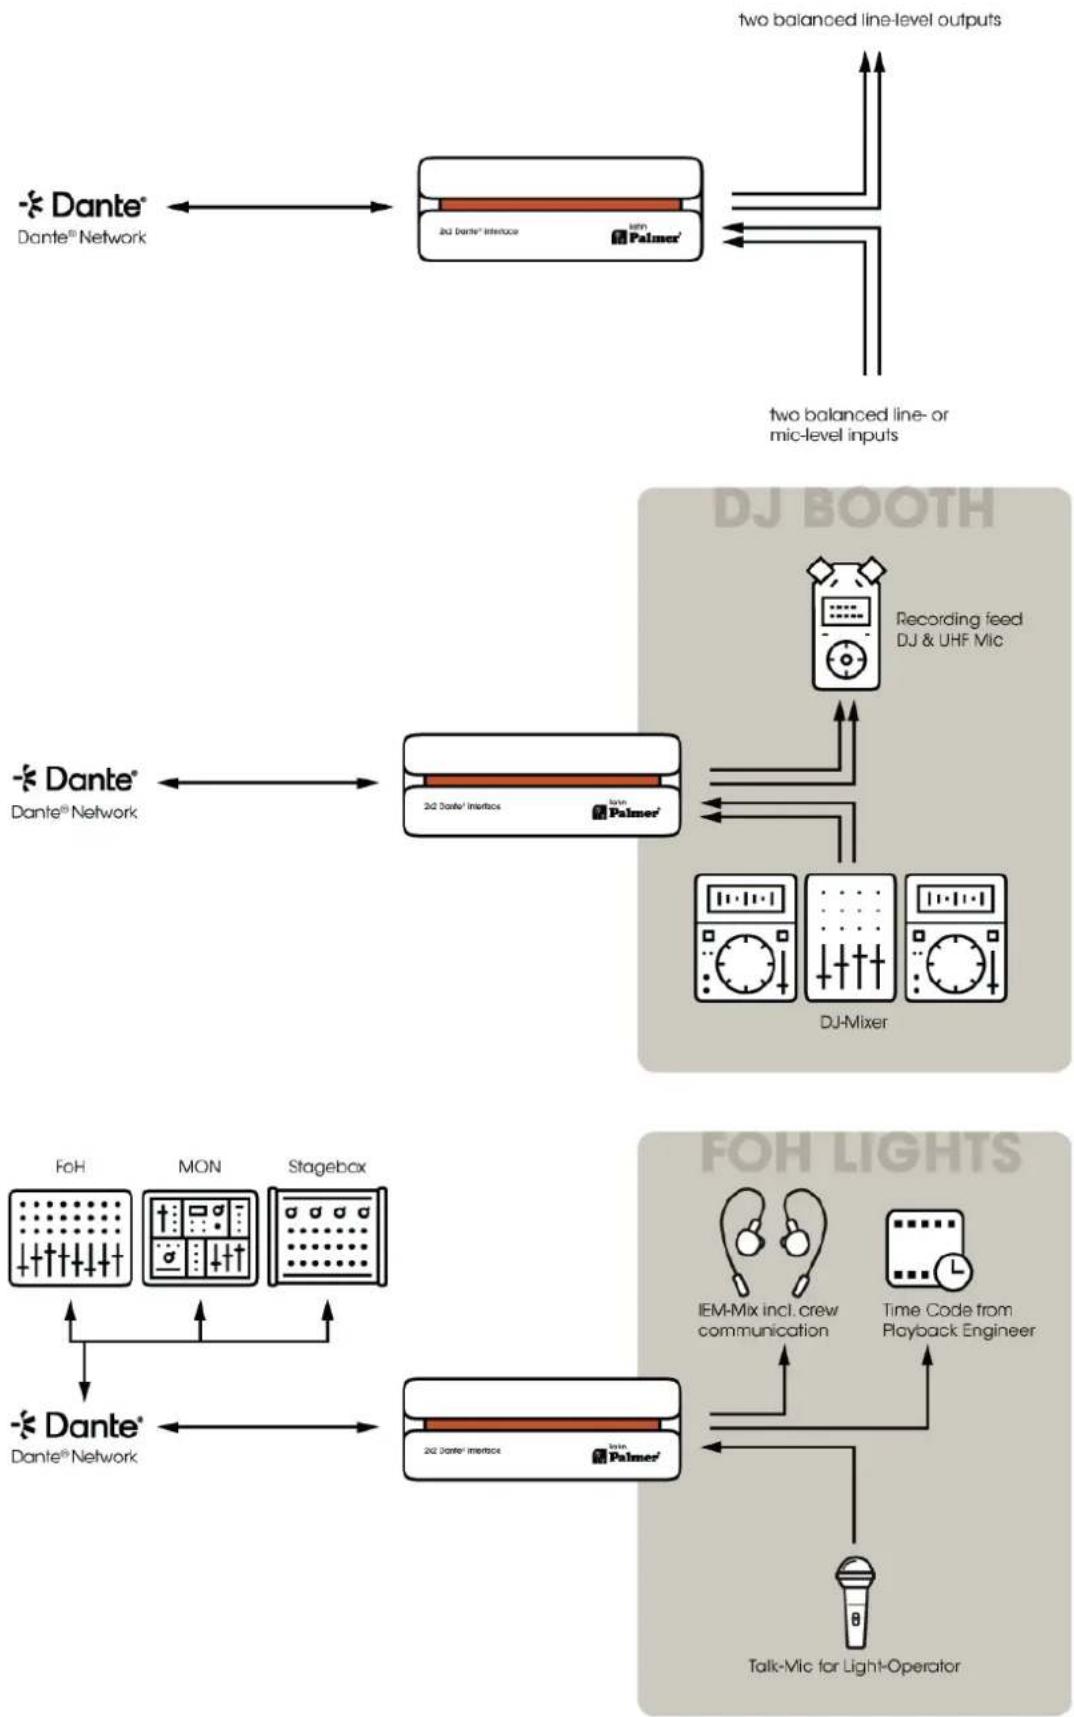
flowchart
graph TD
    A["Dante® Network"] --> B["2Q2 Dante® Interface"]
    B --> C["Two balanced line-level outputs"]
    C --> D["DJ BOOTH"]
    D --> E["Recording feed DJ & UHF Mic"]
    E --> F["DJ-Mixer"]
    F --> G["FoH Mon Stagebox"]
    G --> H["Dante® Network"]
    H --> I["2Q2 Dante® Interface"]
    I --> J["Stagebox"]
    J --> K["Talk-Vic for Light-Operator"]
    K --> L["IEM-Mix incl. crew communication"]
    L --> M["Time Code from Playback Engineer"]
    M --> N["Talk-Vic for Light-Operator"]
CONNECTION EXAMPLES
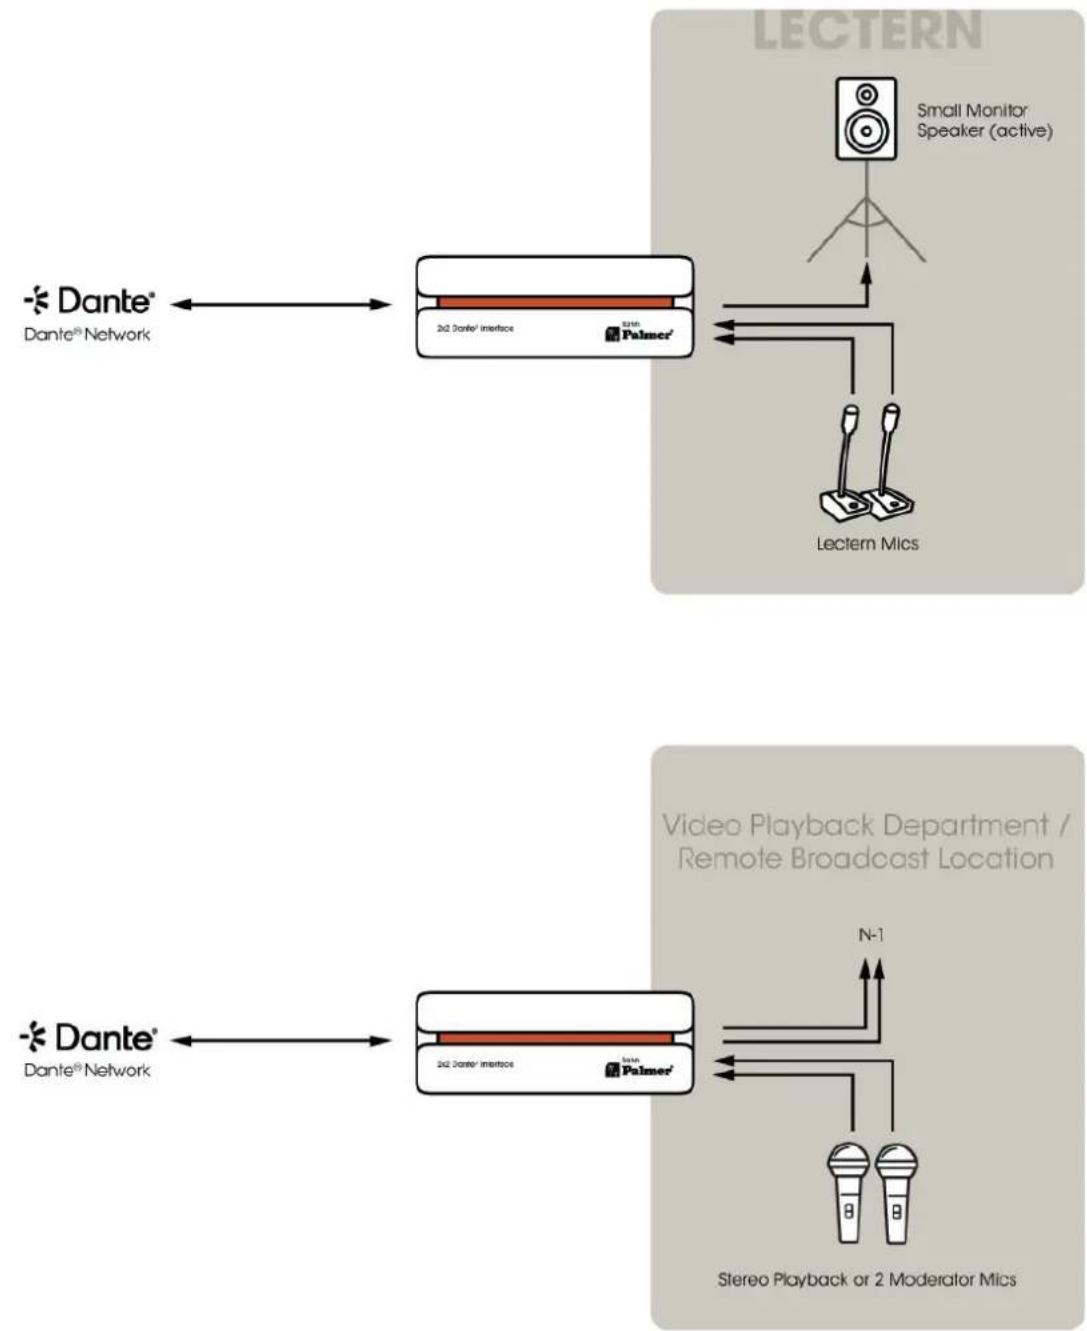
flowchart
graph TD
    subgraph "LECTERN"
        A["Small Monitor Speaker (active)"] --> B["Lectern Mics"]
        C["Dante® Network"] --> D["2x2 Dante® interface"]
        E["Dante® Network"] --> F["2x2 Dante® interface"]
        G["2x2 Dante® interface"] --> H["2x2 Dante® interface"]
        I["2x2 Dante® interface"] --> J["2x2 Dante® interface"]
        K["2x2 Dante® interface"] --> L["2x2 Dante® interface"]
        M["2x2 Dante® interface"] --> N["2x2 Dante® interface"]
        O["2x2 Dante® interface"] --> P["2x2 Dante® interface"]
        Q["2x2 Dante® interface"] --> R["2x2 Dante® interface"]
        S["2x2 Dante® interface"] --> T["2x2 Dante® interface"]
        U["2x2 Dante® interface"] --> V["2x2 Dante® interface"]
        W["2x2 Dante® interface"] --> X["2x2 Dante® interface"]
        Y["2x2 Dante® interface"] --> Z["2x2 Dante® interface"]
        AA["2x2 Dante® interface"] --> AB["2x2 Dante® interface"]
        AC["2x2 Dante® interface"] --> AD["2x2 Dante® interface"]
        AE["2x2 Dante® interface"] --> AF["2x2 Dante® interface"]
        AG["2x2 Dante® interface"] --> AH["2x2 Dante® interface"]
        AI["2x2 Dante® interface"] --> AJ["2x2 Dante® interface"]
        AK["2x2 Dante® interface"] --> AL["2x2 Dante® interface"]
        AM["2x2 Dante® interface"] --> AN["2x2 Dante® interface"]
        AO["2x2 Dante® interface"] --> AP["2x2 Dante® interface"]
        AQ["2x2 Dante® interface"] --> AR["2x2 Dante® interface"]
        AS["2x2 Dante® interface"] --> AT["2x2 Dante® interface"]
        AU["2x2 Dante® interface"] --> AV["2x2 Dante® interface"]
        AW["2x2 Dante® interface"] --> AX["2x2 Dante® interface"]
        AY["Video Playback Department / Remote Broadcast Location"]
    end
DANTE® CONTROLLER
A Dante® network is set up using the freely available DANTE® CONTROLLER software. Download the software from the manufacturer's website www.audinate.com and install it on a computer.
Connect the computer's Ethernet interface and Palmer Iahn's Ethernet interface to the Dante® network (Dante® devices, network switch, and so on). The use of an Ethernet cable Cat. 5 or better is recommended for the connection. Start the Dante® CONTROLLER software.
The software has an automatic device recognition function. You can route signals with a click of the mouse and individually edit the device and channel designations. The IP address, MAC address, and other information about the devices in the Dante® network can displayed in the software.
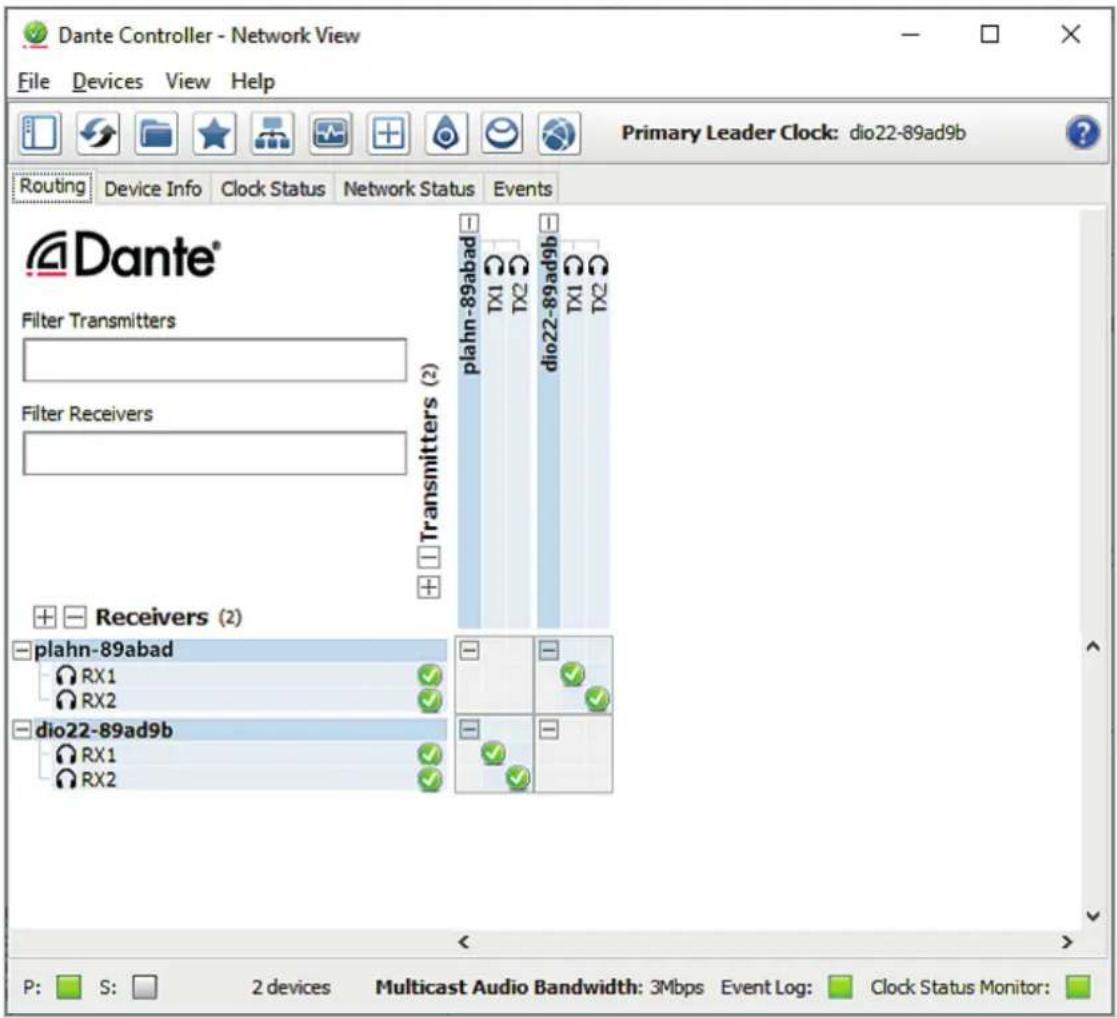
text_image
Dante Controller - Network View File Devices View Help Primary Leader Clock: dio22-89ad9b Routing Device Info Clock Status Network Status Events Dante® Filter Transmitters Filter Receivers Transmitters (2) plahn-89abad TX1 TX2 dio22-89ad9b TX1 TX2 + Receivers (2) plahn-89abad RX1 RX2 dio22-89ad9b RX1 RX2 P: S: 2 devices Multicast Audio Bandwidth: 3Mbps Event Log: Clock Status Monitor:After the configuration of the devices in the Dante® network is completed, you can close the Dante® Controller software and disconnect the computer from the network. The settings in the devices in the network are retained.
When the interface is disconnected from the Dante® network, the device's audio outputs are muted and the Dante® LED indicator on the front of the interface starts flashing.
CARE, MAINTENANCE, AND REPAIR
In order to ensure the long-term, proper functioning of the device, it must be regularly cleaned and, if necessary, serviced. The care and maintenance required depends on the intensity of use and the environment in which it is used. We recommend a visual inspection before each operation. Furthermore, we recommend carrying out all the applicable maintenance measures specified below once every 500 operating hours, or in the case of a lower intensity of use, at the latest after one year. Warranty claims may be limited should defects result from inadequate service and maintenance.
CARE (carried out by the user):

WARNING: Before carrying out any care and maintenance work, the power supply and, if possible, all device connections must be disconnected.

NOTE: Improper care can lead to impairment or even destruction of the device.
- Housing surfaces must be cleaned with a clean, damp cloth. Make sure that no moisture can penetrate the device.
- Air inlets and outlets must be regularly cleaned of dust and dirt. If compressed air is used, make sure that damage to the device is prevented (for example, fans must be blocked in this case).
- Cables and connectors must be cleaned regularly, and dust and dirt must be removed.
- In general, no cleaning agents or abrasive agents may be used; otherwise, the surface finish may be damaged.
- Devices must generally be stored dry and protected from dust and dirt.
MAINTENANCE AND REPAIR (BY QUALIFIED PERSONNEL ONLY)

HAZARD! There are live components in the device. Even after disconnecting the mains connection, there may still be residual voltage in the device, for example, due to charged capacitors.

NOTE: There are no user-serviceable assemblies in the device.

NOTE: Maintenance and repair work may only be carried out by sufficiently qualified specialist personnel. If in doubt, consult a specialist workshop.

NOTE: Improperly performed maintenance work may affect warranty claims.

NOTE: For conversion or retrofit sets provided by the manufacturer, be sure to observe the enclosed installation instructions.
TECHNICAL DATA
GENERAL
| Product number PLAHN | |
| Product type | 2 × 2 I/O Dante Interface |
| Inputs | 2 |
| Input type | Switchable balanced mic or line level |
| Line outputs | 2 |
| Output type | Balanced line level with auto mute relay on loss of Dante/ AES67 signal |
| Cooling | Convection |
ANALOGUE INPUT SECTION
| Number of input connectors 2 |
| Connection type XLR f |
| Mic input sensitivity 63 mV (gain +30 dB) |
| Nominal input clipping 19 dBu (sine 1 kHz, gain -15 dB) |
| Frequency response 10 Hz - 20 kHz (-0.5 dB) |
| THD+N < 0.003% (gain -15 dB, 4 dBu, 20 kHz BW) |
| Input impedance 38 kΩ (balanced) |
| Crosstalk < -100 dB (input 18 dBu, 20 kHz BW) |
| SNR > 112 dB (gain -15 dB, input 20 dBu, 20 kHz BW, α-weighted) |
| CMRR > 45 dB |
| Phantom power (per input) +48 V DC @ 10 mA max |
| Gain -15 dB, 0 dB, +15 dB, +30 dB |
ANALOGUE LINE OUTPUTS
| Number of output connectors | 2 |
| Connection type XLR m | |
| Max. output level | 19 dBu |
| IMD (SMPTE) | < 0.005% (-20 dBFS to 0 dBFS) |
| THD+N < 0.002% (-4 dBFS, 20 kHz BW) | |
| Idle noise | <-85 dBu |
| Dynamic range | >103 dB (0 dBFS, AES 17, CCIR-2k weighting) |
| Frequency response 15 Hz - 20 kHz (-0.5 dB) | |
DANTE™ SPECIFICATIONS
| Audio channels | 2 inputs / 2 outputs |
| Bit depth AD / DA converter | 24 / 32 bit |
| Sample rate | 48 kHz |
| System Latency | Minimum 1 ms |
| Connector DANTE | 100 BASE-T RJ45 |
POWER OVER ETHERNET (POE) SPECIFICATIONS
Minimum PoE requirements PoE+ IEEE 802.3at
POWER INPUT REQUIREMENTS
Input voltage 24 V DC
Minimum current 500 mA
Power connector 5.5 mm barrel jack, inner 2.1 mm
Max. power consumption 12 W
Idle power consumption 7.5 W (no signal input)
Mains inrush current 2 A @ 230 V AC
Operating temperature (non-condensing) 0°C - 40°C; < 85% humidity
GENERAL
Material Aluminium chassis, steel front panel
WAF 60%
Dimensions (W × H × D) 128 × 50 × 140 mm (height with rubber feet)
Weight 0.96 kg
Included accessories External power supply with interchangeable plugs,
Inscription label (tour label)
DISPOSAL

PACKAGING:
-
Packaging can be fed into the reusable material cycle using the usual disposal methods.
-
Please separate the packaging in accordance with the disposal laws and recycling regulations in your country.

DEVICE:
-
This device is subject to the European Directive on Waste Electrical and Electronic Equipment, as amended. WEEE Directive Waste Electrical and Electronic Equipment. Waste equipment does not belong in household waste. Waste equipment must be disposed of by an authorised waste disposal company or a municipal waste disposal facility. Please observe the applicable regulations in your country!
-
Observe all disposal laws applicable in your country.
-
As a private customer, you can obtain information on environmentally friendly disposal options from the vendor of the product or the appropriate regional authorities.

DISPOSABLE AND RECHARGEABLE BATTERIES:
-
Disposable and rechargeable batteries do not belong in household waste. Disposable and rechargeable batteries must be disposed by an authorised waste disposal company or a municipal waste disposal facility.
-
Observe all disposal laws and regulations applicable in your country.
-
As a private customer, you can obtain information on environmentally friendly disposal options from the vendor of the product or the appropriate regional authorities.
-
Devices with disposable and rechargeable batteries that cannot be removed by the usermustbe taken to a collection point for electrical devices.
MANUFACTURER'S DECLARATIONS
Manufacturer's warranty and limitation of liability Adam Hall GmbH Adam-Hall-Str. 1 D-61267 Neu Anspach
Email: Info@adamhall.com / +49 (0)6081 / 9419-0
Our current warranty conditions and limitation of liability can be found at: cdn-shop.adamhall.com/media/pdf/Manufacturers-Declarations-PALMER_DE_EN_ES_FR.pdf
For service requests, contact your distribution partner.

CE CONFORMITY
Adam Hall GmbH hereby confirms that this product meets the following guidelines (where applicable): Low-Voltage Directive (2014/35/EU) EMC Directive (2014/30/EU) RoHS Directive (2011/65/EU) RED (2014/53/EU)
CE DECLARATION OF CONFORMITY
Declarations of conformity for products subject to the Low-Voltage Directive, the EMC Directive, and the RoHS Directive can be requested at info@adamhall.com. Declarations for conformity for products subject to the RED Directive can be requested at www.adamhall.com/compliance.
SUBJECT TO MISPRINTS AND ERRORS, AS WELL AS TECHNICAL OR OTHER MODIFICATIONS!
text_image
lahn FRANKFURT▶Engineered in Germany
text_image
min 0.5A 4V DC 1 2 3 PUSH5. PD + DATA (Powered Device)
13. DREH-DRÜCK-ENCODER SETTINGS (push to select)
text_image
INPUT 1 2 PAIN 2 15 0 GAIN 30 SETTINGS push to select LOCK

EDITIERMODUS:
5. PD + DATA (Powered Device)
13. ENCODEUR ROTATIF SETTINGS (push to select)
Directive RoHS (2011/65/EU)
RED (2014/53/EU)
DÉCLARATION DE CONFORMITÉ CE
5. PD+DATA (Powered Device)
text_image
INPUT 1 2 PAIN 2 15 0 GAIN 30 SETTINGS push to select LOCK

MODO EDICIÓN:
Be true to your sound!
lahn
text_image
INPUT 1 2 PAIN 2 15 0 GAIN 30 SETTINGS push to select LOCK

MODALITÀ DI MODIFICA
USCITA DI LINEA ANALOGICA
5. PD + DATA (Powered Device)
text_image
INPUT 1 2 PAIN 2 15 0 GAIN 30 SETTINGS push to select LOCK