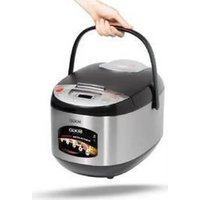
SS-10785 - Food Processor Sogo - Free user manual and instructions
Find the device manual for free SS-10785 Sogo in PDF.


User questions about SS-10785 Sogo
0 question about this device. Answer the ones you know or ask your own.
Ask a new question about this device
Download the instructions for your Food Processor in PDF format for free! Find your manual SS-10785 - Sogo and take your electronic device back in hand. On this page are published all the documents necessary for the use of your device. SS-10785 by Sogo.
USER MANUAL SS-10785 Sogo
natural_image
Black and white rice cooker with digital display and control buttons (no visible text or symbols)OLLA MULTIUSO MULTI COOKER MULTI CUISEUR MULTI FOGÃO MULTI KOCHER MULTI FORNELLO
text_image
A B C D E F G¡Precaución!
natural_image
Top-down line drawing of a circular mechanical component with concentric rings and central bore (no text or symbols)natural_image
Line drawing of a hand holding a small appliance with handles and a lid (no text or symbols)2. MODELO DE PRODUCTOS Y ESPECIFICACIONES
natural_image
Two symbolic illustrations: a sandbar with cross symbol and a flame with smoke, both enclosed in rounded square frames (no text or symbols)7. DIAGRAMA DE CIRCUITO
flowchart
graph TD
    L["Power L"] --> E["Current Source E"]
    E --> N["Main Circuit Board"]
    N --> FUSE1["FUSE"]
    FUSE1 --> ThermalFuse["Thermal fuse"]
    ThermalFuse --> TemperatureSensor["Temperature sensor"]
    TemperatureSensor --> MainCircuitBoard["Main circuit board"]
    MainCircuitBoard --> HeatingPlate["Heating plate"]
    HeatingPlate --> TemperatureSensor["Temperature sensor"]
    TemperatureSensor --> ControlPanel["Control Panel (Command Input apne)"]
    ControlPanel --> MainCircuitBoard
    MainCircuitBoard --> HeatingPlate
    style MainCircuitBoard fill:#f9f,stroke:#333
    style HeatingPlate fill:#ccf,stroke:#333
    style TemperatureSensor fill:#cfc,stroke:#333
This instruction manual can also be downloaded from our web page www.sogo.es
IMPORTANT SAFEGUARDS:
When using electrical appliances, basic safety precautions should always be followed to reduce the risk of fire, electric shock, and/or injury to persons, including the following:
- The power cord must closely plug into the wall outlet with earthing.
- Always keep the cooker unplugged when not in use or without cooking pot.
- Do not place the cooker on a wet or unstable place, or near a firing, heating range, if not, the cooker will deform or malfunction.
- In order to avoid deforming, do not run the pot with hard objects, or heat the pot on other stove. Never use other container instead of pot to cook.
- Do not cover the cooker with a cloth, this may warp or discolor the outer lid.
- The steam vent is very hot during cooking, keep face and hands aways from outer lid and steam vent.
- To protect against electric shock, do not immerse the appliance and electric cord in water or any liquid, or avoid spillage liquid to come into electrical parts and connector.
- The use of power cord must be recommended by the appliance manufacturer when it is damaged.
- Appliances can be used by persons with reduced physical, sensory or mental
capabilities or lack of experience and knowledge if they have been given supervision or instruction concerning use of the appliance in a safe way and understand the hazards involved
-
Children should be supervised, ensure they do not play the appliance.
-
This appliance can be used by children aged from 8 years and above if they have been given supervision or instruction concerning use of the appliance in a safe way and if they understand the hazards involved. Cleaning and user maintenance shall not be made by children unless they are older than 8 and supervised. Keep the appliance and its cord out of reach of children aged less than 8 years
-
This appliance is intended to be used in household and similar applications such as - staff kitchen areas in shops, offices and other working environments; - farm houses; - by clients in hotels, motels and other residential type environments; - bed and breakfast type environments.
-
The heating element surface is subject to residual heat after use.
1. COMPONENTS
A. Inner lid
B. Outer lid
C. Inner pot
D. Lid release button
E. Main body
F. Handle
G. Spoon slot
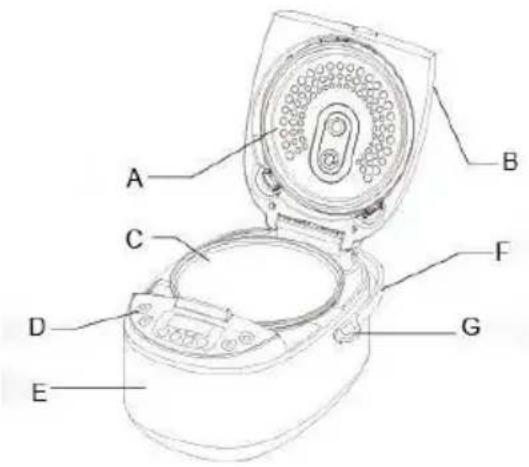
text_image
A B C D E F GCaution!
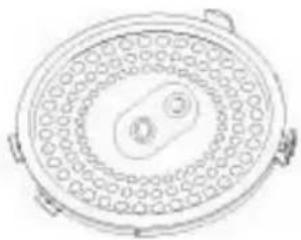
1) Please make sure you have correctly assembled the inner lid before cooking.
natural_image
Top-down line drawing of a circular mechanical component with concentric rings and central bore (no text or symbols)2) Do not lift and move the rice cooker by its handle while it is operating
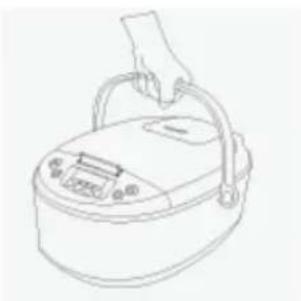
natural_image
Line drawing of a hand holding a small appliance with handles and control buttons (no text or symbols)2. PRODUCT MODELS AND SPECIFICATIONS
| Model SS-10785 | |
| Rated voltage 220-240V~ 50/60Hz | |
| Rated power 900W | |
| Rated capacity 5L | |
| Recommended for 5-10 persons | |
3. Cooking table
| Programs | Default cooking time | Time adjustment | Temperature | Auto keep warm time | 24 hrs preset | |
| 1 | Milk porridge 0:10 | 0:10-1:30 step | 1 min - 60 min Yes | |||
| 2 | Stew | 1:00 | 1:00-8:00 step 10 min | - | 60 min | Yes |
| 3 | My recipe | 0:05 0:05-24:00 step 5 min | 35 - 180° step 5 degrees | NO | Yes | |
| 4 | Soup | 0:50 | 00:50-4:00 step 5 min | - | 60 min | Yes |
| 5 | Steam | 0:20 | 0:20-1:30 step 1 min | - | 60 min | Yes |
| 6 | Yogurt | 6:00 | 03:00-12:00 step 5 min | - | NO | NO |
| 7 | Bake | 0:45 | 0:10-1:30 step 5 min | - | 60 min | Yes |
| 8 | Slow cook | 5.00 | 5:00-8:00 step 10 min | - 60 min | Yes | |
| first hour | - | 60 min Yes | ||||
| second hour | - | |||||
| third hour | - | |||||
| fourth and fifth hours | - | |||||
| 9 | Pasta | 0:08 | 0:02-0:20 step 1 min | - | 60 min | Yes |
| 10 | Rice | 0:40 | 0:15-1:30 step 1 min | - | 60 min | Yes |
| 11 | Fry | 0:15 | 0:05-1:00 step 5 min | - | NO | NO |
4. USING THE APPLIANCE
Milk porridge
a) Take suitable volume of rice with the provided measuring cup. Do not exceed the quantities indicated on the inside of the inner pot. 1 cup of rice is approx. 180ml (approx. 160g). Maximum volume of rice for 4L is 8 cups and 5L is 10 cups.
b) Wash the rice thoroughly.
c) Put the pre-washed rice in the inner pot.
d) Add water to the level indicated on the scale inside the inner pot that corresponds to the number of cups of rice used. Then smooth the surface of the rice. Normal proportion of water and rice is recommended to be 8:1 for porridge.
e) Put the inner pot in the rice cooker. Make sure the pot is placed properly and the heating plate and the outside of the inner pot are clean and dry.
f) Close the lid and connect the power cord.
g) Select "Milk porridge" function by pressing "Menu" button. The corresponding indication light is on.
h) Set the cooking time by pressing "Hour" and "Minute" buttons.
i) Press "Start" button to start cooking. Time will count down after starting cooking.
j) At the end of the cooking process the appliance beeps again and the Keep-Warm light goes on to indicate that the appliance has switched to the keep-warm mode. If you do not need to keep warm, press "Cancel" button.
Stew
a) Make sure the pot is placed properly and the heating plate and the outside of the inner pot are clean and dry.
b) Close the lid and connect the power cord.
c) Select "Stew" function by pressing "Menu" button. Adjust time by pressing "Hour" and "Minute" buttons.
d) Press "Start" button to start cooking. Time will count down after starting cooking.
e) At the end of the cooking process the appliance beeps 5 times and the Keep-Warm light goes on to indicate that the appliance has switched to the keep-warm mode. If you do not need to keep warm, press "Cancel" button.
My receipt
This function allows you to set your own cooking program with a cooking time and temperature that are different from those used in the automatic programs.
a) Select the "My recipe" function by pressing "Menu" button.
b) Use "Hour" and "Minute" buttons to set the cooking time (from 5 minute to 24 hours).
c) Use the "Temperature" button to set the desired temperature (from 35 to 180°C)
d) Press the "Start" button to begin cooking.
e) At the end of the cooking process the appliance beeps 5 times and the Keep-Warm light goes on to indicate that the appliance has switched to the keep-warm mode. If you do not need to keep warm, press "Cancel" button.
Soup
a) Put the ingredients for the soup in the inner pot and add the water. Do not exceed the maximum water level indicated inside the inner pot on the scale,
b) Put the inner pot in the rice cooker. Make sure the pot is placed properly and the heating plate and the outside of the inner pot are clean and dry.
c) Close the lid and connect the power cord.
d) Select "Soup" function by pressing "Menu" button. The corresponding indication light is on.
e) Set the cooking time by pressing "Hour" and "Minute" buttons, but the default time is 1 hour and 30 minutes.
f) Press "Start" button to start cooking. Time will count down after starting cooking.
g) At the end of the cooking process the appliance beeps again and the Keep-Warm light goes on to indicate that the appliance has switched to the keep-warm mode. If you do not need to keep warm, press "Cancel" button.
Steam
a) Measure 3 cups of water with the measuring cup and pour it into the inner pot. The amount of water required varies according to the quantity of food being steamed.
b) Select "Steam" function by pressing "Menu" button. The default time is 15 minutes. Adjust time by pressing "Hour" and "Minute" buttons.
c) Press "Start" button to start cooking. Time will count down after starting cooking.
d) At the end of the cooking process the appliance beeps again and the Keep-Warm light goes on to indicate that the appliance has switched to the keep-warm mode. If you do not need to keep warm, press "Cancel" button.
Note: If the water in the pot dries out before the program ends, the appliances will also switch to keep-warm function for safety.
Yogurt
a) Add the prepared yogurt mixture with box into the inner pot.
b) Put the inner pot in the rice cooker. Make sure the pot is placed properly and the heating plate and the outside of the inner pot are clean and dry.
c) Close the lid and connect the power cord.
d) Select "Yogurt" function by pressing "Menu" button.
e) Press "Start" button to start cooking. The default time is 6 hours and can be adjusted from 4 hours to 12 hours.
f) At the end of the cooking process the appliance beeps again and the Keep-Warm light goes on to indicate that the appliance has switched to the keep-warm mode. If you do not need to keep warm, press "Cancel" button.
Bake
a) Mix the ingredients to prepare the cake mixture.
b) Grease the inner pot.
c) Add the prepared cake mixture into the inner pot (no more than 250g).
d) Put the inner pot in the rice cooker. Make sure the pot is placed properly and the heating plate and the outside of the inner pot are clean and dry.
e) Close the lid and connect the power cord.
f) Select "Bake" function by pressing "Menu" button.
g) Press "Start" button to start cooking.
h) At the end of the cooking process the appliance beeps again and the Keep-Warm light goes on to indicate that the appliance has switched to the keep-warm mode. If you do not need to keep warm, press "Cancel" button.
Note: When cooking finishes, the cake should be taken out timely to avoid getting burned.
Slow cook
a) Make sure the pot is placed properly and the heating plate and the outside of the inner pot are clean and dry.
b) Close the lid and connect the power cord.
c) Select "Slow Cook" function by pressing "Menu" button. Adjust time by pressing "Hour" and "Minute" buttons.
d) Press "Start" button to start cooking. Time will count down after starting cooking.
e) At the end of the cooking process the appliance beeps 5 times and the Keep-Warm light goes on to indicate that the appliance has switched to the keep-warm mode. If you do not need to keep warm, press "Cancel" button.
Pasta
a) Make sure the pot is placed properly and the heating plate and the outside of the inner pot are clean and dry.
b) Connect the power cord.
c) Select "Pasta" function by pressing "Menu" button. Adjust time by pressing "Hour" and "Minute" buttons.
d) Press "Start" button to start cooking. Time will count down after starting cooking.
e) At the end of the cooking process the appliance beeps 5 times and the Keep-Warm light goes on to indicate that the appliance has switched to the keep-warm mode. If you do not need to keep warm, press "Cancel" button.
Rice
a) Take suitable volume of rice with the provided measuring cup. Each cup of uncooked rice normally gives 2 bowls of cooked rice. Do not exceed the quantities indicated on the inside of the inner pot. 1 cup of rice is approx. 180ml (approx. 160g). Maximum volume of rice for 4L is 8 cups and 5L is 10 cups.
b) Wash the rice thoroughly in another container instead of inner pot.
c) Put the pre-washed rice in the inner pot.
d) Add water to the level indicated on the scale inside the inner pot that corresponds to the number of cups of rice used. Then smooth the surface of the rice. Normal proportion of water and rice is recommended to be 1:1.
e) Put the inner pot in the rice cooker. Make sure the pot is placed properly and the heating plate and the outside of the inner pot are clean and dry.
f) Close the lid and connect the power cord.
g) Select "Rice" function by pressing "Menu" button. The corresponding indication light is on.
h) Press "Start" button to start cooking. Time will count down after starting cooking.
i) At the end of the cooking process the appliance beeps again and the Keep-Warm light goes on to indicate that the appliance has switched to the keep-warm mode. If you do not need to keep warm, press "Cancel" button.
Fry
a) Make sure the pot is placed properly and the heating plate and the outside of the inner pot are clean and dry.
b) Connect the power cord.
c) Select "Fry" function by pressing "Menu" button. Adjust time by pressing "Hour" and "Minute" buttons.
d) Press "Start" button to start cooking. Time will count down after starting cooking.
e) At the end of the cooking process the appliance beeps 5 times and the Keep-Warm light goes on to indicate that the appliance has switched to the keep-warm mode. If you do not need to keep warm, press "Cancel" button.
PRESET FUNCTION
PRESET function is used to program the start time of the machine.
The start time can be set from 1 min to 24 hours.
To use this function, you need to select the menu, change the default time if required, then press the PRESET button and set the time after which you want the machine to start automatically. For eg. if its 8 am in the morning and you want the machine to start at 11.30 am, press the PRESET button, set the hour to 3 and minute to 30. The machine will start automatically after 3.30 hours at 11.30 am.
This function cannot be used with YOGURT and FRY function.
5. CAUTION
(1) Danger
- Do not cover the steam vent and the pressure regulator when the rice cooker is operating.
(2) Warning
- Check if the voltage indicated on the appliance corresponds to the local mains voltage before you connect the appliance.
- Only connect the appliance to an earthed wall socket. Always make sure that the plug is inserted firmly into the wall socket.
- Keep the mains cord out of the reach of children. Do not let the mains cord hang over the edge of the table or worktop on which the appliance stands.
- Make sure the heating element, the temperature sensor and the outside of the inner pot are clean and dry before you put the plug in the wall socket.
- Do not use the appliance if the sealing ring is damaged.
- Do not plug in the appliance or press any of the buttons on the control panel with wet hands.
- Never connect this appliance to an external timer switch in order to avoid a hazardous situation.
- Do not come near the pressure regulator or the steam vent with your face or hands when the rice cooker is operating.
- Do not open the lid while rice is boiling.
- Do not open the lid immediately after the cooking process has ended, but wait until the steam inside the rice cooker has been released completely.
- Check the steam vent regularly to ensure that there is no blockage.
- If you have a pacemaker or other implanted device, consult your doctor before you use the appliance.
(3) Caution
- Only use the rice scoop provided. Avoid using sharp utensils.
- Do not expose the rice cooker to high temperatures, nor place it on a working or still hot stove or cooker.
- Always insert the inner pot before you put the plug in the wall socket and switch on the rice cooker.
- Always unplug the rice cooker if not used for a longer period of time.
- Always let the rice cooker cool down before you clean or move it.
- Do not place the inner pot directly over an open fire to cook rice.
- If the appliance is used improperly or for professional or semi-professional purposes or if it is not used according to the instructions in this user manual, the guarantee becomes invalid and we refuse liability for any damage caused.
- Place the rice cooker on a stable, horizontal and level surface.
- The accessible surfaces may become hot when the appliance is operating. Only touch the control panel.
- Beware of hot steam coming out of the steam vent and pressure regulator during cooking or out of the rice cooker when you open the lid.
- Do not lift and move the rice cooker by its handle while it is operating.
- Do not expose the rice cooker to direct sunlight.
- Do not insert metallic objects or alien substances into the steam vent and pressure regulator.
- Do not cook sticky food or food that bubbles a lot, such as curry or barley tea.
- Make sure the lid lock lever is in lock position before you switch on the rice cooker.
- Do not place a magnetic substance on the lid. Do not use the appliance near a magnetic substance.
- Do not use the inner pot if it is deformed.
- Do not exceed the maximum water level indicated in the inner pot to prevent overflows through the pressure regulator.
- Do not place the rice scoop inside the pot while cooking.
- Always clean the appliance after use.
6. CLEAN AND MAINTENANCE
- Wash the cooking pot and steamer in warm and soapy water using a sponge or cloth and rinse with water properly, then wipe dry with cloth. Don't clean with abrasive brushes to avoid damaging the non-stick coating.
- Take out the dew collector and pour the water. Wash it with water and place it back to the rice cooker.
- Rice grains or other residues may stick on the heating plate. To ensure a proper contact with the cooking pot, rub the grains/residues away from the heating plate with fine sandpaper (NO.320), then wipe it with cloth again.


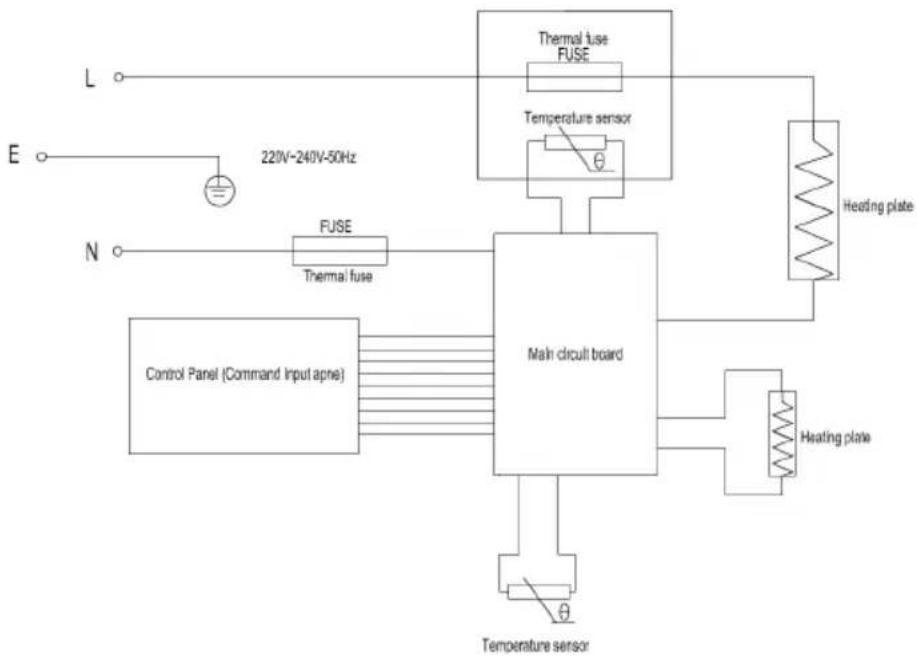
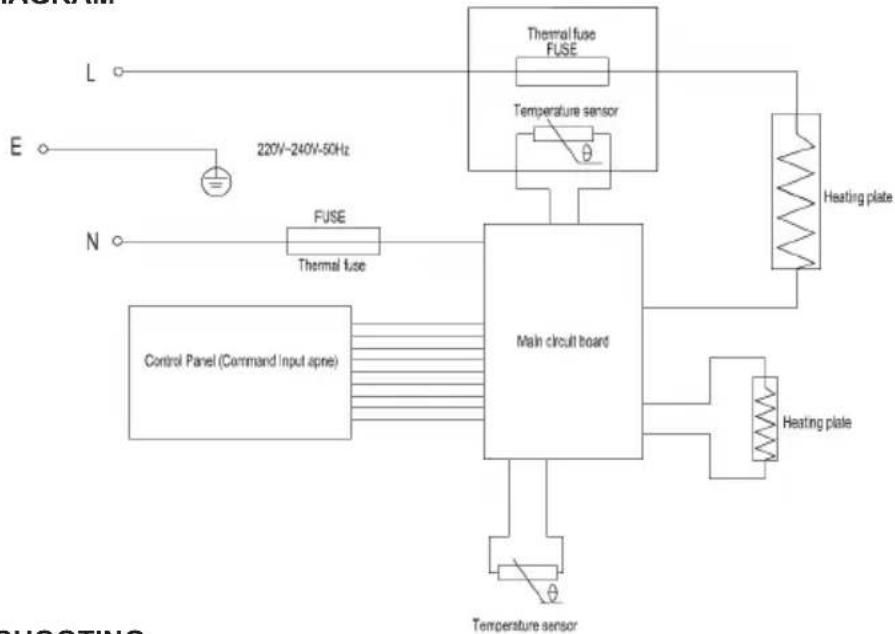
7. CIRCUIT DIAGRAM
flowchart
graph TD
    L["Power Supply L"] --> E["Inductors E"]
    E --> N["Main Circuit Board"]
    N --> FUSE["FUSE"]
    FUSE --> ThermalFuse["Thermal fuse"]
    ThermalFuse --> TemperatureSensor["Temperature sensor"]
    TemperatureSensor --> MainCircuitBoard["Main circuit board"]
    MainCircuitBoard --> HeatingPlate["Heating plate"]
    HeatingPlate --> TemperatureSensor["Temperature sensor"]
    TemperatureSensor --> ControlPanel["Control Panel (Command Input apne)"]
    ControlPanel --> FUSE
    FUSE --> ThermalFuse
    ThermalFuse --> TemperatureSensor
    TemperatureSensor --> MainCircuitBoard
8. TROUBLESHOOTING
| Problem Description | Cause Solution | ||
| Indication light does not go on | Heating plate does not work. | 1. The power cord is not well connected.2. PCB is defective. | 1. Check power coed connection.2. Take the appliance to your dealer or an authorized service centre. |
| Heating plate works. | PCB is defective. Take the appliance to your dealer or an authorized service centre. | ||
| Indication light goes on | Heating plate does not work. | 1. Electronic parts or the temperature sensor malfunction.2. Fuse is broken.3. PCB is disconnected. | Take the appliance to your dealer or an authorized service centre. |
| Rice gets burned or the appliance fails to switch to keep-warm process automatically. | 1. PCB is defective.2. Electronic parts or the temperature sensor malfunction. | Take the appliance to your dealer or an authorized service centre. | |
| There is overflow during cooking process. | 1. PCB is defective.2. Electronic parts or the temperature sensor malfunction. | Take the appliance to your dealer or an authorized service centre. | |
| The rice is not cooked. 1. Not enough water has been added.2. PCB is defective.3. Electronic parts or the temperature sensor malfunction. | 1. Add water according to the scale on the inside of the inner pot.2. Take the appliance to your dealer or an authorized service centre. | ||
| Error code: E1 Temperature sensor on top is disconnected. | Take the appliance to your dealer or an authorized service centre. | ||
| Error code: E2 Temperature sensor on top has a short circuit. | Take the appliance to your dealer or an authorized service centre. | ||
| Error code: E3 Temperature sensor on bottom has a short circuit. | Take the appliance to your dealer or an authorized service centre. | ||
| Error code: E4 Temperature sensor on bottom is disconnected. | Take the appliance to your dealer or an authorized service centre. | ||
text_image
A B C D E F GMise en garde!
natural_image
Top-down schematic of a circular mechanical component with concentric rings and mounting flanges (no text or symbols)natural_image
Line drawing of a hand holding a small appliance with handles and control buttons (no text or symbols)2. MODÈLES DE PRODUITS ET SPÉCIFICATIONS
Cuisson lente (Slow cook)
text_image
A B C D E F GCuidado!
natural_image
Top-down line drawing of a circular mechanical component with concentric rings and two side handles (no text or symbols)natural_image
Line drawing of a hand holding a small appliance with handles and a lid (no text or symbols)2. MODELOS E ESPECIFICAÇÕES DO PRODUTO
Cozimento lento (Slow cook)
text_image
A B C D E F GVorsicht!
natural_image
Top-down line drawing of a circular mechanical component with concentric rings and central slots (no text or symbols)natural_image
Line drawing of a hand holding a cylindrical device with handles and a lid (no text or symbols)2. PRODUKTMODELLE UND SPEZIFIKATIONEN
Milchbrei (Milk Porridge)
Langsames Kochen (Slow cook)
text_image
A B C D E F GAttenzione!
natural_image
Top-down schematic of a circular mechanical component with concentric rings and central slots (no text or symbols)natural_image
Line drawing of a hand holding a portable appliance with handles and control panel (no text or symbols)2. MODELLI E SPECIFICHE DEL PRODOTTO
Cottura lenta (Slow cook)
natural_image
Two simple line drawings: a sandbar with an X mark and a flame with smoke (no text or symbols)8. RISOLUZIONE DEI PROBLEMI
DECLARATION OF CONFORMITY
This device complies with Low Voltage Directive 2014/35/EC, Electromagnetic Compatibility Directive 2014/30/EU, Directive 2015/863/EU on the restriction of the use of certain hazardous substances in electrical and electronic equipment and Directive 2009/125/EC on the eco-design requirements applicable to energy-related products.



DÉCLARATION DE CONFORMITÉ
This symbol means that in case you wish to dispose of the product once its working life has ended, take it to an authorised waste agent for the selective collection of waste electrical and electronic equipment (WEEE).

Imported by:
Sanysan Appliances S.L, NIF: B98753056, C/ Barcas 2, 2
46002 Valencia, Spain
Product made in P.R.C. – Designed by SOGO based on the European Quality Standards
Customer Service: www.sogosat.com / sogosat@sogosat.com / 0034 902 222 161