KGSZ 330 - Saw EINHELL - Free user manual and instructions
Find the device manual for free KGSZ 330 EINHELL in PDF.

User questions about KGSZ 330 EINHELL
0 question about this device. Answer the ones you know or ask your own.
Ask a new question about this device
Download the instructions for your Saw in PDF format for free! Find your manual KGSZ 330 - EINHELL and take your electronic device back in hand. On this page are published all the documents necessary for the use of your device. KGSZ 330 by EINHELL.
USER MANUAL KGSZ 330 EINHELL
text_image
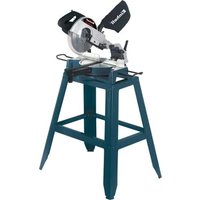
Labeled diagram of a cutaw machine with numbered parts for identification3
text_image
2 ③ ⑦ ⑤ ②4 ⑯ ⑭ ⑬ ⑬ ⑫ ⑫
natural_image
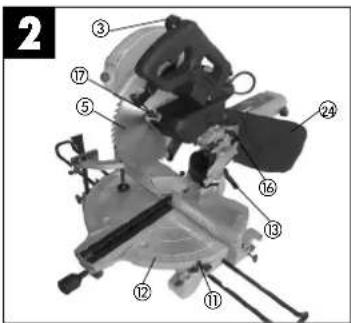
Hand holding a small mechanical component with two vertical rods, no visible text or symbols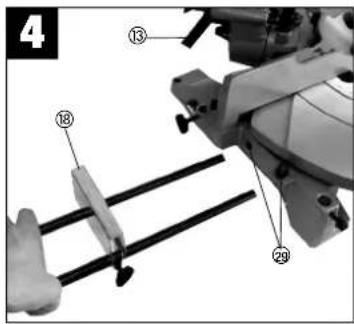
text_image
4 ⑬ ⑲ ⑲ ⑲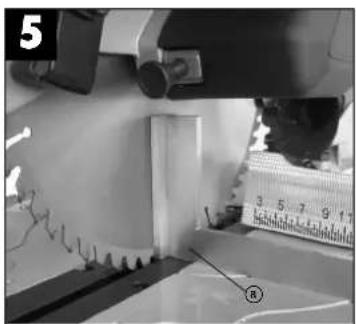
natural_image
Close-up of a mechanical cutting tool with a ruler and a gear-like component, no visible text or symbols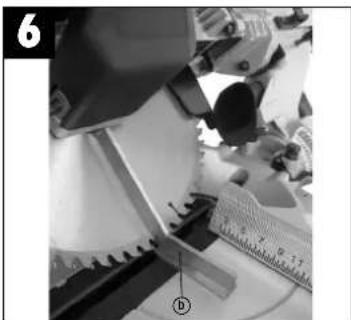
natural_image
Close-up of a mechanical device with a ruler and gear mechanism (no visible text or symbols)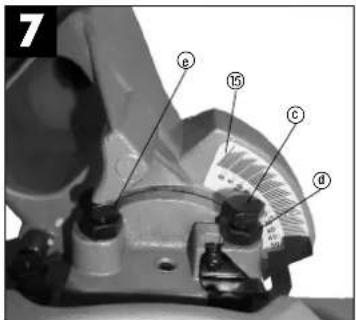
text_image
7 e 15 c d4

natural_image
Mechanical tool with a cutting cutter and workpiece, labeled with numbers ① and ⑦ (no text or symbols on the tool itself)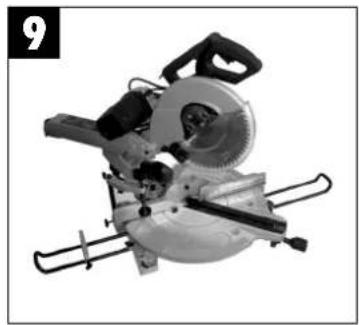
natural_image
Mechanical cutting cutter with visible blades and blade (no text or symbols)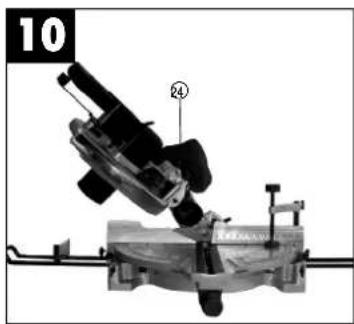
natural_image
Mechanical setup with a mounted optical instrument and a base mount (no visible text or symbols)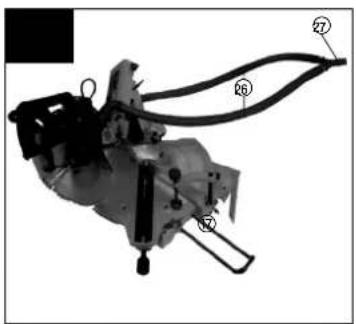
natural_image
Mechanical assembly diagram showing a motor or gear mechanism with numbered components (no text or symbols visible)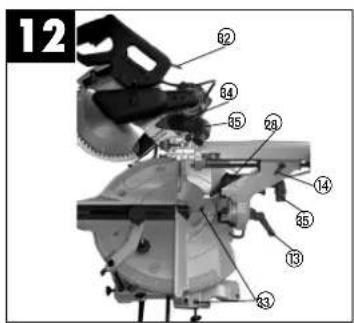
text_image
12 32 34 35 28 14 35 13 33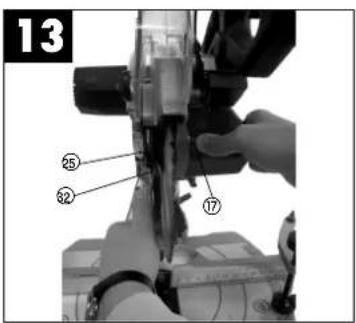
text_image
13 25 32 17D
-
Release lever
-
Handle
-
ON/OFF switch
-
Machine head
-
Saw blade
-
Movable blade guard
-
Stop rail
-
Turntable
-
Stationary base plate
-
Locking grip
-
Pointer
-
Dial for turntable
-
Locking leve
-
Thumb screw
-
Scale
-
Safety pin
-
Saw shaft lock
-
End stop
2. Items supplied
● Crosscut and miter saw
● Clamping device (19)
- Extension supports
● Carbide-tipped blade (4)
● Sawdust bag (24)
● Key for changing the blade (32)
3. Proper use
The drag, crosscut and miter saw is designed to crosscut wood and plastic commensurate with the machine's size.
The machine is not to be used for cutting fire wood. The machine is to be used only for its prescribed purpose.
Any use other than that mentioned is considered to be a case of misuse. The user/operator and not the manufacturer shall be liable for any damage or injury resulting from such cases of misuse.
The machine is to be operated only with suitable saw blades. It is prohibited to use any type of cutting-off wheel.
To use the machine properly you must also observe the safety regulations, the assembly instructions and the operating instructions to be found in this manual. All persons who use and service the machine have to be acquainted with this manual and must be informed about its potential hazards.
It is also imperative to observe the accident prevention regulations in force in your area.
The same applies for the general rules of occupational health and safety.
The manufacturer shall not be liable for any changes
made to the machine nor for any damage resulting from such changes.
Even when the machine is used as prescribed it is still impossible to eliminate certain residual risk factors. The following hazards may arise in
connection with the machine's construction and design:
- Contact with the saw blade in the uncovered saw zone.
● Reaching into the running saw blade (cut injuries).
● Kick-back of workpieces and parts of workpieces.
● Saw blade fracturing.
- Catapulting of faulty carbide tips from the saw blade.
● Damage to hearing if essential ear-muffs are not worn.
● Harmful emissions of wood dust when the machine is used in closed rooms.
4. Important notes
Please read this manual carefully and pay attention to the information provided. Use this manual to familiarize yourself with the machine, its correct use and safety regulations.

Safety regulations
● Always pull the plug out of the power socket before adjusting or servicing the machine.
● Give these safety regulations to all persons who work on the machine.
● Do not use this saw to cut fire wood.
● Caution! Hands and fingers may be injured on the rotating saw blade.
● Before you use the machine for the first time, check that the voltage marked on the rating plate is the same as your mains voltage.
- If you need to use an extension cable, make sure its conductor cross-section is big enough for the saw's power consumption. Minimum cross-section: 1.5 ~mm^2 .
- If you use a cable reel, the complete cable has to be pulled off the reel.
● Never carry the saw by its cable.
- Do not leave the saw in the rain and never use it in damp or wet conditions.
● Provide good lighting.
● Never saw near combustible liquids or gases.
● Wear suitable work clothes! Loose garments or jewellery may become caught up in the rotating saw blade.
GB
- Operators have to be at least 18 years of age. Trainees of at least 16 years of age are allowed to use the machine under supervision.
- Keep children away from the machine when it is connected to the power supply.
- Check the power cable (9). Never use a faulty or damaged power cable.
- Keep your workplace clean of wood scrap and any unnecessary objects.
● Persons working on the machine should not be distracted.
● Note the direction of rotation of the motor and saw blade.
● After you have switched off the motor, never slow down the saw blade by applying pressure to its side.
● Fit only blades which are well sharpened and have no cracks or deformations.
● The machine is to be operated only with tools which conform with EN 847-1: 2003.
● Faulty saw blades have to be replaced immediately.
● Never use saw blades which do not comply with the data specified in this manual.
● Make sure that the arrow on the saw blade complies with the arrow marked on the machine.
- Make certain that the saw blade does not touch the rotary table in any setting. To do so, pull out the power plug and tilt the saw blade by hand into the 45^ position and the 90^ position. If necessary, re-adjust the saw head as described in Section C/F.
- It is imperative to make sure that all the devices used to cover the saw blade are in good working order.
● Never wedge the hinged guard hood in open position.
- Never dismantle the machine's safety devices or put them out of operation.
● Damaged or faulty safety devices have to be replaced immediately.
● Never cut workpieces which are too small to hold securely in your hand.
- Do not place your hands in awkward positions where one or both may slip suddenly and touch the saw blade.
- When working with long workpieces, use an additional support (table, stand, etc.) to prevent the machine from tipping over.
● Always clamp round workpieces such as dowel rods etc. with suitable devices.
● There must be no nails or other foreign bodies in that part of the workpiece you want to cut.
● Always stand to the side of the saw blade when working with the saw.
● Never load the machine so much that it cuts out.
● Always press the workpiece firmly against the table and the stop rail to prevent it from wobbling or twisting.
● Make sure that off-cuts can be removed from the side of the saw blade. If not, they may catch on the saw blade crown and be catapulted into the surrounding area.
● Never saw several workpieces simultaneously.
● Never remove loose splinters, chips or jammed pieces of wood when the saw blade is running
● To rectify faults or remove jammed pieces of wood, always switch off the machine first. - Pull out the power plug!
● Conversions, adjustments, measurements and cleaning jobs are to be performed only when the motor is switched off. - Pull out the power plug!
● Before you switch on the machine, check that all wrenches and adjustment tools have been removed.
- When you leave your workplace, switch off the motor and pull out the power plug.
● Electric installation work, repairs and maintenance are to be carried out only by specialists.
● All guards and safety devices have to be refitted immediately after completion of any repairs or maintenance.
- It is imperative to observe the manufacturer's safety, operating and maintenance instructions as well as the dimensions quoted in the technical data.
- It is imperative to observe the accident prevention regulations in force in your area as well as all other generally recognized rules of safety.
● Note the information published by your professional associations.(VBG7)
- Switch on the dust extraction system each time you use the machine.
● The machine may be used in closed rooms only in conjunction with a suitable vacuum extraction system.
● The circular cross-cut must be connected to a 230 V socket-outlet with a minimum 10 A fuse
● Never use light-duty machines for heavy-duty work.
● Never use the cable for any purpose other than that for which it is intended!
- Adopt a firm standing position and keep your balance at all times.
- Check the tool for signs of damage!
- Before you carry on using the tool it is imperative to check that its safety devices and any slightly damaged parts are working properly and in the way intended.
- Check that the moving parts work properly and do not jam or whether any of the parts are
GB
damaged. All parts must be fitted correctly and
satisfy all conditions for the tool to work properly
● Unless otherwise stated in these instructions, damaged safety devices and parts must be repaired or replaced by experts in an approved specialist workshop.
● Have damaged switches replaced by a customer service workshop.
● This tool complies with the pertinent safety regulations. Repairs are to be carried out only by qualified electricians using original replacement parts. The user may suffer an accident if this condition is not observed.
● The machine is to be operated only with tools which conform with EN 847-1:2003.
- Pull out the power plug and twist the blade with your hand into the 45^ and 90^ positions in order to make sure that the blade does not touch the turntable in any position. If necessary, readjust the saw head.
- If the table insert is worn, replace it.
● Never use blades made of high-speed steel (HSS).
- When cutting miters, make sure that the device for swiveling the arm is fastened securely.
● Be careful when working in vertical mode.
● Caution: Take extra care when making double miter cuts!
- Do not overload your tool.
● Wear safety goggles.
- Use a dust mask when working on dusty jobs
- Check the tool cable/extension cable for damage.
● Always wear gloves when handling saw blades
muffs!)
Sound pressure level LPA 95.9 dB(A)
Sound power level LWA 108.9 dB(A)
"The quoted values are emission values and not necessarily reliable workplace values. Although there is a correlation between emission and immission levels it is impossible to draw any certain conclusions as to the need for additional precautions. Factors with a potential influence on the actual immission level at the workplace include the duration of impact, the type of room, and other sources of noise etc., e.g. the number of machines and other neighbouring operations. Reliable workplace values may also vary from country to country. With this information the user should at least be able to make a better assessment of the dangers and risks involved."
5. Technical data
Asynchronous motor 230 V \~ 50 Hz
Output 1600 W
Operating mode S1
Idle speed n_0
4200 min ^1
Carbide-tipped saw blade o 305 x o 30 x 3.2 mm
Number of teeth 60
Tilting range -45° / 0° / +45°
Mitre cuts 0° to 45° to the left
Saw bed support 522 x 171 mm
Sawing width at 90° 330 x 102 mm
Sawing width at 45° 215 x 102 mm
Sawing width at 2 x 45°
(double mitre cuts) 215 x 65 mm

Wear goggles

Wear ear-muffs

Wear a breathing mask
Noise emission values
● The saw's noise is measured in accordance with DIN EN ISO 3744; EN 60651; 6/93, ISO 7960 Annex A; 2/95. The machine may exceed 85 db (A) at the workplace. The user will require noise protection measures if this is the case. (Wear ear-
6. Before putting the machine into operation
● The machine must be set up where it can stand securely, i.e. it should be bolted to a workbench, a universal base frame or similar.
● All covers and safety devices have to be properly fitted before the machine is switched on.
- It must be possible for the saw blade to run freely.
● When working with wood that has been
GB
processed before, watch out for foreign bodies such as nails or screws etc.
- Before you actuate the On/Off switch, make sure that the saw blade is correctly fitted and that the machine's moving parts run smoothly.
● Before you connect the machine to the power supply, make sure the data on the rating plate is the same as that for your mains.
Important:
This machine was exactly adjusted before it left the factory. For the best results you should check the accuracy of the following settings and make corrections as necessary.
6.1 Setting the angle stop to 90° and 45° (Fig. 5/6/7)
- Release the angle clamping lever (13) and move the cutting head (4) all the way to the right. Secure the angle clamping lever (13).
- Use an angular stop (a/b) to set the blade at 90° in relation to the table.
- If an adjustment is necessary, undo the locknut (d) and turn the screw (c) so that the blade makes an angle of 90^ with the table.
● Tighten the locknut (d). - Use the screw (c) to set the angle indicator (15) to 0.
- Use the same procedure to set the stop to 45", but instead move the cutting head to the left and use the left screw (e).
6.2 Setting the stop face (Fig. 12)
● Lower the cutting head and press in the locking button (16). Make sure that the table shows a miter angle of 0^ .
● Place an angular stop against the stop face and the saw blade.
- If the blade does not touch the angular stop, undo the three screws (33).
- Adjust the stop face so that it touches the angle gage full-face. Retighten the screws.
7. Assembly and operation
Always place the workpiece against the stop face. A twisted and bent workpiece that cannot be held flat on the table or against the stop face may catch on the blade and should not be used. Keep your hands out of the sawing zone. The entire table area is out of bounds for hands. It is marked with "No Hands" signs.
7.1 Fitting the clamping device and extension supports (Fig. 1/3/4)
● Always use the clamping device (19) to secure the workpiece in position. Insert the clamping device in one of the mounts (30) provided and fasten it in place with the clamping screw.
- Insert the extension supports on the left and right in the mounts (29) provided in the base plate and tighten the clamping screw.
● The standard end stop (18) can be used for repeat cuts. In this case, slip the end stop onto one of the extension supports and adjust with the clamping screw.
7.2 Fitting the dust extraction device (Fig. 11/12)
● Mount the dust extraction nozzle (28) in the outlet opening under the cutting arm.
- Mount the big end of the angle piece (35) on the back of the crosscut and miter saw at the outlet opening. The angle piece has to point to the side or down.
- On the angle piece you can either attach the dust bag (24) or a suction hose for drawing off the saw dust.
- Mount the second angle piece on the upper dust extraction socket (34) and plug on the suction hose (26).
- With the Y-piece (27) you can join together the upper and lower suction hose and connect them to a suitable vacuum extraction system.
7.3 Setting up the saw unit (Fig. 1/2)
● To adjust the turntable (8), loosen the locking grip (10) by approx. 2 turns, which frees the turntable (8).
● Turn the tumtable (8) and scale pointer (11) to the desired angular setting on the dial (12) and lock into place with the locking grip (10).
● To release the saw from its position at the bottom (transport position), pull the retaining pin (16) out of the motor mounting while pressing down lightly on the machine head (4).
● Swing the machine head (4) up until the retaining hook latches into place.
- When the tightening screw (13) is loosened, you can tilt the machine head (4) to the left by up to 45^ .
Warning!
Never connect the plug to a power source before you have completed all the installation work, made all the necessary settings, and read and understood all the safety and operating instructions.
7.4 Crosscut 90° and turntable 0° (Fig. 8) For cutting widths up to 170 mm it is possible to fix the saw's drag function with the thumb screw (14) in
GB
rear position. If the cutting width exceeds 170 mm you must ensure that the thumb screw (14) is slackened and that the machine head (4) can be moved.
- Move the machine head (4) to its upper position.
- Use the handle (2) to push back the machine head (4) and fix it in this position if required (dependent on the cutting width).
● Place the piece of wood to be cut against the stop rail (7) and on the turntable (8).
- Lock the material with the clamping device (19) on the base plate (9) to prevent the material from moving during the cutting operation.
- Push down the release lever (1) to release the machine head (4).
- Press the ON/OFF switch (3) to start the motor. Use the handle (2) to apply steady and light downward pressure to cut all the way through the workpiece.
- When the cutting operation is completed, move the machine head back to its upper (home) position and release the ON/OFF button (3). Important! The integral resetting springs will automatically lift the machine head. Do not simply let go of the handle (2) after cutting, but allow the machine head to rise slowly, applying slight counterpressure as it does so.
7.5 Crosscut 90° and turntable 0°-45° (Fig. 9)
The crosscut saw can be used to make right and left angular cuts of 0^-45^ in relation to the stop rail.
- Using the handle (2), set the turntable (8) to the desired angle, i.e. the scale pointer (11) on the turntable must coincide with the desired angular setting (12) on the stationary base plate (9).
● Retighten the locking grip (10) to secure the turntable (8) in place.
● Make the cut as described in section 7.4.
7.6 Miter cut 0°-45° and turntable 0° (Fig. 10/12)
The crosscut saw can be used to make miter cuts of 0^ - 45^ in relation to the work face.
- Move the machine head (4) to its upper position.
- Fasten the tumtable (8) in 0^ position.
- Undo the clamping lever (13) and use the handle (2) to tilt the machine head (4) to the left until the pointer (23) coincides with the required angle value (15).
● Retighten the clamping lever (13) and make the cut as described in section 7.4.
7.7 Miter cut 0°-45° and turntable 0°-45° (Fig. 11)
The crosscut saw can be used to make miter cuts to the left of 0^-45^ in relation to the work face and, at the same time, 0^-45^ in relation to the stop rail (double miter cut).
- Move the machine head (4) to its upper position.
● Release the turntable (8) by slackening the locking grip (10). - Use the handle (2) to adjust the turntable (8) to the angle required (in this connection see also section 7.5).
- Retighten the locking grip (10) in order to secure the turntable in place.
- Undo the locknut (13) and use the handle (2) to tilt the machine head (4) to the left until it coincides with the required angle value (in this connection see also section 7.5).
● Retighten the locknut (13). Cut as described under section 7.4.
7.8 Changing the saw blade (Fig. 13)
● Pull out the power plug.
● Swing up the machine head (4).
● Swing up the adjustable blade guard (6).
- Press the saw shaft lock (17) with one hand while holding the wrench (32) on the flange bolt (25) with the other.
- Firmly press on the saw shaft lock (17) and slowly rotate the flange bolt (25) in clockwise direction. The saw shaft lock engages after no more than one rotation.
- Now, using a little more force, slacken the flange bolt (25) in clockwise direction.
● Turn the flange bolt (25) until it is completely removed.
● Take the blade (5) off of the inner flange and pull out.
- Mount and fasten the new blade in reverse order. Important! The cutting angle of the teeth (i.e. the direction of rotation of the saw blade) must coincide with the direction of the arrow on the housing.
● The blade flanges must be thoroughly cleaned prior to mounting the blade.
● Reattach the movable blade guard (6) in reverse order.
- Ensure that the saw shaft lock (17) is slackened.
- Check to make sure that all safety devices are properly mounted and in good working condition before you begin working with the saw again.
- Important: Every time that you change the saw blade, check to see that it spins freely in the groove of the tumtable in both perpendicular and 45° angle settings.
7.9 Carrying the saw
- Release the miter engagement button (10) and turn the table all the way to the right. Lock the table at a miter angle of 45°.
● Pull the cutting head forward and lock the slide.
● Lower the cutting head and press in the locking
GB
button (16).
● Carry the crosscut and miter box saw by its integral carry-handle (31) and the side of the base.
8. Maintenance
● Always keep the machine's ventilation slats clean and free of obstructions.
- Remove dust and dirt regularly from the machine. Cleaning is best done with compressed air or a rag.
- Lubricate all moving parts at regular intervals.
- Never use caustic agents to clean plastic parts.
9. Ordering replacement parts
Please provide the following information on all orders
for replacement parts:
● Model/type of machine
● Article number of the machine
● ID number of the machine
● Number of the required replacement part

F
GB EC Declaration of Conformity
The undersigned declares in the name of the company that the product is in compliance with the following guidelines and standards.
Eschenstraße 6 · D-94405 Landau/Isar (Germany)
Info-Tel. 0180-5 120 509 • Telefax 0180-5 835 830
※ Technical changes subject to change
The product described in these instructions comes with a 2-year warranty covering defects. This 2-year warranty period begins with the passing of risk or when the customer receives the product.
For warranty claims to be accepted, the product has to receive the correct maintenance and be put to the proper use as described in the operating instructions.
Your statutory rights of warranty are naturally unaffected during these 2 years.
This warranty applies in Germany, or in the respective country of the manufacture's main regional sales partner, as a supplement to local regulations. Please note the details for contacting the customer service center responsible for your region or the service address listed below.
NL GARANTIE
© Ebara International
St. Gällerspäße 192
CH844 Weston
Tel. (052)2259797, Fax (052) 2269700
④ Global UK Ltd
Unit 5 Monetb Wheel
Tcnke Oupus
Methel Graspis Dolfshead Wijal
Business, CH 41, INC
Tel. 0151 6491500, Fax: 0151 6491501
E Commercial Erbell S.A.
Traversia Milk Enter 9.5
Polispo Industrial, B. Mozal
F-29119 Alcero Madrid
© Einfall Portum Uda
Enel Portugal
Apa do 2100 Pia da Idtio, 205 Jornado 2100
Rd. Lamar Cataroiu 24-26
Sr. A AP 9 Sectn. 1
RO75121Bacwesti
Tel. 021 4104800, Fax 021 4103568
④ Poler Plus S.R.O.
Basilu Pachovice
Budays 10 P
CZ 19011 Pnke - Beckovkin 911
(16) Slow GmbH
Mehel Kolon 19 W
Ninsh Kuchi St. 16 W BG-9000 Mmpa
Tel. 052 605254
HR Einbell Droatia do o
Veilm Yac
HR-49234 Lempiri
Tel 049 242 444 Fax 049 342 392
(110) GMA-Belkton echarika d.o.o
Costa Sodecta Filmom 115
SLO 1000 Lihbina
Tel 01/5839304, Fax:01/5193900
© In Mayo/Desarles S.8
Technical & Commercial Company
- Panastra tru & Addiriou St
GB 105-45 Plating
Tel: 0210 4126199
(1) Dem.
81.450000
THE WORLD
Tel: 095-7070179 Fax: 095-6401750
(2) Dihin
Dibita
Metlo St. 23
Tel: 05-2295789 Fax: 05-2295770
(44) 05 Dr. mail
AS EART Roiu aleu
Hondry sold
Hassava Yao FF-62102 To
Tel: 02 201 700 Fax: 07 201 701
Halai Trading Co. LLC
POB 9282, Naidveel Rd. Deira Shop No. 15
UAE-Delmi
Tel. 042279554, Fax 042217696
(II) Alborz Abzav Co. Ltd.
No. 111, Bastan Passage, Imam Khomeini Ave.
B-11546 Telecom
Tel 021 6716072, Fax 021 6727177
① Einhell BiiH d.o.o.
Poslovní Center 90
BA-72250 V
④ Europe industrial and automotive supply
Re-sensu et S
Duncanville
ZA-Moraining 1920
Tel 16 455 571 2 Fax 16 455 571 6
D
The reprinting or reproduction by any other means, in whole or in part, of documentation and papers accompanying products is permitted only with the express consent of ISC GmbH.
F
natural_image
Five gray metal trapezoidal components hanging from a stand, numbered 1 to 6, shown in a row (no text or symbols on the objects themselves)
text_image
2 ② ① ③ ① ② ③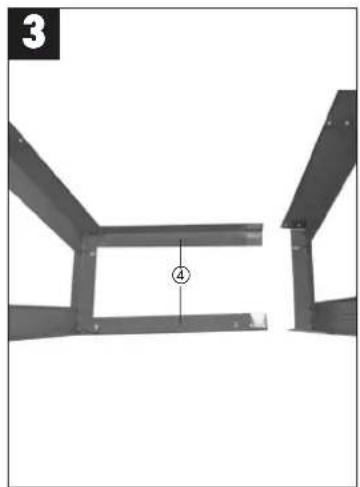
natural_image
Structural diagram of a metal frame with labeled dimension (4), no text or symbols present
3
text_image
4 ⑦ ⑤ ⑥ ⑤ ⑥
natural_image
Simple gray stool with visible legs and side supports, no text or symbols present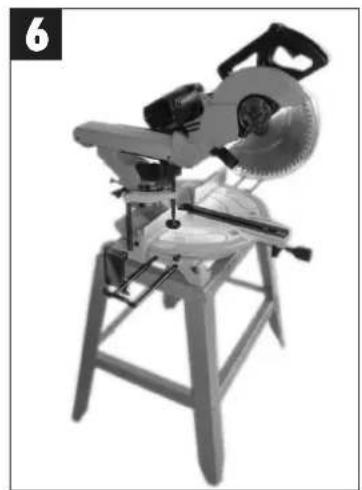
natural_image
Black-and-white photo of a manual cutting machine on a wooden stand, no visible text or symbols4
© Montage Untergestell (Abb. 1-6)
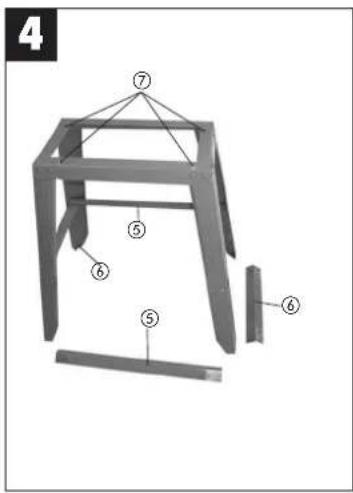
- First screw the 2 short upper struts (1) (Please note: The upper struts are equipped with slots (2) for fastening the saw) loosely from the inside to the top of the legs (3). Then screw the 2 longer upper struts (4) to the legs from the outside so that the slots coincide with the mounting holes of the saw.
● Place base frame on the 4 legs (3) and loosely screw the 2 long (5) and 2 short (6) struts to the 4 legs. - Align the base frame and tighten all the screws.
- Place the saw on the base frame so that the 4 slots (7) of the base frame coincide with the mounting holes of the saw.
- Secure all 4 bolts on the base frame so that they are tight.
© Montage du support (fig. 1-6)
© Montering understel (fig. 1-6)
E Commercial Finholl, S.A.
Travescio Villa Feter, 9 B
Polispo Industrial El Nocal
F-28119 Algate-Madrid
® Fishell Portugal Ltd.
Emmel Portugal Lus. Agedado 2105
Bus da Alcela 225 Anetado 2100
P-4405-017 Arcozelo VNG
Tel. 022 0917500 Fax 022 0917529
① Fishball Italy, c.
I-22070 Beredazzo (Co)
Tel. 031 992080, Fax 031 992084
DK Fishell Skandinavia
Bergesorgini 35
DK-8600 Slikeboro
Tel. 087 201200. Fax 087 201203
⑤ Horse Heralison
Radaginata 3
S-41463 Gateboro
N. Fishell Norms A/S
Saphus, Bungescuvi 48
Sophie Buggesva! 40 Posthokr 2005
N-3255 Lsvlik
(1) Söhléme Horsky
Sankolau Haru Or Kerizomenkaju 2
Korgsamtonkeid 2 FIN-33940 Tamport
Tel. 03 2345000, Fax 03 2345040
PL Fishrill Parkway 700
Ull. Marzalaska 2-5
SI. 1902-2024 Z-0 PI. 50-514 Wroclau
Tel 071 3346508 Fax 071 3346503
① Fishball Hypnosis Ltd
Emilai Hungana C Meisla, Peter 4, 17
Vajda Peter U. 12 H. 1090 Burianost
H-1089 Budapest Tel. 01 3039401 Fax 01 2101179
TE Sowok
makinis ticaret ve sanayi ži, eti
Alley Ceeme mab, Yasemin Sok, No: 19
TB 34843 Maltene - Istanbul
Tel. 0216 4594865. Fax 0216 4429325
Vohlerspo
Zupori 4
SK-95301 Zlate Morayce
Tel. 37 6126255, Fax 37 26256
⑫ Turkestan
HB Finchall Operational
Ennell Croabie
Vendel Vds 2 HP 40004 Lancel
HR-49224 Lepajci Tel 049 342 444. Fax 049 342 392
© CMA Electrometry
SMA-EIERIUMBANKA 0.0.0 Costa Agricina Pitanca 115
Cesta, Andreja, Biter SLO 1000 Luhilen
Tel 01/5838304, Fax 01/5163603
© An Mayollisonoules S. A
Technical & Commercial Company
- Paparatou & Askliniou Sir
GB 18545 Pirāus
Tel 0210 4136155, Fax 0210 4137692
193
Altufvyskon rbsse 24
BUS-127273 Moscow
Tel: 095-7870179 Fax: 095-5401760
- Divils
Matalo. ch. 22
MEATIO 80.25 LT 03199 VII
Tel: 05-2295769, Fax: 05-2295770
HSI AP Retail
CS BANCH Peiu elay
Houley Harlowa yald
Healeva valid EE-82102 Tarl
Tel: 07 301 700 Fax: 07 301 701
(4) Huiqi Trading Co., LLC
POB 9282, Makheel Rd. Deira, Shop No. 15
UAE-Dubal
Tel: 04 2279554. Fax: 04 2217686
(in) Ahng Abzar Co Ltd
No. 111. Basten Passage, Imam Khomeni Ave
IB-11146 Techeran
Tel 021 6716072, Fax 021 6727177
(6) Einbell BiH d.o.o.
Poslovi Center 96
BA-72250 Vitez
④ Eurasia Industrial and Automotive Supply
Bersemer Str.
Duncanville
ZA-Vereeniging 1930
Tel 16 455 571 2, Fax 16 455 571 6
D
The reprinting or reproduction by any other means, in whole or in part, of documentation and papers accompanying products is permitted only with the express consent of ISO GmbH.
F
Technical changes subject to change