HT-SBW53121 - Hi-fi system SHARP - Free user manual and instructions
Find the device manual for free HT-SBW53121 SHARP in PDF.

User questions about HT-SBW53121 SHARP
0 question about this device. Answer the ones you know or ask your own.
Ask a new question about this device
Download the instructions for your Hi-fi system in PDF format for free! Find your manual HT-SBW53121 - SHARP and take your electronic device back in hand. On this page are published all the documents necessary for the use of your device. HT-SBW53121 by SHARP.
USER MANUAL HT-SBW53121 SHARP
natural_image
Exterior view of a modern office building (no signage)User manual
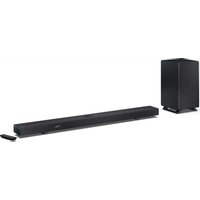
HT-SBW53121 | HT-SBW55121

Dolby Atmos & DTS:X Soundbar with Wireless subwoofer

text_image
EN BG CS DA DE EL ES ET FI FR HR HU IT LV NL NO PL PT RO SK SLLT SR SV UATrademarks:

Bluetooth®
The Bluetooth® word mark and logos are registered trademarks owned by Bluetooth SIG, Inc.

HIGH-DEFINITION MULTIMEDIA INTERFACE
The terms HDMI, HDMI High-Definition Multimedia Interface, HDMI Trade dress and the HDMI Logos are trademarks or registered trademarks of HDMI Licensing Administrator, Inc.

"Tuned by Devialet (registered mark)" is a registered trademark of DEVIALET SA. All IP rights reserved.
Dolby Atmos
Dolby, Dolby Atmos, and the double-D symbol are registered trademarks of Dolby Laboratories Licensing Corporation. Manufactured under license from Dolby Laboratories. Confidential unpublished works. Copyright © 2012-2020 Dolby Laboratories. All rights reserved.


For DTS patents, see http://xperi.com/dts-patents/. manufactured under license from DTS, Inc. and its affiliates. DTS, DTS:X, the DTS:X logo, Virtual X, and the DTS Virtual:X logo are registered trademarks or trademarks of DTS, Inc. and its affiliates in the United States and/or other countries. © DTS, Inc. and its affiliates. all rights reserved.
1
text_image
1234562
text_image
DC IN OPTICAL AUX IN USB 12345 HDMI 2 HDMI 1 HDMI TV (eARC/ARC)3
text_image
CAUTION RISK OF ELECTRIC SHOCK! DONUT OPEN ATTENTION R-SQUE DE CHOC ELECTRIQUE! NE PAS CLINIER PAR AC N 1 2 3 100.240V~ 50V/Hz4
5
natural_image
Simple line drawing of a horizontal panel with two labeled points and a small object on the right (no text or symbols)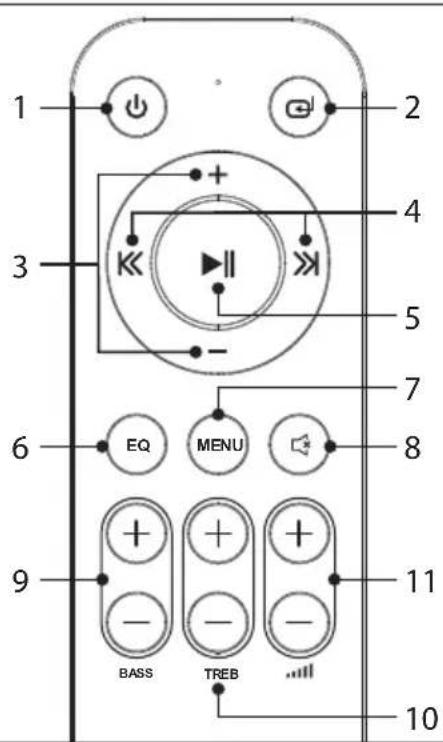
text_image
1 2 3 4 5 6 7 8 9 BASS TREB 106

natural_image
Technical line drawing of a mechanical assembly with two rectangular components and mounting holes (no text or symbols)8
7
text_image
805 mm TV ≥ 100 mm 1 805 mm Ø5.5-6mm 32mm 29
text_image
L AUX IN USB HDMI 2 HDMI 1 HDMI TV (eARC/ARC) HDMIOUT HDMI (eARC/ARC) OB HDMI IN TV10
text_image
TV AUX B HEADPHONE A AUDIO OUT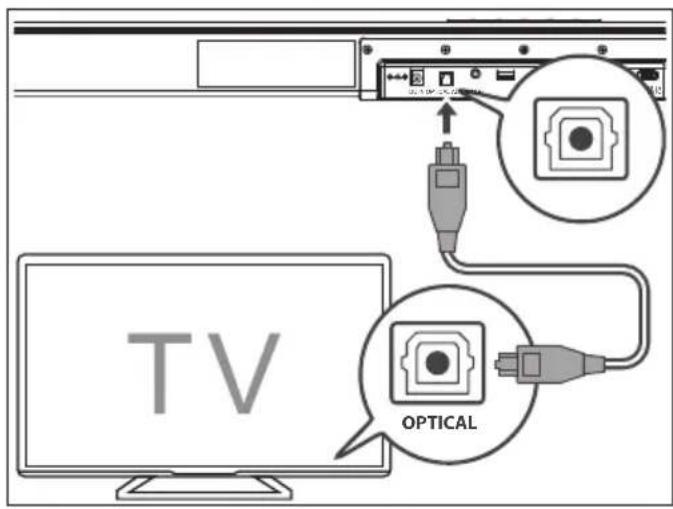
text_image
TV OPTICAL11
flowchart
graph TD
    A["Power Line"] --> B["DC IN"]
    B --> C["AC IN"]
    D["EU"] --> E["Ground"]
    F["UK"] --> G["Ground"]
    H["DC IN OPTIC"] --> I["AC IN"]
    style A fill:#f9f,stroke:#333
    style B fill:#ccf,stroke:#333
    style C fill:#cfc,stroke:#333
    style D fill:#fcc,stroke:#333
    style E fill:#cff,stroke:#333
    style F fill:#ffc,stroke:#333
    style G fill:#cfc,stroke:#333
    style H fill:#fcc,stroke:#333
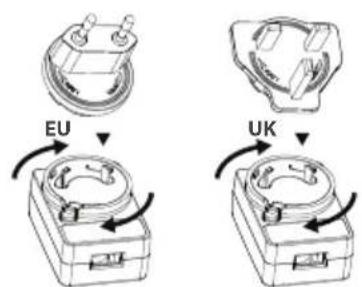
text_image
EU UKImportant safety instructions
Please follow all safety instructions and heed all warnings. Keep this manual for future reference.

This symbol instructs the user to consult the user manual for further safety, operational and maintenance related information.

Refers to class II equipment.
This symbol indicates that this product has a double insulation system and does not require a safety connection to electrical earth (ground).

Refers to alternating current (AC).
This symbol indicates that the rated voltage marked with the symbol is AC voltage.

Refers to direct current (DC).
This symbol indicates that the rated voltage marked with the symbol is DC voltage.

For indoor use only
Energy efficiency marking with level VI

Polarity of d.c. power connector
Precautions
Damage
- Please inspect the product for damage after unpacking. If there is damage in any way do not operate the product and consult your dealer.

text_image
CAUTION RISK OF ELECTRIC SHOCK DO NOT OPENTo prevent the risk of electric shock, do not remove cover (or back panel). No user serviceable parts inside; please refer servicing to qualified service personnel.
Power connection and accessibility
- Do not handle the power cable with wet hands as it may cause an electric shock. If the power plug does not fit into your outlet, do not force the plug into an electrical socket. Switch off the product completely before unplugging. Disconnect the power cable if it is not used for a long time. Ensure that the power plug is always easily accessible. Do not attach extension cables.
Power source
- Ensure that the product is plugged into AC 100-240V 50/60Hz power outlets. Using higher voltage may cause the product to malfunction or even catch fire.
Fused moulded power plug (Non rewireable) - UK, Malta, Cyprus and Ireland only.
- The power cable on this equipment is supplied with a moulded plug incorporating a 5 Amp fuse. The value of the fuse is indicated on the pin face of the plug and if it requires replacing, a fuse approved to BS1362 of the same rating must be used.
Power cord protection
- Do not damage the power cord, do not place any heavy objects on it, do not stretch it or bend it. Damage to the power cord can result in fire or electric shock. If the power cord is damaged, it must be replaced by the manufacturer, a service agent or similarly qualified persons.
Power Adapter
- If the product will not be used for a period of time it is recommended to switch the product off and remove the AC plug and DC power adapter from the mains outlets.
- Only use the supplied mains adapter as failure to do this may result in a safety risk and/or damage to the product.
Child safety
- Always follow basic safety precautions when using this product, especially when children are present. Children should be supervised to ensure that they do not play with the product.
Location
- When in use this product should be placed on a flat, stable surface with no part of the product overhanging an edge. Alternatively this product may be wall mounted as instructed in this user manual.
Ventilation
- Slots and openings in the cabinet are provided for ventilation and to ensure reliable operation of the product protecting it from overheating. These openings must not be blocked or covered. Ensure a minimum distance of 5cm around the product for sufficient ventilation. Never let anyone push anything into holes, slots or any other openings in the product's casing as this could result in an electric shock.
Heat and operating temperature
- Do not install near any heat sources such as radiators, heat registers, stoves, or other apparatus (including amplifiers) that produce heat. Avoid exposure to direct sunlight.
Naked flames
- To prevent the risk of fire, keep candles or open flames away from this product.
Water, moisture, and liquid entry
- To prevent the risk of fire or electric shock, do not expose this product to rain, water or moisture. Do not place objects filled with liquids on or near this product.
Storms and lightning
- Storms are dangerous for all electric products. If the power is struck by lightning, the product might get damaged, even if it is turned off. You should disconnect all the cables and connectors of the product before a storm.
Maintenance
- Unplug the power plug from the power source before cleaning the product. Use the soft brush attachment of your vacuum cleaner and lightly vacuum the speakers fabric. Use a soft and clean cloth to clean the speakers cabinets. Never clean them with chemicals or detergents.
Service and repair
- This product does not contain any parts that are serviceable by the user. Exposing the internal parts inside the product may endanger your life. In case of a fault, contact the manufacturer or authorised service department. The manufacturers guarantee does not extend to faults caused by repairs carried out by unauthorised third parties.
Batteries
Installation
- Do not use any batteries other than those specified. Observe the correct polarity when inserting the batteries. Never use different types of batteries together or mix new and old ones.
Use and maintenance
- Do not expose batteries to high temperatures, e.g. near fire or in direct sunshine. When the product is not to be used for a long time (more than a month), remove the batteries from the product
to prevent them from leaking. If the batteries leak, wipe away the leakage inside the battery compartment and replace the batteries with new ones.
Child safety
• Always ensure battery compartment is closed and secured.
- Batteries are easily swallowed by young children and can cause severe internal burns and lead to death. Keep batteries away from children. Seek immediate medical advice if you believe a battery has been swallowed.
Environmental conditions
- Keep batteries away from low air pressure or high temperatures as this may result in an explosion or the leakage of a flammable liquid or gas.
Disposal
- Please dispose of batteries correctly by following the guidance in this manual (see section "Disposal of this equipment and batteries"). Do not throw them into fire, do not disassemble them and do not try to recharge non-rechargeable batteries. They could leak or explode.
Disposal of this equipment and batteries
Information for users on collection and disposal of old equipment and used batteries.
This symbol means that the product contains batteries covered by European Directive 2013/56/EU which cannot be disposed of with normal household waste. Cd, Hg and Pb underneath the wheelie bin symbol shows whether the battery contains, cadmium (Cd), mercury (Hg) or lead (Pb).

This symbol on a product means that the product is covered by European Directive 2012/19/EU and must not be disposed of or dumped with your other household waste.

This symbol means that the product is designed and manufactured so that it can be recycled and reused.
These symbols on the products, packaging, and/or accompanying documents mean that used electrical and electronic products and batteries should not be mixed with general household waste. Household users should contact either the retailer where they purchased this product, or their local government office, for details of where and how they can take these items for environmentally safe recycling.
CE and UKCA statement:
- Hereby, Sharp Consumer Electronics Poland sp. z o.o. declares that this audio device is in compliance with the essential requirements and other relevant provisions of RED Directive 2014/53/EU and UK Radio Equipment Regulations 2017.
- The full CE text and UKCA declaration of conformity are available at sharpconsumer.com and then entering download section of your model and choosing "CE Statements".
Rear Speaker Ready
For an enhanced, immersive experience, add HT-SPR52021 Wireless Rear Surround Speakers for an additional two surround channels and two height channels.

text_image
Rear Speaker ReadyScan the QR code for further details:

text_image
QR code image containing encoded data, no visible human-readable textwww.sharpconsumer.com/rear-surround-speakers
Box contents
- Soundbar
- Wireless subwoofer
• Remote control (inc. batteries) - Power adapter
• 2 pin (type C) plug adapter
• 3 pin (type G) plug adapter
• EU AC power cable - UK AC power cable
- HDMI cable
• Soundbar low feet (2 pcs)
• Soundbar wall-mount brackets (2 pcs)
• Soundbar wall-mount fixings - User manual
- Warranty card
Controls
Soundbar
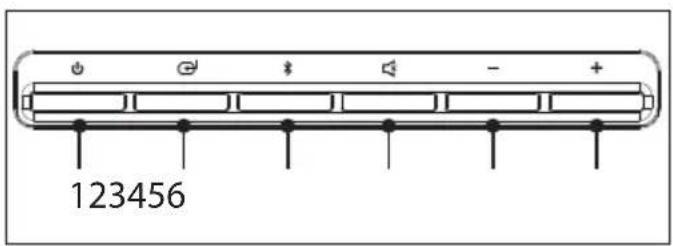
(Refer to 1 on page 1)
- Switch the system between ON and STANDBY.
- ⬆ – Select the source of audio (HDMI eARC/ARC, HDMI 1, HDMI 2, USB, AUX IN, BT, OPTICAL).
- ✗ – Select Bluetooth mode. Press and hold to activate the pairing function in Bluetooth mode or disconnect the existing paired Bluetooth device.
-
- Press to mute or resume the sound.
Long press to mute or unmute the rear speakers (if purchased separately).
- Press to mute or resume the sound.
- — Reduce volume.
-
-
- Increase volume.
-
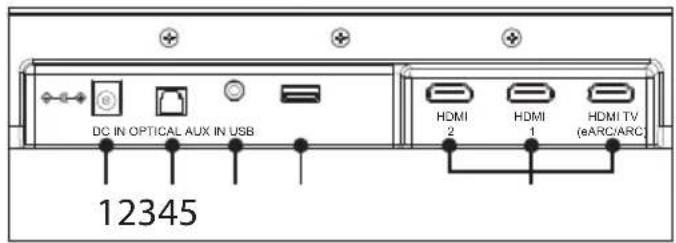
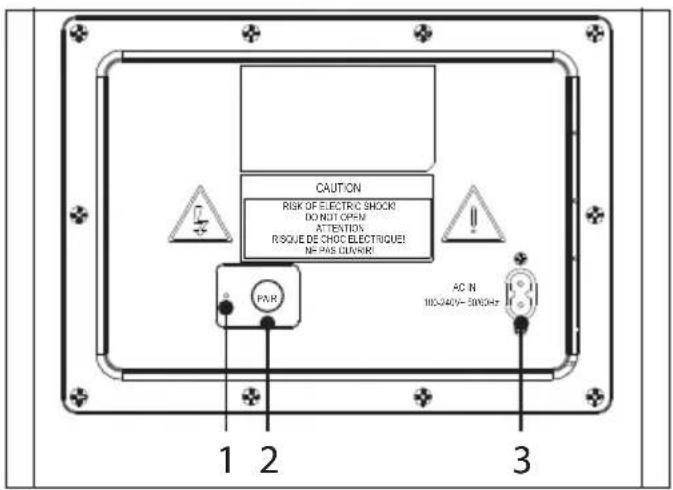
(Refer to 2 on page 1)
- DC IN - Socket for connecting power adapter (DC 22V, 2.1A).
- Optical – Optical input port.
- AUX IN – Connect to an external audio device.
- USB – Insert USB flash drive to play music.
- HDMI (1/2/eARC/ARC) – Connect HDMI TV (eARC/ARC) to your TVs HDMI (eARC/ARC) port. Connect other devices to HDMI 1 / 2 to pass-through to TV.
Subwoofer
(Refer to 3 on page 1)
- PAIR indicator.
- PAIRbutton – Please refer to section "Subwoofer pairing".
- AC IN power input.
Remote Control
(Refer to 4 on page 1)
- switch the system between ON and STANDBY.
- ⬇ – Select the source of audio (HDMI eARC/ARC, HDMI 1, HDMI 2, USB, AUX IN, BT, OPTICAL).
- +/− Menu navigation. Adjust setting value.
- << / >>Press to skip to previous/next track or long press to fast rewind/fast forward in Bluetooth/USB source. Menu navigation.
-
▶|| – Play/pause/resume playback in Bluetooth/USB source. Menu selection.
-
EQcycle EQ presets..
- MENU – Enter the soundbar menu.
- ☐ – Press to mute or resume the sound. Long press to mute or unmute the rear speakers (if purchased separately).
- BASS ✝ -Press to activate bass level adjustment in custom EQ preset.
10.TREB ✅ Press to activate treble level adjustment in custom EQ preset. - ... + - increase/decrease the volume level.
Battery installation
- To open the battery compartment, push your thumb down on to the battery compartment cover and slide it down.
- Fit two AAA batteries observing polarity +/- as shown. When replacing the batteries, use only the same type of battery supplied.
- Re-fit the battery cover and clip it in place.
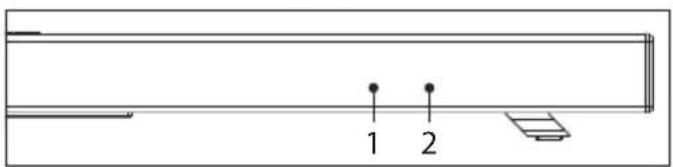
Soundbar front
(Refer to 5 on page 1)
- Remote control sensor.
- LED display.
Soundbar base
(Refer to 6 on page 2)
- Wall-mount bracket screw locations.
Placement and mounting
Placement - soundbar
A If your TV is placed on a table or a wall, you can place the soundbar on a flat surface in front of or underneath the TV, centred with the TV screen.
B If your TV has a centre-mounted stand, you can consider to use the pre-fitted high feet to elevate the soundbar over all or part of the TV stand. This feature has been designed for use with Sharp EQ and FQ series TVs and compatibility with other models and brands is not guaranteed.
C If your TV is attached to a wall, you can mount the soundbar on the wall directly below the TV screen, centred with the TV screen using the included wall-mount kit.
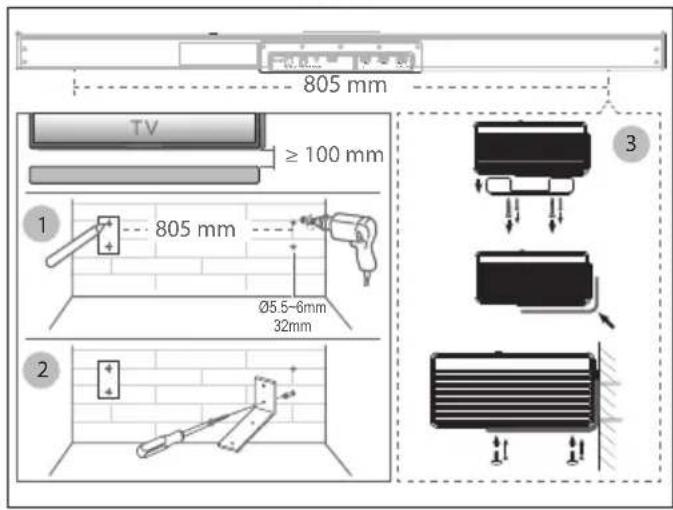
Wall mounting (if using option-C)
(Refer to 7 on page 2)
- Installation must be carried out by qualified personnel only. Incorrect assembly can result in severe personal injury and property damage (if you intend to install this product yourself, you must check for installations such as electrical wiring and plumbing that may be buried inside the wall). It is the installer's responsibility to verify that the wall will safely support the total load of the soundbar and wall brackets.
• Install the Soundbar so the top of the soundbar is at least 100 mm below the bottom of the TV.
• Additional tools (not included) are required for the installation. - Do not overtighten screws.
- Keep this instruction manual for future reference.
- Use an electronic stud finder to check the wall type before drilling and mounting.
IMPORTANT NOTE:
ū You cannot wall mount the soundbar if the riser feet are still attached.
- Using one of the wall-mount brackets, mark the position of the 2 holes on the wall at the desired height. Mark the hole position for the second bracket, ensuring the distance between the two sets of holes is 805 mm. Ensure the soundbar is centered with your TV. Check the position of the marks are parallel using a spirit level. Drill the holes with a 5.5-6mm drill bit to a minimum depth of 32mm. Install the Soundbar so the top of the soundbar is at least 100 mm below the bottom of the TV.
- Firmly fix a wall plug into each hole in the wall if necessary. Tighten the wall-mount brackets on the wall with the provided screws. Make sure that they are securely installed.
- Remove the 2 sets of 2 screws which secure the high feet to the soundbar. Do not try to remove the nearby screws with a torx fitment.
- Lift the soundbar into place and line up the wall-mounting screw holes of the brackets and the soundbar.
- Do not use the previously removed screws for the high feet. Instead, use the screws in the wall mounting screwpack that have a rounded head.
Placement - subwoofer
The subwoofer should be placed in the same room as the soundbar and within 6 meters range of the soundbar. This is to ensure a good wireless connection at all times.
Ideal locations for the subwoofer include:
Room corners: Placing the subwoofer in a corner amplifies bass but can lead to boomy or muddy sound.
Front of the room: Positioning the subwoofer near the front with the soundbar provides clearer and balanced bass.
Avoid enclosed spaces: Do not place the subwoofer in cabinets or enclosed spaces to maintain sound quality.
Away from walls: Leave a few inches between the subwoofer and the wall to reduce vibrations and distortions.
Connections
Dolby Atmos and DTS:X
Dolby Atmos delivers an unparalleled audio experience, featuring overhead sound and the signature richness, clarity, and power of Dolby audio.
To listen to Dolby Atmos audio through your soundbar, you will need Dolby Atmos content delivered to your TV.
Dolby Atmos content is available via some broadcast services, streaming services or via external devices connected by HDMI e.g. a Dolby Atmos compatible games console or Blu-ray player.
For more information on Dolby Atmos content availability visit dolby.com.
DTS:X® technology delivers immersive audio for today's dynamic home entertainment experiences. DTS:X technology delivers multichannel audio and features support for audio objects to bring you closer than ever to your favorite content.
For more information on DTS:X content availability visit dts.com.
Using Dolby Atmos and DTS:X
Dolby Atmos and DTS:X is available only on HDMI sources. For the details of the connection, please refer to "HDMI Connection".
To experience Dolby Atmos and DTS:X through HDMI TV (eARC/ARC),
HDMI 1 or HDMI 2, ensure your TV or source device HDMI audio output is set to PASS THROUGH, AUTO, BITSTREAM or other equivalent mode.
This setting is usually adjusted via the menu of your TV or source device. When the soundbar detects Dolby Atmos or DTS:X content, the
soundbar will display
Using eARC
The "e" in eARC stands for "enhanced". AV equipment with eARC HDMI ports enjoy greater bandwidth and speed compared to regular ARC ports. This allows a wider frequency range and uncompressed audio resulting in more detailed, rich and vibrant sound delivery. Using eARC HDMI ports and compatible cables also allows audio formats such as Dolby Atmos and DTS:X to be played at their full capacity. Your soundbar comes with a high-speed HDMI cable to take advantage of the extra bandwidth offered by eARC.
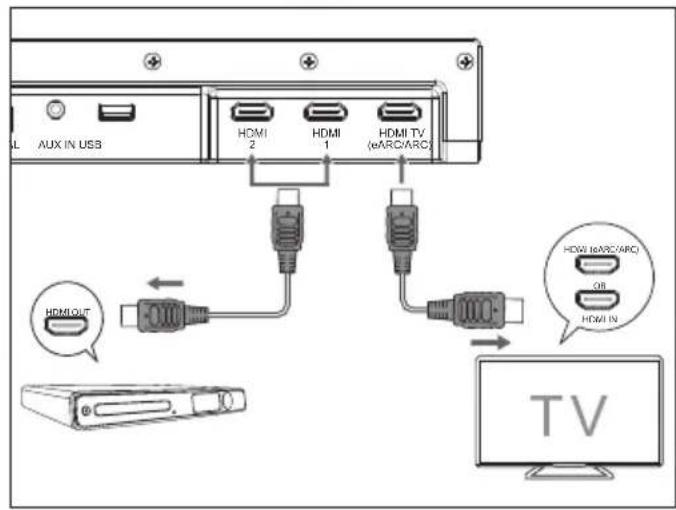
HDMI connection
Using HDMI to connect the soundbar, AV equipment and TV.
Method 1: eARC/ARC
Connect the HDMI cable (included) from the soundbar's HDMI TV (eARC/ARC) port to the HDMI (eARC/ARC) port on your eARC/ARC compliant TV.
TIPS:
ū Your TV must support the HDMI-CEC and eARC/ARC function. HDMI-CEC and eARC/ARC must be set to On in the TVs settings.
ü The setting method of HDMI-CEC and eARC/ARC may differ depending on the TV. For details about eARC/ARC function, please refer to the owner's manual.
Method 2: Standard HDMI
(Refer to 8 on page 2)
If your TV is not HDMI eARC/ARC compliant, connect your soundbar to the TV through a standard HDMI connection.
- Use an HDMI cable to connect the soundbar's HDMI TV (eARC/ARC) port to the TV's HDMI IN port.
- Use an HDMI cable to connect the soundbar's HDMI IN (1 or 2) port to your external devices (e.g. games consoles, DVD players and blu ray).
NOTE:
ū If your TV does not have/support eARC/ARC, no audio sources connected directly to the TV will be sent to the soundbar.
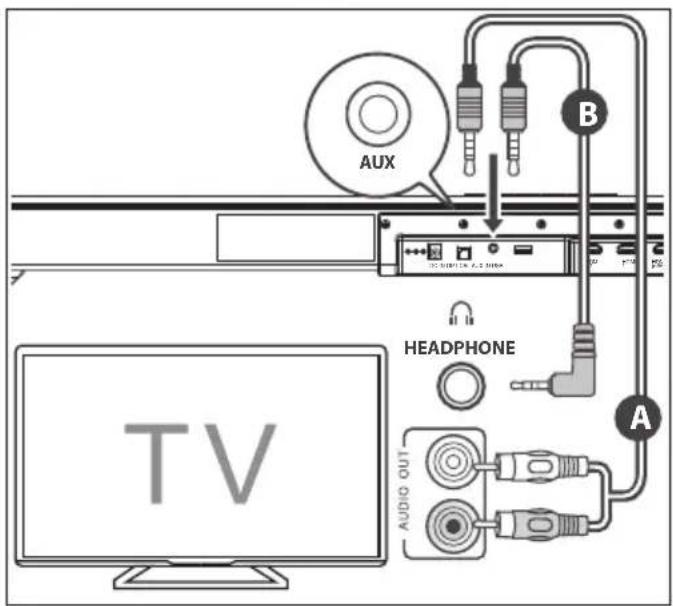
Use the AUX IN port
(Refer to 9 on page 2)
A Use a RCA to 3.5mm audio cable (not included) to connect the TV's audio output RCA ports to the AUX IN port on the soundbar.
B Use a 3.5mm to 3.5mm audio cable (not included) to connect the TV's or external audio device headphone port to the AUX IN port on the soundbar.
Use the OPTICAL port
(Refer to 10 on page 2)
Connect an optical cable (not included) to the TV's OPTICAL OUT port and the OPTICAL port on the soundbar.
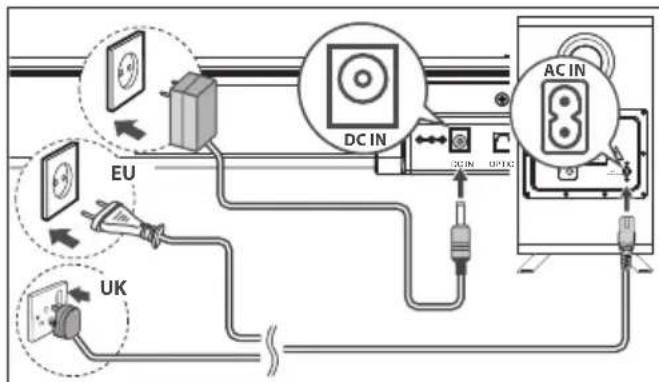
Connect power
(Refer to 11 on page 2)
Risk of product damage!
- Ensure that the power supply voltage corresponds to the voltage printed on the back of the unit.
- Before connecting the DC adapter, ensure you have completed all other connections.
Soundbar
- Connect the adapter to the DC socket of the soundbar and then into a mains socket.
Subwoofer
- Connect the power cord to the AC IN socket of the subwoofer and then into a mains socket.
Subwoofer pairing
Automatic pairing
The subwoofer and soundbar will pair automatically when both are plugged into the mains supply. Connection is wireless, so there is no need for any cables to connect the two units.
- When the subwoofer is connecting with the soundbar, the PAIR indicator will flash.
- When the subwoofer is connected with the soundbar, the PAIR Indicator will light up.
NOTE:
ū Only press the PAIR button on the rear of the subwoofer if pairing manually.
ū If the automatic pairing fails, pair the subwoofer with the soundbar manually.
Manual pairing
- Ensure that all the cables are securely connected and the soundbar is in STANDBY.
- Press and hold the PAIR button on the rear of the subwoofer for 3 seconds. The subwoofer will enter pairing mode and the PAIR Indicator will flash quickly.
-
Press the ⏻ button on the soundbar or on the remote control to switch the system on.
-
Press the MENU button on the remote control, then press the button to highlight
. Press hand wait for 5 seconds. -
When the subwoofer is paired with the soundbar, the PAIR Indicator will light up and the soundbar will display
. -
If the PAIR indicator flashes slowly, the wireless connection has failed and the soundbar will display . Unplug the power cable from the subwoofer and then reconnect the power cable after 4 minutes. Repeat steps 1 \~ 4.
NOTE:
ü If the wireless connection fails again, check if there is conflict or strong interference (for example, interference from an electronic device) around your location. Remove these conflicts or strong interferences and repeat the above procedures.
Basic operation
Standby/ON
When you first connect the soundbar and subwoofer to the mains socket, the soundbar and subwoofer will be in STANDBY.
- Press the ⏻ button on the soundbar or on the remote control to switch the system ON.
- Press the ⏻ button again to switch the system back to STANDBY.
- Disconnect the mains plug from the mains socket for both soundbar and subwoofer if you want to switch the system OFF completely. If a CEC enabled TV/external device is connected, the soundbar will switch on automatically when the TV or the external device is switched on.
ū When there is no input signal received by the soundbar in over 15 minutes, then the system will automatically go into STANDBY.
NOTE:
ū Your TV or external device needs to have CEC enabled if you want the soundbar to turn on when you switch your TV or external device on.
ü CEC stands for Consumer Electronics Control and is a universal method for different devices to communicate with one another. ü See the MENU section for how to disable auto standby.
Select source modes
Press the button repeatedly on the soundbar or on the remote control to select the HDMI HDMI eARC/ARC, HDMI 1, HDMI 2, USB, AUX IN, BT or OPT source. The selected source will show on the soundbar's display.
Adjust the volume
- Press the ...M buttons on the soundbar or on the remote control to adjust the volume.
- If you wish to mute the sound, press the ✗ button on the remote control. Press the ✗ button again or press the ✗ buttons on the soundbar or on the remote control to resume normal listening.
- While playing, press the button on the remote control to select between preset equalisers: MUSIC, MOVIE, VOICE, GAME, SPORT, NIGHT, CUSTOM or EQ OFF.
Adjust the bass / treble
You can adjust the bass and treble levels for the custom EQ setting. Pressing the BASS + or TREB automatically switch the soundbar to the custom EQ setting.
- Press the BASS + button on the remote control to adjust bass level.
- Press the TREB + on the remote control to adjust treble level.
Bluetooth operation
Pair Bluetooth-enabled devices
The first time you connect your Bluetooth device to this soundbar, you need to pair your device to this soundbar.
- With the soundbar power ON, press the ✗ button on the soundbar or the ⏻ button on the remote control to select the BLUETOOTH source.
- Activate your Bluetooth device and select the search mode. "SHARP HT-SBW53121" or "SHARP HT-SBW55121" will appear on your Bluetooth device list depending on your model.
- Select "SHARP HT-SBW53121" or "SHARP HT-SBW55121" in your Bluetooth pairing list. After successful pairing, the soundbar will display
. - Play music from the connected Bluetooth device. To disconnect the Bluetooth function, you can:
ü Switch to another function on the soundbar.
ū Press and holds on the soundbar or remote control.
TIPS:
ū The soundbar will also be disconnected when your device is moved beyond the operational range.
ū If you want to reconnect your device to this soundbar, place it within the operational range.
ū If the device is moved beyond the operational range, when it is brought back, please check if the device is still connected to the soundbar.
ū If the connection is lost, follow the instructions above to pair your device to the soundbar again.
Listen to music from Bluetooth devices
- If the connected Bluetooth device supports Advanced Audio Distribution Profile (A2DP), you can listen to the music stored on the device through the soundbar.
- If the device also supports Audio Video Remote Control Profile (AVRCP), you can use the soundbar's remote control to play music stored on the device.
- Pair your device with the soundbar.
- Play music via your device (if the Bluetooth device supports A2DP).
- Use the soundbars remote control to control playback with the ▶ and the (<< / >> if the Bluetooth device supports AVRCP).
NOTES:
ū The operational range between this soundbar and a Bluetooth device is approximately 8 meters (without any object between the Bluetooth device and the soundbar).
ū Compatibility with all Bluetooth devices is not guaranteed.
ū Any obstacle between this soundbar and a Bluetooth device can reduce the operational range.
ū If the signal strength is weak, your Bluetooth receiver may disconnect, but it will re-enter pairing mode automatically.
USB operation
- Insert the USB device into the soundbar's USB socket.
- Press the ⏻ button repeatedly on the soundbar or the remote control to select the USB source.
- You can navigate different folders stored on the USB device. Press + /— to change the folder.
- Press ▶∥ to play the selected track.
- During playback:
ū To pause or resume play, press th▶|| button on the remote control.
ü To skip to the previous/next file, press the << / > buttons on the remote control. Press and hold << / >> fast rewind / fast forward a track.
TIPS:
ü USB devices up to 32GB are supported.
ü Only MP3/OGG/WAV/FLAC/AAC/AAC+/ALAC files can be played back.
The USB port is for playback or upgrading the software of the soundbar. It is not for charging purposes.
Menu operation
Navigate the soundbars menu by using the remote control and pressing MENU. Use the directional control on the remote control to navigate the available options. Press ▶ to select the menu option. To select a setting within a menu option, use << />>Press ▶ enter a sub-menu. Press MENU to return to the menu level above.
SURR
Turns Dolby Virtualiser or DTS Virtual:X ON or OFF. Dolby Virtualiser affects Dolby Signals. DTS Virtual:X affects DTS and PCM signals.
NOTE:
ü SURR ON/OFF has no effect on a Dolby Atmos signal.
AUDIO FORMAT (scrolling)
Displays on the current audio format being played.
SUBVOL
Adjust the output volume of the subwoofer. Choose between VOL +5 and VOL -5.
SPKVOL
Opens the rear surround speaker volume sub menu.
SPK L or SPK R. Adjust the volume of each surround speaker.
Choose between VOL +5 and VOL -5.
MUTE. Change this setting to mute the rear speakers. Options are ON or OFF.
NOTE:
The default setting is OFF. If switched ON, the rear surround speakers will remain muted until they are unmuted, even if the system has been in standby. Unplugging the soundbar from the mains power supply will automatically switch muting OFF again.
DISP
You can change how many seconds elapse before the soundbars display turns off.
Choose from: 5, 10 or ON. ON will keep the display active at all times.
DIM
You can change the brightness level of the soundbars display.
Choose from: LOW, MED, or HIGH.
STDBY
Change this setting to turn off the automatic standby option. Options are ON or OFF.
The default is ON.
WLPAIR
Select this to manually pair the subwoofer and (optional) rear surround speakers.
WL VER
Shows the current wireless subwoofer and rear surround speakers software version.
SW VER
Shows the current software version of the soundbar.
SW UPG
Activates a software upgrade from an inserted USB stick.
NOTE:
This will only work with compatible software on a USB stick inserted into the soundbars USB port. Periodically check www.sharpconsumer.com for software updates.
RESET
Opens the reset sub menu.
Choose
Room calibration and positional adjustment
The volume of the subwoofer (and rear speakers if purchased separately) can be adjusted relative to the soundbar. This manual calibration allows for greater flexibility when positioning the system components in the room. The default volume for each component is set to 0 and can be adjusted from -5 to +5. Based on the listening position, the default volumes assume a distance of 2m from the subwoofer and 1.5m from the rear speakers. Use the
Troubleshooting
Q: Sometimes I notice minor distortions in voices played through the rear surround speakers (available to purchase separately).
A: This should only occur when a 2.0 channel stereo audio source is being upmixed to 5.1.4 or 7.1.4 channels. With 2.0 channel audio formats, vocals are generally intended to be played from the soundbar only (this is not always the case with multi-channel audio sources). However, in some circumstances voices from 2.0 channel audio sources cannot be separated reliably by the Dolby and DTS upmixer; the result may be that you notice some voices are played through the rear surround speakers at a low volume, and in some instances these voices
may sound distorted. We recommend that the rear surround speakers are positioned at least 1m from your listening position and at this distance any vocal distortion should not be noticeable. If you do notice this behaviour, you can temporarily mute the rear surround speakers.
To do this:
Long press the ✕ on the remote control or on the soundbar to mute the rear surround speakers. Long press again to un-mute.
Or, you can use the soundbar menu:
Navigate the soundbar's menu to select
Use << or >> to select
NOTE:
ü The default setting is OFF. If switched ON, the rear surround speakers will remain muted until they are unmuted, even if the system has been in standby. Unplugging the soundbar from the mains power supply will automatically switch muting OFF again.
text_image
QR code image containing encoded data, no visible human-readable textwww.sharpconsumer.com/rear-surround-speakers
Fused moulded power plug (Non rewireable) - UK, Malta, Cyprus and Ireland only.
text_image
Rear Speaker Readytext_image
QR code image containing encoded data, no visible human-readable textwww.sharpconsumer.com/rear-surround-speakers
Co je v balení:
text_image
Rear Speaker Readytext_image
QR code image containing encoded data, no visible human-readable textwww.sharpconsumer.com/rear-surround-speakers
text_image
Rear Speaker Readytext_image
QR code image containing encoded data, no visible human-readable textwww.sharpconsumer.com/rear-surround-speakers
AUDIO FORMAT (scrolling)
text_image
QR code image containing encoded data, no visible human-readable textwww.sharpconsumer.com/rear-surround-speakers
text_image
QR code image containing encoded data, no visible human-readable textwww.sharpconsumer.com/rear-surround-speakers
Olulised ohutusjuhised
text_image
QR code image containing encoded data, no visible human-readable textwww.sharpconsumer.com/rear-surround-speakers
Karbi sisu:
Kasutage OPTICAL-porti
(Vt 10,1k 2)
text_image
QR code image containing encoded data, no visible human-readable textwww.sharpconsumer.com/rear-surround-speakers
Laatikon sisältö:
text_image
Rear Speaker Readytext_image
QR code image containing encoded data, no visible human-readable textwww.sharpconsumer.com/rear-surround-speakers
text_image
QR code image containing encoded data, no visible human-readable textwww.sharpconsumer.com/rear-surround-speakers
Što je u kutiji:
• Zvučnik
- Bežični subwoofer
• Daljinski upravljač (uklj. baterije)
- Prilagodnik napajanja
• 2-pinski prilagodnik utikača (tip C)
• 3-pinski prilagodnik utikača (tip G)
• EU AC kabel napajanja
• UK AC kabel napajanja
• HDMI kabel
• Soundbar niske noge (2 kom)
• Soundbar zidni nosači (2 kom)
• Soundbar zidne pričvrsnice
- Korisnički priručnik
- Jamstveni list
Kontrole
Zvučnik
(Pregledajte 1 na str. 1)
- Uključivanje uređaja i prebacivanje u stanje pripravnosti.
- ⬆ – Odaberite izvor zvuka (HDMI eARC/ARC, HDMI 1, HDMI 2, USB, AUX IN, BT, OPTICAL).
- ✝ – Odaberite Bluetooth način. Držite pritisnuto kako biste aktivirali uparivanje u Bluetooth načinu ili odspojili postojeći upareni Bluetooth uređaj.
- – Prigušivanje i ponovno uključivanje zvuka.
Dugo pritisnite za prigušivanje ili ponovno uključivanje stražnjih zvučnika (ako su kupljeni zasebno). - — Smanjite glasnoću.
-
+- Povećajte glasnoću.
(Pregledajte 2 na str. 1) -
DC IN – Utičnica za priključivanje prilagodnika napajanja (DC 22V, 2.1A).
- Optički – Priključak optičkog ulaza.
- AUX IN – Priključite vanjski audiouređaj.
- USB – Umetnite USB flash pogon za reprodukciju glazbe.
- HDMI (1/2/eARC/ARC) – Povežite HDMI TV (eARC/ARC) s HDMI (eARC/ARC) priključkom na TV-u. Povežite ostale uređaje s HDMI 1 / 2 za prijenos na TV.
Subwoofer
(Pregledajte 3 na str. 1)
natural_image
Diagram showing two devices with sensor waves connected to a wireless signal block (no text or symbols)Rear Speaker Ready
text_image
QR code image containing encoded data, no visible human-readable textwww.sharpconsumer.com/rear-surround-speakers
text_image
QR code image containing encoded data, no visible human-readable textwww.sharpconsumer.com/rear-surround-speakers
text_image
QR code image containing encoded data, no visible human-readable textwww.sharpconsumer.com/rear-surround-speakers
Déžès turinys:
AUDIO FORMAT (sliding)
Rodomas dabar atkuriamas garso formatas.
SUBVOL
text_image
Rear Speaker Readytext_image
QR code image containing encoded data, no visible human-readable textwww.sharpconsumer.com/rear-surround-speakers
natural_image
Simple line drawing of a Wi-Fi signal icon above a sensor or antenna (no text or symbols)Rear Speaker Ready
text_image
QR code image containing encoded data, no visible human-readable textwww.sharpconsumer.com/rear-surround-speakers
Inhoud van de doos:
- Luidspreker
- Draadloze subwoofer
• Afstandsbediening (incl. batterijen) - Vermogensadapter
• 2-pins (type C) stekkeradapter
• 3-pins (type G) stekkeradapter
• EU-stroomkabel - UK-stroomkabel
- HDMI-kabel
• Soundbar lage voetjes (2 stuks)
• Soundbar muurbeugels (2 stuks)
• Soundbar muurbevestigingen - Handleiding
- Garantiekaart
Bediening
Luidspreker
(Zie 1 op blz. 1)
text_image
QR code image containing encoded data, no visible human-readable textwww.sharpconsumer.com/rear-surround-speakers
Eskens innhold
• Høyttaler
- Trådløs subwoofer
• Fjernkontroll (inkl. batterier)
- Strømadapter
• 2-pinners (type C) overgang
• 3-pinners (type G) overgang
• EU AC-strømkabel
• UK AC-strømkabel
- HDMI-kabel
• Lydplanke lave føtter (2 stk)
• Lydplanke veggmonteringsbraketter (2 stk)
• Lydplanke veggmonteringsfester
- Bruksanvisning
• Garantikort
Kontroller
Høyttaler
(Se 1 pô side 1)
text_image
Rear Speaker Readytext_image
QR code image containing encoded data, no visible human-readable textwww.sharpconsumer.com/rear-surround-speakers
text_image
QR code image containing encoded data, no visible human-readable textwww.sharpconsumer.com/rear-surround-speakers
Conteúdo da caixa:
natural_image
Diagram showing two devices connected to a Wi-Fi signal source (no text or symbols)Rear Speaker Ready
text_image
QR code image containing encoded data, no visible human-readable textwww.sharpconsumer.com/rear-surround-speakers
Continutul cutiei
• Difuzor
- Subwoofer wireless
• Telecomandă (incl. baterii)
- Adaptor de alimentare
- Adaptor de priză cu 2 pini (tip C).
- Adaptor de priză cu 3 pini (tip G).
• Cablu de alimentare AC UE
• Cablu de alimentare AC UK
- Cablu HDMI
• Soundbar picioare joase (2 buc)
• Soundbar suporturi de montare pe perete (2 buc)
- Soundbar fixări de montare pe perete
- Manual de utilizare
- Certificat de garantie
Comenzi
Difuzor
text_image
QR code image containing encoded data, no visible human-readable textwww.sharpconsumer.com/rear-surround-speakers
Čo je v balení
text_image
Rear Speaker Readytext_image
QR code image containing encoded data, no visible human-readable textwww.sharpconsumer.com/rear-surround-speakers
Vsebina embalaže
text_image
QR code image containing encoded data, no visible human-readable textwww.sharpconsumer.com/rear-surround-speakers
Šta je u kutiji
• Zvučnik
- Bežični podvufer
• Daljinski upravljač (uklj. baterije)
- Adapter za napajanje
• 2 pina (tip C) adaptera za utikač
• 3 pina (tip G) adaptera za utikač
• EU AC kabl za napajanje
• UK AC kabl za napajanje
• HDMI kabl
• Zvučna traka niske nogice (2 kom)
• Zvučna traka zidni nosači (2 kom)
• Zvučna traka zidni pričvršćivači
- Korisničko uputstvo
- Kartica garancije
Kontrole
Zvučnik
(Pogledajte 1 na strani 1)
- Prebacite sistem između UKLUUČENO i PRIPRAVNOST.
- ☑ – Izaberite izvor zvuka (HDMI eARC/ARC, HDMI 1, HDMI 2, USB, AUX IN, BT, OPTICAL).
- ✝ – Izaberite Bluetooth režim. Pritisnite i držite da biste aktivirali funkciju uparivanja u režimu Bluetooth ili isključite postojeći upareni Bluetooth uređaj.
- – Pritisnite da utišate ili nastavite sa zvukom. Dug pritisak da biste utišali ili uključili zadnje zvučnike (ako su kupljeni posebno).
- — Smanjite jačinu.
- +- Pojačajte jačinu.
(Pogledajte 2 na strani 1)
- DC IN – Utičnica za povezivanje adaptera napajanja (DC 22V, 2.1A).
- Optical – Optički ulaz.
- AUX IN – Povežite se na spoljni audio uređaj.
- USB – Ubacite USB fleš drajv da biste puštali muziku.
- HDMI (1/2/eARC/ARC) – Povežite HDMI TV (eARC/ARC) na HDMI (eARC/ARC) port vašeg TV-a. Povežite ostale uređaje na HDMI 1 / 2 za prosleđivanje na TV.
Sabvufer
(Pogledajte 3 na strani 1)
text_image
Rear Speaker ReadySkanna QR-koden för mer information:

text_image
QR code image containing encoded data, no visible human-readable textwww.sharpconsumer.com/rear-surround-speakers
text_image
Rear Speaker Readytext_image
QR code image containing encoded data, no visible human-readable textwww.sharpconsumer.com/rear-surround-speakers
Вміст упаковки:
Sharp Consumer Electronics Poland sp. z o.o. Ostaszewo 57B, 87-148 Łysomice, Poland
Made in China
SAU/MAN/0193 V6
www.sharpconsumer.com
SHARP