
WS2331 - Weather Station ADE - Free user manual and instructions
Find the device manual for free WS2331 ADE in PDF.


| Product Type | Weather station (pool and outdoor thermometer) |
| Brand | ADE |
| Model | WS2331 |
| Base station power supply | 2 LR03/R3 (AAA) 1.5 V batteries |
| Pool sensor power supply | 2 LR03/R3 (AAA) 1.5 V batteries |
| Outdoor sensor power supply | 2 LR03/R3 (AAA) 1.5 V batteries |
| Temperature measurement range | -30 °C to 60 °C (-30 °F to 140 °F) |
| Wireless range | approx. 60 m (open area) |
| Display | LCD screen with touch backlight |
| Main functions | Displays pool and outdoor temperature, time (12/24h), temperature trends, min/max recording, °C/°F switching |
| Value memory | Maximum and minimum temperatures (automatic reset at midnight or manual) |
| Installation | Base station on stand or magnet, outdoor sensor with hanging eyelet |
| Maintenance and cleaning | Wipe with a slightly damp cloth |
| Safety | Do not use rechargeable batteries (voltage too low), keep out of reach of children, do not expose to water or shocks |
| Package contents | Base station, pool sensor, outdoor sensor, 6 AAA batteries, instruction manual |
| Warranty | 2 years |
| Repairability | Repair by a specialized workshop, no spare parts provided |
Frequently Asked Questions - WS2331 ADE
You can restart reception by pressing ▲ for more than 2 seconds.
User questions about WS2331 ADE
0 question about this device. Answer the ones you know or ask your own.
Ask a new question about this device
Download the instructions for your Weather Station in PDF format for free! Find your manual WS2331 - ADE and take your electronic device back in hand. On this page are published all the documents necessary for the use of your device. WS2331 by ADE.
USER MANUAL WS2331 ADE
flowchart
graph TD
    A["ES | IT | PL"] --> B["Download"]
    B --> C["Down Arrow"]
Bedienungsanleitung
WS2331
natural_image
Icon of a person using a laptop inside a circle (no text or symbols)16 Aufhänge-Öse
17 Batteriefach
Inbetriebnahme
Allgemeine Hinweise
22761 Hamburg, Germany
Thank you for purchasing a high-quality ADE brand product that combines intelligent functions with an exceptional design. With this pool thermometer, you always have a wide variety of weather and temperature data in view. The many years of experience of the ADE brand ensure a high technical standard and proven quality.
We wish you lots of enjoyment and success using the pool thermometer.
Your ADE Team
Table of Contents
General information.... 26
Safety 27
Scope of delivery.... 29
Intended use....29
Features of the pool thermometer....29
Product overview.... 30
Base station.... 30
Pool Sensor 31
Wireless outdoor sensor 32
Start-up 32
General notes.... 32
Pool Sensor 33
Wireless outdoor sensor 33
Base station.... 33
Starting signal reception 34
Starting signal reception manually....34
Checklist when data is missing on the display .. 35
Setting the time and date manually....35
Choosing a location 36
Signal reception between the base station and wireless outdoor sensor.... 36
Setting up the base station 36
Setting up the outdoor sensor 37
Functions.... 37
Displaying stored temperatures 37
Switch temperature display between °C and °F ....38
Illuminating the display 38
Changing the batteries 38
Cleaning.... 39
Fault/Remedy 39
Technical data.... 40
Declaration of conformity.... 41
Warranty 41
Disposal 42
About this operating manual

This operating manual describes how to operate and maintain your product safely.
Keep this operating manual in a safe place for future reference. If you pass this product on to someone else, pass on this operating manual as well. Failure to observe this operating manual may result in injuries or damage to your product.
Explanation of symbols

This symbol combined with the word DANGER warns of serious injuries.

This symbol combined with the word WARNING warns of moderate and mild injuries.

This symbol combined with the word NOTE warns of material damage.

This symbol indicates additional information and general notes.
Safety
- This product may be used by children aged 8 and above, as well as by persons with reduced physical, sensory, or mental capacities or lacking experience and knowledge if they are supervised or have been instructed in the safe use of the product and understand the risks that may arise.
- Children must not play with the product.
- Cleaning and user maintenance must not be carried out by children unless they are 8 years of age or older and are being supervised.
- Batteries, when swallowed, can be life-threatening. The device and batteries should therefore be kept out of reach of small children. If a battery has been swallowed, medical assistance must be sought immediately.
DANGER for children
- Keep packaging material away from children. There is a risk of choking if swallowed. Also pay attention that children do not pull the packaging material over their heads.
DANGER of fire/burning and/or explosion
- The batteries can explode when changed improperly. Replace the batteries only with those of the same or an equivalent type. Pay attention to the "Technical data".
- Batteries must not be recharged, reactivated by other means, dismantled, thrown into fire, or short-
circuited. Failure to comply with this requirement can lead to explosion and leakage, causing gases to escape!
- Avoid contact of the battery fluid with skin, eyes, and mucosa. In case of contact, immediately rinse the affected areas with plenty of clean water and consult a doctor.
NOTE on material damage
- Always prevent any water or other liquids getting into the inside of the item.
- Protect the product against sharp jolts and vibrations.
- Remove the batteries from the device once they have been consumed or if the device will be left unused for an extended period. You will thus avoid damage that may result from leakage of battery acid.
- When inserting and changing batteries, pay attention to the correct polarity (+/-).
- Do not subject the batteries to any extreme conditions, by – for example – storing them on radiators or under direct sunlight. Increased risk of leakage!
- Clean the battery and device contacts, as needed, before inserting the battery.
- Only insert batteries of the same type; do not use different types or used and new batteries with each other.
- Do not make any modifications to the product. Only allow repairs to be carried out by a specialist
workshop. Repairs carried out improperly can considerably endanger the user.
Scope of delivery
- Pool thermometer consisting of:
-Base station
-Pool sensor
-Wireless outdoor sensor - Batteries:
-2× LR03/R3 (AAA)/1.5 V for base station
-2× LR03/R3 (AAA)/1.5 V for pool sensor
-2× LR03/R3 (AAA)/1.5 V for wireless outdoor sensor - Operating Manual
Intended use
The pool thermometer, which consists of base station, pool sensor and wireless outdoor sensor, displays the water and the outside temperature as well as the time. The pool thermometer is not suitable for commercial use.
Features of the pool thermometer
- 12- and 24-hour display
- Temperature trend display
- Temperature indicator in °C or °F
Base station
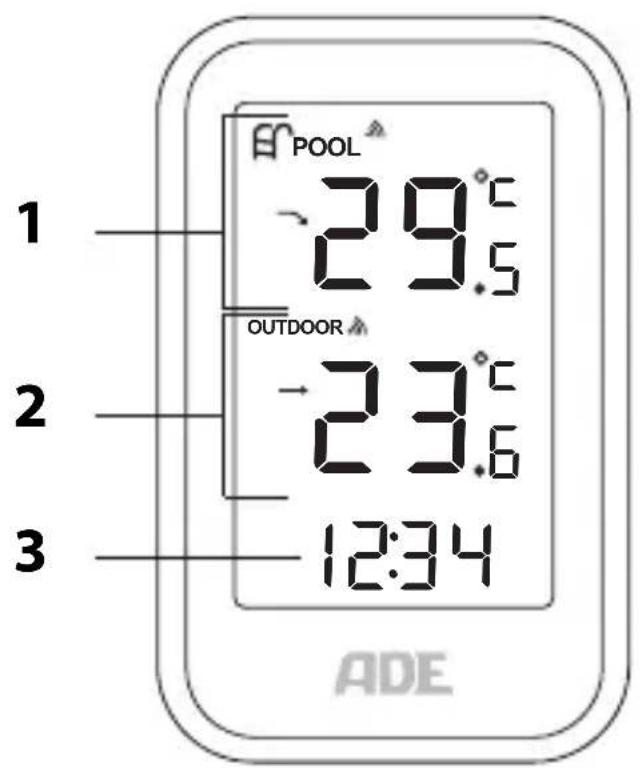
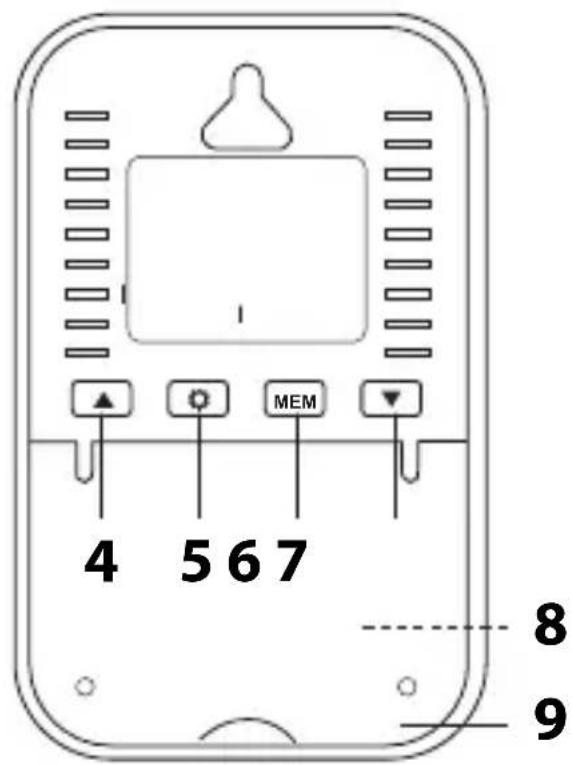
1 Pool temperature display
2 Outside area temperature display
3 Time display
4 ▲ button
5 button
6 MEM button
7 ▼ button
8 Battery compartment
9 Fold out support foot
Pool Sensor
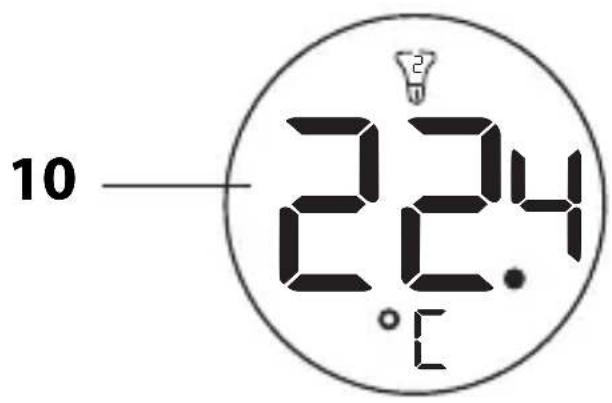
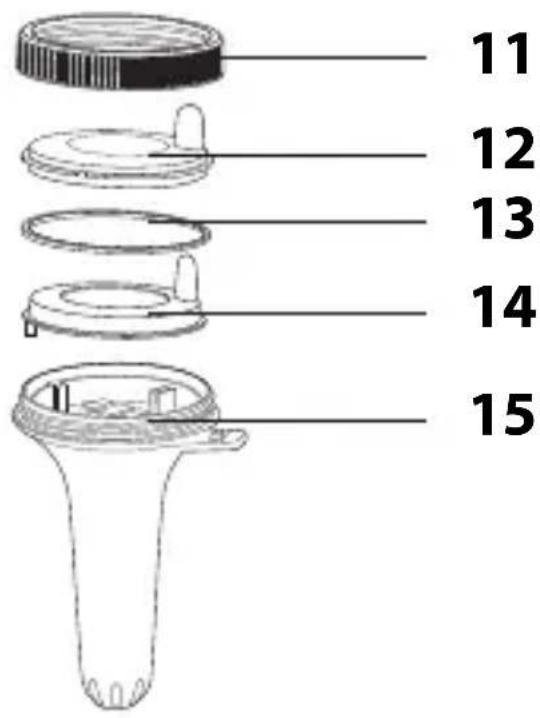
10 Display
11 Screw cover
12 Cover
13 Rubber ring
14 Main control unit
15 Thermometer unit
Wireless outdoor sensor

16 Hanging loop
17 Battery compartment
Start-up
General notes
- Proceed according to the order listed below and first insert the batteries into the pool sensor and the wireless outdoor sensor. Only then can the pool thermometer function properly.
- Do not use rechargeable batteries, since their voltage is too low (only 1.2 V instead of 1.5 V). This affects, among other things, the precision of the measurements.
Pool Sensor
- Remove screw cover.
- Remove main control unit with rubber ring and cover.
- Insert two LR03/R3 (AAA) batteries into the battery compartment. Observe the correct polarity (+/-).
- Assemble the pool sensor in the reverse order.
Wireless outdoor sensor
- Remove the battery compartment cover on the back of the outdoor sensor.
- Insert two LR03/R3 (AAA) batteries as shown on the bottom of the battery compartment. Observe the correct polarity (+/-).
- Replace the battery compartment cover.
Base station
- Fold out the stand.
- Press down the locking tab of the battery compartment cover and fold down the compartment cover.
- Insert two LR03/R3 (AAA) batteries as shown on the bottom of the battery compartment. Observe the correct polarity (+/-).
- Close the battery compartment again.
- Wait about 3 minutes. The base station will take this time to start receiving temperature data from the pool sensor and the wireless outdoor sensor.
Starting signal reception
As soon as the base station is supplied with current, all of the indicators on the display will fade in for a brief moment. The display will also light up briefly.

The device then switches to receiving mode, during which the number of radio waves indicates the quality of the reception: The more radio waves shown on the display, the better is the reception.
- Temperature data received by the wireless outdoor sensor and the pool sensor will appear on the display after a short time. From now on, this data will be transmitted several times a minute and constantly updated.
If no sufficiently strong signal has been received, the base station aborts the receiving process after a few minutes and the radio-tower symbol goes out.
Starting signal reception manually
Use the ▲button to select the area that you want to connect to (pool temperature or outside temperature). Press the ▲button again and hold for longer than 2 seconds to start receiving data again.
Checklist when data is missing on the display
| No data display from the pool sensor or the wireless outdoor sensor | |
| 1. Check that the batteries are inserted the right way round. | |
| 2. Check whether the location is suitable, see "Choosing a location". |
Setting the time and date manually

If there is more than approx. 20 seconds between two pushes of a button, the setting process automatically ends and you will have to repeat it.
- Press the ⚙ button to toggle between the 12-hour and 24-hour formats.
- Press and hold the ⚙ button until the hour flashes on the display.
- Use the ▲ or ▼ buttons to set the hour.
- Press the ⚙ button to save the hour setting and move on to setting the minutes.
- Then press the ▲ or button to set the required value.
- Finish by pressing the ⚙ button.

NOTE on material damage
- Protect the base station from dust, shocks, extreme temperatures, moisture and direct sunlight.
- The base station must only be installed in a dry, enclosed space.
Signal reception between the base station and wireless outdoor sensor
- The maximum distance between the base station and the outdoor sensor may be 60 metres. This range is, however, only possible with "direct line of sight".
- Protective construction materials such as reinforced concrete reduce or inhibit signal reception between the base station and outdoor sensor.
- Devices such as TVs, cordless phones, computers, and fluorescent tubes can likewise disrupt signal reception.
- Do not place the base station and outdoor sensor directly on the ground. This limits the range.
- At low temperatures in winter, the performance of the outdoor sensor batteries can markedly decrease. This reduces the transmission range.
Setting up the base station
The base station has a fold-out support stand at the back and a hanger + magnet.
- Set up the base station as close to a window as possible. Here, the reception will generally be best.
Setting up the outdoor sensor

DANGER of severe injuries
-During wall installation, there must be no electrical cables, gas or water pipes installed in the walls at the mounting site. Otherwise, when drilling holes, there is a risk of electric shock!
The wireless outdoor sensor is equipped with a hanging eyelet on the rear side.
- Place or hang the wireless outdoor sensor in a location where it is protected from direct effects of the weather (rain, sun, wind, etc.). Suitable locations are, for example, under an awning or in a carport.
Functions
Displaying stored temperatures
As soon as the temperature and humidity values are displayed, the base station starts recording the maximum and minimum temperature values.
- Press the MEM button repeatedly to display the following values in sequence:
-highest pool and outside temperature (MAX)
-lowest pool and outside temperature (MIN)
-current pool and outside temperature

- If "LL.L" or "HH.H" appears on the display, the temperature is below or above the display range.
- The recorded readings are automatically deleted every night at midnight. If you want to reset the saved values manually, press and hold the MEM button for 3 seconds.
Switch temperature display between °C and °F
Press the ▼button to toggle the temperature display between °C and °F.
Illuminating the display
- Touch the ⚙ on the top of the base station to switch on the display light for about 10 seconds.
Changing the batteries
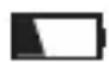
The battery symbol indicates that the inserted batteries should be replaced.
- If the battery symbol is displayed next to the time, it indicates that the base station batteries need to be replaced.
- If the battery symbol is displayed in the pool temperature or outside temperature area, it indicates that the batteries in the relevant sensor need to be replaced.
Cleaning
- If necessary, wipe the base station and sensors with a slightly damp cloth.
Fault/Remedy
| Fault Possible Cause | |
| Temperature indication for the outdoor sensor appears too high. | · Check whether the sensor is exposed to direct sunlight. |
| The display shows "H.HH" or "LL.L" instead of the measured values. | · The values lie above or below the display range. |
| Display is illegible, function is unclear or values are obviously incorrect. | Reset the pool thermometer to its default settings.1. Remove the batteries from the pool sensor, the wireless outdoor sensor and the base station.2. Wait a moment.3. Proceed as described in "Start-up". |
| Base station is not receiving any signals. | · Ensure that there are no sources of electrical interference near the sensors or the base station.· Check the batteries in the sensors and replace them if necessary.· Try moving the base station closer to or further away from the sensors. |
Technical data
Model: Pool and outdoor thermometer WS2331
Batteries:
- Base station: 2× LR03/R3 (AAA)/1.5 V=
- Pool sensor: 2× LR03/R3 (AAA)/1.5 V=
- Wireless outdoor sensor: 2× LR03/R3 (AAA)/1.5 V=
Rated current: 30 mA
Temperature measuring
range: -30^ to 60^ ( -30^ - 140^ )
Range: approx. 60 m (open area)
Distributor:
GRENDS GmbH
Stahltwiete 23
22761 Hamburg, Germany
Our products are constantly being developed and improved. Therefore, we reserve the right to make changes to the design and specifications without further notice.
Declaration of conformity
GRENDS GmbH hereby declares that the pool thermometer WS2331 complies with Directives 2014/53/EU and 2011/65/EU. The full text of the EU declaration of conformity is available at the following Internet address: www.ade-germany.de/doc
The declaration will lose its validity if any modification is made to the device without our consent.
Hamburg, January 2024
GRENDS GmbH

Warranty
Dear Valued Customer,
GRENDS GmbH warrants for 2 years from the date of purchase that it will remedy any defects due to faulty material or workmanship free of charge by repair or replacement. In the event of a warranty claim, please return the product with the proof of purchase (specifying the reason for claim) to your dealer.
Disposing of the packaging

Dispose of the packaging according to type. Dispose of cardboard with waste paper and of films with recyclable materials.
Disposing of the product
Dispose of the product in accordance with the regulations that apply in your country.
This symbol indicates that this electrical or electronic equipment must not be disposed of with normal household waste at the end of its life but taken to a collection site for recycling.
Free collection points for used electrical devices are available in your vicinity. You can obtain the addresses of collection points from your city or local government.
Even (online) distributors of electrical and electronic equipment are required to offer the take-back of waste electrical and electronic equipment. When purchasing a new device, the distributor is obliged, upon the end user's request, to take back an old device free of charge on a 1:1 basis. Without a new purchase, the aforementioned distributors are obliged, upon the end user's request, to take back up to three old devices (max. edge length of 25 cm) free of charge.
Always remove the batteries from the device before
disposing of them! Batteries must be disposed of separately from other parts of the device.
This symbol indicates that batteries and rechargeable batteries must not be disposed of with normal household waste.
You are legally obliged to return all batteries to a collection point in your municipality/district or a retailer. Their ingredients are toxic and, if disposed of improperly, can harm the environment and have detrimental health effects on humans, animals and plants.
- Ensure batteries are fully depleted before disposing of them. For this purpose, leave the device switched on until the display fades away.
- Then remove the batteries from the device as described in the section "Start-up".
16 Ucho zaczepowe
- Inbetriebnahme
- Allgemeine Hinweise
- Table of Contents
- About this operating manual
- Explanation of symbols
- Safety
- DANGER for children
- DANGER of fire/burning and/or explosion
- NOTE on material damage
- Scope of delivery
- Intended use
- Features of the pool thermometer
- Base station
- Pool Sensor
- Wireless outdoor sensor
- Start-up
- General notes
- Starting signal reception
- Starting signal reception manually
- Checklist when data is missing on the display
- Setting the time and date manually
- Signal reception between the base station and wireless outdoor sensor
- Setting up the base station
- Setting up the outdoor sensor
- DANGER of severe injuries
- Functions
- Displaying stored temperatures
- Switch temperature display between °C and °F
- Illuminating the display
- Changing the batteries
- Cleaning
- Technical data
- Declaration of conformity
- Warranty
- Disposing of the packaging
- Disposing of the product
Brand : ADE
Model : WS2331
Category : Weather Station