AUTOGRAPH MINI-OW - Speaker TANNOY - Free user manual and instructions
Find the device manual for free AUTOGRAPH MINI-OW TANNOY in PDF.

User questions about AUTOGRAPH MINI-OW TANNOY
0 question about this device. Answer the ones you know or ask your own.
Ask a new question about this device
Download the instructions for your Speaker in PDF format for free! Find your manual AUTOGRAPH MINI-OW - TANNOY and take your electronic device back in hand. On this page are published all the documents necessary for the use of your device. AUTOGRAPH MINI-OW by TANNOY.
USER MANUAL AUTOGRAPH MINI-OW TANNOY
2 Way Stand Mount 4" Dual Concentric HiFi Loudspeaker (Oiled Walnut)
23Quick Start GuidePRLSHIGL AUTOGRAPHI MINI-OW
EN Safety Instruction
-
Please read and follow all instructions.
-
Keep the apparatus away from water, except for outdoor products.
-
Clean only with a dry cloth.
-
Do not block any ventilation openings. Install in accordance with the manufacturer's instructions.
-
Do not install near any heat sources such as radiators, heat registers, stoves or other apparatus (including amplifiers) that produce heat.
-
Use only attachments/accessories specified by the manufacturer.
-
Use only specified carts, stands, tripods, brackets, or tables Use caution to prevent tip-over
when moving the cart/apparatus combination.
-
Avoid installing in confined spaces like bookcases.
-
Do not place near naked flame sources, such as lighted candles.
-
Operating temperature range 5° to 45°C (41° to 113°F).
Once you have set up your new speakers as described in this manual, please complete and return the registration document or register you product online at www.TANNOY.com – this does not limit your legal rights.
Unpacking
Check carefully for any sign of transit damage. In the unlikely event of transit damage, notify your shipping company and/or dealer as soon as possible for advice. It is recommended you store all packaging to all low protected transport in future.
Caution
These speakers are capable of generating high sound levels over a sustained period of time. Because of their low levels of distortion, it is not always obvious that the sound level is high when working with these speakers. Please be aware that exposure to excessive levels over a sustained period of time can lead to permanent hearing damage.
Controls
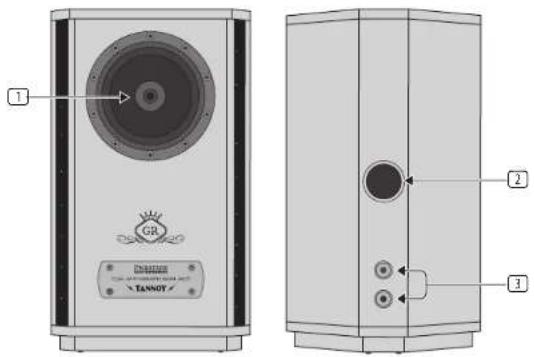
text_image
1 GR TANNOY 2 3- DUAL CONCENTRIC SPEAKER
- BASS PORT
- BINDING POSTS allow you to connect speaker wire with either banana plugs or bare speaker wire.
Operation
Positioning your speakers
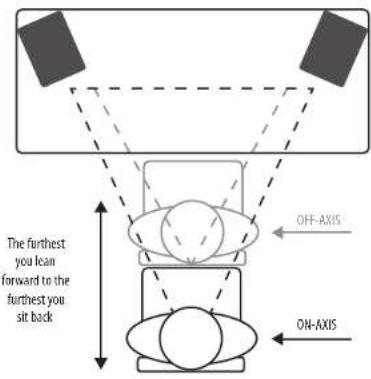
These speakers are designed as near field monitors, positioned typically 0.75 to 3 meters from the listener. They will typically be placed on the mixer metering bridge or on a table either side of a smaller mixing desk or control surface. They may also be mounted on appropriate speaker stands, which will yield the best results in terms of stability and vibration. In all cases, these speakers should be angled towards the listener, with the tweeter approximately at ear height. Far best uniform dispersion, these speakers should be mounted vertically, and not on their sides.
text_image
The furthest you lean forward to the furthest you sit back OFF-AXIS ON-AXISPositioning your speakers for optimal results
8 9 Quick Start Guide PHUSHG AUTOGRAPHI MINI-OW
Connecting your speakers
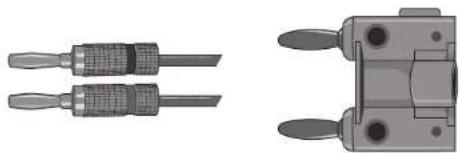
AUTOGRAPH MINI-OW uses binding posts for connection to the amplifier. With binding posts, you can connect by inserting banana plug connectors directly into the holes at the rear of the binding posts, or you can wrap bare speaker wire around the inner posts and then tighten down the outer sleeve.
natural_image
Technical illustration of two screwdrivers and a mechanical clamp (no text or symbols)Banana plugs can help your wire installation look cleaner, and they can give you a durable, good-quality connection, while bare speaker wire can sometimes fray, break or come loose from the binding posts.
Connecting speaker wire to banana plugs
Banana plugs can vary in specific look and construction, but this general procedure should give you an idea of how to connect your speaker wire to the banana plugs:
- Cut your speaker wire to the desired length, with a little extra so you have plenty of wire to work with.
- If your speaker wire consists of two wires inside a conjoined jacket, first separate the two wires so you have approximately two inches to work with for each wire.
- Use a wire stripper to remove about 12 inch of jacket and insulation from the end of each separated wire segment. You will be using the exposed wire strands to attach to the banana plugs.
- Twist the exposed wire strands of each wire segment between your thumb and forefinger so that the individual strands wrap tightly and compactly around each other.
- Open up your banana plugs. Most banana plugs will have a rear barrel that can be unscrewed and loosened, while some varieties of banana plug will need to be opened with a small screwdriver.
- Feed the speaker wire into the banana plugs. Insert wire until it can't go any further, to help ensure a strong connection. Some types of banana plug will have internal terminals where you place the wire end.
- Depending on type, screw the rear barrel back down and/or close and screw the banana plug tightly shut. If you have fed in sufficient wire, the banana plug should tighten down on the wire so that it doesn't fall out.
- Once the wire is secure and tight in the banana plugs, simply insert the banana plug into the back of the speakers' binding posts.
Connecting speaker wire directly to binding posts
To connect speaker wire directly to the binding posts, follow this procedure:
- Unscrew the caps from each binding post until you can see the small hole in the center of the post.
- Cut your speaker wire to the desired length, with a little extra.
- If your speaker wire consists of two wires inside a conjoined jacket, first separate the two wires so you have approximately two inches to work with for each wire.
- Use a wire stripper to remove about 12 inch of jacket and insulation from the end of each separated wire segment.
- Twist the bare wire strands between thumb and forefinger so the individual strands wrap tightly and compactly around each other.
- Insert each wire into the exposed holes in the binding posts.
- Tighten down the caps until the wire is held tightly and securely in each binding post.
ES Introducción
text_image
The furthest you lean forward to the furthest you sit back OFF-AXIS ON-AXISPositioning your speakers for optimal results
natural_image
Two mechanical components shown from different angles: a multi-tube connector and a multi-junction clamp (no text or symbols visible)text_image
The furthest you lean forward to the furthest you sit back OFF-AXIS ON-AXISPositioning your speakers for optimal results
natural_image
Technical illustration of two screwdrivers and a mechanical clamp (no text or symbols)text_image
The furthest you lean forward to the furthest you sit back OFF-AXIS ON-AXISPositioning your speakers for optimal results
natural_image
Technical illustration of two screwdrivers and a mechanical clamp device (no text or symbols)text_image
The furthest you lean forward to the furthest you sit back OFF-AXIS ON-AXISPositioning your speakers for optimal results
natural_image
Technical illustration of two screwdrivers and a mechanical clamp (no text or symbols)text_image
Technical diagram of a speaker device with labeled components and ports, showing front and side views with annotations.text_image
The furthest you lean forward to the furthest you sit back OFF-AXIS ON-AXISPositioning your speakers for optimal results
natural_image
Technical illustration of two screwdrivers and a mechanical clamp device (no text or symbols)text_image
The furthest you lean forward to the furthest you sit back OFF-AXIS ON-AXISPositioning your speakers for optimal results
NL
natural_image
Technical illustration of two mechanical fasteners and a multi-pin connector (no text or symbols)text_image
The furthest you lean forward to the furthest you sit back OFF-AXIS ON-AXISPositioning your speakers for optimal results
natural_image
Technical illustration of two screwdrivers and a mechanical clamp device (no text or symbols)text_image
The furthest you lean forward to the furthest you sit back OFF-AXIS ON-AXISPositioning your speakers for optimal results
natural_image
Technical illustration of two screwdrivers and a mechanical clamp (no text or symbols)text_image
Technical diagram of a speaker device with labeled components and portstext_image
The furthest you lean forward to the furthest you sit back OFF-AXIS ON-AXISPositioning your speakers for optimal results
スピーカーの接続
natural_image
Technical illustration of two screwdrivers and a mechanical clamp device (no text or symbols)text_image
The furthest you lean forward to the furthest you sit back OFF-AXIS ON-AXISPositioning your speakers for optimal results
连接扬声器
natural_image
Technical illustration of two mechanical fasteners and a mechanical clamp (no text or symbols)| System | |
| Frequency response | 106 Hz to 20 kHz +3 dB60 Hz to 20 kHz -10 dB |
| Nominal dispersion 90° conical @ -6 dB points | |
| Power handling (IEC) 50 W continuous, 200 W peak | |
| Sensitivity 85 dB (1 W @ 1 m) | |
| Maximum SPL 102 dB continuous, 108 dB peak | |
| Impedance 8 Ω | |
| Components 1 x 4.5" dual concentric full range transducer | |
| Enclosure | |
| Connectors 2 x binding posts | |
| Physical | |
| Dimensions (H x W x D): 356 x 209 x 155 mm (14.0 x 8.2 x 6.1") | |
| Net weight 4.4 kg (9.7 lbs) | |
| Construction Solid wood + MDF | |
| Finish Oiled walnut veneer with solid walnut trim | |
| Grille | Oatmeal grille cloth |
| Accessories | |
| Parts | 8 x rubber feet2 x foam bung |
Other important information

Important information Asp

portantes

Informations importantes
1. Register online.
Please register your new Music Tribe equipment right after you purchase it by visiting musictribe.com. Registering your purchase using our simple online form helps us to process your repair claims more quickly and efficiently. Also, read the terms and conditions of our warranty, if applicable.
- Malfunction. Should your Music Tribe Authorized Reseller not be located in your vicinity, you may contact the Music Tribe Authorized Fulfiller for your country listed under "Support" at musictribe.com. Should your country not be listed, please check if your problem can be dealt with by our "Online Support" which may also be found under "Support" at musictribe.com. Alternatively, please submit an online warranty claim at musictribe.com BEFORE returning the product.
3. Power Connections.
Before plugging the unit into a power socket, please make sure you are using the correct mains voltage for your particular model. Faulty fuses must be replaced with fuses of the same type and rating without exception.
1. Registro online.
Other important information

1. Registreer online.
Responsible Party Name: Music Tribe Commercial NV Inc.
Address: 122 E. 42nd St.1,
8th Floor NY, NY 10168, United States
Email Address: legal@musictribe.com
PRESTIGE AUTOGRAPH MINI-OW
This equipment has been tested and found to comply with the limits for a Class B digital device, pursuant to part 15 of the FCC Rules. These limits are designed to provide reasonable protection against harmful interference in a residential installation. This equipment generates, uses and can radiate radio frequency energy and, if not installed and used in accordance with the instructions, may cause harmful interference to radio communications. However, there is no guarantee that interference will not occur in a particular installation. If this equipment does cause harmful interference to radio or television reception, which can be determined by turning the equipment off and on, the user is encouraged to try to correct the interference by one or more of the following measures:
- Reorient or relocate the receiving antenna.
- Increase the separation between the equipment and receiver.
- Connect the equipment into an outlet on a circuit different from that to which the receiver is connected.
- Consult the dealer or an experienced radio/TV technician for help.
This equipment complies with Part 15 of the FCC rules. Operation is subject to the following two conditions:
(1) this device may not cause harmful interference, and (2) this device must accept any interference received, including interference that may cause undesired operation.
Important information:
Changes or modifications to the equipment not expressly approved by Music Tribe can void the user's authority to use the equipment.
CE
Hereby, Music Tribe declares that this product is in compliance with General Product Safety Regulation (EU) 2023/988, Directive 2011/65/EU and Amendment 2015/863/EU, Directive 2012/19/EU, Regulation 519/2012 REACH SVHC and Directive 1907/2006/EC, and this passive product is not applicable to EMC Directive 2014/30/EU, LV Directive 2014/35/EU.
Full text of EU DoC is available at https://community.musictribe.com/
EU Representative: Music Tribe Brands DK A/S Address: Gammel Strand 44, DK-1202 Kobenhavn K, Denmark
UK Representative: Music Tribe Brands UK Ltd. Address: 8th Floor, 20 Farringdon Street London EC4A-4AB, United Kingdom
Correct disposal of this product: This symbol indicates that this product must not be disposed of with household waste, according to the WEEE Directive (2012/19/EU) and your national law. This product should be taken to a collection center licensed for the recycling of waste electrical and electronic equipment (EEE). The mishandling of this type of
waste could have a possible negative impact on the environment and human health due to potentially hazardous substances that are generally associated with EEE. At the same time, your cooperation in the correct disposal of this product will contribute to the efficient use of natural resources. For more information about where you can take your waste equipment for recycling, please contact your local city office, or your household waste collection service.