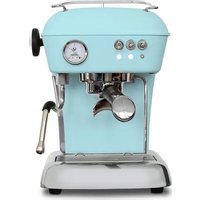
Dream PID - Coffee machine ASCASO - Free user manual and instructions
Find the device manual for free Dream PID ASCASO in PDF.


User questions about Dream PID ASCASO
0 question about this device. Answer the ones you know or ask your own.
Ask a new question about this device
Download the instructions for your Coffee machine in PDF format for free! Find your manual Dream PID - ASCASO and take your electronic device back in hand. On this page are published all the documents necessary for the use of your device. Dream PID by ASCASO.
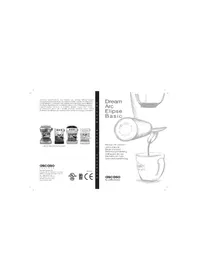
USER MANUAL Dream PID ASCASO
natural_image
Four different types of espresso machines shown in black and white, no visible text or labels.DREAM ARC/FUN EUPSE BASIC
ascaso
t a c t o r y
Ascaso Factory SL
Disposal of your appliance
Old appliances may contain materials which are reclaimed or recycled.
Please contact your distributor or your local waste collection centre
Thank you very much for purchasing anascaso product. This machine makes the best espresso coffee and delicious cappuccinoes. Your coffee machine has been designed and ball using the latest technological computing and engineering innovations. It is therefore a high-quality safe and reliable product.
Introduction
text_image
Technical diagram of a microwave oven with numbered components for identification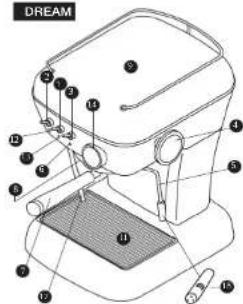
text_image
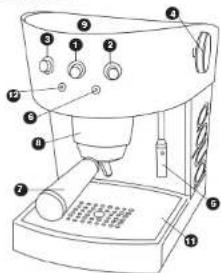
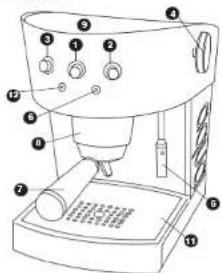
DREAM ① ② ③ ④ ⑤ ⑥ ⑦ ⑧ ⑨ ⑩ ⑪ ⑫ ⑬ol

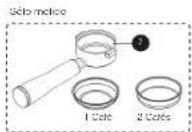
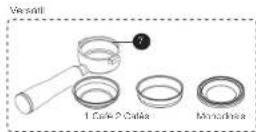
text_image
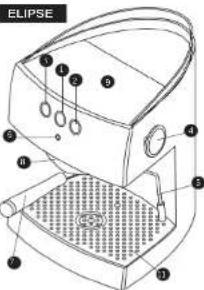
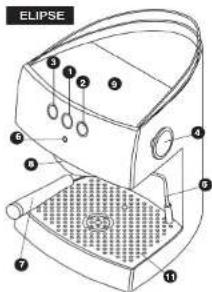
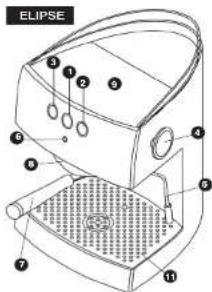
ELIPSE ① ② ③ ④ ⑤ ⑥ ⑦BASIC
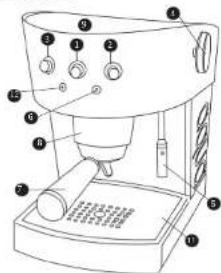
text_image
Labeled diagram of a coffee maker with numbered parts for identification and assembly reference.

ascasodascaso
text_image
DREAM ARC BASIC ELIPSE DEOG: 1 DEOG: 1natural_image
Illustration of a sewing machine needle stitching fabric with a sewing machine (no text or symbols)natural_image
Illustration of a hand holding a small object with arrows indicating motion or movement (no text or symbols)


Consejos generales:
text_image
ascaso since 1962 for coffee lovers2009-11 UM 4 HOME.FH11 Tue Feb 23 14:39:51 2010 Página 10

Users manual
ers manual ascaso
ascaso
Contents
- Technical specifications
- Diagram
- Safety. Start-up
- Preparation of coffee
- Preparation of caspuccino
- Preparation of steam
- Maintenan
- Guarantee
- Declaration of EC conformity
- Quick consultation table
1-. Technical specifications
| DREAM ARC ELIPSE BASIC | ||||
| Voltage (V) | 230VAC~5312 - 125VAC~8012 | |||
| Polar (W) | ||||
| Polar (Bapacure (um)) | ||||
| Weight (kg/mF): 7.5 (FF) / 6.5 (MF) 10 (FF) / 9 (MF) | 7 (FF) / 6 (MF) | |||
| Dimensions (lx h x p)* | 245x345x280 | 220x320x280 | 245x373x283 | 210x310x290 |
| Reservoir capacity (l) | 1.3 | 2 | 1.8 | 2 |
| Filter holder | Brass | |||
*length x height x depth (mm)
11 - I bed filter. MI - Mobile filter.
Main features
Metal body. ABS(Basic)
Brass coffee unit.
Professional system
Automatic temperature control
Cappuccin maker and hot water
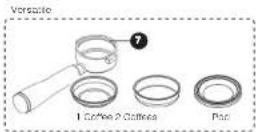
Versatile (mobile filter): Ground coffee/pod. (Option)
Food materials.
Cup warmer
Innovative and functional design
EC Certification
ENGLISH

15

-


ENGLISH
ascasodascaso
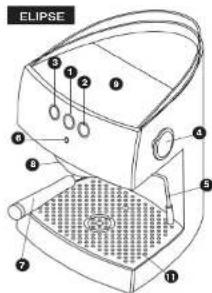
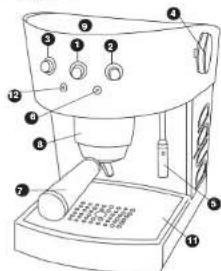
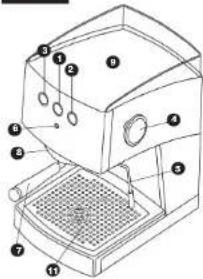
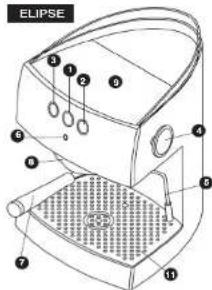
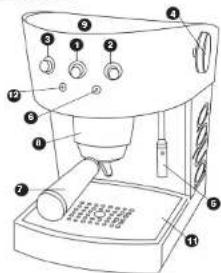
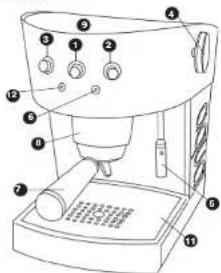
2-. Diagram
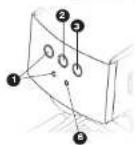
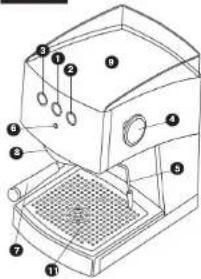
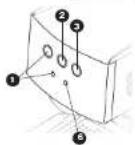
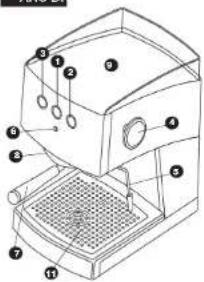
① Crystall switch
3 Steam switch
Coffee starch
1 Steam/water control
5. 2014年1月1日
Temperature pixel light.
3. Monthly inter-balance (gross/bond)
Colies group. (Attention hot surface)
3 Cup warmer. (Attention hot surface)
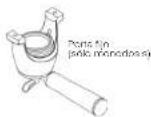
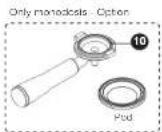
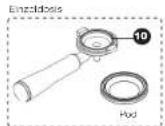
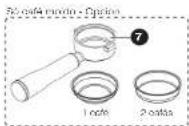
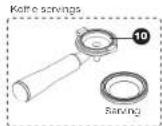
10 Mobile tiller holder (only pod-option)
11 Tray
15 Storm pict light [Only Dream]
On/Off Flat light (Only Dream)
14 Thermometer (coffee/steam) (Only Green)
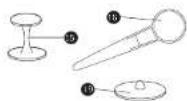
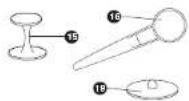
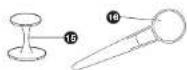
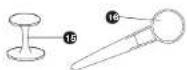
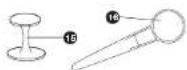
19 Coffee Press
16 Coffee spoon (70g)
7 Discharge tube
10 Steam wind 5 hoas (only boiler models)
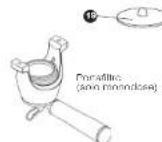
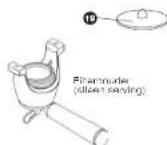
18. Blind filter (Dream mobile: Her mode)
ARC FUN
ARC DE
text_image
Technical diagram of a device with numbered components for identification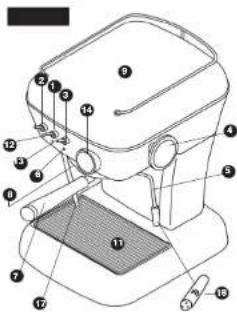
text_image
Technical diagram of a sewing machine with numbered parts for identificationENGLISH
text_image
ELIPSE ① ② ③ ④ ⑤ ⑥ ⑦ ⑧BASIC
text_image
Labeled diagram of a coffee maker with numbered parts for identification16 17
ascasoascaso
text_image
DREAM ARC BASIC ELIPSE REMARK 1 HESCUO 13-. Safety
Important Safeguards
1- Read all instructions
2. Do not touch hot surfaces Use handles or knots
3. To project against fire, electric shock and injury to persons do not immense cord, plugs or (state specific part or parts in question) in water or other liquid.
4. Close supervision is necessary when any appliance is used by or near children.
5. Unplug from outlet when not in use and before cleaning. Allow to cool before putting on or taking off parts and before cleaning the appliance.
6. Do not operate any appliance with a damaged cord or plug or after the appliance malfunctions, or has been damaged in any way. Return appliance to the nearest authorized service facility for examination, repair or adjustment.
7. The use of accessory attachments not recommended by the appliance manufacturer may result in line, electric shock or injury to persons.
8. Do not use outdoors (this item may be omitted if the products is specifically designed for outdoor use).
- Do not let cord hang over edge of table or counter or touch hot surfaces.
10-. Do not place on or near a hot gas or electric burner or in a heated oven.
11.-Always attach plug to appliance first, then plug cord into the wall outlet. To disconnect, turn any control to "off" then remove plug from wall outlet.
12.-Do not use appliance for other than intended use
13-. Save these instructions.
Before setting the appliance going, the person installing should read this manual carefully. The operator should be a responsible adult
In the event of any anomaly, contact your distributor.
Start-up
- Check the electrical voltage is the same as the voltage displayed on the machine specifications label.
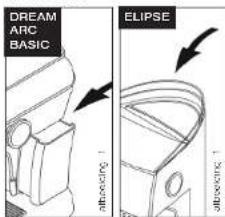
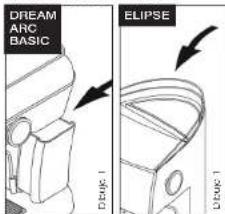
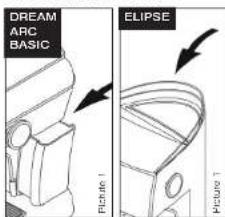
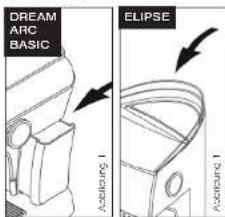
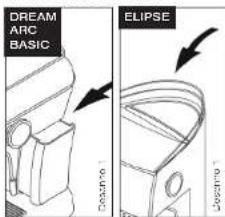
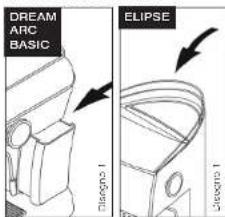
- Fill the reservoir with fresh water. (see picture 1) Check the water intake tube is immersed in the reservoir. The use of low mineral water is recommended. Water quality affects the taste and quality of the coffee, in addition to preventing future breakdowns. Consult us about our filters (descoating treatment)-optional.
- Plug it into the mains.

Important:
MOBILE FILTER HOLDER SYSTEM A) The machine is being used for the first time or has not been used for some time.
Change the water in the boiler and circuit.
1.-Connect the coffee machine with switch 0/1
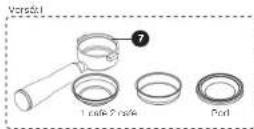
2.-Put the filter holder ⑦ without coffee into position and a recipient below.
3.-Switch on the coffee switch 2 and run approximately half a reservoir capacity of water through it. Careful: Check that the reservoir has enough water. If the coffee machine is used without water, pump resistance may be damaged.
B) PRIMING.
- If coffee does not emerge, when the machine has not been used for some time.
• After producing steam - If there is no water in the reservoir, the following procedure should be performed:
1-Turn on the steam tap ④ with the coffee machine switched on.
2.-Turn on the coffee lunch ② and allow the water to come out (one cup)
through the steam tube 5
3-Turn of the coffee Junction 2 and
Turn off the steam-lap 4
The coffee machine is now ready for use.
C) After steam has been produced, it is very important to wait for the plot light
6 to go on again and either to switch off or to perform priming.
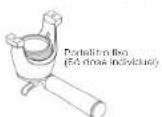
FIXED FILTER HOLDER SYSTEM
Step A is unnecessary. Step B and C are necessaries.
4-. Preparation of coffee Please check your system:
(ground, versatile, pod)
[Unreadable]
Ground
(Only ground system)
Any type of coffee may be used. For optimum results, we recommend using special 'espresso' coffee blends as they
provide a suitable grind. If the coffee comes out either very quickly or very slowly, the type of coffee should be charged for another liner or thicker grind and tamping of the coffee should be varied according to our recommendations.
- Switch on the machine using the main switch 0/1 ① and place the litterholder (with the filter) into the group. In Dream boiler model, orienting discharge tube ⑰ toward the interior of the tray ⑪
- Wall for the pilos light: 6 to switch off (approx. 1.5 minutes). This means the coffee machine has reached the ideal temperature. Press coffee switch 7 and let water min out. For this before making the coffee. This will remove residues and balance the temperature to create optimum working conditions.
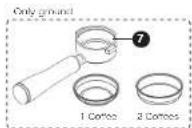
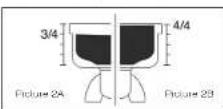
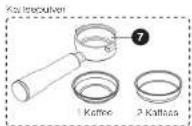
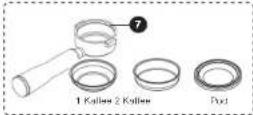
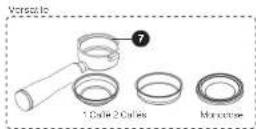
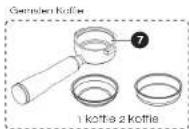
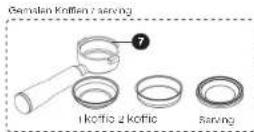
3-Fill the coffee filter basket (1 or two coffees according to requirements). Three-quarter size. The filter must be filled to 3/4 of its capacity, once pressed. (see picture 2A)
- Clean off the remains of coffee that have been deposited on the edges of the filter basket so that it fits perfectly.
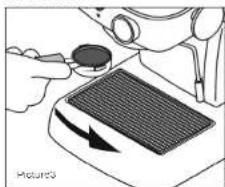
5- Place the filter holder ⑦ into the group ⑧ starting from the left and turning towards the right with enough pressure at the end. (see picture 3) 6- Put the cuts or gups on the grills and
switch on the coffee switch 2. 7.-When the coffee has finished being
ENGLISH
ascaso
natural_image
Illustration of a sewing machine's back panel with a hand adjusting the button (no text or symbols)made, switch off the coffee switch 2. It takes 20/25 seconds to make an espresso perfectly
Versatile (pod/ground)
(versatile mobile system)
Pod coffee:
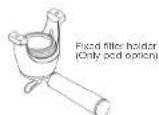
Points 1 and 2 as in the above section Use the specific filter holder 19 or Pod filter (option). (See picture 4) Points 5, 6, 7 and notes as in the above section.
Ground coffee:
For ground coffee, fill the coffee filter basket up to the rim (see picture 2B). To tamp and fill the coffee again. Points 1.2.4.5.6 and 7 as in the above section.
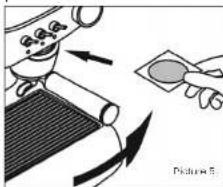
Place the pod in the filter holder and turn it gently to the right as far as it will go. Do not exert force. Close gently (see picture 6). Points 5, 6, 7 and notes as in the section on ground coffee Careful: Do not remove or turn the filter holder while the water is passing through as the appliance is at low pressure at this moment.
natural_image
Illustration of a hand holding a small object with arrows indicating motion or movement (no text or symbols)Notes:
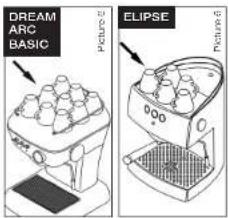
- The filter holder should always be placed in the machine so that it remains warm. Closed position 2. Place the cups on the cup warmer
- The right temperature (optimum 40°C/105°F) will improve the ospresso. (see picture 6)
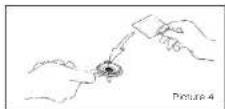
Pod
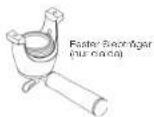
(fixed holder-pod only).
Points 1 and 2 as in the section on ground coffee.
text_image
DREAM ARC BASIC ELIPSE Picture B- If the coffee does not come out very hot, press steam switch ③ for 10 seconds. This will raise the temperature of the machine.
- Coffee will continue to drip from the scouts for a moment after the coffee switch is turned off.
- It is normal for the coffee grounds to be very wet or a soup-like consistency if the filter holder is removed within one to minutes after crowing.
THERMOMETER
The thermometer will mark you the machine temperature. It has to be in between 60°C/180°F and 110°C/230°F for coffee and above 100°C/212°F degrees for steam
Important: Tamped
The best espresso result are obtained when the ground coffee is firmly turrped.
5-. Preparation of cappuccino
Mobile filterholder
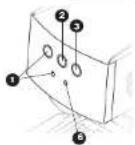
Press general switch ①. Pilots ⑬ and ⑥ (Dream) and ① and ⑥ (Aro,
- When pilot 6 goes out, press steam switch ③. Pilots ⑥ (all models) and ⑰ (Dream) will go out.
- Wait for light ⑥ to go out. This indicates that the coffee machine has reached its deal temperature.
- Turn the hot water/slean knob ④ to open and allow the first drops of water to come out. In a low moment, only steam will come out.
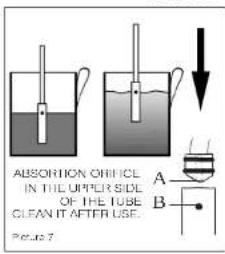
5- Put the tube 6 into the milk to host it so that the milk covers exactly half the absorption hole (never totally cover it). Do this for the whole process. (see picture 7)
ascaso
text_image
ABSORION CHILLER IN THE UPPER SIDE OF THE TUBE CLEAN IT AFTER USE. Figure 7- Liquid is absorbed through the hole and cream forms automatically. The recipient should be lowered automatically while she will deliver
- Turn the water/steam knob 4 to closed and turn of the steam switch 3
Fixed filterholder
Press general switch 1. Pilots 13
and 5 (Dream) and 1 and 6 (Arc.
Ellipse, Basic! will come on.
2. -When plot B goes out press learn
switch 3. Pilots 8 (all models) and 12 (Dream) will come on simultaneously and the pump will be pressed at short intervals.
3. -Wait for approximately 15" and then open side knob ④ and let the first drops of water run out. After a moment only steam will come out. Points 5, 6 and 7 are the same as in the previous section.
If you want a creamy cappuccino, use cold, fresh, whole milk.
If you want not milk (without emulsifying) the hole must be completely covered
ENGLISH


ENGLISH
ascaso
For obtaining micro-foam, you should maintain the absorption hole in the same position.
Important
We recommend running steam through the wand for a few seconds (5") after each use to clean and prevent clogging.
To clean the absorption holes (A and B), you can use a toothpick or a paperclip. This will ensure the tube is free of blockages. Hole R always on the top (see picture 7)
After steaming milk, the steam has to be purged before brewing (picture 2B)
6-. Preparation of hot water
1- Put a cup under the steam tube 5. In Dream mobile filter holder model, place dc gasket 19 in the filter holder and place the filter holder into the machine.
2.-Turn the hot water/steam knob ④ to open and turn on the coffee switch ②. Do the opposite operation after having obtained the required water.
7-. Maintenance and cleaning
General warning: Cleaning and maintenance should be done when the appliance is cold and disconnected from the means. Do not immerse the appliance in water. It should not be cleaned in a dishwasher.
- Cleaning the outside: To clean the outside of the machine, use alcohol 96 ^2 or specific products for polished aluminium, if you have a colour dream for the painted parts, you can use a soft
cloth, moistened with water.
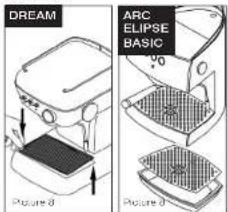
Remove the tray regularly and clean it. If the machine is not to be used for some time, empty the water reservoir. Clean the steam tube with a damp cloth immediately after use. To clear the inside of the steam tube, allow the water to circulate. To clean the adsorption hole, you can use a toothpick or a papcrole. This will ensure the tube is free of blockages.
text_image
DREAM ARC ELIPSE BASIC Picture 8 Picture 82-. Internal cleaning: To obtain top quality espresso coffee it is vital to clean the inner workings of the machine. To clean the interior of the distribution unit, use Acase Coffee Washer. This product is also useful to prevent limscalc buildup in the machine. Regular detailing will contribute to ensuring top quality coffee and it will prolong the useful life of the machine. Consult your distributor.
Coffee Washer use recommendations:
| Coffee/day | Desarling |
| >10 | every month |
| 5-10 | every 2 months |
| 1-5 | every 3 months |
To avoid timescale buildup, you can also use water treatment filters. However, it is advisable to clean the machine in accordance with consumption. Using filters and Coffee Washer will help to maintain the coffee machine in optimum working condition for longer
Back Flushing - Blind Filter Weekly
Place the gasket 19 in the filter holder and place the filter holder into the machine. Press the coffee button, after 10 seconds press the coffee button again to stop the group. Repeat this operation 2 times
Important
It is advisable not to leave the pxd or ground coffee in the fillerholder. Otherwise, coffee will build up affecting the taste of the coffee. Should this occur, run a load of water through the system.
3-. Cleaning the filterholders and the showerheads
Mobile filterholder: Wash the filterholder in hot water with a neutral detergent. Rinse thoroughly. Dry the filterholder with a soft cloth. Do not wash it in the dishwasher.
The fillers, tray and reservoir can be cleaned in the top of the dishwasher. If you wash them by hand, do not forget to rinse thoroughly. Dry with a soft cloth. Use a brush or similar item to remove coffee residue from the showerhead.
Important
(Mobile filterholder)
The showerhead must be cleaned after
ascaso
80 to 100 espresso coffees have been made. This should done as follows:
Remove and clean the showerhead with hot water with a neutral detergent. Once clean replace it, following the instructions for the previous operation in reverse.
8-. Guarantee
The guarantee for this appliance is the receipt of purchase. Please keep this. This receipt must be shown at the Service Centre in the event of breakdown.
This appliance is guaranteed for our distributor(from the date of purchase) against any manufacturing fault or in the materials used.
The amount paid for transport and packaging which may arise are payable by the user.
This guarantee will not be valid if: 1. The receipt of purchase is not prespected.
2.- The machine has not been cleaned sufficiently or timescale has built up. 3.- The appliance has been dismantled by people who are not authorised by the Ascaso Official Technical Assistance Network.
9-. EC declaration of conformity
ASCASO FACTORY SL delivers that the product referred to in this declaration - espresso coffee machine - compies with the requirements of the Directive of 14th of June 1989 on the standardisation of the laws of Member States with regard to machinery (88/392/EEC), an electrical material (73/23/EEC) and on electromagnetic compatibility (89/396/EEC).
ENGLISH


1
2009-11 UM 4 HOME.FH11 Tue Feb 23 14:39:51 2010 Página 15

ascasoascaso
- Quick consultation table
| Possible problems | Causes | What to do? |
| The coffee is not hot | the coffee nashoe has not reached the pomer, temperature. Cold accessories (cup filter holder) | Wait until the on plot gilt has switched off. See general advice. Point 3 See themumber 10 (Cream) |
| The coffee comes out very | The grind is too thick, andger it is not properly lamped. there is insufficient ground cellope | Use special espresso coffee. Experiment with greater or lesser lamping. Fill the filter bakes, up to the edge. |
| The coffee is not cremly | The grind is too thick. he cellope has not been tampe ough. the cellope is state or not of good quality. | Use special espresso coffee. Experiment with greater or lesser lamping. Change the cellope yoe. Use fresh and moreily ground cellope. |
| The coffee does not come out or it comes out very slowly. | There is no water in the reservoir or it is beely protected. Steam stones on. The grind is very fine or has been tamped too much or/and shower. The filter basket is constructed. The appliance has incorrect bollup. | Fill the reservoir of position in property. Turn a few switches off. Use special espresso coffee. Experiment with greater or lesser lamping. Clean the filter basket/sand shower. Clean the appliance. See point 7. |
| A lot of water is fell in the filter bucket, after making the Cote | The coffee has not been properly lamped. there is insufficient collet in the filter bakeet. | Temp properly. See point 3. Increases the amount of coffee in the filter basket, up to the edge. |
| Coffee comes over the edges of the filter basket | The litter holder is not positioned property. there are remains of ground coffee. on the edge of the litter basket. the joint of the head is cliry. the joint of the head is coteltite. | Follow the filter holder adjustment procedure. Point 3. Clean the remains of coffee from the edge of the litter basket before postoring it. Clean the joint with a damp cloth. Call the section centre. |
| The milk is not cremly | The steam tube is blocked. The milk is off. The milk is hot or tukawarm. | Clean the steam tube. Use fresh oils milk (fridge temperature). See the number 10 (Cream) |
| The machine makes a lot of crimes | There is no water in the reservoir. The reservoir is not positioned properly. The solar intake is not increased in the reservoir. The culce is state or very dry. | Fill the reservoir with solar. Adjust the reservoir. Improve the fuel in the reservoir. Use fresh colce. |
*There are no print coffee amount or lamping problems with the pool or pod system. Call your technical service for any anomaly.
www.ascaso.com


text_image
ascaso since 1062 for coffee lovers2009-11 UM 4 HOME.FH11 Tue Feb 23 14:39:51 2010 Página 16

natural_image
Illustration of a sewing machine needle and fabric swatch being placed on a cutting board (no text or symbols)text_image
Diagram illustrating a mechanical or electrical process with labeled components and directional arrows, possibly indicating motion or assembly.text_image
ascaso since 10 Jan for coffee loversThe image is too blurry to recognize any text content.
ARC FUN
ARC DF
text_image
Technical diagram of a device with numbered components for identification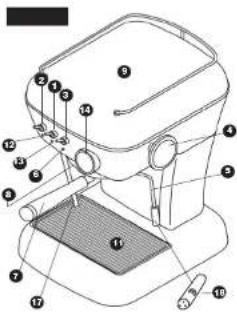
text_image
Technical diagram of a sewing machine with numbered parts for identificationDEUTSCH

Multifunctional system
text_image
ELIPSE ① ② ③ ④ ⑤ ⑥ ⑦ ⑧BASIC
text_image
Labeled diagram of a coffee maker with numbered parts for identification and assembly reference.DEUTSCH
40 41


ascaso
text_image
DREAM ARC BASIC ELIPSE ACCBING 1 ACCBING 1text_image
DREAM ARC ELIPSE BASIC Abbreviation 0 Abbreviation 1text_image
ascaso for coffee lovers2009-11 UM 4 HOME.FH11 Tue Feb 23 14:39:51 2010 Página 29

Instruções de uso
text_image
Technical diagram of a device with numbered components for identification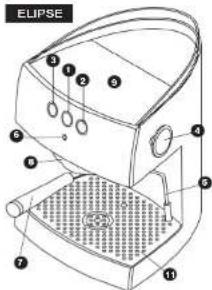
text_image
ELIPSE ① ② ③ ④ ⑤ ⑥ ⑦ ⑧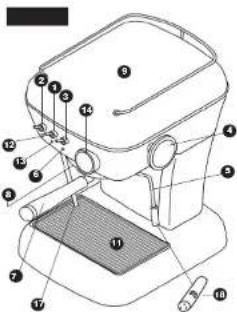
text_image
Technical diagram of a sewing machine with numbered parts for identificationBASIC
text_image
Labeled diagram of a coffee maker with numbered parts for identification and assembly reference
PORTUGUÊS
PORTUGUES

54 55

ascasodascaso
text_image
DREAM ARC BASIC ELIPSE Dreams Decadetext_image
Descinha 6Notes:
text_image
ascaso since 1962 for coffee lovers2009-11 UM 4 HOME.FH11 Tue Feb 23 14:39:51 2010 Página 35

Manuale per l'uso
text_image
Technical diagram of a microwave oven with numbered components for identification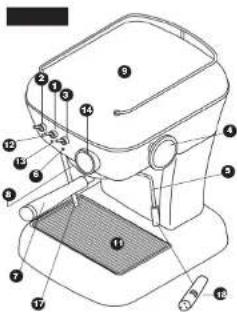
text_image
Technical diagram of a sewing machine with numbered parts for identification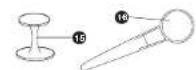

ITALIANO ONVITIVI
text_image
ELIPSE ① ② ③ ④ ⑤ ⑥ ⑦ ⑧BASIC
text_image
Labeled diagram of a coffee maker with numbered parts for identification and assembly referenceITALIANO
66 67

ascasoascaso
text_image
DREAM ARC BASIC ELIPSE Diagno 1 Liogno 1natural_image
Illustration of a hand using a tool to adjust a textured surface, with no visible text or symbols.text_image
Diagram illustrating a mechanical or electrical process with labeled components and directional arrows, possibly indicating motion or assembly.text_image
ascaso since 1962 for coffee lovers2009-11 UM 4 HOME.FH11 Tue Feb 23 14:39:51 2010 Página 41

⑧. Fluride (the Quercyenne Mal Vilnerbace
Fileheader:
ARC FUN
ARC DF
text_image
Technical diagram of a device with numbered components for identification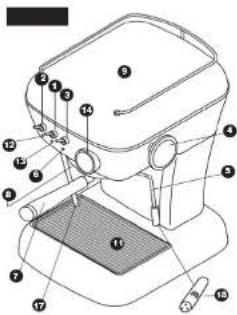
text_image
Technical diagram of a sewing machine with numbered parts for identificationNEDERLANDS

text_image
ELIPSE ① ② ③ ④ ⑤ ⑥ ⑦ ⑧BASIC
text_image
Labeled diagram of a coffee maker with numbered parts for identification and assembly reference76 79

ascaso