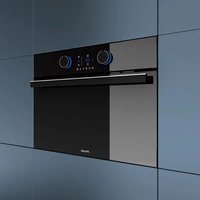
PHTV-942 - Oven Pando - Free user manual and instructions
Find the device manual for free PHTV-942 Pando in PDF.


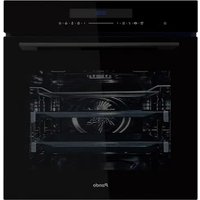
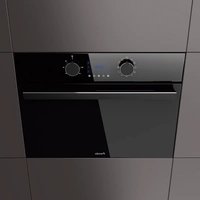
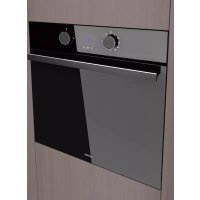
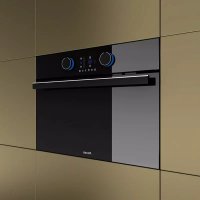
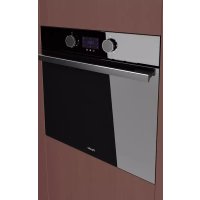
| Product Type | Built-in combination steam oven |
| Brand | Pando |
| Model | PHTV-942 |
| Built-in dimensions (H x W x D) | 450-460 x 560-568 x 580 mm |
| Product dimensions (H x W x D) | 430 x 545 x 547 mm |
| Net weight | 35 kg |
| Net capacity | 44 L |
| Power supply | 220-240 V ~ 50 Hz |
| Maximum power | 3400 W |
| Energy class | A+ |
| Cooking modes | Traditional, Turbo, Grill, Base, Pizza, Steam (100% steam, combined), Gentle cooking, Defrost, Eco, Regeneration, Sous-vide, Pando Chef (automatic recipes) |
| Water tank | 0.8 L (removable, front panel filling) |
| Control display | Digital touchscreen with rotary selectors |
| Supplied accessories | 1 reinforced grid, 1 tray, instruction manual (ES/PT/UK/FR/GE) |
| Child safety | Control panel lock |
| Interior lighting | Halogen G9 25W (replaceable) |
| Maintenance | Regular interior/exterior cleaning, automatic descaling (recommended product Durgol), removable door glass panes |
| Warranty | 3 years against manufacturing defects (with conditions) |
| After-sales service | www.pando.es/fr/service-apres-vente/ |
Frequently Asked Questions - PHTV-942 Pando
User questions about PHTV-942 Pando
0 question about this device. Answer the ones you know or ask your own.
Ask a new question about this device
Download the instructions for your Oven in PDF format for free! Find your manual PHTV-942 - Pando and take your electronic device back in hand. On this page are published all the documents necessary for the use of your device. PHTV-942 by Pando.
USER MANUAL PHTV-942 Pando
natural_image
Exterior view of a modern kitchen oven with control panel and 'Pando' branding (no other text or symbols)Pando
integralcooking
PHTV-942
ES - PT - FR - EN - DE

User manual Guarantee certificate
+ info
flowchart
graph LR
    A["User icon"] --> B["User icon with dot pattern"]
    B --> C["User icon with dot pattern"]
    C --> D["User icon with dot pattern"]
    D --> E["User icon with dot pattern"]

    F["User icon"] --> G["User icon with dot pattern"]
    G --> H["User icon with dot pattern"]
    H --> I["User icon with dot pattern"]

    style A fill:#f9f,stroke:#333
    style B fill:#ccf,stroke:#333
    style C fill:#cfc,stroke:#333
    style D fill:#fcc,stroke:#333
    style E fill:#cff,stroke:#333
    style F fill:#ffc,stroke:#333
    style G fill:#cfc,stroke:#333
    style H fill:#fcc,stroke:#333
    style I fill:#ffc,stroke:#333

    note1["155°C"] --> G
    note2["160°C"] --> H
    note3["165°C"] --> I

INFORMACIÓN
natural_image
Simple line drawing of a cup with an exclamation mark on top, set against a dark background (no text or symbols)natural_image
Technical line drawing of a structural beam with multiple support beams (no text or symbols)
INFORMAÇÃO
natural_image
Simple line drawing of a megaphone with an exclamation mark, no text or symbols presentnatural_image
Technical line drawing of a structural support frame with multiple clamped elements hanging from the base (no text or symbols)9.4. ÁGUA RESIDUAL NO FORNO
https://www.pando.es/en/after-sales-services/
FR
- FONCTIONS DU FOUR....11
- PROGRAMMATION AVEC MINUTERIE DU FOUR 19
5. FONCTIONS DU FOUR

INFORMATION
7. PROGRAMMATION AVEC MINUTERIE DU FOUR
7.1. OPTIONS DE MINUTERIE

INFORMATION
natural_image
Simple line drawing of a megaphone with an exclamation mark, no text or symbols presentnatural_image
Technical line drawing of a structural beam with multiple support columns (no text or symbols)9.4. EAU RESIDUELLE DANS LE FOUR
https://www.pando.es/en/after-sales-services/
FR
First of all we wish to thank you for the trust shown on our Company by purchasing one of our products. We are sure you have made the right choice.
In Pando, not only we offer first quality products, but also we make available a large professional team to serve and assist you on any query you may have regarding installation and/or performance.
We also suggest you to pay a visit to our web site (www.pando.es/en) to get to know us better and where you will find all product range containing all necessary commercial and technical information.
A wide selection of extractor hoods can be found there; Wall Hoods, Ceiling, Island or Canopy Hoods. Four types of installation making possible to adapt ourselves to any type of kitchen based on different needs.
At the same time, we take the opportunity to introduce you our collection of in house essential appliances, such our new high performance Ovens and Microwaves, Induction and Gas Hobs to make real your best recipes. Wine Coolers and Aging Wine Coolers to maintain and keep your wines in best of conditions and built-in Dishwashers with latest technology.
All that under a brand with over 40 year history in the market, making products like a real craftsman, and gathering in them the best of our experience to please all your needs.
We sincerely look forward you to have fun, experience and enjoy with the comfort and capacity of what already became your new kitchen ally.
Many Thanks
The PANDO Team
- DESCRIPTION OF THE APPLIANCE....5
- CONTROL PANEL 5
- SWITCHING ON AND SETTING THE TIME 6
3.1. Water hardness ....7
- DESCRIPTION OF THE CONTROL PANEL 8
4.1. Start screen/standby 8
4.2. Selection screen....9
4.3. Cooking information screen .... 10
- OVEN FUNCTIONS....11
5.1. Steam functions ...... 12
5.2. Cooking with traditional functions ...... 13
5.3. Cooking with steam....13
5.4. Cooking with steam combined functions....14
5.5. Automatic fast preheating .... 14
- COOKING WITH THE PERSONAL COOKING ASSISTANT (PANDO CHEF) 15
6.1. Automatic oven recipes....15
6.2. Cooking with the personal cooking assistant (pando chef)....17
6.3. Preheating while empty....18
6.4. Turning food 18
- OVEN TIMER SETTINGS....19
7.1. Timer options ...... 19
7.2. Programming the timer options....20
- FILLING THE WATER TANK....21
8.1.Open the water tank....21
8.2. Filling the water tank 21
8.3. Refilling the water....22
8.4. Emptying the water tank....22
9 GENERAL OVEN FUNCTIONS ...... 23
9.1. Pausing a cooking cycle....23
9.2. End of a cooking cycle 23
9.3. Steam flow....24
9.4. Residual water in the oven....24
10.1. Safety block for children (control panel lock) 25
- DESCALE....26
- FOOD PROBE......27
- TROUBLESHOOTING....28
- DEMO MODE (Función especial para exposiciones)....29
- TECHNICAL SPECIFICATIONS .... 30
- INSTALLATION DIAGRAMS AND DIMENSIONS 31
-
AFTER-SALES SERVICE AND GUARANTEE 32
-
DESCRIPTION OF THE APPLIANCE
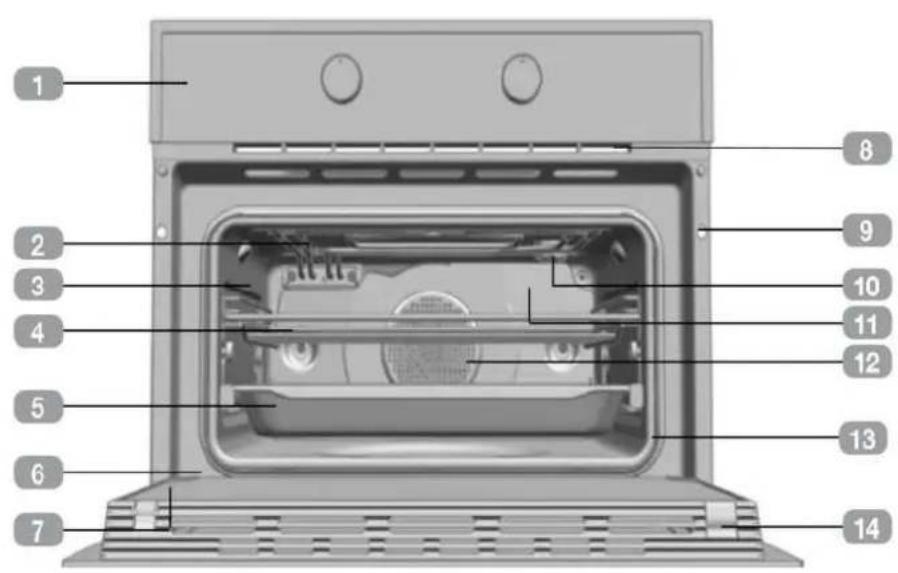
1 Control panel
2 Grill element
3 Tray supports
4 Grid shelf
5 Tray
6 Hinge
7 Inner Glass
8 Air cooling outlet
9 Unit mounting
10 Lamp
11 Back Wall Panel
12 Fan
13 Oven Seal
14 Door
- CONTROL PANEL
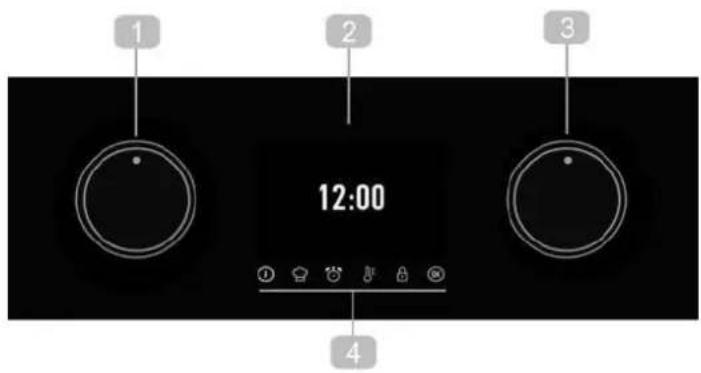
1 Dial to scroll through the menus on the left side of the screen. Cooking mode dial.
2 Display
3 Dial to scroll through the menus on the right side of the screen. Cooking settings dial.
4 Touch keys
① Switching the oven On/Off.

Access to the Personal Cooking Assistant (PANDO CHEF)

Access to the timing and programming settings.

Altering the oven temperature.

Control panel security lock and control panel opening

OK, START, STOP Turn on/off the light*
\* INTERIOR LIGHT
Automatic mode:
Every time you open the oven door, the light inside the vault will come on.
With the door open the light stays on, you can turn it off or on manually by pressing the "OK" key for about 4 seconds.
Manual mode:
To turn on the light with the door closed, press the "OK" key for about 4 seconds, she will remain on for about 12 seconds and then, she will turn off.
3. SWITCHING ON AND SETTING THE TIME
When plugging the oven in for the first time, the logo will appear followed by 12:00 flashing on the screen.
You must set the time in order to use the oven.
To do this select the hour with the left control and the minutes with the right one.
Confirm the settings by pressing the Ⓞ button or waiting a few seconds.
Confirm the time appearance (standard/retro/ hide the clock) by pressing the Ⓞ button or waiting a few seconds.
An audible signal will be heard confirming that the time has been set on the screen.
To change the time:
With the oven in standby (start screen), hold the ⓣ button until the time begins to flash. Follow the previous steps to change the time.

WARNING
The sensitivity of the touch keys adapts continually to environmental conditions.
Make sure the surface of the control panel is clean and free of obstacles when plugging in the oven.
If the display does not respond correctly when you touch the keys, unplug the oven for a few seconds and then plug it in again. Doing this causes the sensors to adjust automatically so that they will react once more to fingertip control.
3.1. WATER HARDNESS
- After setting the clock, you need to set the water hardness.
- The Water Hardness option appears on the display.
- To change the option rotate the right control.
- Press to confirm the option.
- If you wish to modify the water hardness, after the first settings, rotate the left control to the position corresponding to the Steam function.
- Rotate the right control until the Water hardness symbol appears on the right side of the display.
- Press to confirm the option,
- Rotate the right control to select the desired water hardness.
- Press to confirm.
SOFT 0 a 150 0 a 11 0 a15 0 a 8
MEDIUM 151 a 350
12 a 25 16 a 35 9 a 20
HARD 501 a 500
26 a 35 36 a 50 21 a 28
WARNING
In the event of power failure, the water hardness settings will be erased. Reset it and program again after power restore.
4. DESCRIPTION OF THE CONTROL PANEL
Information that you will find on the display screen of your oven and how this will be displayed is outlined below.
4.1. START SCREEN/STANDBY
This screen will appear when the oven is not working, but is still plugged in.
12:00
If the keypad lock is activated, the 🔒 symbol will appear on the left side of the screen.
12:00
If a timer has been programmed, the screen will stop showing the time and show a countdown, as can be seen in the image.
00:15

4.1.1. MODIFY TYPOGRAPHY
- With the oven in standby (start screen), hold the ⏻ button until the time begins to flash. Follow the previous steps to change the time.
- Press to confirm the option,
- Rotate the right control to select the desired typography.
- Press to confirm.
4.2. SELECTION SCREEN
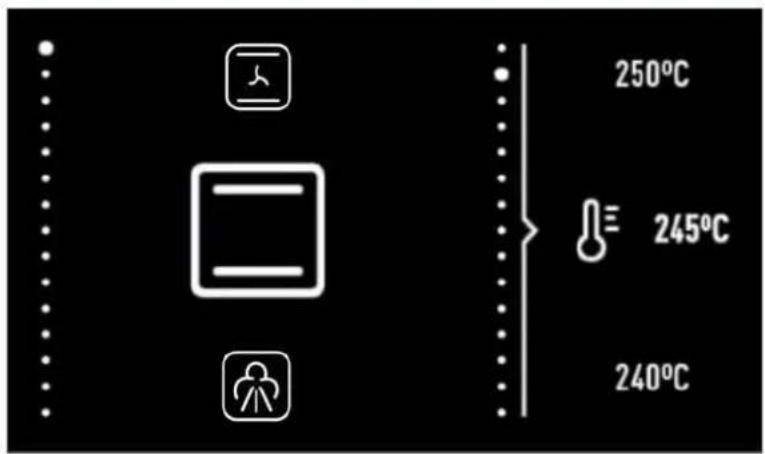
Selecting functionsWhen selecting a cooking function, automatic recipe or timer program the screen will be split into two sections:
LEFT SECTION
This part of the screen shows available cooking settings, automatic recipes and timer programs. To select any one of these, turn the left dial until the desired function appears and confirm the selection with the ⏻ button (if you do not press any buttons, the oven will confirm this automatically after a few seconds).
RIGHT SECTION
This part of the screen shows the values that can be set according to the selected mode: temperature, weight, duration, finish time...
To select a value, turn the right dial until the desired value appears and confirm the selection with the ⓣ button (if you do not press any buttons, the oven will confirm this automatically after a few seconds).
4.3. COOKING INFORMATION SCREEN
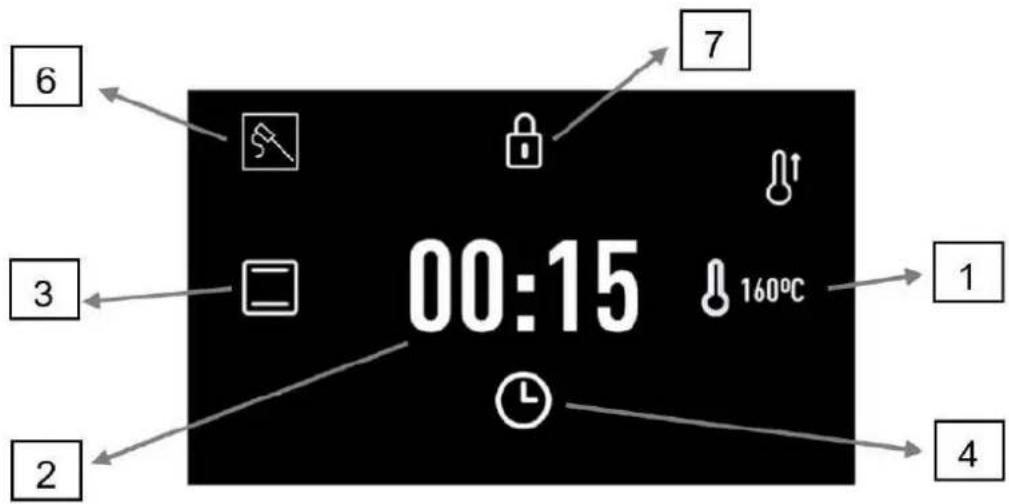
During cooking, the information on the oven's status will appear on the screen.
-
Selected temperature. The symbol will flash until the selected temperature is reached and whenever the oven is transmitting heat to the food.
-
Cooking time.
-
If the timer has not been programmed, the elapsed cooking time will be shown.
- If the timer has been set, the time left until cooking ends (countdown) will be shown.
-
If the oven has been programmed, but is set to delay (cooking has not yet started), the total programmed cooking time will be shown.
-
Cooking settings or automatic recipe selection.
If time settings have been programmed, information relevant to these is shown on the screen.
-
⏻ Timer. Countdown with audible signal to indicate the cooking time has finished.
-
Finish time.
-
Food probe. Appears on the display when a dish is being cooked with the meat probe. The symbol appears with the actual meat probe temperature.
Information on activated safety settings.
- ☐ Keypad lock. The child-safety lock will light up when activated.
5. OVEN FUNCTIONS

INFORMATION
For a description of how to use each of the features, see the cooking guide that comes with your oven.

OVEN SWITCH-OFF

STEAM / STEAM COMBINED FUNCTIONS (20% Steam)

CONVENTIONAL

CONVENTIONAL WITH FAN

GRILL + LOWER ELEMENT

MAXIGRILL

GRILL

LOWER ELEMENT

TURBO + LOWER ELEMENT

TURBO
SLOW COOKING

RISING DOUGH

DEFROST

ECO

Settings with fast preheating
5.1. STEAM FUNCTIONS
When the steam function is selected, there are some special steam functions:

100% VSTEAM

GRILL

CONVENTIONAL

TURBO

GRILL WITH FAN

REGENERATION MANUAL
The "Regenerate" heating type is used to reheat already cooked dishes or briefly bake pasta from the previous day in a gentle way. The activation of steam operation is carried out automatically.
Note: The program is interrupted when the water tank becomes empty during the operation of the "Regenerate" program. Fill the water tank.

Vacuum cooking (SOUS VIDE)
Vacuum cooking is a variant of low temperature cooking in which food is cooked at low temperatures between 50-95 °C and 100% steam. Vacuum cooking is suitable for meat, fish, vegetables and desserts. Food is vacuum-sealed hermetically in special heat-resistant bags or with a heat sealer.
Thanks to the protective packaging, all the nutrients and aromas are preserved.

WATER HARDNESS

DESCALE
5.2. COOKING WITH TRADITIONAL FUNCTIONS
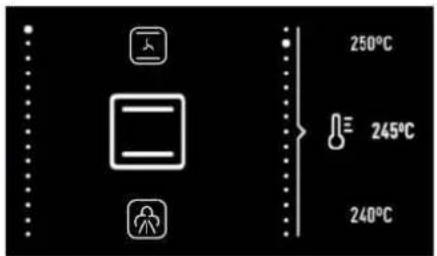
Selecting functions.
- Turn the oven on by pressing the ⏻ button.
- Turn the left dial until the desired function has been reached.
- The recommended temperature for the function chosen will appear on the right.
- If desired, the temperature can be changed by turning the right dial.
- Confirm your choice with the ON button. The oven will begin cooking.
At any time during the cooking process you can:
- Change the cooking function by turning the left dial.
- Change the cooking temperature by turning the right dial.
- Program the cooking timer or a duration/ finish time by pressing the ⏻ button.
- Modify programmed timers or duration/ finish times by pressing the ⏻ button.
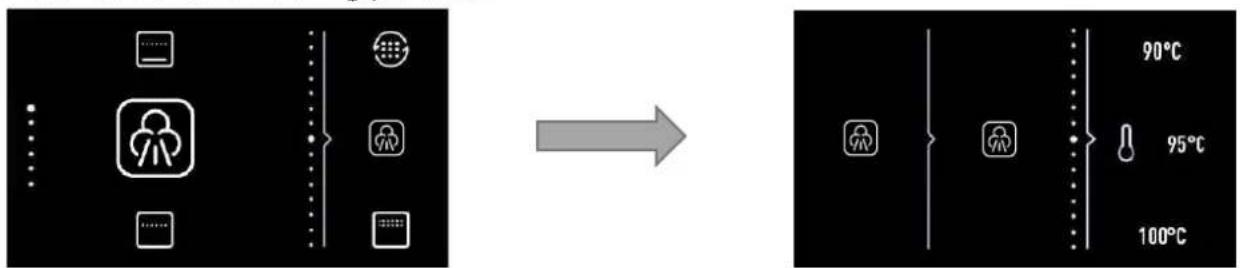
5.3. COOKING WITH STEAM
- Turn the oven on by pressing the Ⓐ button.
- Turn the left dial until the steam function have been reached.
- Turn the right dial to select the desired steam program.
- Confirm your choice with the ☐ button.
- Turn the right dial to select the desired temperature.
- Confirm your choice with the @ button.
- Turn the right dial to select the desired operating time (only in some functions).
- Press ☑ to start the cooking process.
flowchart
graph LR
    A["User Interface"] --> B["User"]
    B --> C["Control Panel"]
    C --> D["90°C"]
    C --> E["95°C"]
    C --> F["100°C"]

INFORMATION
The key can be pressed at any time, and the cooking process will begin .
At any time during the cooking process you can:
- Change the cooking time by pressing the ⏻ button.
- Change the cooking temperature by pressing the button.
5.4. COOKING WITH STEAM COMBINED FUNCTIONS
- Turn the oven on by pressing the ⏻ button.
- Turn the left dial until the symbol has been reached.
- Turn the right dial to select the desired function.
- Confirm your choice with the button.
-
- Turn the right dial to select the desired operating temperature.
- Press to start the cooking process.
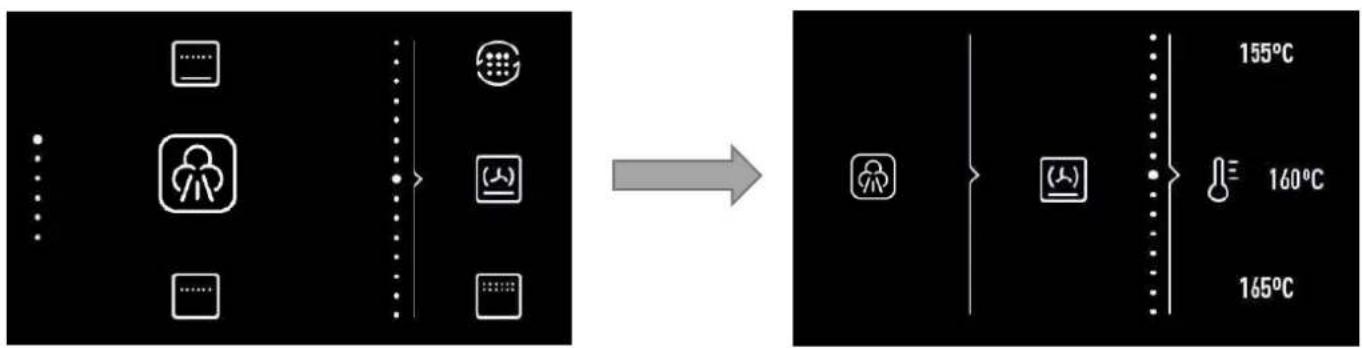
flowchart
graph LR
    A["Device Layout"] --> B["User Icon"]
    B --> C{Temperature}
    C --> D["Device Layout"]
    D --> E["User Icon"]
    E --> F["Device Layout"]
    style A fill:#f9f,stroke:#333
    style B fill:#ccf,stroke:#333
    style C fill:#cfc,stroke:#333
    style D fill:#fcc,stroke:#333
    style E fill:#cff,stroke:#333
    style F fill:#ffc,stroke:#333

INFORMATION
The key can be pressed at any time, and the cooking process will begin .
5.5. AUTOMATIC FAST PREHEATING
The functions indicated incorporate fast preheating.
During fast preheating the symbol lights up.
We recommend waiting until this symbol goes away before putting in the food.
This option is always activated.
To deactivate the fast preheating option press for a few seconds.
6. COOKING WITH THE PERSONAL COOKING ASSISTANT (PANDO CHEF)
6.1. AUTOMATIC OVEN RECIPES
| POULTRY |  |  | CHICKEN | |
 | DUCK | |||
 | GOOSE | |||
 | TURKEY | |||
| DRUMSTICKS | ||||
| MEAT |  |  | SUCKLING PIG | |
 | BEEF | |||
 | LAMB | |||
| [WKS2] | CHOPS | |||
| FISH |  |  | HAKE | |
 | SALMON | |||
| BREAD | [2W6W] | [07D3] | WHITE BREAD | |
| [H0C5] | BROWN BREAD | |||
 | WHOLEMEAL BREAD | |||
| PIZZA |  |  | THICK CRUST | |
 | THIN CRUST | |||
| DESSERTS |  |  | CAKES IN A MOULD | |
 | LARGE FRUITCAKE | |||
 | SMALL PIE | |||
| [B6C2] | CAKES ON TRAYS |
| STEAM |  | SALMON | |
 | FISH FILLET | ||
 | POTATOES | ||
 | ASPARGUS | ||
 | BROCCOLI | ||
 | CARROTS | ||
 | PEAS | ||
 | CAULIFLOWER | ||
 | MILK RICE | ||
 | CORN |

Recipes that require preheating the oven while empty.

TURN Recipes that require turning the food.
6.2. COOKING WITH THE PERSONAL COOKING ASSISTANT (PANDO CHEF)
- Turn the oven on by pressing Ⓐ button.
- Tap the 📁 button.
Recipe selection.
- Turn the left dial until the type of food that you want to cook is shown.
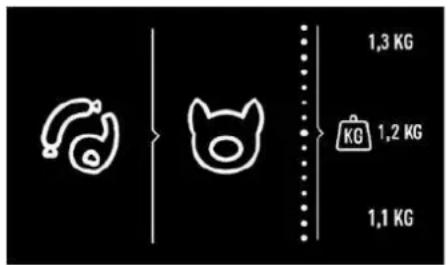
- Available recipes for the selected food type will appear on the left side of the screen. With the right dial select the desired recipe and confirm it with the Ⓤ button.
- on the right section of the screen, the information that the oven needs to program the cooking will appear.
- Depending on the recipe selected, the oven will ask you to key in:
THE WEIGHT OF THE FOOD: select with the right dial and confirm with the button.
THE TEMPERATURE: Confirm the suggested temperature for the recipe or select another with the right dial and confirm with the ⏻ button.
LEVEL OF BROWNNESS: For some recipes, you can select the finish
• HIGH: Well browned
• MEDIUM: Medium browned
- LOW: Lightly browned
- When all settings have been chosen, confirm with the button.
The oven will start cooking and the cooking screen will appear in place of the selection screen, showing the following information:
Selected cooking temperature
Remaining cooking time
Recipe selected
When the cooking time has finished an audible signal will sound for approximately 90 seconds and the cooking symbol will flash on the screen. Press any button to turn off the audible signal.
The oven will turn off automatically.

INFORMATION
In the first 10 minutes of cooking, you will be able to change the weight and level of brownness, or set a finish time.
After this time, these settings will be set and cannot be changed.
To change these cooking settings, tap the button and the oven will revert to the selection screen.
Follow the instructions above.
At any time during the cooking process you can:
Change the cooking temperature by touching the button. Confirm with the button
Set the timer by pressing the button ⏻
Change the existing timer by pressing the button.
To set or modify a program, consult the “Timed cooking programs” section which can be found further on in this user manual.
6.3. PREHEATING WHILE EMPTY
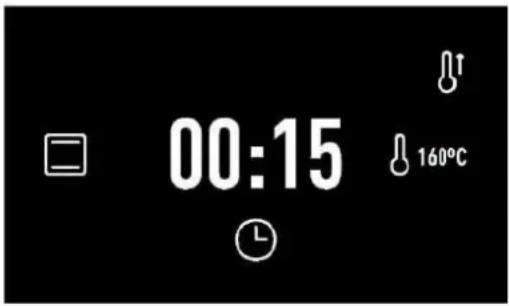
For recipes indicated in the table by the symbol the oven must be preheated before any food is put in.
When you select one of these recipes, the symbol will appear on the screen as cooking begins. When the oven reaches the cooking temperature, the symbol will flash and an audible signal will sound to notify you that the food can now be put into the oven.
When the door is opened to put in the food the audible signal will switch off automatically, and the remaining time will show on the cooking screen.
6.4. TURNING FOOD
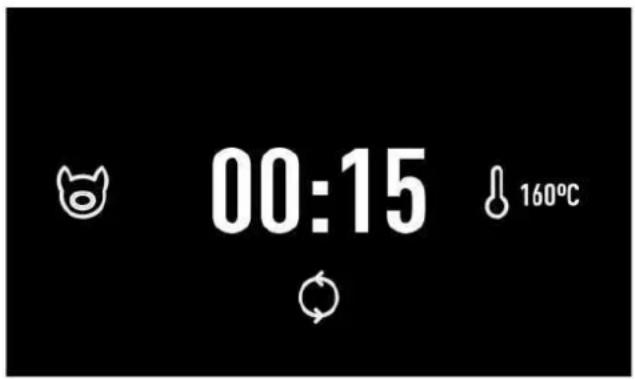
For recipes indicated in the table by the symbol, food must be turned during cooking.
The oven will notify you when to do this with an audible signal and the symbol will appear on the cooking screen.
Opening the oven door to turn the food will cause the audible signal to turn off automatically.
7. OVEN TIMER SETTINGS
7.1. TIMER OPTIONS
You can use the following timer options to program cooking:

Timer: An audible signal will sound when the programmed time finishes. Cooking will NOT stop when the timer sounds. The timer can also be set when the oven is not cooking.

INFORMATION
You can set a timer at any time regardless of whether or not the oven is cooking.
The rest of the timer options are available only when the oven is cooking.

Cooking Time: Allows you to select for how long the oven will cook.
An audible signal will sound at the end of the programmed time, the symbol will flash and the oven will stop heating automatically.
Tap any button to stop the audible signal and turn the oven off.

Cooking Finish Time: Allows you to set the time for when the oven will stop cooking.
An audible signal will sound when the set time is reached, the symbol will flash and the oven will stop heating automatically.
Tap any button to stop the audible signal and turn the oven off.
- Starting delayed cooking (→ Cooking Duration + → Finish Time): Allows you to program the oven to start cooking automatically and switch off automatically once the programmed time has ended

INFORMATION
To program this option, set the Cooking Duration and Finish Time consecutively.
You can access the programming options at any time during cooking.
Similarly, you can change an existing program.
7.2. PROGRAMMING THE TIMER OPTIONS
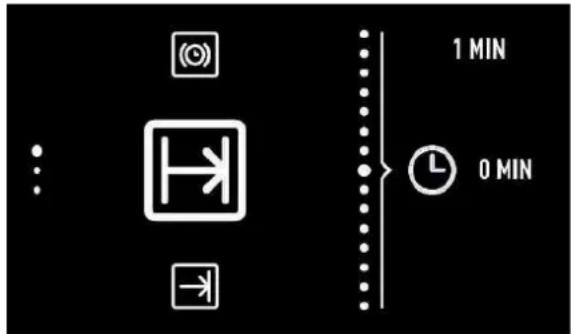
1. Select a cooking function.
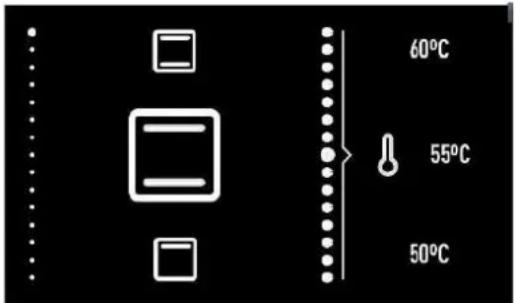
- Press the ⏻ button to access the timer options menu.
- Turn the left dial to select the desired program option.
- Turn the right dial to choose the duration or finish time depending on the chosen option.

INFORMATION
The oven will not allow you to select a finish time before the time it is now.
When programming a finish time, the center section will show the current time to help you choose.
- Confirm your choice with the OK button.
- The cooking screen will then be shown again. You will be able to see programmed timers to the right of the central circle.
8. FILLING THE WATER TANK
8.1. OPEN THE WATER TANK
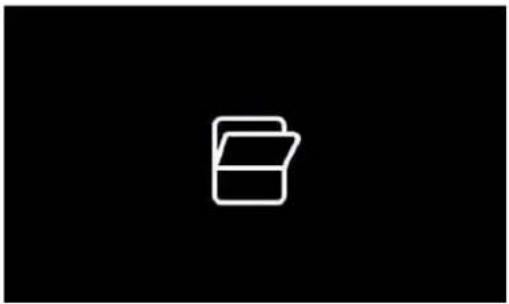
- Press the 🔒 key for a few seconds.
- The front panel slightly opens ( ≈ 15^ ). This process is slow.
natural_image
Simple white folder icon on black background (no text or symbols)- Complete the panel opening manually

NOTE
The panel can be opened during the oven operation.
8.2. FILLING THE WATER TANK
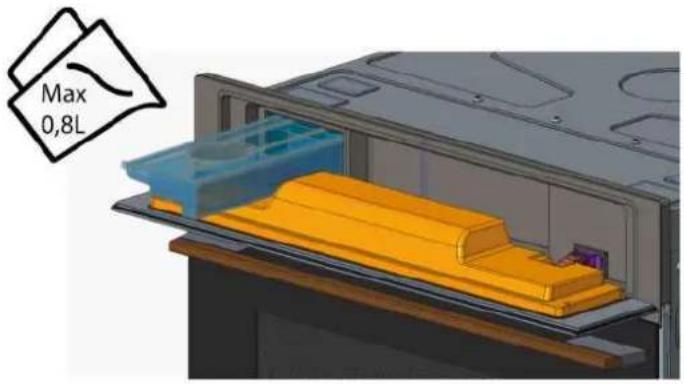
All functions require the water tank to be full.
Fill the water tank up to the "MAX" mark with cold, fresh drinking water and introduce it into the slot located behind the front panel (maximum 0,8L).

NOTE
Do not use sterilized or distilled water for cooking with the steam oven. The minerals in the water are essential for the cooking process to work.

NOTE
When filling the water tank, the top section of the tank does NOT fully seal. Overfilling the tank will potentially cause the tank to leak when moved.
8.3. REFILLING THE WATER
If, however, the water tank needs to be refilled, the Water refill message shows.

natural_image
Simple line icon of a cup with an exclamation mark, no text or symbols presentOnly fill the water tank up to a maximum of 0,5l to ensure that the water does not overflow when it is pumped back to the water tank. RISK OF OVERFLOW.
8.4. EMPTYING THE WATER TANK
When the appliance is switched off, the residual water is pumped back into the water tank.

WARNING
The water in the tank may be hot. Danger of burns!
Depending on the temperature setting and length of the steam cooking functions, this can take up to 1 hour to complete. Always wait until the appear on the display before removing the water tank, attempting to run a second steam function or switching off the power to the steam oven. If interrupted before finishing, the pumping will reset, which can cause the internal water pump to run dry and make a loud vibrating noise while it runs. Over time, this can cause damage to the pump
After the water is pumped back to the water tank, the display will show symbol requiring the following actions:
- Remove and empty the water tank.
- Dry the water tank and introduce it back into the slot located above the cavity. Clean and dry the cooking space.
- Leave the appliance door open so that the cooking space can cool down and dry completely

INFORMATION
It is advisable to remove the water tank and empty it after a cooking cycle.
This prevents the formation of bacteria and limestone inside the appliance.
If the water tank has not been removed from the oven and a new cooking cycle is started, the oven displays the symbol.
9 GENERAL OVEN FUNCTIONS
9.1. PAUSING A COOKING CYCLE
You can pause the cooking process at any time by pressing OK or opening the door.
The oven incorporates a steam-reduction function that is activated when the key is pressed, to gradually release the steam from the cavity, so that there is less steam to flow out of the oven when the appliance door is opened

WARNING
When opening the door during or upon completion of the cooking cycle, be careful of the flow of heat and/or steam coming out of the cooking chamber. Step back or to the side to avoid burns. Keep hands on the oven door until the door is fully opened to avoid being scalded.
At this point:
- The steam generation is paused.
- The cavity walls and the water tank are still very hot. Danger of burning!
- The timer stops and the display shows the remaining operating time (if this has been set).
If you wish, at this point you can:
- Turn or stir the food to ensure it will be evenly cooked.
- Change the cooking parameters.
To restart the process, close the door and press the ⓗkey
9.2. END OF A COOKING CYCLE
At the end of the set duration or when you press the Ⓞkey to finish the cooking cycle, you will hear three beeps and the display will show the word “END”, the oven starts the steam-reduction function.
This function gradually releases the steam from the cavity, so that there is less steam to flow out of the oven when the appliance door is opened.

WARNING
When opening the door during or upon completion of the cooking cycle, be careful of the flow of heat and/or steam coming out of the cooking chamber. Step back or to the side to avoid burns. Keep hands on the oven door until the door is fully opened to avoid being scalded.
The cooling fan can continue to run for a certain length of time after the appliance has been switched off. This is a normal function that is meant to reduce the temperature inside the oven.
When the display shows the symbol, this means that the water was pumped and that the water tank can be removed.
Remove the water tank and dry it thoroughly. Let the cooking space cool down for a moment and then clean and dry it with a cloth. The door should be left open for some time so that the appliance can dry completely.
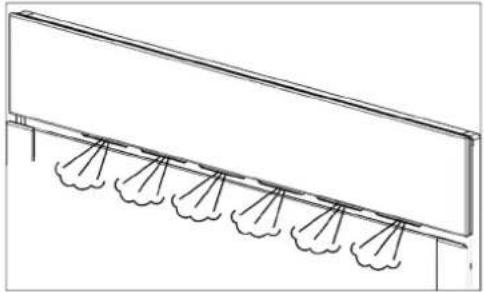
9.3. STEAM FLOW
It is normal to have an intermittent steam flow, coming out from the oven front. This is especially noticeable in winter time or in high moisture environments.
natural_image
Technical line drawing of a structural beam with multiple support columns (no text or symbols)9.4. RESIDUAL WATER IN THE OVEN
To reduce the residual water in the oven, it is recommended to insert a tray in the bottom rack level. The condensation released from the food begins to drip on the tray. The remaining residual water can be easily dried with a cloth. Take care the drip tray under the door is dried after every use. A build-up of liquid in this tray can quickly overflow and damage the surrounding cupboards. It is accessed through the opened door.
This function can be selected at any time while using the oven.
- With the oven switched off. The child lock will not allow the oven to be switched on when the ① button is touched.
- With the oven in use. If the feature is activated while the oven is cooking or set to delay, the keypad will not respond and it will not be possible to use the dials or change the cooking settings.
To activate this feature press and hold the 🔒 button until you hear a beep and the 🔒 symbol appears on the screen. The control panel is now locked.
To deactivate this feature touch and hold the button until you hear a beep and the symbol disappears.
11. DESCALE
DESCALING PROCEDURE
- Rotate the left dial to enter the Steam menu.
- Rotate the right dial until the Descaling symbol 📋 appears on the right side of the display.
- Press the ⓣ to start the descaling function.
- When the display shows "0,5", remove the water tank.
- Pour 0.5 liters of an adequate descaling solution into the water tank and put the water tank back.
- Press ☑The Descale cycle is initiated and takes about 30 minutes.
- The descaling process is silent and during this process, the display shows the percentage of the process and the descaling symbol 🏠
- When the display shows and the oven emits a beep, remove and empty the water tank.
- Fill the water tank with 0,5 liters of fresh water and put the water tank back.
- Close the panel The first rinsing cycle starts.
- When the display shows again and the oven emits a new beep, remove and empty the water tank.
- Fill the water tank with 0.5l of cold water and put the water tank back.
- Close the panel. The second rinsing cycle starts.
- When the rinsing cycle has finished the display shows the symbol 📋 and emits a beep, until the water tank is removed.
- Remove, empty and dry the water tank.

WARNING
The descaling process CANNOT BE STOPPED once started.
Sounds (produced by the water pump) that are absolutely normal can be produced.
During this process, DO NOT try to open the oven door.
12. FOOD PROBE

WARNING
Please cover the socket inside the cavity if you are not using the food probe. Failure to cover the socket will cause damages to the oven.
The food probe measures the inner temperature of the food being cooked and ends the active function when a selected temperature is reached.
- Program the desired cooking function as previously described.
- At the end of the described steps, the food probe menu will appear on the display.
- Rotate the right dial to select the desired temperature.
- Press to confirm and start the cooking function.
13. TROUBLESHOOTING
| Display Description | |
| Descaling | |
| SOFT Soft water. | |
| MED Medium water. | |
| HARD Hard water. | |
 | Appliance must be descaled. |
| Flashing – descaling starts. | |
| 0,5L Feed 0,5l | descaling solution/fresh water into the water tank. |
| 0,8L Feed 0,8l | cold water into the water tank for rinsing. |
| Water tank | |
 | Indication that water tank is missing. |
| Tank is empty, please fill with 0,5l of water. | |
 | The water tank must be removed, emptied and reinserted. |
| Other messages | |
| DEMO mode Showroom mode | |
| END End of function | |
With the DEMO mode activated, you can control the oven without heating. Activating this mode is recommended if the oven is to be plugged in at a showroom.
Activating DEMO mode
Before setting the clock, press the buttons and simultaneously on the programming mode, until "DEMO Mode ON" appears on the screen.
12:00
DEMO MODE ON
Then, set the time on the oven.
The word “DEMO” will be shown permanently on the panel and the oven will work as normal, but without heating up.
12:00
DEMO
To deactivate DEMO mode, repeat the same process.
- TECHNICAL SPECIFICATIONS
| INSTALLATION PHTV-942 | |
| Voltage (V) 220-240 | |
| Frequency (Hz) 50 | |
| Connecting Wire (m) 1,1 m WITHOUT PLUG | |
| Built-in Dimensions (High x Wide x Bottom) (mm) 450-460 x 560-568 x 580 | |
| Product Dimensions without front panel (High x Wide x Bottom) (mm) | 430x545x547 |
| LOGISTIC / PACKING INFORMATION | |
| Net Weight (Kg) 35 | |
| Gross Weight (Oven+Pack.) (Kg) 38 | |
| Packaging Size (High x Wide x Bottom) (mm) | 510x635x655 |
| ACCESSORIES | |
| Instruction Book - Languages (5) ES/PT/UK/FR/GE | |
| Reinforced Grid 1 | |
| FEATURES | |
| Capacity Net (L) 44 | |
| Capacity Gross (L) 45 | |
| Water Tank (L) 0,8 | |
| ELECTRICAL POWER DATA | |
| Grill + Maxigrill 1400-2500 W | |
| STATIC OVEN 2100 W | |
| TURBO | 1600 W |
| Light Power Lamp | 25 W |
| LIGHT | |
| INSIDE LIGHT | HALOGEN G9 |
| MAXIMUN POWER FUNCTION | |
| Maximun Nominal Power (230 V) | 3400 W |
| ENERGY CLASS | |
| EEI | A+ |
16. INSTALLATION DIAGRAMS AND DIMENSIONS
PHTV 942
BUILT IN DIAGRAM
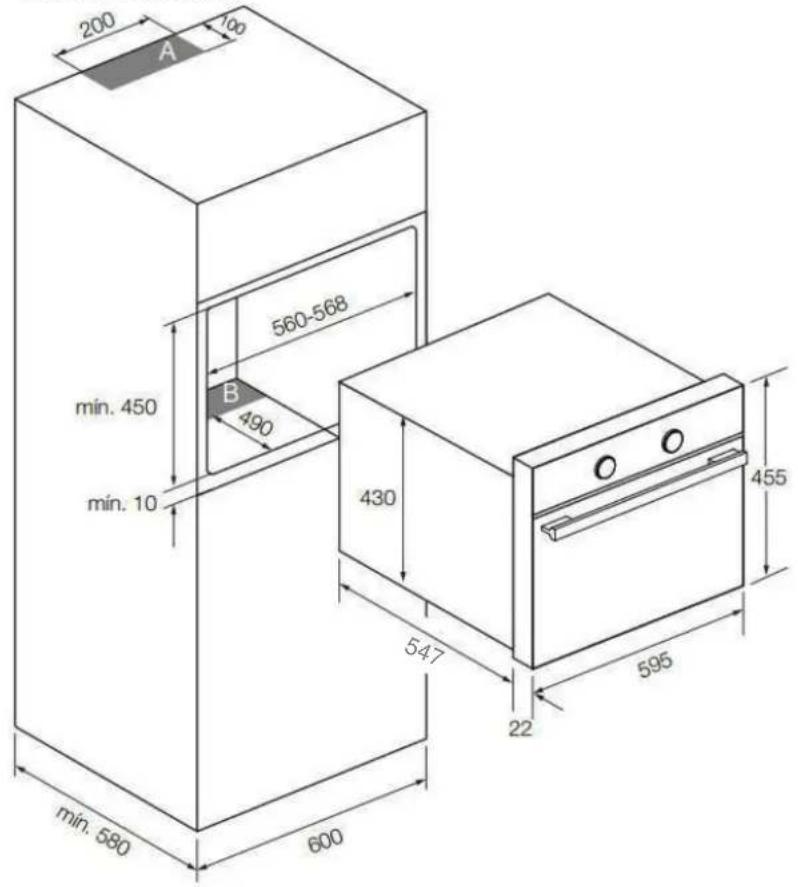

NOTE
Respect the ventilation holes in the cabinet, see installation drawings (200X100mm in zone A and 560x90mm in zone B). If these vents are not available, the productnot work properly and may suffer damage that would NOT be covered by the warranty.

BUILT UNDER DIAGRAM
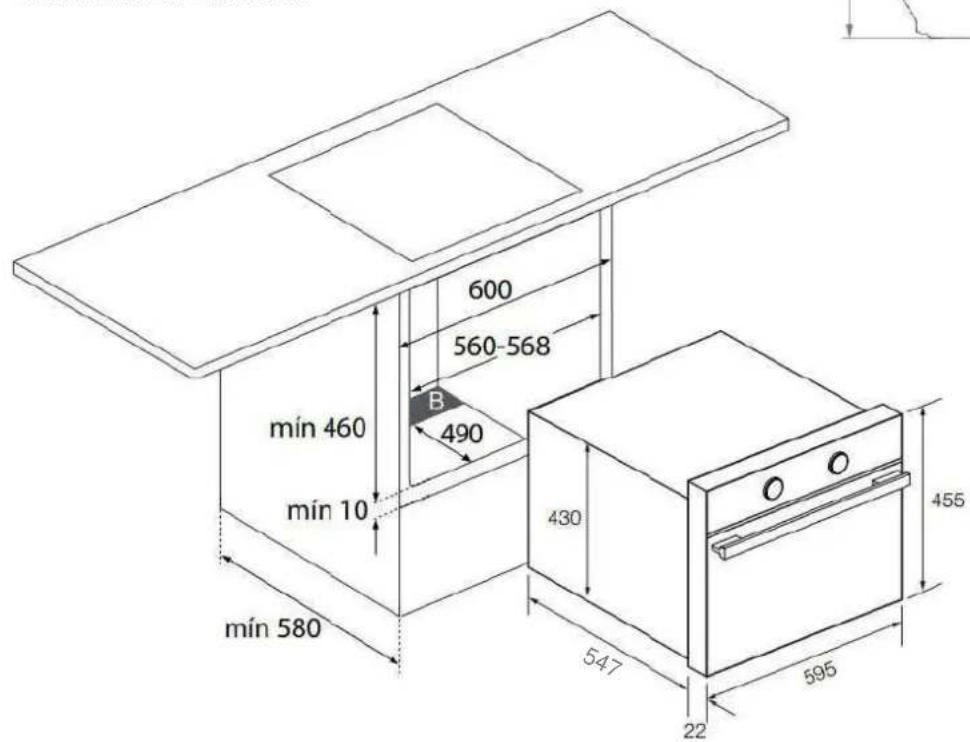
17. AFTER-SALES SERVICE AND GUARANTEE
INOXPAN S.L., thank you for choosing our brand and for trusting a Pando product, standard of Quality, Design & Innovation, a brand honouring his origins and commitments.
TERMS OF THIS WARRANTY:
This product comes with a warranty of 3 year as from the date of purchase covering all product defect affecting its performance. To validate the same is mandatory to apply the purchasing invoice or buying ticket before the official Customer Service engineer.
During the above mentioned period, the Company pledge to repair or replace at no cost any defective part whose cause is due to vice or manufacturing product flaw to make it work fine again, as well as the necessary labour cost and expenses involved in said repairing or replacement.
PANDO WARRANTY EXEMPTIONS:
It shall not be covered by the warranty or may be cause of cancelation of such, any of the following case scenarios, thus being the user the one taking charge of any material cost, labour and customer service travel expenses:
- Installation or performing reviews, cleaning or maintenance.
- If the installation of the device has not been carried out by Authorized Specialist Professional personnel or Pando Official Technical Service personnel, who meet the requirements of the safety standards and electrical power regulations.
- Whenever the product is orientated to commercial or non-residential use, to which it is not madefor.
- Product malfunction caused by not following the instructions, recommendations and/or norms shown in the appliance manuals.
- Malfunctions or problems caused by an inadequate installation, or by not having the necessary free spaces in the furniture and indicated in the installation manual, for adequate ventilation of the product.
- Issues and faults produced by carriage or moves, and/or product handling by non-authorised personnel to this company or the brand Pando.
- Bumps, dents, scratches, or broken glasses
- Other alien bodies present in the interior or exterior of the product
- That the technician does not have easy access to the product, because there are elements that prevent its easy and safe access. All necessary means to access by the Pando authorised engineer shall be on account and responsibility of the user.
- Wiring inadequate handling of external electric cable.
- Wear and tear aesthetical parts, such as light screens, lamps, trays, grills, guides.
- Rust, burns, stains or colour changes in the body, door, accessories or interior cavity caused by improper maintenance or use, or by improper application or unprotected exposure to corrosive elements such as cleaning products not recommended by the manufacturer and inappropriate.
- Issues or malfunction produced by variations of main supply, or natural and random causes from weather or geological origin, as storms, lightning, earthquakes, floods, etc.
- Products whose origin is resale, used appliance, or displays with more than two years since their date of manufacturing.
INOXPAN, S.L., Remains expressly excluded from any liability over any eventual damage any direct or indirect to persons or materials produced by inadequate product handling and use.
Official Pando Customer Service Contact Details:
| ESPAÑA, PORTUGAL Y ANDORRA: | OTROS PAÍSES: | ||
| ESwww.pando.es/asistencia-tecnica/ |  | ENhttps://www.pando.es/en/after-sales-services/FRhttps://www.pando.es/fr/service-apres-vente/ |  |

HINWEIS
natural_image
Simple line drawing of a cup with an exclamation mark on top, set against a dark background (no text or symbols)natural_image
Technical line drawing of a structural beam with multiple support columns (no text or symbols)9.4. RESTWASSERMENGE IM GARRAUM
https://www.pando.es/en/after-sales-services/
FR
SERVICIO POST VENTA España, Portugal y Andorra
Environmental Management System Certification
UNE-EN ISO 14001:2015
ES20/208675

CE
Quality Management System
UNE-EN ISO 9001:2015
ES19/86566

Pando
Installation & Maintenance
EN Installation & Maintenance
Safety Information ....3
Children and Vulnerable People Safety . 3
General Safety 4
Microwaves Safety Instructions ..... 4
Avoid damaging the Microwave oven or other dangerous situations by following these instructions 6
Installation 7
Cleaning and Maintenance 8
Service and Repair 9
INSTALLATION....10
Before installation....10
Electrical connection....10
Oven installation....10
ENVIRONMENTAL INFORMATION ......11
Oven functions ......11
Product disposal 11
BEFORE FIRST USE....11
OTHER IMPORTANT INSTRUCTIONS....11
ACCESSORIES ....12
CLEANING AND MAINTENANCE......12
Cleaning the oven exterior and oven accessories....12
Cleaning the oven interior....12
Cleaning the oven door 13
Steam oven specific cleaning....13
Changing the oven light bulb....14
TROUBLE SHOOTING....14
TECHNICAL SPECIFICATIONS ....15
FIGURES 89
Safety Information
Before the installation and use of the appliance, carefully read the supplied instructions. The manufacturer is not responsible if an incorrect installation and use causes injuries and damages. Always keep the instructions with the appliance for future reference.
Children and Vulnerable People Safety
Warning! Risk of suffocation, injury or permanent disability.
- This appliance can be used by children aged from 8 years and above and persons with reduced physical, sensory or mental capabilities or lack of experience and knowledge if they are supervised by an adult or a person who is responsible for their safety.
- Children should be supervised to ensure that they do not play with the appliance.
- Keep all packaging away from children.
- WARNING: The appliance and its accessible parts become hot during use. Care should be taken to avoid touching heating elements. Children less than 8 years of age shall be kept away unless continuously supervised.
- WARNING: When the appliance is operated in the combination mode, children should only use the oven under adult supervision due to the temperatures generated.
- If the appliance has a child safety device, we recommend that you activate it. Children under 3 years must not be left unsupervised in the vicinity of the appliance.
- Cleaning and user maintenance shall not be made by children without supervision.
General Safety
- This appliance is intended to be used in household applications and not in hotels, shops, offices and other similar environments.
- Internally the appliance becomes hot when in operation. Do not touch the heating elements that are in the appliance. Always use oven gloves to remove or put in accessories or ovenware.
- When heating food in plastic or paper containers, keep an eye on the appliance due to the possibility of ignition.
- The appliance is intended for heating food and beverages. Drying of food or clothing and heating of warming pads, slippers, sponges, damp cloth and similar may lead to risk of injury, ignition or fire.
- If smoke is emitted, switch off or unplug the appliance and keep the door closed in order to stifle any flames.
- Make sure you never catch the power cables of other electrical appliances in the hot door or the oven. The cable insulation may melt. Danger of short-circuiting!
- Warning! Please cover the socket inside the cavity if you are not using the food probe. Failure to cover the socket will cause damages to the oven.
- Only use the food probe recommended for this oven.
- The tray and rack have a system for easy partial removal and handling of food. Always place these accessories inside the oven, as indicated in the Accessories section.
Microwaves Safety Instructions
- WARNING: Do not heat liquids and other foods in sealed containers. They are liable to explode.
- Only use utensils that are suitable for use in microwave ovens.
-
Warning! The oven cannot be used if:
-
The door is not closed correctly;
- The door hinges are damaged;
- The surfaces of the contact between the door and the oven front are damaged;
- The door window glass is damaged;
- There is frequent electrical arcing inside the oven even though there is no metal object inside.
The oven can only be used again after it has been repaired by a Technical Assistance Service technician.
- Microwave heating of beverages can result in delayed eruptive boiling. Care must be taken when handling the container.
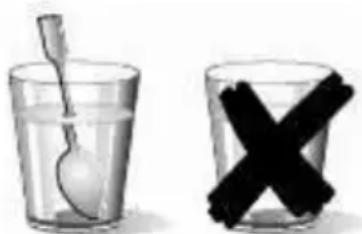
natural_image
Two glassware illustrations: a spoon inside a clear glass and a black X symbol on a larger glass (no text or symbols present)• Take care when heating liquids!
When liquids (water, coffee, tea, milk, etc.) are nearly at boiling point inside the oven and are taken out suddenly, they may spurt out of their containers.
DANGER OF INJURIES AND BURNS!
To avoid that type of situation when heating liquids, put a teaspoon or glass rod inside the container.
- The contents of feeding bottles and baby food jars shall be stirred or shaken and the temperature checked before consumption, in order to avoid burns.
- Eggs in their shell and whole hard-boiled eggs should not be heated in the appliance since they may explode, even after microwave heating has ended.
- Warning! Do not heat pure alcohol or alcoholic drinks in the microwave. FIRE RISK!
- Beware! To avoid food overheating or burning it is very important not to select long time periods or power levels that
are too high when heating small quantities of food. For example, a bread roll can burn after 3 minutes if the power selected is too high.
- For toasting, use just the grilling function and watch the oven all the time. It you use a combined function to toast bread it will catch fire in a very short time.
- To achieve the best results when warming up small loads (such as a glass of water, a milk mug or a popcorn bag) it is suggested that they are placed on the glass tray and position it at the 1^st or higher levels.
- Turn or stir the food at regular intervals to improve heating uniformity.
- To achieve the best cooking results with microwaves the rack must be removed, place the food on the glass tray and position it at the bottom or higher levels.
- Do not place any food or recipient with food/liquid directly on the bottom of the cavity. For better heating results always place the food or recipient with food/liquid over the glass tray.
- Do not cover the bottom of the oven cavity with aluminum or tin foil sheets as there is the risk of damaging the oven.
Avoid damaging the Microwave oven or other dangerous situations by following these instructions
- Never switch on the microwave when it is empty. If there is no food inside there may be an electrical overcharge and the oven could be damaged. RISK OF DAMAGE!
- For carrying out oven programming tests put a glass of water inside the oven. The water will absorb the microwaves and the oven will not be damaged.
- Do not cover or obstruct the ventilation openings.
- Place correctly the oven accessories on the side racks (see the section “Accessories”.
- Use only dishes suitable for microwaves. Before using dishes and containers in the microwave, check that these are suitable (see the section on types of dishes).
- Never remove the mica cover on the ceiling of the oven interior! This cover stops fat and pieces of food damaging the microwave generator.
- Do not keep any inflammable object inside the oven as it may burn if the oven is switched on.
- Do not use the oven as a pantry.
- Do not use the oven for frying as it is impossible to control the temperature of oil heated by microwaves.
- Do not lean or sit on the open oven door. This may damage the oven, especially in the hinge zone. The door can bear a maximum weight of 8 kg.
- The base and the grills can bear a maximum load of 8 kg. To avoid damaging the oven, do not exceed this load.
- Failure to secure tightly the support with the nuts may lead to overheating and damages.
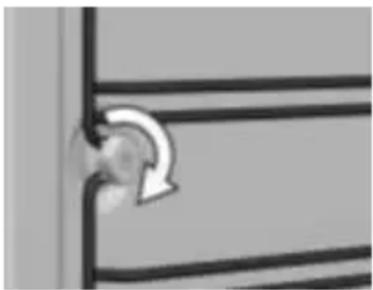
natural_image
Close-up of a mechanical component with a curved arrow indicating rotation (no text or symbols visible)Installation
- The installation must comply with current regulations.
-
The electrical installation is to be set up so that the appliance can be isolated from the mains with a minimum 3mm all-pole contact separation. Suitable separation devices include e.g. cutouts, RCD's and contactors.
-
If the electrical connection is done through a plug and this remains accessible after installation, then it is not necessary to provide the mentioned separation device.
- Protection against electric shock must be provided by the electrical installation.
- WARNING! The oven must be earthed.
- WARNING! The appliance is intended to be built in. Please refer to the last pages of this user manual for detailed information on the installation dimensions.
Cleaning and Maintenance
- WARNING! Cut the power supply before cleaning and maintenance.
- The appliance should be cleaned regularly and any food deposits removed.
- Failure to maintain the appliance in a clean condition could lead to deterioration of the surface that could adversely affect the life of the appliance and possibly result in a hazardous situation.
- Do not use harsh abrasive cleaners or sharp metal scrapers to clean the glass door since they can scratch the surface, which may result in shattering of the glass.
- Do not use a steam cleaner to clean the appliance.
- The door contact surfaces (the front of the cavity and the inside part of the doors) must be kept very clean in order to ensure the oven functions correctly.
- Please follow the instructions regarding cleaning in the section "Oven Cleaning and Maintenance".
- WARNING: Ensure that the appliance is switched off before replacing the lamp to avoid the possibility of electric shock. Please refer to the chapter "CHANGING THE OVEN LIGHT BULB".
Service and Repair
- WARNING! Cut the power supply before repair.
- WARNING! Only a competent person can carry out any service or repair operation that involves the removal of a cover which gives protection against exposure to microwave energy.
- WARNING! If the door or door seals are damaged, the appliance must not be operated until it has been repaired by a competent person.
- If the power cable is damaged it should be substituted by the manufacturer, authorized agents or technicians qualified for this task in order to avoid dangerous situations.
- Repair and maintenance work, especially of current carrying parts, can only be carried out by technicians authorized by the manufacturer.

INFORMATION
This manual describes general oven characteristics, and so they may not correspond in full to those of your oven. Consult the User's guide accompanying this manual to learn about the specific features and equipment of your oven.
The manufacturer reserves the right to change the product characteristics in order to improve its operation.
This information is exclusively for the installer who is responsible for assembly and electrical connection. The manufacturer will not accept liability for possible damage caused if you install the oven yourself.
BEFORE INSTALLATION
- To handle the oven, use the grips at the sides. Do not use the door handle to lift the oven.
- Do not install the oven behind decorative doors. This can cause it to overheat.
- When installing the oven under a counter, follow the instructions for installing it.
- In general, protruding elements (furniture reinforcements, pipes, socket bases, etc.) at the back of the unit must be avoided.
- When the base of the main power socket is inside the unit in which the oven is installed, this must be done in the shaded area. Figure 2.
- The unit in which the oven is installed and adjacent units must withstand temperatures higher than 85 °C.
- The installation instructions must be adhered to strictly. If not, the oven's ventilation circuit may become blocked, causing high temperatures that could damage the kitchen unit and the appliance itself.
For this purpose, check the unit measurements and those of the holes to be drilled in the units, as shown in the following figures:
Column installation
• 45cm MW oven: Figure 7
- 45cm Steam oven: Figure 16 Undercounter installation
• 45cm oven: Figure 8
• 45cm Steam oven: Figure 1
ELECTRICAL CONNECTION
The fitter must ensure that:
- The mains power voltage and frequency correspond to what is marked on the identification plate.
- The domestic wiring system can withstand the maximum power marked on the identification plate.
- After connecting the power supply, check that all electrical parts of the oven are working correctly.
OVEN INSTALLATION
For all ovens. After the electrical connection has been done:
- Position the oven inside the unit and ensure that the feed cable is not trapped or in contact with parts of the oven that heat up.
- Make sure that the body of the oven is not in contact with the walls of the unit and that there is a minimum space of 2 mm between adjacent units.
- Centre the oven in the unit so that there is a minimum space of 5mm between the oven and the doors of the furniture that surrounds it. Figure 3.
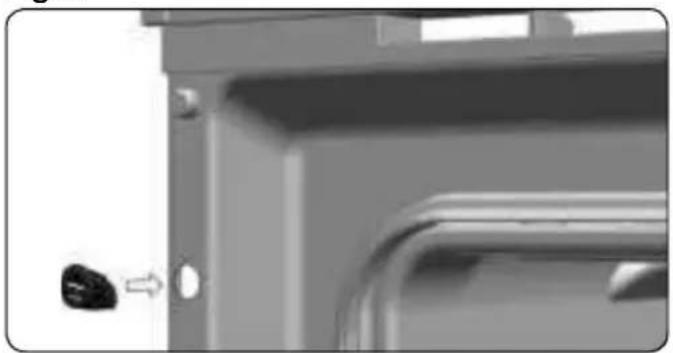
- Open the door and insert the plastic plugs supplied with the oven into their respective housings. Figure 9.
- Fasten the oven to the unit with the screws supplied, screwing them into the unit through the stops.

WARNING
Do not lean on the open door of the oven while executing steps 4 and 5, as the open is not secured to the unit and it could move forwards and fall to the floor.
Environmental information
OVEN FUNCTIONS
The packaging is made from totally recyclable materials which can be put to other uses. Consult your local council regarding the necessary procedures for disposing of these materials.
PRODUCT DISPOSAL

WARNING
The symbol on the product or packaging indicates that this appliance cannot
be disposed of as normal household waste. It should be taken to an electrical and electronic equipment collection point for recycling. In this way, any negative consequences for the environment and public health from incorrect handling can be avoided.
Contact your local council, household waste disposal service or the establishment where you bought the
Before first use
There may be traces of fat and other substances in the oven as a result of the manufacturing process. These should be removed using the following procedure:
- Remove all the packaging from your oven, including the protective plastic, if any.
- Turn your oven to 📁, or if this setting is not available to ❄, at 200 °C for 1 hour.
Consult the User's guide accompanying this manual on how to do this.
- Cool the oven with the door open so that it ventilates and no odors remain inside it.
- Once cold, clean the oven and the accessories.
During this first operation, smoke and smells will be produced. The kitchen should therefore be well ventilated.
Other important instructions
Do not cover the bottom of the oven with aluminum foil as this may affect cooking performance and damage the enamel inside the oven and the interior of your kitchen unit. Do not pour water on the bottom surface when in use; this may damage the enamel. It is normal for condensation to occur on the oven door when cooking food with a high liquid content.
When closing the oven door during cooking, the sound of the air inside it can be heard. This effect is normal due to the pressure exerted by the door when it is closed, guaranteeing the sealing of the cavity.
Accessories
Do not leave any containers or food on the oven floor. Always use the trays and racks supplied with the oven.
To prepare yoghurt, place the jars on the oven floor.
To cook any other food, insert the tray or rack into the runners inside the oven.
-
Between two rails of the side supports or on any of the extractable runners, if the oven has them.
-
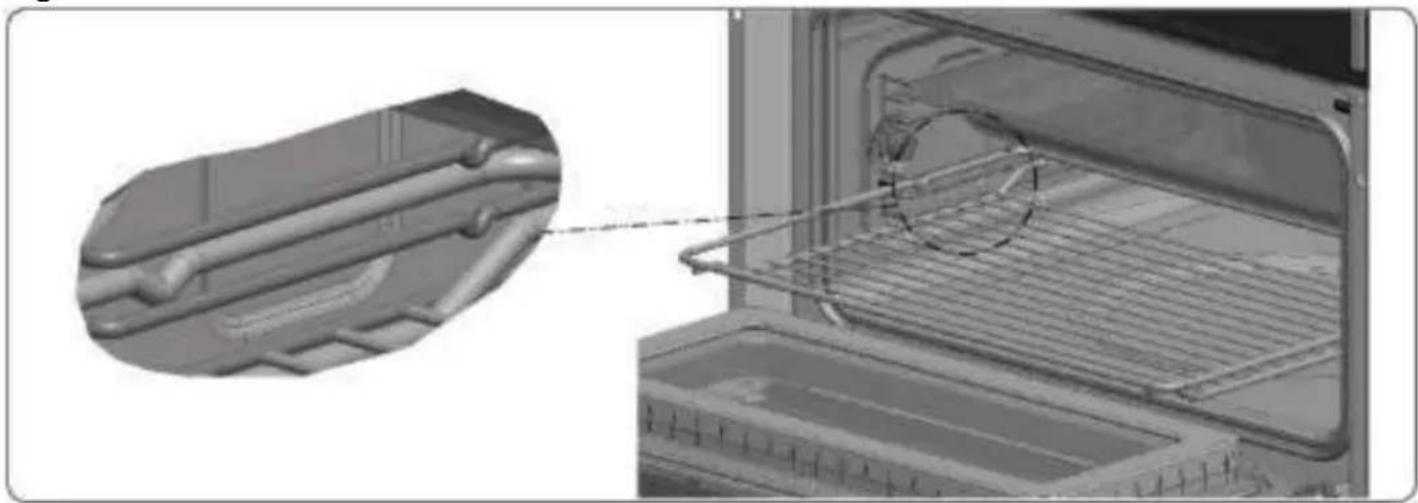
The rack and some of the trays have retention grooves to prevent them from accidentally being removed. Place these grooves towards the back of the oven, facing upwards Figure 4.
-
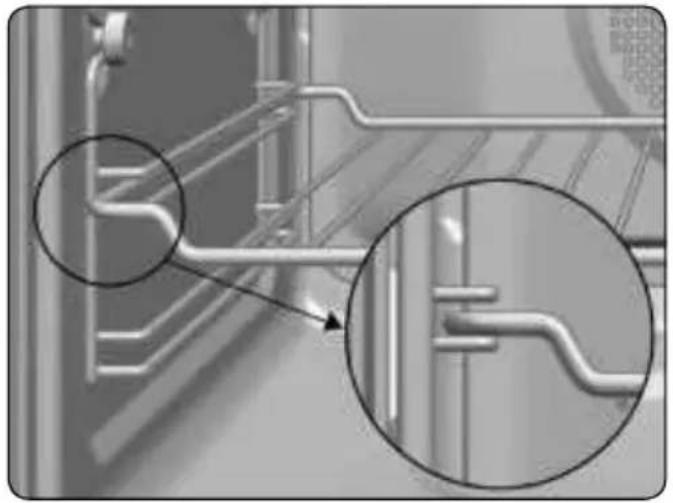
The surface of the rack on which the container will rest must be below the side rails. This prevents the container from accidentally sliding. Figure 5.
Cleaning and maintenance

WARNING
Disconnect the appliance from the mains power supply before any operation.
CLEANING THE OVEN EXTERIOR AND OVEN ACCESSORIES
Clean the outside of the oven and accessories with warm soapy water or with a mild detergent.
Take great care when cleaning stainless steel or painted surfaces. Use only sponges or cloths that do not scratch.
CLEANING THE OVEN INTERIOR
Clean the oven interior regularly to remove traces of fat or food, which can later give off smoke and odors and cause stains to appear. Use nylon brushes or sponges with warm soapy water to clean enameled surfaces such as the bottom of the oven. Clean when the oven is cold. Use oven cleaning products only on enameled surfaces and always follow the manufacturer's instructions.

WARNING
Do not clean the oven interior with steam or pressurized-water cleaning equipment.
Do not use metal scouring pads, wire brushes or any utensil that can scratch the enamel.
Over time, certain types of food such as tomatoes, vinegar and salt-baked dishes may cause the enamel to change color. This is normal and does not affect the functioning of the oven. Do not try to remove these stains using aggressive methods such as those described, as this could cause permanent damage to the surface.
Clean the oven seal regularly to eliminate all traces of fat or food. This will prevent the seal from becoming damaged and breaking during subsequent cooking operations.
It is advisable to clean this seal without removing it.
Dismantling the side supports
- Remove all accessories from inside the oven.
- Completely loosen the nut at the front of the fastening element (A), pull the supports forward (B) and remove them. Figure 10.
Assembling the supports
-
Insert the rear notch into the rear fastening nut.
-
Fix the front fastening nut (C) in the front notch of the support. Figure 11.
-
Secure the support with the nut (D) and turn until it is fully adjusted (E). Figure 11.

WARNING
Failure to secure tightly the support with the nuts may lead to overheating and damages.
CLEANING THE OVEN DOOR
Dismantling/assembling the interior glass of the door

WARNING
If dismantling the glass panes with the door fitted in the oven, always do it with the hinge in the locked position. If not, the door will close and the unmounted glass panes could break and cause injury.
Depending on the model, your oven may have 1 or 3 panes of glass. Follow the instructions for the type of door your oven has.
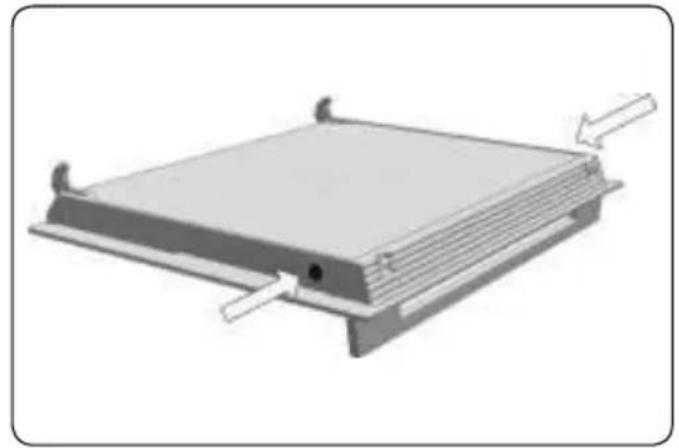
- Using your fingers, press the buttons located at the top of both sides of the oven door. Figure 12.
- Keep them pressed and pull on the plastic seal above the door. Figure 13.
- Remove the glass panes from the door. Clean them with a glass cleaner or soap and water and a soft cloth.

WARNING
Pay attention to the order and position of the glass panes when removing them as they must be reassembled in the sam order and position when you have finished cleaning them.
-
Once clean, insert pane no. 3 into the same position so that the TERMOGLASS indication printed on it is visible as shown in Figure 14.
-
Reattach the top seal of the door, making sure that the side tabs fit into their housings.

WARNING
Never switch the oven on if any of th glass panes on the door are missing.
STEAM OVEN SPECIFIC CLEANING
Descaling
Whenever steam is produced, irrespective of the hardness of the local water supply (i.e. the limescale content of the water), limescale is deposited inside the steam generator.
The time interval between descaling depends on the hardness of the water and frequency of use. If steaming 4 × 30 minutes per week, the appliance must be descaled (depending on water hardness) roughly as follows:
| Water hardness | Descale after about |
| Very soft | 18 months |
| Medium | 9 months |
| Very hard | 6 months |
The appliance automatically detects when descaling is necessary as described on the user's guide booklet.
IMPORTANT NOTE: Failure to descale the appliance will likely impair the functioning of or cause damage to the appliance.
Suitable descaling solutions
For descaling, use the descaling solution "durgol®".
This solution allows a professional and careful descaling of your appliance. Available at Customer Care Centers.
Warning! Do not use vinegar or vinegar-based products as they can cause damage to the oven's internal circuit.
Traditional descaling solutions are not appropriate because they can contain foaming agents.
CHANGING THE OVEN LIGHT BULB

WARNING
Make sure the oven has been disconnected from the mains before changing the bulb.
The replacement bulb must withstand temperatures up to 300 °C. You can order them from the Technical Assistance Service Department.
Changing the upper bulb
To substitute the light bulb, proceed as follows:
Trouble shooting
This section describes some of the most frequent problems that can affect your oven,
- Disconnect the oven from the power supply. Take the plug out of the socket or switch off the oven's power circuit.
- Loose and remove the glass light cover (1).
- Remove the bulb (2). Warning! The bulb may be very hot.
- Fit a new G9 230V / 25W bulb. Warning! Do not touch the light bulb surface directly with your fingers because you may damage the bulb. Follow the lamp manufacturer's instructions.
- Tighten the glass light cover into place (1).
- Connect the oven again to the power supply.
along with the most common causes and possible solutions.
The oven stops working
- Check the power connection.
- Check the fuses and the circuit breaker of your installation.
- Make sure the timer is either in the manual or programmed setting.
- Check the position of the control and temperature dial.
The inside light does not go on
- Change the bulb.
- Check it has been properly installed as set out in the Installation Instructions.
Nothing happens when the keys are pressed
- Check if the Safety Block is active.
The heating pilot light does not turn on
- Select a temperature.
- Select a setting.
- It should only come on while the oven is heating up to the selected temperature.
Oven smoking during use
• Normal during first use.
- Clean the oven regularly.
- Reduce the amount of fat or oil in the tray.
- Do not cook at temperatures higher than those indicated in the cooking chart.
The expected cooking results are not achieved
- Check the cooking charts for guidance on how your oven operates.
My accessories and shelf supports are damaged
- You must replace them and remove them during subsequent cleaning cycles.
The enamel color has changed or stains have appeared
- The chemical composition of some food-stuffs may cause changes in the enamel.
- This is normal and does not damage the properties of the enamel.
If the oven is operating and there are some irregular noises
- Check if there is any electrical arcing inside the oven caused by foreign metallic objects (see the "Ovenware" chap the Cooking guide booklet).
- Check if the ovenware is touching the oven walls.
- Check if there are any loose items of cutlery or cooking tools inside the oven.
The food doesn't heat up or heats very slowly
- Check if inadvertently metal ovenware has been used.
- Check if the correct operating times and power level has been selected
- Check if the food inside the oven is a larger amount or colder than it usually is
The food is too hot, dried out or burnt
- Check if the correct operating time and power level has been selected.
There are some noises after the cooking process is finished
- This is not a problem. The cooling fan keeps on working for some time. When the temperature has dropped sufficiently, the fan will switch itself off.
There is a vibrating noise, "PUMP" is flashing and no functions work
- The removal of residual liquids was interrupted, and the pump is now running dry. Let the process finish and the oven should be ready to use.
Technical specifications

WARNING
If these problems persist despite these tips, contact the Technical Service Department.
Inform the Technical Service Department of the kind of problem you are experiencing and give the:
- Serial Number (S-No)
- Model of Appliance (Mod.)
This information is on the oven identification plate which is on one side of the opened door.
Indice
natural_image
Two glassware items: a spoon inside and a black X symbol on the right (no text or labels)natural_image
Close-up of a mechanical component with a curved arrow indicating rotation (no text or symbols visible)Instalação
natural_image
Two glass bowls: one with a spoon inside, the other with a black 'X' symbol (no text or labels)natural_image
Close-up of a mechanical component with a curved arrow indicating rotation (no text or symbols)Instalación
natural_image
Two glassware illustrations: a spoon inside a clear glass and a black X symbol (no text or symbols present)natural_image
Close-up of a mechanical component with a curved arrow indicating rotation (no text or symbols)Installation
INSTALLATION DU FOUR
natural_image
Two glass bowls: one with a spoon inside, the other with a black X symbol (no text or labels)natural_image
Close-up of a mechanical component with a curved arrow indicating rotation (no text or symbols visible)Installation
natural_image
Two glass bowls: one with a spoon inside, the other with a black 'X' symbol (no text or labels)• لسوائل!
natural_image
Close-up of a mechanical component with a curved arrow indicating rotation (no text or symbols visible)التركيب
natural_image
Technical line drawing of a 3D rectangular structure with a central shaded section and dimension label '90' (no text or symbols beyond the measurement)Fig. 3
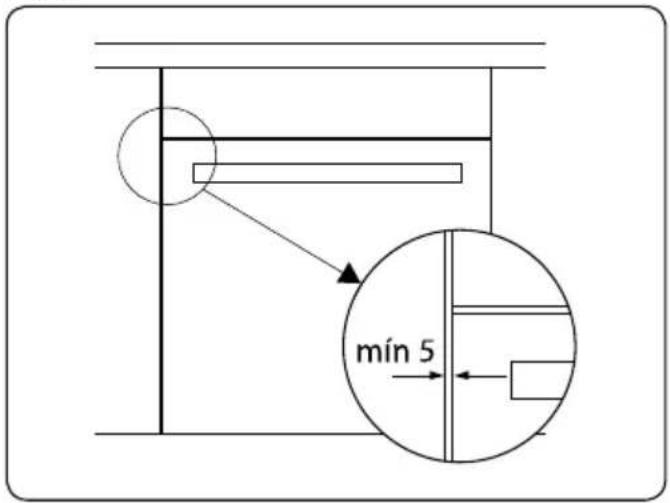
Fig. 4
natural_image
Interior view of a microwave oven with a rack and insulation material inside (no text or symbols visible)Fig. 5 Fig. 6
natural_image
Close-up of industrial piping connections with magnified circular insets highlighting specific pipe sections (no text or symbols)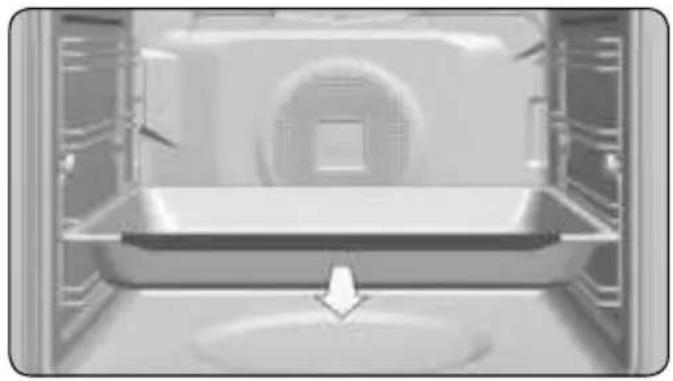
natural_image
Interior view of a modern kitchen appliance with a central tray and side door (no visible text or symbols)Fig. 7
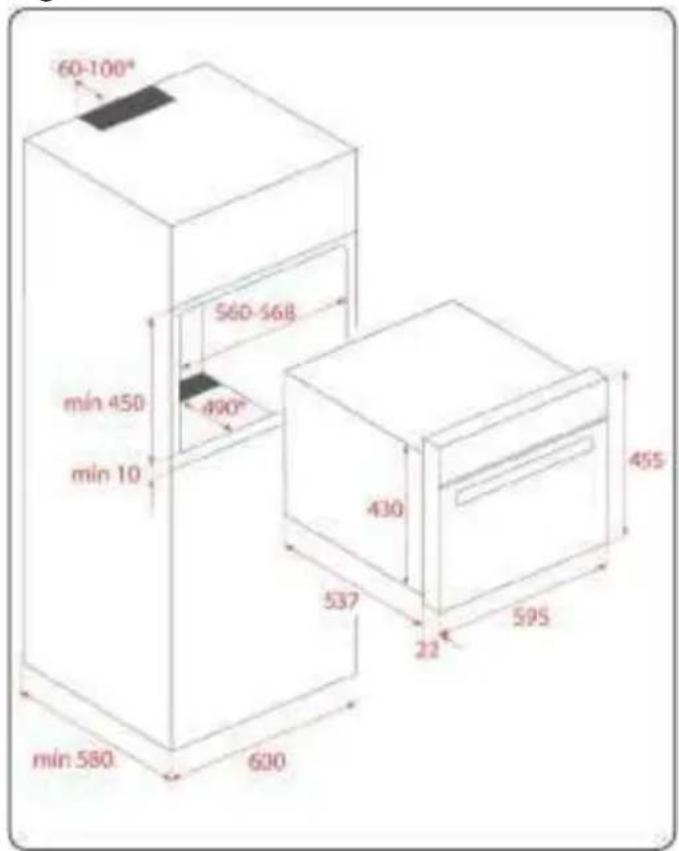
Fig. 8

Fig. 9
natural_image
Close-up of a mechanical component with a black connector and directional arrow (no text or symbols visible)Fig. 10

Fig. 11
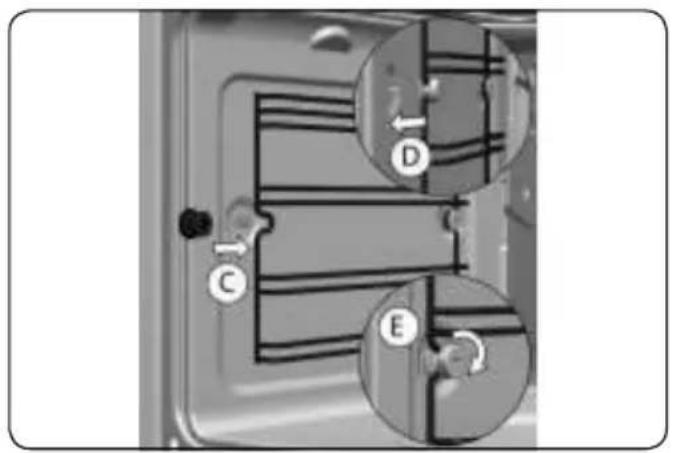
Fig. 12
natural_image
3D diagram of a rectangular electronic component with mounting base and side supports, no text or symbols presentFig.13

natural_image
Diagram of a mechanical or electrical component with directional arrows indicating movement or force (no text or symbols present)Fig.14
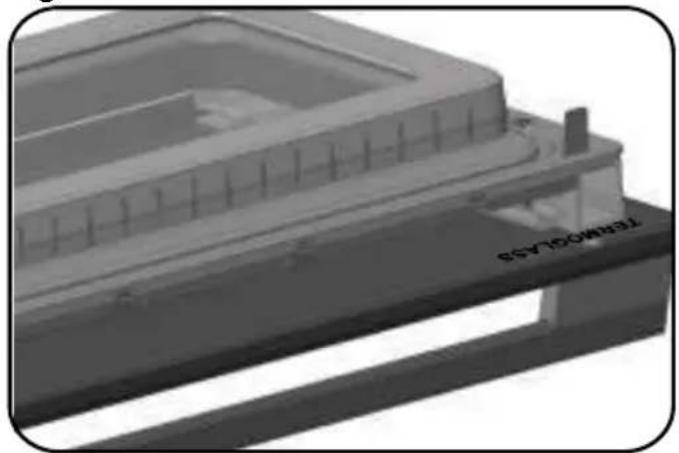
natural_image
3D model of a mechanical assembly with labeled component 'TEMPORATE' (no other text or symbols visible)Fig. 15
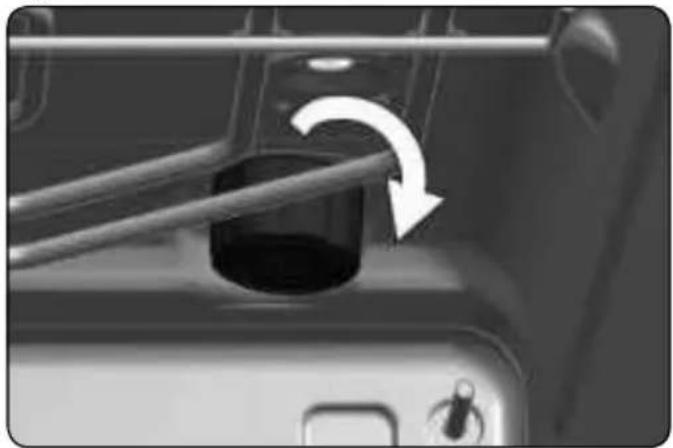
natural_image
Close-up of a mechanical component with a circular opening and directional arrow indicating rotation (no text or symbols)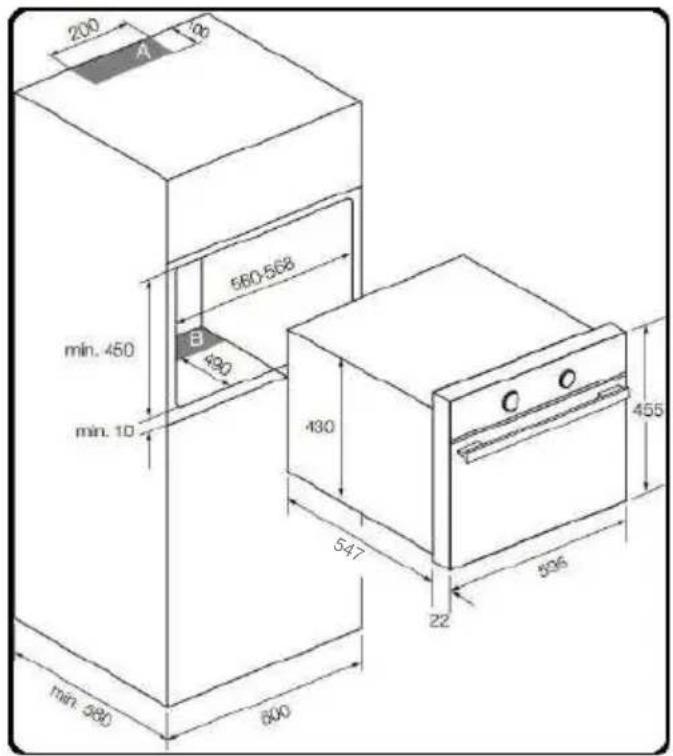
Fig. 16
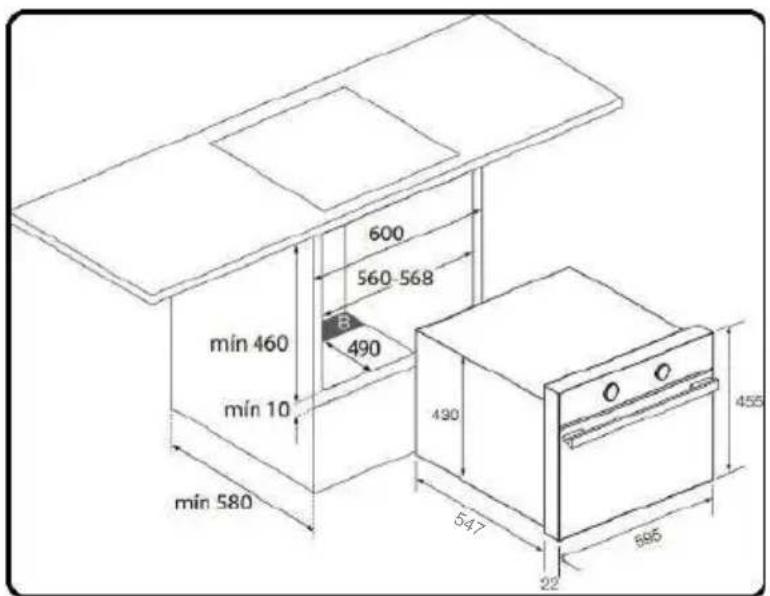
Fig. 17
- Pando
- integralcooking
- PHTV-942
- INFORMACIÓN
- INFORMAÇÃO
- ÁGUA RESIDUAL NO FORNO
- FONCTIONS DU FOUR
- INFORMATION
- PROGRAMMATION AVEC MINUTERIE DU FOUR
- OPTIONS DE MINUTERIE
- EAU RESIDUELLE DANS LE FOUR
- \* INTERIOR LIGHT
- SWITCHING ON AND SETTING THE TIME
- To change the time:
- WARNING
- WATER HARDNESS
- DESCRIPTION OF THE CONTROL PANEL
- START SCREEN/STANDBY
- MODIFY TYPOGRAPHY
- SELECTION SCREEN
- LEFT SECTION
- RIGHT SECTION
- COOKING INFORMATION SCREEN
- OVEN FUNCTIONS
- STEAM FUNCTIONS
- REGENERATION MANUAL
- Vacuum cooking (SOUS VIDE)
- COOKING WITH TRADITIONAL FUNCTIONS
- COOKING WITH STEAM
- COOKING WITH STEAM COMBINED FUNCTIONS
- AUTOMATIC FAST PREHEATING
- COOKING WITH THE PERSONAL COOKING ASSISTANT (PANDO CHEF)
- COOKING WITH THE PERSONAL COOKING ASSISTANT (PANDO CHEF)
- LEVEL OF BROWNNESS: For some recipes, you can select the finish
- PREHEATING WHILE EMPTY
- TURNING FOOD
- OVEN TIMER SETTINGS
- TIMER OPTIONS
- PROGRAMMING THE TIMER OPTIONS
- Select a cooking function.
- FILLING THE WATER TANK
- OPEN THE WATER TANK
- NOTE
- FILLING THE WATER TANK
- REFILLING THE WATER
- EMPTYING THE WATER TANK
- GENERAL OVEN FUNCTIONS
- PAUSING A COOKING CYCLE
- At this point:
- END OF A COOKING CYCLE
- STEAM FLOW
- RESIDUAL WATER IN THE OVEN
- DESCALE
- DESCALING PROCEDURE
- FOOD PROBE
- TROUBLESHOOTING
- Activating DEMO mode
- INSTALLATION DIAGRAMS AND DIMENSIONS
- AFTER-SALES SERVICE AND GUARANTEE
- TERMS OF THIS WARRANTY:
- PANDO WARRANTY EXEMPTIONS:
- HINWEIS
- RESTWASSERMENGE IM GARRAUM
- Installation & Maintenance
- Safety Information ....3
- Microwaves Safety Instructions ..... 4
- INSTALLATION....10
- ENVIRONMENTAL INFORMATION ......11
- BEFORE FIRST USE....11
- OTHER IMPORTANT INSTRUCTIONS....11
- ACCESSORIES ....12
- CLEANING AND MAINTENANCE......12
- TROUBLE SHOOTING....14
- TECHNICAL SPECIFICATIONS ....15
- FIGURES 89
- Safety Information
- Children and Vulnerable People Safety
- General Safety
- Microwaves Safety Instructions
- Avoid damaging the Microwave oven or other dangerous situations by following these instructions
- Installation
- Cleaning and Maintenance
- Service and Repair
- BEFORE INSTALLATION
- ELECTRICAL CONNECTION
- OVEN INSTALLATION
- Environmental information
- OVEN FUNCTIONS
- PRODUCT DISPOSAL
- Before first use
- Other important instructions
- Accessories
- CLEANING THE OVEN EXTERIOR AND OVEN ACCESSORIES
- CLEANING THE OVEN INTERIOR
- Dismantling the side supports
- Assembling the supports
- CLEANING THE OVEN DOOR
- Dismantling/assembling the interior glass of the door
- STEAM OVEN SPECIFIC CLEANING
- Descaling
- Suitable descaling solutions
- CHANGING THE OVEN LIGHT BULB
- Changing the upper bulb
- Trouble shooting
- The oven stops working
- The inside light does not go on
- Nothing happens when the keys are pressed
- The heating pilot light does not turn on
- Oven smoking during use
- The expected cooking results are not achieved
- My accessories and shelf supports are damaged
- The enamel color has changed or stains have appeared
- If the oven is operating and there are some irregular noises
- The food doesn't heat up or heats very slowly
- The food is too hot, dried out or burnt
- There are some noises after the cooking process is finished
- There is a vibrating noise, "PUMP" is flashing and no functions work
- Technical specifications
- Indice
- Instalação
- Instalación
- INSTALLATION DU FOUR
Brand : Pando
Model : PHTV-942
Category : Oven