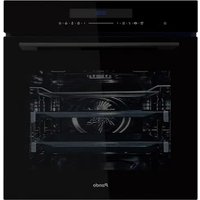
PHP-864 - Oven Pando - Free user manual and instructions
Find the device manual for free PHP-864 Pando in PDF.


| Product type | Built-in oven |
| Brand | Pando |
| Model | PHP-864 |
| Power supply | 220-240 V, 50-60 Hz |
| Maximum power | 3200 W |
| Energy class | A+ |
| Energy efficiency index (EEI) | 81.9 |
| Usable volume | 72 L |
| Temperature range | 30 - 250 °C |
| Dough proving range | 30 - 45 °C |
| Number of functions | 13 |
| Main functions | Convection, Conventional, ECO, Dual grill, Top+Bottom heat, Pizza, Defrost, Proving, Meat probe, Pyrolytic |
| Cleaning | Pyrolytic |
| Display type | Touch control with slider |
| Safety lock | Yes (long press 3 seconds) |
| Meat probe | Yes |
| Rapid preheat | Yes |
| Demonstration mode | Yes (exhibition) |
| Net weight | 42 kg |
| Power cord length | 1.1 m |
| Included accessories | Grid, flat and deep baking tray, meat probe |
| Maintenance | Pyrolytic cleaning; door dismantling for cleaning; removable telescopic rails |
| Safety | Function lock, cooling ventilation, automatic lock in pyrolytic mode, child safety |
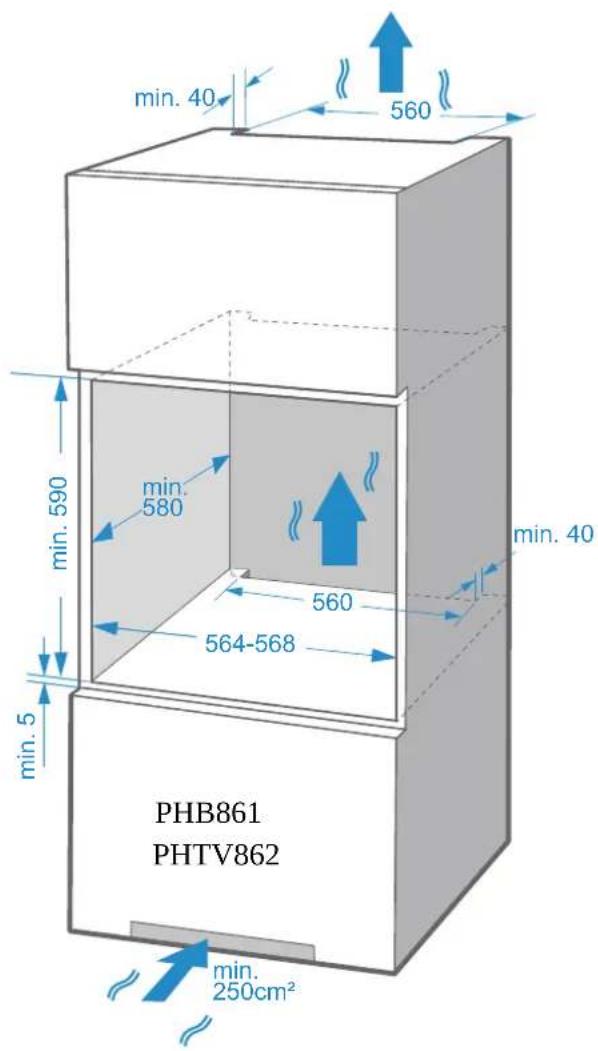
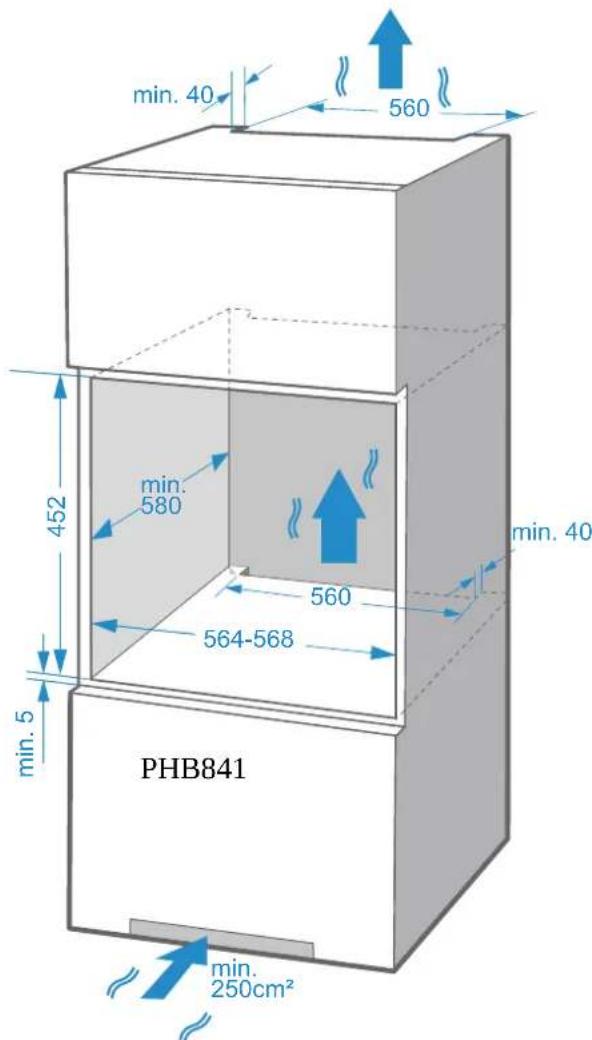
| Installation | Built-in, under counter or column, minimum ventilation 250 cm² |
Frequently Asked Questions - PHP-864 Pando
User questions about PHP-864 Pando
0 question about this device. Answer the ones you know or ask your own.
Ask a new question about this device
Download the instructions for your Oven in PDF format for free! Find your manual PHP-864 - Pando and take your electronic device back in hand. On this page are published all the documents necessary for the use of your device. PHP-864 by Pando.
USER MANUAL PHP-864 Pando
USER AND INSTALLATION MANUAL EN
CERTIFICATE OF GUARANTEE
Pando
integralcooking
CAMPANASDECORATIVAS
HORNOS&MICROONDAS
Certificate of registration of carbon footprint, offsetting and CO2 absorption projects of the Ministry for Ecological Transition and Demographic Challenge (MITERD).
The Global Kitchen Partner
Images and content in this handbook is of exclusive property of Pando - INOXPAN S.L, for which it is completely forbidden the use of images as well as total or partial reproduction without previous authorisation in written.
LAS IMAGENES MOSTRADAS EN ESTE MANUAL NO SON CONTRACTUALES.
THE IMAGES SHOWN IN THIS HANDBOOK ARE NOT CONTRACTUAL
La Direc tion de Pando se reserva el direcho de modifier, alterar o melhor los dibujos tectnicos que se exponen en este manual sin previo aviso. Pando Technical Management reserves the right to modify, alter or improve any technical drawings exposed in this handbook without previous warning.
Para(PC)os
horneados
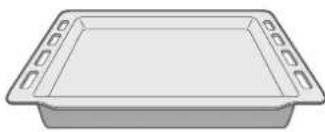
Bandeja honda
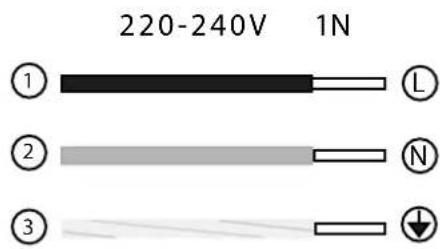
- Marrón o Negre = Linea/Fase (L)
- Azul = Neutro (N)
- Verde/Amarillo = Toma Tierra
EFICIENCY ENERGÉTICA EN 60350-1
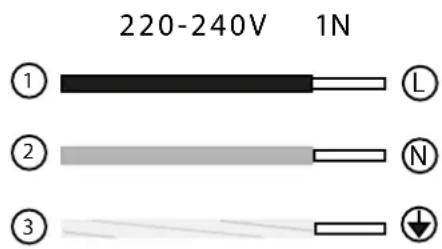
- Marrón o Negre = Linea/Fase (L)
- Azul = Neutro (N)
- Verde/Amarillo = Toma Tierra
EFICIÊNCIA ENERGÉTICA EN 60350-1
GARANTIA DO PRODUCTO
https://www.pando.es/en/after-sales-services/
It should only be installed in a kitchen.
- Check for any damage to the appliance immediately after unpacking.
- Do not connect the appliance if it is damaged.
- Only an authorized professional can connect the appliance.
- If the power cord is damaged, it must be replaced by the manufacturer, their service department, or similarly qualified persons to avoid hazards.
- Our ovens are not designed to operate using an external timer or a separate remote control system.
- Damages caused by incorrect connection are not covered by the warranty.
- Use this appliance indoors and only for culinary purposes.
- During use, the appliance becomes very hot. Be careful when touching the heating elements inside the oven.
- During use, do not leave the oven unattended, especially when it is being used by children or by persons with reduced physical, sensory, or mental capacities, or by those lacking experience and knowledge. Such individuals should only use the oven if they have been instructed by a responsible person on how to use the appliance safely and have understood the associated risks.
- This appliance should not be used by children under the age of 8 years, and from that age, if they use it, it must be under supervision and at a prudent distance from both the oven and the power cord.
- Ovens that have shelves and accessories include details and instructions indicating the correct use of these items.
RISK OF ELECTRIC SHOCK!
- A faulty oven can cause an electric shock. Never turn on a faulty oven. Unplug the oven from the electrical outlet or turn off the circuit breaker in the fuse box. Contact the after-sales service.
- The insulation on the wires of electrical appliances can melt when touching hot parts of the oven. Do not let the wires of electrical appliances come into contact with hot parts of the oven.
- Do not use high-pressure cleaners or steam cleaners, as they can cause an electric shock.
- Improperly conducted repairs are dangerous. Repairs and the replacement of damaged power cords must only be carried out by one of our qualified after-sales technicians. If the oven is faulty, unplug it from the network or disconnect the circuit breaker in the fuse box and contact the after-sales service.
RISK OF BURNS!
- The oven gets very hot. Never touch the interior surfaces of the oven or the heating elements.
- Always allow the oven to cool down.
- Keep children at a safe distance.
-
Oven accessories and utensils become very hot. Always use oven gloves when removing accessories or utensils from the cavity.
-
Alcoholic vapors can ignite in the hot cooking compartment. Never prepare foods containing large amounts of high-alcohol beverages. Use only small amounts of high-alcohol beverages. Open the oven door carefully.
- Accessible parts become hot during operation. Never touch hot parts. Keep children at a safe distance.
- When opening the oven door, hot steam may escape. Depending on its temperature, the steam may not be visible. When opening it, do not stand too close to the oven. Open the oven door carefully and keep children away.
- Water in a hot cavity can create hot steam. Never pour water into the hot cavity.
RISQUE DE BLESSURE!
TAILLE DU PRODUIT PHB-841
| 1720 | ||||
| 593 | ||||
| 461 | ||||
| 453 | 453 | 449 | 440 | 447 |
| 570 | 6 | |||
| 550 | ||||
| 533 | ||||
| 562 | ||||
LA GARANTIE NE S'APPLIQUERA PAS,
MÉME SI ELLE EST ENCORE
VALIDABLE!
GARANTIE DES PRODUITS
Pando reserves the right to change or cancel any measures of the articles in the manual without prior notice, without affecting the essential characteristics of functionality and safety, and is not responsible for any errors or omissions that may occur in the manual.
Technical specifications valid except for typographical errors, omission, or printing. The images and content of this manual are the exclusive property of Pando - INOXPAN S.L., and any appropriation of images and total or partial reproduction without prior written authorization is strictly prohibited.
THE IMAGES SHOWN IN THIS MANUAL ARE NOT CONTRACTUAL.
Pando's Technical Management reserves the right to modify, alter, or improve the technical drawings displayed in this manual without prior notice.
The paper version of this manual cannot be updated in real-time, to ensure the latest version of your product's instructions, we recommend consulting the digital version at www.pando.es
First of all, we would like to thank you for the trust you have placed in our company by purchasing one of our products.
For purchasing one of our products. We are sure that you have made the right decision.
At Pando, not only do we offer top quality products, but we also have a large team of professionals who will help you and advise you on any queries you may have during installation or operation.
To get to know us better, we invite you to visit our website (www.pando.es) where you can see our full range of products with the most up to date commercial and technical information.
Here you will find a wide selection of Decorative Hoods; wall-mounted, ceiling-mounted, island, integrated into furniture and integrated into the hob.
This variety allows us to adapt to any style of kitchen.
We also show you our collection of essential appliances in any home.
Appliances such as our collection of high-performance Ovens and Microwaves with high performance, Induction and Gas Hobs that will help you to make the best recipes, Wine Cellars and Ageing Cellars to maintain and preserve your wines in the best conditions, Dishwashers with the most modern technology and our with the most up-to-date technology and our range of Refrigerators and Freezers with Freezers and Refrigerators for panel integration together with those for free installation.
All this under a brand with a very long trajectory of more than 40 years in the sector, which manufactures its products as a sector, which manufactures its products like a true craftsman. Bringing the best of our experience to everything we do.
We sincerely hope you have fun, experience and enjoy the comfort and capabilities of what is already your new capabilities of what is already your new kitchen ally.
Muchasgracias
El equipo de Pando
The symbol on the product or its packaging indicates that this product cannot be disposed of like normal domestic waste. The product must be handed over at a collection point for recycling electrical and electronic equipment. If you ensure that this product is correctly disposed of, you will help to avoid the possible negative environmental and public health effects that could arise from incorrect disposal. For more detailed information about recycling this product, please contact your city authorities, the domestic waste service or the establishment where you purchased it. This electrical appliance is marked in compliance with European Directive 2012/19/EU on electrical and electronic appliance waste (WEEE).
COLLECTION OF HOUSEHOLD APPLIANCES

ENVIRONMENTAL PROTECTION AND WASTE TREATMENT
DISPOSAL OF THE PACKAGING. The packaging is marked with in Green Dot.
In its commitment to the protection of the environment and in compliance with the provisions of the European Directive 94/62 / EC on packaging and packaging waste and the derived Law 22/2011 on Contaminated Residues and Soils, Pando entrusts entities of social economy an Integrated Management System, responsible for the periodic collection at the consumer's home or in its vicinity of used packaging and packaging waste for subsequent treatment.
To remove all packaging materials such as cardboard, expanded polyurethane, and film, use the appropriate containers.
This ensures the correct treatment and reuse of packaging materials.
INDEX
SAFETYWARNINGS 174
Causes of Damage (Not Covered by Warranty) 176
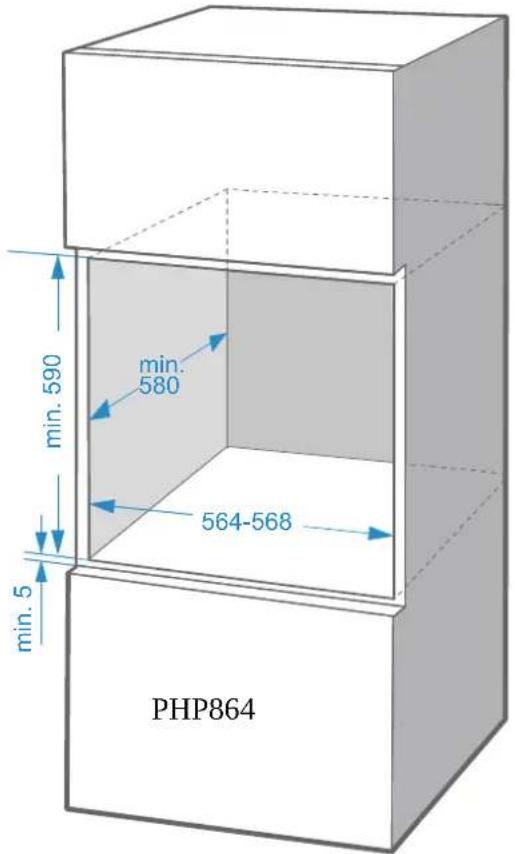
PRODUCT DIMENSIONS PHB-861, PHTV-862, PHP-864 178
PRODUCT DIMENSIONS PHB-841 179
INSTALLATION 180
Under-counter installation 180
Under Plate Installation 181
Ventilation 181
Installation On Column. 182
FIRSTUSE 183
TIME SETTINGS 184
FIRST IGNITION 184
FUNCTIONS OF THE DISPLAYS 185
DISPLAYS 186
COOKING PROGRAMMES 187
USE OF THE PHB - 841 / 861 189
Cooking. 189
Change During Firing. 189
Rapid Preheating 189
Timer. 189
Function Lock & Power On 190
Demo Mode (DEMO) 190
Manual Cleaning Function 190
Programming Of The Cleaning Function 191
USE THE PHTV - 862 192
Cocinar. 192
Rapid Preheating 192
Change During Firing 192
Sonda De Temperatura 193
Function Lock & Power On 193
Steam. 193
Water Box 194
Steam cleaning function. 195
Automatic descending function 195
USE THE PHP - 864 196
Cooking. 196
Rapid Preheating 196
Change During Firing. 196
Timer. 197
Function Lock & Power On 197
Demo Mode (DEMO) 197
Sonda De Temperatura 197
Pyrolysis Cleaning 198
ACCESSIONS 200
Introducing Accessories 200
Lock Function 201
ENERGY EFFICIENCY 201
HEALTH ADVICE 202
How to clean your oven according to its surface 203
OVEN DOOR 204
Dismantling the oven door 205
Assembly of the oven door 205
Removing the door cover 205
Telescopic Guides 206
Fixing the telescopic slides 207
Removing the telescopic slides 208
ELECTRICAL INSTALLATION 209
ENERGY EFFICIENCY EN 60350-1 209
TROUBLESHOOTING YOUR FURNACE IF NECESSARY 211
TIPS AND TRICKS 212
COMMON RECIPES 214
COOKING IN ECO MODE 218
TECHNICAL SPECIFICATIONS PHB-841/861 219
TECHNICAL SPECIFICATIONS PHTV-862 / PHP-864 220
CUSTOMER SERVICE 221
WARRANTY 222
SAFETYWARNINGS
Please read these instructions carefully. Only by doing so can you use your device safely and correctly. We strongly recommend that you keep the instruction manual and installation instructions for future use or for subsequent owners.
- The oven gets very hot. Never touch the interior surfaces of the oven or the heating elements.
- Always allow the oven to cool down.
-
Keep children at a safe distance.
-
Oven accessories and utensils become very hot. Always use oven gloves when removing accessories or utensils from the cavity.
- Alcoholic vapors can ignite in the hot cooking compartment. Never prepare foods containing large amounts of high-alcohol beverages. Use only small amounts of high-alcohol beverages. Open the oven door carefully.
- Accessible parts become hot during operation. Never touch hot parts. Keep children at a safe distance.
- When opening the oven door, hot steam may escape. Depending on its temperature, the steam may not be visible. When opening it, do not stand too close to the oven. Open the oven door carefully and keep children away.
- Water in a hot cavity can create hot steam. Never pour water into the hot cavity.
RISK OF INJURY!
- Scratches on the glass of the oven door can cause cracks. Do not use glass scrapers, abrasive or sharp detergents, or cleaning products.
- The hinges of the oven door move when opening and closing the door, so hands can get caught. Keep hands away from the hinges.
;FIRE HAZARD!
- Combustible objects stored in the cavity can catch re. Never store combustible objects in the cavity. Never open the appliance door if there is smoke inside. Turn o the appliance and unplug it from the electrical outlet or disconnect the circuit breaker in the fuse box.
- When opening the appliance door, an airflow is created. Greaseproof paper can come into contact with the heating element and catch re. Do not place loose greaseproof paper on the accessories during preheating. To secure the greaseproof paper, place a plate or baking tin over the paper. Only cover the necessary surface with greaseproof paper. The greaseproof paper should not protrude above the accessories.
PELIGRO POR MAGNETISMO!
Permanent magnets are used on the control panel or control elements. These can alectronic implants, e.g., cardiac pacemakers or insulin pumps. Individuals with electronic implants should maintain a minimum distance of 10cm from the control panel.
Causes of Damage (Not Covered by Warranty)
- Do not cover or place accessories on the cavity door; aluminum foil, greaseproof paper, or dishes. Do not place dishes on the cavity door if an operating temperature higher than 50^ has been programmed. Otherwise, heat buildup and damage to the enamel would occur.
- Aluminum foil: Aluminum foil in the cavity should not come into contact with the glass of the door. This could cause permanent discoloration of the glass.
- Silicone pans: Do not use silicone pans, mats, covers, or accessories containing silicone. The oven sensor could be damaged.
- Water in a hot cooking compartment: Do not pour water into the cavity when it is hot. This would generate steam and cause damage.
- Moisture in the cavity: If left there for an extended period, moisture in the cavity can cause corrosion. Let the oven dry after use. Do not store wet foods in the closed cavity for extended periods. Do not store food in the cavity.
- Do not cool the oven with the door open: after operating at high temperatures, let the oven cool down with the door closed. Avoid anything getting trapped in the oven door. Even if the door is left
slightly open, nearby furniture fronts can be damaged over time. Only leave the oven door open to dry if a lot of moisture has accumulated during operation.
- Fruit juice: when baking particularly juicy fruit pies, do not overfill the baking tray. Fruit juice dripping from the baking tray leaves stains that cannot be removed. It is strongly recommended to use deeper universal trays.
- Transporting the oven: do not transport or hold the oven by the door handle. The door handle cannot support the weight of the oven and could break.
- Very dirty seal: If the seal is very dirty, the oven door will not close properly during operation. The fronts of adjacent units could be damaged. Always keep the seal clean.
- Using the oven door as a seat, shelf, or countertop: Do not sit on the oven door or place or hang anything on it. Do not place kitchen utensils or accessories on the oven door.
-
Insertion of accessories: Depending on the oven model, accessories may scratch the panel of the door when closing it. Always insert accessories into the cavity fully.
-
If you use the residual heat from the turned-off oven to keep food warm, a high moisture content may occur inside the cavity. This could cause condensation and corrosion damage to your oven, as well as damage to your kitchen. Avoid condensation by opening the door or using the "Defrost" mode.
- When the oven door or drawer is open, do not leave anything on it, as it could unbalance the appliance or break the door. Do not allow children near the oven when it is in operation, especially when the grill is on.
PRODUCT DIMENSIONS PHB-861, PHTV-862, PHP-864
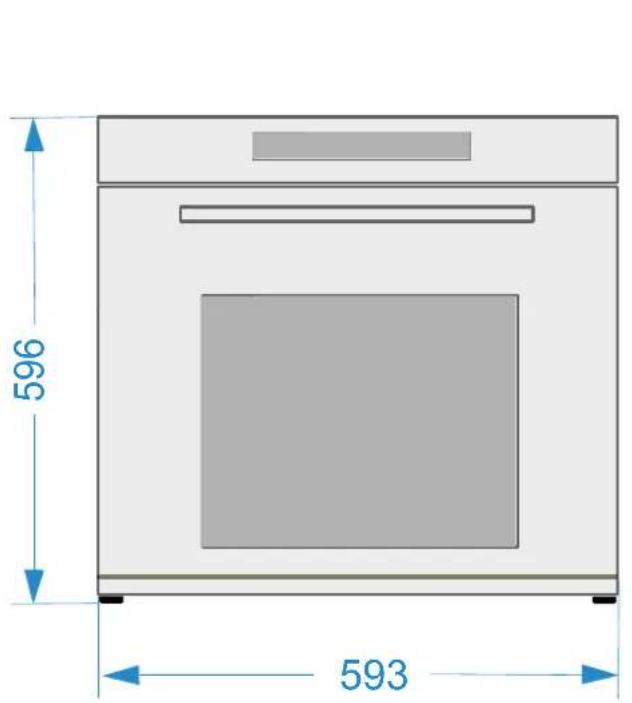
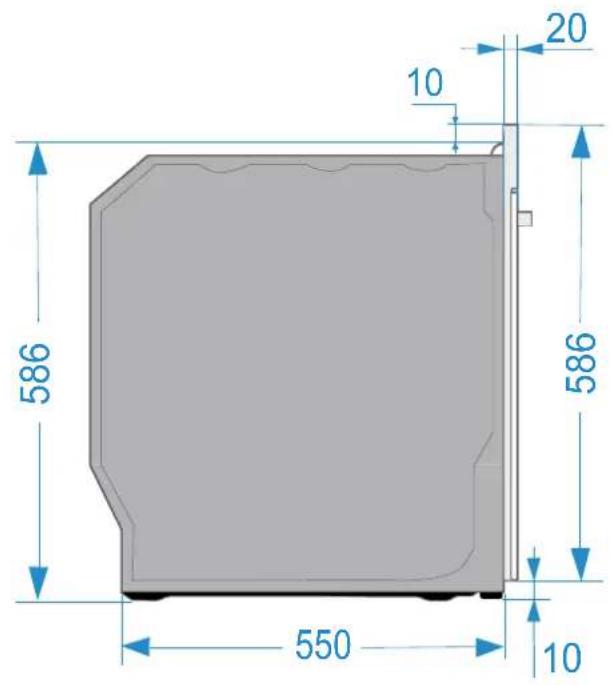
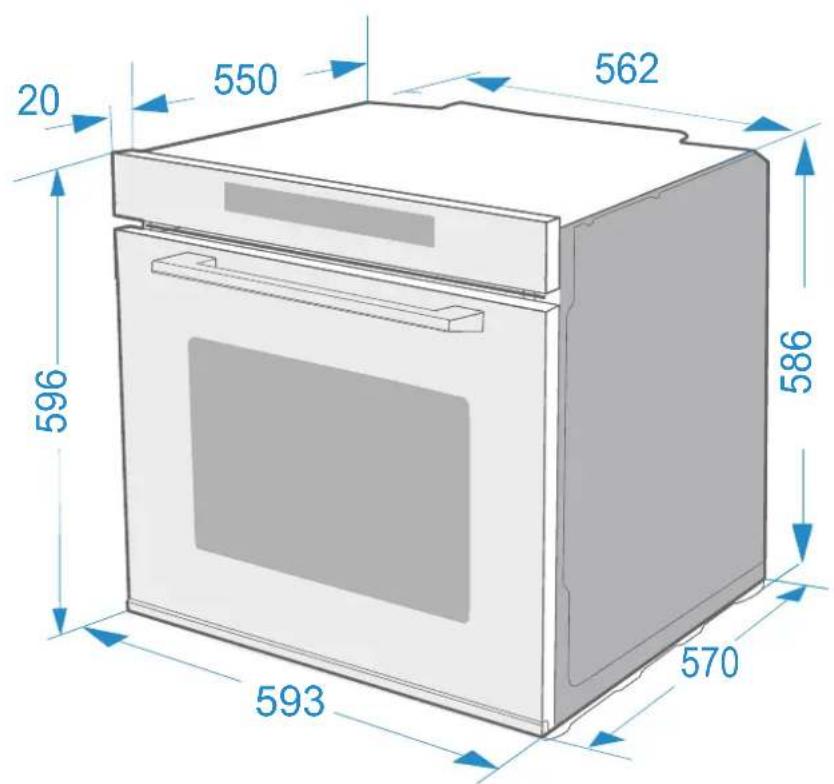
* Tolerance of ±2 on all measurements.
PRODUCT DIMENSIONS PHB-841
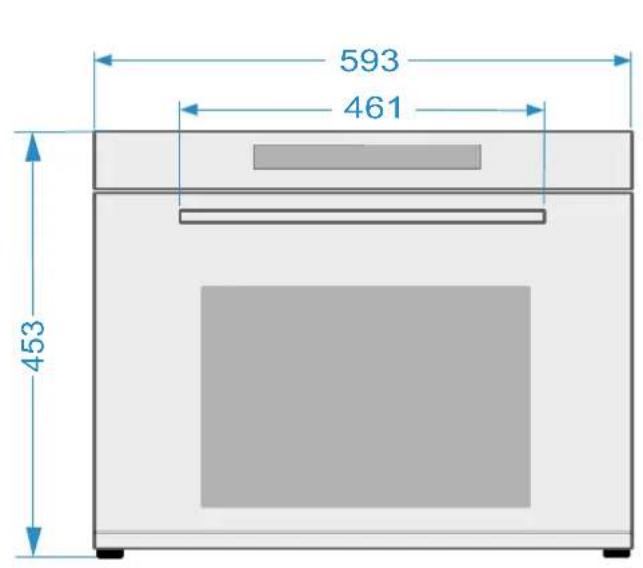
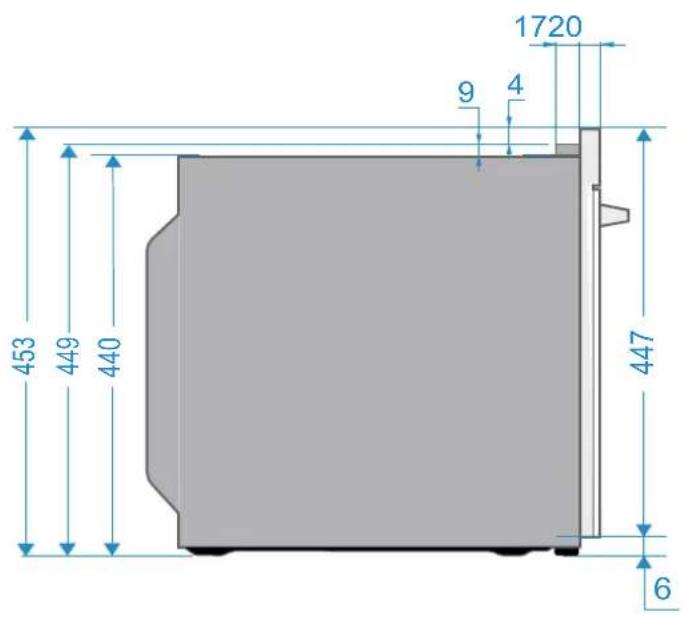

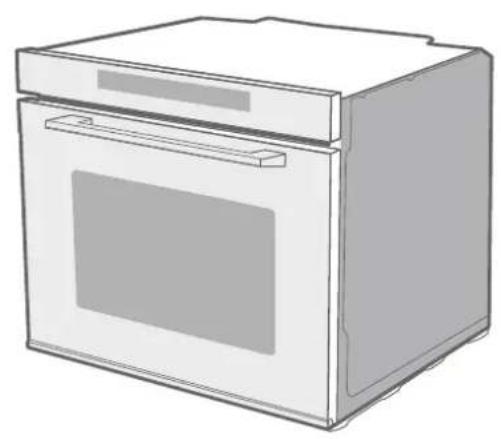
* Tolerance of ±2 on all measurements.
INSTALLATION
ATTENTION! PLEASE NOTE THIS BEFORE INSTALLATION!
To use this oven safely, ensure that it has been professionally installed in accordance with the installation instructions. Damage caused by incorrect installation is not covered by the warranty. During installation, wear protective gloves to avoid cutting yourself on sharp edges. Check the oven for damage before installation and do not connect it if it is damaged. Before switching on the oven, remove all packaging material and adhesive film from the oven. The plug must be accessible or a switch must be incorporated in the fixed wiring, so that the oven can be disconnected from the mains after installation if necessary.
Caution! The oven must not be installed behind a decorative door to avoid damage to the oven. overheating.
Attention! Observe the ventilation instructions on the furniture, depending on the model.
Under-counter installation
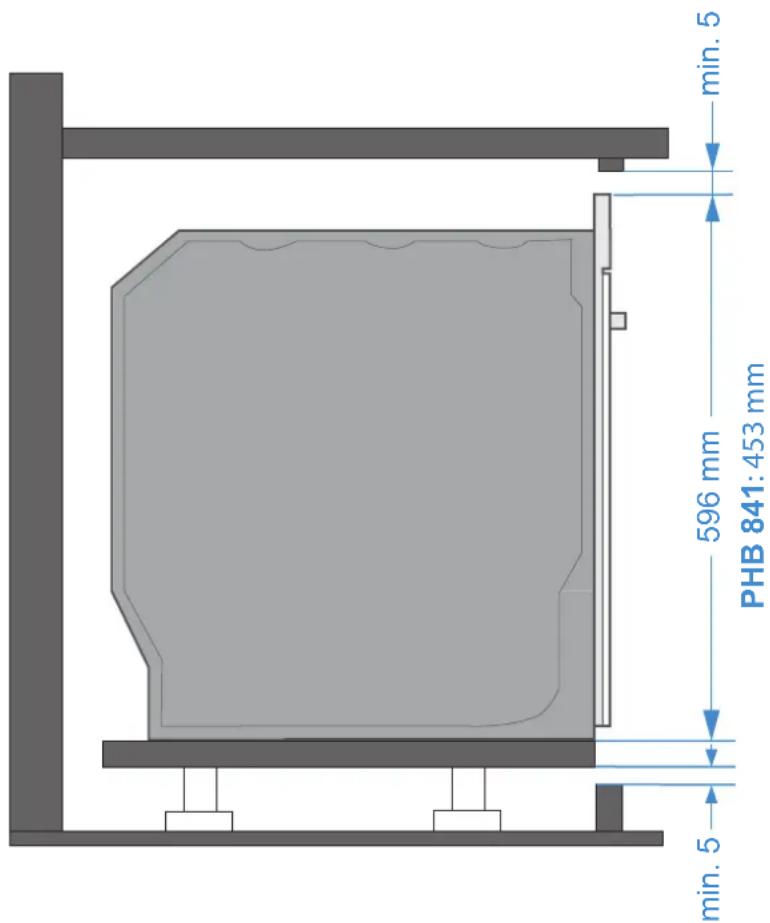
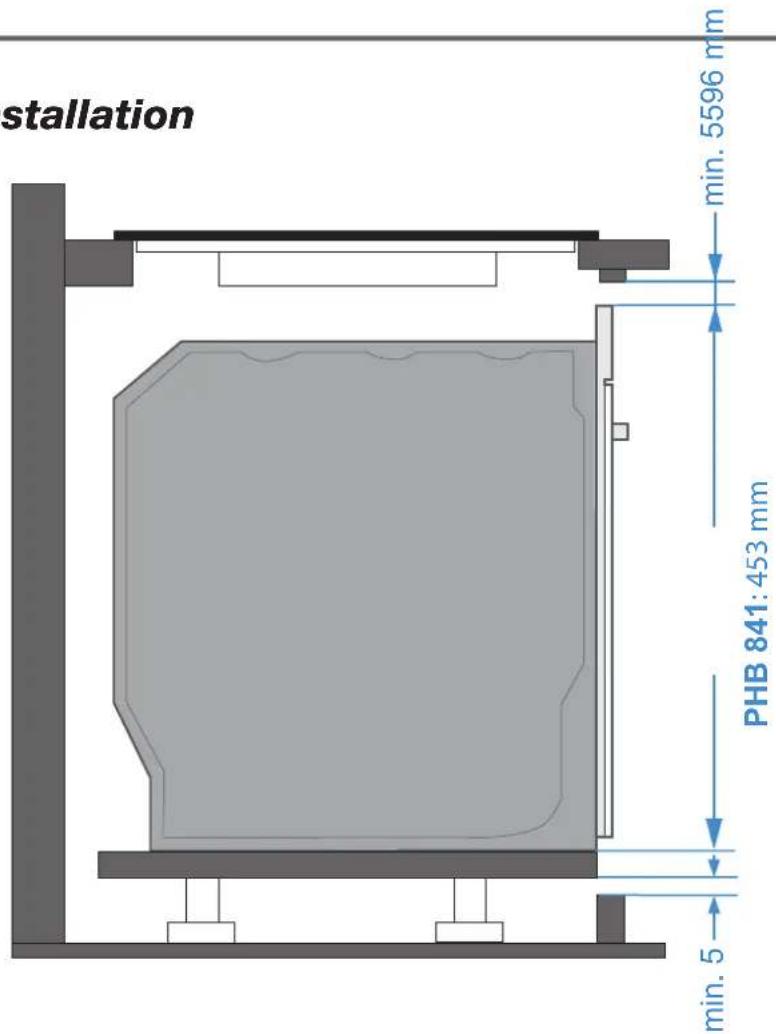
Under Plate Installation
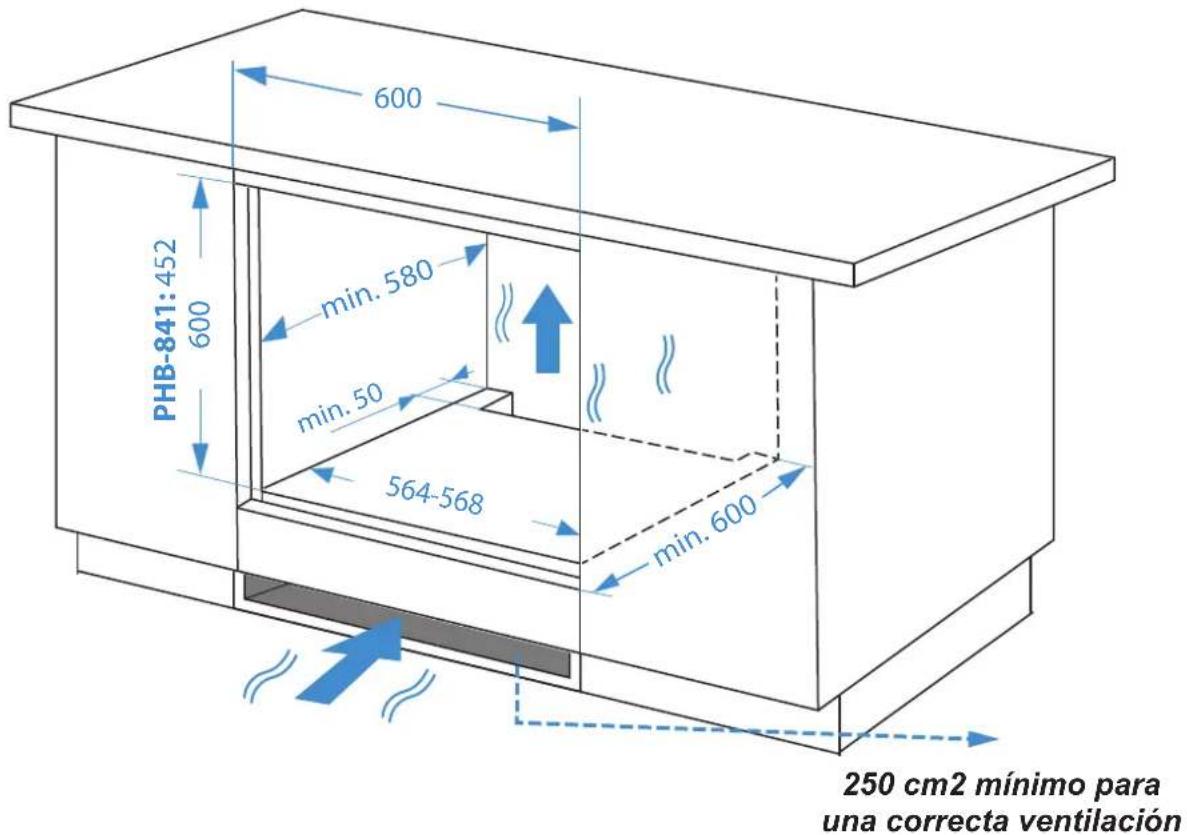
Ventilation
Installation On Column
FIRSTUSE
Before First Use
BEFORE USING THE OVEN TO PREPARE FOOD FOR THE FIRST TIME, THE CAVITY AND ACCESSORIES MUST BE CLEANED.
- Remove all adhesives, surface protection films and protective parts for transport.
- Remove all accessories and side grilles from the cavity.
- Thoroughly clean the fittings and side grilles with soapy water and a kitchen towel or a soft brush.
- Make sure that the cavity is free of packaging debris, such as polystyrene pellets or pieces of wood that could cause a fire hazard.
- Clean the smooth surfaces of the cavity and door with a soft, damp cloth.
- To eliminate the smell of new food, heat the oven when it is empty and the oven door is closed.
- Keep the kitchen well ventilated while the oven is heating up for the first time. Keep children and pets out of the kitchen during this time. Close the door to adjoining rooms.
- Make the necessary adjustments. In the following section you will find information on how to adjust the oven before normal use.
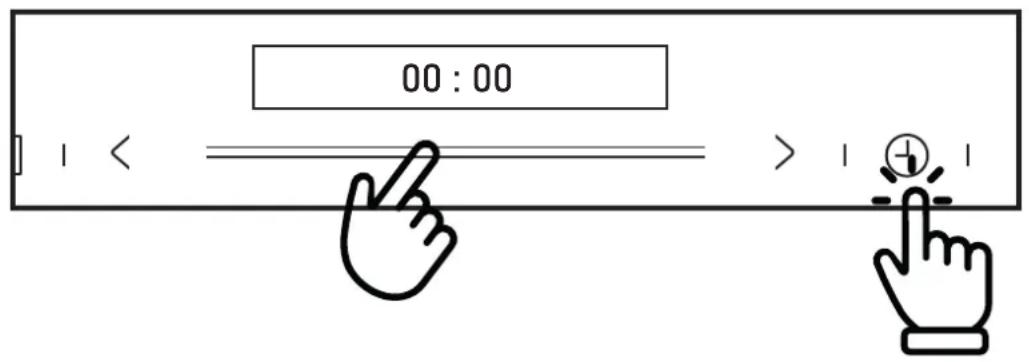
TIME SETTINGS
- ACTIVATE THE TIME SETTINGS BY Clicking ON THE CLOCK SYMBOL.
- SET THE TIME BY SLIDING YOUR FINGER ON THE SLIDER
- ACTIVATE MINUTE SETTING WITH ANOTHER CLICK ON THE CLOCK SYMBOL
- SET THE MINUTES BY SLIDING YOUR FINGER ON THE "SLIDER".
- SAVE CHANGES AND FINALISE
FIRST IGNITION
| FIRST IGNITION | Once you have oven cooled... | ||
| PHP - 841 / PHP - 861 / PHTV - 862 P | PHP - 864 | 1. Clean smooth surfaces and the door with soapy water and a kitchen towel. 2. Wipe dry with a dry cloth. 3. Install the side grilles. | |
| Warm-up mode | |||
| Temperature | 250 °C | ||
| Weather | 1h 2h | ||
FUNCTIONS OF THE DISPLAYS
| * | ON / OFF Switches functions on, off and cancels functions. | |
| PHP 841 | Timer Locks the display with a press of 3 seconds. | |
| PHB 861 | Temporizador Activates the timer function. | |
| * | Rapid preheating Preheat the oven more quickly. | |
| * | Programme selection | Press this symbol to change the programme |
| * | Slider Slide your finger over to change the settings values displayed on the screen. | |
| * | Time setting and clock | Adjusts the duration time. |
| * | Temperature setting Adjusts the temperature range. | |
| * | Switching the light on/off | Turn the light on and off.. |
| * | Home / Pause | Starts and pauses the cooking process. |
| PHP 864 | Timer and blocking | Press and hold for 3 seconds to lock functions |
| PHP 864 | Delayed programming | Delayed programming of the cooking programme. |
| PHTV 862 | Switch on light and blocking | Press once to switch the light on and off. Press and hold to lock the display to prevent accidental activation or deactivation of functions. |
| PHTV 862 | Steam cooking programmes. | See “Steam” section on the following pages. |
| PHTV 862 | Water tank | |
| PHTV 862 | Automatic programmes | |
DISPLAYS
TOUCH CONTROL PHB - 841 y 861

TOUCH CONTROL PHB - 841 y 861

TOUCH CONTROL PHP - 864

TOUCH CONTROL PHTV - 862

COOKING PROGRAMMES
Your oven has several operating modes that make it easy to use. Here is a table where you will find the right heating for your plate and areas of application.
| MODELO | TIPOS DE CALENTAMIENTO | T° USO | ||
| * | Conventional | 30 - 250°CPHB841 = 100-235 °C | For traditional baking and roasting on one level. Especially suitable for cakes with moist toppings | |
| * | Convection | 50 - 250°C | For baking and roasting on one or more levels. The heat is provided by the heating ring. | |
| * | ECO | 140 - 240°CPHB841 = 150-200 °C | For energy-saving cooking energetic. | |
| * | Conventional + fan | 50 - 250°CPHB841 = 50-235 °C | For baking and roasting on one or several levels. The fan distributes the heat evenly around the cavity. | |
| * | Radiant heat | 150 - 250°CPHB841 = 100-235 °C | For grilling small quantities of food and for browning food. Place the food in the central part under the grill radiator | |
| * | Double Grill and fan | 50 - 250°CPHB841 = 100-250 °C | For grilling flat food and for browning food. The fan distributes the heat evenly around the cavity. | |
| * | Radiant heat | 150 - 250°CPHB841 = 100-235 °C | For grilling flat food and for browning food. | |
| * | Pizzas | 50 - 250°C | For pizza and dishes that need a lot of heat from below. The bottom heater and heating ring will operate. | |
| * | Indoor heater | 30 - 220°CPHB841 = 50-235 °C | For adding extra browning to pizza, pie and cake bases. Heating comes from the bottom heater. | |
| * | Defrost | - | To defrost frozen food | |
| MODEL | TYPES OF HEATING | T° USO | ||
| * | Fermentation 30 | - 45°C | Pour la fabrication de pâttes à base de le-vure et de levain pour la fermentation et pour la fabrication de cultures de yaourt. | |
| PHTV - 862PHP - 864 | Probe the vine | 40 - 99°C | Pour aider à cuire les viandes telles que les steaks et le poulet. | |
| PHP - 864 | Pyrolytic selfcleaning | To burn food leftovers. | ||
- Matches all models
CAUTION DURING USE!
If you open the oven door during an operation in progress, the operation will not stop.
YOU RUN THE RISK OF GETTING BURNED!
NOTES:
- The defrosting, proving and "ECO" functions cannot be preheated quickly.
- For defrosting large portions of food, it is possible to remove the side racks and to place the container on the floor of the cavity.
- In order to heat the dishes, it is advisable to remove the side racks, and the heating modes "Hot air roasting" and "Heating with fan" with temperature setting below 50^ are useful. If the dishes cover more than half of the cavity floor, "Hot air grilling" should be used.
- The "Heating with fan" function will ensure that the heat distribution in the cavity is as even as possible, the fan will operate at certain times during the heating process to ensure the best possible performance.
Cooling fan
The cooling fan is switched on and off as required. Warm air is exhausted above the door.
CAUTION!
- After connecting the oven to the mains, touch the function symbol on the oven, touch F the symbol several times to select the most suitable function. To adjust the cooking temperature, use the slider or the [< / >] symbol.
- Touch the Start / Pause symbol and the oven will start to operate, otherwise after 10 minutes the oven will return to the clock.
- If you wish to set a cooking time for the selected function, you can touch the clock symbol and set the time using the slider or the [ / ] symbol.
- If you want to stop the process completely during cooking, you can touch to cancel it. ①
- If you want to pause the cooking touch the Start/Pause symbol.
Change During Firing
During the operation period of the appliance, you can change the cooking type and temperature by using the oven function or the slider control. After the change, if there is no further action after 6 seconds, the oven will heat up according to what you have changed. If you want to change the cooking time during the cooking process, touch and change it using the slider or the symbol [ / ] . After the change, if there is no further action after 6 seconds, the oven will operate at what you have changed it to.
If you want to cancel the cooking process, tap ①
NOTE: Changing the mode/temperature/resting time may negatively influence the cooking result, so we strongly advise you not to do so unless you are very experienced in cooking.
CAUTION!
During operation the oven becomes very hot, especially inside the oven cavity. Once the oven has been switched off, NEVER touch the interior surfaces of the oven or the heating elements. Use oven gloves when removing accessories or utensils from the cavity and allow the oven to cool down. Keep children at a safe distance to avoid burns.
Rapid Preheating
You can use fast preheating to shorten the preheating time of a function. When you select a function, touch the quick preheat symbol, ^ and the quick preheat mark on the display will light up.
NOTE: If this function cannot preheat quickly, a beep will be heard.
Timer
You can use the timer function by touching When the time is reached, the oven will beep to remind you. At the first touch of, set the timer for hours, then touch again and set the timer by minutes. Touch again and the setting is complete. You can set the timer before and during the cooking process
Function Lock & Power On
Your oven is fitted with a safety lock so that it can not be switched on or any settings changed accidentally. A long press for 3 seconds activates the lock. A further long press of 3 seconds unlocks the oven again.
You can activate and deactivate the lock when the oven is running or stopped, by long pressing for 3 seconds on the symbol.
Demo Mode (DEMO)
(Special function for exhibitions)
When the demonstration mode is activated, the switch-off and switch-on are still active but the heating elements do not work.
- From standby mode, press and hold the power symbol “①” until the demo mode is activated. The following will appear on the display
00:00 OFF
- Slide the slider to switch from OFF to OFF mode. ON mode. The following will appear on the display:
00:00 ON
- After 3 seconds the configuration is activated. The following will appear on the display:
00:00
NOTE: You can press the Cancel button to exit the setting, or wait 3 seconds to automatically exit the demo mode setting state and return to the standby state.
Manual Cleaning Function
This function facilitates the removal of grease and other food debris that may have adhered to the sides of the oven. To facilitate cleaning, do not allow dirt to accumulate. Clean the oven frequently.
PLEASE NOTE THIS BEFORE STARTING THE CLEANING FUNCTION!
| Do not pour hot water into the oven and make sure the oven is cool before you start, as this may damage the enamel. | |
| Before touching the surface of the oven, make sure that it has cooled down completely. | |
| Do not open the oven door until the function has finished. The cooling cycle is necessary for the function to work properly. | |
| Dirt and excess water can be removed with a damp cloth. | |
| If further cleaning is required after using the cleaning function, use neutral detergents and non-abrasive sponges. |
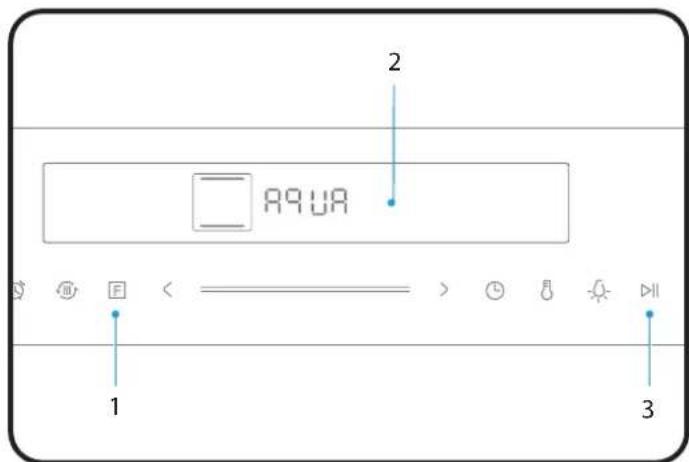
Programming Of The Cleaning Function
- Remove the trays and all accessories from inside the oven, including tray supports and telescopic rails [explained in previous sections].
- Pour 250ml of purified/distilled water and properly mixed detergent (a small spoonful of mild detergent in water will suffice) into the bottom of the cavity.
- In standby mode, press the "F" key to select.
- Press the " l " key. The programme will run for 30 minutes.
- Once it has cooled down and the process has wipe with a soft cloth.
NOTA: After repeated use in this way, white limescale stains may occur inside the oven cavity from time to time. These spots do not damage the product and can be easily removed with a damp cloth.
NOTE: Water cleaning will operate at 100^ for 30:00 min, and the temperature and cleaning time CANNOT BE CHANGED if there is water in the gutter, it is better to clean it in time, otherwise there is a risk of rust on the bottom of the cavity plate.
USE THE PHTV - 862
Cocinar
- After switching on the oven, touch the oven function symbol to select the functions. Use the slider or the < / > symbol to set the cooking temperature.
- Touch the symbol l and the oven will start. If not, the oven will return to the timer after 5 minutes.
- During the cooking process, you can touch ① to cancel it.
NOTE: After setting the temperature, you can touch the clock symbol 一 to set the cooking time; you can adjust it using the slider or the < / > symbol.
Rapid Preheating
You can use fast preheating to shorten the preheating time of a function. When you select a function, touch the quick preheat symbol, ^ and the quick preheat mark on the display will light up.
NOTE: If this function cannot preheat quickly, a beep will be heard.
Change During Firing
During the operation period of the appliance, you can change the cooking type and temperature by using the oven function or the slider control. After the change, if there is no further action after 6 seconds, the oven will heat up according to what you have changed. If you want to change the cooking time during the cooking process, touch
and change it using the slider or the symbol [ / ] . After the change, if there is no further action after 6 seconds, the oven will operate at what you have changed it to.
If you want to cancel the cooking process, tap ①
NOTE: Changing the mode/temperature/resting time may negatively influence the cooking result, so we strongly advise you not to do so unless you are very experienced in cooking.
CAUTION!
During operation the oven becomes very hot, especially inside the oven cavity. Once the oven has been switched off, NEVER touch the interior surfaces of the oven or the heating elements. Use oven gloves when removing accessories or utensils from the cavity and allow the oven to cool down. Keep children at a safe distance to avoid burns.
Sonda De Temperatura
Your oven is equipped with a probe to measure the temperature of the food. When you insert the
meat probe in the position, the icon will light up. At the same time the The display will change to show the temperature setting of the meat cooker.
- Insert the short end of the probe into the probe hole in the upper right corner of the cavity.
- Insert the long end of the probe into the centre of the food.
- Select the probe temperature.
- Press "F" to select a function (Only the following functions:
- Press the < / > " key to set the temperature.
- Press the " " key to start cooking.
Function Lock & Power On
Your oven is fitted with a safety lock so that it can not be switched on or any settings changed accidentally. A long press for 3 seconds activates the lock. A further long press of 3 seconds unlocks the oven again.
You can activate and deactivate the lock when the oven is running or stopped, by long pressing for 3 seconds on the symbol.
Steam
- Steam can be added manually by pressing the steam button during cooking.
- With the oven in standby mode, press the steam button to set the steam mode and add steam for cooking. The default steam level is 1 [L01].
NOTE: The steam has three levels, the amount of steam increases with increasing level. Press the steam button once and you will have level 1. Press twice and you will have level 2, and press three times and you will have level 3. Whichever level is chosen, the light on the right of the display will show the level (L01/L02/L03).
Press the steam button four times to cancel the addition of steam and it will switch off.
Water Box
METHOD 1 FOR ADDING WATERMETHOD 2 FOR ADDING WATER
Press the water box in and pull it out. Press the water box in and pull it out.

Take out the sealing gasket and add water
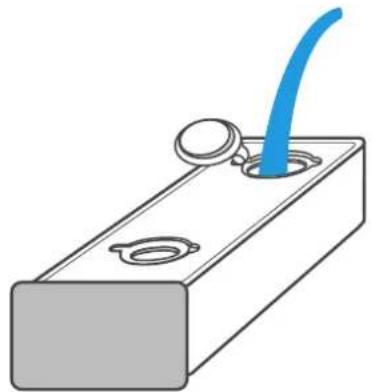
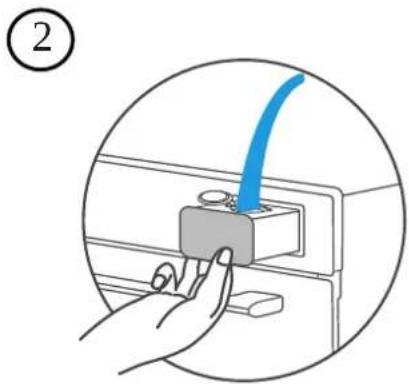
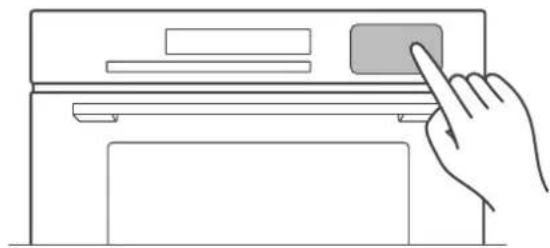
1 Remove the cover the box and clean
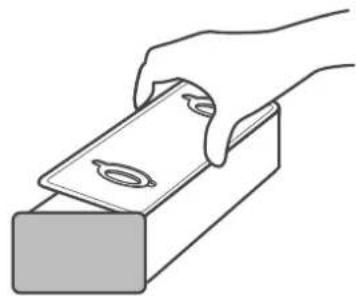
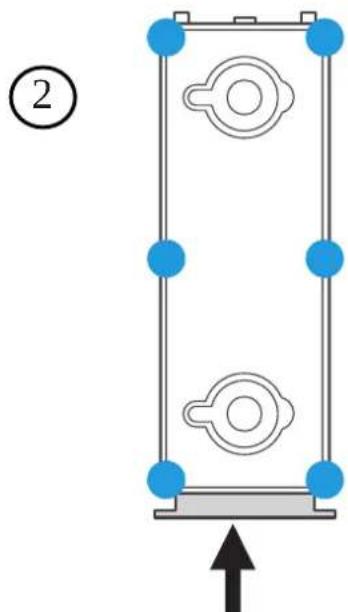
Fit the lid and sealing gasket and press down firmly at the points shown in the picture to prevent jamming.
Steam cleaning function
This function uses steam to soften the dirt inside the cavity, making it easier to clean.
- Turn on the system, push and pull out the water box. Inject 1000ml of fresh water into the water box.
- Push the water tank into the appropriate place in the oven.
- In standby mode, press the "A" button several times until the display shows "A11", which means that the oven enters the steam cleaning function with a preset time of "05:00min".
- Press " " to start the programme.
NOTES: Steam cleaning time cannot be adjusted. Press the pause button or open the door to stop the cleaning process. Close the door and press the start button to restart the cleaning process.
Automatic descending function
For best results in cleaning and descaling the steamer, use detergent with sodium citrate. Follow the manufacturer's instructions indicated on the packaging. It is suggested to use the descaling function after the steam function has been running for 20 hours.
- Remove the water reservoir and fill it with 1000ml water
- Put the water tank in place.
- In standby mode, press the button "A" several times until the display shows "A10", which means that the oven enters the automatic descending function with a preset time of "40:00 min".
The tank icon will light up and the rest will disappear, this shows the current water level (water, no water, full of water).
- Press “ ” to start the programme.
- When the remaining time is 10:00 min, the programme stops and reminds you of the lack of water. Remove the water tank and pour out the water. Clean the water tank thoroughly.
- Change water, repeat steps 3 and 4.
NOTE: The descending process must not be stopped. If the descending process stops before completion, the entire programme must be started from step 3.
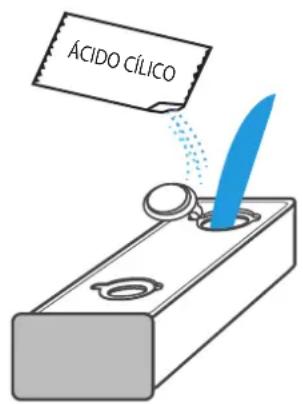
Remove the lid of the water box and add half a bag of citric acid.
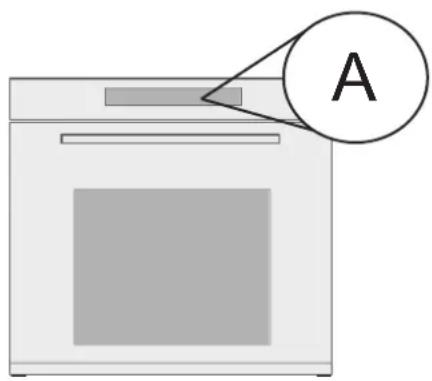
Press the automatic programme selection button and select the A10 programme whose duration is 40 minutes, then the disqualification process will start.
USE THE PHP - 864
Cooking
- After connecting the oven to the mains, touch the function symbol on the oven, touch F the symbol several times to select the most suitable function. To adjust the cooking temperature, use the slider or the [ / ] symbol.
- Touch the Start / Pause symbol and the oven will start to operate, otherwise after 10 minutes the oven will return to the clock.
- If you wish to set a cooking time for the selected function, you can touch the clock symbol and set the time 山 using the slider or the [ / ] symbol.
- If you want to stop the process completely during cooking, you can touch to cancel it. ①
- If you want to pause the cooking touch the Start/Pause symbol.
Rapid Preheating
You can use fast preheating to shorten the preheating time of a function. When you select a function, touch the quick preheat symbol, ^ and the quick preheat mark on the display will light up.
NOTE: If this function cannot preheat quickly, a beep will be heard.
Change During Firing
During the operation period of the appliance, you can change the cooking type and temperature by using the oven function or the slider control. After the change, if there is no further action after 6 seconds, the oven will heat up according to what you have changed. If you want to change the cooking time during the cooking process, touch
and change it using the slider or the symbol [ / ] . After the change, if there is no further action after 6 seconds, the oven will operate at what you have changed it to.
If you want to cancel the cooking process, tap ①
NOTE: Changing the mode/temperature/resting time may negatively influence the cooking result, so we strongly advise you not to do so unless you are very experienced in cooking.
CAUTION!
During operation the oven becomes very hot, especially inside the oven cavity. Once the oven has been switched off, NEVER touch the interior surfaces of the oven or the heating elements. Use oven gloves when removing accessories or utensils from the cavity and allow the oven to cool down. Keep children at a safe distance to avoid burns.
Timer
You can use the timer function by touching 35 When the time is reached, the oven will beep to remind you. At the first touch of, set the timer for hours, then touch again and set the timer by minutes. Touch again and the setting is complete. You can set the timer before and during the cooking process
Function Lock & Power On
Your oven is fitted with a safety lock so that it can not be switched on or any settings changed accidentally. A long press for 3 seconds activates the lock. A further long press of 3 seconds unlocks the oven again.
You can activate and deactivate the lock when the oven is running or stopped, by long pressing for 3 seconds on the symbol.
Demo Mode (DEMO)
(Special function for exhibitions) When the demonstration mode is activated, the switch-off and switch-on are still active but the heating elements do not work.
- From standby mode, press and hold the power symbol “①” until the demo mode is activated. The following will appear on the display
00:00 OFF
- Slide the slider to switch from OFF mode. ON mode. The following will appear on the display:
00:00 ON
- After 3 seconds the configuration is activated. The following will appear on the display:
00:00
NOTE: You can press the Cancel button to exit the setting, or wait 3 seconds to automatically exit the demo mode setting state and return to the standby state.
Sonda De Temperatura
Your oven is equipped with a probe to measure the temperature of the food. When you insert the meat probe in the position, the icon will light up. At the same time the The display will change to show the temperature setting of the meat cooker.
- Insert the short end of the probe into the probe hole in the upper right corner of the cavity.
- Insert the long end of the probe into the centre of the food.
- Select the probe temperature.
- Press "F" to select a function (Only the following functions:
- Press the < / > " key to set the temperature.
- Press the " " key to start cooking.
Pyrolysis Cleaning
RISK WARNING!
Risk of burns!
The cooking compartment reaches an extremely high temperature during pyrolytic mode (both inside and outside). Do not touch the door and let the oven cool down. Keep children, disabled and elderly people who are unable to look after themselves away from the appliance.
Risk of damage to health!
The pyrolytic mode heats the cooking compartment to a very high temperature so that food residues are burnt o. This process releases vapours which may irritate mucous membranes. While the cleaning function is running, keep the kitchen well ventilated. Do not stay in the kitchen for long periods of time. Keep children and pets away and always follow the instructions in the manual or from a professional.
Risk of re!
- A large amount of food residues, fat and meat juices can catch ifre when the pyrolytic mode is in operation. Before starting the cleaning function, always remove the excess waste and food leftovers.
Do not use the pyrolytic mode to clean accessories. These may burn or fall apart and in the process release gases
- The oven will become very hot on the outside during pyrolytic mode. Do not hang objects that can burn, e.g. tea towels, on the door handle. Do not place anything against the front of the oven.
- Keep children away from the oven.
- If the door seal is damaged, a large amount of heat will be generated around the door. Do not rub or remove the seal.
- Never use the oven if the gasket is missing or damaged.
Before Starting the Pyrolytic Mode
Caution!
- Before activating the pyrolytic mode, remove accessories and cookware, including removable rails, from the compartment. This will not only achieve good cleaning results, but will also ensure that the accessories have a long service life.
- Before starting the cleaning function, manually remove food residues and clean the inside of the oven door, edges of the compartment and the area around the gasket. Do not rub or remove the gasket.
While performing these operations, make sure the oven is turned on.
Setting the pyrolytic selfcleaning mode
- Switch on the oven by pressing the button
- Select the "Pyrolytic" operating mode by pressing. Pyrolysis programme
- Check that all accessories and food have been removed and that the door is securely closed.
- Press the "Start / Stop" button to start the cleaning operation.
- Ventilate the kitchen when the cleaning function is on. is in operation.
- The cooking compartment locks the door shortly after the start of operation. The cooking compartment cannot be opened until the temperature is reduced.
Pyrolysis mode end signal
If an acoustic signal sounds continuously and the oven stops heating. This means that the pyrolytic mode has ended. You can press the button to turn off the beeps, or the beeps will turn off automatically later.
After the pyrolysis mode has ended
Once the cooking compartment has cooled down, use a damp cloth to wipe off any ash left in the cooking compartment and around the door.
NOTES: During pyrolytic mode, the frame inside the oven may discolour and you may also notice white spots on the enamelled surface. This is normal and does not affect performance. The discolouration can be removed with the help of a stainless steel cleaning product and the white marks are food residues that can be removed with lemon juice and other cleaning products.
Please note that ....
- Once pyrolysis mode is activated, the oven will automatically lock and the oven door cannot be opened.
- You will also not be able to change any settings except to pause and start once cleaning has begun.
ACCESSORIES
Baking trays
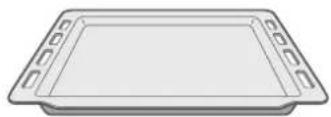
Flat baking tray
For small baking

Deep baking tray
For baking with liquids or juices.
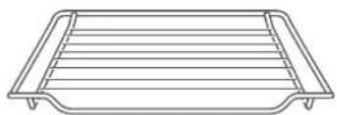
Grid
To place; plates, moulds, refractory dishes. For roasting and grilling food
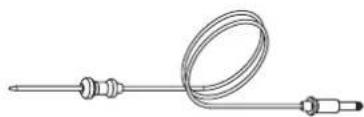
Meat probe For measuring the temperature of meat.
NOTE: Insert the probe into the centre of meat or poultry. Away from fat or bone.
(Only with models PHP-864, PHTV-862)
Only use original accessories. They are specially adapted to your oven. Accessories can become deformed when overheated.
This does not affect their functioning. Once they have cooled down again, they return to their original shape.
Introducing Accessories
NOTE: Only use original accessories. They are specially adapted for your oven.
Accessories may become deformed when overheated. This does not affect their function.
Once they have been returned to cool, they return to their original shape.
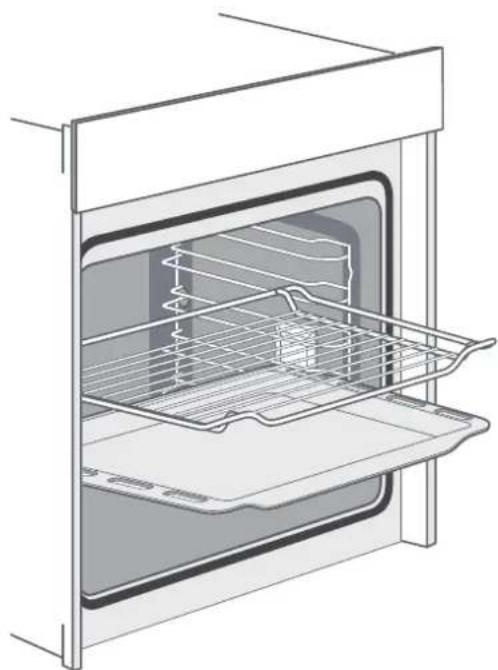
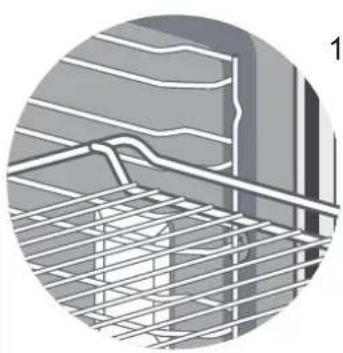
The oven has 5 levels from top to bottom for to place trays and grids.
Accessories inserted directly into the shelves can be pulled out approximately halfway without risk of tipping, and those inserted into the shelves with telescopic rails can be pulled out completely without risk of tipping, provided that the weight of the cooking vessel is properly centred.
Lock Function
The fittings can be pulled out about halfway until they lock into place.
The locking function prevents the accessories from tilting due to the gravity of the food and the accessories themselves while they are being removed. The accessories must be inserted correctly into the cavity so that they are protected against tipping over.
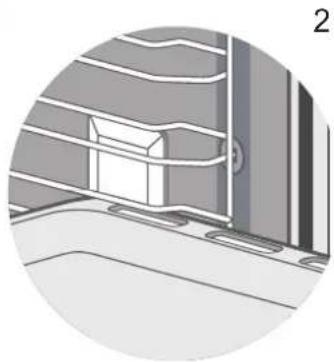
- When inserting the rack, make sure that the rack is facing to the right, as shown in picture 1.
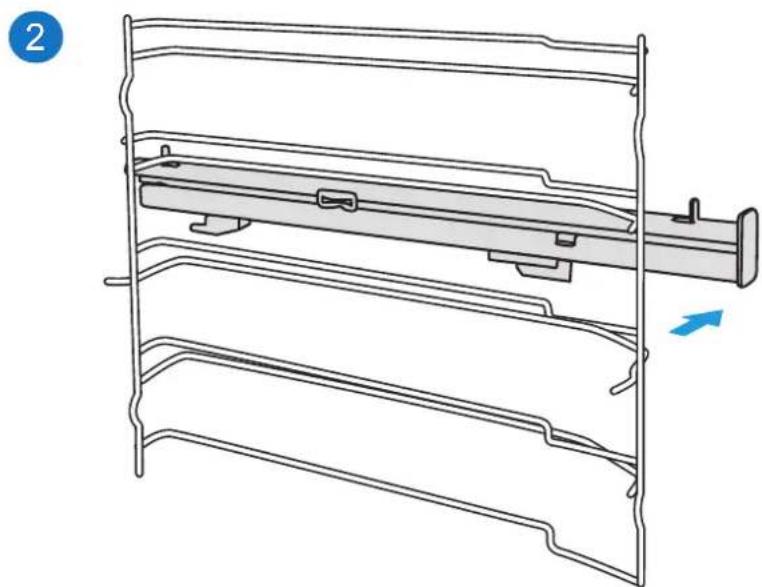
- When inserting the support tray, make sure that the support tray is facing to the right, as shown in picture 2.
ENERGY EFFICIENCY
- Remove all accessories that are not required during the cooking and baking process.
- Do not open the door during the cooking and baking process, if you open the door during the cooking and baking process, change the mode to "Light". (Without changing the temperature setting).
- Reduce the temperature setting in fanless modes to 50^ 5 to 10 minutes before the end of the cooking and baking time. This will allow you to use the residual heat in the cavity to complete the process.
- Use "Fan heat", whenever possible. You can reduce the temperature between 20^ and 30 °C.
- You can cook and bake using "Fan Heat" on more than one level at the same time.
- If it is not possible to cook and bake different dishes at the same time, you can heat one after the other using the preheat function of the oven.
- Do not preheat the oven when it is empty, if it is not necessary, if possible put the food in the oven immediately after reaching the selected temperature, you know that this temperature has been reached because the light goes out automatically when the oven is switched on for the first time.
- Do not use reflective paper, such as aluminium to cover the floor of the cavity.
- Use the timer and/or a temperature whenever possible.
- Use baking pans and baking dishes with a dark matt finish and light weight. Avoid using heavy accessories with shiny surfaces, such as stainless steel or aluminium.
HEALTH ADVICE
How to avoid acrylamide:
Acrylamide is mainly produced by heating starchy foods (e.g. potatoes, chips, bread) at very high temperatures for a long time.
Advice:
- Use short cooking times.
- Cook the food until the surface is golden yellow, do not brown until it is dark brown.
- Larger portions have less acrylamide.
- Use the "fan heat" mode if possible.
- French fries: use more than 450g per pan, place them evenly and turn them from time to time. Use the product information if available for the best cooking result.
With good care and cleaning, your appliance will retain its appearance and will continue to work at full capacity for a long time. Here we explain how to care for and clean your oven properly. To ensure that the various surfaces are not damaged by the use of an unsuitable cleaning agent, please observe the instructions in the table.
CAUTION! RISK OF SURFACE DAMAGE.
Advice:
- Clean the cooking compartment after each use. This will prevent the build-up of dirt.
- Always remove lime, fat, starch and albumin residues (e.g. egg whites) immediately.
- Immediately dispose of leftover sugary foods, if possible, while they are still hot.
- Use suitable grilling utensils, e.g. a grill pan.
- Wash new sponges thoroughly before use.
Do not use:
- Strong or abrasive cleaning agents.
- Cleaning products with high alcohol content.
- Hard scouring pads or sponges.
- High pressure cleaners or steam cleaners.
- Special cleaners for cleaning the oven whilehot
Notes:
- Slight differences in colour on the front of the oven are due to the use of different materials, such as glass, plastic and metal.
- The shadows on the door panels, which look like stripes, are due to reflections produced by the interior lighting.
- The enamel of the acrylics is baked at very high temperatures. This can lead to a slight colour variation. As a result, these edges may be rough. Corrosion protection and function are not affected.
- Always keep the oven clean and remove dirt immediately so that stubborn dirt deposits do not build up.
How to clean your oven according to its surface
| Area | Cleaning |
| Door handle | Hot soapy water: Wipe with a tea towel and then dry with a soft cloth. If the descaler comes into contact with the door handle, clean it immediately. Otherwise, the stains cannot be removed. |
| Enamelled surfaces and surfaces self-cleaning | Please note the instructions for the surfaces of the The following cooking methods are listed in the table. |
| Glass cover for lighting inside | Hot soapy water: Wipe with a tea towel and then dry with a soft cloth. If the oven compartment is very dirty, use oven cleaner. |
| Door seal No remove! | Hot soapy water: Wipe with a tea towel. Do not rub. |
| Door panels | With hot soapy water: Wipe with a kitchen towel and then, dry with a soft cloth. Do not use glass cleaner, glass scraper or stainless steel scouring pad. |
| Ace door cover ro stainless steel | Stainless steel cleaner: Observe the manufacturer's instructions. Do not use stainless steel care products. Remove the door cover for cleaning. |
| Accessories | Hot soapy water: Immerse and clean with a tea towel or brush. If there are large deposits of dirt, use a stainless steel scouring pad. |
| Rails | Hot soapy water: Immerse and clean with a tea towel or brush. |
| Extraction system | Hot soapy water: Clean with a tea towel or brush. Do not remove the lubricant while the extraction rails are removed. It is better to clean them while they are inserted. Do not clean in the dishwasher. |
| Thermometer for meat | Hot soapy water: Clean with a tea towel or brush. Do not clean in the dishwasher. |
| Stainless steel front | With hot soapy water: Wipe with a kitchen towel and then wipe dry. with a soft cloth. Immediately remove lime, grease, starch and albumin stains (e.g. egg whites, egg whites, etc.).egg). Corrosion may form under these stains.Special cleaning agents for stainless steel are available from our after-sales service or specialised dealers. Apply a very thin layer of the cleaning agent with a soft cloth. |
| Plastic | With hot soapy water: Wipe with a kitchen towel and then wipe dry.with a soft cloth. Do not use window cleaners or glass scrapers. |
| Surfaces graffiti | With hot soapy water: Wipe with a kitchen towel and then wipe dry.with a soft cloth |
| Control panel | With hot soapy water: Wipe with a kitchen towel and then wipe dry.with a soft cloth. Do not use window cleaners or glass scrapers. |
OVENDOOR
WARNING!
DISASSEMBLY OF THE OVEN DOOR. MUST BE CARRIED OUT BY A SPECIALIST SAT DE PANDO. IF ANY DAMAGE OCCURS DURING THIS PROCESS BY AN UNAUTHORIZED USER OR UNAUTHORIZED PERSONNEL, IT WILL NOT BE COVERED BY THE WARRANTY, EVEN IF IT IS STILL IN FORCE!
With good care and cleaning, your appliance will retain its appearance and continue to perform at its best.
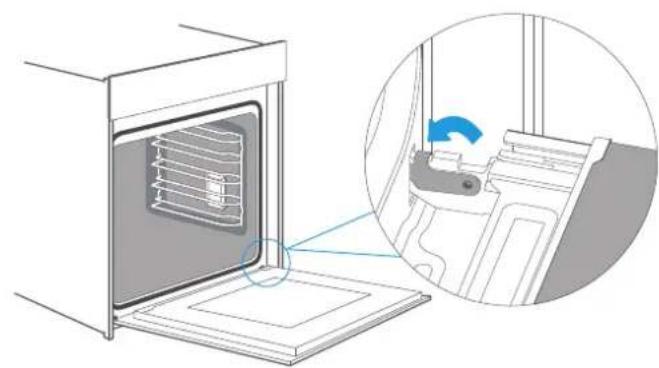
The following is detailed below how to disassemble and clean the oven door. To clean and remove the door panels, you can disassemble the oven door. Each of the oven door hinges has a locking lever.
When the locking levers are open, the oven door can be removed by means of an angular movement.
WARNING!
When the hinge lock is open,
ONLY THE DOOR HAS TO BE REMOVED,
The hinge locking levers are locked when the oven door is closed, the door is locked in place and ready for use. When the hinge lock levers are closed, the oven door is locked in place and ready for use.
Locking lever OPEN Door ready for dismantling..
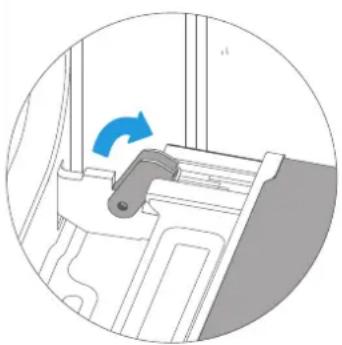
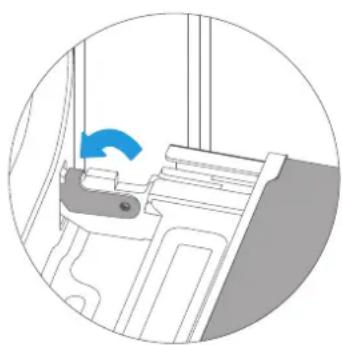
Locking lever CLOSED Door ready for normal use.
RISK OF INJURY!
If the hinges are not locked, they can be snapped shut with great force.
Ensure that the locking levers are always completely closed.
Dismantling the oven door
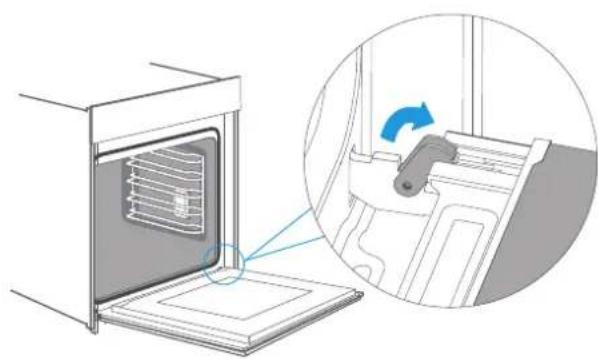
- Open the oven door fully.
- Open the two locking levers to the left and right.
- Hold the door with both hands on the left and right side and pull it upwards with an angular movement.
Assembly of the oven door
Reassemble the oven door in the reverse order of disassembly..
- When fitting the oven door, ensure that both hinges are positioned squarely in the installation holes in the front panel of the cavity.
-
Make sure that the hinges are inserted in the correct position. You should be able to insert them easily and without resistance. If you feel any resistance, check that the hinges are correctly inserted into the holes.
-
Open the oven door fully. While opening the oven door, you can recheck whether the hinges are in the correct position. If they are positioned incorrectly, do not you will be able to open the oven door fully. Close both locking levers again.
-
Close the oven door. At the same time, we strongly recommend that you check once again whether the door is in the correct position. and if the ventilation slots are not too bad sealed.
Removing the door cover
The plastic inlay on the door cover may discolour. For thorough cleaning, you can remove the cover.
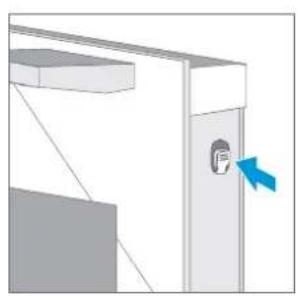
Remove the oven door as shown above.
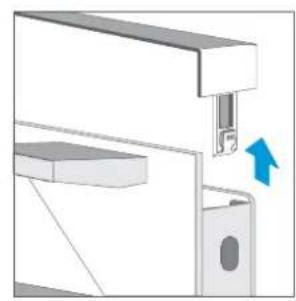
- Press the right and left sides of the lid together.
- Remove the cover.
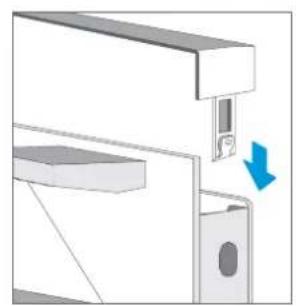
- After removing the door cover, the rest of the oven door can be easily removed so that you can continue cleaning. Once cleaning of the oven door is complete, replace the oven door cover and press it back into place until it audibly clicks into place.
- Position the oven door and close it.
CAUTION!
- Removing the door cover releases the inner glass panes of the oven door, which can easily move and cause damage or injury, as well as fall out and break.
- By removing the door cover and the inner glass, the overall weight of the oven door is reduced. The hinges can move more easily when closing the door so that you can catch your hands. Keep your hands away from the hinges.
Due to the above 2 points, we strongly recommend that you do not remove the door cover unless you have removed the oven door.
Damage caused by improper handling is not covered by the warranty.
Telescopic Guides
When you want to give the runners and cavity a good cleaning, you can remove the shelves and clean them. In this way, your oven will retain its appearance and remain fully functional for a long time to come.
When you want to give the runners and cavity a good cleaning, you can remove the shelves and clean them. In this way, your oven will retain its appearance and remain fully functional for a long time to come.
In order to disassemble and assemble the guides correctly without damaging the product, the following steps must be taken:
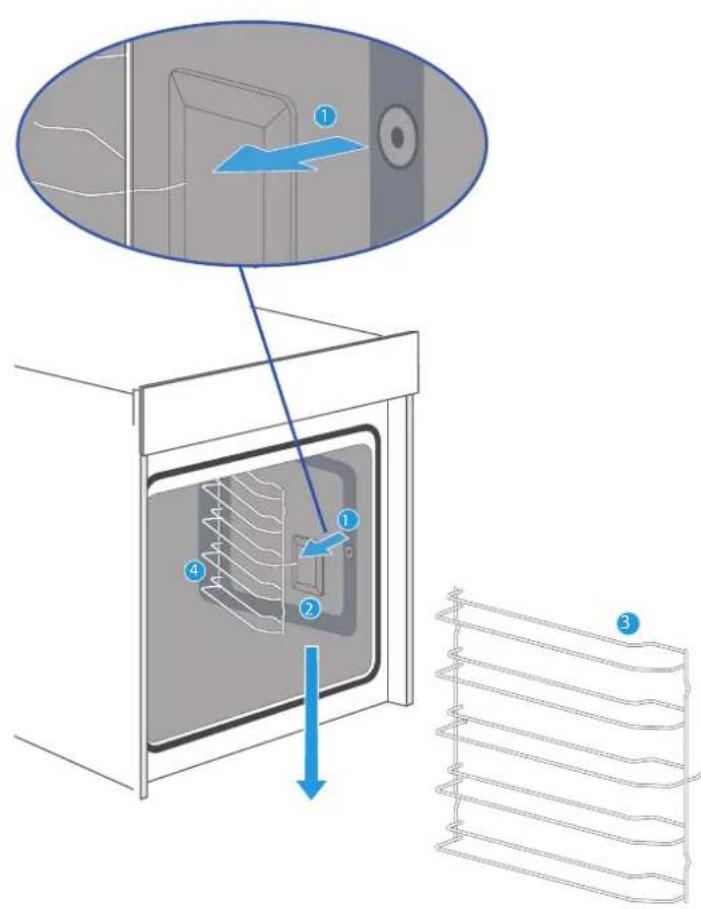
- Pull the front part of the rails horizontally towards the inside of the oven (following the direction of the arrow) until the element comes out; the rails can then be pulled out as shown in the picture.
- To replace the rails, the rails protruding from the rear of the rails must be fitted correctly into the cavities on the inside of the oven.
- First insert the rods of the rear part into the corresponding holes and then insert the front part into the hole.
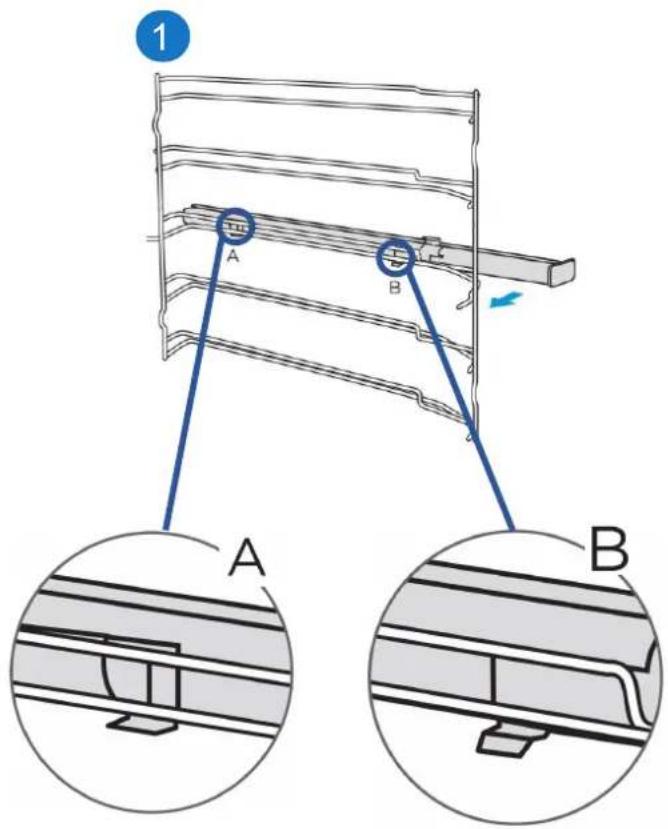
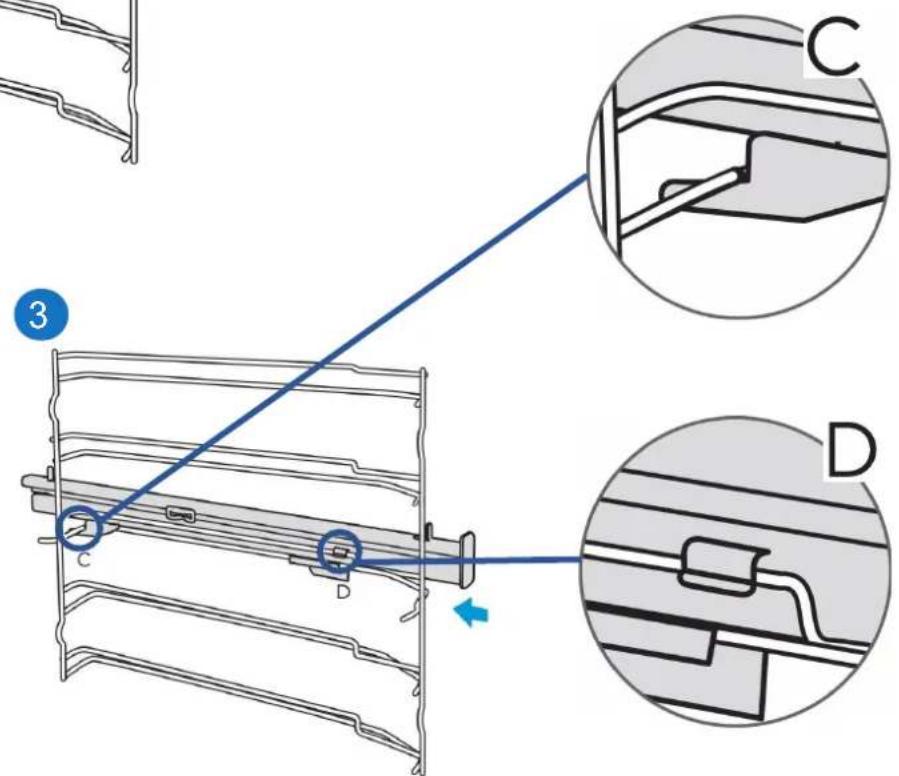
Fixing the telescopic slides
(Take the left-hand side, for example, the same for the right side)
- Position points A and B of the telescopic slides horizontally on the outer rail.
- Turn the telescopic slides 90 degrees anticlockwise for the right-hand side.
- Push the telescopic slides forward, make point C engage the lower rail and point D engage the upper rail.

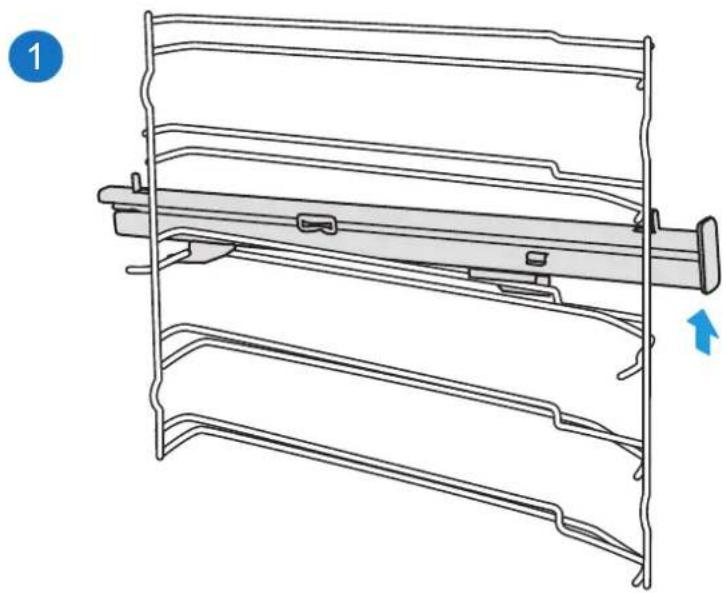
Removing the telescopic slides
(Take the left-hand side, for example, the same for the right side)
- Lift up one end of the telescopic slides with force.
- Lift all telescopic slides and remove them. backwards.
ELECTRICAL INSTALLATION
ATTENTION! QUALIFIED INSTALLER OR SAT PANDO ONLY
CAUTION! THE ELECTRICAL INSTALLATION OF THE OVEN MUST BE CARRIED OUT BY A QUALIFIED INSTALLER OR A SPECIALIST FROM THE PANDO TECHNICAL SUPPORT SERVICE.
IF ANY DAMAGE OCCURS DURING THIS PROCESS THAT HAS BEEN CARRIED OUT BY AN UNQUALIFIED USER OR PERSONNEL, IT WILL NOT BE COVERED BY THE WARRANTY, EVEN IF IT IS STILL VALID!
Please note.....
- To connect the oven to the mains, the installer must use a power supply cable type H05RR-F, H05SS-F or H07RN-F.
- The connection must be made through an omnipolar circuit breaker, suitable for the current to be withstood and with a minimum opening between contacts of 3mm for disconnection in cases of emergency, cleaning or lamp replacement. Under no circumstances may the earthing cable pass through this switch.
-
Any manipulation or repair of the appliance, including replacement of the power cable, must be carried out by authorised service personnel using original spare parts. Repairs or handling carried out by other persons may cause damage to the appliance or malfunction, endangering its safety.
-
This switch can be replaced by a plug, provided that it is accessible in normal use.
The oven must always be connected to a good earth connection in accordance with current regulations. - Switch off your oven when it is out of order.
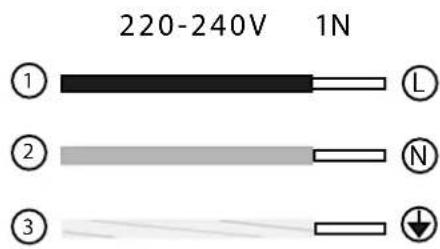
Interpretation of power supply wires:
- Brown or Black = Line/Phase (L)
- Blue = Neutral (N)
- Green/Yellow = Grounding
ENERGY EFFICIENCY EN 60350-1
Please note the following information:
- The measurement is carried out in the "ECO" function to determine the label class data.
-
The measurement is carried out in the "Upper and lower heating" to determine the data for the conventional mode.
-
During the measurement, only the required accessory must be in the cavity. All other parts must be removed.
- The oven is installed as described in the installation guide and placed in the centre of the cabinet.
- It is necessary for the measurement to cl set the door as at home, even if the cable disturbs the sealing function of the seal during the measurement.
- To ensure that the energy data does not adversely affect the sealing, it is necessary to close the door carefully during the measurement. It may be necessary to use a tool to ensure the sealing of the gasket as in the household, where no cables disturb the sealing function.
- The cavity volume is determined for "Defrosting" use. To ensure efficient use of the oven, all included accessories, including the side grids, are removed.
TROUBLESHOOTING YOUR FURNACE IF NECESSARY
Before calling the after-sales service, be sure to check that the problem you are experiencing is not listed in the table below or that the problem is due to incorrect operations. Often, you can solve the problem yourself at no additional cost.
If a dish does not turn out exactly the way you want it to, you will find plenty of tips and instructions for preparation at the end of the instruction manual.
Incidents Possible cause Solutions
| The oven does not work. | Cutting off current | Check whether the light in the cooker or other appliances is kitchen work. |
| The fan does not work all the time in the mode: "Fan heating". | This is normal operation due to the best possible heat distribution and furnace performance. | |
| After a firing process, a noise is heard and an air flow is observed in the vicinity of the control paddle. | The cooling fan continues to run, to prevent high humidity conditions in the cavity and cool the oven for your comfort. The cooling fan will turn off automatically. | |
| The food has not been cooked sufficiently in the time indicated i n the recipe. | A temperature different from the recipe temperature has been used. Check the temperatures again. The quantities of ingredients are different from the recipe. Check the recipe again. | |
| Uneven browning during cooking | The temperature setting is too high, or the shelf level could be optimised. Recheck the recipe and settings. The surface finish and/or the colour and/or the material of the bakeware were not suitable for the selected oven function. When using radiant heat, such as in "Top and bottom heating" mode, use ovenware with matt finish, dark colour and light weight. | |
| The lamp does not light. | If it is necessary to replace the lamp, this operation must be carried out by the Pando Technical Assistance Service or a qualified installer. | |
TIPS AND TRICKS
| You want to cook your own recipe | Try to use the settings of similar recipes first and optimise the cooking process according to the result. |
| Is the cake ready? | Insert a wooden toothpick into the cake about 10 minutes before the baking time is up. If there is no uncooked dough on the toothpick after removing it, the cake is ready. |
| The cake loses a lot of volume when it cools down after baking. | Try to reduce the temperature by 10 °C and recheck the food preparation instructions regarding mechanical handling of the dough. |
| The height of the cake is much higher in the centre than at the outer edge. | Do not grease the outer edge of the springform pan. |
| The cake is too golden on top. | Use a lower shelf level or lower temperature (this may prolong cooking time). |
| The cake is too dry. | Increase the temperature by 10 °C (this may reduce the cooking time). |
| The food looks good, but the humidity inside is too high. | Set the temperature 10°C lower (this may prolong the cooking time) and recheck the recipe. |
| The gilding is uneven. | Set the temperature 10 °C lower (this may extend the cooking time). Use the "Upper and lower heating" mode on one level. |
| Cake is less golden on the inside | Choose a lower level. |
| When baking on more than one level at the same time: one shelf is darker than the other. | Use the fan mode to bake on more than one level and remove the pans individually when they are ready. It is not necessary for all trays to be ready at the same time. |
| Condensation of water during cooking | Steam is part of the baking process and normally exits the oven together with the cooling airflow. This steam may condense on different surfaces in or near the oven and form water droplets. This is a physical process that cannot be avoided altogether. |
| What kind of ovenware can be used? | Any heat-resistant ovenware can be used. It is recommended not to use aluminium in direct contact with food, especially sour food. Make sure that the container and lid fit tightly. |
| How to use the grill function? | Preheat the oven for 5 minutes and place the food at the level indicated in this manual. Close the oven door when using any grilling mode. Do not use the oven with the door open, except to load / remove / check food. |
| How to keep the oven clean during grilling? | Use the tray filled with 2 litres of water on level 1. Almost all liquids dripping from the food placed on the rack will be captured by the tray. |
| The heating element in all grilling modes switches on and off over time. | This is normal operation and depends on the temperature setting. |
| How to calculate the oven settings, when the weight of a roast is not given by a recipe? | Choose the settings next to the roast weight and slightly change the time. Use a meat probe, if possible, to detect the temperature inside the meat. Place the meat probe head carefully into the meat, following the manufacturer's instructions. Ensure that the probe head is positioned in the centre of the largest part of the meat, but not near a bone or hole. |
| What happens if a liquid is spilled on food in the oven during the baking or cooking process? | The liquid will boil and vapour will be produced as a normal physical process. Be careful, because the steam is hot. See also "Condensation of water during baking" for more information. If the liquid contains alcohol, the boiling process will be faster and may cause flames in the cavity. Make sure that the oven door is closed during this type of process. Open the door wide Carefully and only if necessary. |
COMMON RECIPES
| CAKES CONTAINER LEVEL MODE T. °C | TIME(min.) | |||
| Box-shaped (plain) sponge cake | Box 2 | Conventional with fan | 170 50 | |
| Box-shaped (plain) sponge cake | Box 1 Conventional 140 70 | |||
| Fruit sponge cake in a round shape | Round shape 1 | Conventional with fan | 150 50 | |
| Sponge cake with fruit on a tray | Tray 1 Conventional 140 70 | |||
| Brioche with sultanas | Cupcake tray | 2 Conventional 220 | p.m.d.t.:19:00t.h.: 11:00 | |
| Gugelhupf (with hard cam) | Tray 1 Conventional 150 | t.d.p.: 11:00t.h.: 60:00 | ||
| Cupcakes | Cupcake tray | 1 Conventional 160 | p.d.t.: 8:30a.m.t.h.: 30:00 | |
| Cupcakes | Cupcake tray | 1 | Conventional with fan | 150 p.d.t.: 8:30a.m.t.h.: 30:00 |
| Apple and yeast cake in tray | Tray 1 | Conventional with fan | 160 | t.d.p.: 10:00t.h.: 42:30 |
| Sponge cake (6 eggs) | Spring form | 1 Conventional 160 | p.d.t.: 9:30a.m.t.h.: 41:00 | |
| Sponge cake (4 eggs) | Spring form | 1 Conventional 160 | t.d.p.: 9:00a.m.t.h.: 26:00 | |
| Sponge cake | Spring form | 1 Conventional 160 35 | ||
| Apple and yeast cake in a tray | Tray 2 | Conventional with fan | 150 | p.m.d.t.: 8:00a.m.t.h.: 42:00 |
| Sweet bread braid (jalal type) | Tray 2 | Conventional with fan | 150 40 | |
NOTE: t.d.p. = preheating time
t.h. = baking time
CAKES CONTAINER LEVEL MODE T. ^ C TIME (min.)
| Small cakes 20 gr | Tray 2 Conventional 150 36 | |||
| Small cakes 40 gr | Tray 2 + 4 Conventional 150 | t.d.p.: 10:00 t.h.: 34:00 | ||
| Butter cake and yeast | Tray 2 Conventional 150 | p.m.d.t.: 8:00 a.m. t.h.: 30:00 | ||
| Mantecada | Tray 2 Conventional 170 | p.m.d.t.: 8:00 a.m. t.h.: 13:00 | ||
| Mantecada 2 trays | Tray 2 + 4 | Conventional with fan | 160 | t.d.p.: 8:20 t.h.: 12:00 |
| Vanilla biscuits | Tray | 2 Conventional | 160 | p.m.d.t.: 8:00 a.m. t.h.: 10:00 |
| Vanilla biscuits Tray 2 + 4 | Conventional with fan | 150 | p.m.d.t.: 8:00 a.m. t.h.: 14:00 | |
| PAN | CONTAINER | LEVEL | MODE | T. °C | TIME(min.) |
| White bread (1 kg flour)Box shape | Box | 1 | Conventional | 170 | t.d.p.: 9:20t.h.: 50:00 |
| White bread (1 kg flour)Box shape | Box | 1 | Conventional with fan | 170 | t.d.p.: 12:00t.h.: 45:00 |
| Fresh pizza (thin) | Tray | 2 | Conventional | 170 | p.d.t.: 9:30a.m.t.h.: 21:00 |
| Fresh pizza (thick) | Tray | 2 | Conventional | 170 | t.d.p.: 10:00t.h.: 45:00 |
| Fresh pizza (thick) | Tray | 2 | Conventional with fan | 170 | p.m.d.t.: 8:00a.m.t.h.: 41:00 |
| Bread | Tray | 1 | Conventional | 190 | t.d.p.: 9:00a.m.t.h.: 30:00 |
| MEAT CONTAINER LEVEL MODE T. °C TIME (min.) | ||||
| Sirloin of beef 1,6 kg | Tray 2 | Double grill with fan | 180 55 | |
| Meatloaf 1 kg of meat | Tray 1 Conventional | 180 75 | ||
| Chicken 1 kg | Tray | L2: shelf | Double grill | 180 50 |
| L1: tray | with | |||
| fan | ||||
| Fish (2,5 kg) | Tray | 2 | Conventional | 170 70 |
| Tomahawk Ribs cooked T.H. | Tray 3 Conventional | 120 85 | ||
| Roast neck of pork (1,2 kg) | Tray 1 Conventional | 160 82 | ||
| Chicken 1,7 kg Tray | L2: shelf L1: tray | Conventional | 180 78 | |
| FOOD TESTING ACCORDING TO EN 60350-1 | ||||||
| RECIPES | ACCESSORIES | F | °C | LEVEL | TIME (MIN) | PREHEAT |
| Cake | Spring form Ø 26 cm | 170 | 1 | 30-35 | No | |
| Cake | Spring form Ø 26 cm | 160 | 1 | 30-35 | No | |
| Cake small | 1 tray | 150 | 2 | 30-40 | Yes | |
| Cake small | 1 tray | 150 | 2 | 40-50 | Yes | |
| Cake small | 2 trays | 150 | L2 and L4 | 30-35 | Yes | |
| Cheesecake | Spring form Ø 26 cm | 150 | 1 | 70-80 | No | |
| Apple pie | Spring form Ø 20 cm | 170 | 1 | 80-85 | No | |
| Cake of apple | Spring form Ø 20 cm | 160 | 1 | 70-80 | No | |
| Bread | 1 tray | 210 | 1 | 30-35 | Yes | |
| Bread | 1 tray | 190 | 1 | 30-35 | Yes | |
Automatic menu table
| Menu | Visualisation | No. of pulses is | Mode Temp. in °C | Duration in minutes | |
| Roast chicken a la media | C01 1 | Covction | 250 17 | ||
| Grilled prawns | C02 | 2 | Convection | 250 | 10 |
| Pizza A01 3 Convection 200 13 | |||||
| Croissant bread | A02 | 4 | Convection | 180 | 11 |
| Biscuits A03 5 Convection 160 15 | |||||
| Roast meat | A04 | 6 | Double grill + fan | 250 20 | |
| Cake | A05 | 7 | Conventional | 175 | 35 |
| Cod | A06 | 8 | Convection | 250 | 17 |
| Millefeuille of yellow and purple potatoes | A07 9 Convection | 180 35 | |||
| 200 5 | |||||
| Roast chicken with new potatoes | A08 10 | Convection | 25 0 | 15 | |
| 200 25 | |||||
| Perfect roast beef | A09 | 11 | Convection | 250 5 | |
| 120 50 | |||||
| Decalcification | A10 12 | - | - | 40 | |
| Cleaning | A11 | 13 | - | - | 5 |
COOKING IN ECO MODE
ECO mode emits heat from the bottom and the heating ring; with this mode you can save energy during cooking.
Challah 1 band ja 180 1 45-50 No
| Roast pork 1 tray | 200 1 80-85 No | ||||
| Cherry clafoutis | Round shape | 200 | 1 | 55-60 | No |
| Roast beef 1.3 kg | 1 tray | 200 | 1 | 80-85 | No |
| Brownies | Grid and glass plate | 180 | 1 | 55-60 | No |
| Potato gratin | Grid and round plate | 180 | 1 | 65-70 | No |
| Lasagne | Grid and glass plate | 180 | 1 | 75-80 | No |
| Cheesecake | Spring form Φ 20 cm | 160 | 1 | 80-90 | No |
TECHNICAL SPECIFICATIONS PHB-841/861
| Specifications - EN | PHB - 841 |
| INSTALLATION | DATA |
| Voltage [V - VAC] | 220 - 240 |
| Frequency [Hz] | 50 |
| Rated maximum power [W] | 3000 |
| Power cable [m] [m | 1,5 |
| ≈ Net Weight [Kg] | 27.4 |
| TECHNICAL and AESTHETICAL CHARACTERISTICS | |
| More efficient function | ECO |
| Energy Efficiency Index [EEI]. | 85,7 |
| Energy Efficiency Class | A |
| BENEFITS | |
| Temperature range | 30 - 250 °C |
| Dough fermentation temperature range | 30 - 45 °C |
| Useful volume [L] | 50 |
| COOKING FUNCTIONS | |
| Total number of functions | 11 |
| Specifications - EN | PHB - 861 |
| INSTALLATION | |
| Voltage [V - VAC] | 220 - 240 |
| Frequency [Hz] | 50 - 60 |
| Rated maximum power [W] | 2900 |
| Power cable [m] | 1,1 |
| ≈ Net Weight [Kg] | 32 |
| TECHNICAL and AESTHETICAL CHARACTERISTICS | |
| More efficient function | ECO |
| Energy Efficiency Index [EEI]. | 81,9 |
| Energy Efficiency Class | A+ |
| BENEFITS | |
| Temperature range | 30 - 250 °C |
| Dough fermentation temperature range | 30 - 45 °C |
| Useful volume [L] | 72 |
| COOKING FUNCTIONS | |
| Total number of functions | 11 |
TECHNICAL SPECIFICATIONS PHTV-862 / PHP-864
| Specifications - EN | PHTV - 862 |
| INSTALLATION | |
| Voltage [V - VAC] | 220 - 240 |
| Frequency [Hz] | 50 - 60 |
| Rated maximum power [W] | 3150 |
| Power cable [m] | 1,1 |
| ≈ Net Weight [Kg] | 39 |
| TECHNICAL and AESTHETICAL CHARACTERISTICS | |
| More efficient function | ECO |
| Energy Efficiency Index [EEI]. | 74 |
| Energy Efficiency Class | A+ |
| BENEFITS | |
| Temperature range | 30 - 250 °C |
| Dough fermentation temperature range | 30 - 45 °C |
| Useful volume [L] | 72 |
| COOKING FUNCTIONS | |
| Total number of functions | 12 |
| Specifications - EN | PHP - 864 |
| INSTALLATION | |
| Voltage [V - VAC] | 220 - 240 |
| Frequency [Hz] | 50 - 60 |
| Rated maximum power [W] | 3200 |
| Power cable [m] | 1,1 |
| ≈ Net Weight [Kg] | 42 |
| TECHNICAL and AESTHETICAL CHARACTERISTICS | |
| More efficient function | ECO |
| Energy Efficiency Index [EEI]. | 81,9 |
| Energy Efficiency Class | A+ |
| BENEFITS | |
| Temperature range | 30 - 250 °C |
| Dough fermentation temperature range | 30 - 45 °C |
| Useful volume [L] | 72 |
| COOKING FUNCTIONS | |
| Total number of functions | 13 |
CUSTOMER SERVICE
Our after-sales service is at your disposal if your oven needs repairing. We will always find a suitable solution. Please contact the dealer from whom you purchased your oven. When you call us, please state the model and serial number so that we can advise you correctly. You will find the type plate with these numbers when you open the oven door.
ATTENTION
This furnace must be installed in accordance with current regulations and must be used only in a well-ventilated space. Read the instructions before installing or using this oven.
NOTE
Rely on the professionalism of the manufacturer. You can therefore be sure that the repair will be carried out by trained service technicians who have original spare parts for your appliances.
Above all, thank you again for purchasing the Pando built-in oven, and we hope that our oven will help make your food delicious and your life easier.
PRODUCT WARRANTY
INOXPAN S.L., thanks you for choosing and placing your trust in a product of our brand Pand o, which is distinguished by its Quality, Design and Innovation, being faithful to its origins and commitments.
CONDITIONS OF GUARANTEE PANDO:
This appliance is guaranteed for 3 years from the date of purchase. This warranty exclusively covers the Pando product against any manufacturing defect that affcts its proper functioning. In order for the warranty to be valid, it is essential to present the invoice or purchase receipt together with a photo of the label or registration number of the product to the Pando Authorised Service technician.
During this period, the Company undertakes to replace or repair free of charge any defective part due to a defect or manufacturing defect in the appliance, until it is working properly, as well as the necessary labour and expenses incurred as a result of such repair or replacement.
EXCLUSIONS FROM THE WARRANTY PANDO:
It will not be covered by the guarantee of the product or induc tion, and could be cause for cancellation of the same, and in these cases the user will be responsible for the costs of materials, labour and travel of the technical service, in the following cases:
- The installation, servicing, cleaning or maintenance of the furnace.
If the installation of the oven has not been carried out by Authorised Professional Specialists or Official Pando - Technical Service personnel, who comply with the requirements of safety standards and electrical power regulations.
- Any breakdown, malfunction or malfunction caused by incorrect installation or use.
- Breakdowns or damage caused by failure to observe or follow the safety instructions, recommendations for use and
- maintenance in the appliance's manuals.
- When the appliance is intended for commercial or non-domestic use, for which it is not intended.
- Malfunctioning of the product due to non-compliance with the standards, instructions and recommendations indicated in the appliance manuals.
- Breakdowns or problems caused by an inadequate installation, or by not having the required free spaces in the furniture and indicated in the installation manual, for adequate ventilation of the product.
- Breakdowns or damage caused by transport or transfer, and handling of the appliance by unauthorised personnel not authorised by this company or the Pando brand.
- Bumps, dents, scratches or scrapes, broken glass.
- Presence of foreign bodies foreign to the device, inside or outside the product.
- The technician does not have easy access to the product, because there are elements that prevent easy and safe access. The means required for the authorised Pando technician to access the device are the responsibility of the user.
- Improper handling of the wiring and connections of the oven.
Aesthetic components, wear and tear, such as light screens, lamps, trays, grills, guides. - Rust, burns, stains or discoloration of the body, door, fittings or interior cavity resulting from improper maintenance or use, or from improper application or unprotected exposure to corrosive elements such as cleaning agents not recommended by the manufacturer and unsuitable cleaning agents.
- Breakdowns or damage caused by variations in the electricity supply or fortuitous and natural causes of atmospheric or geological origin such as storms, lightning, earthquakes, floods, etc.
- Appliances from resale, second hand, trade-in or exhibitions that are more than three years old from the date of manufacture.
INOXPAN, S.L., is expressly excluded from any liability for any direct or indirect damage to persons or things caused by a product improperly installed, handled, used and/or maintained.
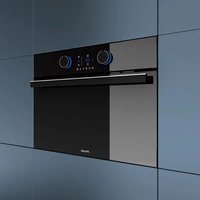
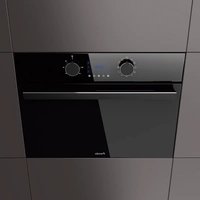
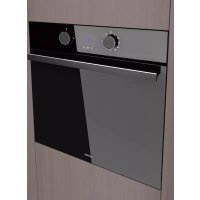
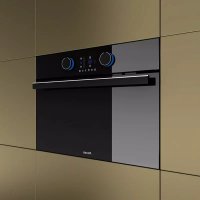
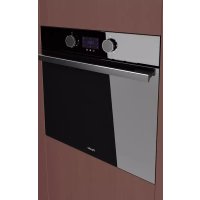
- Pando
- integralcooking
- The Global Kitchen Partner
- Bandeja honda
- EFICIENCY ENERGÉTICA EN 60350-1
- EFICIÊNCIA ENERGÉTICA EN 60350-1
- GARANTIA DO PRODUCTO
- RISK OF ELECTRIC SHOCK!
- RISK OF BURNS!
- RISQUE DE BLESSURE!
- TAILLE DU PRODUIT PHB-841
- GARANTIE DES PRODUITS
- ENVIRONMENTAL PROTECTION AND WASTE TREATMENT
- INDEX
- SAFETYWARNINGS 174
- PRODUCT DIMENSIONS PHB-861, PHTV-862, PHP-864 178
- PRODUCT DIMENSIONS PHB-841 179
- INSTALLATION 180
- FIRSTUSE 183
- TIME SETTINGS 184
- FIRST IGNITION 184
- FUNCTIONS OF THE DISPLAYS 185
- DISPLAYS 186
- COOKING PROGRAMMES 187
- USE OF THE PHB - 841 / 861 189
- USE THE PHTV - 862 192
- USE THE PHP - 864 196
- SAFETYWARNINGS
- RISK OF INJURY!
- ;FIRE HAZARD!
- PELIGRO POR MAGNETISMO!
- Causes of Damage (Not Covered by Warranty)
- PRODUCT DIMENSIONS PHB-861, PHTV-862, PHP-864
- PRODUCT DIMENSIONS PHB-841
- INSTALLATION
- ATTENTION! PLEASE NOTE THIS BEFORE INSTALLATION!
- Under-counter installation
- Installation On Column
- FIRSTUSE
- Before First Use
- TIME SETTINGS
- FIRST IGNITION
- FUNCTIONS OF THE DISPLAYS
- DISPLAYS
- COOKING PROGRAMMES
- CAUTION DURING USE!
- NOTES:
- Cooling fan
- CAUTION!
- Change During Firing
- Rapid Preheating
- Timer
- Function Lock & Power On
- Demo Mode (DEMO)
- Manual Cleaning Function
- Programming Of The Cleaning Function
- USE THE PHTV - 862
- Cocinar
- Sonda De Temperatura
- Steam
- Water Box
- METHOD 1 FOR ADDING WATERMETHOD 2 FOR ADDING WATER
- Steam cleaning function
- Automatic descending function
- USE THE PHP - 864
- Cooking
- Pyrolysis Cleaning
- RISK WARNING!
- Risk of damage to health!
- Risk of re!
- Before Starting the Pyrolytic Mode
- Setting the pyrolytic selfcleaning mode
- Pyrolysis mode end signal
- After the pyrolysis mode has ended
- Please note that ....
- ACCESSORIES
- Baking trays
- Flat baking tray
- Deep baking tray
- Grid
- Introducing Accessories
- Lock Function
- ENERGY EFFICIENCY
- HEALTH ADVICE
- How to avoid acrylamide:
- Advice:
- CAUTION! RISK OF SURFACE DAMAGE.
- Do not use:
- How to clean your oven according to its surface
- OVENDOOR
- WARNING!
- Dismantling the oven door
- Assembly of the oven door
- Removing the door cover
- Remove the oven door as shown above.
- Telescopic Guides
- Fixing the telescopic slides
- Removing the telescopic slides
- (Take the left-hand side, for example, the same for the right side)
- ELECTRICAL INSTALLATION
- ATTENTION! QUALIFIED INSTALLER OR SAT PANDO ONLY
- Please note.....
- Interpretation of power supply wires:
- ENERGY EFFICIENCY EN 60350-1
- TROUBLESHOOTING YOUR FURNACE IF NECESSARY
- TIPS AND TRICKS
- COOKING IN ECO MODE
- TECHNICAL SPECIFICATIONS PHB-841/861
- CUSTOMER SERVICE
- ATTENTION
- NOTE
- PRODUCT WARRANTY
- CONDITIONS OF GUARANTEE PANDO:
- EXCLUSIONS FROM THE WARRANTY PANDO:
Brand : Pando
Model : PHP-864
Category : Oven