IR-DRYER3000.1 - Heating MSW - Free user manual and instructions
Find the device manual for free IR-DRYER3000.1 MSW in PDF.

User questions about IR-DRYER3000.1 MSW
0 question about this device. Answer the ones you know or ask your own.
Ask a new question about this device
Download the instructions for your Heating in PDF format for free! Find your manual IR-DRYER3000.1 - MSW and take your electronic device back in hand. On this page are published all the documents necessary for the use of your device. IR-DRYER3000.1 by MSW.
USER MANUAL IR-DRYER3000.1 MSW
PRODUCT NAME INFRARED PAINT DRYER
NOM DU PRODUIT SECHEUR INFRAROUGE
PRODUCT MODEL IR-DRYER3000.2 IR-DRYER2600.1
MODÈLE IR-DRYER2000.1
MODELLO IR-DRYER2000.2
R-1DRYFRT100
MODEL VÝROBKU
NAZWA PRODUCENTA
MANUFACTURER ADDRESS
ADRESSE DU FABRICANT
INDIRIZZO DEL FORNITORE
IR-DRYER3000.2 | IR-DRYER3000.1 | IR-DRYER2000.1
IR-DRYER2000.2 | IR-DRYER1000
| The operation manual must be reviewed. |
| Never dispose of electrical equipment together with household waste. |
| This machine complies to the CE declarations. |
| Attention! Hot surface may cause burns |
| Attention! The hand can be squeezed |
| Attention! Wear protective gloves. |
| Attention! Risk of fire or explosion. |
| Attention! Risk of accident. |
⚠️ PLEASE NOTE! Drawings in this manual are for illustration purposes only and in some decals it may differ from the actual machine.
The original operation manual is in German. Other language versions are translations from German.
USER MANUAL
SAFETY INSTRUCTIONS
General safety information for the use of electrical devices:
To avoid any risk of injury from fire or electric shock, please follow the basic safety instructions when using this device. Please read the instructions carefully and make sure that you have understood them well. Keep the manual near the equipment to be able to read it at any time. Always use current sources connected to the ground that provide the correct voltage (indicated on the label on the device). If you have any doubts, let an electrician check that the connection is properly grounded. Never use a defective power cable. Do not open the unit in damp or wet environment, or if your hands or body are damp or wet. Protect the unit from solar radiation. Use the device in a protected place to avoid damaging the equipment or putting at risk others. Make sure the device is able to cool and avoid placing it too close to other devices that produce heat. Before cleaning the machine, disconnect it from the power source. Use a soft damp cloth for cleaning. Avoid using detergents and make sure that no liquid enters the unit. No internal element of this device needs to be maintained by the user. Opening the device without our approval leads to a loss of warranty!
SAFETY GUIDELINES
- Please read and understand these instructions carefully before using the device! Please observe the safety guidelines carefully in order to prevent damages through improper use!
- Please keep this manual available for future reference. If this device is passed on to third parties, the manual must be passed on with it.
- Only use this device indoors and for its intended use.
- We do not offer any warranty for damages resulting from improper use or incorrect operation.
- Before using this device for the first time, please check whether the main voltage type and current comply with the indicated data on the type plate.
- This device is not intended to be used by persons (including children) with limited physical, sensory or mental capabilities or lack of experience and/or knowledge, unless they are supervised by a person responsible for their safety or have received instruction as to how the device is used.
- ELECTRIC SHOCK HAZARD! Do not try to repair the unit yourself. In case of device failures, repairs must be done by qualified experts.
- Please check the main plug and power cable regularly. If the power cable for this device is damaged, it has to be replaced by the manufacturer or its customer service or another qualified person in order to prevent hazards.
-
Prevent damages to the power cable by avoiding squeezing or bending it or rubbing it on sharp edges. Also keep the power cable away from hot surfaces and open flames.
-
ATTENTION! DANGER TO LIFE! While cleaning, never immerse the device in water or other liquids.
II. Under no circumstances should the housing be opened. - When in use do not look directly at the emitter.
- The device heats up to extremely high temperatures. Even after work, the device may remain hot for some time. Do not touch hot parts of the machine.
TECHNICAL DATA
| Product name INFRARED PAINT DRYER | |||||
| Model IR-DRYER3000.2 IR-DRYER3000.1 IR-DRYER2000.1 | IR-DRYER2000.2 IR | DRYER1000 | |||
| Nominal power supply [V] Frequency [Hz] | 230~150 | ||||
| Rated power [W] | 3 x 1100 | 3 x 1100 | 2 x 1100 | 2 x 1100 | 1100 |
| Time scope [min] | 0-99 | 0-99 | 0-99 | 0-60 | 0-60 |
| Temperature range [°C] | 40-100° | 40-100 | 40-100° | 40-100° | 40-100° |
| Temperature adjustment | YES1 | YES | YES1 | YES1 | YES1 |
| Weight [kg] | 47 | 48 | 39 | 15 | 14 |
* Temperature depends on the distance between IR emitter and workpiece
SCOPE OF THE APPLICATION
The IR emitter is designed for drying all materials used in bodywork repairs.
The user is liable for any damage resulting from non-intended use of the device!
BERORE THE FIRST USE
Upon receipt of the goods, check the packaging for defects and open the packaging if there are no damages. If the packaging is damaged, please contact your transport company and distributor within 3 days, and document the damages as detailed as possible. Do not turn the package upside down! When transporting the package, please ensure that it is kept horizontal and stable.
DISPOSING OF THE PACKAGING
Please keep all packaging materials (cardboard, plastic tapes and Styrofoam), so that in case of a problem, the device can be sent back to the service centre in accurate condition!
INSTALLING THE APPLIANCE
POSITIONING THE MACHINE
The machine should be positioned on a dry and stable surface, vertically so as to prevent movement during operation. The machine should be positioned on a flat, level surface, with sufficient load capacity for the machine and its contents. Ensure unobstructed access to the electricity plug at all times. Make sure the power source reflects the parameters on the rating plate! Prior to first use remove and wash all elements and wash the entire machine.
IR-DRYER3000.2 | IR-DRYER3000.1 | IR-DRYER2000.1


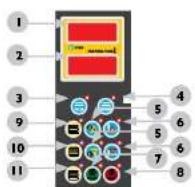
CONTROL PANEL DESCRIPTION IR-DRYER3000.2
- Time display
- Button for setting time "+"
- Button for setting time "+"
- Lamp selection
- Start
-
Stop
-
Time display
-
Temperature display
- Work mode selector: pulsating
- Work mode selector: constant
- Buttons for setting time" "+" and "-"
- Buttons for setting temperature: "+" and "-"
- Start
- Stop
- Emitter selector: emitter I
- Emitter selector: emitter 2
- Emitter selector: emitter 3
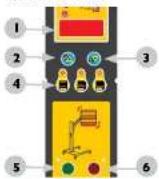
IR-DRYER3000.1
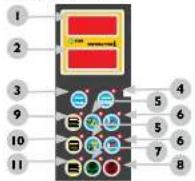
I. Voltmeter
2 Time display
3. Button for setting time: "+"
4. Button for setting time: "-"
5/6. Emitter selector
7. Function: RUST PROOF PRIMER
8. Function: PRIMER
9. Function: PRIMARY FILLER
10. Function: TOP COAT
II. Function: SECONDARY FILLER
12. Function: VARNISH
13. Start
14. Stop
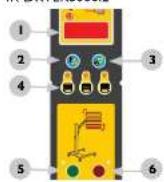
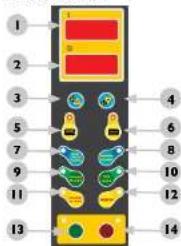
IR-DRYER2000.1
(1) 2023年1月1日
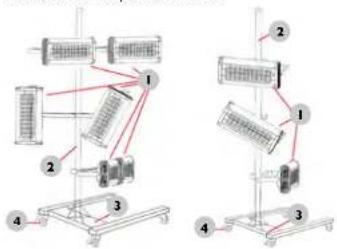
OPERATING PRINCIPLE
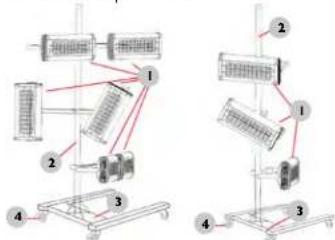
- Assemble the device in accordance with the diagram and position it correctly.
- Then connect to power supply and turn on.
- Use the buttons to set the device operating time.
- IR-DRYER3000.1 and IR-DRYER2000.1 models have a temperature adjustment feature. Use buttons to set the temperature on the IR-DRYER3000.1 model, and use function buttons to set the temperature on the IR-DRYER2000.1 model.
- Then select the emitters to be switched on.
- Once the device has been positioned correctly, activate it using the start button. To deactivate the emitters, press the stop button. When not in use device off and disconnect it from the power source. To adjust the position of the IR unit, pull the lever on the frame of the device. To adjust the angle of the emitter, loosen the levers on the sides, align at the required angle and tighten.
IR-DRYER2000.2 | IR-DRYER1000
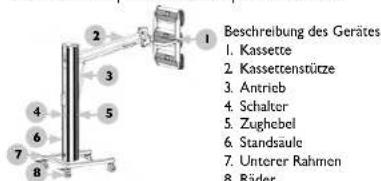
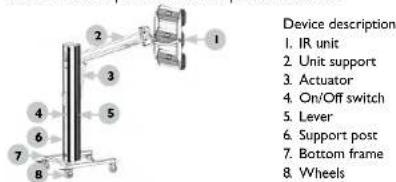
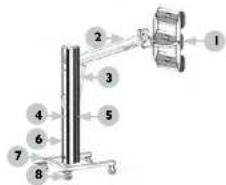
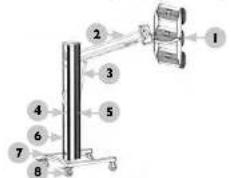
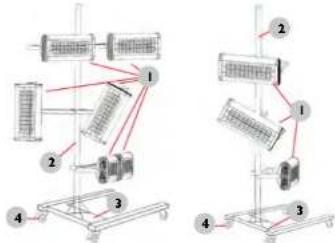
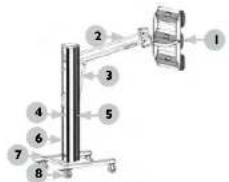
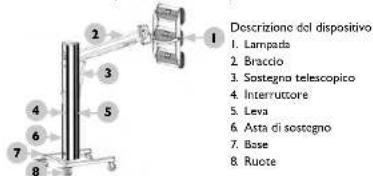
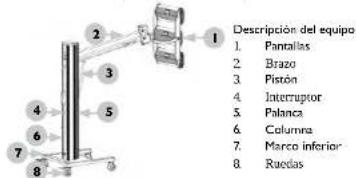
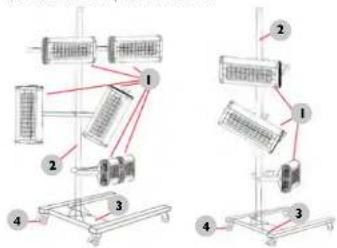
Device description
I. Emitters
2 Support post
3. Bottom support frame
4. Wheels
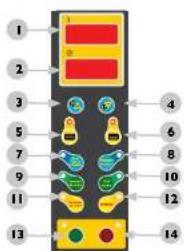
CONTROL PANEL DESCRIPTION
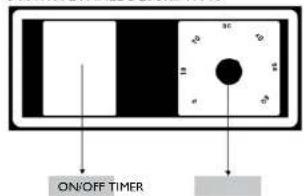
ON/OFF switch
TIMER - Time settings
OPERATING PRINCIPLE
- Assemble the device in accordance with the diagram and position it correctly.
2 Then connect to power supply and turn on. - Use the knob to select the time foe which the device is to be active.
- When not in use device off and disconnect it from the power source.
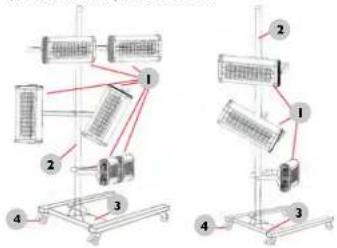
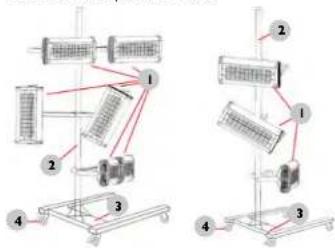
ASSEMBLING THE DEVICE
Assemble the device in accordance with the overview diagram below.
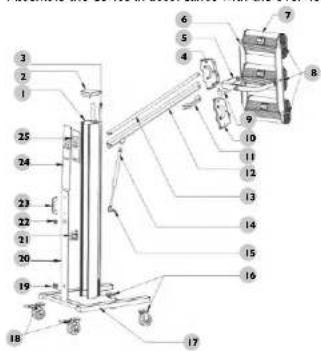


| NUMBER DESCRIPTION | NUMBER DESCRIPTION | ||
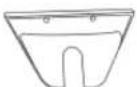
| 1 Vertical support post | 14 Actuator | ||
| 2 Upper cap | 15 Actuator bracket | ||
| 3 Plastic trim | 16 Front wheels | ||
| 4 Left clamp | 17 Support frame | ||
| 5 Support frame | 18 Rear wheels | ||
| 6 Terminal strip | (with brake mechanism) | ||
| 7 IR unit | 19 Flange | ||
| 8 Plastic lever for adjusting angles | 20 Cover | ||
| 9 Connector | 21 Control transformer | ||
| 10 Right clamp | 22 On/Off switch | ||
| 11 Handle | 23 Handle | ||
| 12 Bottom support rod | 24 Cover | ||
| 13 Top support rod | 25 Control panel | ||
REPLACING LAMPS
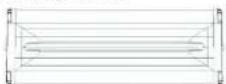
I. Dismantle the IR unit
3. Remove the housing from both sides of the IR unit.
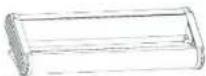
5. Then remove the bulb and install a new one with similar parameters.

2. Remove the protective mesh
4. Remove the covers from both sides of the IR unit.

6. Then assemble the IT unit and the device in reverse order to dismantling.
TRANSPORTATION AND STORAGE
During transport, the machine should be protected from shaking, crashing and turning upside down. Store it in a properly ventilated place with dry air and without any corrosive gas.
CLEANING AND MAINTENANCE
- Disconnect the machine from the electricity when cleaning it.
- Use cleaner without corrosive substances to clean surface.
• After cleaning, all parts should be able to dry before the machine is to be reused - Store the unit in a dry, cool place, free from moisture and direct exposure to sunlight.
• Never spray the device with water jets.
CHECK REGULARLY DEVICE
Check regularly whether the device is damaged. If it should be damaged, please stop using it immediately and contact your customer service to solve the problem.
What to do in case of a problem?
Please contact your customer service and prepare the following information:
• Invoice number and serial number (the latter is to be found on the technical plate on the device).
• If relevant, take a picture of the damaged, broken or defective part.
It will be easier for your customer service clerk to determine the source of the problem if you give a detailed and precise description of the matter. The more detailed your information, the better the customer service will be able to solve your problem rapidly and efficiently!
CAUTION: Never open the device without the authorization of your customer service. This can lead to a loss of warranty!

MOTOR TECHNICS
INSTRUKCJA OBSŁUGI
IR-DRYER3000.2
IR-DRYER3000.1
IR-DRYER2000.1
IR-DRYER2000.2
IR-DRYER1000
expondo.de

SYMBOLE
IR-DRYER3000.2 | IR-DRYER3000.1 | IR-DRYER2000.1
IR-DRYER2000.2 | IR-DRYER1000
Opis urządzenia
IR-DRYER3000.2 | IR-DRYER3000.1 | IR-DRYER2000.1
POPIS OVLÁDACÍCH PANELÚ
IR-DRYER3000.2
IR-DRYER3000.1
IR-DRYER2000 1
IR-DRYER2000.2 | IR-DRYER1000
Popls zařízeni
IR-DRYER3000.2 | IR-DRYER3000.1 | IR-DRYER2000.1
IR-DRYER2000.2 | IR-DRYER1000
IR-DRYER3000.2 | IR-DRYER3000.1 | IR-DRYER2000.1
IR-DRYER2000.2 | IR-DRYER1000
IR-DRYER3000.2 IR-DRYER3000.1 IR-DRYER2000.1
IR-DRYER2000.2 | IR-DRYER1000
Safety Protection Switch
Pull up this handle to move cassettes up and down.
CAUTION!
MOVING PART
Do not place your hand over this rod when moving the cassette up and down
* Always keep a minimum safe distance from the heat source when using. Usually, 30-50cm
* Always keep the cassette at the highest position after usage
CAUTION
HOT! Do not touch this part with bare hands.
This cover is extremely hot when the heater is on.
CAUTION!
-
Make sure that the facility supply voltage and frequency are the same as shown on the nameplate.
-
Remove all protection pads from the light tubes before using
-
Protect the lamp against shock and vibrations even when it is cold.
CAUTION!
-
Do not load over 60kg
-
Do not modify or repair lifter under qualified.
-
Pull up handle to adjust cassette.
-
The litter has a hydraulic control
CAUTION! DO NOT MOVE BEFORE FULL INSTALLATION
NOTE
Performance gains depend on the following factors:
-
Supply cable is at least 1.5mm2.
-
16A breaker is required
-
16A power socket is required
-
Supply voltage and frequency match the name plate figures.
-
Plug mainrains a good connection with socket
Input Voltage: Single phase AC 230V-50Hz
FR
Bouton de sécurité
NAMEPLATE TRANSLATIONS
Manufacturer
spencn Pöskar, z. com. sp.k. ul. Dekanac vina 3.65-155 Zielana Gūna | Poland, EU
Product name Infrared Palm Dover
Model
Power
Voltage/Frequency 230V\~50Hz
Weight
Precher, 1950 year
Sural-No.
ECONOM PARCELLE IN DEPARTMENT [ apportado de
Producent
expendo Polska sp. x c.o. sp. k
Ⅲ Desarajini 3, 10-155 Zeišni Gilt [Pelnje, Bu
We hereby certify that the appliances listed in this manual are CE compliant.
FR
For the disposal of the device please consider and act according to the national and local rules and regulations.
CONTACT
expondo Polska sp. z o.o. sp. k.
ul. Dekoracyjna 3
65-155 Zielona Góra | Poland, EU
e-mail: info@expondo.de