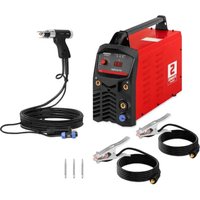
S-STUD 2500 - Welding machine Stamos - Free user manual and instructions
Find the device manual for free S-STUD 2500 Stamos in PDF.


| Product Type | Stud Welding Machine |
| Brand | Stamos |
| Model | S-STUD 2500 |
| Rated Input Voltage | 230 V ~ |
| Mains Frequency | 50 Hz |
| Welding Voltage Range | 20 - 195 V |
| Power Consumption | 500 VA |
| Capacitor Capacity | 108000 µF |
| Storage Energy | 2500 J |
| Welding Range (Diameters) | M3 to M10 (except M7) |
| Welding Gun Cable Length | 4 m |
| Ground Cable Length | 2 x 3 m |
| Weight | 21 kg |
| Display | Digital Voltage Display |
| Indicator Lights | Voltage, Ready, Running |
| Settings | Adjustable welding voltage and gun pressure |
| Weldable Materials | Steel, aluminum, stainless steel, copper |
| Protection | Main fuse, electrical insulation |
| Maintenance | Clean with mild products, store dry |
| Standards | Compliant with CE directives |
Frequently Asked Questions - S-STUD 2500 Stamos
User questions about S-STUD 2500 Stamos
0 question about this device. Answer the ones you know or ask your own.
Ask a new question about this device
Download the instructions for your Welding machine in PDF format for free! Find your manual S-STUD 2500 - Stamos and take your electronic device back in hand. On this page are published all the documents necessary for the use of your device. S-STUD 2500 by Stamos.
USER MANUAL S-STUD 2500 Stamos
Rev. 20.03.2017 Rev. 20.03.2017
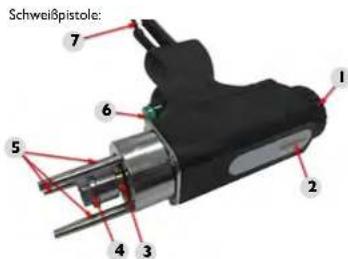
1.Druckregulator
2.Druckska
The operation manual must be read carefully.
Never dispose of electrical equipment together with household waste.
This machine conforms to CE declarations.
Use full body protective clothes.
Attention! Wear protective gloves.
Safety goggles must be worn.
Attention! Hot surface may cause burns.
Attention! Risk of fire or explosion.
Attention! Harmful fumes, danger of poisoning. Gases and vapours may be hazardous to health. Welding gases and vapours are released during welding. Inhalation of these substances may be dangerous to your health.
Use a welding mask with appropriate filter shading.
CAUTION! Harmful radiation of welding arc.
Do not touch part that are under voltage/power.
PLEASE NOTE! Drawings in this manual are for illustration purposes only and in some details it may differ from the actual product.
The original operation manual is in German. Other language versions are translations from German.
1. SAFETY OF USE
1.1 GENERAL NOTES
Take care of your own safety and the one of third parties by reviewing and strictly following the instructions, included in the operating manual of the device.
Only qualified and skilled personnel can be allowed to start, operate, maincain and repair the machine.
The machine must never be operated contrary to its intended purpose.
1.2 PREPARATION OF WELDING WORK SITE
WELDING OPERATIONS MAY CAUSE FIRE OR EXPLOSION
- Strictly follow the occupational health and safety regulations applicable to welding operations and make sure that the workplace is equipped with suitable fire extinguisher.
- Never carry out welding operations in flammable areas posing the risk of material ignition.
- Never carry out welding operations in an atmosphere containing flammable particles or vapours of explosive substances.
- Remove all flammable materials within 12 meters from the welding operations area and if the removal is not possible, then please cover flammable materials with a fireproof blanket.
- Use safety measures against sparks and glowingmetal particles.
- Make sure that sparks or hot mecal splinters do not penetrate through the slots or openings in the coverings, shields or protective screens.
- Do not weld tanks or barrels that contain or have contained flammable substances. Do not weld in the vicinity of such containers and barrels.
- Do not weld pressure vessels, pipes of pressurised installations or pressure trays.
Always ensure adequate ventilation.
It is recommended to take a stable position prior to welding.
1.3 PERSONAL PROTECTION EQUIPMENT
ELECTRIC ARC RADIATION CAN DAMAGE EYES AND SKIN
- When wearing, wear a clean, fireproof and non conductive clothing without oil marks (leather, thick cotton), leather gloves, high boots and protective hood.
Before welding, remove all flammable or explosive items, such as propane butane lighters or matches. Use a face shield (helmet or shield) and eye protection, with a filter featuring a shade level matching the sight of the welder and the welding current. The safety standards suggest colouring No. 9 (minimum No. 8) for each current below 300 A. A lower colouring of the shield can be used if the arc is covered by the workpiece.
Always use approved safety glasses with side protection under the helmet or any other cover. - Use guards for the welding operations site in order to protect other people from the blinding light radiation or projections.
- Always wear earplugs or other hearing aids to protect against excessive noise and to avoid spatter entering the cars.
- Bystanders should be warned to not look at the electric arc.
1.4 PROTECTION AGAINST ELECTRIC SHOCK
ELECTRIC SHOCK CAN BE LETHAL
The power cable must be connected to the nearest socket and placed in a practical and secure position. Positioning the cable negligently in the room and on a surface which was not checked must be avoided as it can lead to electrocution or fire.
- Touching electrically charged elements can cause electrocution or serious burns.
- Electrical arc and the working area are electrically charged during the power flow.
- Input circuit and inner power circuit of the devices are also under voltage charge when the power supply is turned on.
The elements under the voltage charge must not be touched.
- Dry, insulated gloves without any holes and protective clothing must be worn at all times.
Insulation mats or other Insulation layers, big enough as not to allow for body contact with an object or the floor, must be placed on the floor.
The electrical arc must not be touched.
- It must be checked if the earthing cable is properly connected or the pin is correctly connected to the earthed socket. Incorrect connection of the earthing can cause life or health hazard.
- The power cables must be regularly checked for damages or lack of insulation. Damaged cables must be replaced. Negligent insulation repair can cause death or serious injury.
The device must be turned off when it is not being used
The cable mustn't be wrapped around the body.
- A welded object must be properly grounded.
The device may only be used in perfect condition.
- Damaged device elements must be repaired or replaced. Seat belts must be used when working at height.
- All components of the equipment and the safety equipment must be stored in one place.
- When the device is switched on, the handle end must be kept away from the body.
The ground cable must be mounted to the welded element or as close as possible to it (e.g. to a work table).
THE DEVICE CAN STILL BE UNDER VOLTAGE UPON FEEDER DISCONNECTION
Voltage in the input capacitor must be checked upon turning off the device and disconnecting it from the power source. One must make sure that the voltage value is equal to zero. Otherwise, the device elements must not be touched.
EN
EN
1.5 GASES AND FUMES
PLEASE NOTE! GAS MAY BE LETHAL OR DANGEROUS TO HUMAN HEALTH!
-
When welding, ensure good ventilation. Avoid Inhalation of the gas.
-
Chemical substances (lubricants, solvents) must be removed from the surfaces of welded objects as they burn and emit toxic smokes under the influence of temperature.
- The welding of galvanised objects is permitted only when efficient ventilation is provided with filtration and access to fresh air. Zinc fumes are very toxic, an intoxication symptom is the so called zinc fever.
2.MACHINE USE DESIGNATION
The stud welding machine is designed for permanent welding of bolts, nails, stubs, studs, pins, etc. It may be used for steel, aluminum, stainless steel and copper.
- TECHNICAL SPECIFICATIONS
| Product name Stud Welder | ||
| Model S-STUD 1600 S-STUD2500 | ||
| No. art 2158 2159 | ||
| Voltage / frequency 230V~/ 50 Hz 230V~/ 50 Hz | ||
| Welding voltage [V] 20-195 | 20-195 | |
| Rated power [KVA] | 500 | 500 |
| Capacitors [uF] | 72000 | 108000 |
| Scored energy [J] | 1600 2500 | |
| Welding range | M3-M8 (except M7) | M3-M10 (except M7) |
| Welding gun lead length [m] | 4 | 4 |
| Return lead length [m] | 2 x 3 | 2 x 3 |
| Weight [kg] | 21 | 21 |
4. OPERATION
4.1 GENERAL NOTES
The device must be used according to its purpose, in accordance with the OHS regulations and restrictions resulting from the data included in the rating plate (IP level, operation cycle, supply voltage, etc.).
The machine must not be opened, as it will cause warranty loss and, in addition, exploding, unshielded elements can cause serious injuries.
The producer does not bear any responsibility for technical changes in the device or material losses caused by the introduction of the said changes.
In case of malfunctions, contact the service centre.
- Louvers must not be shielded - the welder must be positioned at 30 cm away from objects surrounding it.
The welder must not be kept under your arm or near to your body.
- The machine must not be installed in rooms with aggressive environments, high dustiness and near devices with high electromagnetic field emission
4.2 DEVICE STORAGE
The machine must be protected against water and moisture.
- The welder must not be positioned on heated surfaces.
The device must be stored in a dry and clean room.
4.3 CONNECTING THE DEVICE
4.3.1 Connecting the power
- Connection of the device must be performed by a qualified person. In addition, a person with required qualifications should check if the earthing or electrical installation with protection system is in line with the safety regulations and if they operate correctly.
1213
Rev. 20.03.2017 Rev. 20.03.2017
The device must be placed near the work station.
The connection of excessively long conduits to the machine must be avoided.
One-phase welders should be connected to the socket fitted with an earthing prong.
- Welders powered from a 3-Phase network are delivered without a plug, the plug must be obtained independently and installation should be assigned to a qualified person.
PLEASE NOTE! THE DEVICE MAY ONLY BE USED UPON CONNECTION TO AN INSTALLMENT WITH A PROPERLY FUNCTIONING FUSE!
Machine description:
Front view
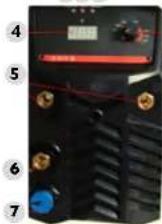
123
8
- Charging indicator light
- Ready to work indicator light
- In use indicator light
- Welding voltage display
- Return lead socket
- Welding lead socket
- Welding gun control socket
- Voltage adjustment knob
Rear view:
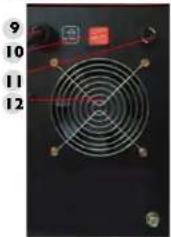
-
Power cable
-
On/off switch
H Main future - Fan
Gun:
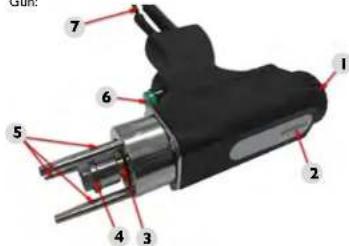
Tension adjustment knob
2. Tension scale
3. Collet attachment point
4. Fastening nut
5. Stabilising pins
6. Trigger
7. Welding and control leads
EN
Operation:
- Attach the correct collet before operating the machine. In order to do that:
a. Unscrew the fastening nut.
b. Prepare the selected collet which reflects the size of the element which is to be welded to the metal surface.
c. Within the selected collet, adjust the position of the threaded pin so that during welding the welded element remains in contact with it (adjustment is done by twisting the pin relative to the collet).
d. Once the threaded pin is adjusted, lock it in place using the locking nut.
e. Then insert the selected collet as far as possible into the opening in the gun and use the locking nut to hold it in place.
Use the spanner which is part of the set if there is resistance when unscrewing the locking nut. - Then select the correct stabilising pins. Use longer stabilising pins for welding elements of a larger diameter (M8, M10) Select a smaller set for smaller diameters, unless the welded element is unusually long - then use longer pins. In order to unfasten the pins, twist them anti-clockwise. If there is resistance, use the spanner included in the set. Attach them analogously.
- To begin welding, connect the lead clamps to the metal which the given element is to be attached to (ideally at both ends of the metal surface), and then connect the assembled machine to the power supply, then set the welding voltage using the knob. The knob scale shows diameters. However, it is only an APPROXIMATE voltage, which may vary according to the materials used.
- The tension adjustment knob is in the rear part of the gun. Set is so that the welded elements are tightly flush with each other during welding. The tension indicator is found in the upper part of the gun. As the tension is increased by turning the knob, the indicator points to a higher value on the scale.
- In order to permanently attach the elements, press the gun firmly against the element to be welded to the surface it is to be attached to, so that all three stabilising pins are in contact with the surface. Then press the gun button. The welding time is between 1 and 3ms , and it is possible to remove the element from the gun immediately by moving the gun vertically upwards
Attention! Do not touch the welded elements when the machine is in use - this could result in a serious Injury or death!
6. DISPOSING OF PACKAGING
The various items used for packaging (cardboard, plastic straps, polyurethane foam) should be kept, so that the device can be sent back to the service centre in the best possible condition in case of any problems!
7. TRANSPORTATION AND STORAGE
Shaking, crashing and turning upside down of the device should be prevented when it is transported. Store it in a properly ventilated surrounding with dry air and without any corrosive gas.
8. CLEANING AND MAINTENANCE
Always unplug the device before cleaning it and when the device is not in use.
- Use cleaner without corrosive substances to clean surface.
- Dry all parts well before the device is used again.
- Store the unit in a dry, cool place, free from moisture and direct exposure to sunlight.
9. CHECK REGULARLY THE DEVICE
Check regularly if the device doesn't present any damage. If there is any damage, please stop using the device. Please contact your customer service to solve the problem.
What to do in case of a problem?
Please contact your customer service and prepare following information:
- Invoice number and serial number (the latter is to be found on the technical plate on the device).
If relevant, a picture of the damaged, broken or defective part.
- It will be easier for your customer service clerk to determine the source of the problem if you give a detailed and precise description of the matter. The more detailed your information, the better the customer service will be able to answer your problem rapidly and efficiently!
CAUTION: Never open the device without the authorization of your customer service. This can lead to
a loss of warranty!
PL
PL
SYMBOLE
TECHPLATE TRANSLATIONS
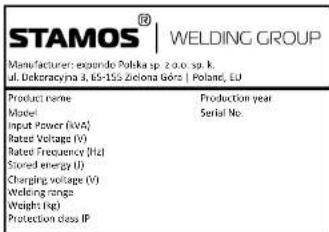







DE
We hereby certify that the appliances listed in this manual are CE compliant.
FR
Rev. 20.03.2017 Rev. 20.03.2017
For the disposal of the device please consider and act according to the national and local rules and regulations.
CONTACT
expondo Polska sp. z o.o. sp. k.
ul. Dekoracyjna 3
65-155 Zielona Góra | Poland, EU
e-mail: info@expondo.de
- SAFETY OF USE
- 1.2 PREPARATION OF WELDING WORK SITE
- 1.3 PERSONAL PROTECTION EQUIPMENT
- ELECTRIC ARC RADIATION CAN DAMAGE EYES AND SKIN
- 1.4 PROTECTION AGAINST ELECTRIC SHOCK
- ELECTRIC SHOCK CAN BE LETHAL
- THE DEVICE CAN STILL BE UNDER VOLTAGE UPON FEEDER DISCONNECTION
- 1.5 GASES AND FUMES
- PLEASE NOTE! GAS MAY BE LETHAL OR DANGEROUS TO HUMAN HEALTH
- 2.MACHINE USE DESIGNATION
- OPERATION
- 4.2 DEVICE STORAGE
- 4.3 CONNECTING THE DEVICE
- EN
- DISPOSING OF PACKAGING
- TRANSPORTATION AND STORAGE
- CLEANING AND MAINTENANCE
- CHECK REGULARLY THE DEVICE
- PL
- SYMBOLE
- TECHPLATE TRANSLATIONS
- DE
- FR
- CONTACT
Brand : Stamos
Model : S-STUD 2500
Category : Welding machine