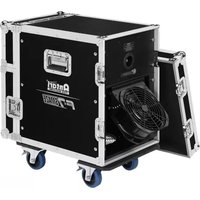
F-1 Fazer - Effect machine Antari - Free user manual and instructions
Find the device manual for free F-1 Fazer Antari in PDF.


| Product type | Fog machine (effect) |
| Brand | Antari |
| Model | F-1 Fazer |
| Dimensions (L x W x H) | 618 x 275 x 327 mm |
| Weight | 14,1 kg |
| Power supply | AC 100-120V or 220-240V, 50/60 Hz |
| Power | 800 W |
| Heating time | Approximately 4 minutes |
| Fluid consumption | 8,5 ml/min |
| Tank capacity | 2,4 L |
| Maximum runtime | 4,5 hours at maximum output |
| Compatible fluid | Antari FLG Heavy Fog Fluid (water-based) |
| Operating ambient temperature | 0 °C to 40 °C |
| Control | DMX (2 channels), Timer, Manual, Wireless (optional), W-DMX (optional) |
| DMX connectors | XLR 3-pin and 5-pin |
| Power connection | Neutrik PowerCon |
| Optional accessories | WTR-10 (wireless remote control), W-DMX-PCBR (W-DMX kit) |
| Recommended cleaning | Distilled water regularly, use high-quality Antari fluid |
| Safety | Humidity protection, grounding, ventilation space 50 cm, automatic shutdown with cleaning |
| Warranty | Contact Antari dealer |
Frequently Asked Questions - F-1 Fazer Antari
User questions about F-1 Fazer Antari
0 question about this device. Answer the ones you know or ask your own.
Ask a new question about this device
Download the instructions for your Effect machine in PDF format for free! Find your manual F-1 Fazer - Antari and take your electronic device back in hand. On this page are published all the documents necessary for the use of your device. F-1 Fazer by Antari.
USER MANUAL F-1 Fazer Antari
F-1 Fazer User Manual
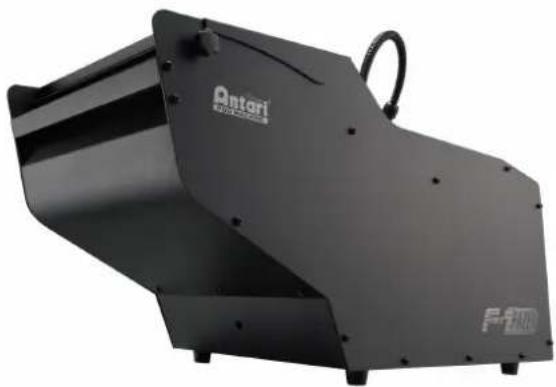
natural_image
Exterior view of a black industrial machine with 'Anteri' branding and 'F-1200' marking (no additional text or symbols visible)


User Manual - English
Safety Information

Please read the following safety information carefully before operating the machine. This information includes important safeguards about installation, usage, and maintenance. Pay attention to all warning labels and instructions in this manual and printed on the machine.
If you have questions about how to operate the machine safely, please contact your local Antari dealer for help.
- Keep this device dry.
• Always connect to a grounded circuit to avoid risk of electrocution. - Before connecting the machine to power, always check the voltage indicated on the machine matches your local AC voltage. Do not use the machine if the AC power voltage does not match.
- Disconnect the machine from AC power before servicing and when not in use.
- This product is for indoor use only! Do not expose to rain or moisture. If fluid is spilled, disconnect AC power and clean with a damp cloth. If fluid is spilled onto electronic parts, immediately unplug the machine and contact your local Antari dealer for advice.
- No user serviceable and modifiable parts inside. Never try to repair this product, an unauthorized technician may cause damage or malfunction to the machine.
• For adult use only. Never leave the machine running unattended. - Installed the machine in a well-ventilated area. Provide at least 50 cm space around the machine.
- Never add flammable liquid of any kind to the machine.
• Make sure there are no flammable materials close to the machine while operating.
• Only use Antari fluid. Other fluid may lead to heater clog or malfunction.
- If the machine fails to work, unplug the machine and stop operation immediately. Contact your local Antari dealer for advice.
• Before transporting the machine, make sure the fluid tank is completely drained.
- Fog fluid may present health risks if swallowed. Do not drink fog fluid. Store it securely. In case of eye contact or if fluid is swallowed, immediately seek medical advice.
Unpacking and Inspection
Immediately upon receiving the machine, carefully unpack the carton, check the content to ensure that all parts are present and have been received in good condition. If any parts appear damaged or mishandled from shipping, notify the shipper immediately and retain the packing material for inspection.
What is included: 1 x F-1 Fazer
1 x Power Cord
1 x User Manual
Product Dimensions
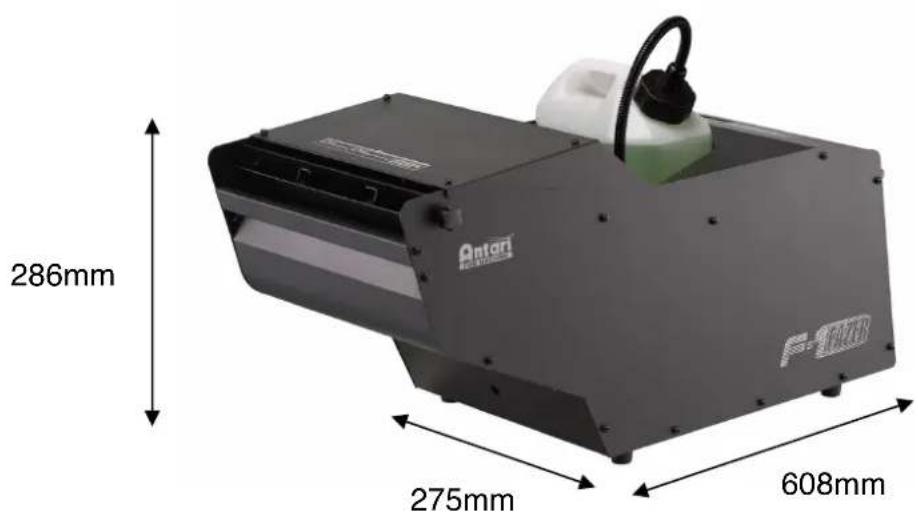
text_image
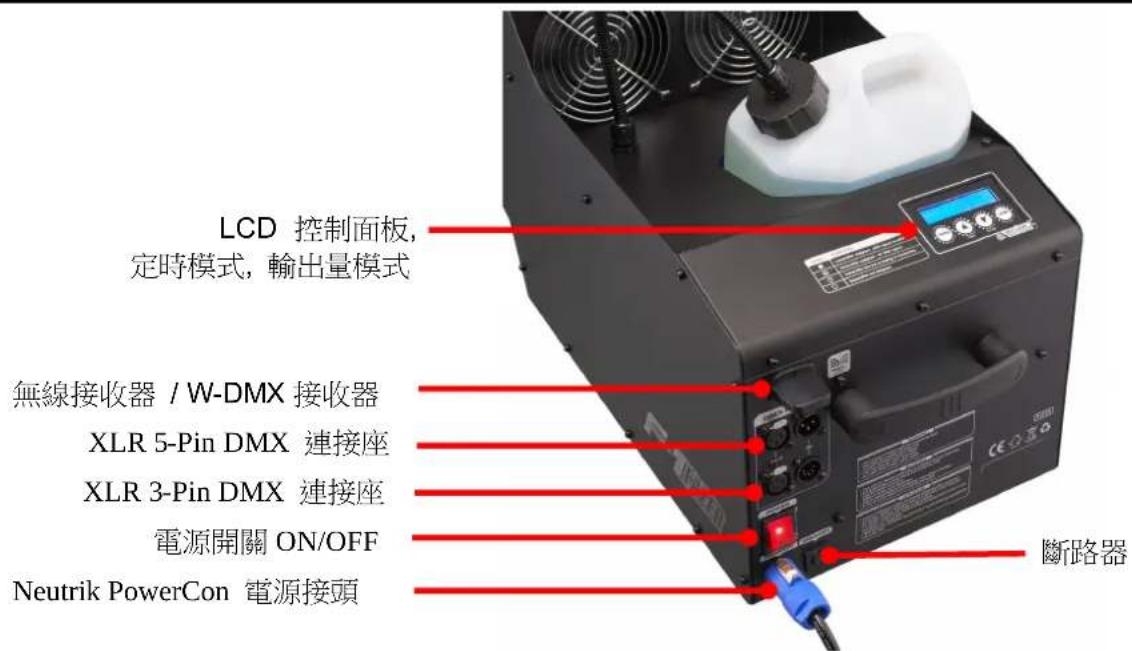
286mm 275mm 608mm Antar F-MasterProduct Overview
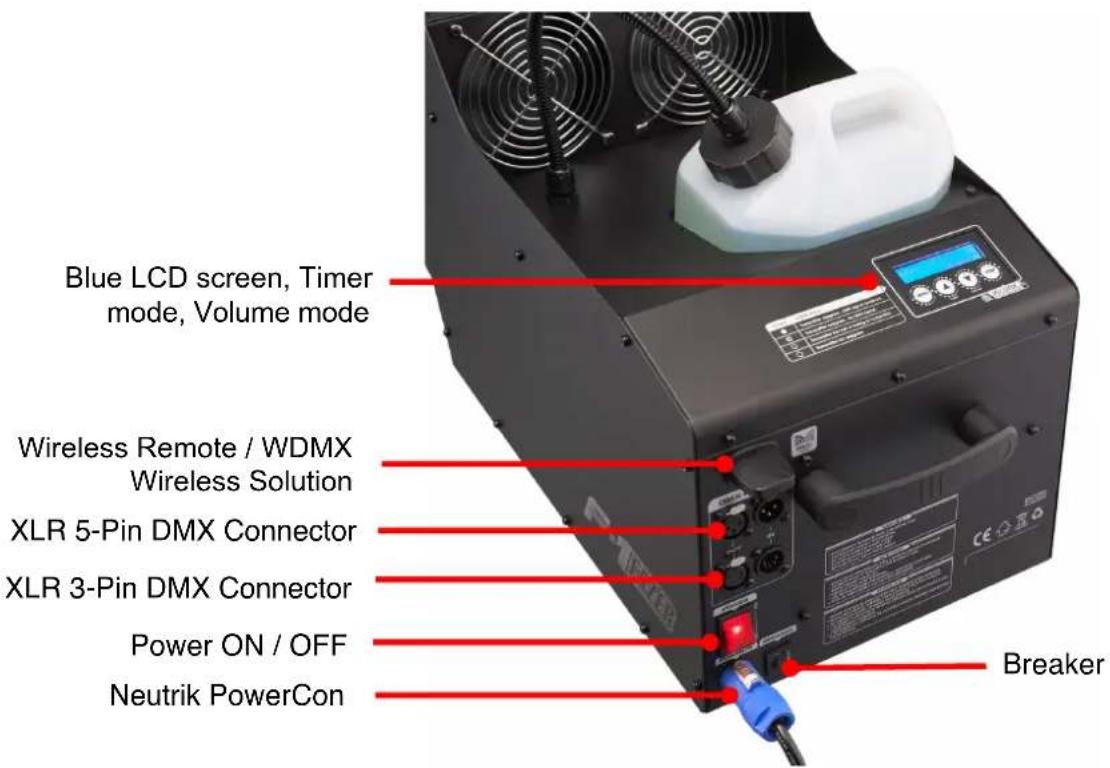
text_image
Blue LCD screen, Timer mode, Volume mode Wireless Remote / WDMX Wireless Solution XLR 5-Pin DMX Connector XLR 3-Pin DMX Connector Power ON / OFF Neutrik PowerCon BreakerBoth Wireless Remote and Wireless DMX are Optional and not included
Optional Wireless Remote Add On Kit: WTR-10
Optional Wireless DMX Add On Kit: W-DMX-PCBR
Setting Up
Step 1: Place the machine on a flat surface and in a suitably large area with at least 50 cm of open space around the machine.
Step 2: Fill the fluid tank with Antari approved fluid.
Step 3: Connect the machine to a suitably rated power supply. To determine the power requirement for the machine refer to the label on the back of the machine.

Always connect the machine to a protected circuit and ensure it is properly grounded to avoid risk of electrocution.
Step 4: Turn on the machine and allow it to heat up. Heat up takes approximately 4 mintues.
Once the machine has reached operating temperature, the display will show Ready to
Faze. Now the machine is ready for operation.
Step 5: To start making haze, press the VOLUME button on the control panel.
Step 6: To turn off the machine, hold the STOP button for 3 seconds; the machine will
automatically run a self-cleaning process and shut off after the process is done.
Operation
Control Panel Operation
The machine can be operated with the onboard digital control interface.
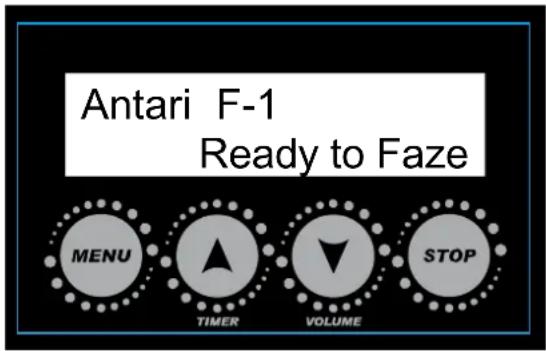
text_image
Antari F-1 Ready to Faze MENU TIMER VOLUME STOP| Button | Function |
| [MENU] | Scroll through setting menu |
| [UP]/[TIMER] | Up/Activate Timer function |
| [DOWN]/[VOLUME] | Down/Activate Volume function |
| [STOP] | Deactivate Timer/Volume function.Or to select and memorize the setting.Hold 3 seconds to start self-cleaning process and shut down the machine |
Control Menus
Both the Wireless Remote and W-DMX menu only function when the Optional Wireless
Remote or W-DMX Add On Kits are installed.
Set interval time at Timer mode from 5 to 200 seconds
Set duration time at Timer mode from 1 to 200 seconds
Timer Output XXX %
Set output volume at Timer mode from 1 to 100 %
Volume Output XXX %
Set output volume at Volume mode from 1 to 100 %
Fan Speed XXX %
Set fan speed from 20 to 100%
Set DMX/W-DMX address from 1 to 511
Wireless XX
Turn On/Off Wireless Remote Control function
Air Pump Sensor XX
Turn On/Off Air Pump Sensor
DMX Mode XXXX
Select DMX mode from 2ch, 1ch, and Sync mode
W-DMX Power XX
Turn On/Off W-DMX function
W-DMX Reset XXX
Unlink from a W-DMX transmitter
Run Last Setting XX
Turn On/Off run last setting function
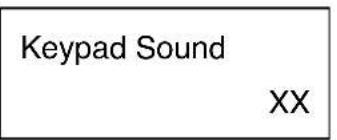
Keypad Sound XX
Turn On/Off Keypad Sound
DMX Connector Pin Assignment
The machine provides a 3- or 5-pin XLR connector for DMX connection. The diagram below indicates pin assignment information.
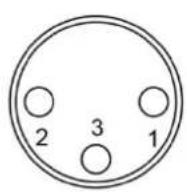
3 Pin XLR
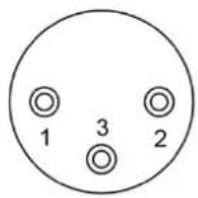

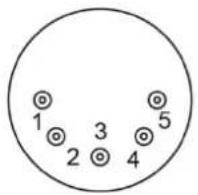
5 Pin XLR
| Pin | Function |
| 1 | Ground |
| 2 | Data- |
| 3 | Data+ |
| 4 | N/A |
| 5 | N/A |
DMX Operation
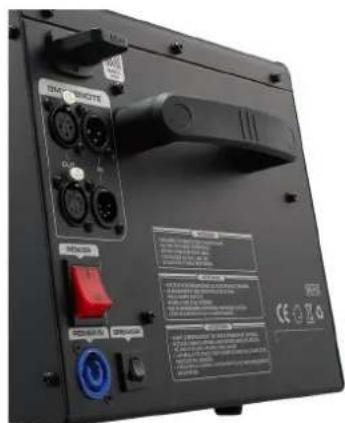
Making the DMX Connection – Connect the machine to a DMX controller or to one of the machines in the DMX chain. The machine uses a 3-pin or 5-pin XLR connector for DMX connection, the connector is located on the front of the machine.
text_image
ENOCHEMROTE ENOCHEMROTE ENOCHEMROTE ENOCHEMROTE ENOCHEMROTE ENOCHEMROTE ENOCHEMROTE ENOCHEMROTE ENOCHEMROTE ENOCHEMROTE ENOCHEMROTE ENOCHEMROTE ENOCHEMROTE ENOCHEMROTE ENOCHEMROTE ENOCE ENOCE ENOCE ENOCE ENOCE ENOCE ENOCE ENOCE ENOCE ENOCE ENOCE ENOCE ENOCE ENOCE ENOCE ENOCE ENOCE ENOCE ENOCE ENOCE ENOCE ENOCE ENOCE ENOCE ENOCE ENOCC ENOCC ENOCC ENOCC ENOCC ENOCC ENOCC ENOCC ENOCC ENOCC ENOCC ENOCC ENOCC ENOCC ENOCC ENOCC ENOCC ENOCC ENOCC ENOCC ENOCC ENOCC ENOCC ENOCC ENOCC ENOCCC ENOCHEMROTEAddress Setup – Use control menu to set DMX address. The machine occupies 2 control channels. The starting address is defined as the first channel from which the machine will respond to the controller. Always double check to make sure there are no overlapping channles in order to control the machine correctly.
DMX Channel Function
| Channel Mode | Channel | Value | Function |
| 2 | 1 | 0-4 | Faze off |
| 5-255 | Faze 1-100% | ||
| 2 | 0-4 | Fan 20% | |
| 5-255 | Fan 21-100% | ||
| 1 | 1 | 0-4 | Faze offFan 100% |
| 5-255 | Faze 1-100%Fan 100% | ||
| Sync | 1 | 0-4 | Faze OffFan 20% |
| 5-255 | Faze 1-100%Fan 21-100% |
Status of W-DMX connection (Optional)
| Symbol on the Liquid Crystal Display | Status of W-DMX connection |
| ● | Transmitter assigned, DMX signal received |
| ◎ | Transmitter assigned, No DMX signal |
| ⊙ | Transmitter link lost or linking to transmitter |
| ○ | Transmitter not assigned |
Wireless Remote Control Operation (Optional)
The optional wireless remote control system consists of a handheld transmitter and a receiver on the rear of the machine.
*This menu function is only available when the Optional Wireless Remote Control Add On Kit is installed:
Wireless
XX
Turn On/Off Wireless Remote Control function
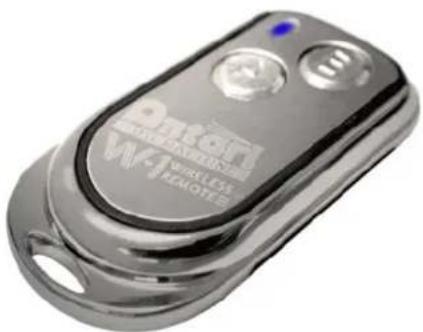
Optional Wireless Remote Control Add On Kit: WTR-10 *Handheld Transmitter
natural_image
Close-up of a metallic wireless remote control device with two buttons and a blue indicator light (no readable text or symbols beyond branding)With the transmitter, it is possible to make haze output via radio signal at maximum distance of 50 meters. Press the button "A" to produce haze output and press the button "B" to stop hazing.
\*Receiver
natural_image
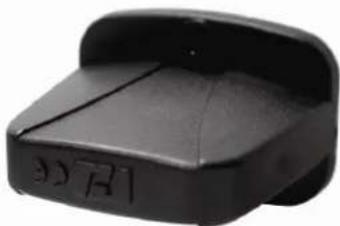
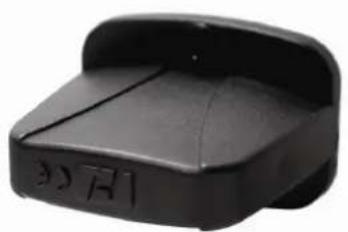
Black plastic device with a curved lid and visible internal components (no text or symbols)If the optional wireless remote control function is selected and included, a radio signal receiver is tested and pre-attached on the machine. The included transmitter also has been paired with the attached receiver before shipping.
To activate or deactivate the wireless remote control function, press [Menu] button until the LCD displays "Wireless". Then press the ▲ [Up] or ▼ [Down] button to turn on and off the wireless remote control function.
Registering transmitter
Transmitter can be paired from the receiver. Each receiver can pair up to 5 transmitters.
Follow below steps to pair transmitter from receiver.
Step 1: Turn on machine and turn on wireless remote control function.
Step 2: Power off machine and turn on again
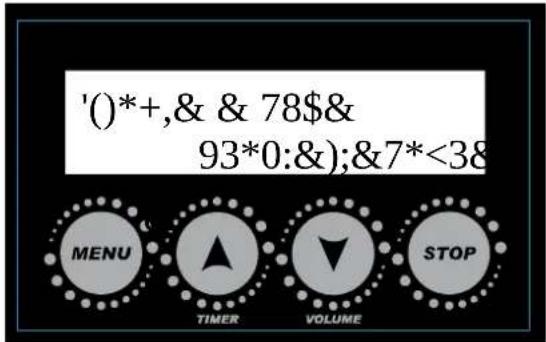
Step 3: Wait until display show "Wireless Detecting"
Step 4: Press [A] button on the transmitter to pair
text_image
'()*+,& & 78$& 93*0:&);&7*<38 MENU TIMER VOLUME STOPNote:
Multiple transmitter can be registered at once. When registering new transmitters, previous registered transmitters will be automatically deleted.
Installation instructions for wireless remote antenna
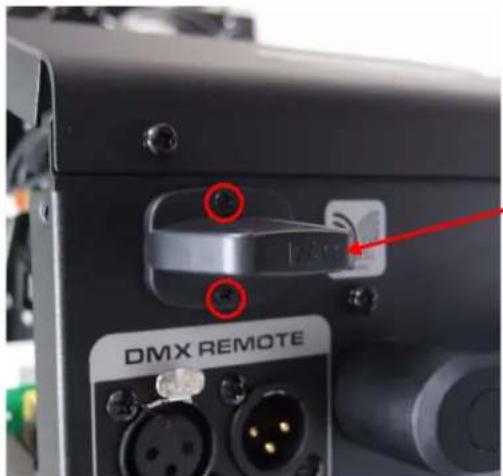
Step 1: unscrew and remove the flat cover on the machine.
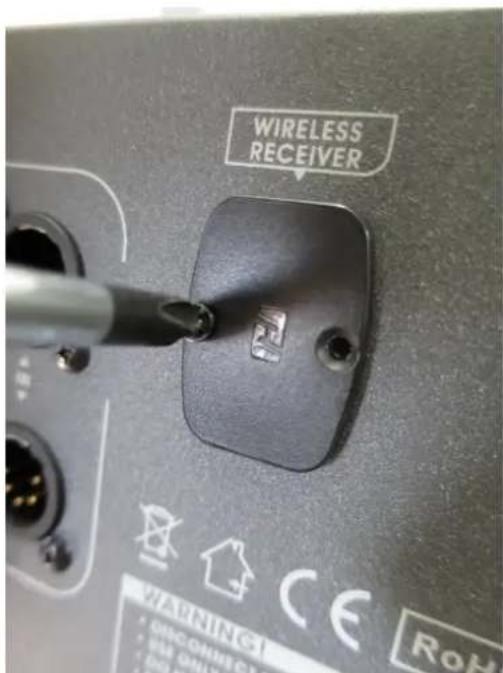
text_image
WIRELESS RECEIVER WARNING CE RoH • ONCOMMENTS • USE ONLY • RUNStep 2: Pull out the cable with terminal.
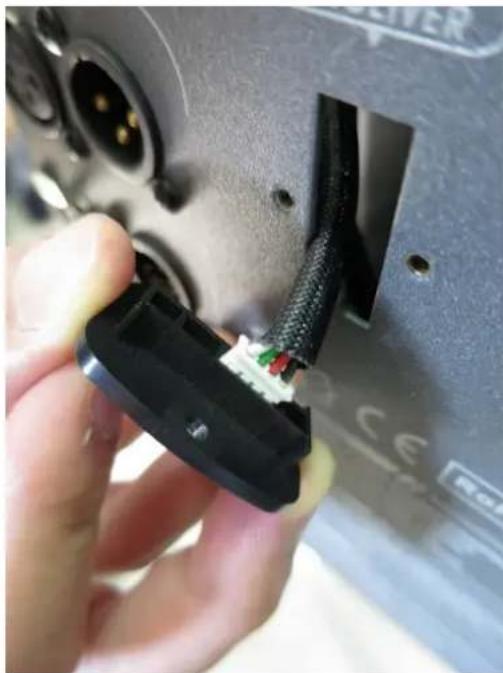
natural_image
Close-up of a hand inserting a black cable into a device housing (no visible text or symbols)Step 3: Connect the terminal to W-1 Wireless Signal Receiver.
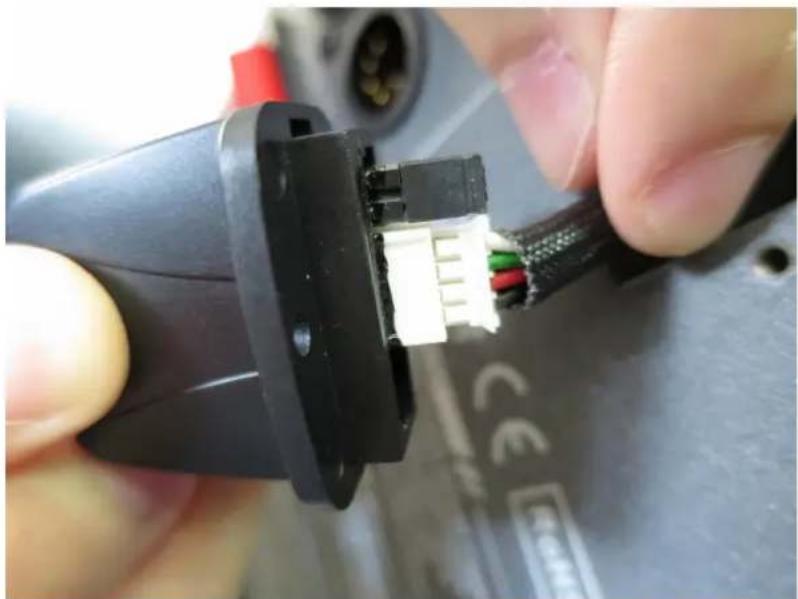
natural_image
Close-up of hands inserting a black cable into a connector with visible pinout and color (no text or symbols)Step 4: Screw the receiver on machine tightly.
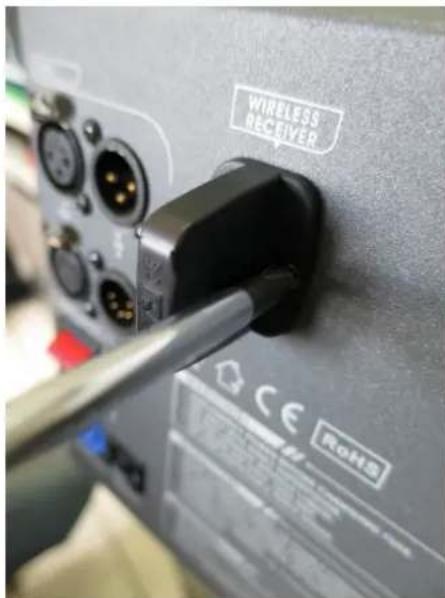
text_image
WIRELESS RECEIVER RoHSThe installation is completed.
Notes:
-
Once the wireless remote control function is turned On, the letter "W" will be displayed on the LCD screen.
-
Once the wireless remote control function is turned On, the LCD screen will display "Wireless Detect ..." each time when the machine is turned on; this allows users to pair new transmitter with the machine's receiver. Every new registration overwrites the
previous memory.
- One machine can be controlled by up to 5 transmitters while one transmitter can be registered to an unlimited number of machines.
W-DMX Control Operation (Optional)
* The optional wireless DMX control system consists of a W-DMX PCB inside the machine and a W-DMX antenna on the rear of the machine.
Optional Wireless DMX Add On Kit: W-DMX-PCBR
These menu functions are only available when the Optional Wireless DMX Control Add On Kit is installed:
W-DMX Power
XX
Turn On/Off W-DMX function
W-DMX Reset
XXX
Unlink from a W-DMX transmitter
* How to install W-DMX board and antenna onto F-1
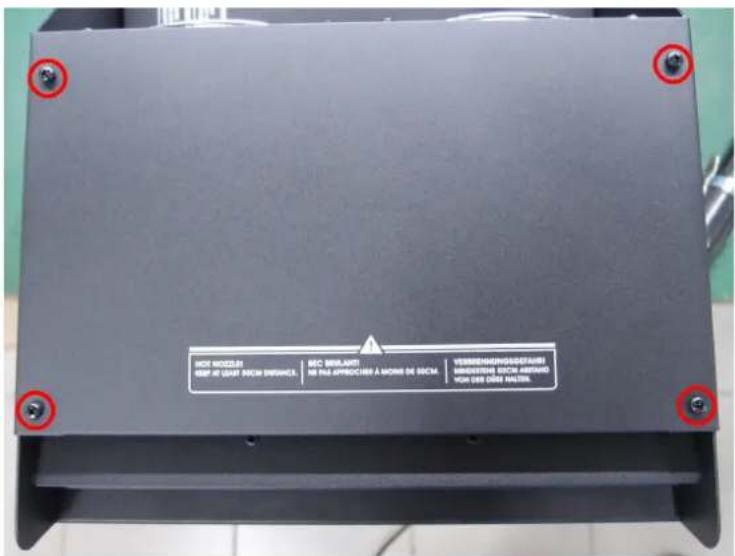
text_image
NOT MODELS OFF AT LEAF 30CM REFERENCE. SEC MRAJATI NE PE APPROACHÉS À MÔME DE 30CM. VERSEREIGNISSÉTANTI MINISTÈME 30CM ANTÉAVO VOL DES DIME NATURE.Step 1. Remove the screws on the top of F-1.
Step 2. Remove the screws on the side of F-1.
Step 3. Remove the cover on the control panel.
Step 4. Put the antenna (Part # W-DMXR) onto F-1
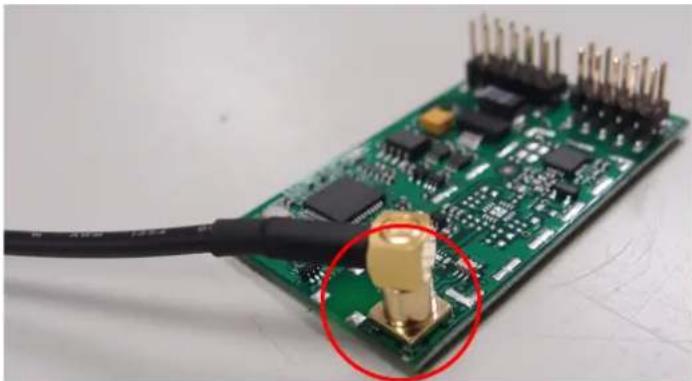
natural_image
Close-up of a green printed circuit board with a black cable and a gold connector, no visible text or symbols.Step 5.
Connect the antenna (Part # W-DMXR onto the W-DMX board (Part # W-DMX-PCB)
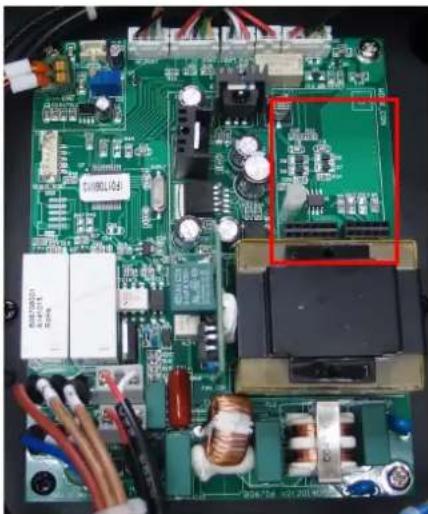
natural_image
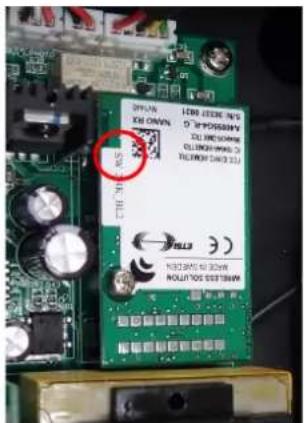
Close-up of a green printed circuit board with various electronic components and wiring (no visible text or symbols)Step. 6
The red-framed area is where the W-DMX board is placed.
Step 7. Install the W-DMX onto the main PCB and then screw the screw tightly. The installation of W-DMX antenna and W-DMX board is completed.
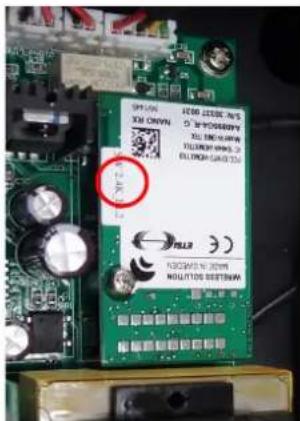
text_image
SP-ON XOM 2000, NTS XM CROWN S100000000 XELI 50000000 YELLHYAM 5000 ELEKHYAM 5000 TOLL N30000000, NTS MOLITOS SEETENVMThe Part Number of Optional Wireless DMX module is W-DMX-PCBR (1 x W-DMX antenna + 1 x W-DMX board)
Service and Maintenance
- Do not allow the machine and fluid to become contaminated.
- Regularly fill distilled water to fluid tank and run the machine to clean the system. After cleaning, refill Antari fog fluids into fluid tank and make sure the machine can produce fog properly.
• It is recommended to run the machine on a monthly basis in order to achieve best
performance and output condition.
- Excessive dust, liquid and dirt built up will degrade performance and cause overheating.
Technical Specifications
| - Input voltage | US model : AC 100-120V, 50 / 60Hz 6.8A |
| EU model : AC 220-240V, 50 / 60Hz 3.5A | |
| - Rated power | 800W |
| - Warm-up time | 4.5 minutes (approx.) |
| - Fluid consumption | 8.5 ml/min |
| - Fluid tank capacity | 2.4 Liters (0.63 gallon) |
| - Compatible fluid | Antari FLG Heavy Fog Fluid |
| - Operating time | 4.5 hrs at max. output |
| - Ambient temp. range | 0 °C - 40 °C (32 °F-104 °F) |
| - Control | Manual, DMX512, Timer |
| Wireless (Optional) | |
| Wireless DMX (Optional) | |
| - DMX channels | 2 channels |
| - Connection | Neutrik Powercon (Power) |
| XLR 3-pin and 5-pin (DMX) | |
| - Optional accessories | W-DMX-PCBR Wireless DMX 512 |
| WTR-10 Wireless Remote | |
| WTR-40 Wireless DMX 512 and remote | |
| WTR-50 Wireless Remote | |
| WTR-60 Wireless DMX 512 | |
| - Dimension | L618 W275 H327 mm |
| (L24.33 W10.83 H12.87 inch) | |
| - Weight | 14.1 kg (31.09 lbs) |

text_image
FAZERtext_image
Back panel of a black electronic device with labeled buttons and ports, including status indicators and safety warnings.natural_image
Close-up of a metallic remote control device with two buttons and a blue indicator light (no readable text or symbols)natural_image
Black plastic electronic device with a flat top and side slots (no visible text or symbols)text_image
Antari F-1 Ready to Faze MENU TIMER VOLUME STOPRemarque :
natural_image
Close-up of a hand inserting a black plastic component into a device housing (no visible text or symbols)natural_image
Close-up of hands inserting a USB into a black plastic electrical plug (no visible text or symbols)natural_image
Close-up of a green printed circuit board with gold connectors and a black cable, no visible text or symbolsnatural_image
Close-up of a green printed circuit board with various electronic components and wiring (no readable text or symbols)text_image
Antari F-1 Ready to Faze MENU TIMER VOLUME STOPnatural_image
Close-up of a metallic wireless remote control device (no visible text or symbols on the device body)natural_image
Black plastic object with a curved lid and engraved markings (no readable text or symbols)text_image
Antari F-1 Ready to Faze MENU TIMER VOLUME STOPHinweis:
natural_image
Close-up of a hand inserting a black cable into a device component, showing wiring and a small connector (no text or symbols visible)natural_image
Close-up of hands inserting a black plastic component into a black connector (no visible text or symbols)text_image
RIP MODULE PART OF ROOT ROOT GOURD BY RIP MODULES FOR THE WORKING AND WORK IN THIS WARNING SHEET ORDER FOR LIME ORDER VOLUMEtext_image
DMX REMOTE OUT POWER POWERIN BREAKER WEETLED BY: 100% Power: 400W (500W) / 200W (500W) 100% Power: 400W (500W) / 200W (500W) Power: 400W (500W) / 200W (500W) PowerIN: 400W (500W) / 200W (500W) Breaker: 400W (500W) / 200W (500W) Power: 400W (500W) / 200W (500W) PowerIN: 400W (500W) / 200W (500W)natural_image
Close-up of a black cable with a small green connector, isolated on white background (no text or symbols)natural_image
Close-up of a green printed circuit board with gold connectors and a black cable, no visible text or symbolsSchritt 5.
natural_image
Close-up of a green printed circuit board with various electronic components and wiring (no readable text or symbols)Schritt 6.
text_image
286mm 275mm 608mm Ontari F-10000機器外觀概述
text_image
Antari F-1 Ready to Faze MENU TIMER VOLUME STOPtext_image
Run Last Setting XX開啟/關閉 使用上次設定數值的功能
text_image
Keypad Sound XX開啟/關閉 按鍵聲音
DMX 連接 Pin 的接點說明
natural_image
Close-up of a metallic remote control device with visible branding and buttons (no readable text or symbols beyond branding)*無線接收器
natural_image
Black plastic object with a curved top and side gap, no visible text or symbolstext_image
Antari F-1 Ready to Faze MENU TIMER VOLUME STOP注意:
text_image
DMX REMOTE OUT N POWER POWER IN BREAKER • 100 MHz Remote / 100 MHz (Differential) • 100 MHz Low/High Power / High Power / Low Power / High Power / Low Power / High Power / Low Power / High Power / Low Power / High Power / Low Power / High Power / Low Power / High Power / Low Power / High Power / Low Power / High Power / Low Power / High Power / Low Power / High Power / Low Power / High Power / Low Power / High Power / Low Power / High Power / Low Power / High Power / Low Power / High Power / Low Power / High Power / Low Power / HighPower / Low Power / High Power / Low Power / High Power / Low Power / High Power / Low Power / High Power / Low Power / High Power / Low Power / High Power / Low Power / High Power / Low Power / High Power / Low Power / High Power / Low Power / High Power / Low Power / High Power / Low Power / High Power / Low Power / High Power / Low Power / High Power / Low Power / High Power / Low Power / High Power / Low Power/ High Power / Low Power / High Power / Low Power / High Power / Low Power / High Power / Low Power / High Power / Low Power / High Power / Low Power / High Power / Low Power / High Power / Low Power / High Power / Low Power / High Power / Low Power / High Power / Low Power / High Power / Low Power / High Power / Low Power / High Power / Low Power / HighPower步驟 3. 拆下機身後方的天線檔板.
text_image
DMX REMOTE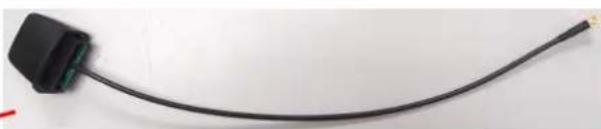
natural_image
Close-up of a black cable with a green connector, isolated on white background (no text or symbols)natural_image
Close-up of a green printed circuit board with a black cable and a gold connector, no visible text or symbols.步驟 5.
natural_image
Close-up of a green printed circuit board with various electronic components and wiring (no readable text or symbols)步驟6.
請將 W-DMX 板安裝在左圖紅框處。
text_image
DHYAN XIM ONION LED LED O 3000000V LED LED O 3000000V LED LED O 3000000V LED LED O 3000000V LED LED O 3000000V LED LED O 3000000V LED LED O 3000000V LED LED O 3000000V LH12 NCC BAN 15.22W MOLUTOS SETTING 电容控制面板 电容控制面板功能For current product information visit Antari at:www.antari.com For information requests please contact us at:sales@antari.com